height AUDI Q5 2018 User Guide
[x] Cancel search | Manufacturer: AUDI, Model Year: 2018, Model line: Q5, Model: AUDI Q5 2018Pages: 392, PDF Size: 60.56 MB
Page 269 of 392
u co ..... N r--N ..... 0 <( 0 00
The shoulder belt should lie as close to the center
of the collar bone as possib le and should fit well
on the body
c> A in Safety belt position on
page 265.
~ Push the loop-around fittings up c> fig . 232 @,
or
~ squeeze together the @ button, and push the
loop-around fittings down@ .
~ Pull the belt to make sure that the upper at
tachment is properly engaged .
A WARNING
Always read and heed all WARNINGS and oth
er important informat ion
c> page 263.
(D Tips
With the front seats, the height adjustment
of the seat can also be used to adjust the po
sition of the safety belts .
Improperly worn safety belts
Incorrectly positioned safety belts can cause se
vere injuries .
Wearing safety belts improperly can cause seri
ous injury or death . Safety belts can only work
when they are correctly pos itioned on the body .
Imp roper seating positions reduce the effect ive
n ess of safety be lts and will even inc rease the
ris k of injury and death by mov ing the safety belt
to cr it ic al areas of the body. Imp roper sea ting
positions also increase the risk of serious inj ury
and death when an airbag deploys and strikes an
occupant who is not in the co rrect seating posi
tion . A driver is respons ible for the safety of all
ve hicle occupants and espec ia lly for children.
Therefore:
~ Never permit anyone to assume an incorrect
s itting position in the veh icle wh ile traveling
c> &_ .
A WARNING
Improperly worn safety belts inc rease the risk
of serious personal injury and death wheneve r
a vehicle is be ing used.
Safet y be lts
- Always make sure that all veh icle occupants
are cor rectly restrained and stay in a correct
seating position whenever the vehicle is be ing used.
- Always read and heed all WARNINGS and
other important informat ion
c> page 263.
Belt tensioners
How safety belt pretensioners work
Reversible safety belt pretensioners
T he following fu nctions a re availab le w hen safety
belts w it h reversib le safety bel t tensione rs ar e
fas tened:
- I n certa in driv ing s ituations, the safety belts
may tig hten w it h a reve rsib le tensioning func
t ion
c> page 112.
-The safety be lts may also t ighten with this re-
ve rs ible tens io ni ng f un ct io n in m ino r collisions.
Pyrotechnic safety belt pretensioners
Seat belts with pyrotechnic safety be lt preten
sioners are tensioned automatically i n severe col·
lis ions, depending on the circumstances . This
helps to reduce the fo rwa rd motion of the occu
pants.
A WARNING
r----
- I t is poss ible for the pretensioners to dep loy
incorrectly .
- Any wo rk on the tens ioner system or remov
al and installation o f system components
for other repairs must be performed by a
qualified wor kshop.
- The pyrotechnic system can only provide protection for one collision. If the pyrotech
n ic pretens ioners deploy, the pretensioning
system must be replaced.
(D Tips
- A fine dust is re leased when the pyrotechnic
safety belt pretensioners dep loy. This is nor
ma l and is not caused by a f ire in the veh i-
cle.
..,
267
Page 303 of 392
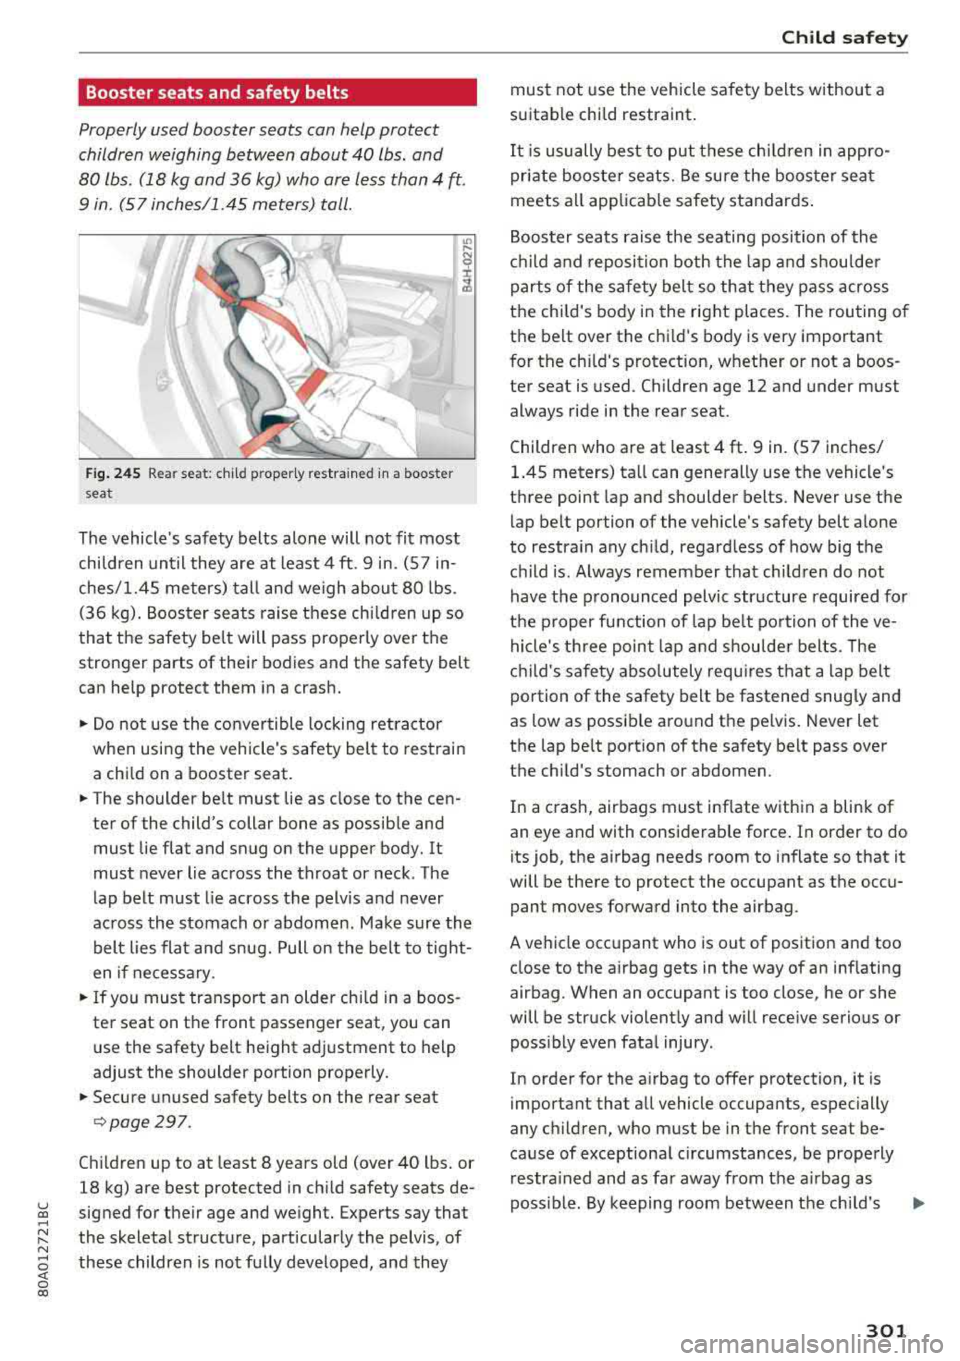
Booster seats and safety belts
Properly used booster seats can help protect
children weighing between about 40 lbs. and
80 lbs . (18 kg and 36 kg) who are less than 4
ft.
9 in. (57 inches/1.45 meters) tall.
Fig . 245 Rea r seat: chi ld p roper ly restrained in a booster
sea t
The vehicle's safety belts alone will not fit most
children until they are at least 4
ft. 9 in. (57 in
ches/1.45 meters) tall and weigh about 80 lbs.
(36 kg). Booster seats raise these children up so
that the safety belt will pass properly over the
stronger parts of their bodies and the safety belt
can help protect them in a crash.
.,. Do not use the convertible locking retractor
when using the vehicle's safety belt to restrain
a chi ld on a booster seat .
.. The shoulder belt must lie as close to the cen
ter of the child's collar bone as possib le and
must lie fla t and snug on the upper body. It
must never lie across the throat or neck. The
lap belt must lie across the pelvis and never
across the stomach or abdomen . Make sure the
belt lies flat and snug. Pull on the belt to tight
en if necessary .
.,. If you must transport an older child in a boos
ter seat on the front passenger seat, you can
use the safety belt height adjustment to help
adjust the shoulder portion properly .
.. Secure unused safety belts on the rear seat
¢page 297.
Children up to at least 8 years old (over 40 lbs. or
18 kg) are best protected in chi ld safety seats de-
~ signed for their age and we ight. Experts say that .....
~ the skeletal structure, particularly the pelvis , of N
~ these children is not fully developed, and they
0 co
Child safety
must not use the vehicle safety belts without a
suitable child restraint .
It is usually best to put these children in appro
priate booster seats. Be sure the booster seat
meets all applicab le safety standards .
Booster seats raise the seating position of the
child and reposition both the lap and shoulder
parts of the safety belt so that they pass across
the chi ld's body in the right places. The routing of
the be lt over the chi ld's body is very important
for the ch ild's protection, whether or not a boos
ter seat is used. Children age 12 and under must
always ride in the rear seat.
Children who are at least 4
ft. 9 in. (57 inches/
1.45 meters) tall can generally use the vehicle 's
three point lap and shoulder belts. Never use the
lap belt portion of the vehicle 's safety belt alone
to restrain any ch ild, regard less of how big the
ch ild is. Always remember that child ren do not
have the pronounced pelvic structure required for
the proper function of lap belt portion of the ve
hicle's three point lap and shoulde r belts. The
child's safety absolutely requires that a lap belt
portion of the safety belt be fastened snugly and
as low as possible around the pe lvis . Never let
the lap belt portion of the safety belt pass over
the child 's stomach or abdomen .
In a crash, airbags must inflate within a blink of
an eye and with considerab le force. In order to do
its job, the airbag needs room to inflate so that it
will be there to protect the occupant as the occu pan t moves forward into the airbag .
A vehicle occ upant who is out of position and too
close to the a irbag gets in the way of an inf lating
airbag. When an occupant is too close , he or she
will be struck violent ly and w ill rece ive serious or
poss ibly even fata l injury .
In order for the airbag to offer protection, it is
important that all vehicle occupants, especially
any ch ildren, who must be in the front seat be
cause of exceptiona l circumstances, be properly
restrained and as far away from the airbag as
poss ible. By keeping room between the child's
..,_
301
Page 328 of 392
Wheels
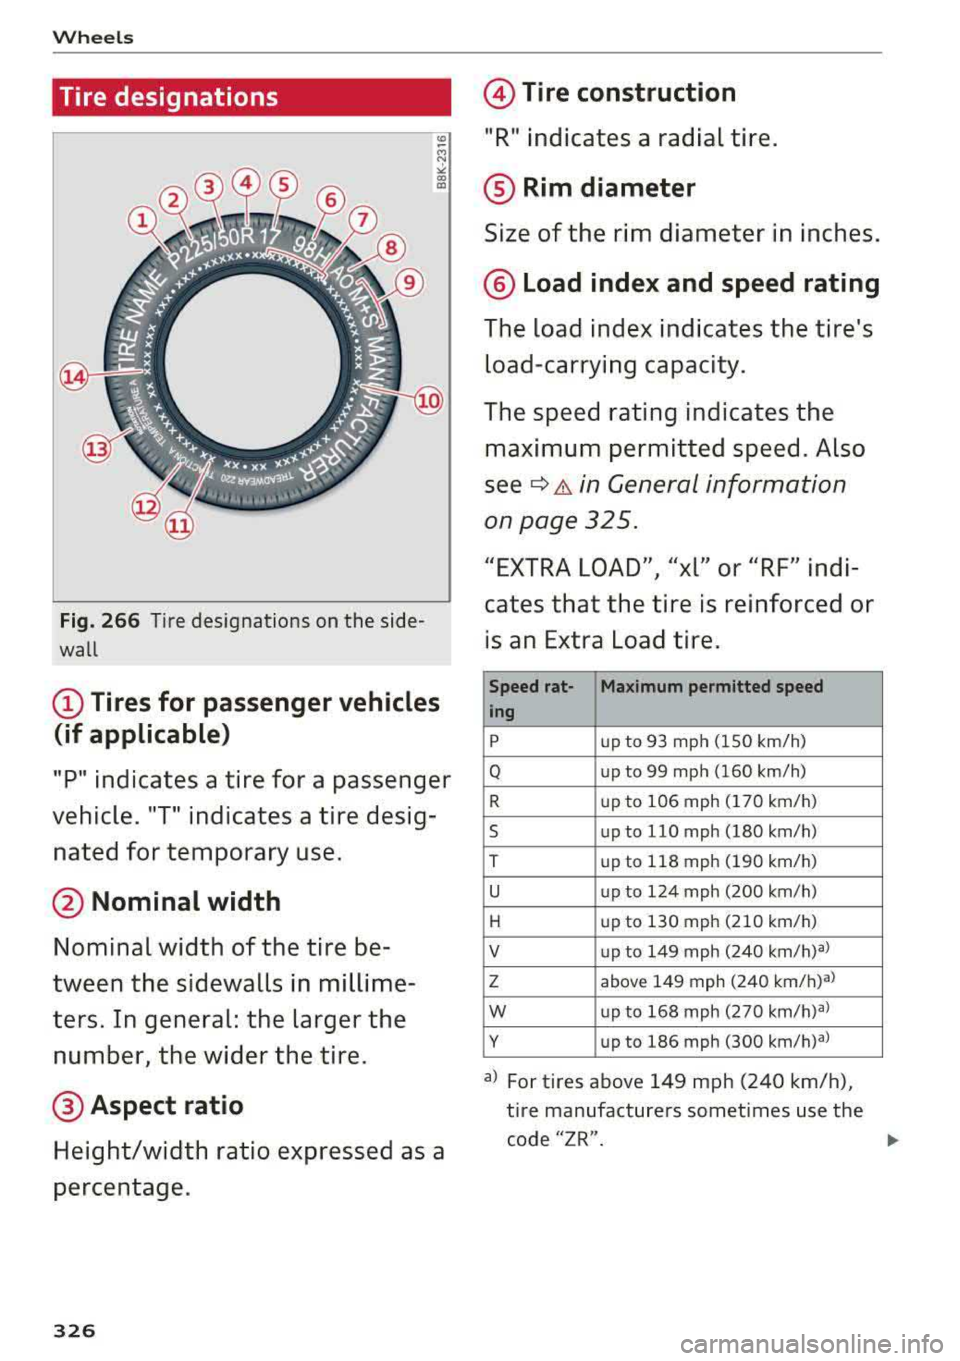
Tire designations
Fig. 266 Tire designations on the side
wall
(D Tires for passenger vehicles
(if applicable)
"P" indicates a tire for a passenger
vehicle. "T" indicates a tire desig
nated for temporary use.
@ Nominal width
Nominal width of the tire be
tween the sidewalls in millime
ters. In general: the larger the
number, the wider the tire.
@ Aspect ratio
Height/width ratio expressed as a
percentage.
326
@ Tire construction
"R" indicates a radial tire.
® Rim diameter
Size of the rim diameter in inches.
® Load index and speed rating
The load index indicates the tire's
load-carrying capacity.
The speed rating indicates the maximum permitted speed. Also
see
¢ A in General information
on page 325.
"EXTRA LOAD", "xl" or "RF" indi
cates that the tire is reinforced or
is an Extra Load tire.
Speed rat-
Maximum permitted speed
ing
p
up to 93 mph (150 km/h )
Q up to 99 m ph (1 60 km/h)
R up to 106 mph (170 km /h)
5 up to 11 0 mph (180 km/h)
T up to 118 mph (190 km/h)
u up to 124 mph (200 km /h)
H up to 130 mph (210 km/h)
V up to 149 mph (240 km /h)al
z a bov e 149 mph (240 km/h) al
w up to 168 mph (270 km /h) al
y up to 186 mph (300 km /h) al
a ) For tires above 149 mph (240 km/h),
tire manufacturers sometimes use the
code "ZR" .
Page 330 of 392
Wheel s
Glossary of tire and loading
terminology
Accessory weight
means the combined weight (in
excess of those standard items
which may be replaced) of auto matic transmission, power steer
ing , power brakes , power win
dows , power seats, radio, and
heater, to the extent that these
items are available as factory-in
stalled equipment (whether in
stalled or not).
Aspect ratio
means the ratio of the height to
the width of the tire in percent. Numbers of 55 or lower indicate a
low sidewall for improved steer
ing response and better overall
handling on dry pavement .
Bead
means the part of the tire that is
made of steel wires, wrapped or
reinforced by ply cords and that is
shaped to fit the rim.
Bead separation
means a breakdown of the bond
between components in the bead.
328
Cord
means the strands forming the
plies in the tire.
Cold tire inflation pressure
means the t ire pressure recom
mended by the vehicle manufac
turer for a tire of a designated
size that has not been driven for
more than a couple of miles (kilo
meters) at low speeds in the
three hour period before the tire pressure is measured or adjusted.
Curb weight
means the weight of a motor ve
hicle w ith standard equipment in
cluding the maximum capacity of
fuel, oil, and coolant, ai r condi
tioning and additional weight of
optional equipment.
E x tra load ti re
means a tire designed to operate
at higher loads and at higher in
flation pressures than the corre
sponding standard tire. Extra load
tires may be identified as "X L",
"
l" "EXTRA LOAD" or "RF" on X I I
the sidewall. .,.
Page 342 of 392
Wheels
Wheel bolts and rims
Wheel bolts
Wheel bolts must be clean and loosen/tighten
easi ly.
Rims
Rims with a bolted rim ring* or with bolted wheel
covers* consist of multiple pieces . These compo
nents were bolted together using special bolts
and a special procedure . You must not repair or
d isassemble them
C> _&. .
_& WARNING
Wheel bolts that are tight ened or repaired in
correctly can become loose and result in loss
of vehicle control, which increases the risk of
an accident. For the correct tightening specifi
cation, see
e> page 356, Finishing.
-Always keep the wheel bolts and the
threads in the wheel hub clean and free of
grease.
- Only use wheel bolts that fit the rim.
- Always have damaged rims repaired by an
authorized Audi dealer or authorized Audi
Service Facility . Never repair or disassemble
rims yourse lf, because this increases the risk
of an accident.
Winter tires
Winter tires significantly improve the vehicle's
handling when driving in winter conditions . Be
cause of their construction (width, compound,
tread pattern), summer tires provide less trac
tion on ice and snow.
"'Use winter tires on all four wheels .
"'Only use winter tires that are approved for your
vehicle .
"'Please note that the maximum permitted
speed may be lower with winter tires
e> & in
General information on page 325.
An author
ized Audi dealer or authorized Audi Service Fa
cility can inform you about the maximum per
mitted speed for your tires .
"'Check the tire pressure after installing wheels
¢page 335.
340
The effectiveness of winter tires is reduced great
ly when the tread is worn down to a depth of
0.16 in (4 mm) . The characteristics of winter
tires also decrease greatly as the tire ages, re
gardless of the remaining tread.
@) For the sake of the environment
Reinstall summer tires at the appropriate
time, because they provide better handling
when roads are free of snow and ice. Summer
tires cause less road noise, tire wear and fuel
consumption .
(D Tips
You can also use all season tires instead of
winter tires. Please note that in some coun
tries where winter tires are required, only
winter tires with the
& symbol may be per
mitted.
Snow chains
Snow cha ins not only improve the driving in win
ter road conditions, but also the braking.
"'Only install snow chains on the rear wheels.
"' Check and correct the seating of the snow
chains after driving a few feet, if necessary. Fol
low the instructions from the manufacturer.
"'Note the maximum speed of 30 mph (SO km/
h). Note the local regulations.
Use of snow chains is only permitted with certain
rim/tire combinations due to technical reasons.
Check with an authorized Audi dealer or author
ized Audi Service Facility to see if you may use
snow chains.
Use
fine-mesh snow chains. They must not add
more than 0 .53 in (13.S mm) in height, including
the chain lock.
You must remove the snow chains on roads with
out snow . Otherwise, you could impair driving
ability and damage the tires .
_& WARNING
Using incorrect snow chains or installing snow
chains incorrectly can result in loss of vehicle
9"'
Page 343 of 392
u co ..... N r--N ..... 0 <( 0 00
control, which increases the risk of an
accident.
@ Note
-Snow chains can damage the rims/wheel
covers* if the chains come into direct con
tact with them . Remove the wheel covers*
first. Use coated snow chains.
-Do not install and use snow chains if there is
a malfunction in the air suspension*, be
cause the vehicle height will be very low. If
you drive with snow chains anyway, the
wheel housings and other vehicle compo
nents can be severely damaged.
(D Tips
When using snow chains, it may be useful to
switch the offroad mode on <=>
page 141.
Low-profile tires
App lies to: ve hicles with low -profile tires
Compared to other tire/rim combinat ions, low
profile tires offer a wider tread surface and a
l arger r im diameter with shorter tire sidewalls.
This results in an agile dr iv ing style. However, it
may reduce the leve l of comfort and increase
road noise when driving on roads in poor condi
tion .
L ow -profile tires can become damaged more
quickly than standard tires when driving over
l arge bumps, potholes, manhole covers, and
curbs . Therefore, it is particular ly important to
maintain the correct tire pressure<=>
page 335 .
To reduce the risk of damage to the tires and
rims, drive very carefu lly on poor roads.
Check your wheels regularly every 2,000 mi
(3,000 km) for damage. Fo r example, check for
bulges/cracks on the tires or deformations/
cracks on the rims.
After a heavy impact or damage, have the tires
and rims inspected or replaced immediate ly by
an authorized Audi dealer or authorized Audi
Service Facility .
Lo w-profile tires can wear out faster than stand
ard tires.
Wheels
Uniform tire quality grading
-Tread wear
-Traction AA ABC
-Temperature ABC
Quality grades can be found where applicable on
the tire side wall between tread shoulder and
maximum section width <=>
page 326, fig. 266.
For example: Tread wear 200 , Traction AA, Tem
perature A.
All passenger car tires must conform to Federal
Safety Requirements in addition to these grades.
Tread wear
The tread wear grade is a comparative rating
based on the wear rate of the tire when tested
under controlled cond it ions on a specified gov
ernment test course.
For example, a tire graded 150 would wear one
and one half (1 1/2) times as we ll on the govern
ment course as a tire graded 100.
The relative performance of tires depends upon
the actual cond it ions of the ir use, however, and
may depa rt significantly from the norm due to
variations in driv ing habits, service practices and
differences in road characteristics and climate.
Traction
The traction grades, from highest to lowest, are
AA , A, Band
C. Those grades represent the tire's
ability to stop o n wet pavement as measured un
der controlled conditions on specified govern
ment test surfaces of asphalt and concrete. A tire
marked C may have poor traction performance
c:>,& .
Temperature
The temperature grades are A (the highest), B,
and C, representing the tire's resistance to the
generation of heat and its ability to dissipate
heat when tested under controlled conditions on
a specified indoor laboratory test wheel.
Sustained high temperature can cause the mate
rial of the tire to degenerate and reduce tire life,
and excessive temperature can lead to sudden
tire failure
c:> ,& . ..,.
341
Page 347 of 392
u co ..... N r--N ..... 0 <( 0 00
wash operator to reduce the risk of acci
dents.
- To reduce the risk of cuts, protect yourself
from sharp metal components when wash ing the underbody or the inside of the wheel
housings.
- After washing the vehicle, the braking effect may be delayed due to moisture on the
brake rotors or ice in the winter . This in
creases the risk of an accident. The brakes
must be dried first with a few careful brake
applications.
@ Note
- If you wash the vehicle in an automatic car
wash, you must fold the exterior mirrors in
to reduce the risk of damage to the mirrors.
Power folding exterior mirrors* must only
be folded in and out using the power folding
function.
- To reduce the risk of damage to the rims
and tires, compare the width between the
wheels on your vehicle with the distance be
tween the guide rails in the car wash.
- To reduce the risk of damage, compare the
height and width of your vehicle with the
Care and cleaning
height and width of the inside of the car
wash .
- T o reduce the risk of paint damage, do not
wash the vehicle in direct sunlight .
- To reduce the risk of damage to the surface,
do not use insect removing sponges, kitchen
sponges or similar items .
- Matte finish painted vehicle components:
- To reduce the risk of damage to the sur-
face, do not use polishing agents or hard
wax.
- Never use protective wax. It can destroy
the matte finish effect .
- Do not place any stickers or magnetic
signs on vehicle parts painted with matte
finish paint. The paint could be damaged
when the stickers or magnets are re
moved.
@ For the sake of the environment
Only wash the vehicle in facilities specially de
signed for that purpose. This will reduce the
risk of dirty water contaminated with oil from
entering the sewer system.
Cleaning and care information
When cleaning and caring for individual vehicle
components, refer to the following tables. The
information contained there is simply recom
mendations. For questions or for components that
are not listed, consult an authorized Audi
dealer or authorized Audi Service Facility. Also
follow the information found
in ¢.&. .
Exterior cleaning
Component Situation Solution
Windshield wiper
Deposits soft cloth with glass cleaner, ¢ page 52
blades
Headlights/
Deposits Soft sponge with a mild soap solution3>
Tail lights
Sensors/
Deposits Sensors: soft cloth with a solvent-free cleaning solution
camera lenses Camera lenses: soft cloth with an alcohol-free cleaning
solution
Snow/ice Hand brush/solvent-free de-icing spray
Wheels Road salt Water
Brake dust Acid-free special cleaning solution
345
Page 356 of 392

Emergency assistance
Raising the vehicle
Fig. 276 Sill p ane ls : mar kin gs
Fig. 277 Sill: pos itio nin g th e ve hicle jack
"' Place the vehicle jack* (vehicle tool kit) on a
firm surface . Use a flat , stable support if neces
sary . On a slippery surface such as tile, you
shou ld use a non-slip pad (such as a rubber
mat) ¢,&. .
"'Find the mark ing on the sill that is closest to
the tire that will be changed
¢ fig. 2 76 . Behind
the marking, there is a lifting point on the side
sill for the vehicle jack*.
"'Turn the handwheel to raise the vehicle jack*
under the lifting point on the side sill until the
bracket on the jack @completely covers the
notch on your vehicle .
"' Align the vehicle jack* so the bracket @covers
the notch and the base @ is flat on the ground .
T he base @ mus t be direct ly unde r the lifting
po int @ .
"'Mount the crank on the vehicle jack*: insert the
crank into the opening on the handwheel. Turn
the crank to the left or right to secure it.
"'Continue raising the vehicle jack* with the
crank until the wheel lifts off the ground slight
ly .
354
A WARNING
,-
- Make sure the vehicle jack* is stable . There
is a risk of injury when the ground is slick or
soft, because the vehicle jack* could slide or
sink .
- Only raise your vehicle with the vehicle jack*
provided by the factory. If you use a veh icle
jack designed for another vehicle, your vehi
cle can slide and cause injury.
- Position the vehicle jack* only at the desig
nated mounting points on the side sill and
align the jack. Otherwise, the vehicle jack*
could slip and cause an injury if it does not
have sufficient hold on the vehicle.
- Vehicles with air suspension*: changes in
temperature or load can affect the height of
the stopped vehicle .
- To reduce the risk of an accident,
neve r start
the engine when the vehicle is raised.
- To reduce the risk of injury, support the
ve
hicle securely with suitable stands if work is
to be performed underneath the vehicle .
- To help prevent injury to yourself and your
passengers:
- Do not raise the veh icle until you are sure
the jack* is securely engaged.
- Passengers must not remain in the vehicle
when it is jacked up .
- Make sure that passengers wait in a safe
place away from the vehicle and well away
from the road and traffic .
- Make sure jack position is correct, adjust
as necessary and then continue to ra ise
the jack*.
- If work has to be done under the vehicle,
ensure that it is safely supported on suita
ble stands -risk of injury!
- Never start the engine when the vehicle is
on the jack* - risk of accident!
(D Note
Do not lift the vehicle by the sill. Position the
vehicle jack* only at the designated mounting
po ints on the side sill. Otherw ise, your vehicle
will be damaged .
..,.
Page 371 of 392
u co ..... N r-N .....
~ 0 co
Technical data
Vehicle specifications
XXXXX XX -X -XXXX XXX XX
®-+ : ::::::. XXXXXXXX XX X XX XXX XXX
IYP /lffl XXX XXX
XX XXXXXXX XX X X XX
XXX KW XXX
®i ~=-:~~ XXXX XXX XXX
©+ ~ rur:i~ xxxx I xxxx XXX I xx
II. · AIJSlit I OPTIONS
EOA 7D 5 4U B 6XM SSG SR W
2 EH JO Z 1LB 1AS 1BA
3FC SM U 7Xl
F O A 9G3 OG7 O YH OJF
TL 6 3 KA 8EH UlA X 9B OZ7
l XW
803
908 8Z4 020
7 T6 CV7
71<0 4X3 21< 2
3L4 4 KC 3YO 413 5 02
1S A 7GB
01A 4GQ
XX . X XX X XX X XXXX
Fig. 293 Vehicl e ident ifica tion labe l
Vehicle Identification Number (VIN )
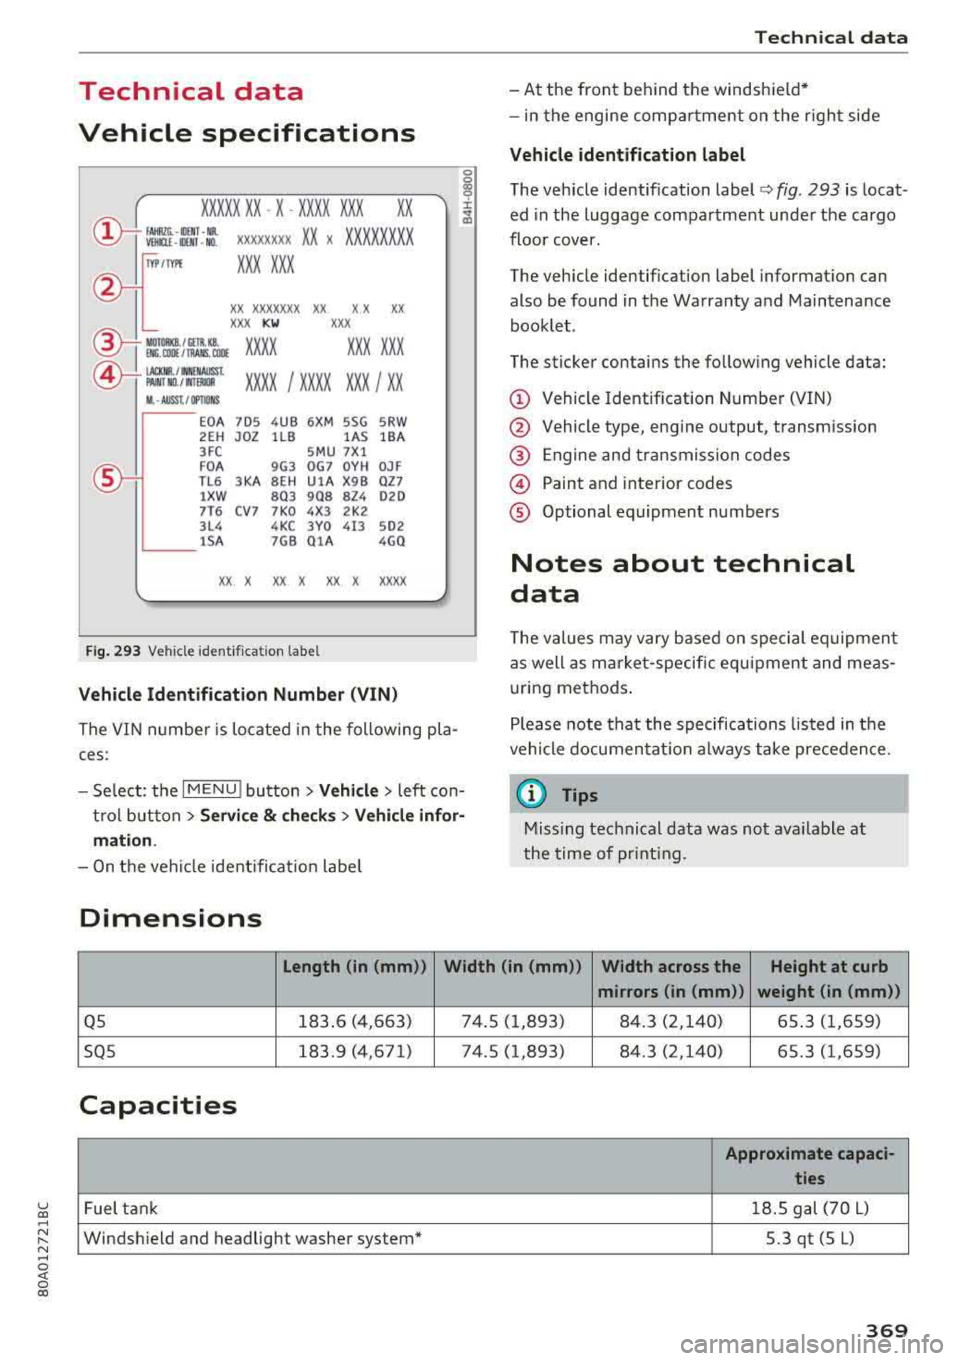
The VIN n umber is located in the following pla
ces :
0
0
~ :x:
t rol button
> Servi ce & check s > Vehicle infor·
mati on.
-On t he vehicle identificat io n labe l
Dimensions
Technical data
-At the front behind the windshield *
-in the engine comp artme nt on the r igh t side
Vehicle identification label
The vehicle identification label¢ fig. 293 is locat
ed in the luggage compartment under the cargo
floor cover.
The vehicle identification label informat ion can
also be found in the Warranty a nd Maintenance
booklet .
The sticker contains the fo llow ing vehicle data:
© Vehicle Identif ication Number (VIN)
@ Vehicle type, engine output, transm ission
@ Engine and transmiss ion codes
© Paint and interior codes
® Optional equipment numbers
Notes about technical
data
T he values may vary base d on special eq uipment
as well as m arket -specific equipment and meas
u ring methods .
Please note that the specifications listed in the
vehicle documen tat ion a lways take prece dence.
(D Tips
Missing technical data was not ava ilable at
the time of pr int ing.
Length (in (mm )) Width (in (mm ))
Width across the Height at curb
mirrors (in (mm )) weight (in (mm))
Q5 183.6 (4,663) 74 .5 (1 ,893) 84.3 (2,140) 65.3 (1 ,659)
SQ5 183.9 (4,671) 74.5 (1,893) 84 .3 (2,140) 65.3 (1,659)
Capacities
Approximate capaci·
ties
Fuel tank 1
8.5 gal (70 L)
Windsh ield and headlight washer system* 5.3qt(5L)
369
Page 386 of 392
Index
Rear lid
refer to Luggage compartment lid . . . . 36, 37
Rea r lower ing . . . . . . . . . . . . . . . . . . . . . . . . 128
Rear Seat Entertainment preparation
refer to Audi Entertainment mobile . . . . . 234
Rearview camera
refer to Parking systems .... ... .. . 131,133
Rea r window defogge r . . . . . . . . . . . . . . . . . . 7 1
Rear window washer system . . . . . . . . . . . . . 51
R EAR (button) . . . . . . . . . . . . . . . . . . . . . . . . . 71
Recirculat ion mode (automatic climate con-
trol system) . . . . . . . . . . . . . . . . . . . . . . . . . . 7 1
Recuperation . . . . . . . . . . . . . . . . . . . . . . . . . 16
Ref ueling. ....... ... .. ..... ... .. .. ... 311
Remote control
refer to Remote contro l key . . . . . . . . . . . . 31
Remote control key . . . . . . . . . . . . . . . . . . . . 31
Remote con trol ope ra tion
Garage door opener (Home link) . . . . . . . . . 43
Remote lock ing and unlocking
Aud i connect vehicle control . . . . . . . . . . . 198
Removing the caps (wheel bolts) . . . . . . . . . 353
Repair man uals ... ... .. ..... ... .. .. ... 371
Repa irs
A irbag system . . . . . . . . . . . . . . . . . . . . . . 284
Rep lacement key . . . . . . . . . . . . . . . . . . . . . . 31
Rep lac ing
Light bulbs . . . . . . . . . . . . . . . . . . . . . . . . . 362
Replac ing wiper blades . . . . . . . . . . . . . . . . . 53
Reporting Safety Defects . . . . . . . . . . . . . . . 259
Reset
refer to Restart ( MMI) . . . . . . . . . . . . . . . . 250
Reset button (trip odometer) . . . . . . . . . . . . 1 2
Resetting the trip odometer . . . . . . . . . . . . . 1 2
Res id ual heat (automa tic climate cont rol) . . 7 2
Restart (MMI) . . . . . . . . . . . . . . . . . . . . . . . . 250
R etractor . . . . . . . . . . . . . . . . . . . . . . . . . . . . 264
Reve rse gear . . . . . . . . . . . . . . . . . . . . . . . . . . 85
Rewinding (a udio/video file) . . . . . . . . . . . . 234
R igh t cont rol b utton . . . . . . . . . . . . . . . . . . . . 13
Rims ....... .. .. ................ ... . 340
Clea ning . . . . . . . . . . . . . . . . . . . . . . . . . . . 345
Ringtone settings . . . . . . . . . . . . . . . . . . . . . 185
Road car rier . . . . . . . . . . . . . . . . . . . . . . . . . 368
384 Roaming
refer to Data connection
. . . . . . . . . . . . . . 194
Roof load ... .. .. .. .. .. ............ 67, 370
Roof rack ... .. .. .. .. .. ............. ... 67
also refer to Roof rack . . . . . . . . . . . . . . . . . 67
Ro ute criteria . . . . . . . . . . . . . . . . . . . . . . . . 212
Ro ute guidance
refer to Navigation .. .. ............. . .
Running direct io n (tires)
s
Safe driving habits
S afety 2
03
355
252
A irbag system . . . . . . . . . . . . . . . . . . . . . . 2 69
Be lts . . . . . . . . . . . . . . . . . . . . . . . . . . . . . . 261
Cargo . . . . . . . . . . . . . . . . . . . . . . . . . . . . . 257
Correct seat ing pos ition . . . . . . . . . . . . . . 253
Pedal area . . . . . . . . . . . . . . . . . . . . . . . . . . 256
Telephone . .... .. .. .. ............. .. 174
Safety be lt height adjustment . . . . . . . . . . . 266
Safety be lt pos ition . . . . . . . . . . . . . . . . . . . 265
Safety be lt heig ht adjustme nt . . . . . . . . . 266
S afety be lts wor n by pregnant women . . . 266
Safety be lt pretensioner
Service and disposal . . . . . . . . . . . . . . . . . . 268
Safety be lts . . . . . . . . . . . . . . . . . . . . . . 261, 264
Cleaning . . . . . . . . . . . . . . . . . . . . . . . . . . . 346
Danger to passengers who do not wear a
safety belt . . . . . . . . . . . . . . . . . . . . . . . . . 262
Fastening . . . . . . . . . . . . . . . . . . . . . . . . . . 264
Imprope rly wo rn . . . . . . . . . . . . . . . . . . . . 267
Not wor n . . . . . . . . . . . . . . . . . . . . . . . . . . 262
S afety be lt pos it ion . . . . . . . . . . . . . . . . . . 265
S afety i nstr uctions . . . . . . . . . . . . . . . . . . . 263
Securing child sa fety seats . . . . . . . . . . . . 302
Specia l considerations for pregnant wom -
en . . . . . . . . . . . . . . . . . . . . . . . . . . . . . . . . 266
Unfastening . . . . . . . . . . . . . . . . . . . . . . . . 266
Warn ing/ indicator light . . . . . . . . . . . . . . 261
Worn properly . . . . . . . . . . . . . . . . . . . . . . 263
Safety be lt warning light . . . . . . . . . . . . . . . 261
Safety i nstr uctions
fo r side c urtain airbags . . . . . . . . . . . . . . . 290
fo r us ing ch ild safety se ats . . . . . . . . . . . . 295
f or using sa fe ty be lts . . . . . . . . . . . . . . . . . 263
Monitoring the Advanced Airbag System . 283