display AUDI Q5 2018 Owner's Manual
[x] Cancel search | Manufacturer: AUDI, Model Year: 2018, Model line: Q5, Model: AUDI Q5 2018Pages: 392, PDF Size: 60.56 MB
Page 73 of 392
u co ..... N ,..._
N ..... 0 <( 0 00
system operates most efficiently in eco cooling
mode.
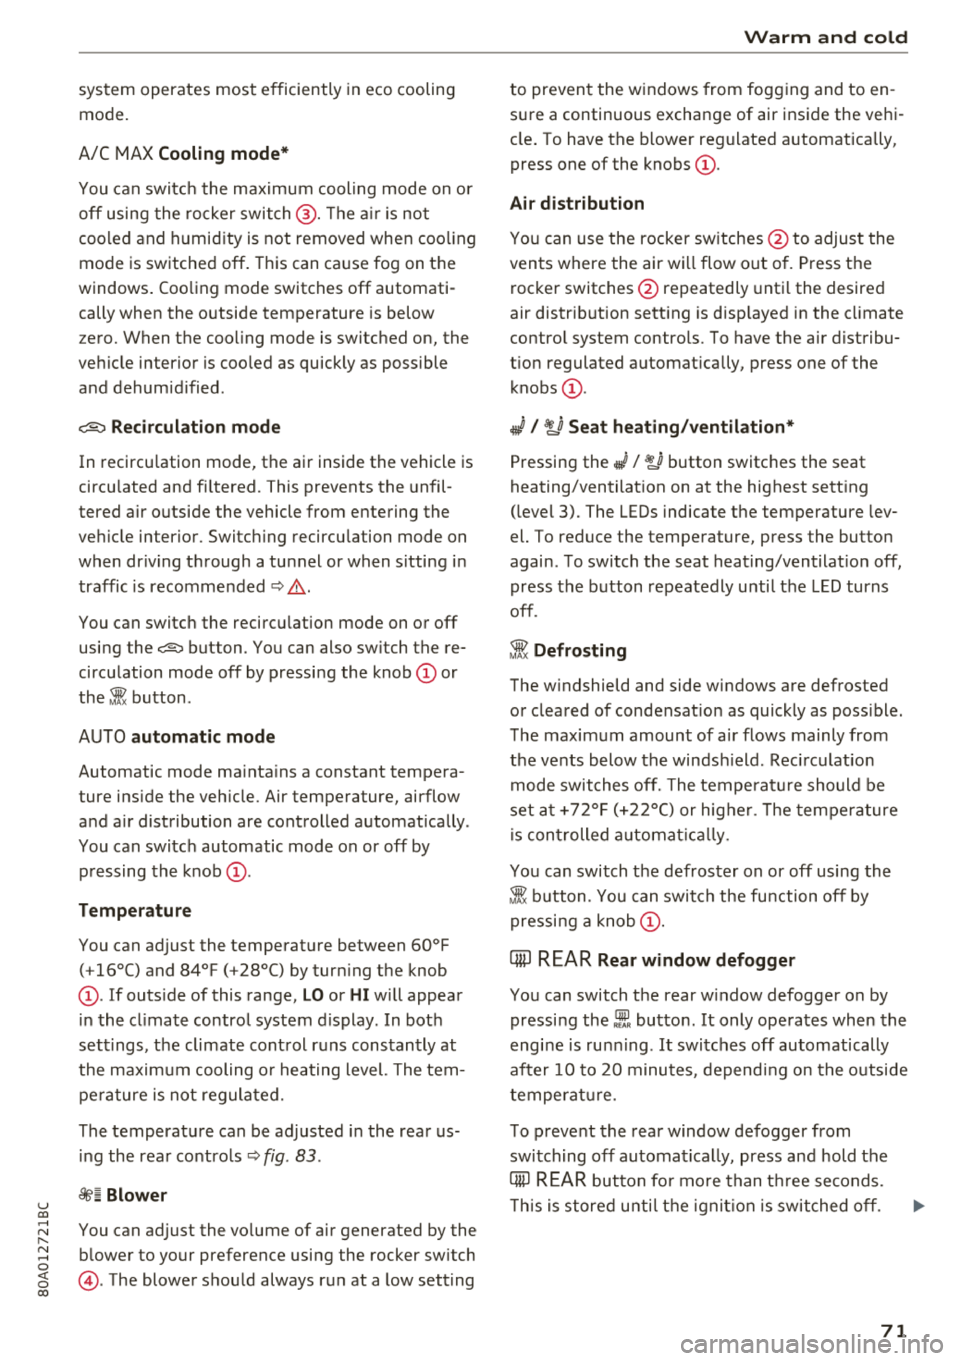
A/C MAX Cooling mode*
You can switch the maximum cooling mode on or
off using the rocker switch@. Th e air is not
cooled and humidity is not removed when coo ling
mode is switched off. This can cause fog on the
windows . Cooling mode switches off automati
cally when the o utside temperature is below
ze ro. When the cooling mode is switched on, the
vehicle interior is cooled as quickly as possible
and dehumidified.
<::E::> Recirculation mode
In recirculation mode, the air inside the vehicle is
circu lated and fi ltered. This prevents the unfil
tered air outside the vehicle from entering the
ve hicle interior . Switch ing recirculation mode on
when dr iv ing through a tunnel or when s itting in
traffic is recommended
~ ,&. .
You can switch the recircu lation mode on or off
using the
6<:> button . You can also sw itch the re
circulation mode off by pressing the knob(!) or
the Sfx button.
AUTO automatic mode
Automatic mode ma inta ins a constant tempera
ture ins ide the veh icle. Air temperature, airflow
and a ir distribution are controlled automatically .
You can switch automatic mode on or off by pressing the
knob @.
Temperature
You can adjust the temperature between 60°F
(+16°() and 84°F (+28°() by turn ing the knob
@. If outs ide of this range, LO or HI will appear
in the climate control system display. In both
sett ings, the climate control runs constantly at
the maximum cooling or heating level. The tem
perature is not regulated.
The temperature can be adjusted in the rear us
in g the rea r controls
~ fig . 83 .
<%'~ Blower
You can adjust the vo lume of air generated by the
blower to your preference using the rocker sw itch
@ . The blower should always run at a low setting
Warm and cold
to prevent the windows from fogging and to en
sure a continuous exchange of air inside the ve hi
cle . To have the blower regulated a utomatica lly,
press one of the
knobs @.
Air distribution
You can use the rocker sw itches @to adjust the
vents where the air wi ll flow out o f. Press the
rocker switches @repeatedly until the desired
air distrib ution setting is disp layed in the climate
contro l system controls. To have the air distribu
t ion regulated automat ically, press one of the
knobs @.
.JI~ Seat heating/ventilation*
Pressing the JI~ button switches the seat
heating/ventilation on at the highest setting
(level 3). The LEDs indicate the temperature lev
el. To reduce the temperature, press the button
again. To switch the seat heat ing/ventilat ion off,
press the button repeatedly until the LED turns
off.
:.f% Defrosting
The w indshield and side windows are defrosted
or cleared of condensat ion as quickly as poss ible.
The maximum amount of a ir flows mainly from
the vents below the windsh ield. Rec ircu lat ion
mode switches off. The temperatu re should be
set at +72°F (+22°() or hig her. Th e temperature
is controlled automat ically.
You can switch the defroster on or off using the
3R button. You can switch the fu nction off by
pressing a
knob @.
[ffi) REAR Rear window defogger
You can switch the rear w indow defogger on by
pressing the
!!P. button . It only operates when the
engi ne is run ning .
It switches off automatically
after 10 to 20 minutes , depending on the outside
temperature.
T o prevent the rear window defogger from
switching off automat ically, press and hold the
QiP REAR button for more than thr ee seconds.
T his is stored until the ignition is switched off .
.,.
71
Page 74 of 392
Warm and cold
SYNC Syn chr oniz ation
Use t he rocker sw itc h® to select the f unct ion.
When synchronization is switched on, the set
tings for the driver's side are applied to the front
passenger's side and the rear (except for seat
heating/venti lation*). When the settings on the
front passenger's side or in the rear are changed,
the synchron izat ion is automatically switched off
and
3 -z one appears in the display .
SET REAR function
Use the rocker switch ® to select the function .
When the function is switched on, you can adjust
all settings for the rear us ing the climate control
system controls in the cockpit . The rear climate
control system controls cannot be operated at
the same time . T his function switches off auto
mat ica lly after a ce rtain per iod of t ime or after
leav ing the menu.
Vents
You can open or close the center and rear vents in
the cockpit and the vents in the rear center con
sole us ing the r idged thumbwhee ls . T he levers
adjust the d irection of the airflow from the vents.
Re sidu al he at
You can activate the residual heat function when
the ignition is switched off by pressing the knob
(!) . The res idual heat from the coolant is used to
heat the vehicle interior. The residual heat func
tion switches off automatically afte r about 15
m inutes.
A WARNING
- Yo u should not use the re circulation mode
for an extended period of time, because no
fres h air is drawn in and the windows can
fog when cooling mode is sw itched off. This
increases the risk of an accident.
- Individuals with reduced sensitivity to pain
or temperature cou ld deve lop burns when
using the seat heating* funct ion. To reduce
the risk of injury, these ind iv iduals should
not use seat heati ng*.
72
@ Note
To avoid damaging the seat heating* ele
ments, do not knee l on the seats or p lace
heavy pressure on one area of the seat.
Setup
The climate control system basic settings ore ac
cessed in the Infotainment system .
.. Select in the Infotainment system : IMENU! but
ton
> Veh icle > left control button > Air condi
t ioning
Auto recirculation
When sw itched on, a utomat ic rec ircu lat ion con
tro ls the recircu lation mode automatically . If the
windows fog up, press
the® MAX button .
Automatic au xiliary heater *
The auxiliary heater he lps to wa rm the vehicle in
te rior more qu ic kl y.
Steering wheel heating
Applies to: vehicles with steering wheel heating
The steering wheel rim con be heated .
.. Press the lg\~ page 14, fig . 11 button on the
mu ltifu nction stee ring wheel to switch the
steer ing whee l heating on and off . The mes
sage
S teering wheel h eating : on /Ste ering
wheel heating: off
appears in the instrument
cluster display.
The tempe ra ture is ma inta ined at a constant lev
el when steering wheel heating is switc hed on .
The steer ing whee l heating sett ings are stored
automat ica lly and assigned to the remote control
k ey tha t is in use .
Page 80 of 392
Driving
you stop it. You also cannot lock the vehicle from
the outside.
Shift to P, otherwise vehicle can roll away.
Doors do not lock if gearshift is not in
P
This message appears for safety reasons if the
selecto r lever is in the "N" position when you
switch the ignition off. Move the selector lever to
the "P" posit ion. Otherwise the vehicle is not pro
tected from rolling and it cannot be locked.
I) Remote control key : hold back of key
against the designated area. See owner's man
ual
I f the indicator light turns on and this message
appears, there is a malfunction
c:> page 78.
Shift to P before leaving vehicle, otherwise vehi
cle can roll away
This message appears if the driver's door is
opened while the ignition is switched on and the
transmission has not been shifted to the "P" posi
tion . Sh ift the transm iss ion into the "P" position
and turn off the ignition if you are leav ing the ve
h icle. Otherwise the vehicle could roll. Also see
<=:>page 79.
Starting the engine when there is a
malfunction
It may not be possible to start the engine under
certain circumstances, for example, if the bat
tery in the vehicle key is drained, if interference is
affecting the key or if there is a system malfunc tion.
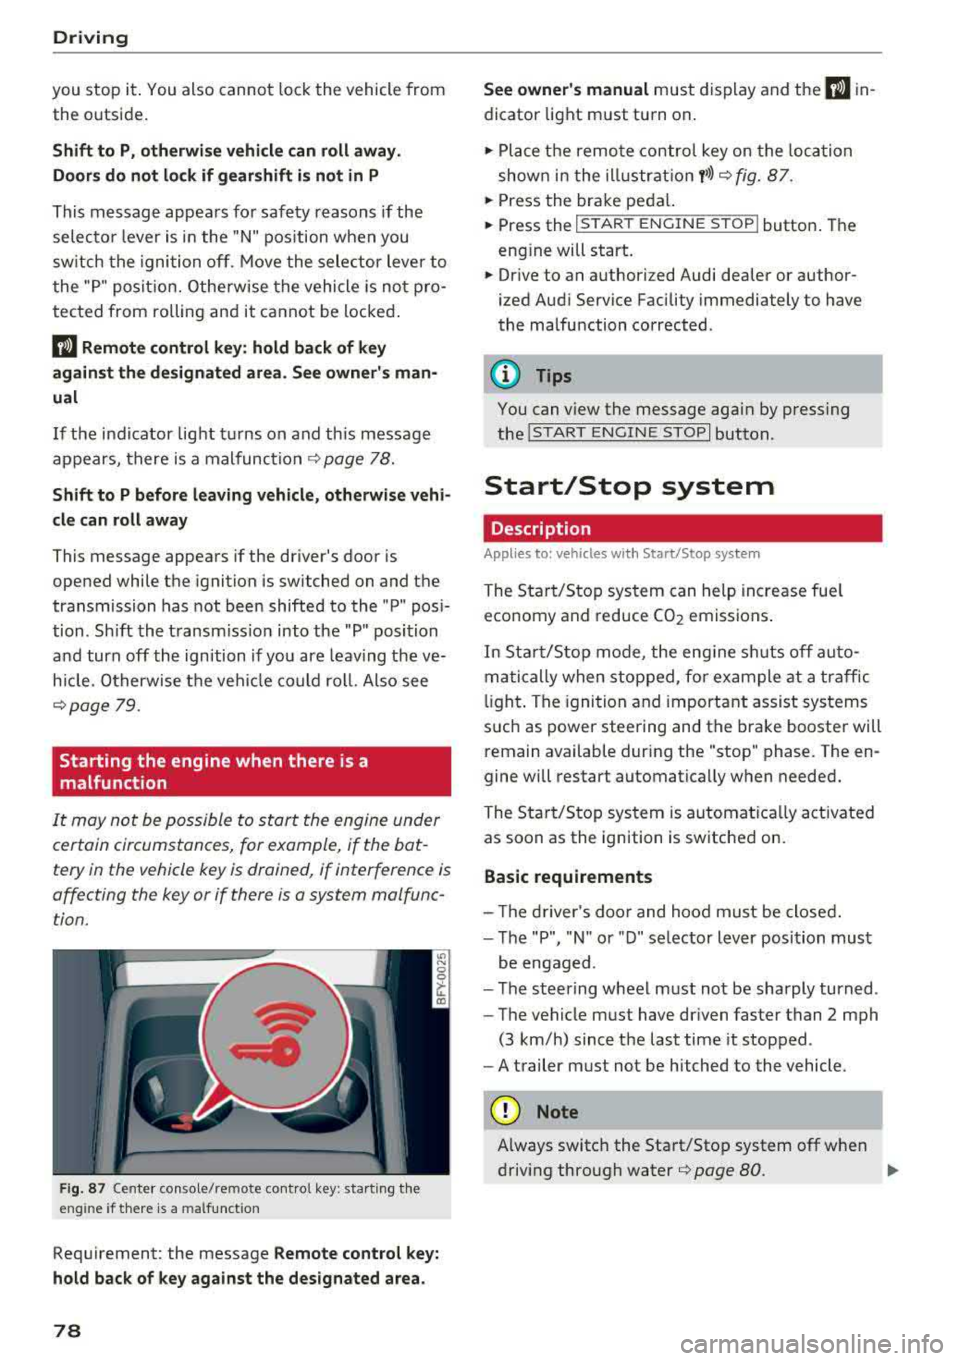
F ig. 87 Center console/remote contro l key : start ing the
eng ine if there is a malfunct ion
Requirement: the message Remote control key:
hold back of key against the designated area.
78
See owner's manual must display and the I) in
dicator light must turn on .
.,. Place the remote control key on the loca tion
shown in the illu strat ion
y >l) c:> fig. 87.
... Press the brake pedal.
... Press the I START ENGINE STOPI button. The
eng ine will start.
... Drive to an authorized Audi dealer or author
ized Aud i Service Facility immediately to have
the malfunction corrected .
(!) Tips
You can view the message aga in by pressing
the lS TART
ENGINE STOP I button.
Start/Stop system
Description
Appl ies to : vehicles wi th Start/Stop sys te m
The Start/Stop system can help increase fue l
economy and reduce CO2 emissions.
In Sta rt/S top mode, the engine sh uts off auto
matically when stopped, for example at a traffic
li ght . The ignition and important assist systems
such as power steering and the brake booster will
remain available dur ing the "stop" phase. The en
gine will restart automatically when needed.
The Start/Stop system is automat ica lly act ivated
as soon as the ignition is switched on.
Basic requirements
- Th e driver's door and hood must be closed.
- The "P", "N " or "D" selector lever position must
be engaged .
- The steering wheel must not be sharply turned .
- The vehicle must have dr iven faster than
2 mph
(3 km/h) since the last time it stopped.
- A trailer must not be hitched to the vehicle.
(D Note
Always switch the Start/Stop system off when
driving through water
r=;, page 80.
Page 81 of 392

u co ..... N r--N ..... 0 <( 0 00
(D Tips
-Depending on the driving situation, the en
gine may already stop when
coasting before
the vehicle has come to a complete stop
ll.
- If you select the "D" selector lever position
after shifting into reverse, the vehicle must be driven faster than 6 mph (10 km/h) in or
der for the Start/Stop system to be active
again.
Stopping/starting the engine
Applies to: vehicles with Start/Stop system
"'Apply the brakes and keep your foot on the
brake pedal until the vehicle has stopped. The
rl1 indicator light appears in the instrument
cluster once the engine stops automatically .
"'The engine starts again when you take your
foot off the brake pedal. The indicator light
turns off.
(D Tips
-The ignition will turn off if you press the
I START ENGINE STOP I button during a stop
phase .
- You can determine for yourself if the engine
will stop or not by reducing or increasing
the amount of force you use to press the brake pedal. For example, if you only lightly
press on the brake pedal in stop-and-go
traffic or when turning, the engine will not
switch off when the vehicle is stationary. As
soon as you press the brake down harder,
the engine will switch off.
- Press the brake pedal during a Stop phase
to keep the vehicle from rolling.
Starting/stopping the engine automat
ically
Applies to: vehicles with Start/Stop system
The system checks if certain conditions are met
before and during the "stop" phase, and deter
mines if and how long the engine is stopped de
pending on the situation. For example, if power
usage is high, the engine will not be stopped .
ll Market-specific
Driving
Along with other conditions, the following fac
tors influence the automatic engine start or stop:
- Environmenta l conditions (slopes, inclines, ele-
vation, temperature)
- Battery (charge status, temperature, power us-
age)
- Engine temperature
- Assistance systems
- Driving behavior
If the
rid indicator light appears in the instru
ment cluster display, the engine will not be stop
ped.
Switching the ignition off automatically
Applies to: vehicles with Start/Stop system
If you leave the vehicle during a "stop" phase, the
engine can be restarted within approximately 30
seconds if the doors are closed, the driver's safe
ty belt is fastened and the brake pedal is pressed.
If you leave the vehicle longer than 30 seconds,
the ignition will switch off automatically to pre
vent the vehicle battery from draining. If this is
the case, the message
Start/stop system: igni
tion will be switched off in 30s
will appear in the
instrument cluster and, if the low beam head
lights are switched on, the parking lights will
switch on instead. The parking lights will switch
off after approximately 30 minutes or when you
lock the vehicle.
The ignition also switches off when you lock the
vehicle from the outside during a stop phase.
If the Start/Stop system has not turned off the
engine or if you have switched the Start/Stop sys
tem off manually, the ignition will not be auto matically switched off and the engine will contin
ue to run.
A WARNING
-To reduce the risk of poisoning, never allow
the engine to run in confined spaces.
-
79
Page 82 of 392
Drivin g
(D Tips
If you leave t he vehicle with the "D/S" or "R"
selector lever pos ition engaged, the parking
brake is automatically set.
Manually switching the Start/Stop system
off/on
A pp lies to: ve hicles w ith Sta rt/Stop system
The (A_) oFF button is located in the center conso le .
.. Press (A_) OfF to switch on or off. The LED in the
button turns on when the funct ion is switched
off.
@ Tips
If you switch the system off dur ing a stop
phase, the engine w ill start again automati
cally .
Messages
App lies to: ve hicles w ith Sta rt/Stop system
Start /stop system: deactivated . Please start
engin e manually
This message appea rs when specific conditions
are not met during a stop phase. The Sta rt/Stop
system wi ll not be ab le to restart the engine . The
engine must be started wit h the
I S TAR T ENGINE STOP I button.
Start /stop sy stem: malfunction! Function
una vailable . Please cont act Se rvice
There is a malfunction in the Start/Stop system .
Drive the vehicle to an authorized Audi dealer or
author ized Service Facility as soon as poss ible to
have the malfunction corrected.
80
Electromechanical
parking brake
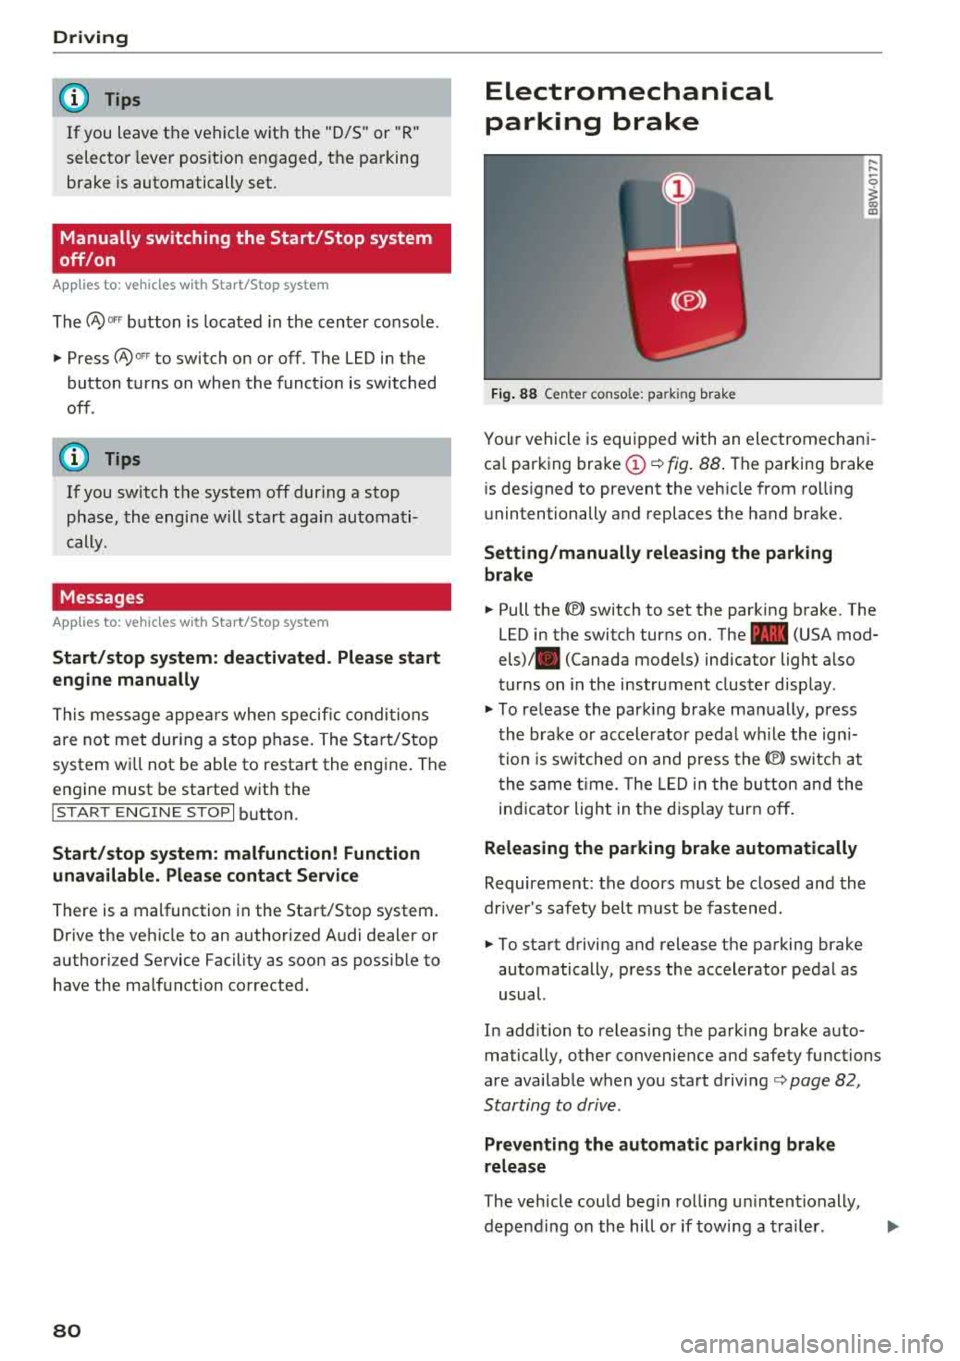
F ig . 88 Center console: parking brake
,-.. ,-..
0
1 m
Your vehicle is equipped with an electromechani
ca l parking
brake (!)¢ fig . 88 . The parking brake
is designed to prevent the vehicle from ro lling
unintentionally and replaces the hand brake.
Setting /manuall y re leasing the parking
br ake
.. Pull the®> switch to set the parking brake. The
LED in the switch turns on. The
-(USA mod
els)/ . (Canada models) indicator light also
turns on in the instrument cluster display .
.. To release the parking brake manually, press
the brake or accelerator peda l w hile the ign i
tion is switched on and press
the®) sw itc h at
the same t ime. The LED in the button and the
indicator light in t he disp lay turn off .
Releasing the parking brake automatically
Requirement: the doors m ust be closed and the
drive r's safety belt must be fastened.
.. To start driving and release the parking brake
automatically, press the accelerator pedal as
usual.
In add ition to releasing the parking brake auto
matically, other convenience and safety functions
are available when you start
driving¢ page 82,
Starting to drive .
Preventing the automatic parking br ake
release
The vehicle could beg in rolling un intentionally,
depend ing on the hill or if towi ng a tra iler.
.,.
Page 86 of 392
Driving
Drive quick ly through sandy or marshy off-road
sections and do not stop , if at all poss ibl e.
Driving through water
Also read the information found in ¢ page 73.
Driving on a slope
If you a re ever unable to dr ive up a hill , do not try
to turn around . Drive back down in
re verse in
stead. Otherwise you r un the r isk o f tipping over .
If the vehicle threatens to tip over when dr iving
across a slope , you mu st immediately stee r
downhill in the direction of the slope.
Do not park your vehicle on steep hills.
To reduce the r isk of t ipping over, dr ive on hills in
the direction of the downward s lope (fa ll line)
-
never crosswise .
Tilt angle display
Description
Applies to: vehicles with a ti lt angle display
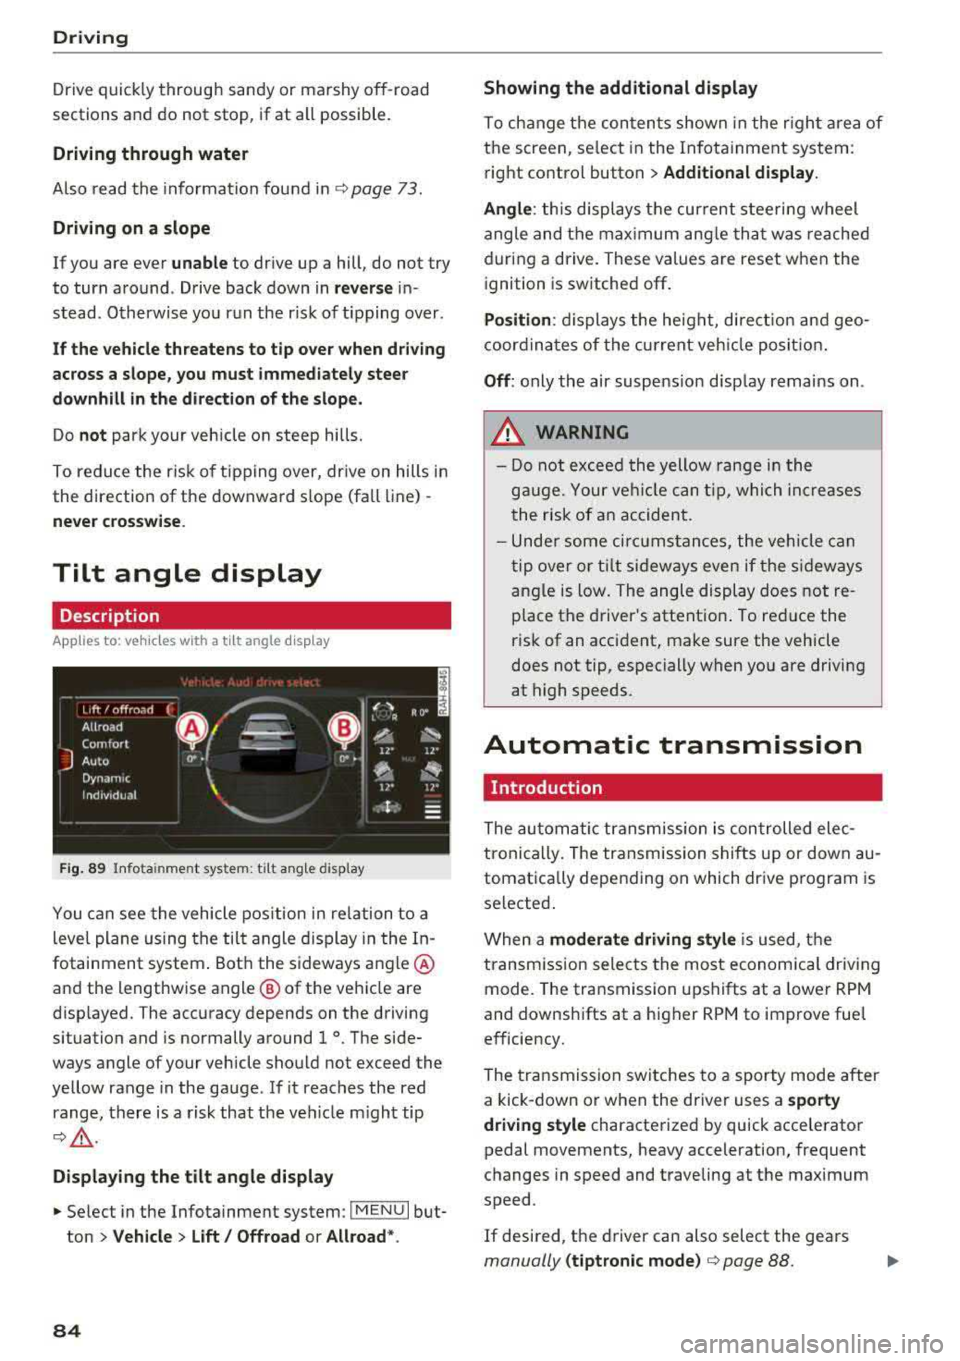
F ig. 89 I nfo ta in me nt syste m: tilt ang le d ispla y
You c an see the vehicle pos ition in re lation to a
leve l plane us ing the tilt angle display in the In
fotainment system . Bot h the sideways angle @
and the lengthwise angle @ of the vehicle are
disp layed. The accuracy depends on the driving
situation and is normally a round 1
°. The side
ways angle of your vehicle should no t exceed the
ye llow range in the gauge . If it reaches the red
range, there is a risk that the ve hicle m ight tip
¢ ,&. .
Displaying the tilt angle display
~ Select in the Infotainment system : IME NUI but
ton
> Vehicle > Lift / Offroad or Allroad *.
84
Showing the additional display
To ch ange the con ten ts shown in the r igh t ar ea of
t h e screen, se lect in the In fo ta inment system :
r ight contro l button
> Additional display.
Angle :
this displays t he cur rent stee ring wheel
angle and t he max imum ang le th at was re ached
dur ing a drive . These values are reset when the
i gnition is switche d off .
Position : displays the he ig ht, di re ct io n a nd geo
coor din at es of the cur rent veh icle posit io n.
Off : only the air suspe nsio n disp lay remains on .
A WARNING
- Do not excee d the yellow range in the
g au ge. Your ve hicle can t ip, whi ch in cre as es
t he risk of an accident.
- Unde r some ci rcumstan ce s, the vehicle can
t ip ove r or til t sid eways eve n if the s ideways
angle is low. The angle display does not re
p lace the driver's attent io n. To re duce the
risk of an accident, make sure the vehicle
does not tip, especially when yo u are driving
at high speeds.
Automatic transmission
Introduction
The au tom atic transmission is con trolled ele c
tronically. The transmission shifts up or down au
tomat ica lly depending on which dr ive p rogram is
selected .
When a
moderate driving style i s used, t he
transm iss ion selec ts the most economica l driv ing
mode. The transmission upshifts at a lower RPM
and downshifts at a higher RPM to improve fue l
e fficiency.
The tra nsmission switches to a sporty mode after
a kick-down or when the driver uses a
sporty
driving style
characterized by quick accelerator
pedal movements, heavy acceleration, frequent
changes in speed and t raveling at the max imum
speed .
If desired, th e driver can also select the gears
manually (tiptronic mode ) ¢ page 88.
Page 87 of 392
S tronic transmission
The S tronic is a dual-clutch transmiss ion. Power
is transferred using two clutches that work inde
pendently from one another. They replace the
torque converter used in conventional automatic
transmissions and allow the vehicle to accelerate
without a noticeable interruption in traction.
tiptron ic transmission
In the tiptronic transmission, power is transfer
red by a torque converter.
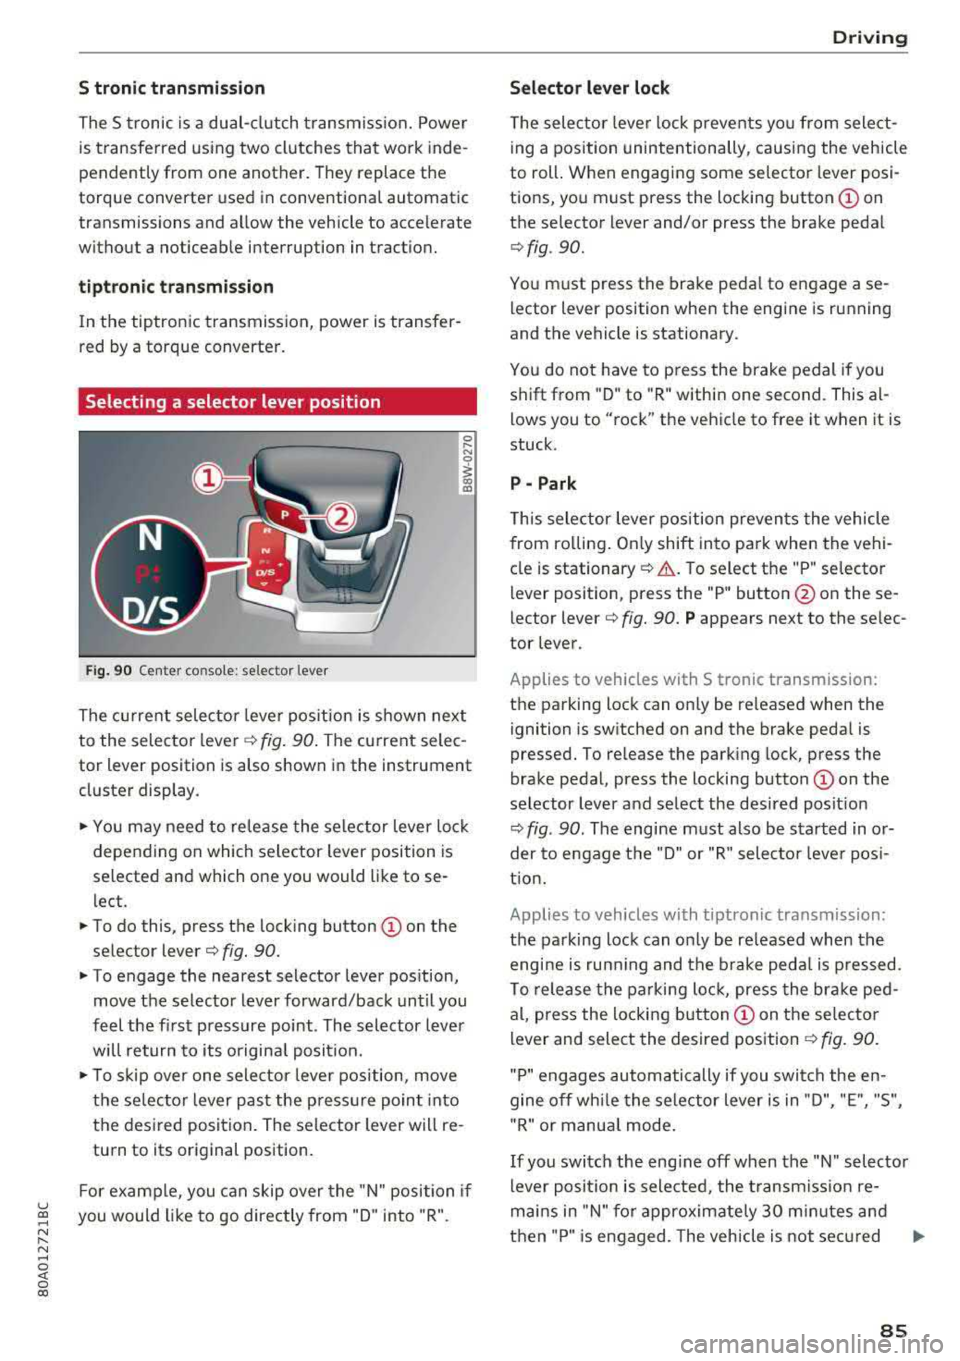
Selecting a selector lever position
Fig. 90 Center co nso le: selector lever
0 ,.... N
0
1 a,
The current selector lever position is shown next
to the selector
l ever ¢ fig. 90. The current selec
tor lever position is also shown in the instrument
cluster display .
... You may need to release the selector lever lock
depending on which selector lever position is
selected and which one you would like to se
l ect.
... To do this, press the locking button © on the
selector
lever¢ fig. 90.
... To engage the nearest selector lever position,
move the selector lever forward/back until you
feel the first pressure point . The selector lever
will return to its original posit ion.
.., To skip over one selector lever position, move
the selec tor lever past the pressure point into
the desired position . The selector lever will re
turn to its original position.
F or example, you can skip over the "N" position if
u ~ you would like to go directly from "D" into "R".
N ...... N ......
~ 0 co
Driving
Selector lever lock
The selector lever lock prevents you from select
ing a position unintentionally, causing the vehicle
to roll. When engaging some selector lever posi
tions, you must press the locking
button © on
the selector lever and/or press the brake pedal
¢ fig . 90.
You must press the brake pedal to engage a se
lector lever position when the engine is running
and the vehicle is stationary.
You do not have to p ress the brake pedal if you
shift from "D" to "R" within one second. This
al
lows you to "rock" the vehicle to free it when it is
stuck.
P - Park
This selector lever position prevents the vehicle
from ro lling . On ly shift into pa rk when the vehi
cle is
stationary ¢.&. . To select the "P" selector
lever position, press the "P" button @ on these
lector
lever¢ fig. 90. P appears next to the selec
tor lever.
Applies to vehicles with S t ronic transm ission:
the parking lock can only be re leased when the
ignition is switched on and the brake pedal is
pressed. To release the parking lock, press the
brake pedal, press the locking
button @ on the
selector lever and select the desired posit ion
¢ fig . 90. The engine must also be started in or
der to engage the "D" or "R" selector leve r pos i
tion.
Applies to vehicles with tiptronic transmission:
the parking lock can only be re leased when the
engi ne is ru nning and the brake pedal is pressed .
To release the parking lock, press the brake ped
al, press the locking
button @ on the selector
lever and select the desired position
¢ fig. 90.
"P " engages automatically if you switch the en
gine off whi le the selector lever is in "D", "E", "S",
" R" or manua l mode.
If you switch the eng ine off when the "N" selector
lever position is selected, the transmission re
mai ns in "N" for approximately 30 m inutes and
then "P" is engaged. The vehicle is not secured
..,
85
Page 91 of 392
u co ..... N ,..._
N ..... 0 <( 0 00
Launch control program
App lies to: ve hicles with S tro nic tra nsm issio n
The launch control program provides the best
possible acceleration when starting from a stop.
Requirement: the eng ine must be at operating
temperature and the steer ing whee l must not be
turned .
~ Deactivate the Start/Stop system* c:> page 80.
The LED in the 10~ ·1 button turns on.
~ With the engine runn ing, press the ~
l fl - O~FF =I but
ton briefly
c> page 141 . The Ill indicator light
tu rns o n and the message
Stabil ization control
( ESC ): offroad . Warning! Reduc ed stabilit y
ap
pears in the inst rumen t cluste r display.
~ Pull the selector lever back o ut of t he "D/S" po
s it ion briefly to select the "S " position or se lect
the
D ynamic driving mode in drive se -
lect* ¢ page 12 7.
~ Press the brake pedal firmly with your left foot
and hold it all the way down for at least one
second.
~ At the same t ime, press the gas pedal all the
way dow n with your right foot unt il the engi ne
reaches and stays at a h igh RPM level.
~ Remove yo ur foot from t he b rake pedal within
five seconds
c:> ,&. .
A WARNING
-Always adapt yo ur driving to the traffic flow.
- O nly use the La unch contro l prog ram when
road and traffic conditions allow it and ot h
er drivers wi ll not be endangered or both
ered by your driving and the vehicle's accel
eration.
- Please note that the drive whee ls can spin
and the vehicle can break away when off
road mode is switched on, espec ia lly when
the road is slippery.
- Once the vehicle has started moving, press the
I~ OF F! button briefly to turn the offroad
mode off .
(D Tips
-The transmiss ion temperature may increase
s ignificantly after using the launc h control
program. If that happens, the program may
Driving
not be ava ilab le for a few minutes. It will be
avai lab le agai n after a coo l-down period.
- Whe n accelerati ng usi ng the launch cont ro l
program, all vehicle parts are s ubject to
heavy loads. This can lead to increased
wear.
Transmission malfunction
• Tran smiss ion: too hot. Please stop vehicle
Do not continue driving. Se lect the "P" selector
l ever posit ion and contact an authorized A udi
dealer or authorized Audi Service Fac ility for as
s istance.
• Tran smiss ion: malfunction! Plea se stop ve
hicle and shift to P
Do not continue dr iv ing . Se lect t he "P" selec to r
l ever posit ion and contact an authori zed A udi
dealer or authorized Audi Service Facility for as
s istance.
[O] Selector lever : malfunction ! You can con tin
ue d riving. Please contact Se rvice
The re is a system malfu nction in t he transmis
s io n. Dr ive to an a uth orized Aud i de aler o r au
tho rized Aud i Serv ice Facili ty immedia tely to have
the mal function corrected.
[i'J P button : malfun ction! Auto P when engine
off . Pl ea se conta ct Servi ce
T here is a malfunct ion in the "P" button on the
selector lever . The transm ission automatically
engages "P " when you sw itch off t he engine.
D rive to an author ized A udi dealer or autho riz ed
Audi Se rvice Faci lity immed iate ly to have the
malfunction corrected.
[i'J Select or lever : malfun ction! Gear change on
l y pos sibl e using both paddl e le ver s. Plea se con
ta ct Service
T here is a system malfunction in the transmis
s io n. You can con tinue dr iv ing with restr icted
funct ion. The se lector lever is not wo rk ing . Gea rs
can on ly be selected by tapping bo th shift pad
dles at the same time when the vehicle is station
ary
c> page 88 , fig . 92 . Pay attention to these-
l ected transmission position in the instrument
.,.
89
Page 92 of 392
Driving
cluster display. The parking lock engages auto
matica lly when you turn off the engine. Drive to
an author ized Audi dealer or authorized Audi
Serv ice Facility immediately to have the malfunc
tion corrected .
[O] Transmission : Please p ress brake pedal and
select gear ag ain
Press the bra ke pedal and se lect the des ired se
lector lever position again. You can then continue
driving.
[il Tran smi ssion: too h ot. Please adapt driving
s tyle
The transm ission tempe rature has increased s ig
n ificant ly. Dr ive ve ry ca utiously or take a b reak
from dr iv ing unt il the tempera ture returns to the
normal range and the ind icator light turns off .
[O] Transmis sion : malfunction ! You can contin
ue driving . See owner' s manual
There is a system malfunct ion in the transm is
sion . You may continue dr iv ing . Drive to an au
thor ized A udi dealer or authorized Audi Service
F acility soon to have the malfunction co rrected.
[il T ransmission : malfunct ion! You can contin
ue dri ving in D until engine is off
There is a system malfunct ion in the transmis
sion . The transmission is switching to emergency
mode . If you tur n the engine off, you will not be
able to select any other selector lever pos it ions
after start ing the eng ine again . Drive to a n au
thor ized Audi dealer or author ized A udi Service
F a cility immediately to have the malfunc tion cor
rected.
[O] Tran smis sion: malfunction! You can contin
ue driving with limited function . Pl ea se conta ct
Service
There is a system malfunct ion i n the transm is
sion . The transmission is switching to emergency
mode. This mode only shifts into certa in gea rs o r
w ill no longer shift at all. The engine may stall.
Dr ive to an a utho rized Aud i dea ler or a uthorized
Audi Serv ice Facility immediately to have the
malfunction corrected .
90
[il Transmis sion: malfunction! You can contin
ue dri ving with limited fun ction. No reve rse
gear
There is a system malfunction in the tra nsmis
s ion . The transmission is switch ing to emergency
mode. This mode only s hifts into certain gears or
will no longer shift at a ll. The eng ine may sta ll.
You cannot engage the reverse gear. Drive to an
authori zed Audi dealer or authori zed Audi Service
Facility immediately to have the ma lfunction cor
rected .
[il Danger of rolling away! P not poss ible.
Plea se apply park ing bra ke
- The parking lock was re leased using the emer
gency re lease
c::> page 90 . Or
- The parking lock can no longer be engaged .
Dr ive to an authorized Audi dealer or author
ized Aud i Service Facility immed iately to have
the malfunction corrected.
[il Mo ve selector le ver to automatic position
There is a ma lf u nction in the tiptron ic mode. End
tiptroni c mode by pus hing the se lec tor lever to
the left into the "D/S " position .
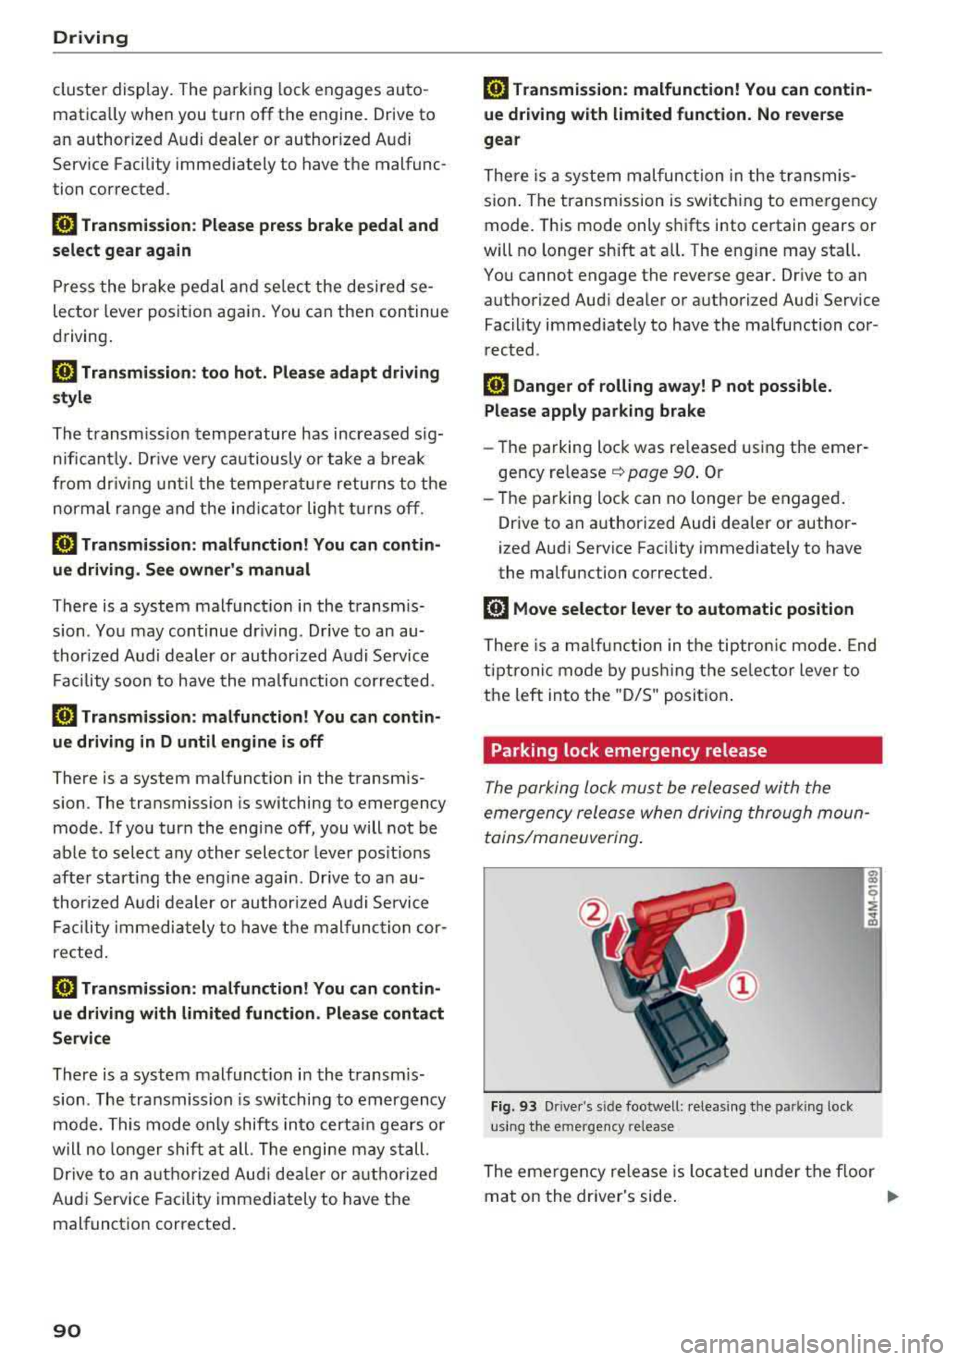
Parking lock emergency release
The parking lock must be released with the
emergency release when driving through moun
tains/maneuvering .
Fig. 93 Drive r's s ide footwell : relea sin g the parkin g lock
us ing the e mergency release
The emergen cy release is located under the f loor
mat on the dr iver's side .
.,.
Page 96 of 392
Trail er to wing
- Set the a ir suspension to the standard vehi
cle height, otherwise the applicab le tongue
weight no longer applies to your vehicle.
(D Tips
- Use chocks when parking on incl ines if the
trailer is loaded .
- We recommend also having the vehicle in
spected between the inspection intervals if
you are towing a trai ler frequent ly .
- Avo id driving with a trailer d uring the vehi
cle break-in period .
Driving with a trailer
Driving with a trailer requires extra caution .
Speed
Adhere to the legal speed limits. Follow the legal
regulat ions spec ific to the country.
As the speed increases, the driving stability of
the trailer decreases . Therefore you should not
exceed the maximum legal speed l imit whe n
there a re unfavorabl e road, weathe r and/or wind
conditions. This especially appl ies when dr iv ing
downhill.
You must always reduce you r speed as soon as
you not ice even the s lightest sw inging motion of
the t railer. Neve r try to "straighte n ou t" the t rail
e r by accelera ting.
The weight distribution is very poor if t he veh icle
is empty and the t railer is loaded . H oweve r if you
m ust dr ive under these c ircumstances, t hen d rive
espec ially slowly.
Brakes
Brake in a t imely manner . Downshift before driv
i n g downhill so that the engine can assist w ith
b raking
¢ ,&. .
When us ing a tra iler with overrun brakes, first
brake gently then qu ickly . This reduces the risk of
je rk ing w hile brak ing if the tra ile r w heels lock up .
Engine coolant temperature
Pay attention specif ica lly to the coolant tempera
ture display when there are h igh outside tempe r
atures, and when dr iv ing o n long inclines
94
¢ page 11. Shift to a higher gear in a timely man
ner .
A WARNING
Constant braking causes the brakes to over
heat and substantially reduces braking per
formance, increases braking distance or caus
es complete failure of the brake system.
-