display AUDI Q5 2018 Repair Manual
[x] Cancel search | Manufacturer: AUDI, Model Year: 2018, Model line: Q5, Model: AUDI Q5 2018Pages: 392, PDF Size: 60.56 MB
Page 140 of 392
Parking aid
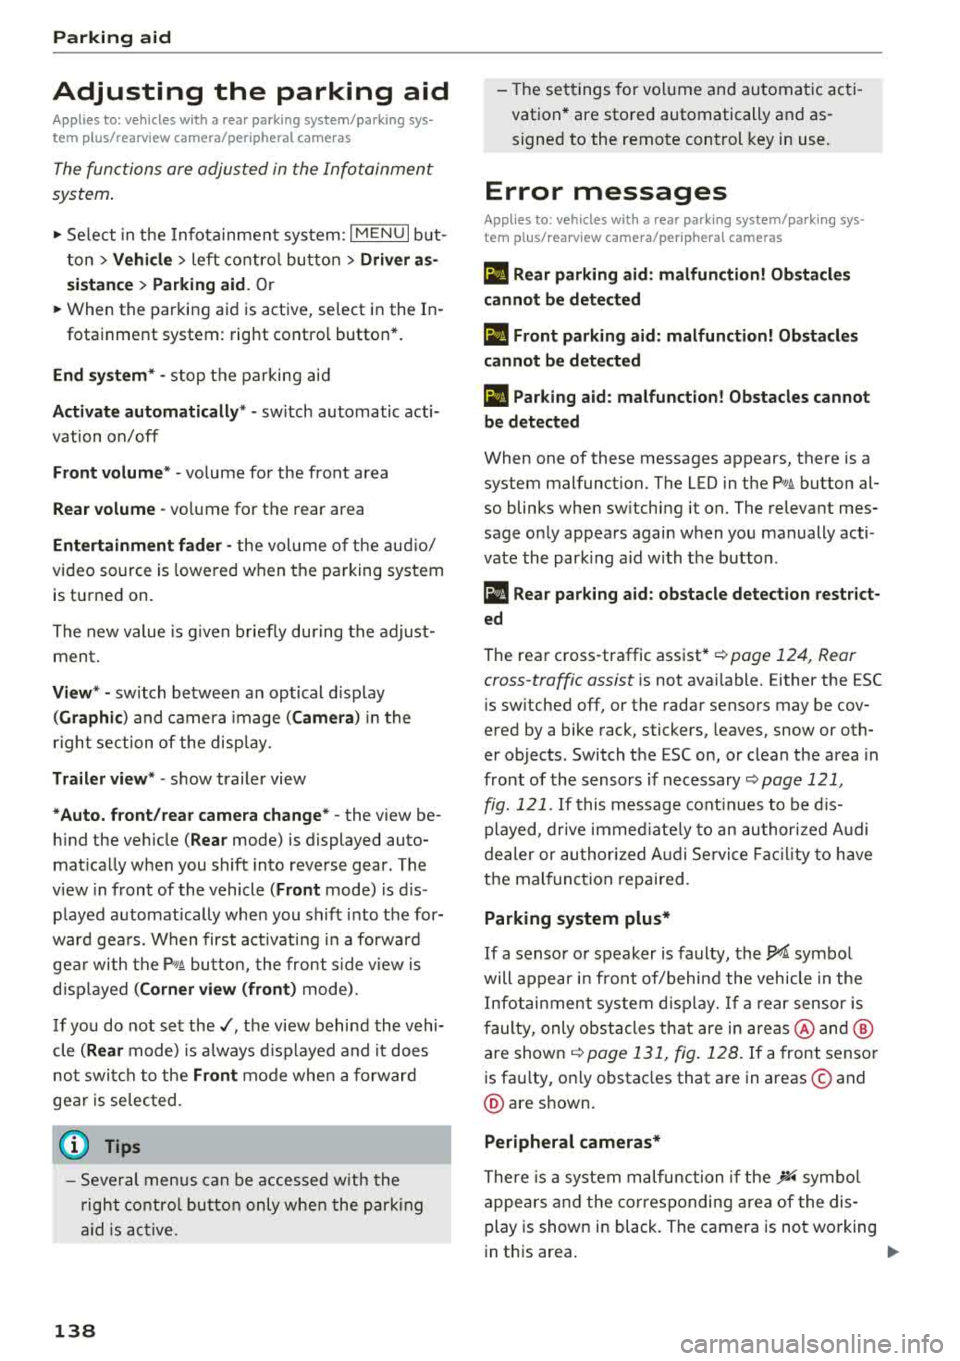
Adjusting the parking aid
Applies to: vehicles with a rear parking system/parking sys
tem plus/rearview camera/peripheral cameras
The functions are adjusted in the Infotainment
system .
.,. Select in the Infota in m ent system: IMENU I but
t on
> Vehicle > left co ntro l bu tton > Driver a s
sistance > Parking aid .
Or
.,. When the par kin g aid is active, se lect in the In -
fotainment system : rig ht contro l butto n*.
End sy stem * -stop t he pa rking aid
Activate automatically * -switch automatic acti
vation on/off
Front volume * -volume for the front area
Rear volume -vo lume for t he rear area
Entertainment fader -the vol ume o f th e aud io/
video so urce is lowered when t he parking system
is turned on.
T he new value is g iven b riefly du ring the a djus t
men t.
View * -sw itch betwee n an optical d isplay
( Graphic ) and camera image ( Camera ) in the
r ight section of the disp lay.
Trail er view * -show trailer view
*Auto. front /rear came ra change* -the view be
h ind the veh icle
( Rear mode) is displayed auto
mat ica lly w hen you shift into reverse gear. The
v iew in front of the vehicle
( Front mode) is d is
p layed automat ically whe n you sh ift into the for
ward gea rs. When first activat ing in a forward
gea r with t he
P,,1~ bu tto n, the front s ide v iew is
d isp layed
(Corner view (front) mode).
If you do not set
the./, t h e view behind the vehi
cle
( Rear mode) is a lways d isp layed and it does
no t swi tch to the
Front mode whe n a forwar d
ge ar is se lec ted .
(0 Tips
-Seve ral menus can be accessed w ith the
r ight contr ol butt on o nly w hen the p ark ing
a id is active.
138
- The set tings for vo lume and automa tic ac ti
vation * are stored automatically and as
signe d to the remote control key in use.
Error messages
Applies to: vehicles with a rear parking system/parking sys
tem plus/rearview camera/peripheral cameras
Ill Rear parking aid: malfunction! Ob stacl es
cannot be detected
Ill Front parking aid: malfunction! Obstacles
cannot be detect ed
Ill Parking aid : malfunct ion! Obstacles cannot
be detected
When one of these messages appears, there is a
system malfunction. The LED in t he
Pw, button al
so blinks whe n sw itchi ng it on. The releva nt mes
sage o nly appears again w hen you manually acti
vate the par king a id wi th t he b utton .
[ii Rear parking aid : obstacle detection restrict
ed
The rea r cross-traffic ass ist* c:!;> page 124, Rear
cross-traffic assist is no t ava ilable. Either the ESC
is sw itched off, or the radar sensors may be cov
ered by a bike rack, stickers, leaves, snow or oth
er objects . Switch t he ESC on , or clean the area in
front of the sensors if necessary
c:!;> page 121,
fig. 121 .
If this message cont inues to be d is
played, drive immed iate ly to an author ized A udi
de aler or au thor ized A udi Servi ce Facili ty to h ave
t h e mal funct ion repai red .
Parking system plus*
If a senso r or speaker is faulty, the.!¼ symbo l
will appear i n fro nt of/behind the vehicle in the
I nfotai nment syste m disp lay. If a rear sensor is
f aulty, only obs tacles th at are in areas @ and @
a re show n
<:!;>page 131, fig . 128 . If a front senso r
i s fa ulty, o nly obstacles that a re in a reas © and
@ are s hown.
Peripheral cameras*
There is a system malfunction if t he % symbo l
appe ars and the co rresponding area of the dis
play is shown in black . The camera is not wo rking
i n th is area.
...
Page 141 of 392
u co ..... N ,..._
N ..... 0 <( 0 00
Drive to an authorized Audi dealer or authorized
Audi Service Facility immediately to have the
malfunct ion corrected.
Trailer hitch
Applies to: vehicles with a rear parking system/parking sys
tem plus/ rearv iew camera/peripheral cameras and trailer
hitc h
When the tra iler socket is in use, the parking sys
tem rear sensors are not activated when you shift into reverse gear or when you press the
Pw~ but
ton. This results i n the following restrictions.
Rear parking system*
There is no distance warning.
Parking system plus*
There is no distance warning for the rear. The
front sensors remain activated . The visual display
switches to trai ler mode.
Rearview camera* /peripheral cameras*
There is no distance warning for the rear. The
front sensors remain activated. The visual display
switches to trai ler mode. The rearview camera
image will not show the orientation lines and the
b lue surfaces.
@ Tips
Trailer hitches that are not installed at the
factory may cause the parking system to ma l
function or they may restrict its function.
Parking aid
139
Page 150 of 392
Multi Media Interface
MMI On/Off knob with
joystick function
Operating
Fig.149 MMI On/Off knob wi th joystick functio n
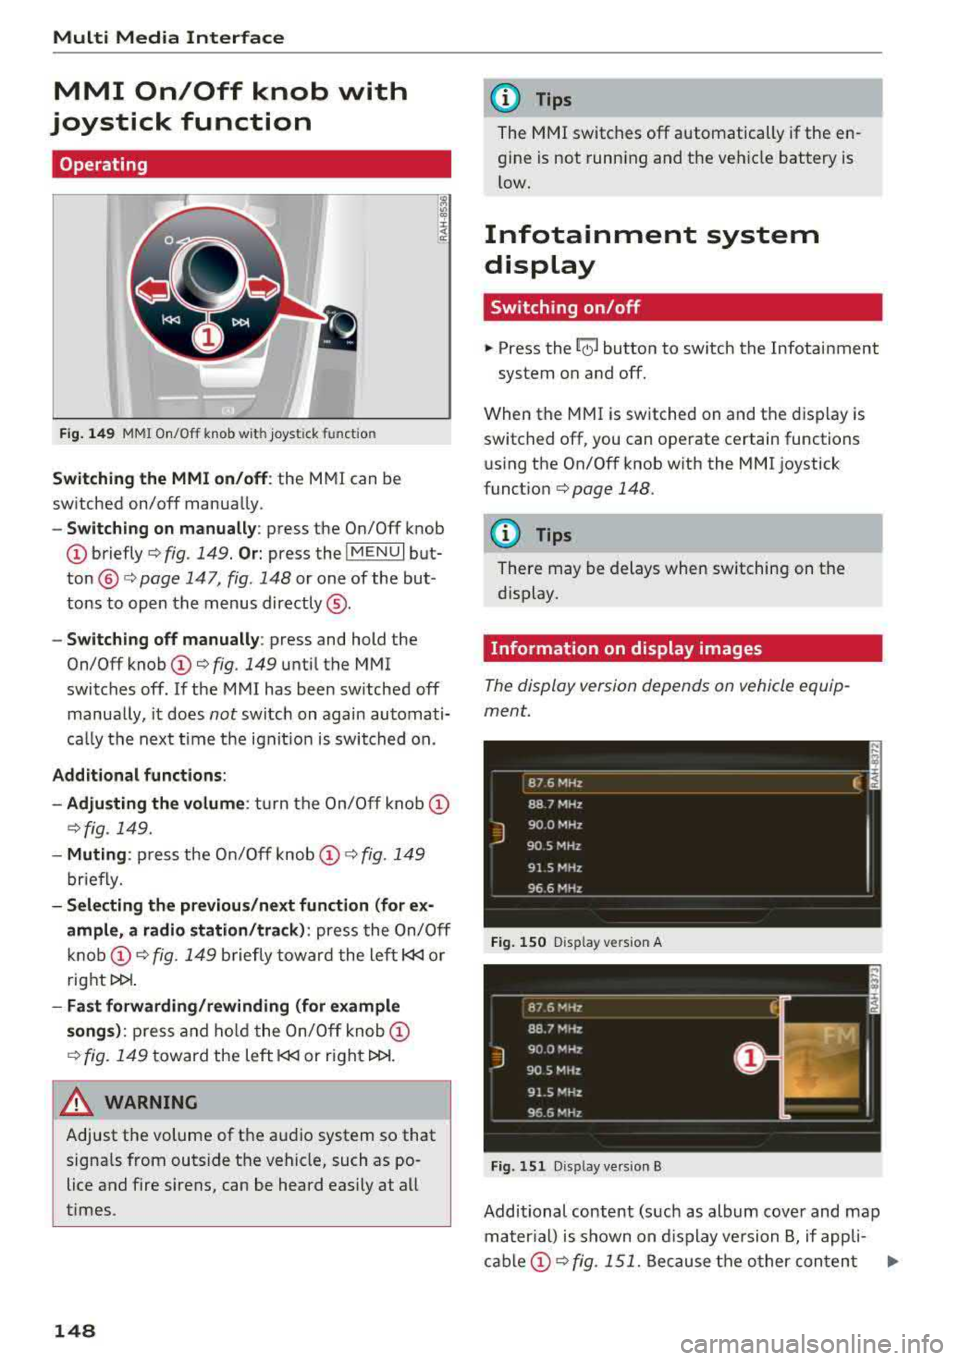
Switching the MMI on/off: the MMI can be
switched on/off manually .
-Switching on manually : press the On/Off knob
@briefly c:> fig. 149. Or: press the IMENUI but
ton @ c:> page 147, fig. 148 or one of the but
tons to open the menus directly ®·
-Switching off manually: press and hold the
On/Off knob
(D c:> fig. 149 until the MMI
switches off. If the MMI has been switched off
manually, it does
not switch on again automati
ca lly the next time the ignit ion is switched on.
Additional functions:
- Adju sting the volume :
turn the On/Off knob (D
c:>fig. 149.
-Muting : press the On/Off knob (D c:> fig. 149
briefly.
- Selecting the previous /next function (for ex
ample, a radio station/track):
press the On/Off
knob
(D c:> fig . 149 briefly toward the left l
t>l>I .
-Fast forwarding/rewinding (for example
songs): press and hold the On/Off knob (D
c:> fig. 149 toward the left l
.&_ WARNING
Adjust the volume of the audio system so that
signals from outside the vehicle, such as po
lice and fire sirens, can be heard easily at all
times.
148
@ Tips
The MMI switches off automatically if the en
gine is not running and the vehicle battery is
low.
Infotainment system
display
Switching on/off
.. Press the~ button to switch the Infotainment
system on and off.
When the MMI is switched on and the display is
switched off, you can operate certain functions using the On/Off knob with the MMI joystick
funct ion
c:> page 148 .
{!) Tips
There may be delays when switching on the
display.
Information on display images
The display version depends on vehicle equip
ment.
_ 8_ 7_ 6
_ M_H _z ____________ ____ f. ;
88 7 MHz
J
900 MHz
90.5 MHz
91 5 MHz
96 6 MHz - -------------
Fig. 150 D isp lay vers ion A
Fig. 151 D isp lay vers ion B
Additional content (such as album cover and map
mater ial) is shown on display version B, if appli-
cable
(D c:> fig . 151. Because the other content Ill-
Page 151 of 392
u co ..... N r-N .....
~ 0 co
shown on the displays is nearly identical between
the two versions, this manual will primarily de
scr ibe display version A .
MMI operation
Selecting and confirming a function
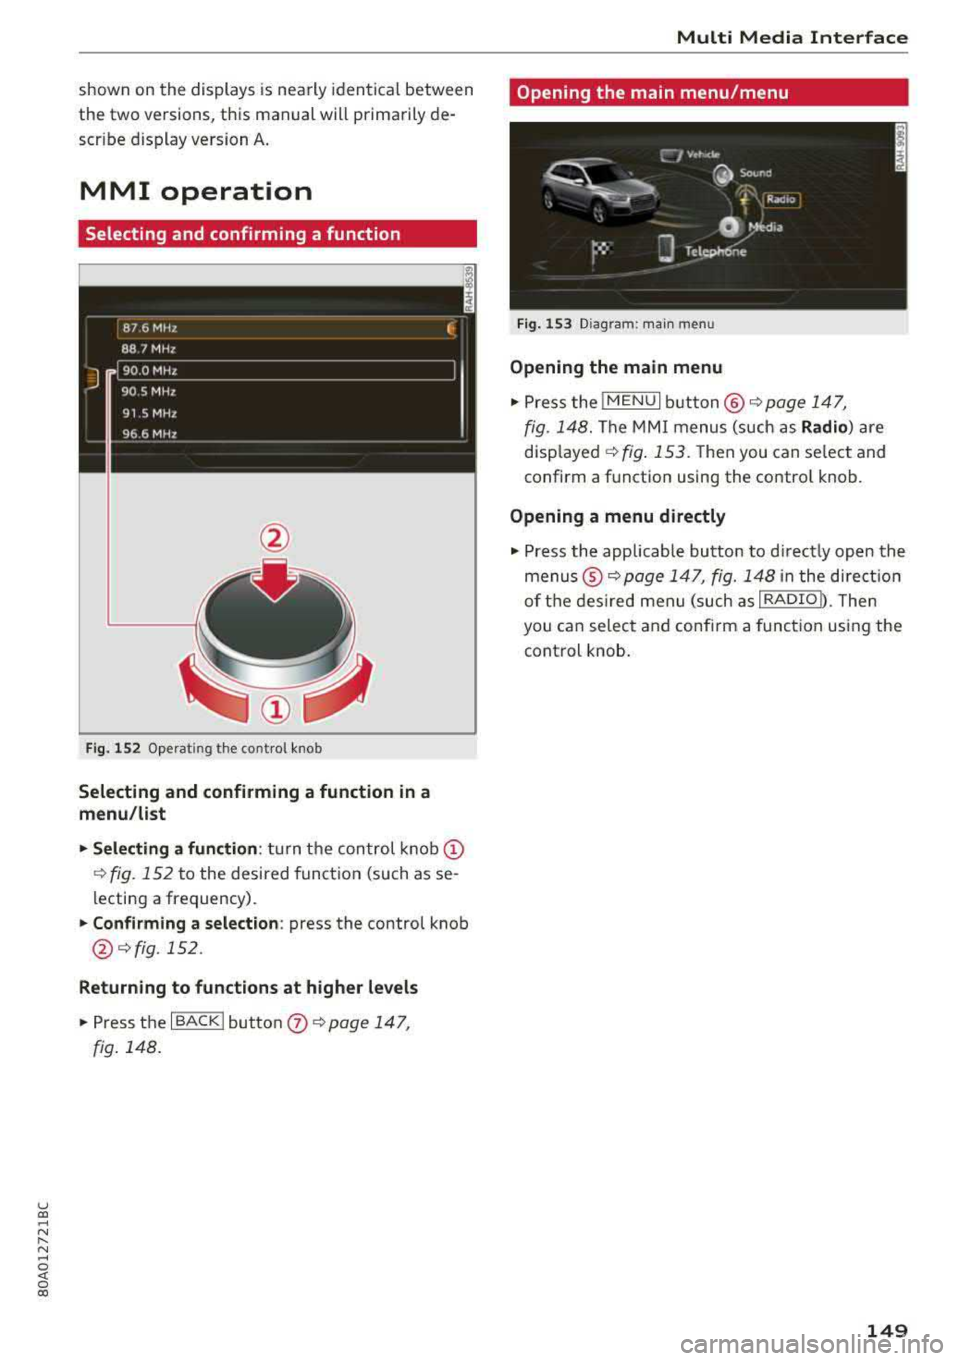
Fig. 152 Operating the contro l knob
Selecting and confirming a function in a
menu /list
"'Selecting a function : turn the control knob (D
¢fig. 152 to the desired function (such as se
lecting a frequency) .
"'Confirming a selection: press the control knob
@¢fig, 152.
Returning to functions at higher levels
"'Press the I BACK I button 0 ¢ page 147,
fig. 148.
Multi Media Inte rface
Opening the main menu/menu
Fig. 153 Diag ram: main menu
Opening the main menu
"'Press the lMENUI button @ ¢page 147,
fig . 148. The MMI menus (such as Radio) are
disp layed
¢ fig. 153. Then you can select and
confirm a function using the contro l knob.
Opening a menu directly
"' Press the applicable button to d irectly open the
menus ®
¢page 147, fig. 148 in the direct ion
of the desired menu (such as
I RADIO b. Then
you can select and confirm a function using the
control knob.
149
Page 152 of 392
Multi Media Interfac e
Opening the selection menu/options menu
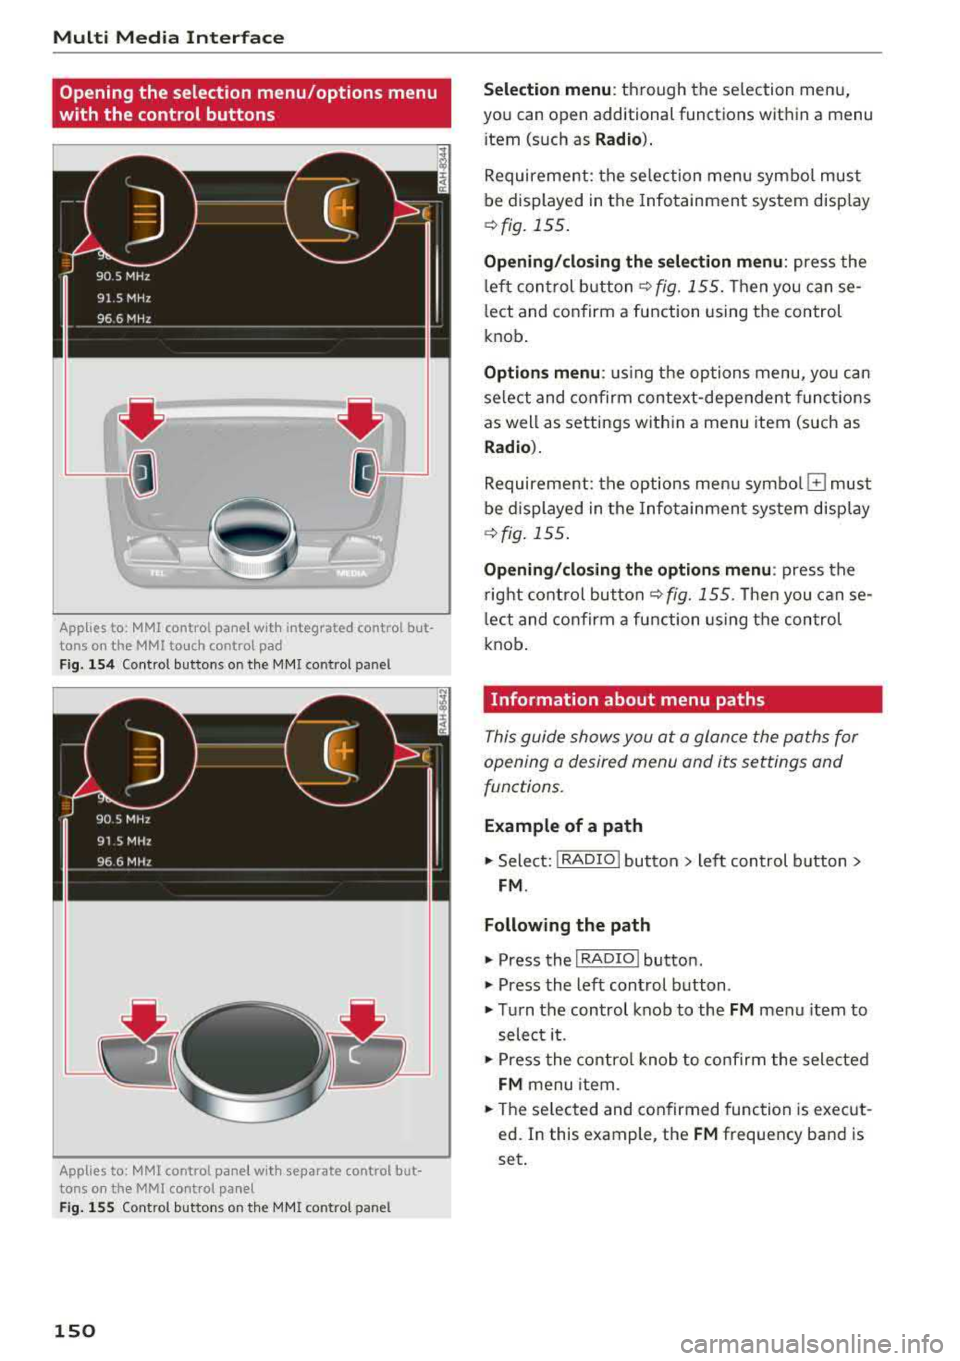
with the control buttons
Applies to: MMI control panel with integrated control but
tons on the MMI to uch control pad
F ig. 154 Control buttons o n the MMI co ntrol panel
Applies to: MMI control pane l with separate control but
tons on the MMI control panel
Fig . 155 Contro l but tons o n the MMI co ntrol pan el
150
Se lection menu : through the se lection menu,
you can open additional functions wit hin a menu
i tem (such as
R ad io ).
Requirement: the se lection menu symbol must
be displayed in the Infotainment system disp lay
<9 fig. 155 .
Opening /clo sing the selection m enu : press the
l eft control b utton ¢
fig. 155. Then you can se
lect and confirm a function using the control
knob .
Options menu : using the options menu, yo u can
select and confirm context-dependent funct ions
as well as settings within a menu item (such as
Rad io).
Requirement: the options menu symbo l G must
be displayed in the Info tainment sys tem display
¢ fig. 155 .
Opening/clo sing th e opti ons menu : press the
r ight control but ton
¢ fig. 155. Then you can se
l ect and confirm a function using the control
knob .
Information about menu paths
This guide shows you at a glance the paths for
opening a desired menu and its settings and
functions.
E xample of a path
11> Select: I RADIO I button > left control b utton >
FM .
Following the path
" Press the I RADIO I button.
" Press the left control button .
"Turn the control knob to the FM menu item to
select it .
"Press the contro l knob to confirm the selected
FM menu item .
"The se lected and confirmed func tion is execut
ed. In this example , the
FM frequency band is
set .
Page 153 of 392
u co ..... N r-N .....
~ 0 co
MMI touch
MMI touch control pad
Applies to: vehicles with MMI touch
You can enter data using handwriting recogni
tion on the MMI touch control pad.
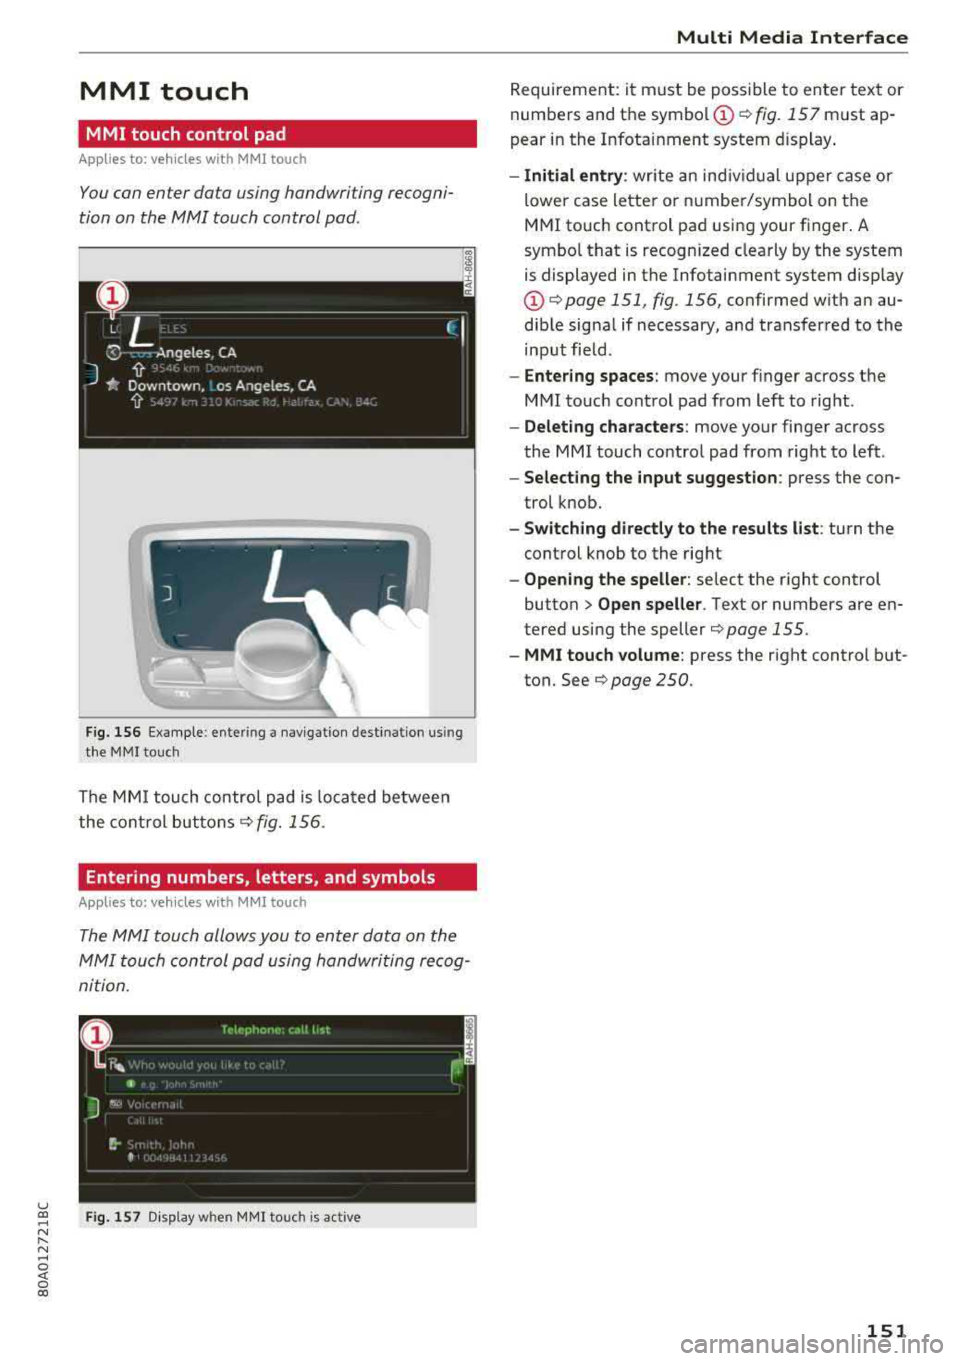
F ig . 1 56 Examp le : enter ing a nav igation dest ination us in g
t h e MMI touc h
The MMI touch control pad is loca ted be twee n
the cont ro l
buttons¢ fig. 156 .
Entering numbers, letters, and symbols
Applies to: veh icles with MMI touch
The MMI touch allo ws you to enter data on the
MMI touch con trol pad using handwriting rec og
ni tion .
Fig . 15 7 Disp lay w hen MMI touc h is act ive
Multi Media Inte rface
Requirement: it must be poss ible to enter text or
numbers and the
symbol (!) q fig. 157 must ap
pear in the Infotainment system d isplay .
-Initial entry : write an ind iv idual upper case or
lower case letter or n umbe r/symbol on the
MMI touch cont rol pad using your finger . A
symbo l that is recogn ized clearly by the system
is displayed in the Infotainment system disp lay
(D q page 151 , fig. 156, confirmed w ith an au
dib le sig na l if necessary, and transferred to the
input field.
- Enter ing spaces : move your finger across the
M MI touch control pad from left to right .
-Delet ing characters : move your finger across
the MMI touch contro l pad from right to left .
-Select ing the input suggestion : press the con
trol k nob.
- Switching directly to the results list : turn the
control knob to the rig ht
- Opening the speller : select the right control
button>
Open speller . Text or numbers are en
tered using the
speller¢ page 155.
- MMI touch volume : press the right control b ut
ton. See
¢ page 250 .
151
Page 155 of 392
u co ..... N r-N .....
~ 0 co
Zooming in/out on the map
Applies to: vehicles with automatic transmission and MMI
touch
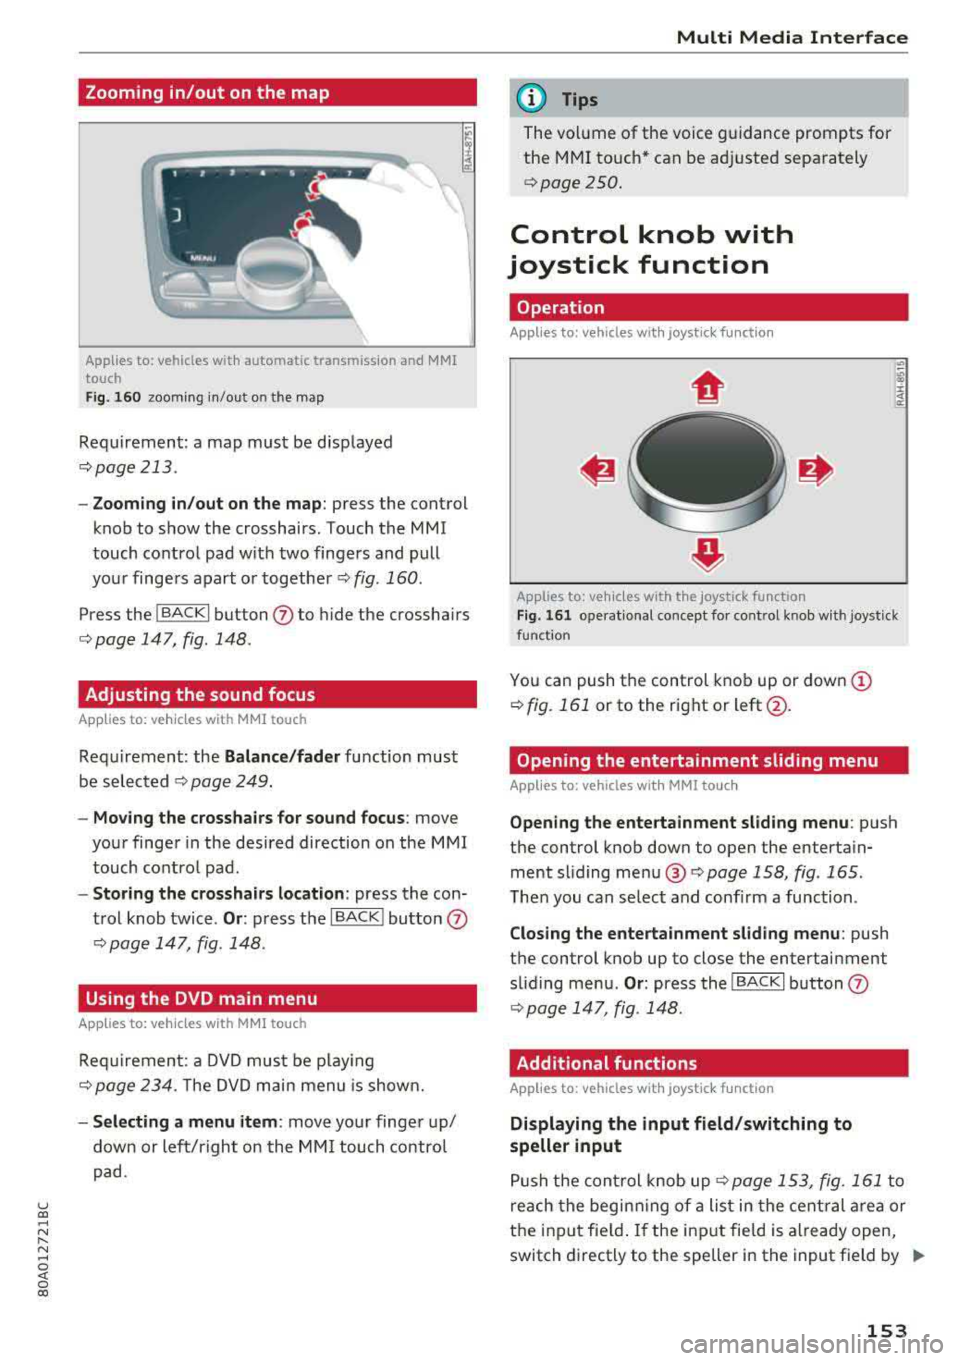
Fig. 16 0 zooming in/out on the map
Requirement: a map must be disp layed
¢page 213.
- Zooming in/out on the map : press the control
knob to show the crosshairs. Touch the MMI
touch contro l pad w it h two finge rs and pull
your finge rs apart o r
together¢ fig. 160.
Press the !BACKI button (J) to hide the crossha irs
¢ page 147 , fig. 148.
Adjusting the sound focus
App lies to: veh icles with MMI touch
Requirement: the Balance/fader fu nction must
b e selected
¢ pag e 24 9.
- Mo ving the crosshairs for sound focus : move
your finge r in the desired direction on the M MI
touch co ntro l pad.
- Storing the crosshairs location : press the con
trol knob twice.
Or : press the I BACK ! button (J)
¢ page 147, fig. 148.
Using the DVD main menu
Applies to: vehicles with MMI touch
R equi remen t: a D VD mus t be pl ay ing
¢ page 234. T he DVD m ain menu is show n.
- Selecting a menu item : move yo ur finger up/
down or le ft/right on th e MM I touch contro l
p ad.
Multi Media Inte rface
(D Tips
The vol ume of the voice guidance prompts for
the M MI to uch * can be a djusted sepa rately
¢ page 250.
Control knob with
joystick function
Operation
Applies to: vehicles with joystick function
Applies to: vehicles w ith the joystick function
Fi g. 16 1 operat ional concept for control kno b w ith joystick
function
Yo u can push the control kno b up or dow n (D
¢ fig. 161 or to the rig ht or left@.
Opening the entertainment sliding menu
Applies to: vehicles with MMI touch
Opening the ente rtainment sliding menu : push
the control knob down to open the enterta in
ment sli ding me nu®
¢page 158, fig . 165.
The n you can se lect and con firm a func tion.
Closing the entertainment sliding menu : push
t h e control knob up to close the entertainment
s lid ing me nu.
Or : press the IBACK I button (J)
¢ page 147, fig . 148.
Additional functions
Applies to: vehicles with joystick function
Displaying the input field/switching to
speller input
P ush the con trol knob up¢ page 153, fig. 16 1 to
r e ach the begin ning of a list in the cent ral area or
t h e inpu t field. If the in put fie ld is a lready open,
switch d irectly to the speller in the input field by
..,.
153
Page 156 of 392
Multi Media Interfac e
pushing the control knob up again i=:>page 155,
Letter/number speller.
On the map
Requiremen t: a map must be disp layed
i=:>page 213 .
-Di spla ying the input field : push the control
knob up .
-Di spla ying rout e guidan ce : when route guid
ance is active, you can also display the route
guidance by pushing the contro l knob up
i=:> page 208, fig . 187.
- Zoomi ng in /out on the map (zoom): tur n the
contro l knob to the right/ left to zoom in/out on
the map .
Applies to : vehicles without MMI touch with joyst ick function
- Sho win g/h id ing the cros shairs : press the con
trol knob . The crosshairs are shown on the
map. Press the
I BACK I button to hide the cross
hairs.
- Mo ving the cro ssha ir s: when the crosshairs are
vis ible, turn the control knob in the d irection
the crossha irs shou ld move. Press the control
knob and ho ld it unti l the crossha irs are in the
desired poi nt on the map .
-Add itional options on t he map : see
i=:>page 214
Adjusting the sound focus
Applies to: vehicles without MMI touch with joystick function
Requirement: the balance/fader function must
be selected
c> page 249.
- Mo ving the sound fo cus using th e crosshair s:
the crosshairs can be moved hori zontally. Turn
the control knob to the left o r to the r ight.
Press the control knob to move the crosshairs
vertically . Turn the control knob to the left or
to the right . Press the control knob aga in to
save the setting .
Using the DVD main menu
Requirement: a DVD must be p lay ing
i=:> page 234 . The DVD main menu is shown .
-Sele cting a menu item : move the control knob
with joystick funct ion up or down or to the left
or right.
- Confi rming a selection : press the control knob.
154
Opening the selection/options menu with
the control knob
Applies to: vehicles with joystick function
Applies to: MMI control panel with control knob and joy
stick function
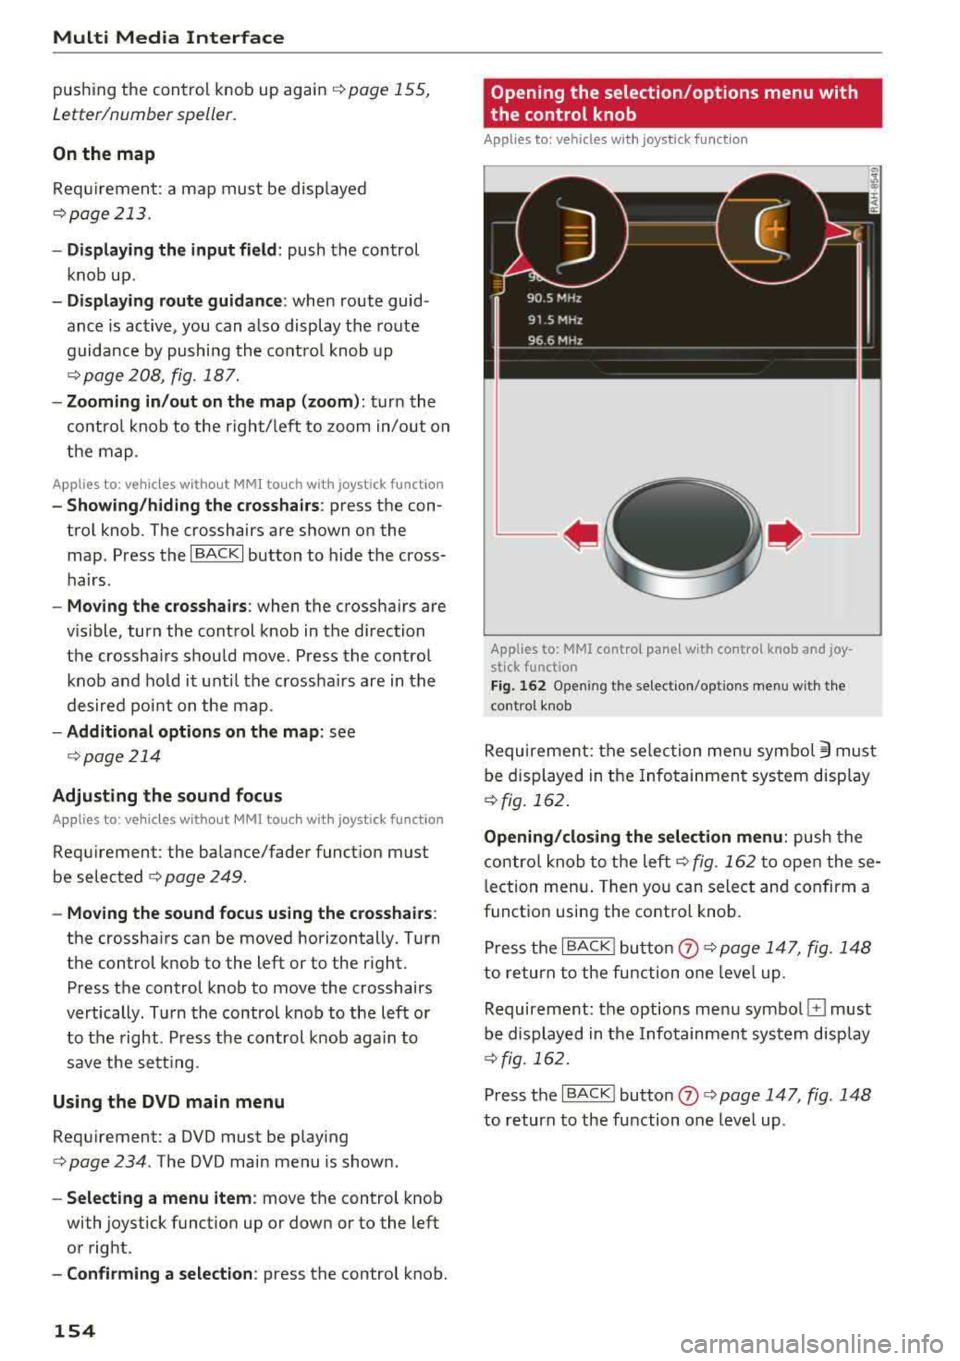
Fig. 162 Ope ning the se lec tion/opt ions menu w it h t he
contro l kn ob
Requirement : the se lection menu symbo l 3 must
be displayed in the Infotainment system display
¢ fig. 162 .
Opening /cl os ing the se lection menu : push the
contro l knob to the left
i=:> fig. 162 to open these
l ection menu . Then you can select and confirm a
function using the control knob.
Press the
I BACK I button (J) c> page 147, fig . 148
to return to the function one leve l up .
Requirement: the options menu symbo l
El must
be displayed in the Infotainment system display
i=:> fig. 162.
Press the I BACK I button 0 c> page 147, fig . 148
to return to the function one leve l up .
Page 157 of 392
Shortcut keys
Frequently used radio stations can be stored on the s hortcut keys.
T he sho rtc ut key s are located on the M MI control
panel ®¢ page 147, fig. 148 .
Storing radio stations : tur n t he control kno b to
the desired rad io station in a list ( for example, a
radio station in the FM station list). Press and
h o ld the desired shortcut key for several seconds.
The active radio station will be stored on t he
shortcut key.
Accessing a radio station: press the shortcut key .
Letter/number speller
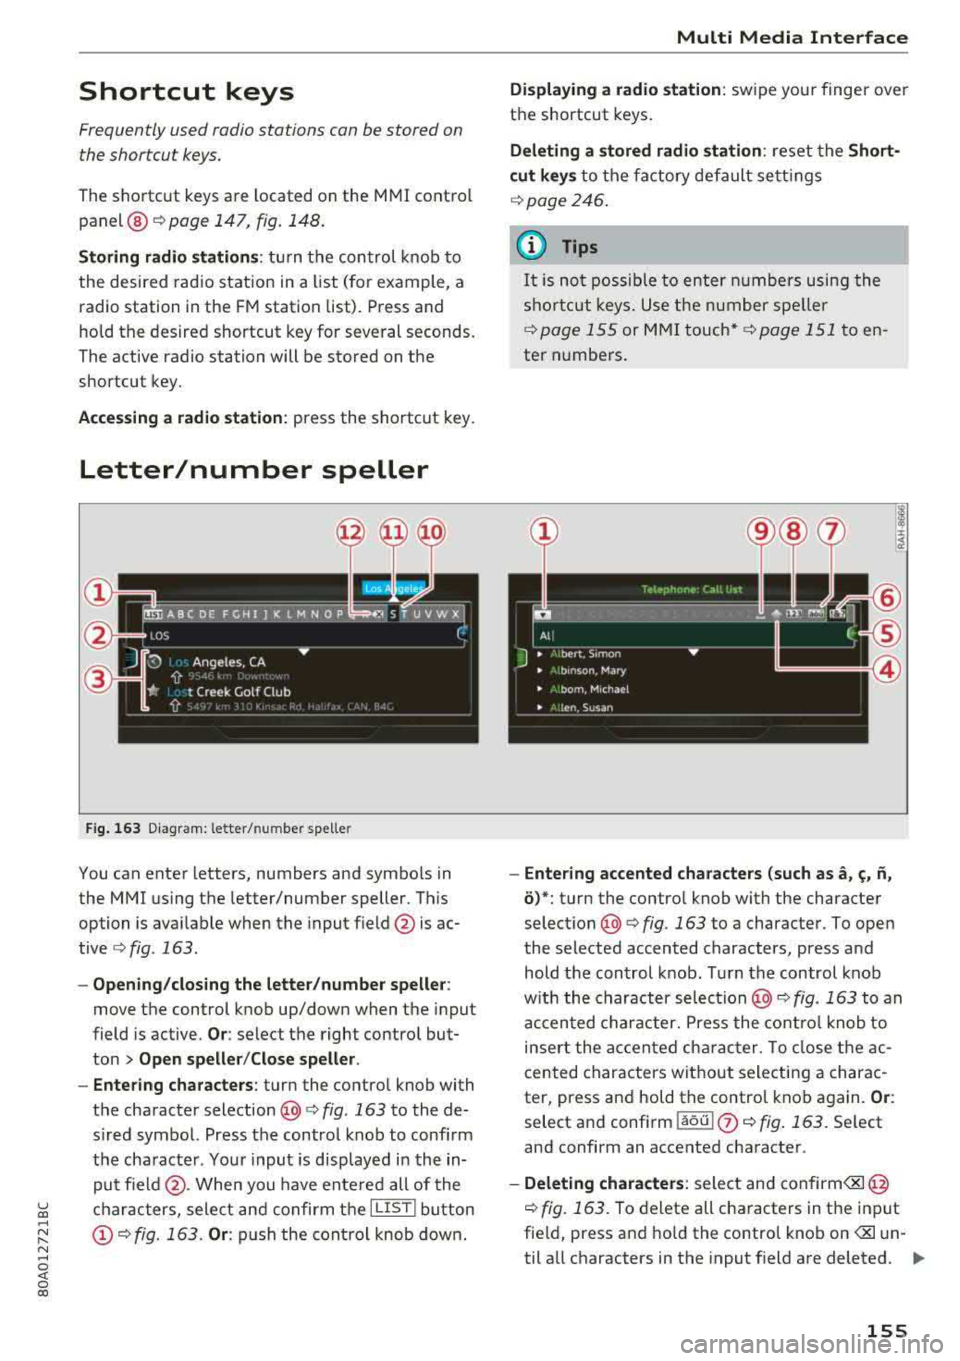
Fig. 163 D iagram: lette r/ n um be r spe ller
You can enter letters, numbers and symbo ls in
the MMI using the letter/number speller. This
option is ava ilab le when the input f ield @is ac
tive
¢ fig . 163.
-Opening /clos ing the letter /number speller :
move the control knob up/down when t he in put
field is active.
O r: select the right contro l but
ton
> Open speller /Close speller .
-Entering characters : turn the control knob with
t h e character selection
@ ¢fig . 163 to the de
s ir ed symbo l. Press the control knob to confirm
t h e cha racter . You r input is disp layed i n the in
pu t field @. When you have en te re d all of the
~ ch aracters, sele ct an d confirm t he I L IST I button .....
~ © c::> fig. 163 . Or: push the con trol knob dow n.
N .....
~ 0 co
Multi Media Inte rface
Displaying a radio station : swipe you r finger ove r
t h e shortcut keys .
Deleting a stored radio station : reset the Short
cut keys
to the fa ctory default se tt ings
¢ page 246 .
{l) Tips
It
i s no t pos sible to en ter num bers u sing the
s hor tc u t k eys . Use the number spe ller
¢ page 155 or MMI touch* ¢page 151 to e n
ter n umbe rs .
-Entering accented characters (such as a, ~. n,
o) *: tu rn the contro l knob with the character
select io n @ c::>fig . 163 to a character. To open
the selected accented characters, press and hold the con trol knob. Tu rn the control knob
w ith the character selec tion
@ c::> fig. 163 to an
ac cen ted charac ter. Press the cont ro l knob to
inser t the a ccen ted ch ara cter. To close t he ac
c ented characters wit hout select ing a charac
ter, press an d hold the contro l knob again.
Or :
select a nd confi rm !aou I 0 c::> fig . 163. Se lect
and confirm an accented cha racter .
-Deleting chara cters : select an d confirm
fie ld, press and hold the control knob on
...,
155
Page 158 of 392
Multi Media Interface
- Entering special characters:
select and con
firm
l !&? I@ q fig. 163 or l123 I@ . Select and
confirm the desired spec ial character (for ex
amp le, a hyphen or period) with the number
speller.
- Input assistance: in some cases such as in navi
gation*, there is a word suggestion* @
<=>fig. 163 based on available entr ies while you
are enter ing data. You can select th is sugges
tion by pushing the control knob upward.
-Results list : in some cases, such as in the direc
tory, the system switches automat ically to the
results list based on ava ilab le entr ies @
Symbol/Description Description
<=> fig. 163. Select and confirm a suggestion
from the list .
Requireme nt: the input
field @qfig. 163 must
be active.
- Switching between speller and MMI touch* :
the handwriting recognition for the MMI touch
control pad* is activated automatically . Simply
start wr it in g.
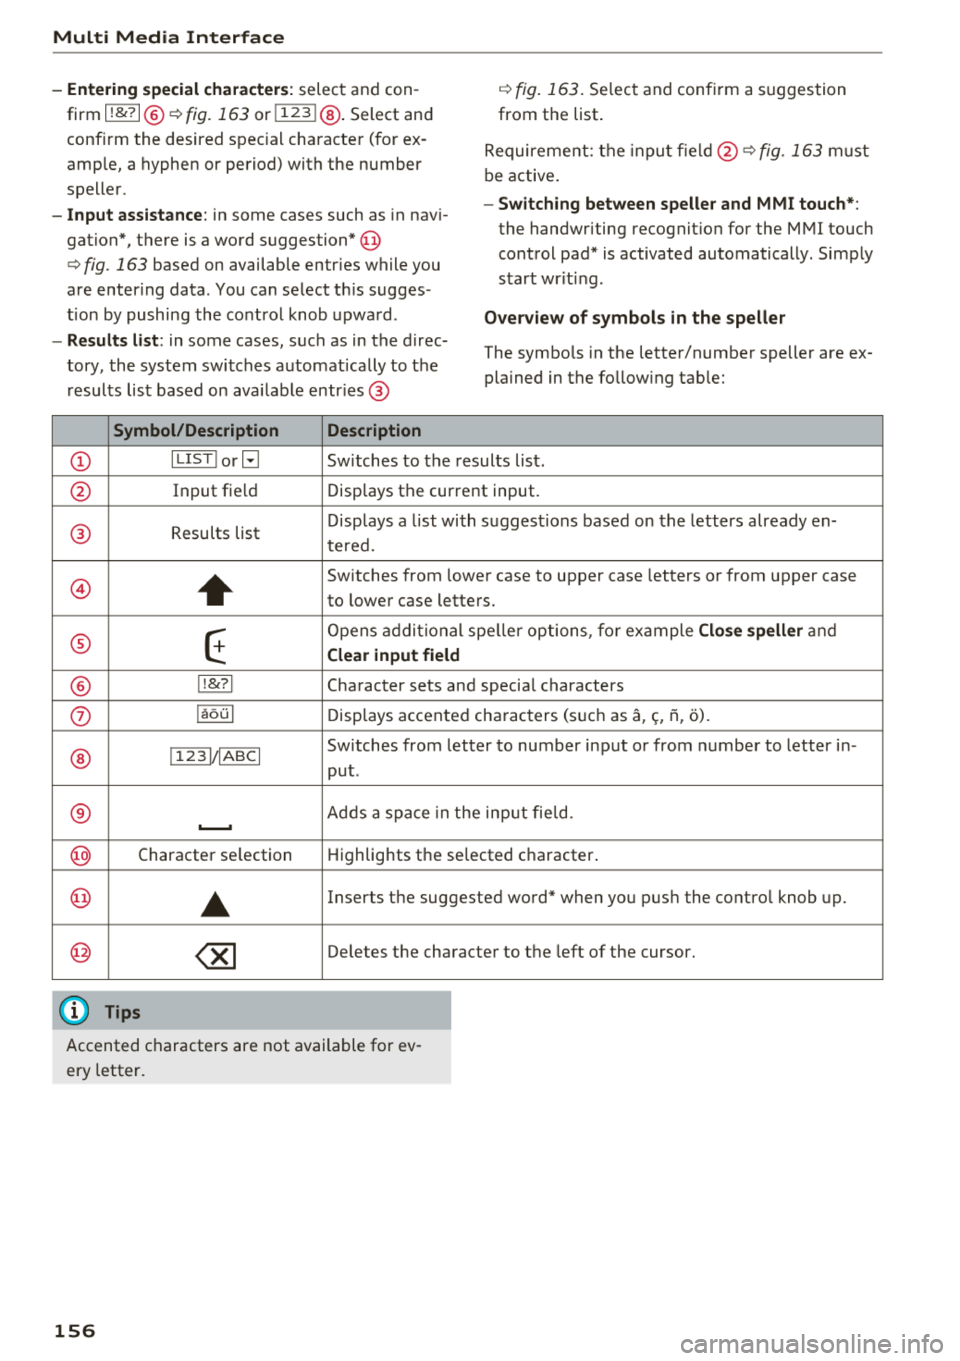
Overview of symbols in the speller
The symbols in the letter/number speller are ex
plained in the follow ing tab le:
CD ILIST lorB Switches to the results list.
@ Input field Displays the current input.
® Results list Displays
a list with suggestions based on the letters already en-
tered.
@
+
Switches from lower case to upper case letters or from upper case
to lower case letters.
® E
Opens additional speller options, for example Close speller and
Clear input field
® !!&?I Character sets and special characters
0 laoul Displays accented characters (s uch as a,<;, fi, o).
Switches from letter to number input or from number to letter in-
® !123 1/IABCI
put .
® .......... Adds a space in the input field .
@ Character se lection Highlights
the selected c haracter .
@ ..
Inserts the suggested word* when you push the control knob up .
@ ~ Deletes the character to the left of the cursor.
(D Tips
Accented characters are not available for ev
ery letter.
156