AUDI Q5 2018 Owners Manual
Manufacturer: AUDI, Model Year: 2018, Model line: Q5, Model: AUDI Q5 2018Pages: 392, PDF Size: 60.56 MB
Page 341 of 392
u a, .... N r-N ....
~ a,
including the weight of a trail
er hitch and the tongue
weight of a loaded trailer -
does not make the vehicle heavier than the vehicle's
Gross Vehicle Weight Rating .
Determining correct load
limit
Use the example below to calcu
late the total weight of the pas
sengers and luggage or other
things that you plan to transport
so that you can make sure that
your vehic le w ill not be over load
ed .
Steps for Determining Correct
Load Limit
1. L ocate the statement "TH E
COMBINED WEIGH T OF OCCU
PANTS AND CARGO SHOULD
NEVER EXCEED XXX KG OR XXX
L BS" on your vehicle's placard
(tire inflation pressure label)
¢ page 335, fig . 269 .
2. Determine the combined
weight of the driver and pas
sengers that w ill be riding in
your vehic le .
3. Subt ract the combined weight
of the driver and passengers
from "XXX" kilograms or "XXX"
Wheels
pounds shown on the stick
er ¢ page 335, fig. 269 .
4. The resulting figure equals the
available amount of cargo and
luggage load capacity . For ex
ample , if the
"XXX" amount
equa ls
1400 lbs . and there will
be five
150 l bs . passengers in
your vehicle, the amount of
available cargo and luggage
load capacity is
650 lbs .
(1 400- 750 (5 X 1 50) = 650
lbs .)
5. Determine the comb ined
weight of luggage and cargo
being loaded on the vehicle .
T hat weight may not safely ex
ceed the availab le cargo and
luggage load capacity calculat
ed in Step 4 .
6 . If your vehicle will be towing a
tra iler, load from your tra iler
w ill be transferred to your ve
hicle. Consult this manual to
determine how this reduces
the availab le cargo and lug
gage load capacity of your veh i
c le .
.,. Check the tire sidewall
(¢ page 326, fig . 266) to deter
mine the designated load rat ing
for a specific t ire .
339
Page 342 of 392
Wheels
Wheel bolts and rims
Wheel bolts
Wheel bolts must be clean and loosen/tighten
easi ly.
Rims
Rims with a bolted rim ring* or with bolted wheel
covers* consist of multiple pieces . These compo
nents were bolted together using special bolts
and a special procedure . You must not repair or
d isassemble them
C> _&. .
_& WARNING
Wheel bolts that are tight ened or repaired in
correctly can become loose and result in loss
of vehicle control, which increases the risk of
an accident. For the correct tightening specifi
cation, see
e> page 356, Finishing.
-Always keep the wheel bolts and the
threads in the wheel hub clean and free of
grease.
- Only use wheel bolts that fit the rim.
- Always have damaged rims repaired by an
authorized Audi dealer or authorized Audi
Service Facility . Never repair or disassemble
rims yourse lf, because this increases the risk
of an accident.
Winter tires
Winter tires significantly improve the vehicle's
handling when driving in winter conditions . Be
cause of their construction (width, compound,
tread pattern), summer tires provide less trac
tion on ice and snow.
"'Use winter tires on all four wheels .
"'Only use winter tires that are approved for your
vehicle .
"'Please note that the maximum permitted
speed may be lower with winter tires
e> & in
General information on page 325.
An author
ized Audi dealer or authorized Audi Service Fa
cility can inform you about the maximum per
mitted speed for your tires .
"'Check the tire pressure after installing wheels
¢page 335.
340
The effectiveness of winter tires is reduced great
ly when the tread is worn down to a depth of
0.16 in (4 mm) . The characteristics of winter
tires also decrease greatly as the tire ages, re
gardless of the remaining tread.
@) For the sake of the environment
Reinstall summer tires at the appropriate
time, because they provide better handling
when roads are free of snow and ice. Summer
tires cause less road noise, tire wear and fuel
consumption .
(D Tips
You can also use all season tires instead of
winter tires. Please note that in some coun
tries where winter tires are required, only
winter tires with the
& symbol may be per
mitted.
Snow chains
Snow cha ins not only improve the driving in win
ter road conditions, but also the braking.
"'Only install snow chains on the rear wheels.
"' Check and correct the seating of the snow
chains after driving a few feet, if necessary. Fol
low the instructions from the manufacturer.
"'Note the maximum speed of 30 mph (SO km/
h). Note the local regulations.
Use of snow chains is only permitted with certain
rim/tire combinations due to technical reasons.
Check with an authorized Audi dealer or author
ized Audi Service Facility to see if you may use
snow chains.
Use
fine-mesh snow chains. They must not add
more than 0 .53 in (13.S mm) in height, including
the chain lock.
You must remove the snow chains on roads with
out snow . Otherwise, you could impair driving
ability and damage the tires .
_& WARNING
Using incorrect snow chains or installing snow
chains incorrectly can result in loss of vehicle
9"'
Page 343 of 392
u co ..... N r--N ..... 0 <( 0 00
control, which increases the risk of an
accident.
@ Note
-Snow chains can damage the rims/wheel
covers* if the chains come into direct con
tact with them . Remove the wheel covers*
first. Use coated snow chains.
-Do not install and use snow chains if there is
a malfunction in the air suspension*, be
cause the vehicle height will be very low. If
you drive with snow chains anyway, the
wheel housings and other vehicle compo
nents can be severely damaged.
(D Tips
When using snow chains, it may be useful to
switch the offroad mode on <=>
page 141.
Low-profile tires
App lies to: ve hicles with low -profile tires
Compared to other tire/rim combinat ions, low
profile tires offer a wider tread surface and a
l arger r im diameter with shorter tire sidewalls.
This results in an agile dr iv ing style. However, it
may reduce the leve l of comfort and increase
road noise when driving on roads in poor condi
tion .
L ow -profile tires can become damaged more
quickly than standard tires when driving over
l arge bumps, potholes, manhole covers, and
curbs . Therefore, it is particular ly important to
maintain the correct tire pressure<=>
page 335 .
To reduce the risk of damage to the tires and
rims, drive very carefu lly on poor roads.
Check your wheels regularly every 2,000 mi
(3,000 km) for damage. Fo r example, check for
bulges/cracks on the tires or deformations/
cracks on the rims.
After a heavy impact or damage, have the tires
and rims inspected or replaced immediate ly by
an authorized Audi dealer or authorized Audi
Service Facility .
Lo w-profile tires can wear out faster than stand
ard tires.
Wheels
Uniform tire quality grading
-Tread wear
-Traction AA ABC
-Temperature ABC
Quality grades can be found where applicable on
the tire side wall between tread shoulder and
maximum section width <=>
page 326, fig. 266.
For example: Tread wear 200 , Traction AA, Tem
perature A.
All passenger car tires must conform to Federal
Safety Requirements in addition to these grades.
Tread wear
The tread wear grade is a comparative rating
based on the wear rate of the tire when tested
under controlled cond it ions on a specified gov
ernment test course.
For example, a tire graded 150 would wear one
and one half (1 1/2) times as we ll on the govern
ment course as a tire graded 100.
The relative performance of tires depends upon
the actual cond it ions of the ir use, however, and
may depa rt significantly from the norm due to
variations in driv ing habits, service practices and
differences in road characteristics and climate.
Traction
The traction grades, from highest to lowest, are
AA , A, Band
C. Those grades represent the tire's
ability to stop o n wet pavement as measured un
der controlled conditions on specified govern
ment test surfaces of asphalt and concrete. A tire
marked C may have poor traction performance
c:>,& .
Temperature
The temperature grades are A (the highest), B,
and C, representing the tire's resistance to the
generation of heat and its ability to dissipate
heat when tested under controlled conditions on
a specified indoor laboratory test wheel.
Sustained high temperature can cause the mate
rial of the tire to degenerate and reduce tire life,
and excessive temperature can lead to sudden
tire failure
c:> ,& . ..,.
341
Page 344 of 392
Wheels
The grade C corresponds to a leve l of perform
ance which all passenger car tires must meet un
der the Federa l Motor Vehicle Safety Standard
No.
109. Grades Band A represent higher levels
of performance on the laboratory test wheel than
the minimum required by law.
A WARNING -
The traction grade ass igned to this tire is
based on straight-ahead braking traction
tests, and does not include acce le rat ion, cor
ne ring, hydroplaning or peak traction charac
teristics.
A WARNING
Th e temperatu re grade for this tire is estab
lished for a tire that is properly inflated and
not overloaded. Excessive speed, underinfla
tion, or excessive loading, either separate ly or
in combination, can cause heat buildup and
possible tire failure.
A WARNING
-
-
Temperature grades apply to tires that are properly inflated and not over or underinflat
ed.
Tire pressure monitoring system
(l) General notes
Each t ire, including the spare (if provided),
should be checked monthly when cold and inflat
ed to the inflation pressure recommended by the
ve hicl e manufacturer on the vehicle placard or
tire in flatio n press ure label. ( If yo ur vehicle has
t ires of a different siz e than the size indicated on
the vehicle placard or tire inflation pressure la
be l, you should determine the proper tire infla
tion pressure for those t ires) .
As an added safety feature, your veh icle has been
equipped with a tire pressure monitoring system
(TPMS) that illuminates a low tire pressure te ll
tale when one or more of your t ires is significant
ly under-inflated. Accordingly, when the low tire
pressure tellta le illuminates, you should stop and
342
check your tires as soon as possible, and inflate
them to the proper pressure . Driving on a signifi
cant ly under-inflated t ire causes the t ire to over
heat and can lead to tire fa ilure . Under-inflation
also reduces fue l eff iciency and tire tread life,
and may affect the vehicle's handling and stop
ping ability .
Please note that the TPMS is not a substitute for
proper tire maintenance, and it is the dr iver's re
spons ibility to maintain correct tire pressure,
even if under-inflation has not reached the level
to trigger illumination of the TPMS low tire pres
su re te lltale .
Your vehicle has also been equipped with a TPMS
malfunction indicator to indicate when the sys
tem is not operating prope rly . The TPMS mal
function indicat or is combined with the low tire
pressure telltale. When the system detects a
malfunction, the telltale will flash for approxi
mately one minute and then remain continuously
illuminated. This sequence wi ll continue upon
s ub sequent vehicle start-ups as long as the mal
funct ion exists.
When the malfunction indicator is illuminated,
the system may not be able to detect or signal
l ow tire pressure as intended. TPMS malfunctions
may occur for a variety of reasons, including the
i nstallation of replacement or alternate tires or
wheels on the veh icle that prevent the TPMS
from functioning properly. Always check the
TPMS ma lfunction telltale after replac ing one or
more tires or wheels on you r vehicle to ens ure
that the rep lacement or alternate tires and
whee ls allow the TPMS to continue to function
properly.
If the tire pressure monitoring indicator
appears
App lies to : vehicles wit h Tire Pressure Mo nitor ing System in
dicator
The tire pressure indicator in the instrument
cluster informs you if the tire pressure is too low
or if there is a system malfunction .
Using the ABS sensors, the tire pressure monitor
in g system compares the tire tread circumfer
en ce and vibration characteristics of the
Page 345 of 392
individual tires. If the pressure changes in one or
more tires, this is indicated in the instrument
cluster display with an indicator light
[IJ and a
message . If only one tire is affected, the location
of that tire will be indicated.
The tire pressures must be stored in the Infotain ment system again each time the pressures
change (switching between partial and full load
pressure) or after changing or replacing a tire on
your vehicle
¢ page 343 . The tire pressure moni
toring system only monitors the tire pressure you
have stored. Refer to the tire pressure label for
the recommended tire pressure for your vehicle
¢ page 335, fig. 269.
Tire tread circumference and vibration character
istics can change and cause a tire pressure warn
ing if:
- the tire pressure in one or more tires is too low
- the tires have structural damage
- the tire was replaced or the tire pressure was
changed and it was not stored
¢ page 343
- tires that are only partially used are replaced
with new tires
Indicator lights
[IJ-loss of pressure in at least one tire¢,&. .
Check the tires and replace or repair if necessary.
Check/correct the pressures of all four tires and
store the pressure again in the Infotainment sys
tem
¢ page 343 .
mm (Tire Pressure Monitoring System) Tire
pressure: malfunction! See owner's manual.
If
mm appears after switching the ignition on or
while driving and the
[IJ indicator light in the in
strument cluster blinks for approximately one minute and then stays on, there is system mal
function . Try to store the correct tire pressures
~ page 343 . In some cases , you must drive for
several minutes after storing the pressures until
the indicator light turns
off. If the indicator light
does turn off or turns on again after a short peri
od of time, drive to an authorized Audi dealer or
authorized Audi Service Facility immediately to
~ have the malfunction corrected. .... N ,..._
N ..... 0 <( 0 00
Wheels
A WARNING
--- If the tire pressure indicator appears in the
display, reduce your speed immediately and
avoid any hard steering or braking maneu
vers. Stop as soon as possible and check the
tires and their pressure.
- The driver is responsible for maintaining the
correct tire pressure. You must check the
tire pressure regularly .
- Under certain conditions (such as a sporty
driving style, winter conditions or unpaved
roads), the tire pressure monitoring system
indicator may be delayed.
@ Tips
- The tire pressure monitoring system can al
so stop working when there is an ESC mal
function.
- Using snow chains may result in a system
malfunction.
- The tire pressure monitoring system in your
Audi was calibrated with
"Audi Original
Tires"~ page 332. Using these tires is rec
ommended.
Storing tire pressures
App lies to: vehicles wi th Tir e Pr essure Mo nito ring Syste m in
dica tor
If the tire pressure changes or a tire is replaced ,
it must be confirmed in the Infotainment sys tem .
.. Before storing the tire pressures, make sure the
tire pressures of all four tires meet the speci
fied values and are adapted to the load
¢page 335 .
.. Switch the ignition on .
.. Select in the Infotainment system: I MENU ! but
ton
> Vehicle > Service & checks > Tire pres
sure monitoring
> Store tire pressure > Yes,
store now.
(D Tips
Do not store the tire pressures if snow chains
are installed .
343
Page 346 of 392
Care and cleaning
Care and cleaning
General information
Regular, proper care helps to maintain your vehi
cle's value. It can also be a requirement when
submitting warranty claims for corrosion damage
and paint defects on the body.
The required cleaning and care products can be
obtained from an authorized Audi dealer or au
thorized Service Facility . Read and follow the in
structions for use on the packaging .
A WARNING
-Using cleaning and care products incorrectly
can be dangerous to your health.
- Always store clean ing and care products out
of reach of children to reduce the r isk of poi
son ing.
@ For the sake of the environment
- Preferab ly purchase environmenta lly-friend
l y cleaning products.
- Do not dispose of leftover cleaning and care
products with household trash.
Car washes
The longer that deposits such as insects, bird
droppings, tree sap or road salt remain on the ve
h icle, the more the surface can be damaged. High
temperatures such as those caused by sunlight
increase the damaging effect.
Before washing, r inse
off heavy deposits with
p lenty of water.
Stubborn deposits such as bird droppings or tree
sap are best removed with plenty of water and a microfiber cloth.
A lso, wash the underside of yo ur vehicle once
road sa lt stops being used for the season .
Pressure washers
When washing your veh icle w ith a pressure wash
er , al ways fo llow the operating instructions pro
vided with the press ure washer. This is especially
important in regard to the pressure and spraying
distance. Do not aim the spray directly at the
344
seals on the side windows, doors, lids or the sun
roof* or at tires, rubber hoses, insulating materi
a l, sensors* or camera lenses* . Keep a distance of
at least 16 in (40 cm).
Do not remove snow and ice with a pressure
washer.
Never use cone nozz les or high pressure nozzles.
The water temperature must not be above 140 °F
(60 °() .
Automatic car washes
Spray off the vehicle before washing.
Make sure that the windows and roof* are closed
and the windshie ld wipers are
off . Follow instruc
tions from the car wash operator, especially if
there are accessories attached to your vehicle.
If possible, use car washes that do not have
brushes.
Washing by hand
Clean the vehicl e starting from the top and work
in g down using a soft sponge or cl eaning br ush.
Use solvent-free cleaning products.
Washing vehicles with matte finish paint by
hand
To avoid damaging the paint when washing, first
remove dust and large part icles from you r vehi
cle. Insects, grease spots and fingerprints are
best removed with a special cleaner for matte
finish paint .
Apply t he product using a microfiber cloth. To
avoid damaging th e paint surface, do not use too
much pressure.
R inse the vehicl e thoroughly with wate r. Then
clean using a neutra l shampoo and a soft micro
f iber cloth .
Rinse the vehicl e thoroughly again and let it air
dry. Remove any water residue using a chamois.
A WARNING
-Only wash the vehicle when the ignition is
off and follow the instructions from the car
-
Page 347 of 392
u co ..... N r--N ..... 0 <( 0 00
wash operator to reduce the risk of acci
dents.
- To reduce the risk of cuts, protect yourself
from sharp metal components when wash ing the underbody or the inside of the wheel
housings.
- After washing the vehicle, the braking effect may be delayed due to moisture on the
brake rotors or ice in the winter . This in
creases the risk of an accident. The brakes
must be dried first with a few careful brake
applications.
@ Note
- If you wash the vehicle in an automatic car
wash, you must fold the exterior mirrors in
to reduce the risk of damage to the mirrors.
Power folding exterior mirrors* must only
be folded in and out using the power folding
function.
- To reduce the risk of damage to the rims
and tires, compare the width between the
wheels on your vehicle with the distance be
tween the guide rails in the car wash.
- To reduce the risk of damage, compare the
height and width of your vehicle with the
Care and cleaning
height and width of the inside of the car
wash .
- T o reduce the risk of paint damage, do not
wash the vehicle in direct sunlight .
- To reduce the risk of damage to the surface,
do not use insect removing sponges, kitchen
sponges or similar items .
- Matte finish painted vehicle components:
- To reduce the risk of damage to the sur-
face, do not use polishing agents or hard
wax.
- Never use protective wax. It can destroy
the matte finish effect .
- Do not place any stickers or magnetic
signs on vehicle parts painted with matte
finish paint. The paint could be damaged
when the stickers or magnets are re
moved.
@ For the sake of the environment
Only wash the vehicle in facilities specially de
signed for that purpose. This will reduce the
risk of dirty water contaminated with oil from
entering the sewer system.
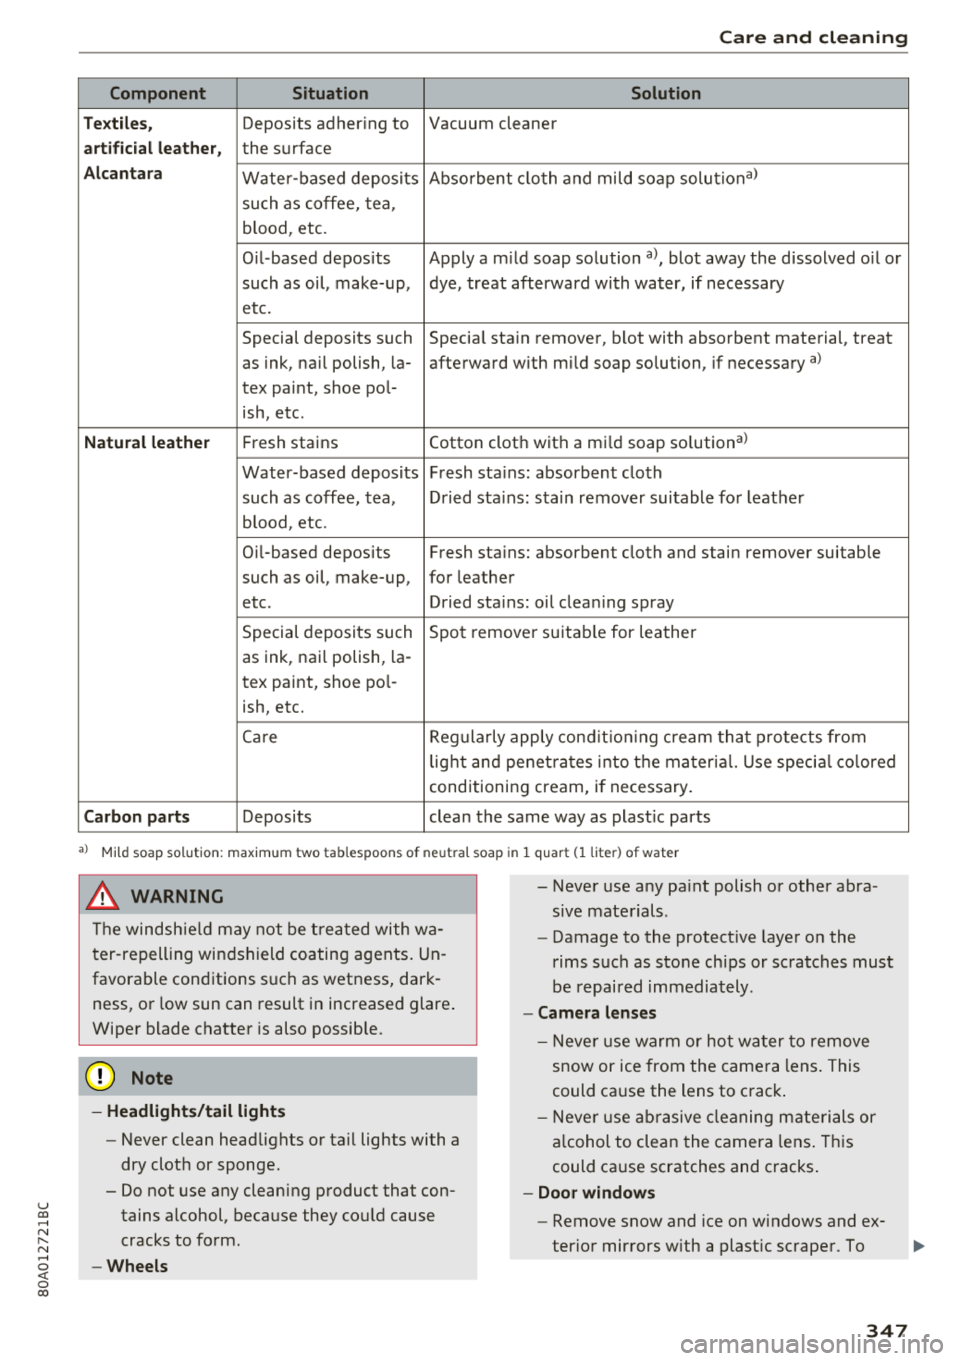
Cleaning and care information
When cleaning and caring for individual vehicle
components, refer to the following tables. The
information contained there is simply recom
mendations. For questions or for components that
are not listed, consult an authorized Audi
dealer or authorized Audi Service Facility. Also
follow the information found
in ¢.&. .
Exterior cleaning
Component Situation Solution
Windshield wiper
Deposits soft cloth with glass cleaner, ¢ page 52
blades
Headlights/
Deposits Soft sponge with a mild soap solution3>
Tail lights
Sensors/
Deposits Sensors: soft cloth with a solvent-free cleaning solution
camera lenses Camera lenses: soft cloth with an alcohol-free cleaning
solution
Snow/ice Hand brush/solvent-free de-icing spray
Wheels Road salt Water
Brake dust Acid-free special cleaning solution
345
Page 348 of 392
Care and cleaning
Component Situation Solution
Exhaust tail pipes
Road salt Water, cleaning solution suitab le for stainless steel, if nee-
essary
Decorative parts/ Deposits Mild
soap solution al, a cleaning solution suitab le for stain-
trim less stee l, if necessary
Paint Paint damage Refer to t he paint number on the vehicle data label, repair
with touch up
paint ~ page 369
Spilled fuel Rinse
with water immediately
Surface rust Rust remover, then protect with hard wax; for questions,
consult an author ized Audi dealer or authorized Aud i Serv-
i ce Facility.
Corros ion Have it removed by an authori zed Aud i dea ler or author-
ized Audi Service Fac ility.
Water no longer Pr
otect with hard wax (at least twice per year)
beads on the surface
of clean paint
No shine even though Treat wit h suitable polish; then apply paint protectant if
pa int has been pro- the polish that was used does not contain any protectant
tected/paint looks
poor
Deposits such as in- Dampen w ith water immediately and remove with a micro-
sects, bird dropp ings, f iber cloth
tree sap and road salt
Grease -based con- Remove immediately with a mild soap solution
al and a
taminants such as soft cloth
cosmetics or sunb lock
Carbon parts Deposi ts clean the same way as painted parts ~ page 344
Decorative decals Deposits Soft sponge with a mild soap solutiona l
•> Mi ld soap so lution: maxim um two tablespoo ns o f neu tra l s oap in 1 quart (1 lite r) of water
Interior cleaning
Component Situation Solution
Window glass
Deposits Glass cleaner, then wipe dry
Decorative parts/ Deposits Mild soap so lution al
trim
Plastic parts
Deposits Damp clo1th
Heavier deposits Mild soap solution
al, detergent-free p lastic clean ing solu-
tion, if necessary
Display s/instru-Deposi ts Soft cloth with LCD cleaner; dust in the lower area of the
ment cluster instrument cluster can be removed using a soft brush.
Controls Deposits Soft brush, then a soft cloth with a m ild soap solutional
Safety belts Deposits Mild
soap so lution a l, allow to dry before letting them re -
tract
346
Page 349 of 392
u co .... N ,..._
N .... 0 <( 0 00
Care and cleaning
Component Situation Solution
T ex tile s,
Deposits adhering to Vacuum cleaner
art ifi ci al l eat her, the surface
A lcan tara Water-based deposits Absorbent cloth and mild soap solutiona>
such
as coffee, tea,
b lood, etc.
O il-based deposits Apply a m ild soap solution
al, blot away the dissolved o il or
such as oil, make-up, dye, treat afterward with water, if necessary
etc.
Special deposits such
Special stain remover, blot with absorbent material, treat
as ink, nail polish, la-afterward with mild soap solution, if necessary
a)
tex paint, shoe pol-
ish, etc.
Natu ral leathe r Fresh stains Cotton cloth with a mi
ld soap so lution a>
Water-based deposits Fresh stains : absorbent cloth
such as coffee, tea, Dried stains: stain remover suitable for leather
b lood , etc.
Oi l-based deposits Fresh stains: absorbent cloth and stain remover suitable
such as oil, make-up, for leather
etc . Dried stains: oil clean ing spray
Special deposits such Spot
remove r suitable for leather
as ink, nai l polish, la-
tex paint, shoe pol-
ish, etc.
Care Regula rly apply cond it ion ing cream that p rotects from
lig ht and penet rates into the mater ia l. Use specia l co lored
conditioning cream, if necessary.
Carbon p art s Deposits clean the same way as plast ic parts
a) Mi ld soap solution: maximum two tablespoons of neutral soap in 1 quar t (1 liter) of water
.8, WARNING
The windsh ie ld may not be trea ted with wa
ter-repelling windshield coating agents. Un
favorable conditions such as wetness, dark
ness, or low sun can result in increased glare .
Wiper blade chatter is also possible.
@ Note
- Headlights /tail light s
-Never clean headlights or tail lights with a
dry clot h or sponge.
- Do not use any cleaning product that con
tains alcohol, because they could cause
cracks to form .
-Wheels
-
- Never use any pa int polish or other abra
sive materials .
- Damage to the protect ive layer o n the
rims such as stone ch ips or scratches must
be repaired immediately .
-Cam era lenses
- Neve r use warm or hot wa ter to remove
snow or ice from the camera lens . This
could ca use the lens to crack .
- Neve r use ab rasive cleaning m ate rials or
a lcohol to clean the camera lens . This
could ca use scratches and cracks .
-Door window s
-Remove snow and ice on windows and ex-
terior mirrors w ith a plast ic scraper . To
347
Page 350 of 392
Care and cl eaning
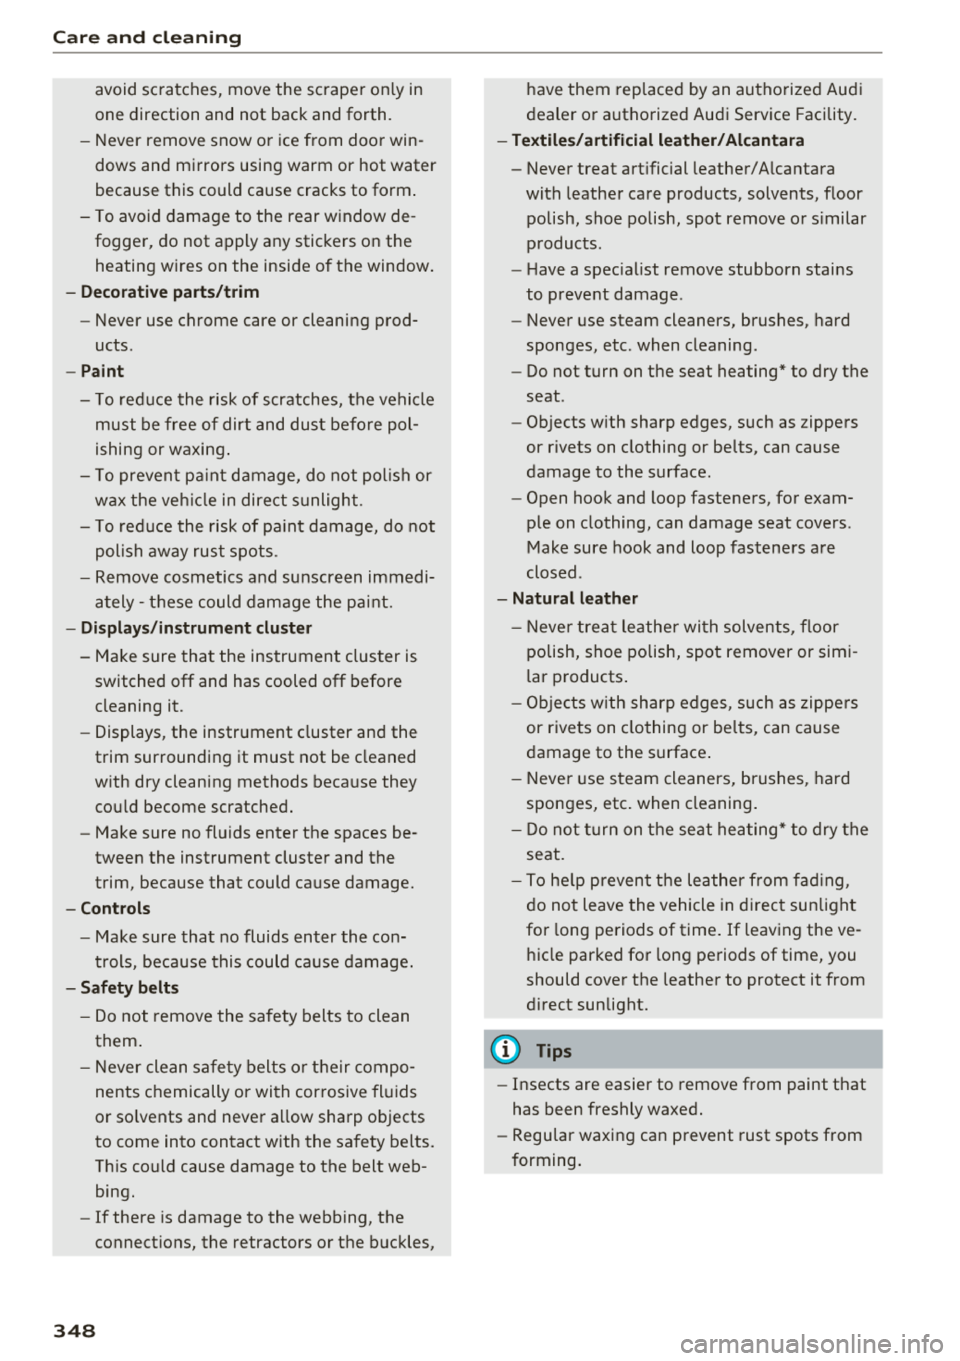
avoid scratches, move the scraper on ly in
one direction and not back and forth.
- Never remove snow o r ice from door win
dows and mirrors using warm or hot water
because this could cause cracks to form .
- To avoid damage to the rear w indow de
fogger, do not apply any stickers on the heating wires on the inside of the window .
-Deco rati ve parts /trim
- Never use chrome care or cleaning prod-
ucts.
- Paint
-To red uce the risk of scratches, the vehicle
must be free of dirt and dus t before pol
ishing or waxing .
- To prevent pa int damage, do not pol ish or
w ax the veh icle in dire ct sunlight.
- To red uce the risk of pa int damage, do not
polish away rust spots.
- Remove cosmetics and sunscreen immedi
a tely
-these could damage the p aint.
- Displays /instrument cluster
- Make sure that the instrument cluster is
switched off and
has cooled off before
cleaning it.
- Displays, the instrument cluster and the
trim surrounding it must not be cleaned
w ith dry cleaning methods beca use they
cou ld become scratched.
- Make sure no fluids enter the spaces be
tween the instrument cluster and the
trim, because that could cause damage.
- Controls
- Make sure tha t no fluids enter the con-
trols, because this could ca use damage.
- Safety belts
- Do not remove the safety belts to clean
them .
- N ever clean sa fe ty belts o r their compo
nents chemically or wi th cor rosive fl uids
or so lvents and neve r allow sharp objects
to come into contact w ith the sa fety belts.
Th is could cause damage to the belt web
bing.
- If there is damage to the webbing, the
connect ions, the retractors or the b uck les,
348 have them replaced by an authorized Aud
i
dealer or authorized Aud i Serv ice Facility.
- Te xtile s/artificial leather/ Alcantara
- Never treat art ificial leather/ A lcantara
with leathe r ca re products, solvents, floor
polish, shoe polish, spot remove o r similar
p roducts.
- Have a spec ialist remove stubborn stains
to prevent damage .
- Never use steam cleaners, brushes, hard
sponges, etc. when cleaning.
- Do not turn on the seat heating* to dry the
seat .
- Objects w ith sharp edges, such as zippers
or rivets on clothing or belts, can cause
damage to the surface .
- Open hook and loop fastene rs, for exam
p le on clothing, can damage seat covers .
Make sure hook and loop fastene rs a re
closed.
- Natural l eather
- N eve r trea t le ather wi th solvents, floor
polish, shoe polish, spot remover or sim i
lar products .
- Obje cts w ith sharp edges, such as zippe rs
or rive ts on clothing or belts, can cause
damage to the surface .
- N eve r use s team cleaners, brushes, hard
spon ges, etc . when cleaning .
- D o not turn on the seat he ating * to dry the
seat.
- T o he lp prevent the le ather from f ading,
d o not leave the vehicle in d irec t sunlight
for long periods of time . If leav ing the ve
h icle parked for long periods of time, you
should cove r the leathe r to protect it from
d irect sunlight.
(D Tips
- Insects are easier to remove from paint that
has been freshly waxed.
- Regular waxing can prevent rust spots from
forming.