Tire AUDI Q5 2021 Owner´s Manual
[x] Cancel search | Manufacturer: AUDI, Model Year: 2021, Model line: Q5, Model: AUDI Q5 2021Pages: 332, PDF Size: 118.86 MB
Page 6 of 332
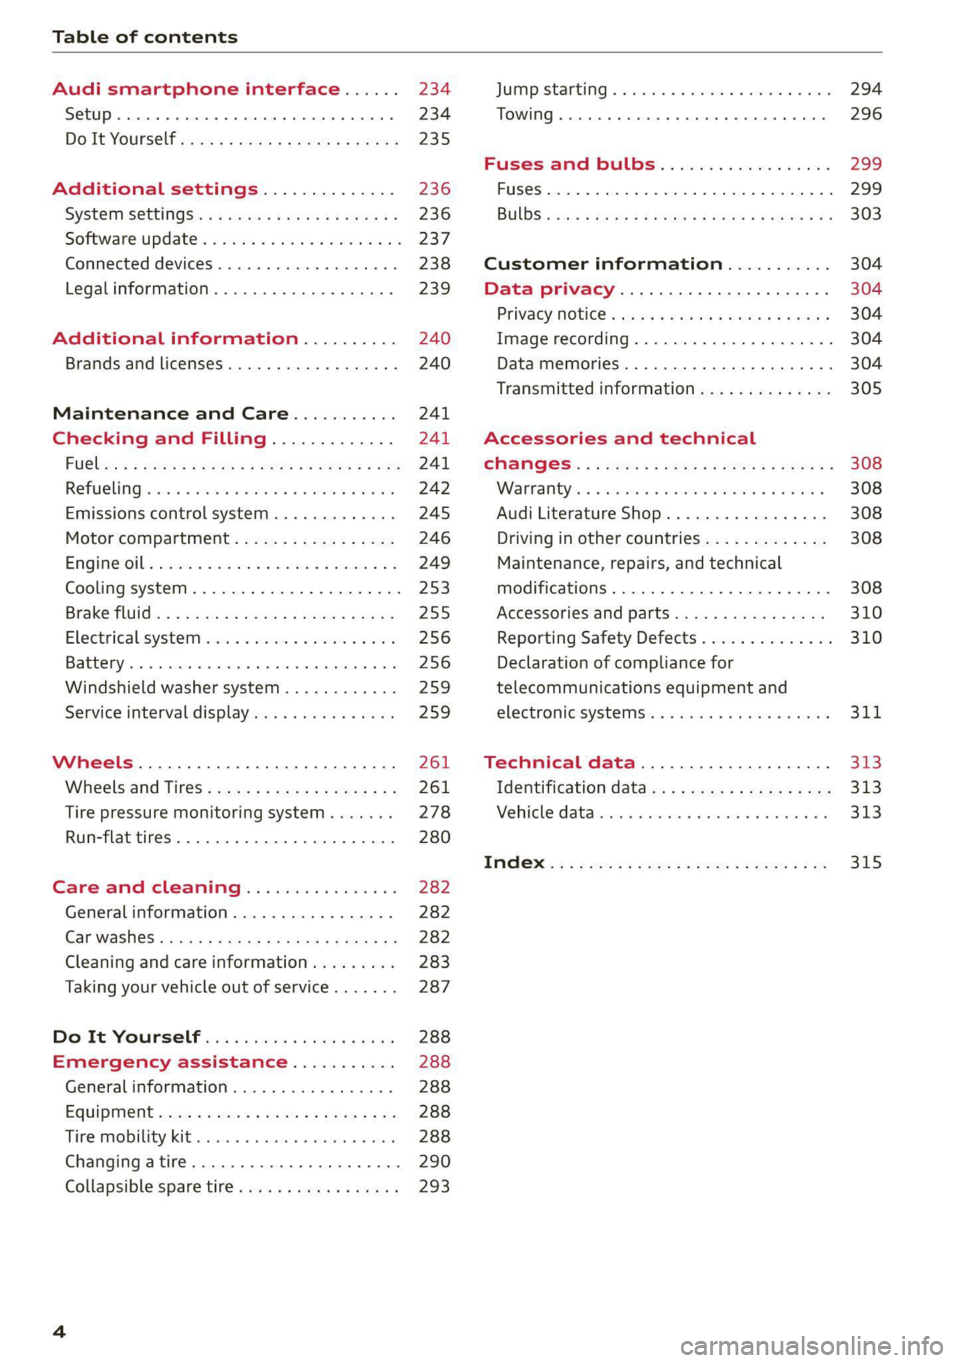
Table of contents
Audi smartphone interface...... 234
Setup... eee eee eee eee 234
DOIt YOURSELT sce 5 s woes se meee 5 2 ee 235
Additional settings.............. 236
System Settings: : s eens s i vows ve sews es 236
Software update...............2..-0. 237
Connected devices.............000005 238
Legalinformation................... 239
Additional information.......... 240
Brands and licenses..............0005 240
Maintenance and Care........... 241
Checking and Filling............. 241
FUGles « = seam = = sews ez nes eg eee Eee 241
RefaelinGuecs « sess oo wea 2 wen 2 wenn 242
Emissions control system............. 245
Motor compartment................. 246
Engine@iOiles esive s+ wacom ov soe 3 v ema ¥ vs 249
Cooling systeM............0 0.002 253
Brake fluid): < s asws s ¢ qa > § eee + tf eee 255
Electrical:system iiss ee sccwe owe 2 x ere 256
Battery... .. eee eee eee eee 256
Windshield washer system...........- 259
Service interval display............... 259
Wheels............. 6.0. c eee eee 261
Wheels and Tires...........--0000005 261
Tire pressure monitoring system....... 278
Run-flat tires... 2.2... eee eee eee 280
Care and cleaning................ 282
Generalinformation................. 282
Car washes « swas 5 ¢ sams se pean co eee Gs 282
Cleaning and care information......... 283
Taking your vehicle out of service....... 287
Do'lt Yourself sos so isis é genes scene 288
Emergency assistance........... 288
Generalinformation................. 288
EQUIPMENE wees + « wees = nae go wees 8 2 ee 288
Tire MOBILE KEE scccee x © creases we © anairers 6% cenie 288
Changingatire...................000- 290
Collapsible spare tire.............000. 293
JUIMIPFSTANEING 5 x exces 6 w erates @ a cawcens vw ae 294
TOWING... cece ete 296
Fuses and bulbs.................. 299
Fuses... 0... eee ee eee eee 299
BUILDS: sss s = wavs & & ees 5 2 ctetDs sb eG ee 303
Customer information........... 304
Data privacy................000 eee 304
Privacy NOLICE « naw, 2 w aay ¥ Kaew + Meee © 304
Timage reGOrding). « « canew + sect ws caver a os 304
Data memories............00.00e eee 304
Transmitted information.............. 305
Accessories and technical
CINERGSS:. « » sem: : x ews ce ee be ee ee 308
Warranty’ « = eon x 2 manors 6 o ois wv ee 6 308
Audi Literature Shop.............000- 308
Driving in other countries............. 308
Maintenance, repairs, and technical
modifications..................00008 308
Accessories and parts..............-. 310
Reporting Safety Defects.............. 310
Declaration of compliance for
telecommunications equipment and
electroniesystems's « «cows se mean 2 news 314,
Technical data.................... 373
Identification data................... 313
Vehicle datatics ss saves o srewa sv awe 0 ve 313
TAAGK es = see « = wee « = owe Be nee eg oe 315
Page 11 of 332
80B012721BA
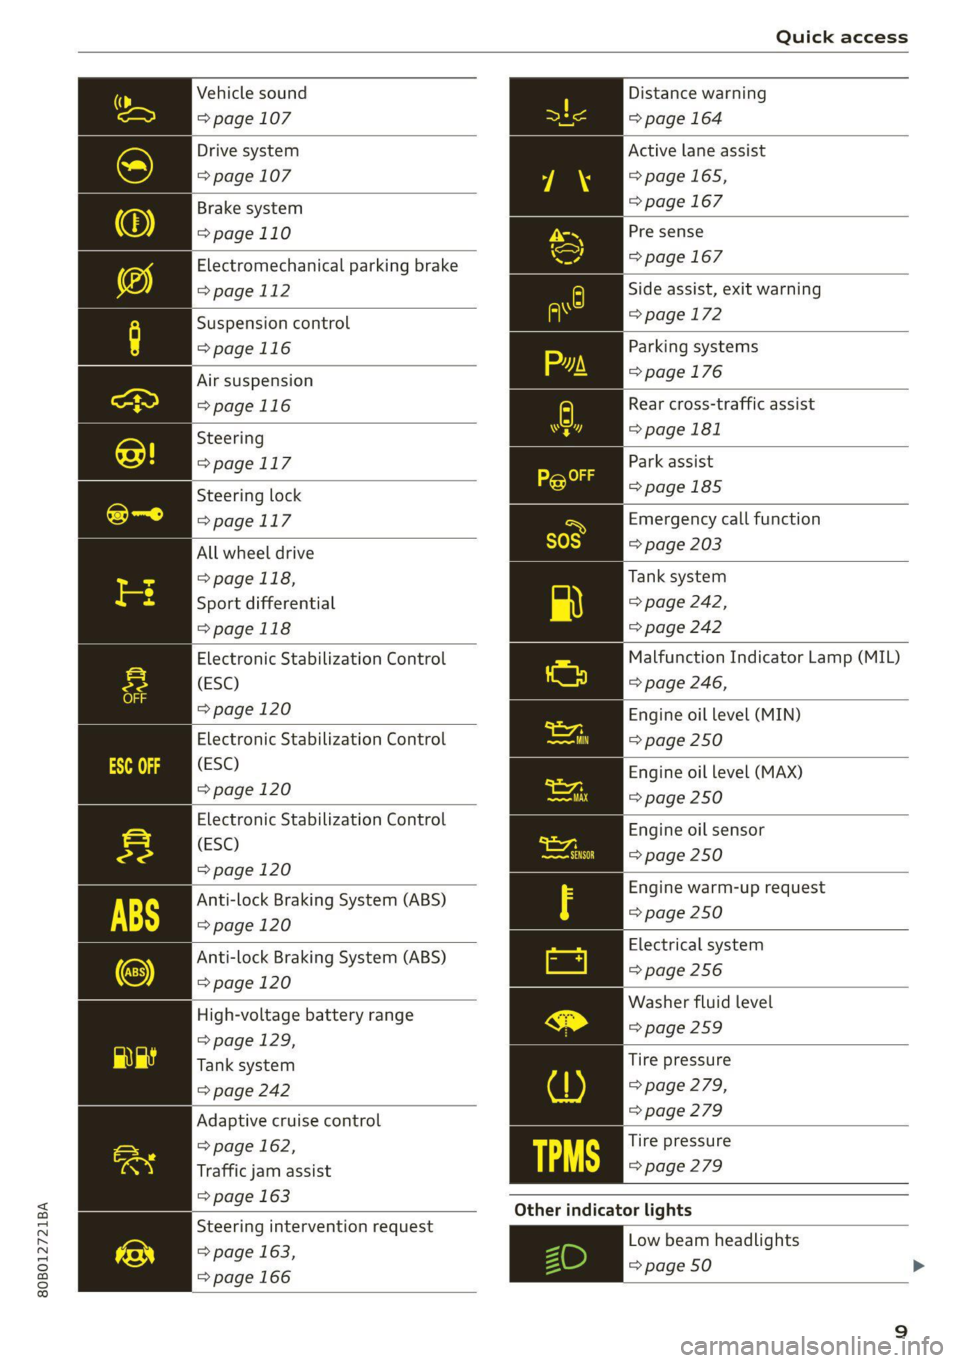
Quick access
Vehicle sound
=> page 107
Drive system
=> page 107
Brake system
=>page 110
Electromechanical parking brake
=> page 112
Suspension control
=>page 116
Air suspension
=>page 116
Steering
>page 117
Steering lock
=> page 117
All wheel drive
> page 118,
Sport differential
=>page 118
Electronic Stabilization Control
(ESC)
=> page 120
Electronic Stabilization Control
(ESC)
=> page 120
Electronic Stabilization Control
(ESC)
=> page 120
Anti-lock Braking System (ABS)
=> page 120
Anti-lock Braking System (ABS)
=> page 120
High-voltage battery range
=>page 129,
Tank system
=> page 242
Adaptive cruise control
=> page 162,
Traffic jam assist
=> page 163
Steering intervention request
=> page 163,
=> page 166
Distance warning
=> page 164
Active lane assist
=>page 165,
= page 167
Pre sense
=> page 167
Side assist, exit warning
=>page 172
Parking systems
=>page 176
Rear cross-traffic assist
=> page 181
Park assist
=>page 185
Emergency call function
=> page 203
Tank system
=> page 242,
=> page 242
Malfunction Indicator Lamp (MIL)
=> page 246,
Engine oil level (MIN)
=> page 250
Engine oil level (MAX)
=> page 250
Engine oil sensor
=> page 250
Engine warm-up request
=> page 250
Electrical system
=> page 256
Washer fluid level
=>page 259
Tire pressure
=> page 279,
=> page 279
Tire pressure
=> page 279
Other indicator lights
Low beam headlights
=> page 50 >
9
Page 36 of 332
Opening and closing
Opening and closing
Central locking
(eT e e eeu)
ZA WARNING
— If you leave the vehicle, switch the ignition
off and take the key with you. This applies
particularly when children remain in the ve-
hicle. Otherwise, children could start the ve-
hicle or operate electrical equipment (such
as power windows), which increases the risk
of an accident.
— Applies to vehicles with anti-theft alarm sys-
tem: When the vehicle is locked from the
outside, no one - especially children - should
remain in the vehicle, because the windows
can no longer open from the inside
= page 37, Anti-theft alarm system.
Locked doors make it more difficult for
emergency workers to enter the vehicle,
which puts lives at risk.
All doors and the luggage compartment lid can
be centrally unlocked and locked at once. You can
select in the MMI if the entire vehicle or only the
driver's door should unlock when unlocking the
vehicle > page 35. The turn signals flash twice
when you unlock the vehicle and flash once when
you lock the vehicle. If they do not flash when
locking, check if all doors and lids are closed.
Depending on the vehicle equipment, you may
have different options for centrally unlocking and
locking your vehicle.
— Vehicle key > page 39
— Sensors in the door handles > page 39
— Lock cylinder in the driver's door > page 37
— Interior central locking switch > page 36
Vehicle key
The term “vehicle key” refers to the remote con-
trol key or convenience key*. The convenience
key* is a remote control key with special func-
tions > page 39 and > page 97.
34
Automatic locking
If you unlock the vehicle but then do not open
any of the doors, the luggage compartment, or
the hood within a short period time, the vehicle
locks again automatically. This feature prevents
the vehicle from being accidentally left unlocked
for a long period of time.
Automatic locking (Auto Lock)
The Auto Lock function locks all doors and the
luggage compartment lid once the speed has ex-
ceeded approximately 9 mph (15 km/h). The ve-
hicle will unlock again if the unlock function in
the central locking switch is pressed, the “P” gear
is engaged, or the ignition is switched off.
You can open the doors individually from the in-
side by pulling the door handle one time. To open
the rear doors individually, you must pull the
door handle twice.
In the event of a crash with airbag deployment,
the doors will also automatically unlock to allow
access to the vehicle.
Unintentionally locking yourself out
Only lock your vehicle when all of the doors and
the luggage compartment lid are closed and
there is no key in the vehicle. This reduces the
risk of locking yourself out accidentally.
The
following features help to reduce the risk of
locking your vehicle key in the vehicle:
— If the driver's door is open, the vehicle cannot
be locked by pressing the & button on the re-
mote control key or by touching the locking
sensor* on a door.
— If the vehicle key that was used most recently is
inside the luggage compartment, the luggage
compartment lid will automatically open again
after it closes >.
— If the vehicle key that was last used is detected
inside the vehicle, then the vehicle cannot be
locked from the outside > ©.
Z\ WARNING
Observe the safety precautions > page 34. >
Page 37 of 332
80B012721BA
Opening and closing
@) Note
The following applies when locking the vehi-
cle:
— If the vehicle key that was last used is de-
tected inside the passenger compartment,
then the vehicle cannot be locked from the
outside using the sensor. Take the vehicle
key with you and lock the vehicle again. Oth-
erwise, the vehicle will not be protected
against unauthorized access.
— If you try to lock the vehicle using the but-
ton on the vehicle key while the front pas-
senger's or rear door is open, and you acci-
dentally place the vehicle key inside the pas-
senger compartment and close the door,
the vehicle will lock at first. But if the key-
less system detects a vehicle key inside the
vehicle after it locks, then the vehicle will
unlock again. The turn signals will flash sev-
eral times to indicate this. If you do not
open the vehicle to remove the vehicle key
within a brief period, then the vehicle will
lock automatically. This prevents the vehicle
from being left unlocked for long periods of
time. The vehicle key will then be locked in-
side the vehicle.
— If the luggage compartment lid closes and
the system detects that the last vehicle key
that was used is inside the luggage com-
partment, then the luggage compartment
lid will open again. The turn signals will
flash several times to indicate this. The
doors will lock. Always take the vehicle key
with you, or unauthorized persons may be
able to enter the vehicle.
@ Tips
— Do not leave valuables unattended in the ve-
hicle. A locked vehicle is not a safe!
—The LED in the driver's door rail blinks when
you lock the vehicle. If the LED turns on for
approximately 30 seconds after locking,
there is a malfunction in the central locking
system. Have the problem corrected by an
authorized Audi dealer or authorized Audi
Service Facility.
Setting the central locking system
You can adjust the central locking system to your
preferences. The settings depend on the vehicle
equipment.
> Applies to MMI: Select on the home screen: VE-
HICLE > Settings & Service > Central locking.
Door unlocking
—If you select All, all doors and the luggage
compartment lid will be unlocked when unlock-
ing the vehicle.
— If you select Driver's door, only the driver's
door will be unlocked. To unlock all doors and
the luggage compartment lid, press the (9 but-
ton on the vehicle key twice. In vehicles with a
convenience key”, only the driver's door will un-
lock when you pull the driver's door handle. If
you pull another door handle, the entire vehicle
will be unlocked.
The entire vehicle will always be locked f you
press the &@ button.
Long press to open windows
You can select if all windows and the panoramic
glass roof* should open using the vehicle key
= page 46, Convenience opening and closing. If
you press and hold the f button on the vehicle
key, all of the windows and the panoramic glass
roof* will close.
Disable rear lid handle
You can select if the luggage compartment lid
can open with the handle. If you activate this
function, the luggage compartment lid can only
be opened with the <¥ or 4s button on the vehi-
cle key or in the driver's door. In vehicles with a
convenience key*, you can still open the luggage
compartment lid using the handle if an author-
ized convenience key is detected > page 41.
Fold mirrors
You can select if the exterior mirrors automatical-
ly fold in when locking.
35
Page 71 of 332

80B012721BA
Sitting correctly and safely
protection. Therefore, always fasten the safety
belt and make sure it is positioned correctly
> fig. 65.
To ensure the safety belt is positioned correctly,
make sure of the following points:
—The lap portion of the safety belt must be locat-
ed across the lap.
— The shoulder portion of the safety belt must
rest over the center of the shoulder.
— The safety belt must always rest flat and se-
curely on the body.
For pregnant women, the safety belt must rest
evenly across the chest and as low and flat as
possible on the lap, so that no pressure is applied
to the lower abdomen. This should be done
throughout the entire pregnancy > fig. 66.
ZA WARNING
Incorrect safety belt positioning can cause se-
rious injury in the event of an accident or dur-
ing sudden braking or driving maneuvers.
— Never drive with the backrest reclined ex-
tremely far. The more the backrest is tilted
back, the greater the risk of injury due to the
safety belt being routed incorrectly.
— The safety belt itself or a loose safety belt
can cause serious injuries if it shifts onto
soft areas of the body, such as the stomach.
— The shoulder portion of the safety belt must
lie over the center of the shoulder and
chest, and never under the arm, behind the
back, or across the neck or face.
— The lap portion of the safety belt must lie
across the lap and never over the stomach.
— The safety belt must lie flat and securely on
the upper part of the body and the lap.
— The belt webbing must not be pinched or
twisted, or rub against sharp edges.
— If the safety belt height is set incorrectly
and/or the safety belt is routed incorrectly,
then the safety belt's protective function
will be impaired in the event of an accident.
Make sure the safety belt is at the right
height and is routed correctly for the pas-
senger using it.
—A safety belt that is too loose may lead to in-
juries during an accident, because your body
will move farther forward due to kinetic en-
ergy and will be stopped abruptly by the
belt.
— Heavily bulky, loose clothing (for example, a
coat over a sports jacket) may prevent the
seat and safety belts from functioning cor-
rectly.
— Do not position the safety belt over hard or
breakable objects (such as glasses, pens,
etc.).
— The lap belt portion of the safety belt must
sit as low as possible on the lap of pregnant
women and lie flat under the belly.
() Note
Make sure that there are no hook-and-loop
fasteners or sharp objects such as zippers or
rivets on clothing in the area where the safety
belt is worn. Otherwise, the safety belt could
be damaged.
Fastening and unfastening safety belts
B4H-0270
Fig. 68 Releasing the belt buckle from the belt latch
Observe the safety precautions > page 67.
69
Page 80 of 332
Sitting correctly and safely
information for this > page 74, Advanced airbag
system. If you must secure a forward-facing child
safety seat, move the front passenger's seat as
far back as possible so that it is as far as possible
from the front passenger's airbag. While doing
this, make sure the seat can be adjusted all the
way.
Only switch to a larger child safety seat when
absolutely necessary
Switch to a larger child safety seat only when ab-
solutely necessary. Secure your child using a safe-
ty belt without a child safety seat only if all of the
following statements are true:
— The child is large enough to sit upright in the
seat
— The child is able to sit with his or her back rest-
ing completely on the seat backrest
—The child is able to sit with his or her knees
bent over the edge of the seat surface
—The child is able to sit with both of his or her
feet completely touching the floor in the foot-
well
— The lap portion of the safety belt lies flat and
securely over the hip area and never over the
stomach
—The shoulder portion of the safety belt lies flat
and securely over the center of the shoulder
and the chest, and never under the arm, behind
the back, or over the neck or face.
—The child is able to maintain this seating posi-
tion throughout the entire trip
Read and follow the important information and
warnings regarding the correct use of safety belts
=> page 67.
@) Tips
— Child safety seats can also be secured to
seats with side airbags. In the event of an
accident, children can also be protected by
the side airbags if the child is correctly se-
cured in a suitable child safety seat that is
attached correctly.
— The lower LATCH anchors as well as the
safety belt may be required to correctly in-
stall some child safety seats. Using both at
the same time is permitted, provided that
78
the fastening systems or safety belts do not
impair those in an adjacent seating position.
— All child safety seats are constructed so that
they can be secured using the lap safety belt
in the vehicle.
— Child safety seats with a load leg can only
be secured to the outer rear seats and to the
front passenger's seat.
Secu child safety seats to the lower
LATCH anchors
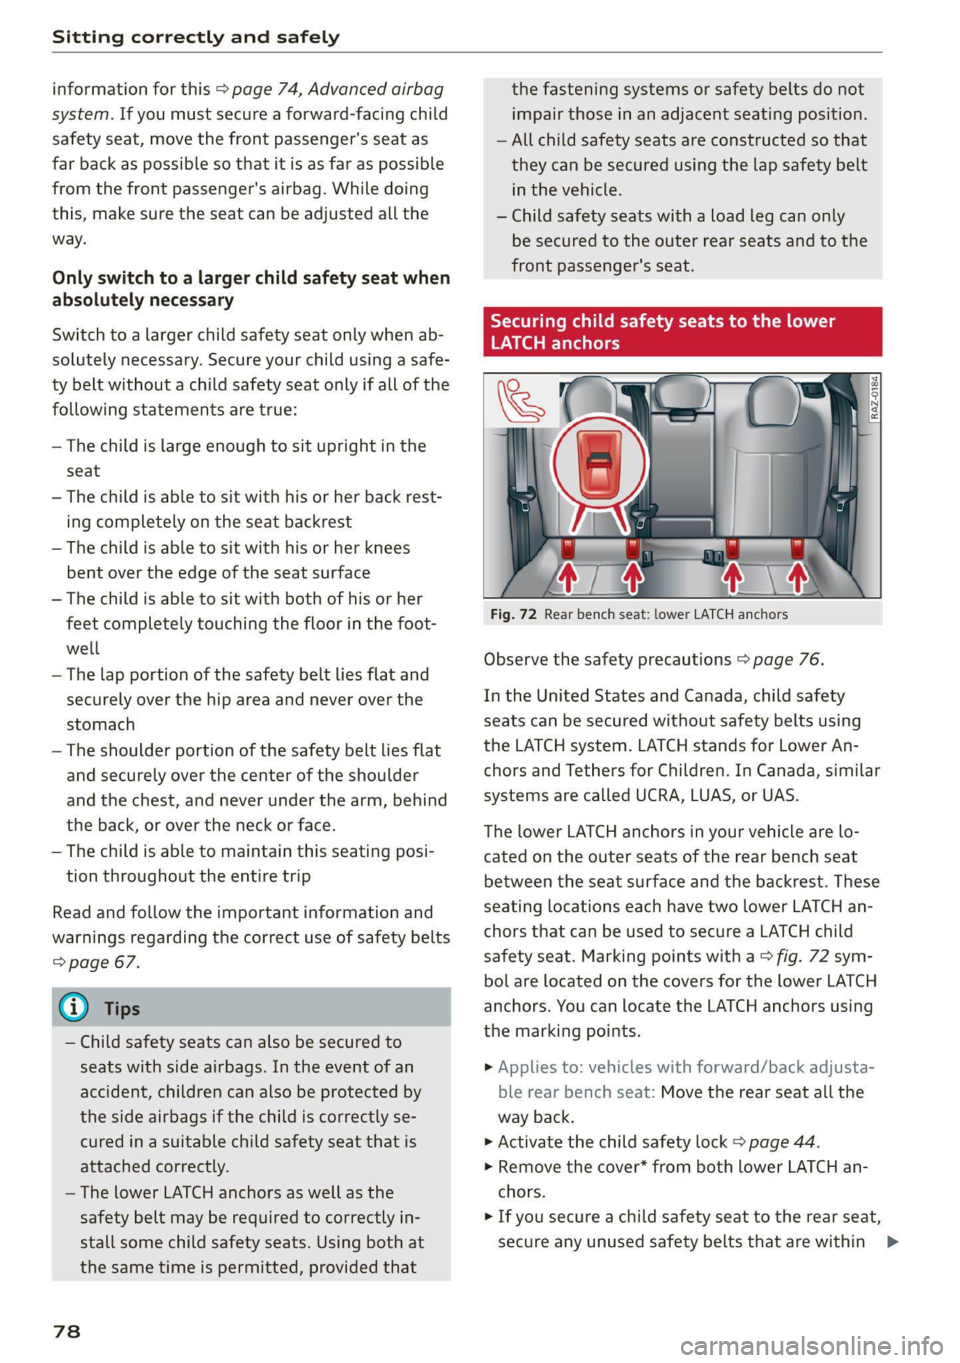
Fig. 72 Rear bench seat: lower LATCH anchors
Observe the safety precautions > page 76.
In the United States and Canada, child safety
seats can be secured without safety belts using
the LATCH system. LATCH stands for Lower An-
chors and Tethers for Children. In Canada, similar
systems are called UCRA, LUAS, or UAS.
The lower LATCH anchors in your vehicle are lo-
cated on the outer seats of the rear bench seat
between the seat surface and the backrest. These
seating locations each have two lower LATCH an-
chors that can be used to secure a LATCH child
safety seat. Marking points with a > fig. 72 sym-
bol are located on the covers for the lower LATCH
anchors. You can locate the LATCH anchors using
the marking points.
> Applies to: vehicles with forward/back adjusta-
ble rear bench seat: Move the rear seat all the
way back.
> Activate the child safety lock > page 44.
» Remove the cover* from both lower LATCH an-
chors.
> If you secure a child safety seat to the rear seat,
secure any unused safety belts that are within >
Page 87 of 332
80B012721BA
Storage and convenience
bench seat to protect the backrest from
damage.
— If you move the front seat back when the
rear seat backrest is folded forward, you
could damage the head restraints on the
rear seat.
— Make sure that the heating grid strips for
the rear window defogger are not damaged
by abrasive objects.
— Applies to: vehicles with manual luggage
compartment cover: Let the luggage com-
partment cover roll up slowly to reduce the
risk of damage.
—The tire pressure must be adapted to the
load > page 271.
— You can purchase straps at specialty stores.
Luggage compartment cover
Applies to: vehicles with luggage compartment cover
2
S|
2 = +
ao
Fig. 79 Luggage compartment: removing and installing
the luggage compartment cover
Observe the safety precautions > page 84.
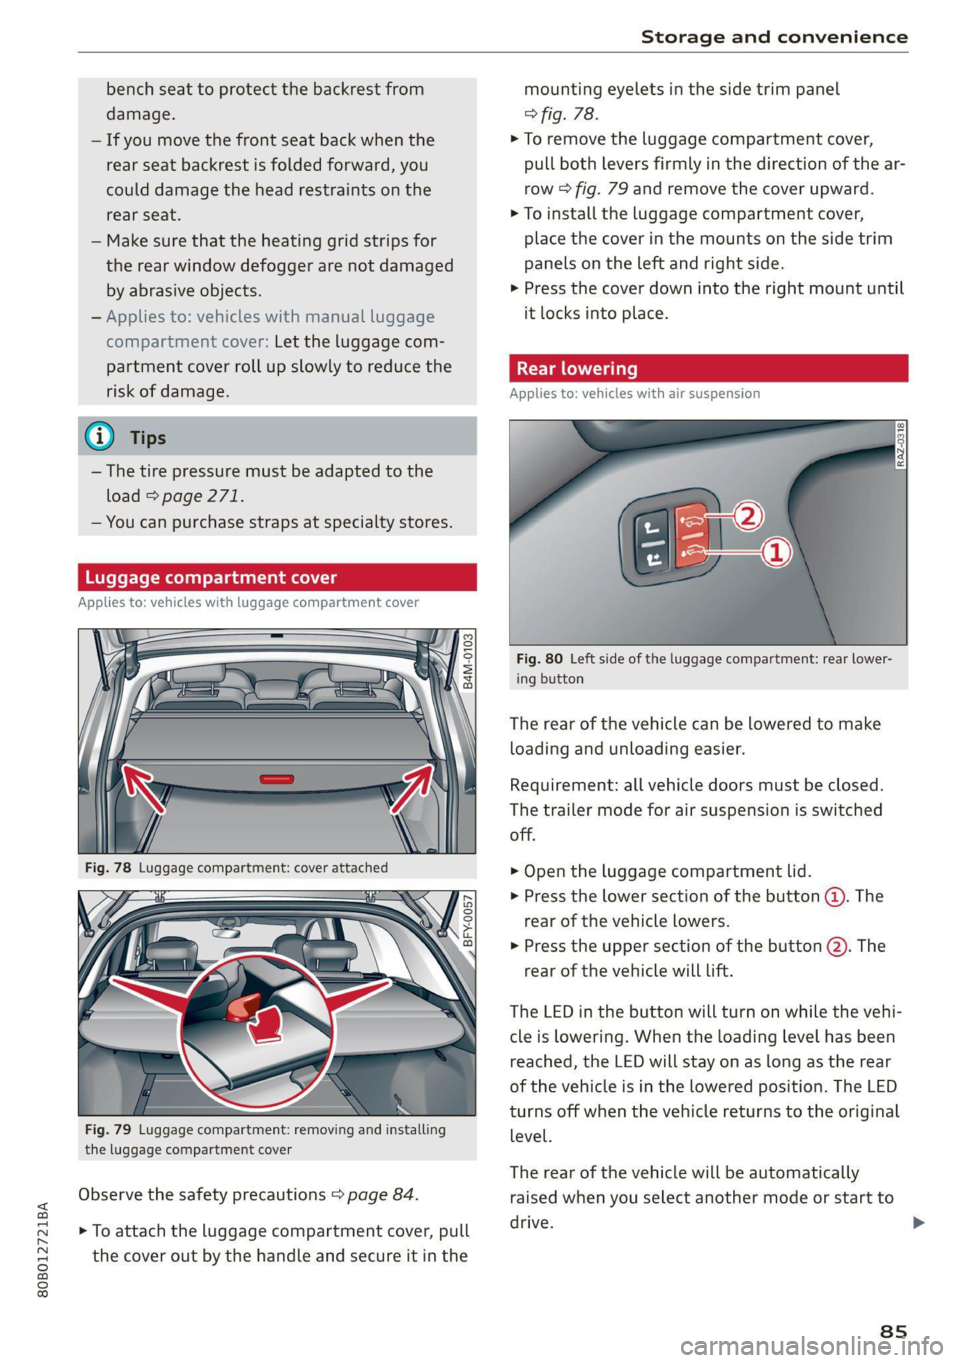
> To attach the luggage compartment cover, pull
the cover out by the handle and secure it in the
mounting eyelets in the side trim panel
> fig. 78.
> To remove the luggage compartment cover,
pull both levers firmly in the direction of the ar-
row > fig. 79 and remove the cover upward.
> To install the luggage compartment cover,
place the cover in the mounts on the side trim
panels on the left and right side.
> Press the cover down into the right mount until
it locks into place.
Applies to: vehicles with air suspension
Fig. 80 Left side of the luggage compartment: rear lower-
ing button
The rear of the vehicle can be lowered to make
loading and unloading easier.
Requirement: all vehicle doors must be closed.
The trailer mode for air suspension is switched
off.
> Open the luggage compartment lid.
> Press the lower section of the button (@). The
rear of the vehicle lowers.
> Press the upper section of the button @. The
rear of the vehicle will Lift.
The LED in the button will turn on while the vehi-
cle is lowering. When the loading level has been
reached, the LED will stay on as long as the rear
of the vehicle is in the lowered position. The LED
turns off when the vehicle returns to the original
level.
The rear of the vehicle will be automatically
raised when you select another mode or start to
drive.
ss
>
Page 90 of 332
Storage and convenience
ie-downs and luggage com nt net Car
Applies to: vehicles with removable cargo floor
Fig. 88 Luggage compartment: installing the cargo floor
Removing and installing the cargo floor
> To remove the cargo floor, pull the entire cargo
floor toward the back of the vehicle.
> To insert the cargo floor, slide it toward the
backrests until it audibly engages into the tabs
> fig. 88.
Roof rack
stretched out z -
General information
Applies to: vehicles with roof rack mount
Observe the safety precautions > page 84.
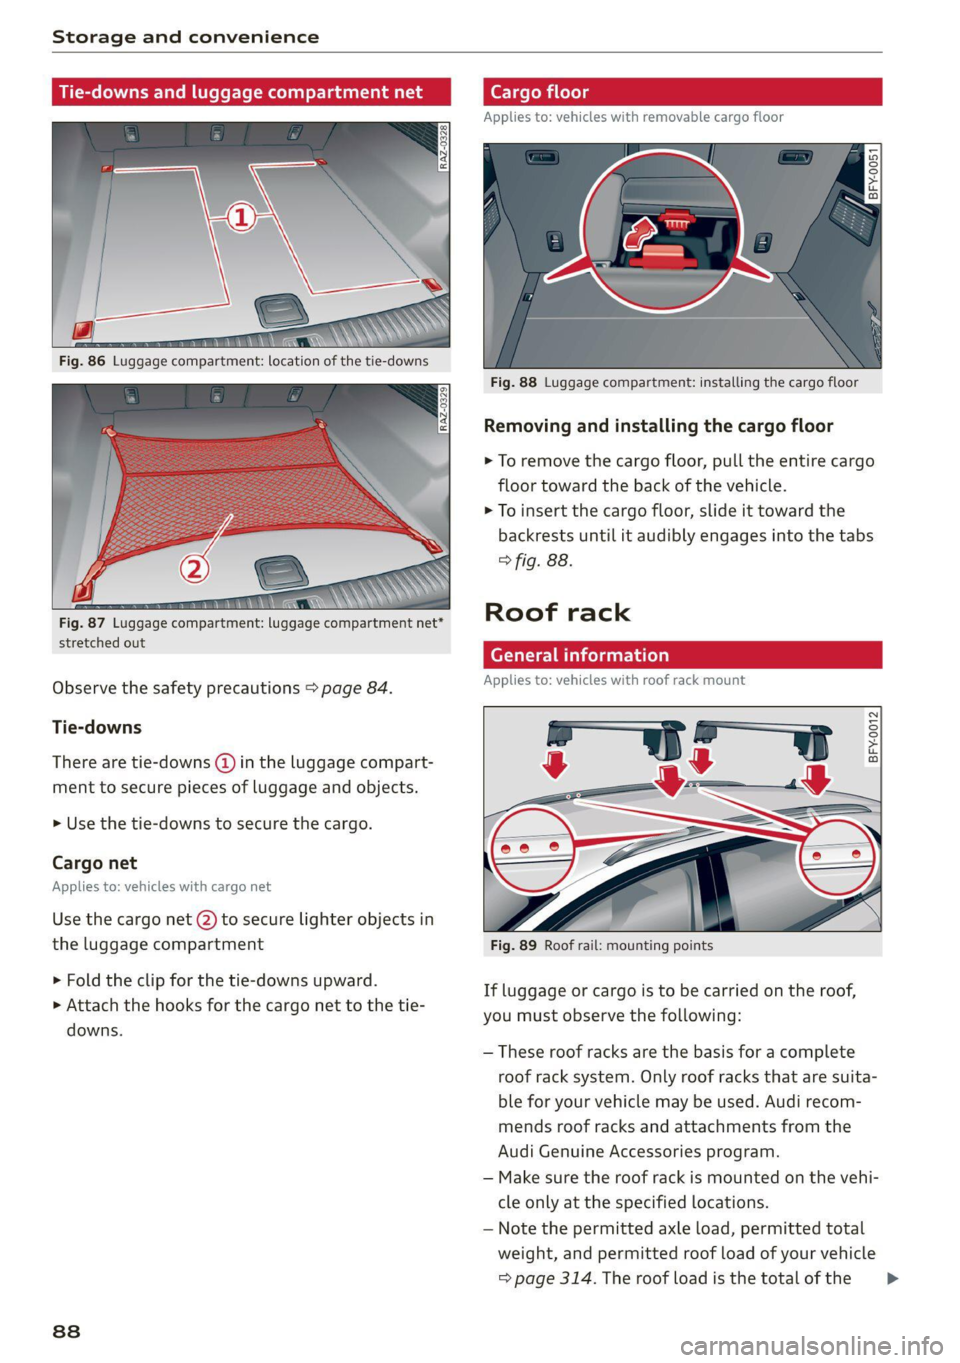
Tie-downs
BFY-0012 There are tie-downs (@ in the luggage compart-
ment to secure pieces of luggage and objects.
» Use the tie-downs to secure the cargo.
Cargo net
Applies to: vehicles with cargo net
Use the cargo net (2) to secure lighter objects in
the luggage compartment Fig. 89 Roof rail: mounting points
> Fold the clip for the tie-downs upward.
> Attach the hooks for the cargo net to the tie-
downs.
If luggage or cargo is to be carried on the roof,
you must observe the following:
— These roof racks are the basis for a complete
roof rack system. Only roof racks that are suita-
ble for your vehicle may be used. Audi recom-
mends roof racks and attachments from the
Audi Genuine Accessories program.
— Make sure the roof rack is mounted on the vehi-
cle only at the specified locations.
— Note the permitted axle load, permitted total
weight, and permitted roof load of your vehicle
=> page 314. The roof load is the total of the >
88
Page 109 of 332
80B012721BA
Driving
> If necessary, scroll to the e-tron short-term
statistics or e-tron long-term statistics.
Vehicle sound
Applies to: vehicles with plug-in hybrid drive
The electric drive system generates considerably
less noise than a combustion engine. An artificial
engine sound is generated when driving electri-
cally so that the vehicle can be heard from the
outside when driving. The vehicle sound auto-
matically fades out at higher speeds when the
sounds from the tires and wind start increasing.
ZA WARNING
Other road users may not be able to defini-
tively hear electric vehicles when they are
driving. This increases the risk of an accident
particularly when driving in areas with little
traffic, when maneuvering, or when driving in
reverse.
aia e Lae MNdeolaaile] Neda ate lig
Taare)
Your driving style greatly influences the amount
of fuel and energy consumed, the environmental
impact, and the wear on the motor, brakes, and
tires. Note the following information for efficient
and environmentally-conscious driving:
— Turn off electrical equipment that is not need-
ed, for example seat heating”.
— Anticipate upcoming traffic situations while
driving to avoid unnecessary acceleration and
braking.
— Avoid driving at high speeds.
— Avoid adding extra weight to the vehicle if pos-
sible, for example by not leaving roof racks or
bike racks installed when they are not needed.
— Make sure the tire pressure is correct.
— Have maintenance performed regularly on the
vehicle.
— Do not let the engine run while the vehicle
parked.
— Do not drive with winter tires during the summ-
er.
— Use the Start/Stop system.
— Utilize the engine braking effect.
— Avoid driving short distances when possible.
— Plug-in hybrid drive: If you must brake the vehi-
cle and coasting is not possible, then switch
quickly from the accelerator pedal to the brake
pedal and press the brake with steady pressure.
This allows the best possible use of recupera-
tion.
(i) Tips
The amount of noise produced by the vehicle
can increase significantly when driving with a
sporty style. Show respect to others around
you and the environment with the way you op-
erate your vehicle, especially at night.
Energy management
Your vehicle is equipped with an intelligent ener-
gy management system for distributing electrici-
ty. This significantly improves the starting ability
and increases the vehicle battery life.
G) Tips
— If you drive short distances frequently, the
vehicle battery may not charge enough
while driving. As a result, convenience func-
tions for electrical equipment may be tem-
porarily unavailable.
— The vehicle battery will gradually drain if
the vehicle is not driven for long periods of
time, or if electrical equipment is used
when the engine is not running. To ensure
that the vehicle can still be started, the
electrical equipment will be limited or
switched off.
Messages
B Drive system: malfunction! Safely stop vehi-
cle
There is a malfunction in the drive system. The
brake
booster and the power steering may stop
working. Stop the vehicle immediately or as soon
as possible and do not continue driving. Secure
the vehicle against rolling before exiting the vehi-
cle > page 98. Have the problem corrected by an
authorized Audi dealer or authorized Audi Service
Facility.
107
>
Page 118 of 332
Driving dynamic
Suspension
CET aR Cn) Led
Applies to: vehicles with suspension control
The adaptive dampers are an electronically-con-
trolled damping system. The firmness of the sus-
pension will adapt to the driving conditions and
the driving situation. The settings depend on the
selected Audi drive select* mode.
Air suspension
Applies to: vehicles with air suspension
The air suspension is an electronically-controlled
suspension and leveling system. The firmness of
the suspension will adapt to the driving condi-
tions and the driving situation. The system balan-
ces out changes in load. The vehicle level will also
adapt gradually to the vehicle speed in order to
reduce the wind resistance at high speeds and in-
crease the ground clearance at low speeds. The
settings depend on the selected Audi drive se-
lect* mode.
Displaying the vehicle level
» Applies to MMI: Select on the home screen: VE-
HICLE > Audi drive select.
The filled-in boxes represent the current vehicle
level. The more boxes that are filled in, the high-
er the ground clearance. The box that corre-
sponds with the current vehicle level will flash
while the vehicle is lifting or lowering. The target
level is highlighted in color.
Raising the vehicle
» Applies to MMI: Select on the home screen: VE-
HICLE > Audi drive select.
> Press Raise to reach the highest vehicle level
and thus the maximum ground clearance.
> Press Lower to lower the vehicle down again.
The Audi drive select* mode will be changed if
necessary when the vehicle is raised.
The vehicle will lower at speeds of approximately
22 mph (35 km/h) and below. This function may
only be used temporarily when increased ground
clearance is necessary. It is not intended for long
drives.
116
@) Note
— Also refer to the information about ground
clearance > page 116.
— When transporting the vehicle on a road
carrier, rail carrier, ship carrier, or other car-
rier, it may only be secured at the running
surfaces of the tires (circumference). Secur-
ing the vehicle at the axle components, sus-
pension struts, or towing eyes is not permit-
ted because the pressure in the air suspen-
sion struts can change during transport. The
vehicle might not be secured sufficiently if
this happens.
Ground clearance
The vehicle height and clearance can be influ-
enced by the following factors:
— Change in temperature
— Change in load
— Change to the Audi drive select* mode
— Lifting and lowering via the air suspension*
— Lower the rear* of the vehicle
ZA WARNING
To reduce the risk of injury, make sure no one
gets pinched when the vehicle level is chang-
ing, for example when cleaning the under-
body or the wheel housings.
() Note
Always make sure there is enough clearance
above and below the vehicle. This is especially
important for entrances with height restric-
tions, for example, before driving into under-
ground garages. You could also scrape the
ground when driving over the edges of curbs
or on steep ramps, which could damage your
vehicle.
Messages
Bair suspension: malfunction! You may con-
tinue driving slowly at max. XX mph (km/h)
There is a malfunction. Driving stability may be
limited. Drive to an authorized Audi dealer or >