Tire AUDI Q5 2021 Owner´s Manual
[x] Cancel search | Manufacturer: AUDI, Model Year: 2021, Model line: Q5, Model: AUDI Q5 2021Pages: 332, PDF Size: 118.86 MB
Page 122 of 332
Driving dynamic
these control systems are installed and this
can affect driving stability and increase the
risk of a collision.
— As the vehicle load increases, especially the
roof load, the vehicle's center of gravity also
increases along with the risk of the vehicle
tipping. To reduce the risk of an accident, al-
ways adapt your driving style to the current
conditions and avoid sudden driving maneu-
vers.
G) Tips
The ABS and ASR only function correctly when
all four wheels have a similar wear condition.
Different tire sizes can lead to a reduction in
motor power.
The So* button (or #, depending on the model)
for controlling the ESC is located in the center
console, in front of the selector lever. The ESC is
automatically switched on when the ignition is
switched on.
Limiting ESC
It may make sense in some situations to limit the
ESC stabilization functions so that the wheels can
spin:
— Rocking the vehicle to free it when it is stuck
— Driving in deep snow, on unpaved ground, or
with snow chains
— Driving downhill while braking on loose ground
— Driving with axle articulation
The ESC can be limited in order to allow the
wheels to spin.
—To limit the ESC, press the So button briefly.
The B indicator light will turn on.
—To completely reactivate the ESC stabilization
function, press the button again. The indicator
light turns off.
If you select the Offroad Audi drive select mode,
the Offroad ESC mode will be automatically
used. This mode is suited for driving offroad and
is designed for uneven terrain or loose ground.
120
Switching off ESC
For a more active control of the vehicle where the
stabilizing functions of the ESC cannot intervene,
the ESC can be switched off.
— To switch off the ESC, press and hold the Sor
button for more than three seconds. The B
and aa indicator lights turn on.
—To completely reactivate the ESC stabilization
function, press the button again. The indicator
lights turn off.
ZA\ WARNING
— When the ESC is switched off or limited,
there will be no vehicle stabilization or it will
be limited. The driving wheels could spin
and the vehicle could swerve, especially on
slick or slippery road surfaces. When there is
a heavy vehicle load and sudden driving ma-
neuvers, it may not be possible to prevent
the vehicle from tipping under certain cir-
cumstances, which increases the risk of an
accident.
— Because of the increased risk of an accident,
only drive with the ESC switched off or Limit-
ed when it is necessary. Reactivate the ESC
as soon as possible.
G) Tips
— If you select the Audi drive select* Offroad
mode, hill descent assist will switch on.
— If the ESC is limited, switched off, or mal-
functioning, systems with an automatic
braking intervention function may not be
fully available.
— If malfunctions occur in other systems or
certain driver assist systems are active, the
ESC must be switched on by the system. The
ESC
may switch on automatically and can-
not be operated with the button.
B fs / B © Stabilization control (ESC/
ABS): malfunction! See owner's manual
There is a malfunction in the ABS or EDL. This al-
so causes the ESC to malfunction. The brakes still >
Page 138 of 332
High-voltage system
> The power cable must be removed from the
socket.
Loosening the cable
> If necessary, loosen the screw (8) using the
screwdriver provided.
> Lift the lever @ all the way up.
> Pull the connector (2) out just until you feel re-
sistance.
> Close the lever @ until it is resting on the con-
nector @).
> Remove the connector (2) completely.
Attaching the cable
> Lift the lever @ up slightly.
> Insert the connector @) into the control unit
just until you feel resistance.
> Lift the lever @ all the way up.
> Insert the connector (2) all the way into the
control unit.
> Close the lever @).
> Tighten the screw @) using the screwdriver pro-
vided.
Z\ WARNING
— Note the warnings for charging > A\ in
Charging on page 126.
— Before switching a cable, always unplug the
power cable from the socket.
— Only change cables in a dry environment.
— The Audi charging system may only be used
as a complete unit consisting of the power
cables, the control unit, and the vehicle ca-
ble. Depending on the country, the total
length of the power cable, control panel and
vehicle cable may be restricted, for example
to 24.6 ft (7.5 m) in the USA. Audi recom-
mends using only cables approved by Audi.
@) Tips
The power cable with the power connector for
industrial sockets and the Audi charging sys-
tem control unit are designed to work togeth-
er. Changing the power cable to another con-
nector type may reduce the available charging
power of the entire system. Limitations on
the ability to transfer power (current capacity)
depending on the phase and the number of
136
available phases may affect the available
charging power.
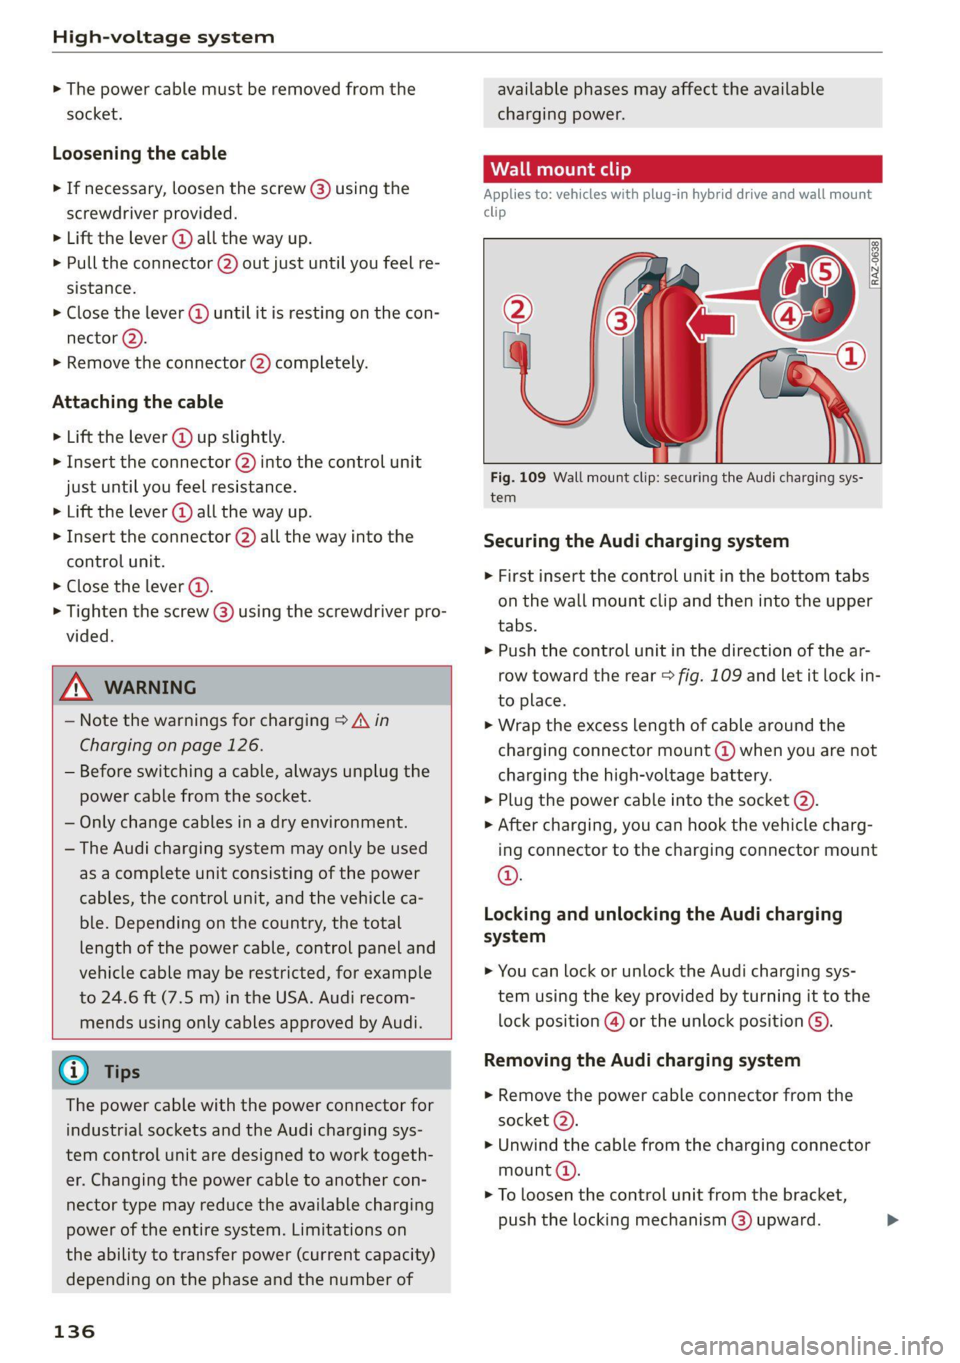
Applies to: vehicles with plug-in hybrid drive and wall mount
clip
RAZ-0638,
Fig. 109 Wall mount clip: securing the Audi charging sys-
tem
Securing the Audi charging system
> First insert the control unit in the bottom tabs
on the wall mount clip and then into the upper
tabs.
> Push the control unit in the direction of the ar-
row toward the rear > fig. 109 and let it lock in-
to place.
> Wrap the excess length of cable around the
charging connector mount @ when you are not
charging the high-voltage battery.
> Plug the power cable into the socket @).
> After charging, you can hook the vehicle charg-
ing connector to the charging connector mount
©.
Locking and unlocking the Audi charging
system
> You can lock or unlock the Audi charging sys-
tem using the key provided by turning it to the
lock position @) or the unlock position ().
Removing the Audi charging system
> Remove the power cable connector from the
socket (2).
> Unwind the cable from the charging connector
mount (4).
> To loosen the control unit from the bracket,
push the locking mechanism @) upward.
Page 141 of 332
80B012721BA
Trailer towing
in the trailer correctly will help to achieve this
weight. Having the tongue weight too low affects
the vehicle's handling.
You can determine the tongue weight using a
tongue weight scale, a bathroom scale, or a pub-
lic weigh station, for example.
The permitted tongue weight of your vehicle can
be found in the vehicle documentation or in
=> page 314.
Load distribution
Poor cargo load and distribution can negatively
impact vehicle handling. Load the trailer based
on the following criteria as much as possible:
— Store objects in the vehicle luggage compart-
ment, if possible. The vehicle should always
carry the heaviest possible load and the trailer
should have the lightest possible load.
— Distribute the load in the trailer so that the
heavy objects are as close to the axle as possi-
ble.
— Secure objects so that they do not slide.
— Utilize the maximum permitted tongue weight
if possible.
Tires
Set the tire pressure on your vehicle for a “full
load”; see the tire pressure sticker > page 271. If
necessary, also adjust the tire pressure on the
trailer according to the manufacturer's specifica-
tions.
The trailer and the vehicle should be equipped
with winter tires when driving in winter tempera-
tures.
Outside mirrors
If you cannot see the traffic behind the trailer
with the standard exterior mirrors, then you
must attach additional exterior mirrors. Adjust
them so you have a sufficient visibility behind
you.
Exterior lighting
Follow the legal regulations for lighting on your
trailer that are applicable in the country where
you are operating the vehicle. Contact an author-
ized Audi dealer or authorized Audi Service Facili-
ty for more information.
Before you start driving, check all lighting equip-
ment on the trailer while it is hitched to the vehi-
cle.
The headlight range control automatically ad-
justs the light range of the headlights.
When the B indicator light blinks, then the turn
signals are activated in trailer mode. If a turn sig-
nal on the trailer or on the vehicle fails while in
trailer mode, the indicator light will not blink
twice as fast to indicate this.
Safety chains
Make sure the safety chains are correctly applied
when pulling a trailer. The chains should hang
enough so that the trailer can drive around
curves. However, they must not touch the
ground.
Air suspension
Applies to: vehicles with air suspension
The Audi drive select* Comfort mode > page 115
must be selected before you adjust the tongue
weight on the trailer and hitch the trailer >@,
=> page 116.
The air suspension trailer mode must be switched
on.
Applies to MMI: select on the home screen: VE-
HICLE > Settings & Service > Air suspension:
trailer.
Switch trailer mode off again when you are no
longer towing a trailer.
For vehicles with a factory-installed trailer hitch,
the air suspension trailer mode will automatically
switch on if you connect the trailer cable to the
socket.
When using carrier systems that are mounted di-
rectly on the trailer hitch ball head, you can also
switch trailer mode off manually.
If you must drive on roads that are in poor condi-
tion, you can raise the vehicle again after hitching
the trailer or after adjusting the tongue weight
> page 116.
139
Page 144 of 332

Assist systems
intervention requests from the steering as-
sist systems may vary as well.
Surrounding area
detection
Sensor and camera coverage areas
RAZ-1071
Fig. 111 Rearview camera coverage area
The assist systems analyze the data from various
sensors and cameras installed in the vehicle. Do
not use any assist systems if there is damage in
there area of the sensors and cameras or on the
vehicle underbody. Damage can impair the func-
tion of the sensors and cameras or cause mal-
functions. Have an authorized Audi dealer or au-
thorized Audi Service Facility check their func-
tion.
142
Radar sensors
Depending on the vehicle equipment, the area
surrounding the entire vehicle may be detected
> fig. 110.
The wheel sensors on the rear corners of the vehi-
cle are positioned so that the adjacent lanes to
the left and right are detected on roads with a
normal lane width.
Ultrasonic sensors
Depending on vehicle equipment, various areas
may be displayed in the MMI using the ultrasonic
sensors > fig. 110.
The range of the displays depends on the location
of the ultrasonic sensors:
@ Approximately 4 ft (1.20 m)
® Approximately 3 ft (0.90 m)
@® Approximately 5.2 ft (1.60 m)
©® Approximately 3 ft (0.90 m)
© Approximately 3 ft (0.90 m)
The side area ©) is detected and evaluated when
passing. There may have been changes to the sur-
rounding area after switching the ignition off and
on again, after opening the doors, or if the vehi-
cle is left stationary for a period of time. In this
case, the area will appear black until the area has
been detected and evaluated.
Cameras
Use the camera image on the display to assist you
only if it shows a good, clear picture. Keep in
mind that the image in the display is enlarged
and distorted. Under certain circumstances, ob-
jects may appear different and unclear on the dis-
play.
The rearview camera can only detect the area
marked in red > fig. 111. Only this area is dis-
played on the center display. > A\.
ZX WARNING
Sensors and cameras have spots in which the
surrounding area cannot be detected. Objects,
animals, and people may only be detected
with limitations may not be detected at all.
Always monitor the traffic and the vehicle's >
Page 147 of 332
80B012721BA
Driving information
Driving information
Speed warning system
Applies to: vehicles with speed warning system
The speed warning system helps the driver to
stay below a specified maximum speed. A warn-
ing threshold can be set in the MMI for this pur-
pose.
Once the speed slightly exceeds the stored
threshold, the speed warning system will alert
the driver with an indicator in the instrument
cluster and a warning tone. Once the speed drops
below the stored maximum speed, the indicator
will turn off.
Setting a threshold is recommended if you would
like to be reminded when you reach a certain
maximum speed. Situations where you may want
to do so include driving in a country with a gener-
al speed limit or if there is a specified maximum
speed for winter tires.
@) Tips
Regardless of the speed warning system, you
should always monitor your speed using the
speedometer and make sure you are adhering
to the legal speed limit.
Setting the warning threshold
Applies to: vehicles with speed warning system
> Applies to: MMI: Select on the home screen:
VEHICLE > Driver assistance > Speed warning.
Messages
Applies to: vehicles with speed warning system
iol Manually set speed limit XX mph
(km/h) exceeded
The stored speed was exceeded.
Camera-based traffic
sign recognition
Applies to: vehicles with camera-based traffic sign recognition
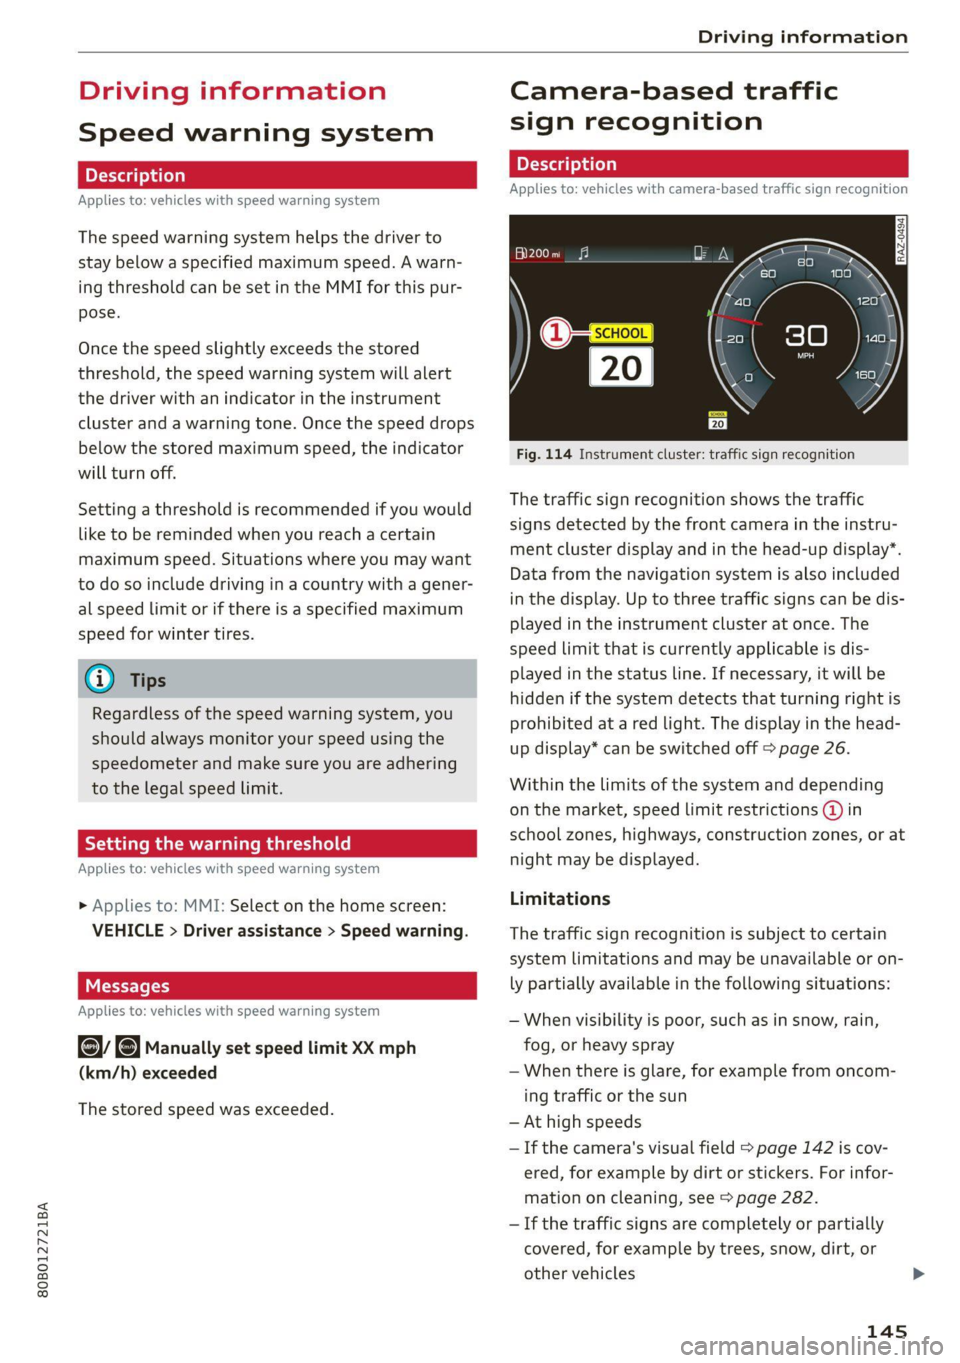
Fig. 114 Instrument cluster: traffic sign recognition
The traffic sign recognition shows the traffic
signs detected by the front camera in the instru-
ment cluster display and in the head-up display”.
Data from the navigation system is also included
in the display. Up to three traffic signs can be dis-
played in the instrument cluster at once. The
speed limit that is currently applicable is dis-
played in the status line. If necessary, it will be
hidden if the system detects that turning right is
prohibited at a red light. The display in the head-
up display* can be switched off > page 26.
Within the limits of the system and depending
on the market, speed limit restrictions @ in
school zones, highways, construction zones, or at
night may be displayed.
Limitations
The traffic sign recognition is subject to certain
system limitations and may be unavailable or on-
ly partially available in the following situations:
— When visibility is poor, such as in snow, rain,
fog, or heavy spray
— When there is glare, for example from oncom-
ing traffic or the sun
— At high speeds
— If the camera's visual field > page 142 is cov-
ered, for example by dirt or stickers. For infor-
mation on cleaning, see > page 282.
— If the traffic signs are completely or partially
covered, for example by trees, snow, dirt, or
other vehicles
145
Page 181 of 332
80B012721BA
Parking and maneuvering
Operating the peripheral cameras
Applies to: vehicles with peripheral cameras
Fig. 140 Center display: peripheral cameras.
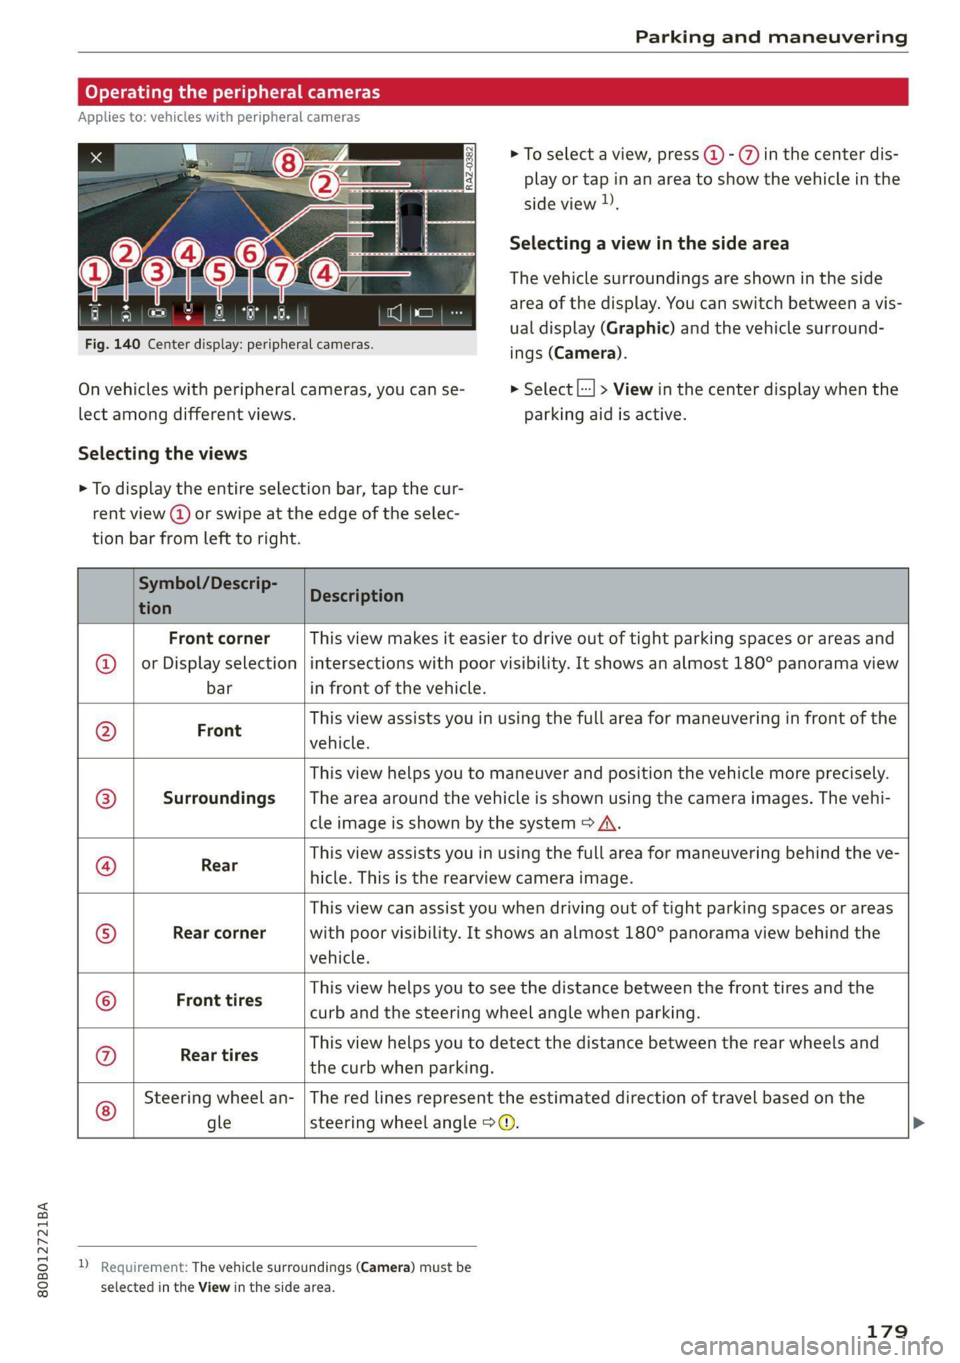
On vehicles with peripheral cameras, you can se-
lect among different views.
Selecting the views
> To select a view, press (4) - %) in the center dis-
play or tap in an area to show the vehicle in the
side view ).
Selecting a view in the side area
The vehicle surroundings are shown in the side
area of the display. You can switch between a vis-
ual display (Graphic) and the vehicle surround-
ings (Camera).
> Select |---| > View in the center display when the
parking aid is active.
> To display the entire selection bar, tap the cur-
rent view (a) or swipe at the edge of the selec-
tion bar from left to right.
Symbol/Descrip-
tion
Description
Front corner
or Display selection
bar
This view makes it easier to drive out of tight parking spaces or areas and
intersections with poor visibility. It shows an almost 180° panorama view
in front of the vehicle.
Front
This view assists you in using the full area for maneuvering in front of the
vehicle.
Surroundings
This view helps you to maneuver and position the vehicle more precisely.
The area around the vehicle is shown using the camera images. The vehi-
cle image is shown by the system > A\.
Rear
This view assists you in using the full area for maneuvering behind the ve-
hicle. This is the rearview camera image.
Rear corner
This view can assist you when driving out of tight parking spaces or areas
with poor visibility. It shows an almost 180° panorama view behind the
vehicle.
Front tires
This view helps you to see the distance between the front tires and the
curb and the steering wheel angle when parking.
©G/O@}]
©
|S}
©
|0)
©
Rear tires
This view helps you to detect the distance between the rear wheels and
the curb when parking.
©
Steering wheel an-
gle
The red lines represent the estimated direction of travel based on the
steering wheel angle >@.
D Requirement: The vehicle surroundings (Camera) must be
selected in the View in the side area.
179
Page 186 of 332

Parking and maneuvering
ZA\ WARNING
— Observe the safety precautions and note the
limits of the assist systems, sensors, and
cameras > page 141.
— The driver is always responsible when enter-
ing or exiting a parking space and during
similar maneuvers.
— Do not use this function if the vehicle cannot
move freely, for example when on a vehicle
jack.
— Sensors and cameras have spots in which
the surrounding area cannot be detected.
Objects, animals, and people may only be
detected with limitations may not be detect-
ed at all. Always monitor the traffic and the
vehicle's surroundings directly and do not
become distracted.
@) Note
— Do not use the park assist systems when
transporting cargo that extends out of the
vehicle, when snow chains are mounted, or
when the parking space is on a hill or in-
cline.
— Park assist guides the vehicle either away
from curbs or onto them if other vehicles
are parked on the curb. Make sure that your
vehicle's tires and rims are not damaged.
Resume control of the vehicle in time or
stop the parking process if needed to pre-
vent damage.
G) Tips
Follow the legal regulations in the country
where you are located when using Park assist.
dem Re eee
Applies to: vehicles with park assist
Requirement: a suitable parking space must be
found and selected > page 181. The vehicle must
initially be stationary.
In the center display, arrows and symbols on the
vehicle roof @) > page 182, fig. 145 indicate
what action is needed, such as applying the
brakes or changing the direction. Park assist au-
184
tomatically steers the vehicle into the parking
space while the driver presses the pedals.
> After stopping the vehicle briefly, make sure
the actual direction the vehicle is traveling
matches the direction indicated by the park as-
sist.
> Remove your hands from the steering wheel.
>» Pay attention to the path of the vehicle. If the
traffic situation permits, accelerate carefully
> AX. The maximum parking speed is approxi-
mately 4 mph (7 km/h).
> Follow the visual instructions in the center dis-
play and the warning tones until the parking
process
has ended.
Z\ WARNING
— Observe the safety precautions and note the
limits of the assist systems, sensors, and
cameras > page 141.
— The park assist is an assist system. The driv-
er is still responsible for monitoring the ve-
hicle's surroundings and preventing colli-
sions when using the system.
— When using park assist to drive into or out
of a parking space, the steering wheel turns
quickly on its own. Reaching into the steer-
ing wheel spokes while this is happening can
result in injury.
G) Tips
You can also cancel the driving direction set
by the system by shifting between a forward
gear and reverse gear. Based on the position
of the vehicle, the system then calculates the
additional steering and driving directions for
maneuvering.
ten Lei ek ace
Applies to: vehicles with park assist
If you parked the vehicle in a parallel parking
space, park assist can help you drive out of it.
Park assist automatically steers the vehicle out of
the parking space while the driver presses the
pedals.
» Start the engine.
> Press the Pe button in the center console.
Page 217 of 332
80B012721BA
Navigation
OTN eee late celeurl ela)
Applies to: vehicles with navigation system and online traffic
information
The MMI can receive real-time online traffic infor-
mation about congestion, accidents, road con-
struction, and other incidents.
Requirement: the MMI must be connected to the
Internet > page 197, Audi connect. Traffic infor-
mation must be switched on in the MMI
>page 215.
Traffic information will be displayed on the
standard map > page 209, fig. 154.
Online traffic information is also displayed on the
standard map > page 212.
G) Tips
— Having the online traffic information func-
tion switched on provides the most accurate
reports of traffic situations and traffic fore-
casting. Your vehicle transmits and process-
es its anonymous, encrypted position infor-
mation at regular intervals to the traffic da-
ta provider. You can switch off data transfer
at any time > page 305.
— The online traffic information network is
not available in all countries, and the cover-
age is not nationwide.
Settings
Applies to: vehicles with navigation system
You can adjust the navigation system settings in
the instrument cluster and in the MMI display
separately. The settings depend on the country
and vehicle equipment.
Accessing settings
> Applies to: MMI: Select on the home screen:
NAVIGATION > ©}.
Accessing settings using the multifunction
steering wheel
> Applies to: multifunction steering wheel: Select
in the instrument cluster: Navigation tab >
button.
Please note that a setting applied to the multi-
function steering wheel is only valid for the in-
strument cluster map.
Map settings
Satellite map: see > page 212.
Traffic: you can display current traffic informa-
tion on the map.
— Free flow of traffic
— Traffic obstructions
— Traffic information
Map colors
— Automatic: the map display adapts to the light-
ing conditions (for example, by changing from
day to night when driving through a tunnel).
— Day or Night
Map orientation
— 2D heading-up map/2D north-up map: the
current vehicle position is displayed. The map is
oriented in the direction of travel or to the
north.
— 3D heading-up map: the current vehicle posi-
tion is shown on a three-dimensional map and
is aligned to the direction of travel.
— Overview: the entire route from the vehicle po-
sition to the destination or the next stopover is
displayed on the map. The map is oriented to
the north.
Automatic zoom
— On: the map scale is adapted automatically de-
pending on the type of road being traveled (ex-
pressway, highway, other roads) so that you al-
ways have an optimal overview of the road
ahead. When route guidance is active, the scale
is adjusted automatically for a better detailed
view when there are upcoming maneuvers.
— Intersection: when route guidance is active, the
scale is adjusted automatically for a better de-
tailed view when there are upcoming maneu-
vers.
— Off
MMI map contents/Map content: you can switch
the display of additional information (such as
POIs) on the map in the center display on or off. >
215
Page 233 of 332
80B012721BA
Media
Opening the search
Requirement: the selected source must support
the search function.
> Applies to: MMI: Select on the home screen:
MEDIA > Search.
Entries that contain the entered search term are
listed in the results list. Each result is marked
with the symbol for a category in the media cen-
ter > page 228.
You can search for the following categories:
— Artists
— Albums
— Tracks
— Genres
— Videos
Options and settings
Context-dependent functions and settings may
be available depending on the selected source,
the connected mobile device, and the connection
type.
Requirement: the playback view must be dis-
played @) > page 229, fig. 164.
> Press More @).
Play more like this
The track currently playing is quickly analyzed for
features such as artist, genre, mood, and beat,
and a smart playlist with similar tracks will be
shown.
Aspect ratio
Audi recommends the Auto setting for the pic-
ture format. If you press on an aspect ratio, you
will see a preview of the setting on the screen.
Press OK to apply the selected aspect ratio.
The following table gives an overview of the as-
pect ratios. The possible aspect ratios depend on
the source or video file being played.
Aspect ra-
Description
tio B
The MMI detects the picture for-
mat of the source and displays the
image in the optimal ratio.
Auto
The image is fixed in the corre-
sponding ratio. Select one of these
options if the image is distorted or
a section of the image is cut off or
blurry when Auto is selected.
4:3,
16:9
The image is enlarged to fill the en-
an tire display.
The image is displayed in the ratio
of the source format. Select this
option if the image is distorted or a
section of the image is cut off or
blurry when Auto is selected.
Accessing settings
Original
> Applies to: MMI: Select on the home screen:
MEDIA > ©.
Depending on the vehicle equipment, the follow-
ing settings may be available:
Online additional data
Requirement: the MMI must be connected to the
Internet. A data plan must be available
=> page 201.
When the function is switched on, additional in-
formation (such as album cover, artist, track) will
be loaded depending on the availability from the
different providers.
Supported media and file formats
The USB storage device connection supports the
following media file properties:
231
Page 263 of 332
80B012721BA
Wheels
Wheels Wheels
and Tires
General information
> Check your tires regularly for
damage, such as punctures,
cuts, cracks, and bulges. Remove
foreign objects from the tire
tread.
>If driving over curbs or similar
obstacles, drive slowly and ap-
proach the curb at an angle.
> Have faulty tires or rims re-
placed immediately.
>Protect your tires from oil,
grease, and fuel.
>Mark tires before removing
them so that the same running
direction can be maintained if
they are reinstalled.
>Lay tires flat when storing and
store them ina cool, dry location
with as little exposure to light as
possible.
A WARNING
—Never drive faster than the
maximum permitted speed for
your tires. This could cause the
tires to heat up too much. This
increases the risk of an acci-
dent because it can cause the
tire to burst.
—Always adapt your driving to
the road and traffic condi-
tions. Drive carefully and re-
duce your speed on icy or slip-
pery roads. Even winter tires
can lose traction on black ice.
() Note
—Please note that summer and
winter tires are designed for
the conditions that are typical
in those seasons. Audi recom-
mends winter tires during the
winter months. Low tempera-
tures significantly decrease
the elasticity of summer tires,
which affects traction and
braking ability. If summer
tires are used in very cold tem-
peratures, cracks can form on
the tread bars, resulting in
permanent tire damage that
can cause loud driving noise
and unbalanced tires.
—Burnished, polished or
chromed rims must not be
used in winter driving condi-
tions. The surface of the rims
does not have sufficient corro-
sion protection for this and
could be permanently dam-
aged by road salt or similar
substances.
261