rear view mirror AUDI Q5 2021 Owner´s Manual
[x] Cancel search | Manufacturer: AUDI, Model Year: 2021, Model line: Q5, Model: AUDI Q5 2021Pages: 332, PDF Size: 118.86 MB
Page 53 of 332
80B012721BA
Lights and Vision
— When using lighting equipment, the driver
is responsible for adhering to any local ap-
plicable regulations while driving and when
parking the vehicle.
— Only the front headlights turn on when the
daytime running lights are switched on*. In
vehicles in certain markets, the tail lights
will also turn on.
—Incool or damp weather, the inside of the
headlights, turn signals, and tail lights can
fog over due to the temperature difference
between the inside and outside. They will
clear shortly after switching them on. This
does not affect the service life of the light-
ing.
Turn signal and high beam lever
BFV-0012
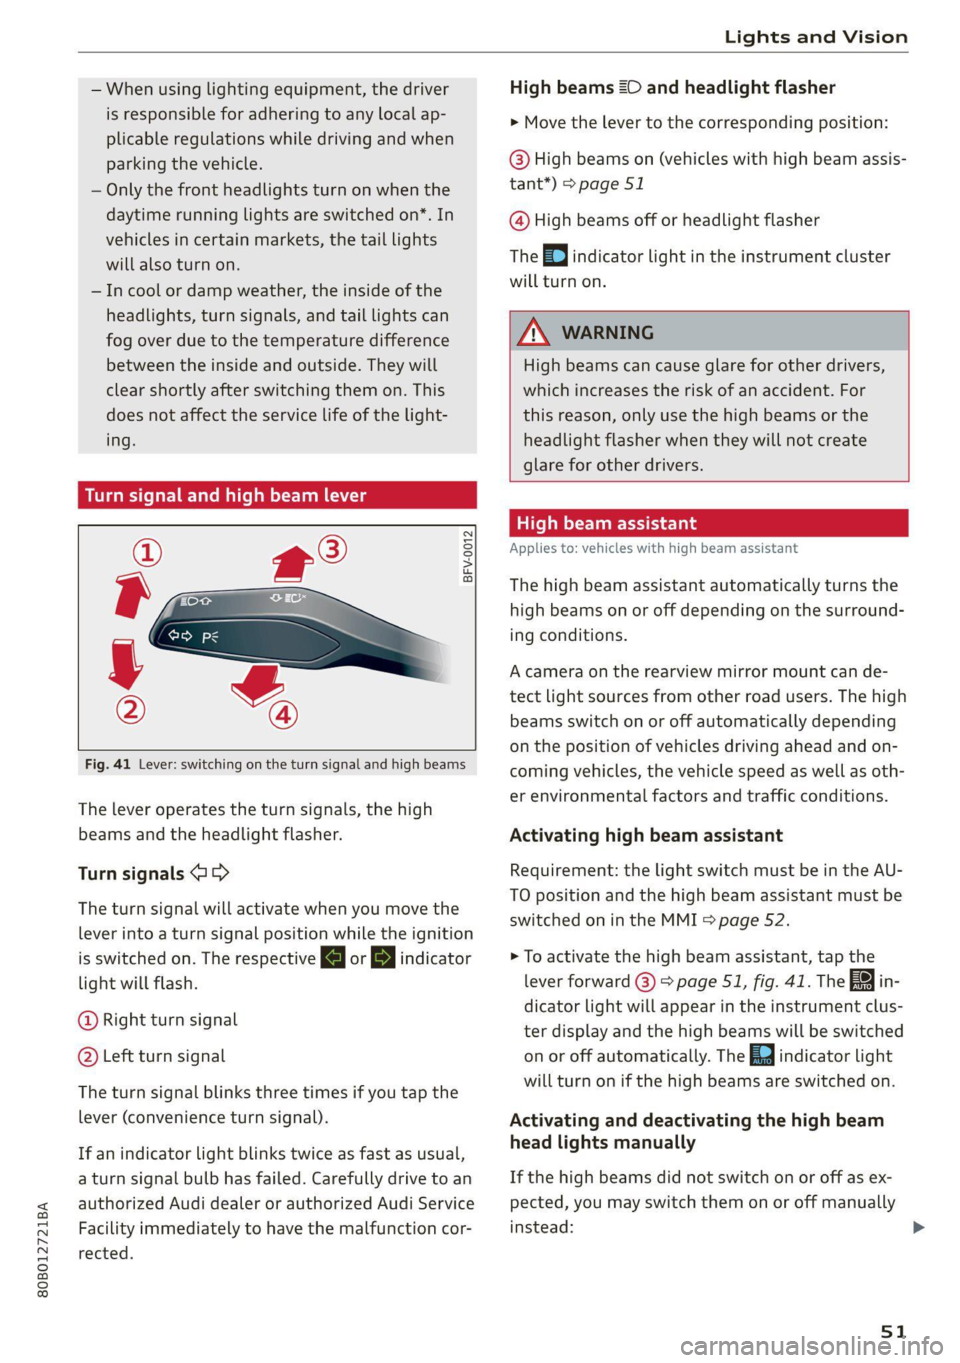
Fig. 41 Lever: switching on the turn signal and high beams
The lever operates the turn signals, the high
beams and the headlight flasher.
Turn signals @ >
The turn signal will activate when you move the
lever into a turn signal position while the ignition
is switched on. The respective KJ or By indicator
light will flash.
@ Right turn signal
@ Left turn signal
The turn signal blinks three times if you tap the
lever (convenience turn signal).
If an indicator light blinks twice as fast as usual,
a turn signal bulb has failed. Carefully drive to an
authorized Audi dealer or authorized Audi Service
Facility immediately to have the malfunction cor-
rected.
High beams =O and headlight flasher
> Move the lever to the corresponding position:
@) High beams on (vehicles with high beam assis-
tant”) > page 51
@ High beams off or headlight flasher
The
=o] indicator light in the instrument cluster
will turn on.
Z\ WARNING
High beams can cause glare for other drivers,
which increases the risk of an accident. For
this reason, only use the high beams or the
headlight flasher when they will not create
glare for other drivers.
ithe
Applies to: vehicles with high beam assistant
The high beam assistant automatically turns the
high beams on or off depending on the surround-
ing conditions.
A camera on the rearview mirror mount can de-
tect light sources from other road users. The high
beams switch on or off automatically depending
on the position of vehicles driving ahead and on-
coming vehicles, the vehicle speed as well as oth-
er environmental factors and traffic conditions.
Activating high beam assistant
Requirement: the light switch must be in the AU-
TO position and the high beam assistant must be
switched on in the MMI > page 52.
> To activate the high beam assistant, tap the
lever forward @) > page 51, fig. 41. The fa in-
dicator light will appear in the instrument clus-
ter display and the high beams will be switched
on or off automatically. The Ed indicator light
will turn on if the high beams are switched on.
Activating and deactivating the high beam
head lights manually
If the high beams did not switch on or off as ex-
pected, you may switch them on or off manually
instead:
51
Page 58 of 332
Lights and Vision
way out. The mirrors will make a loud noise
when they latch into place. The mirror hous-
ing must not be moved back into place by
hand because this could impair the function
of the mirror mechanism.
— Applies to: vehicles without power folding
exterior mirrors: If the mirror housing was
moved by outside forces (such as an impact
when maneuvering), you must move it back
in place by hand.
— If you wash the vehicle in an automatic car
wash, you must fold the exterior mirrors in
to reduce the risk of damage to the mirrors.
Never fold power folding exterior mirrors*
by hand. Only fold them in and out using
the power controls.
G) Tips
If the power adjusting function malfunctions,
the glass in both mirrors can be adjusted by
pressing on the edge of it by hand.
Dimming the mirrors
Manual dimming rearview mirror
> Pull the lever on the bottom of the mirror back.
Automatic dimming rearview mirror
Applies to: vehicles with automatic dimming mirrors
> The interior and exterior mirrors dim automati-
cally when light shines on them, for example
from headlights on a vehicle behind you.
ZA WARNING
Applies to: vehicles with automatic dimming mirrors
— Electrolyte fluid can leak out from broken
mirror glass. This liquid can irritate the skin,
eyes and respiratory system. If there is con-
tact with the fluid, flush immediately with
plenty of water. Consult a physician if neces-
sary.
— Repeated or long-term exposure to electro-
lyte fluid can lead to irritation of the air-
ways, especially in people with asthma or
other respiratory conditions. Take deep
breaths immediately after leaving the vehi-
cle or, if this is not possible, open all of the
doors and windows as wide as possible.
56
— If electrolyte fluid comes into contact with
the eyes, flush them thoroughly with plenty
of clean water for at least 15 minutes and
then seek medical attention.
— If electrolyte fluid comes into contact with
the skin, flush the affected area with clean
water for at least 15 minutes, and then
clean with soap and water and seek medical
attention. Clean affected clothing and shoes
thoroughly before wearing again.
— If the fluid was swallowed and the person is
conscious, flush the mouth with water for at
least 15 minutes. Do not induce vomiting
unless this is recommended by medical pro-
fessionals. Seek medical attention immedi-
ately.
C) Note
Applies to: vehicles with automatic dimming mirrors
Electrolyte fluid can leak out from broken mir-
ror glass. This liquid damages plastic surfaces
and paint. Clean this liquid as quickly as possi-
ble, for example with a wet sponge.
G) Tips
Applies to: vehicles with automatic dimming mirrors
— If the light reaching the rearview mirror is
obstructed, the automatic dimming mirror
will not function correctly,
— The automatic dimming mirrors do not dim
when the interior lighting is turned on or
the reverse gear is selected.
ire} KR So
2
= z a
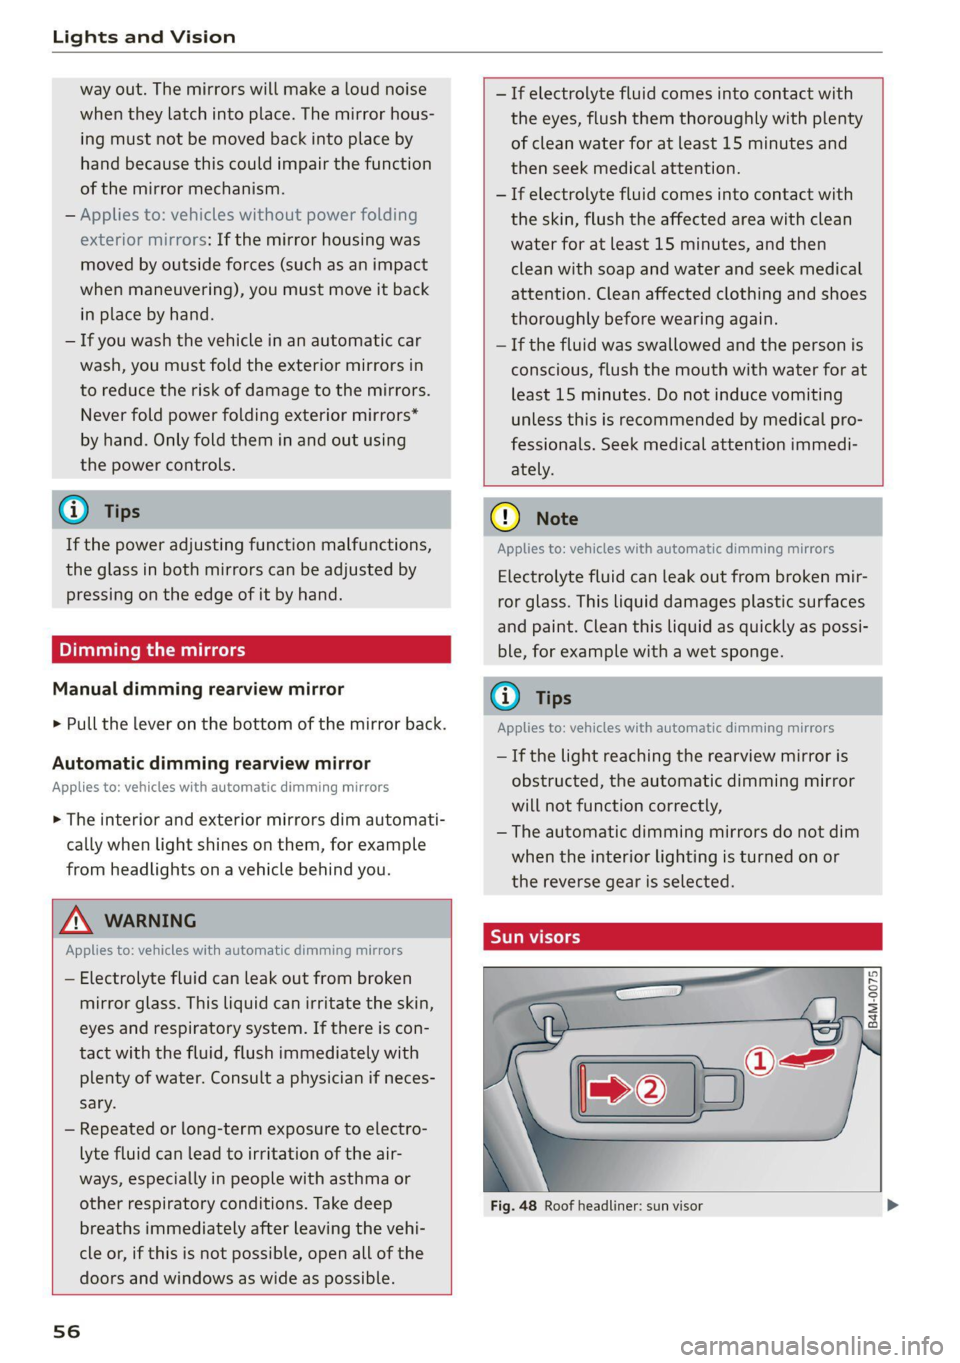
Fig. 48 Roof headliner: sun visor
Page 62 of 332
Lights and Vision
dealer or authorized Audi Service Facility to have
the malfunction repaired.
SB Automatic wipers: malfunction! See owner's
manual
The light/rain sensor is malfunctioning. You can
still control all functions that are not controlled
by the rain sensor using the windshield wiper lev-
er. Drive immediately to an authorized Audi deal-
er or authorized Audi Service Facility to have the
malfunction repaired.
Digital compass
Scare meee lu Rei Rela
Applies to: vehicles with digital compass
BFV-0288
3
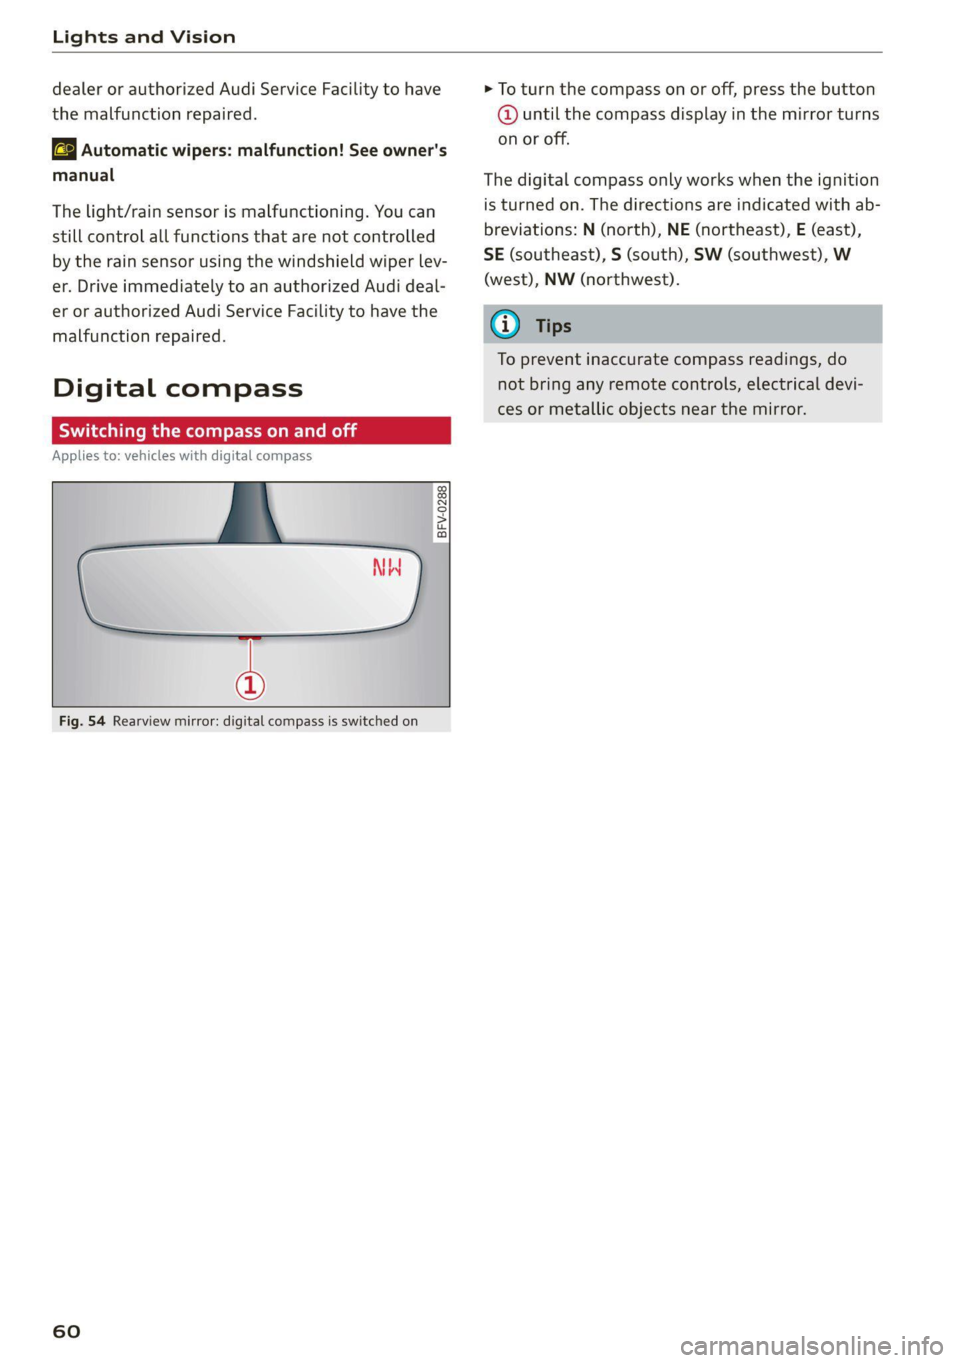
Fig. 54 Rearview mirror: digital compass is switched on
60
> To turn the compass on or off, press the button
@ until the compass display in the mirror turns
on or off.
The digital compass only works when the ignition
is turned on. The directions are indicated with ab-
breviations: N (north), NE (northeast), E (east),
SE (southeast), S (south), SW (southwest), W
(west), NW (northwest).
G) Tips
To prevent inaccurate compass readings, do
not bring any remote controls, electrical devi-
ces or metallic objects near the mirror.
Page 63 of 332
80B012721BA
Lights and Vision
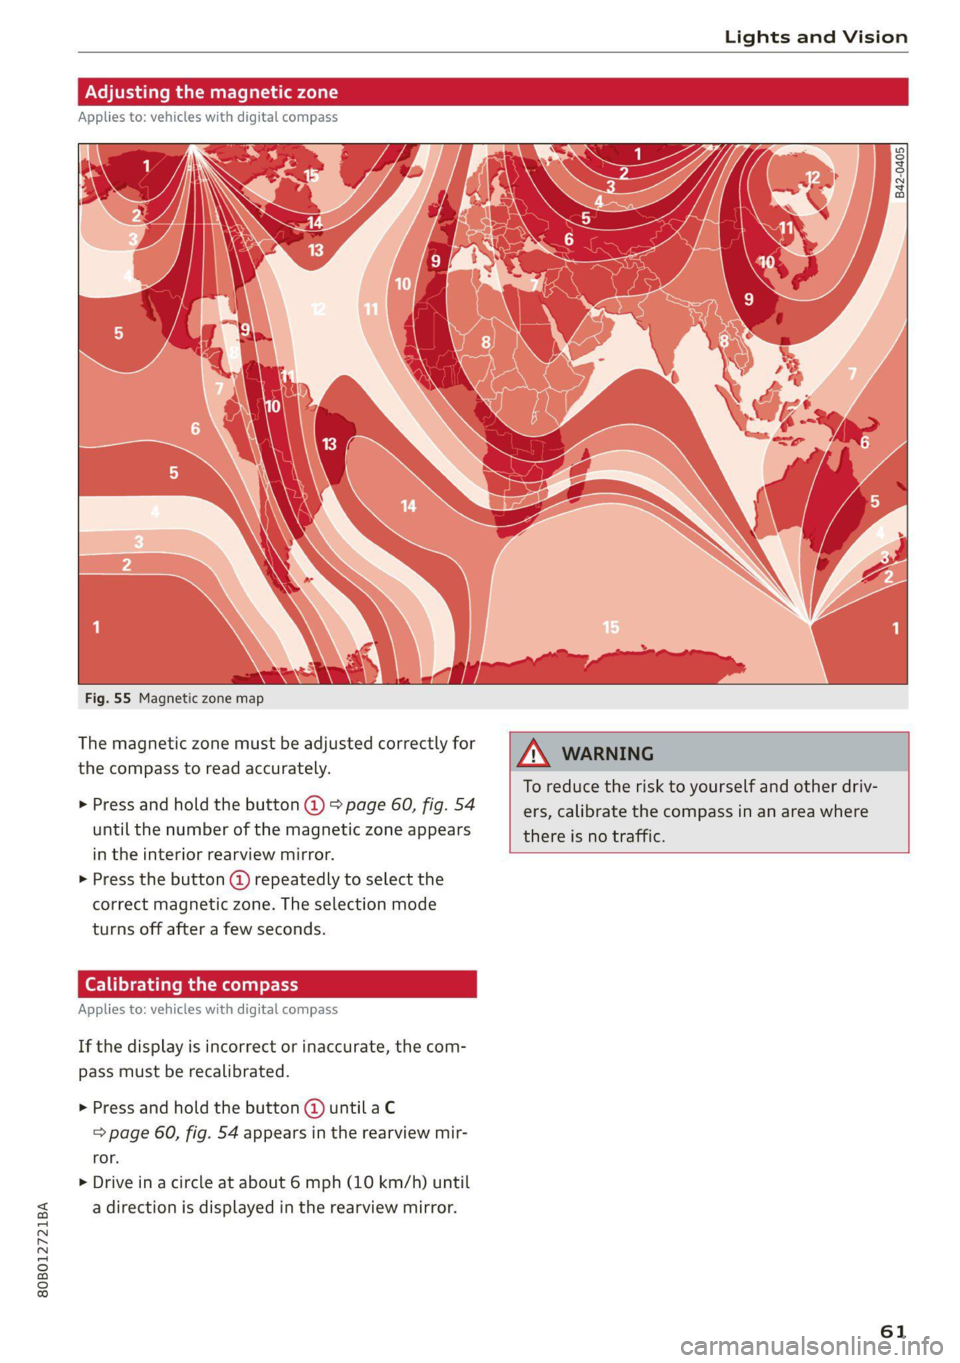
Fig. 55 Magnetic zone map
The magnetic zone must be adjusted correctly for
the compass to read accurately.
> Press and hold the button @ > page 60, fig. 54
until the number of the magnetic zone appears
in the interior rearview mirror.
> Press the button () repeatedly to select the
correct magnetic zone. The selection mode
turns off after a few seconds.
Calibrating the co
Applies to: vehicles with digital compass
If the display is incorrect or inaccurate, the com-
pass must be recalibrated.
> Press and hold the button @ until a C
=> page 60, fig. 54 appears in the rearview mir-
ror.
> Drive in a circle at about 6 mph (10 km/h) until
a direction is displayed in the rearview mirror.
B42-0405
To reduce the risk to yourself and other driv-
ers, calibrate the compass in an area where
there is no traffic.
61
Page 64 of 332
Sitting correctly and safely
Sitting correctly and
safely
Correct passenger
seating position
(eT reeeleur isola)
As
the driver, you are responsible for making sure
every passenger is sitting correctly in their seat
and maintaining this seating position while driv-
ing. Make sure that:
— Every passenger in the vehicle has adjusted his
or her seat correctly > page 62
— The steering wheel is adjusted correctly
=> page 65
— The mirrors are adjusted so that there is a suffi-
cient view of the area around the vehicle
=>page 55
— Every passenger in the vehicle has his or her
head restraint adjusted correctly > page 66
— Every passenger in the vehicle has his or her
safety belt fastened correctly > page 67
— The activation status of the front passenger's
airbag is suitable for the passenger in the front
passenger's seat > page 74
— Children are secured in suitable child safety
seats that are secured to appropriate vehicle
seats > page 76. Read and observe the impor-
tant safety information pertaining to the use of
child safety seats on the front passenger's seat
= A\ in General information on page 76.
Examples of incorrect seating positions
Safety belts can only provide its optimal protec-
tion when they are routed correctly. Incorrect
seating positions significantly reduce the protec-
tive functions of the safety belts and increase the
risk of injury due to incorrect belt routing.
The following list includes examples of seating
positions that could be dangerous for all vehicle
occupants. This is not a complete list. The pur-
pose is to provide examples to increase your
awareness of the topic. The following points ap-
ply when the vehicle is in motion:
— Never stand inside the vehicle.
— Never stand on the seats.
62
— Never kneel on the seats.
— Never tilt your backrest too far back.
— Never lean against the instrument panel.
— Never lie down on the rear bench seat.
— Never sit only on the front section of the seat.
— Never sit sideways on the seat.
— Never lean against the window.
— Never place your feet out of the window.
— Never place your feet on the instrument panel.
— Never place your feet on the seat cushion.
— Never ride in the footwell.
— Never sit on the armrests.
— Never drive or ride in a seat without fastening
your safety belt.
— Never ride in the luggage compartment.
ZA WARNING
Incorrect seating positions, failure to wear a
safety belt, or being too close to an airbag in-
crease the risk of serious or fatal injury to ve-
hicle occupants, especially if the airbags de-
ploy and come into contact with occupants
who are not seated correctly. Note the impor-
tant information and warnings in the chapters
for the topics given above.
G) Tips
If you or other vehicle passengers have physi-
cal limitations that prevent sitting in a correct
position, modifications to the vehicle may be
necessary. For more information, contact an
authorized Audi dealer or authorized Audi
Service Facility, or call Audi customer support
at 1-800-822-2834.
Front seats
General information
Make sure that:
— You can press the pedals down completely
while your legs are slightly bent
— The distance between your upper body and the
steering wheel or instrument panel is at least
10 inches (25 cm)
— The distance between your knees and the in-
strument panel is at least 4 inches (10 cm) >
Page 151 of 332

80B012721BA
Driving information
> To start timing a new lap after driving a lap, se-
lect New lap in the menu. This starts timing
the next lap at the same time.
After completing a lap, the difference between
the last lap and the previous best lap time will be
won an indicated with a “~” or “+”.
Pausing timing and displaying a split time
> To insert a pause @ select Pause in the menu.
> To resume timing, select Resume in the menu.
> To display a split time, select Split time in the
menu. The split time appears for approxi-
mately ten seconds in the instrument cluster.
The current lap timing will continue running.
Canceling lap timing
The timing of the current lap will stop. The lap
time will be erased and will not be included in the
statistics.
> Select Cancel lap in the menu.
Resetting the time
> Select Reset lap times in the menu.
G) Tips
— A maximum of 99 lap times can be meas-
ured.
— If timing is paused, you can continue it later
even if you switch the ignition off.
— Saved lap times cannot be individually de-
leted from the total results.
— The saved lap timer values will remain after
switching the ignition off.
yo e-) a(t)
Applies to: vehicles with lap timer
Displaying lap statistics
You can display the number of laps driven
the fastest lap “+”, the slowest lap “-”, and the
average time “®” in the instrument cluster.
> Select in the instrument cluster: Vehicle func-
tions tab > E] button > Lap statistics.
> Turn the thumbwheel down or up to display the
individual lap times.
> To return to the lap timing that was started, se-
lect the [I button > Lap times.
Resetting lap statistics
Requirement: the lap statistics menu must be
displayed.
> To reset the lap statistics, press and hold the
left thumbwheel until the message No lap
times have been recorded yet. appears.
@) Tips
The lap statistics list the lap times for the last
30 laps. The fastest and slowest lap times out
of up to 99 measured laps are also displayed.
Integrated Toll Module
Applies to: vehicles with Integrated Toll Module
Depending on the region, you can pay toll fees in
certain countries using the Integrated Toll Mod-
ule (ITM). It replaces a separate transponder for
detecting toll fees. The system electronics are in-
tegrated in the rearview mirror housing.
Gi) Tips
The system complies with United States FCC
regulations and ISED regulations > page 311.
Applies to: vehicles with Integrated Toll Module
To use the ITM in toll zones, you must register
and activate it.
Registration
> Applies to MMI: Select on the home screen: VE-
HICLE > Settings & Service > Vehicle informa-
tion Toll module.
> Note the Integrated Toll Module ID.
> To register the ITM, go to the displayed web ad-
dress and follow the instructions.
Activation
> To activate the ITM, press CD in the MMI.
Entering the number of passengers
Depending on the number of passengers and the
region, a lower toll fee may be charged. You must
either enter the number of passengers or
149
>
Page 152 of 332

Driving information
deactivate the ITM based on the laws applicable
in the area where you are driving.
> To enter the number of passengers, select the
appropriate button in the MMI.
> To deactivate the ITM, press © in the MMI.
@) Tips
— The driver is responsible for specifying the
correct number of passengers and activat-
ing or deactivating the ITM.
— Malfunctions can occur when detecting tolls
if both the ITM and transponder are activat-
ed. Deactivate the system not being used or
remove it as necessary.
—If a rearview mirror is replaced, you must
register the new ITM and remove the old
ITM from the account.
Display
Applies to: vehicles with Integrated Toll Module
The selected number of passengers is displayed
in the MMI status bar > page 23.
The i symbol in the status bar and a notifica-
tion in the MMI will indicate if there is a faulty
connection between the ITM and the MMI or if
the ITM is faulty. If the connection interference
continues or the ITM is faulty, drive immediately
to an authorized Audi dealer or authorized Audi
Service Facility.
150
Page 174 of 332

Driver assistance
— Curves
— High barriers on the side of the road
ZA\ WARNING
— Observe the safety precautions and note the
limits of the assist systems, sensors, and
cameras © page 141.
— The display may not appear on time when
vehicles are approaching or being passed
very quickly.
@) Tips
— If the window glass in the driver's door or
front passenger's door has been tinted, the
display in the exterior mirror may be incor-
rect.
— The system is not available when towing a
trailer. There is no guarantee the system
will switch off when using a retrofitted trail-
er hitch. Do not use these functions when
towing a trailer.
— The system complies with United States FCC
regulations and ISED regulations
=> page 311.
Adjusting side assist
Applies to: vehicles with side assist
You can adjust the side assist to your preferences.
The settings depend on the vehicle equipment.
> Applies to: MMI: Select on the home screen:
VEHICLE > Driver assistance > Side assist.
Possible settings:
The system can be switched on and off. If the sys-
tem is switched on, the displays in the exterior
mirrors will turn on briefly each time the ignition
is switched on.
Brightness - Change the brightness only when
side assist is switched on, so that the selected
setting can be checked in the exterior mirror dis-
plays. Adjust the brightness to a level where the
display will not interfere with your view ahead.
Because the display brightness automatically
adapts to the ambient light, it may have already
been adjusted to the highest or lowest setting
during the automatic adaptation.
172
G) Tips
— If you switch side assist on or off, the exit
warning will also switch on or off.
— Certain settings are automatically stored
and assigned to the remote control key be-
ing used.
Messages
Applies to: vehicles with side assist
fg ° is displayed when there is a malfunc-
tion, the side assist and exit warning system
functions may be unavailable or may be limited.
A message that indicates the cause and possible
solution
may appear with some displays. The
weather conditions may be too poor or a sensor
may be covered. Clean the sensor area at the rear
corners of the vehicle > page 143, fig. 113 and
try to turn the systems on again later.
If the malfunction remains, drive to an author-
ized Audi dealer or authorized Audi Service Facili-
ty immediately to have the malfunction correct-
ed.
Page 180 of 332

Parking and maneuvering
steering wheel until the orange orientation
lines align with the parking space.
@ You can use the horizontal blue markings to
help you estimate the distance to an obsta-
cle. Each marking represents approximately 3
feet (1 meter). The blue area represents an
extension of the vehicle's outline by approxi-
mately 16 feet (5 meters) to the rear.
@® You can recognize the rear bumper in the
lower display.
@ You should stop driving in reverse when the
red orientation line touches the edge of an
object, at the latest.
Trailer view
Applies to: vehicles with trailer view
The trailer view > fig. 139 assists you in position-
ing the vehicle in front of a trailer.
— Applies to: vehicles with peripheral cameras:
Switch to the Rear view > page 179, fig. 140.
— Select -| > Trailer view in the center display
when the parking system is active.
Now you can position your vehicle in front of the
trailer. The orange orientation line ©) > fig. 139
indicates the expected path toward the trailer
hitch. Use the blue markings ©) to help you esti-
mate the distance to the trailer hitch. Each mark-
ing represents approximately 1 foot (0.30 me-
ters). The width of the blue surface represents
the maximum steering wheel angle.
Symbols
Applies to: vehicles with peripheral cameras
If $2/&®/< is displayed and the display area
represented by that symbol is not available, then
the camera on the that side is not available. The
power exterior mirrors may have been folded in
or a door or the luggage compartment lid may
have been opened.
If # is displayed, there is a system malfunction
and the display area represented by that symbol
is not available. The camera is not working in this
area.
If one of the symbols continues to be displayed,
drive immediately to an authorized Audi dealer or
178
authorized Audi Service Facility to have the mal-
function repaired.
ZA\ WARNING
— Observe the safety precautions and note the
limits of the assist systems, sensors, and
cameras > page 141.
— Sensors and cameras have spots in which
the surrounding area cannot be detected.
Objects, animals, and people may only be
detected with limitations may not be detect-
ed at all. Always monitor the traffic and the
vehicle's surroundings directly and do not
become distracted.
@) Note
— The orange orientation lines @ show the di-
rection the rear of the vehicle will be travel-
ing, based on the steering wheel angle. The
front of the vehicle swings out more than
the rear of the vehicle. Maintain plenty of
distance so that an exterior mirror or a cor-
ner of the vehicle does not collide with any
obstacles.
— Keep enough distance from the curb to
avoid damage to the rims.
— Only use the images provided by the camera
on the rear of the vehicle when the luggage
compartment lid is completely closed. Make
sure any objects you may have mounted on
the luggage compartment lid do not block
the rearview camera.
G) Tips
— Applies to vehicles with air suspension: The
accuracy of the orientation lines and blue
surfaces on the camera display decreases
when the vehicle is raised or lowered with
the air suspension.
— There is no distance warning for the rear
and the sides* when trailer towing mode is
detected. The front sensors remain activat-
ed. The visual display switches to trailer
mode. There is no guarantee the functions
will be deactivated when using a retrofitted
trailer hitch.
Page 182 of 332
Parking and maneuvering
A WARNING
— Observe the safety precautions and note the
limits of the assist systems, sensors, and
cameras > page 141.
— The Surroundings view is created from the
individual camera images. The vehicle image
is shown by the system. Objects and obsta-
cles above the camera are not displayed.
@® _ Note
— Only use the images provided by the camera
on the rear of the vehicle when the luggage
compartment lid is completely closed. Make
sure any objects you may have mounted on
the luggage compartment lid do not block
the rearview camera.
— The front of the vehicle swings out more
than the rear of the vehicle. Maintain plenty
of distance so that an exterior mirror or a
corner of the vehicle does not collide with
any obstacles.
Gy Tips
— Depending on the selected gear, it will auto-
matically switch between the Front and
Rear views. If you switch the view manually,
the automatic front/rear camera change will
be temporarily deactivated.
— When first activated while a forward gear is
engaged, the Front corner is displayed.
Rear cross-traffic assist
Applies to: vehicles with rear cross-traffic assist
Fig. 141 Sensor detection range for rear cross-traffic assist
180
Fig. 142 Center display: rear cross-traffic assist display
General information
The rear cross-traffic assist monitors the area be-
hind and next to the vehicle using radar sensors
at the rear corners of the vehicle. The system can
detect moving objects that are approaching, such
as vehicles > fig. 141. A display in the MMI and
various warnings provide assistance when exiting
a parking space.
Requirements
— The parking aid is switched on > page 174 or
reverse gear is selected.
— The speed when driving in reverse must not be
higher than approximately 9 mph (15 km/h).
Displays, warnings, and braking
— Display: the display @ appears only when the
parking aid is active. For vehicles with peripher-
al cameras, this only happens in the Rear and
Rear corner camera views. Arrows show the di-
rection from which the cross traffic is approach-
ing.
— Audible warnings: a continuous tone may
sound as an additional warning when driving in
reverse.
— Automatic brake activation: if you do not react
to a warning, a brief braking by the system can
warn you of a potential collision with an ap-
proaching object.
The audible warning signal and the automatic
brake activation occur only when driving in re-
verse.
Switching on and off
— Applies to MMI: Select on the home screen: VE-
HICLE > Parking aid > Rear cross-traffic assist.
Or: