light AUDI Q7 2009 Owner´s Manual
[x] Cancel search | Manufacturer: AUDI, Model Year: 2009, Model line: Q7, Model: AUDI Q7 2009Pages: 426, PDF Size: 97.13 MB
Page 89 of 426

Applies to vehicles : wit h automat ically di mmi ng in side mirr or
Automatically dimming inside mirror
The automatic dimming function can be turned on and off
if required.
Disabling auto dimming
Fi g. 8 1 In side r ear
v iew mirror
- Press butto n @ ~ fig. 8 1 briefly, -th e gree n indicator
light @ goes out .
A ctivating /re activ ating auto dimming
- Press button@
briefly, -the green indicato r light @
goes on.
Automa tic dimming func tio n
The automatic dimming function is activated every time the ignition
is turned on . The green indicator light is lit to indicate auto dimming
is active.
When dim ming is activated, the inside m irror will darken
automati
cally
in response to the amount of light striking the mirror (such as
headlights from rearwa rd approaching vehicles). Even in dimm ing
mode, the mirror surface turns bright when :
• the interior light is switched on
• reverse gear is engaged .
Controls and equip
ment
Cl ea r vision
& WARNING
The glas s of the in side re ar vie w mirror i s layered and cont ain s an
electrolyte to a chieve it s properties. Be aware of liquid electrolyte
leaking from a bro ken mirror gl ass. Thi s liquid can cause irrit ation
to skin , eyes , and re spir atory sy ste m . If you get el ectrolyte in your
e ye s or on your skin , immed iatel y rinse w ith plenty of w ater.
If irri
t a tion per sists, s eek medical attention .
0 Note
Liquid electrolyte leaked from a broken mirror glass wil l damage any
p lastic surfaces it comes in contact with . C lean up sp illed e lectrolyte
immediately with clear water and a sponge .
[ i ] Tip s
• If you sw it c h off the automati c di m mi ng function on the in side
mirror , autom atic dimming of the out side mirrors* will likewise be
dis abled .
• Check to make sure there are no objects preven ting light from
reaching the inside mirror.
• Do not attach any stickers to the windshie ld in front of the light
sensor*, as this would interfere with the automatic operation of the
headlig hts and the automatic d imming of the inside mirror.
• Be aware that automatic dimming of the inside mirror can only
operate properly if the rear window sun b lind* is retracted. •
I • •
Page 90 of 426

Clear vision
Outside mirrors
The ou tside mirrors are electrically adjusted.
Adjusting the outside mirrors
Fi g. 82 Fo rw ard
s e ction o f dr iver's
armr est: powe r mirror
c ontr ols
- Tur n the adjusti ng knob to pos ition (0 ~ fi g. 82 to adjust
t h e outs ide mirror on t he d river 's sid e.
T u rn the adjust ing k nob to p ositi on @ to adjust the
o ut side m irro r on t he p assenger side .
Press the kno b in the appropriate direction to move t he
mir ror surface so t hat you have a good vie w to the rear .
Heated mirrors
-Tur n t he knob to positio n @.
Folding both outside mirrors flat *
- Turn t he knob to @ .
Depending on the outside temperature, the mirror surfaces are
heated until the ignition is switched off -even if the knob is no
longer in position
@ .
We recommend folding * the outside mirrors flat to help when
parking your vehicle o r when maneuvering in very tight spaces.
Memo ry sett ing for th e out side mirrors *
When the seat position is saved in the memory, the posi tion of the
outside mirrors is saved at the same time
=> page 97 .
If the position of the passenger mirror is changed when the vehicle
is in reverse gear and the switch is in the @ pos ition, this new tilted
position wil l be automatically saved to the remote key when the
veh ic le is taken out of reverse gear. To save, the rotary kn ob for
mirror adjustment must be in the @ position, the se lector lever
must be in the P p osition and the ignition must be off . T his will now
become the stored setting when the vehicle is put in reverse gear
again .
Tilting th e passenger' s side out side mirror {only with
seat memory )
When you move the selec tor lever into R (Reverse), the mirror on the
front passenger's door (kn ob turned to @ => fig . 82) will tilt slightly
downward. This make is easier for you to see the curb when you are
backing into a parking space.
The mirror returns to its initial pos ition as soon as reverse gear is
disengaged and vehicle speed is above about 9 mph (15 km/h). The
mirror also returns to its ini tial pos ition if the swi tch is moved to the
driver's outside mirror
(0 or the ignition is switched off.
Automati c anti -glar e for th e outside mirror s*
The outside mirrors dim at the same time as the inside mirror . When
the ignition is switched on, the mirrors automatical ly dim
depending on the amount of light striking the mirrors {such as head
l ights shini ng into the vehicle from the rear).
When you turn on the interior l ight, or when you move the se lector
l ever into R (Reve rse), the anti -g lare function stop s and the mirrors
return to their original condition {not darkened).
(D Note
• Curved {i.e. convex) mirror surfaces increase your fie ld of view .
Remember that vehic les or other objects w ill appear smaller and ...
Page 91 of 426

farther away than when seen in a flat mirror. If you use this mirror to
estimate distances of fol lowing ve hicles when chang ing lanes, you
cou ld estimate incorrect ly and cause an accident .
• I f the mirro r housing is moved uninten tio nal ly ( for example,
while parking your vehicle), then you must first fo ld the mirror elec
tr ically. D o not readj ust the mirro r ho us ing manua lly . You could
damage the motor which contro ls the mirror .
• I f you take the veh ic le to an automatic car wash, y ou mus t fold
the exterior mirrors flat to prevent damaging them . Power folding
ex terior mirr ors* must no t be folded in or out by hand . Use the
power function!
[ i ] Tips
If there shou ld be a malfunction in the electrica l system, you can
sti ll adj ust the outside mi rrors by pressing the edge of the mirro r.•
Appl ie s to v ehicl es: with au tomat ic d imm ing for outs id e m irro rs
Automatic dimming for outside mirrors
The outside mirrors are dimmed together with the automatic
dimming o f the inside mir ror . When the ignition is switched on, the
mirrors dar ken au tomat ical ly dependin g on the light strik ing them
(e .g. head lights from the rear).
When t he in ter ior lig hting is switched on and when reverse gear is
engaged, the m irrors are switched back to the ir original brightness
(n ot di mmed).
& WARNING
The glass of the inside rear view mirror is layered and contain s an
ele ctrolyte to a chieve its propert ies . Be aware of liquid ele ctrolyte
leaking from a broken mirror gla ss. This liquid can cau se irritation
to skin , eyes , and re spiratory system . If you get elect rolyte in your
Controls and equip
ment
Cl ea r vision
& WARNING (continued )
eyes or on your s kin , immed iately rinse with plenty of water . If irri
tation per sists , seek medical attent ion .
0 Note
Electrolyte leak ing fro m a broken mirror g lass attacks the vehic le
paint and plastic surfaces . C lean up spilled electro lyte immediately
with c lear water and a sponge .
[ i ] Tips
• If automatic dimming for the inside mirror i s swit ched off, the
o uts ide mirror s are also not dimmed automatically .
• Automatic di mming for the mirr or only opera tes prop erly if the
sunshade * for the rear window is retracted, or the light striking the
inside mirror is not h inde red by o ther o bjec ts. •
Digital compass
Ap plies t o vehicles : with d ig ita l com pass
Activating or deactivating the compass
The direction is displayed on the interior rear vie w mirror.
I • •
Fig . 8 3 Inside re ar
view mirror : digital
co mp ass ac tivat ed
Page 94 of 426
Seats and storage
Seats and storage
General recommendations
Why is your seat adjustment so important?
The safety belts and the airbag system can only provide
maximum protection if the front seats are correctly
adjusted.
There are various ways of adjusting the front seats to provide safe
and comfortable support for the driver and the front passenger.
Adjust your seat properly so that :
• you can easily and quickly reach all the switches and controls in
the instrument panel
• your body is properly supported thus reducing physical stress
and fatigue
• the safety belts and airbag system can offer maximum protec
tion=>
page 241.
In the following sections , you will see exactly how you can best
adjust your seats.
There are special regulations and instructions for installing a child safety seat on the front passenger's seat. Always follow the informa
tion regarding child safety provided in=>
page 263, "Child Safety".
L1}. WARNING
Incorrect seating position of the driver and all other passengers
can result in serious personal injury.
• Always keep your feet on the floor when the vehicle is in motion
- never put your feet on top of the instrument panel, out of the
window or on top of the seat cushion. This applies especially to
the passengers. If your seating position is incorrect, you increase
the risk of injury in the case of sudden braking or an accident. If
& WARNING (continued)
the airbag inflates and the seating position is incorrect, this could
result in personal injury or even death.
• It is important for both the driver and front passenger to keep
a distance of at least 10 inches (25 cm) between themselves and
the steering wheel and/or instrument panel. If you're sitting any closer than this, the airbag system cannot protect you properly. In
addition, the front seats and head restraints must be adjusted to
your body height so that they can give you maximum protection.
• Always try to keep as much distance as possible between your
self and the steering wheel or instrument panel.
• Do not adjust the driver's or front passenger's seat while the
vehicle is moving. Your seat may move unexpectedly, causing
sudden loss of vehicle control and personal injury.
If you adjust
your seat while the vehicle is moving, you are out of position. •
Driver's seat
The correct seat position is important for safe and relaxed
driving.
We recommend that you adjust the driver's seat in the
following manner:
- Adjust the seat in fore and aft direction so that you can
easily push the pedals to the floor while keeping your
knees slightly bent=>&, in "Why is your seat adjustment
so important?".
Adjust the seatback so that when you sit with your back
against the seatback, you can still grasp the top of the
steering wheel. _..
Page 99 of 426
Seat memory
Applies to vehicles: w ith seat memory
Driver's seat memory
The seat adjustment settings for two drivers con be stored
using the memory buttons in the driver's door.
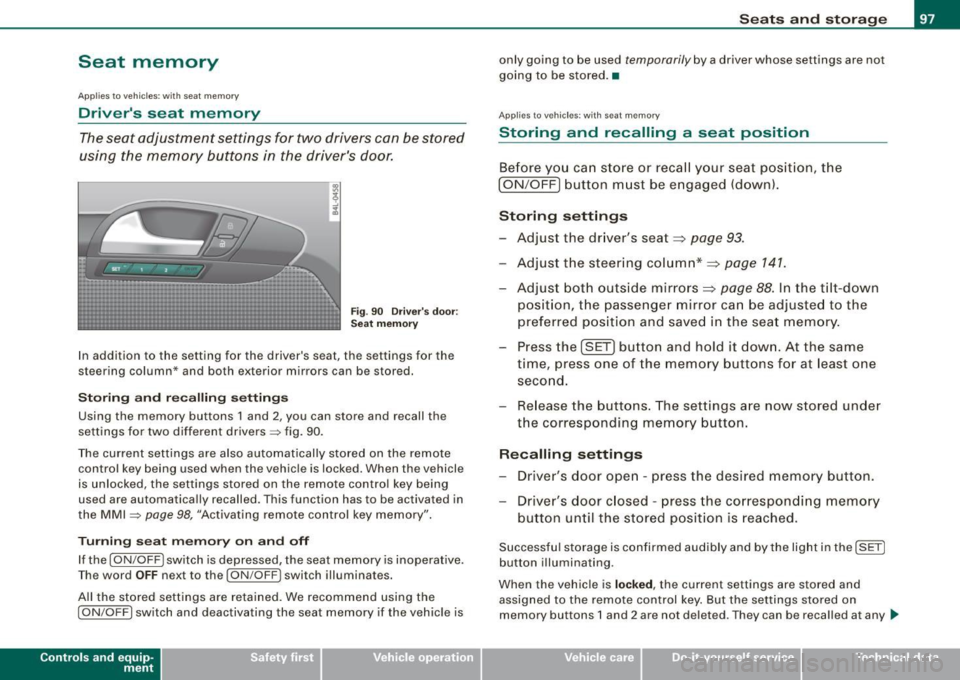
Fig . 90 Driver's door :
Seat memory
In addition to the setting for the driver's seat, the settings for the
steering column* and both exterior mirrors can be stored.
Storing and recalling settings
Using the memory buttons 1 and 2, you can store and recall the
settings for two different drivers=> fig. 90.
The current settings are also automatically stored on the remote control key being used when the vehicle is locked. When the vehicle
is unlocked, the settings stored on the remote control key being
used are automatically recalled. This function has to be activated in
the MMI =>
page 98, "Activating remote control key memory".
Turning seat memory on and off
If the [ ON/OFF ! switch is depressed, the seat memory is inoperative.
Th e word OFF next to the [ON/OFF) switch illuminates.
All the stored settings are retained. We recommend using the
I ON/OFF] switch and deactivating the seat memory if the vehicle is
Con tro ls and eq uip
ment
Seats and storage
only going to be used temporarily by a driver whose settings are not
going to be stored. •
Applies to veh icles: w ith seat memory
Storing and recalling a seat position
Before you can store or recall your seat position, the
I ON/OFF] button must be engaged (down).
Storing settings
- Adjust the driver's seat~
page 93.
-Adjust the steering column*~ page 141.
Adjust both outside mirrors~ page 88. In the tilt-down
position, the passenger mirror can be adjusted to the
preferred position and saved in the seat memory.
- Press the
!SET) button and hold it down. At the same
time, press one of the memory buttons for at least one
second.
- Release the buttons. The settings are now stored under
the corresponding memory button.
Recalling settings
- Driver's door open -press the desired memory button.
- Driver's door closed -press the corresponding memory
button until the stored position is reached.
Successful storage is confirmed audibly and by the light in the [ SET]
button illuminating.
When the vehicle is
locked , the current settings are stored and
assigned to the remote control key. But the settings stored on
memory buttons 1 and 2 are not deleted. They can be recalled at any
~
Vehicle care I I irechnical data
Page 109 of 426
________________________________________________ S_e_ a_ ts_ a_ n_d _ s_t _o _r_ a ....; g::;. e _ __._
- To remove the eyelet, move it approximately to the
middle of the track (notch). Remove the eyelet.
Securing the cargo
-Fold the clip on the fastening eyelet up and secure the
cargo~
page 106, fig. 106 -arrow-.
- Observe the safety notes
~ page 229.
In a collision, the laws of physics mean that even smaller items that
are loose in the vehicle will turn into heavy missiles that can cause
serious injury. Items in the vehicle pick up kinetic energy which
varies with the vehicle and the weight of the item. Vehicle speed is
the most significant factor.
For example, in a frontal collision at a speed of 30 mph (48 km/h),
the forces acting on a 10-lb (4.5 kg) object are about
20 times the
normal weight of the item. This means that the weight of the item
would suddenly be the equivalent of about 200 lbs (90 kgl. One can
easily imagine the injuries that an item of that weight flying freely
through the passenger compartment can cause in a collision at a
speed considered relatively low .
& WARNING
Weak, damaged or improper straps used to secure items to tie
downs can fail during hard braking or in a collision and cause
serious personal injury.
• Always use suitable retaining straps and properly secure items
to the tie-downs in the luggage compartment to help prevent
items from shifting or flying forward.
• When the rear seat backrest is folded down, always use suit
able retaining straps and properly secure items to the tie-downs in
the luggage compartment to help prevent items from flying
forward into the passenger compartment.
• Never attach a child safety seat tether strap to a tie-down. •
Con tro ls and eq uip
ment
Ap plies to vehicles: with cargo net
Cargo net
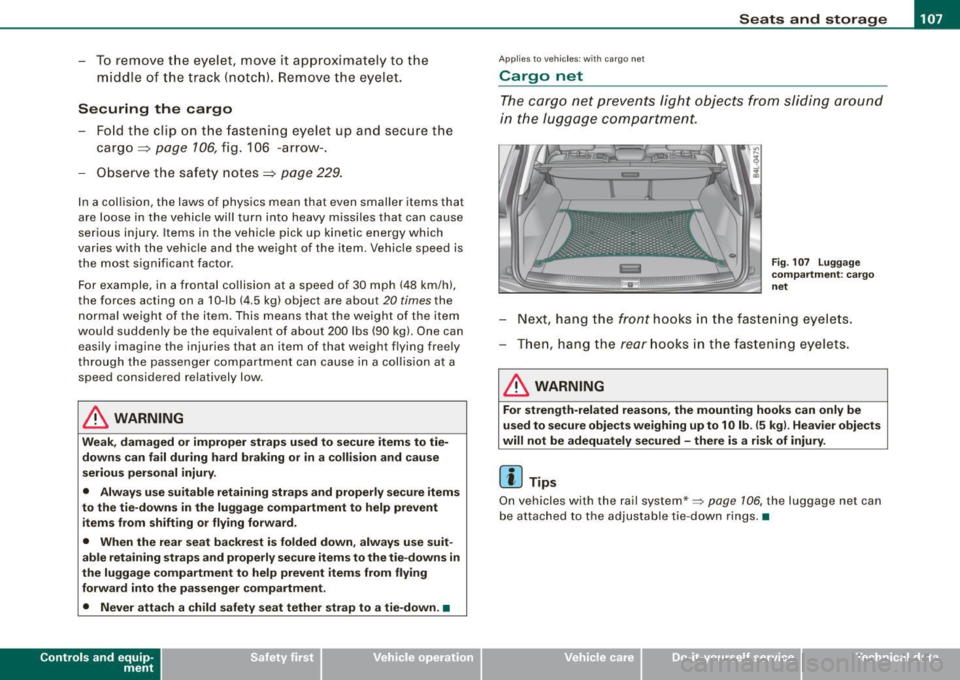
The cargo net prevents light objects from sliding around
in the luggage compartment.
Fig . 107 Luggage
compartment: cargo
net
Next, hang the front hooks in the fastening eyelets.
Then, hang the
rear hooks in the fasten ing eyelets .
& WARNING
For strength-related reasons, the mounting hooks can only be
used to secure objects weighing up to 10 lb . (5 kg). Heavier objects
will not be adequately secured -there is a risk of injury .
Ii] Tips
On vehicles with the rail system*~ page 106, the luggage net can
be attached to the adjustable tie-down rings. •
Vehicle care I I irechnical data
Page 111 of 426

________________________________________________ S_e_ a_ ts_ a_ n_d _ s_t _o _r_ a ....; g::;. e _ __.ffllll
• The two inner attaching eyes on the left and right in the seatback
~ fig. 108 (Dare not suitable for tying down cargo -risk of damage.
Only the luggage compartment cover should be attached here.
[ i J Tips
• You can use the luggage compartment cover to store light
weight clothing or articles but do not leave any heavy or sharp
objects in the pockets of the clothing.
• Remember that placing clothing or articles on the luggage
compartment cover can block the driver's vision in the rear view
mirror. This also applies especially when you have to transport large
objects.
• So that stale air can escape from the vehicle be sure not to cover
the ventilation slot between the rear lid and the luggage compart
ment cover. •
Protective liner
Dirty or wet objects can be transported under the cargo
floor in a protective tray.
Con tro ls and eq uip
ment
Fig . 110 Cargo floor:
folded upright Fig
. 111 Removing the
cargo floor
Setting up the cargo floor
- Open the rear lid.
- Set up cargo floor with the help of the handle ©
=> fig. 110 and adjust the outside edges in the recesses
@.
Lay the items in the protective tray.
Folding the cargo floor up
- Open the rear lid.
Fold the cargo floor up to the seatback with the help of
the handle @.
Removing the cargo floor, installing
- Open the rear lid.
- Fold the cargo floor up to the seatback with the help of
the handle @.
- To remove, pull the entire cargo floor out of the guides
-arrow-=> fig. 111 in the direction of the rear of the
vehicle.
t,.
Vehicle care I I irechnical data
Page 114 of 426
_L-_S::..:: e..:a :..:t:.:s :....:: a:.:.n .:.. d::....: s:.. t.:.. o::..:.. ra= g:..:e :...._ _____________________________________________ _
- Vehicles with 6 seats*: The ski sack has two straps with
hooks on the underside. Hang the hooks into the luggage
compartment by the rear fastening eyes and pull the
securing strap tight by the free end@.
Storage
- Release the securing strap for the sack.
- Pull the sack to the rear over the folded down seatback .
- Raise the seatback until it is securely latched.
- Fold up the empty sack.
- Stow the ski sack in the luggage compartment so that it
cannot slide around .
& WARNING
• The ski sack is intended only for the transportation of skis,
snowboards and other light objects. To reduce the risk of serious
personal injury never transport heavy or pointed objects in the ski
sack.
• When braking rapidly or during an accident the load could be
displaced and cause injury to occupants.
• Sharp edges on the load must be covered for protection.
Always fasten the belt tightly around the sack and its contents
=> page 111, fig . 114.
[ i] Tips
Never stow the ski sack away if it 's wet or damp (for example, snow
melting from skis). Let it dry completely before you stow it away. •
Roof rack
First things first
A roof rack can be fitted to carry additional luggage on
the roof.
Always read and follow the instructions provided by the
roof rack manufacturer when the roof rack system must
be installed.
If you are transporting luggage or other objects on the roof, please
note the following :
• Your vehicle has specially designed aerodynamic roof rails. Only
install a roof rack specifically designed for your model. Contact the
nearest authorized Audi dealer for information on approved
modular roof racks for your vehicle.
• These approved roof racks are the basis for a complete roof rack
system. Additional attachments for the basic roof rack are neces
sary to safely transport luggage, bicycles, surf boards, skis or small
boats . All necessary hardware for these systems is available at your
authori zed Audi dealer .
• We recommend that you keep the installation instructions for
your roof rack system together with your Owner's literature in the
vehicle.
When should the roof rack be removed?
• Before going through an automatic car wash (it is best to ask the
car wash operator for advice).
• When not in use , to reduce fuel consump tion, wind noise and to
guard against theft. _.,,
Page 119 of 426

________________________________________________ S_e_ a_ ts_ a_ n_d _ s_t _o _r_ a ....; g::;. e _ __._
To open ashtray
- Touch the l id to open the ashtray.
Removing ashtray insert
Press the front of the open lid downward in the direction
of the arrow=>
page 116, fig. 121 - the ashtray insert
pops out slightly.
- Lift the ashtray insert up and out.
Reinstalling ashtray insert
-Open the lid on the ashtray insert and press the insert
into the housing as far it can go.
& WARNING
Never put waste paper in the ashtray . Hot ashes or other hot
objects in the ashtray could set waste paper on fire. •
Cigarette lighter/socket
Ap plies t o ve hicles: w it h c ig arette ligh ter
Cig are tt e lighte r
Contro ls and eq uip
ment
Fig . 122 Open front
beverage storage
compartment with
cigarette lighter
Using the cigarette lighter
-Push the knob in.
- Wait until the cigarette lighter knob pops out.
- Remove the cigarette lighter immediately and use it.
- Reinsert cigarette lighter into the socket after use.
Connecting an appliance
- Remove cigarette lighter.
- Plug in appliance to be used.
The socket of the cigarette lighter may be used for 12-volt appli
ances with maximum consumption of up to 100 watts, such as a
flash light, small vacuum cleaner, etc .
Before you purchase any accessories, always read and follow the
information in~
page 403, "Additional accessories and parts
replacement" .
& WARNING
Improper use of the cigarette lighter can cause serious injury or
start a fire.
• Be careful when using the cigarette lighter . If you do not pay
attention to what you are doing when you are using the cigarette
lighter you can burn yourself .
• The cigarette lighter and socket remain functional even if the
ignition is switched off or the ignition key is removed . Never leave
children inside the vehicle without supervision.
0 Note
• To avoid damaging the socket , only use plugs that fit properly. _.,
Vehicle care I I Technical data
Page 120 of 426
• ..__S_ e_a _ t_ s_ a_ n_ d_ s_t _o _r_ a-' g==- e ________________________________________________ _
• Only use the cigare tte lighte r socket as a power source for elec
t rical accessories for short dura tions. Use the sockets in the vehicle
when a power source is needed for longer durations .
[ i ) Tip s
When the engine is off and accessor ies are s till plugged in and are
on, the vehicle battery can still be drained. •
Outlet
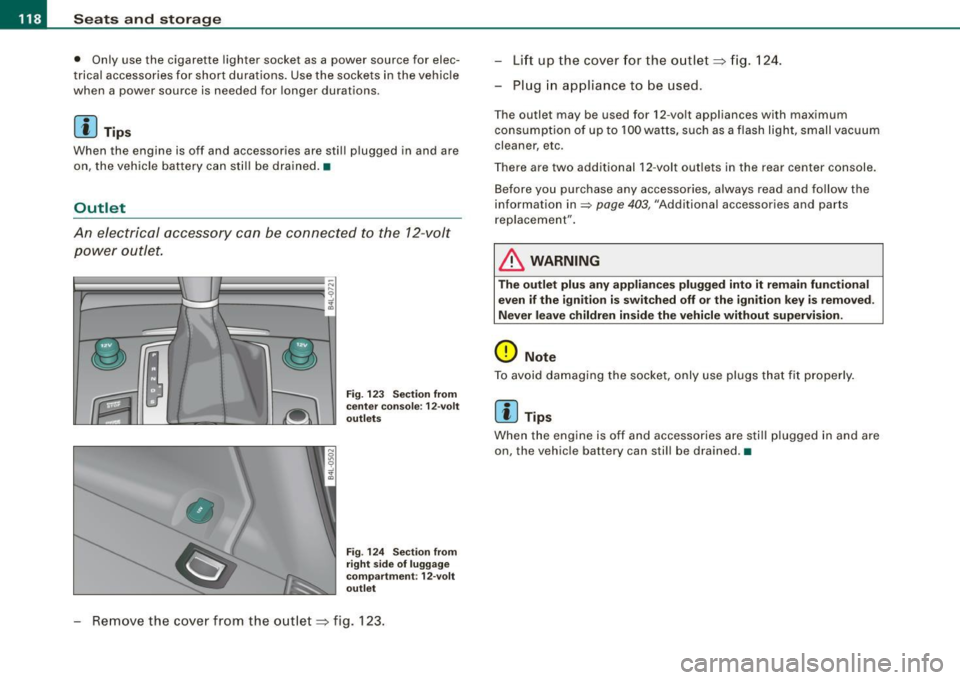
An electrical accessory can be connected to the 12-volt
power outlet.
Fig . 123 S ection from
ce nter co nso le : 1 2-vo lt
outl ets
F ig .
12 4 Sec tion from
righ t side o f luggage
co mp artm ent : 12-vo lt
o utle t
Remove the cover from the outlet~ fig. 123 . Lift up the cover
for the outlet ~ fig. 1 24.
- Plug in appliance to be used .
The outlet may be used for 12 -volt appliances with maximum
consumption of up to 100 watts, such as a flash light , small vacuum
cleaner, etc .
There are two additional 12 -volt out lets in the rear center console .
Before you purchase any accessories, always read and fo llow the
information in
~ page 403, "Additional accessories and parts
r ep lacement".
& WARNING
The outlet plu s any appliance s plugged into it remain fun ctional
even if the ignitio n is swit ched off o r the igniti on key is r emo ved .
Ne ver le ave childr en in sid e the vehicle without supervi sion.
0 Note
To avoid damaging the socket , only use pl ugs t hat fit properly .
[ i J Tips
When the engine is off and accessories are sti ll plugged in and are
on , the vehic le battery can stil l be drained .•