clock AUDI Q7 2009 Owner´s Manual
[x] Cancel search | Manufacturer: AUDI, Model Year: 2009, Model line: Q7, Model: AUDI Q7 2009Pages: 426, PDF Size: 97.13 MB
Page 16 of 426

Instruments and warning/indicator lights
Warning light in the instrument cluster -t
When the _L warning light in the instrument cluster starts to flash,
this can mean one of two things: either the coolant
temperature is
too high, or the coolant
level is too low~ page 33.
If the needle is well in the upper area of the gauge, the coolant
temperature is too high.
Stop the vehicle, switch the engine off and
allow the engine to cool.
If the warning light comes on again after
driving a short distance, contact an authorized dealer.
& WARNING
• Always observe the warning in ~ page 324, "Engine compart
ment", before opening the hood and checking the engine coolant
level.
• Never open the engine hood if you see or hear steam, or if you
see engine coolant dripping from the engine compartment . You
could burn yourself. Let the engine cool off first so that you cannot
hear or see any steam or engine coolant.
0 Note
• Mounting additional lights or accessories in front of the air inlets
reduces the cooling effect of the radiator. At high outside tempera
tures or high engine load, the engine could overheat.
• The front spoiler has been designed to properly distribute the
cooling air when the vehicle is moving. If the spoiler is damaged,
this could reduce the cooling effect and the engine could then
over
heat. Ask your authorized Audi dealer for assistance. •
Tachometer (engine rev counter)
The tachometer indicates the engine RPM (revolutions per
minutes).
The tachometer 0 ~ page 13, fig. 2 is the left of the two large clock
type displays. The
engine turns at a speed
1,000 times the single digit in the
display, e.g. if the needle is pointing at the "2" the engine is turning
at 2,000 RPM.
If engine RPM drops below 1,500, you should downshift to the next
lower gear. The red area at the end of the scale indicates maximum
permissible engine RPM after the break -in period. Before reaching
this area, move the selector lever to position "D (Drive)" or ease your
foot off the accelerator pedal.
0 Note
The tachometer needle should not move into the red range. If it
does, then only for a
very short period of time. You could damage
your engine by driving at high RPM .
'£> For the sake of the environment
Upshifting early saves fuel and reduces engine noise.•
Digital clock with date display
Date and time of day can be set in the MM/.
Fig . 3 Instrument
cluster with digital
clock
The date, time of day, and time and date format can be set in the
MMI. You can find out more in the MMI manual. .,_
Page 17 of 426

[ i J Tips
• The digital c lock and the odometer are turned on for about 30
seconds when the driver's door is opened.
• When the ignition is turned off, the odometer reading and the
digital clock with date display can be switched on for about
30 seconds by pressing the !CHECK] button~
page 16, fig. 5. •
Speedometer with odometer
The speedometer shows you the vehicle speed, and the
odometer shows you how many miles (kilometers) you
have driven.
Fig. 4 Instrument
c luster Odometer and
reset button
The odometer and trip odometer are located inside the speedom
eter.
• USA models - Miles
• Canada models -Kilometers
You can switch the disp lay from miles to kilometers and vice versa
via the MMI.
Lower odometer
The lower odometer shows the total number of miles (kilometers)
driven .
Contro ls and eq uip
ment
Instruments and warning /indicator lights
Upper odometer (trip odometer)
The upper odometer shows the total number of miles (kilometers)
driven since you last reset the odometer to zero. You can use this
odometer when you want to keep track of how many miles (kilome
ters) you have driven for a single trip or errand. The last digit indi
cates 1/10 of a mile (100 meters).
You can reset the trip odometer to zero by pressing the Reset button
~ o.o.
Malfunction message
If there is a malfunction somewhere in the instrument cluster,
dEF
wil l appear in the trip odometer and will stay on . Contact your
authorized Audi dealer to have the problem corrected .
Immobilizer
When the ignition is switched on, the data on the ignition key are
scanned automatically.
If an unauthorized key was used,
SAFE is displayed continuously in
the odometer display field. The vehicle cannot be operated
~ page 51.
[ i J Tips
• The digital clock and the odometer are turned on for about 30
seconds when the driver's door is opened.
• When the ignition is turned off, the odometer reading and the
dig ital clock with date display can be switched on for about
30 seconds by pressing the
I CHECK] button ~ page 16, fig. 5. •
Fuel gauge
The fuel gauge only works when the ignition is on .
When the needle reaches the reserve mark, the~
page 36
symbo l appears in the instrument cluster display as well as the
message
Please refuel. There are approximately between 2.6 and 3.2 ~
Vehicle care I I Technical data
Page 18 of 426

Instruments and warning/indicator lights
gallons (10-12 liters) of fuel left. This message is meant to remind
you to
refuel.
The total tank capacity of your vehicle is listed in~ page 399 .
0 Note
Never run the tank completely dry. An irregular supply of fuel can
cause engine misfiring and fuel could enter the exhaust system. The
catalytic converter could then overheat and be damaged. •
[ CHECK] button
You can perform different functions with this button.
Fig. 5 CHECK button in
the instrument cluster
The [ CHECK I button performs the following functions:
Switching on the clock and odometer
With the ignition turned off, the odometer reading and the digital
clock with date display can be switched on for about 30 seconds by
pressing the !CHECK ] button ~ fig. 5.
Starting the Auto-Check sequence
The Auto-Check system~ page 30 constantly monitors certain indi
vidual functions and components of the vehicle when the ignition is
turned on and when the vehicle is moving. With the ignition turned on, you can start the "Auto-Check
sequence" by pressing the
I CHECK] button. You can perform an
Auto-Check sequence when the vehicle is stationary and the ignition
is turned on or when the vehicle is moving not faster than 3 mph
(5 km/hl.
The number of keys programmed to the vehicle is also displayed.
The display
3\3 indicates that three keys have been programmed.
This allows you to make sure you have received all of the keys when
you purchase a used vehicle.
For example, if you only receive two keys, you should take those
keys to your authorized Audi dealer to have the missing key deacti
vated so it cannot be used. You should also report the missing key
to your insurance company.
Calling up the driver information
A yellow or red symbol appears in the instrument cluster display,
usually with a driver message. The driver message display disap
pears after about 5 seconds. The driver message can be displayed
again by briefly pressing the
I CHECK I button.
Setting the speed warning
By pressing the I CHECK] button briefly, you can set threshold 1 of
the speed warning while you are driving~
page 39. By maintaining
pressure on the [ CHECK] button, you delete the warning
threshold. •
Page 81 of 426

Rear interior lights
There are reading lights in the rear for the passengers.
8QJ
---------
0
Fig. 69 Headliner : Rear
reading lights
Fig . 70 Headliner :
Third row reading light
-Press one of the switches ~ to turn the right or left
reading light on or off=? fig. 69.
For vehicles with third row seating*, the luggage compartment light
can be switched on and off with the button -M-and used as a reading
light => fig. 70. The rear lid has to be closed.
The lights in the luggage compartment and in the rear lid switch on and off automatically when the lid is opened and closed.
Con tro ls and eq uip
ment
Clear vision
[ i] Tips
If the rear lid remains open longer than 10 minutes, the luggage
compartment lights turn off automatically to prevent the vehicle
battery from discharging .•
App lies to veh ic le s: with background lighting
Background lighting
The background lighting can be adjusted in the MM/.
Fig. 71 Car: Back
ground lighting
- Press the Systems * control button in the car menu.
- Select
Background lighting .
-Rotate the control knob clockwise to increase the bright-
ness, and
- Rotate the control knob
count erclockwis e to reduce the
brightness.
When the vehicle is unlocked, the standard lighting turns on auto
matically and dims after approx. 2 minutes, and when the ignition is
turned on it switches off immediately. .,
Vehicle care I I Technical data
Page 122 of 426
• ..__S_ e_a _ t_ s_ a_ n_ d_ s_t _o _r_ a-' g==- e ________________________________________________ _
Cooling box in glove compartment
The cooling box works only when the air-conditioning is
in cooling mode.
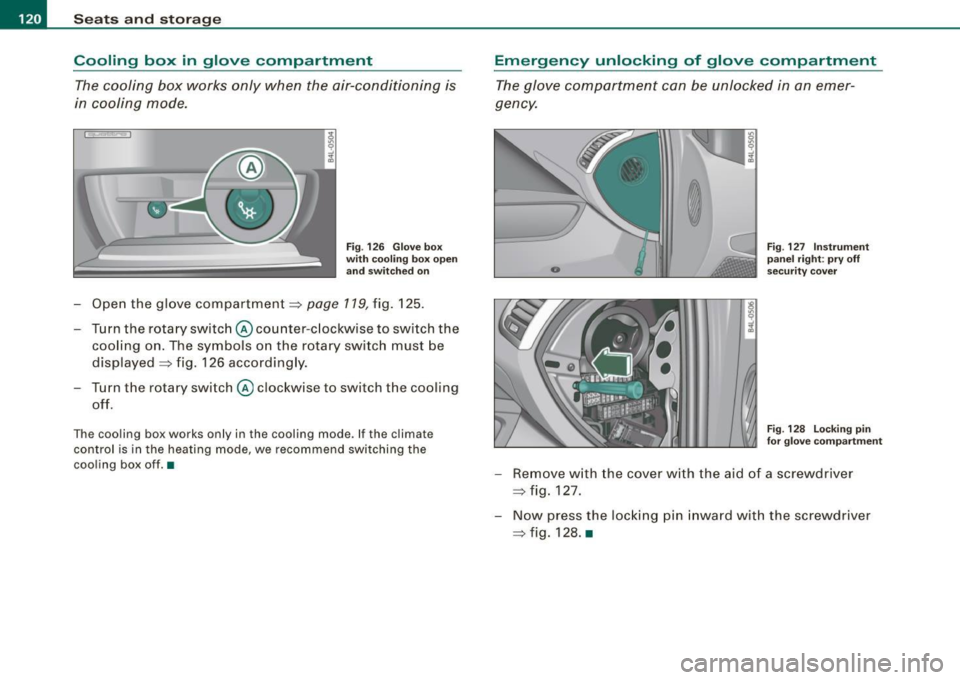
Fig . 126 Glove box
with cooling box open and switched on
-Open the glove compartment=> page 119, fig. 125.
Turn the rotary switch @ counter-clockwise to switch the
cooling on. The symbols on the rotary switch must be
displayed => fig. 126 accordingly.
Turn the rotary switch@ clockwise to switch the cooling
off.
The cooling box works only in the cooling mode. If the climate
control is in the heating mode, we recommend switching the
cooling box off.•
Emergency unlocking of glove compartment
The glove compartment can be unlocked in an emer
gency.
Fig . 127 Instrument
panel right: pry off
security cover
F ig . 128 Locking pin
for glove compartment
- Remove with the cover with the aid of a screwdriver
=> fig. 127.
- Now press the locking pin inward with the screwdriver
=> fig. 128. •
Page 142 of 426
• ..__O_ n_ t_h _e _ r_o _a _ d __________________________________________________ _
On the road
Steering
Applies to vehicles : w ith manua lly ad justab le steering whee l
Manually adjusted steering wheel
The height and reach of the steering wheel can be
adjusted.
First, adjust the driver's seat correctly.
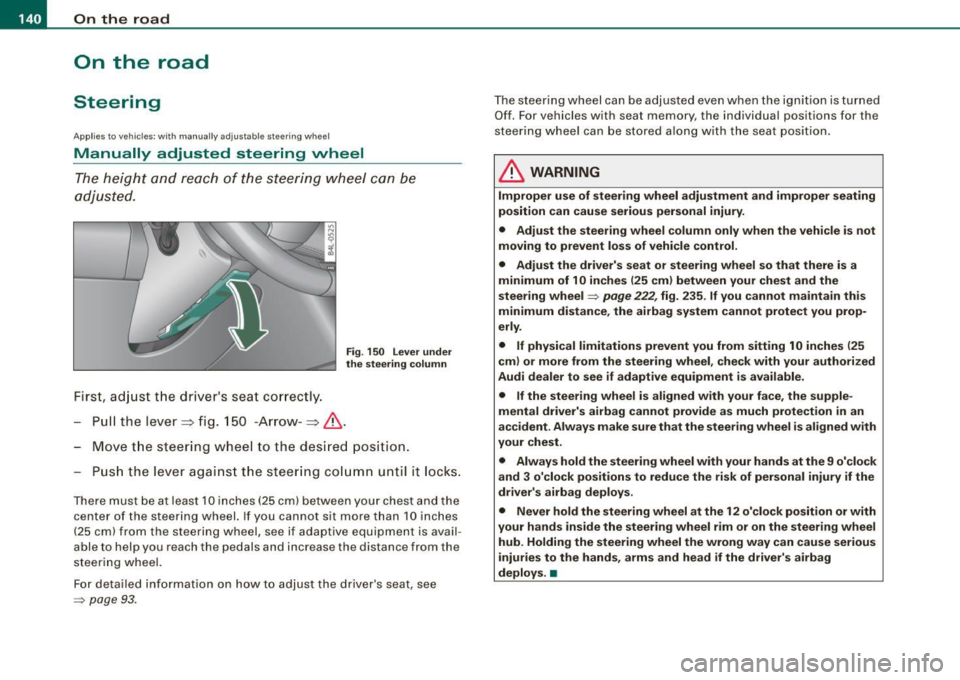
Fig . 150 Lever under
the steering column
Pull the lever~ fig. 150 -Arrow -~&.
Move the steering wheel to the des ired position.
Push the lever against the steering column until it lock s.
There must be at leas t 10 inch es (25 cm) between your chest and the
center of the steering wheel. If you cannot sit more than 10 inches
(25 cm) from the steering wheel, see if adaptive equipment is avail
able to help you reach the pedals and increase the distance from the
steering wheel.
For detailed information on how to adjust the driver's seat, see
=> page 93.
The steering wheel can be adjusted even when the ignition is turned
Off. For vehicles with seat memory, the individual positions for the
steering wheel can be stored along with the seat position.
& WARNING
Improper use of steering wheel adjustment and improper seating
position can cause serious personal injury .
• Adjust the steering wheel column only when the vehicle is not
moving to prevent loss of vehicle control.
• Adjust the driver's seat or steering wheel so that there is a
minimum of 10 inches (25 cm) between your chest and the
steering wheel
=> page 222 , fig . 235 . If you cannot maintain this
minimum distance, the airbag system cannot protect you prop
erly .
• If physical limitations prevent you from sitting 10 inches (25
cm) or more from the steering wheel, check with your authorized
Audi dealer to see if adaptive equipment is available .
• If the steering wheel is aligned with your face , the supple
mental driver's airbag cannot provide as much protection in an
accident . Always make sure that the steering wheel is aligned with
your chest .
• Always hold the steering wheel with your hands at the 9 o'clock
and 3 o'clock positions to reduce the risk of personal injury if the
driver's airbag deploys .
• Never hold the steering wheel at the 12 o'clock position or with
your hands inside the steering wheel rim or on the steering wheel
hub. Holding the steering wheel the wrong way can cause serious
injuries to the hands, arms and head if the driver's airbag
deploys. •
Page 143 of 426
___________________________________________________ O_ n_ t_h _e_ r_o _a_ d _ ___._
Ap plies to v ehi cles : wi th ele ctr ic ally a djuste d steer in g wh eel
Electrically adjusted steering vvheel
The he ight and re ach of the stee ring whe el can b e electr i
cally adj uste d to s uit t he d river .
First, adjust the d river's seat co rrect ly.
Height adjustment
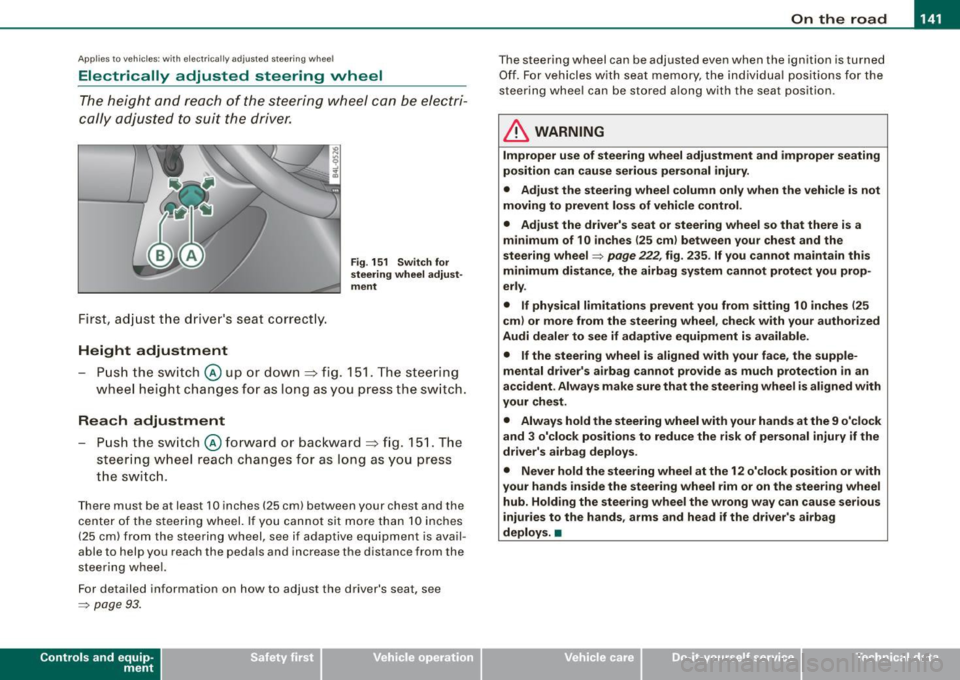
Fig . 151 Switch for
steering wheel adjust ·
ment
- Push the switch@ up or dow n=> fig. 1 51. T he steer ing
w heel he ight cha nges for a s long as you pre ss th e swi tc h.
Reach adjustment
- Push the s witch @ forw ard o r backwar d => fig . 151. Th e
s teer ing whe el reach ch an ges for as lon g as you pr ess
t h e s wit c h.
Ther e must b e at least 1 O in ches ( 25 cml betw een your chest and the
cen te r of th e st eer ing w hee l. If you cannot sit mo re than 1 0 in che s
(2 5 cm) from the stee rin g wh eel, se e if adaptive equ ipm ent is ava il
able to help you reach the pedals and increase the distance from the
st eeri ng whe el.
F or detailed info rmation on how to ad just the drive r's seat, see
~ pa ge 93 .
Con tro ls and eq uip
ment
T he steering whe el can be adj ust ed even when the ignition is turn ed
O ff . F or vehi cle s with seat memory , the i ndividu al p osi tions fo r the
st eer in g w he el can be sto red a lon g w ith th e seat position.
& WARNING
Improper use of steering wheel adjustment and improper seating
position can cause serious personal injury.
• Adjust the steering wheel column only when the vehicle is not
moving to prevent loss of vehicle control .
• Adjust the driver's seat or steering wheel so that there is a
minimum of 10 inches (25 cm ) between your chest and the
steering wheel
~ page 222, fig . 235 . If you cannot maintain this
minimum distance , the airbag system cannot protect you prop
erly .
• If physical limitations prevent you from sitting 1 O inches (25
cml or more from the steering wheel , check with your authorized
Audi dealer to see if adaptive equipment is available.
• If the steering wheel is aligned with your face, the supple
mental driver's airbag cannot provide as much protection in an
accident . Always make sure that the steering wheel is aligned with
your chest .
• Always hold the steering wheel with your hands at the 9 o'clock
and 3 o'clock positions to reduce the risk of personal injury if the
driver's airbag deploys .
• Never hold the steering wheel at the 12 o'clock position or with
your hands inside the steering wheel rim or on the steer ing wheel
hub . Holding the steering wheel the wrong way can cause serious
injuries to the hands, arms and head if the driver's airbag
deploys. •
Vehicle care I I Technical data
Page 224 of 426
-Driving Safely
Pll:1------=---------------
Proper occupant seating positi ·ons
Proper seating position for the driver
The proper driver seating position is important for safe,
relaxed driving.
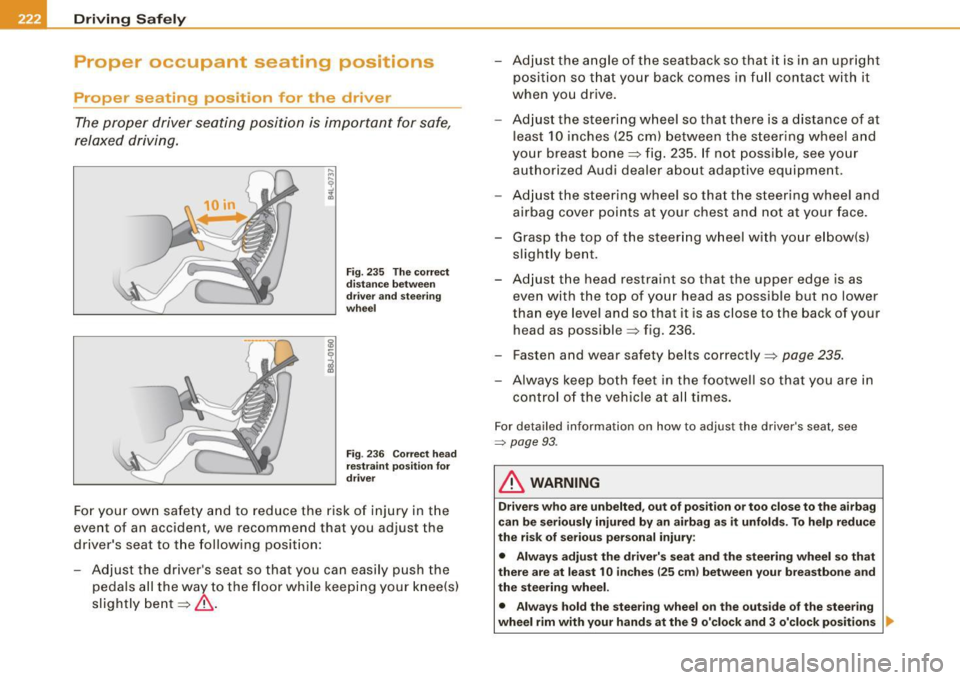
Fig. 235 The correct
distance between
driver and steering
wheel
Fig. 236 Correct head
restraint position for
driver
For your own safety and to reduce the risk of injury in the
event of an accident, we recommend that you adjust the
driver's seat to the following position:
- Adjust the driver's seat so that you can easily push the
pedals all the way to the floor while keeping your knee(s)
slightly bent=:>& . - Adjust the angle of the seatback so that
it is in an upright
position so that your back comes in full contact with it
when you drive.
- Adjust the steering wheel so that there is a distance of at
least 10 inches (25 cm) between the steering wheel and
your breast bone=:> fig. 235. If not possible, see your
authorized Audi dealer about adaptive equipment.
- Adjust the steering wheel so that the steering wheel and
airbag cover points at your chest and not at your face.
- Grasp the top of the steering wheel with your elbow(s)
slightly bent.
- Adjust the head restraint so that the upper edge is as
even with the top of your head as possible but no lower
than eye level and so that it is as close to the back of your
head as possible =:> fig . 236.
- Fasten and wear safety belts correctly=:>
page 235.
-Always keep both feet in the footwell so that you are in
control of the vehicle at all times.
For detailed information on how to adjust the driver's seat, see
=> page 93 .
& WARNING
Drivers who are unbelted, out of position or too close to the airbag
can be seriously injured by an airbag as it unfolds. To help reduce
the risk of serious personal injury:
• Always adjust the driver's seat and the steering wheel so that
there are at least 10 inches
125 cm) between your breastbone and
the steering wheel.
• Always hold the steering wheel on the outside of the steering
wheel rim with your hands at the 9 o'clock and 3 o'clock positions ..
Page 225 of 426

Driving Safely -
----------------
& WARNING (continued)
to help reduce the risk of personal injury if the driver's airbag
inflates.
• Never hold the steering wheel at the 12 o'clock position or with
your hands at other positions inside the steering wheel rim or on
the steering wheel hub . Holding the steering wheel the wrong way
can cause serious injuries to the hands, arms and head if the
driver's airbag deploys .
• Pointing the steering wheel toward your face decreases the
ability of the supplemental driver's airbag to protect you in a colli
sion.
• Always sit in an upright position and never lean against or
place any part of your body too close to the area where the airbags
are located .
• Before driving, always adjust the front seats and head
restraints properly and make sure that all passengers are properly
restrained.
• Never adjust the seats while the vehicle is moving. Your seat
may move unexpectedly and you could lose control of the vehicle.
• Never drive with the backrest reclined or tilted far back! The
farther the backrests are tilted back, the greater the risk of injury
due to incorrect positioning of the safety belt and improper
seating position.
• Children must always ride in child safety seats
=> page 263.
Special precautions apply when installing a child safety seat on
the front passenger seat
=> page 241 . •
Controls and equip
ment Safety first
Vehicle operation
Proper seating position for the front
passenger
The proper front passenger seating position is important
for safe, relaxed driving.
For your own safety and to reduce the risk of injury in the
event of an accident, we recommend that you adjust the
seat for the front passenger to the following pos ition:
- Move the front passenger seat back as far as possible.
There must be a minimum of 10 inches (25 cm) between
the breastbone and the instrument panel =>
&.
- Adjust the angle of the seatback so that it is in an upright
position and your back comes in full contact with it
whenever the vehicle is moving.
- Adjust the head restraint so that the upper edge is as
even with the top of your head as possible but not lower
than eye level and so that it is as close to the back of your
head as possible =>
page 225.
-Keep both feet flat on the floor in front of the front
passenger seat.
- Fasten and wear safety belts correctly=:>
page 235.
For detailed information on how to adjust the front passenger's
seat, see
=> page 92.
& WARNING
Front seat passengers who are unbelted, out of position or too
close to the airbag can be seriously injured or killed by the airbag
as it unfolds. To help reduce the risk of serious personal injury : .,
Vehicle care Do-it-yourself service Technical data
Page 330 of 426
Fuel supply and filling your fuel tank Refuelling procedure
- Insert the fuel nozzle from the gasoline pump into the
fuel filler neck as far as it will go.
- Select a medium refuelling rate so that the nozzle switches off automatically when the tank is full.
Putting the fuel cap back on
- After filling your tank, twist the fuel filler cap clockwise as
far as it will go.
Close the fuel filler flap.
To avoid fuel spilling or evaporating from the fuel tank always close
fuel filler cap properly and completely. An improperly closed fuel
filler cap may also cause the MIL lamp=>
page 29 to come on.
& WARNING
Improper refueling or handling of fuel can cause fire, explosion
and severe burns.
• Fuel is highly flammable and can cause severe burns and other
injuries.
• Failure to shut the engine off while refueling and/or to insert
the pump nozzle fully into the fuel filler neck could cause fuel to spray out of filler neck or to overflow. Fuel spray and overflowing
fuel can cause a fire.
• Never use a cellular telephone while refueling . The electromag
netic radiation can cause sparks that can ignite fuel vapors and
cause a fire.
• Never get back into your vehicle while refueling. If in excep
tional circumstances you must get back in your vehicle while refu
eling, make certain that you close the door and touch metal to
discharge static electricity before touching the filler nozzle again.
Static electricity can cause sparks that can ignite fuel vapors
released during refueling .
& WARNING (continued)
• Never smoke or have an open flame anywhere in or near your
vehicle when refueling or filling a portable fuel container.
• For your safety, we strongly recommend that you do not travel
with a portable fuel container in your vehicle. The container, full or
empty may leak and could cause a fire, especially in a crash.
• If, under exceptional circumstances, you must transport a
portable fuel container, please observe the following:
-Never fill a portable fuel container while it is anywhere in or
on the vehicle (for example, in the luggage compartment, or on
the trunk). Static electricity can build up while filling and can
ignite fuel vapors causing a fire.
- Always place a portable fuel container on the ground before
filling.
- Always keep the filler nozzle completely inside the portable
container before and during filling.
- If filling a portable container made of metal, the filler nozzle
must always be in contact with the container. This will help
prevent static electricity from discharging and cause a fire.
- Never spill fuel inside the vehicle or luggage compartment. Fuel vapors are highly flammable .
- Always observe local and state/provincial laws regarding the
use, storage and transportation of fuel containers.
- Make certain the fuel container meets industry standards
(ANSI / ASTM F852-86l.
0 Note
If any fuel has spilled onto the car, it should be removed immedi -
ately to prevent damage to the paint. _.,