AUDI Q7 2010 Owner´s Manual
Manufacturer: AUDI, Model Year: 2010, Model line: Q7, Model: AUDI Q7 2010Pages: 390, PDF Size: 93.04 MB
Page 341 of 390

_____________________________________________ W __ h_a_ t_ d_o_ I_ d_o _ n_ o_ w _ ? __ _
& WARNING (continued)
-Never store the inflatable spare tire or jack and tools in the
passenger compartment.
- Always store all jacking equipment, tools, and the inflatable
spare tire in the luggage compartment.
- Tighten the knurled retaining screw for the inflatable spare
tire securely.
0 Note
• The inflatable spare tire has been developed specifically for this
vehicle model. It must not be exchanged or used for other vehicle
models . Similarly, inflatable tires from other vehicle models must
not be used.
• Normal summer or winter tires must not be installed on the inflat
able tire rim. •
Inflating inflatable spare tire
-Remove the compressor from the luggage compartment
~ page 338, fig. 250.
- Unscrew the valve stem from the spare tire.
- Screw the tire filler hose from the compressor firmly onto
the valve of the spare tire.
- Insert the plug from the compressor into a socket of the
vehicle ~
page 104.
- Switch the compressor on .
- Let the compressor run until it has reached SO PSI (3.5
bar). Switch the compressor off after running for
12 minutes at the most - danger of overheating!
Safety first
& WARNING
The compressor and the tire filler hose can become extremely hot
while they are running · danger of burns!
0 Note
Switch the compressor off after running for 12 minutes at the most
danger of overheating! Allow the compressor to cool down for a few
minutes before you use it again.
[ i] Tips
The compressor must not be connected to the cigarette lighter
socket, as this socket does not provide the required power.•
Changing a wheel
Before changing a wheel
Observe the following precautions for your own and your
passenger's safety when changing a wheel.
- After you experience a tire failure, pull the car well away
from moving traffic and try to reach
level ground before
you stop ~& -
- All passengers should
leave the car and move to a safe
location (for instance, behind the guardrail)~ &.
- Engage the
parking brake to prevent your vehicle from
rolling unintentionally~ &.
- Move
selector lever to position P ~ & .
- If you are tow ing a trailer: unhitch the trailer from your
vehicle. ..,_
Vehicle care Do-it-yourself service Technical data
Page 342 of 390

111.___W_ h_ a_t _ d_ o_ I_d_ o_ n_o _w_ ? ____________________________________________ _
-Block the diagonally opposite wheel with the folding
chocks or other objects.
- Take the
jack and the inflatable spare tire out of the
luggage compartment =>
page 336.
& WARNING
You or your passengers could be injured while changing a wheel if
you do not follow these safety precautions:
• If you have a flat tire, move a safe distance off the road. Turn
off the engine, turn the emergency flashers on and use other
warning devices to alert other motorists.
• Make sure that passengers wait
in a safe place away from the
vehicle and well away from the road and traffic.
• To help prevent the vehicle from moving suddenly and possibly
slipping off the jack, always fully set the parking brake and block
the wheel diagonally opposite the wheel being changed with the
folding chocks or other objects. When one front wheel is lifted off
the ground, placing the Automatic Transmission in "P" (Park) will
not prevent the vehicle from moving.
• Before you change a wheel, be sure the ground is level and
firm. If necessary, use a sturdy board under the jack.
• After installing the inflatable spare tire, make sure that you
replace the flat tire/wheel in its storage area properly and tighten
the knurled retaining screw securely. •
Changing a wheel
When you change a wheel, follow the sequence described
below step-by-step and in exactly that order .
1. Activate the vehicle jack mode (only vehicles with Adaptive
Air Suspension) =>
page 180.
2. Remove the decorative wheel cover*. For more details see
also =>
page 341, "Decorative wheel covers" or
=>
page 341, "Wheels with wheel bolt caps".
3. Loosen the
wheel bolts=> page 342.
4. Locate the proper mounting point for the jack and align
the jack below that point=>
page 342.
5. Lift the car with the jack=> page 342.
6. Remove the wheel with the flat tire and then install the
inflatable spare tire=> page 344.
7. Tighten all wheel bolts lightly.
8.
Lower the veh icle with the jack .
9. Use the wheel bolt wrench and
firmly tighten all wheel
bolts =>
page 342.
10. Replace the decorative wheel cover*.
11. Deactivate the vehicle jack mode (only vehicles with
Adaptive Air Suspension)=>
page 180.
& WARNING
Always read and follow all WARNINGS and information:::::, & in
"Raising the vehicle" on
page 342 and=> page 345. •
After changing a wheel
A wheel change is not complete without the doing the
following.
- Store and secure the wh eel you replaced in the spare
wheel well.
- Replace the tools and the jack in their proper location .
Page 343 of 390

_______________________________________________ W __ h_a _t_ d_o_ I_ d_o_ n_ o_ w_ ? _ __._
- As soon as poss ible, have the tig htening torqu es on all
wheel bolts checked with a torque wrench . The correct
tightening torque is 120 ft lb (160 Nm).
- Have the flat tire
rep laced as soon as possible.
(I] Tips
• If you notice that the wheel bolts are corroded and difficult to turn
while chang ing a tire, they should be replaced before you check the
tightening torque.
• Drive at reduced speed until you have the t ightening torques
checked. •
Applies to ve hicl es: w ith dec orative wheel covers
Decorative wheel covers
The decorative wheel covers must be removed first to
access the wheel bolts.
Removing
Fig . 251 Changing a
wheel: Remov ing the
wheel cover
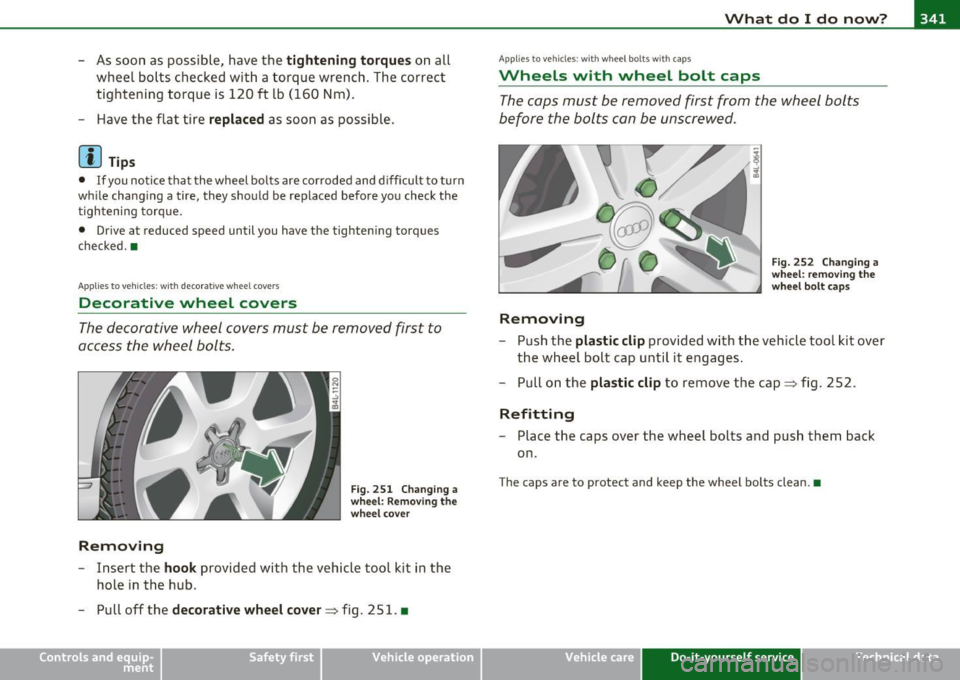
- Insert the hook provided with the vehicle tool k it in the
hole in the hub .
- Pull off the
deco rative whe el co ver => fig . 251 . •
Vehicle OP-eration
Applies to vehicles : w ith wheel bolts w ith caps
Wheels with wheel bolt caps
The caps must be removed first from the wheel bolts
before the bolts can be unscrewed.
Removing
F ig. 252 Ch angi ng a
wheel : removing the
wheel bolt c aps
- Push the plastic clip provided with the veh icle tool kit over
the wheel bolt cap until it engages .
Pull on the
plastic cli p to remove the cap=> fig . 252.
Refitting
- Place the caps over the wheel bolts and push them back
on .
The caps are to pr otect and keep the wheel bolts clean .•
Vehicle care Do-it-yourself service iTechnical data
Page 344 of 390

lffll.,___W_ h_ a_t _ d_ o_ I_d_ o_ n_o _w_ ? ___________________________________________ _
Loosening and tightening the wheel bolts
The wheel bolts must be loosened before raising the
vehicle.
Loosening
Fig . 253 Changing a
wheel: loosening the wheel bolts
-Install the wheel bolt wrench over the wheel bolt and
push it down as far as it will go.
- Take tight hold of the
end of the wrench handle and turn
the wheel bolts
counter-clockwise about one single turn
in the direction of arrow:::::, fig. 253 .
Tightening
-Install the wheel bolt wrench over the wheel bolt and
push it down as far as it will go.
- Take tight hold of the
end of the wrench handle and turn
each wheel bolt
clockwise until it is seated.
& WARNING
• Do not use force or hurry when changing a wheel -you can
cause the vehicle to slip off the jack and cause serious personal
injuries.
& WARNING (continued)
• Do not loosen the wheel bolts more than one turn before you
raise the vehicle with the jack. -You risk an injury.
(I] Tips
If a wheel bolt is very tight, you may find it easier to loosen by care
fully pushing down on the end of the wheel bolt wrench with
one foot
only. As you do so, hold on to the car to keep your balance and take
care not to slip. •
Raising the vehicle
The vehicle must be lifted with the jack first before the
wheel can be removed.
Fig. 254 Changing a
wheel: mounting
points for the jack ..
Page 345 of 390

_____________________________________________ W __ h_a _ t_ d_o_ I_ d _ o_ n_o_ w_ ? _ ___._
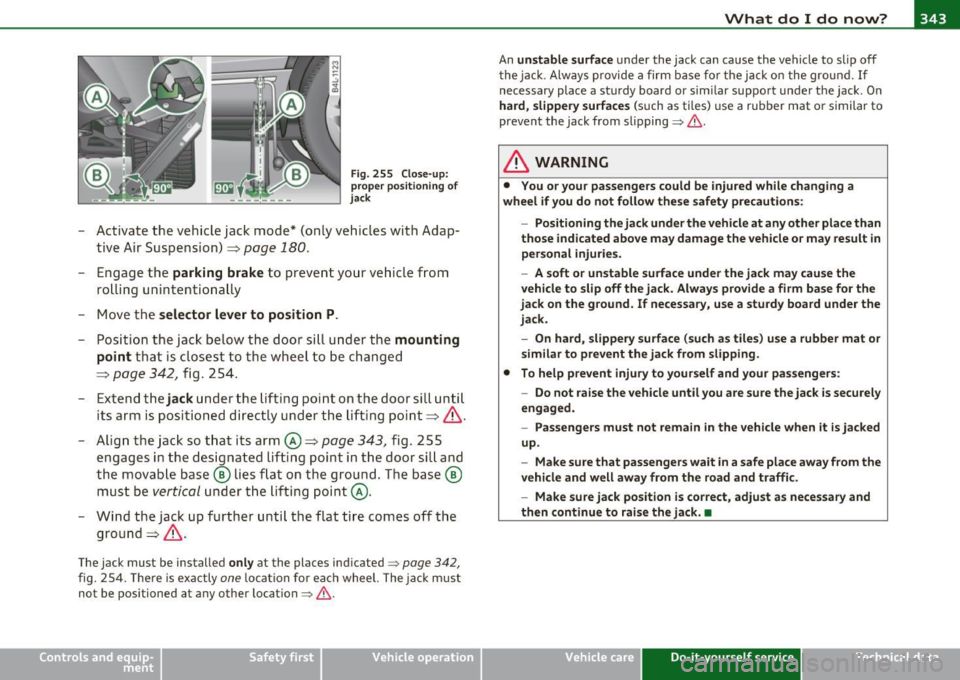
Fig. 255 Close-up:
proper positioning of
jack
-Activate the vehicle jack mode* (only vehicles with Adap
tive Air Suspension) =>
page 180.
- Engage the parking brake to prevent your vehicle from
rolling unintentionally
- Move the
selector lever to position P.
- Position the jack below the door sill under the mounting
point
that is closest to the wheel to be changed
=>
page 342 , fig. 254.
- Extend the
jack under the lifting point on the door sill until
its arm is positioned directly under the lifting point=>&.
- Align the jack so that its arm©=>
page 343, fig. 255
engages in the designated lifting point in the door sill and
the movable base® lies flat on the ground. The base ®
must be
vertical under the lifting point@.
- Wind the jack up further until the flat tire comes off the
ground =>& .
The jack must be installed only at the places indicated=> page 342,
fig. 254. There is exactly one location for each wheel. The jack must
not be positioned at any other location=>& .
Vehicle OP-eration
An unstable surface under the jack can cause the vehicle to slip off
the jack . Always provide a firm base for the jack on the ground. If
necessary place a sturdy board or similar support under the jack . On
hard, slippery surfaces (such as tiles) use a rubber mat or similar to
prevent the jack from slipping=>&.
& WARNING
• You or your passengers could be injured while changing a
wheel if you do not follow these safety precautions:
-Positioning the jack under the vehicle at any other place than
those indicated above may damage the vehicle or may result in personal injuries.
- A soft or unstable surface under the jack may cause the
vehicle to slip off the jack. Always provide a firm base for the
jack on the ground. If necessary, use a sturdy board under the
jack.
- On hard, slippery surface (such as tiles) use a rubber mat or
similar to prevent the jack from slipping.
• To help prevent injury to yourself and your passengers:
-Do not raise the vehicle until you are sure the jack is securely
engaged.
- Passengers must not remain in the vehicle when it is jacked
up.
- Make sure that passengers wait in a safe place away from the
vehicle and well away from the road and traffic.
- Make sure jack position is correct, adjust as necessary and
then continue to raise the jack. •
Vehicle care Do-it-yourself service iTechnical data
Page 346 of 390

lffll.___W_ h_ a_t _ d _ o_ I_ d_ o_ n_o _w_ ? ___________________________________________ _
Taking the wheel off/installing the
inflatable spare tire
Follow these instructi ons step-by-step for changing the
wheel
Fig. 256 Ch an ging a
wh eel: alig nm ent pi n
i n si de the to p h ole
After you have loosened all wheel bolts and raised the vehic le
off the gro und, remove and replace the wheel as follows:
Removing the wheel
- Remove the topmost wheel bolt complete ly and set it
aside on a
clean surface.
- Screw the threaded end of the
alignment p in from the
tool kit hand-tight into t he empty bolt ho le~
page 344,
fig . 256.
-Then r emove the other whee l bol ts as describe d above .
- Take off the wheel leaving the a lignm ent pin in the bo lt
hole .
Putting on the inflatable spare tire
-Inflate the inflatable spare tire~ page 339 and push the
wheel over t he alignment pin. -
Screw in and tighten all wheel bolts
slightly .
- Remove the alignment pin and insert and t ighten the
remaining w hee l bolt slightly like the rest .
- Turn the jack handle counter -c lockwise to lower the
vehicle u ntil the jac k is fully released .
Use t he wheel bolt wrenc h to t ighten all w hee l bolts f irmly
~ page 342. Tighten t hem crosswise, from one bolt to
the (approx imately) opposite one, to keep the wheel
cente red .
[I] Tips
• When mounting tires with unid irectional tr ead design make sure
the tread pattern is po inted the r ight way ~
page 344.
• The wheel bolts should be clean and easy to turn. Check for dirt
and corrosion on the mating surfaces of both the whee l and the h ub.
Remove all dirt from these surfaces before remounting the w heel. •
Tires with unidirectional tread design
Tires with unidirectional tread design must be mounted
with their tread pattern pointed in the righ t direction .
Using a spare tire w ith a t read pattern intended for
u se in a specific direction
When usi ng a spare tire w ith a t read pa ttern intended fo r use in a
specific direction, please note the following:
• T he di rec tion of rotation is ma rked by an ar row on the s ide of the
tire.
• If the spare tire has to be installed in the incor rect d irect io n, use
the spare tire only temporar ily since the tire will not be ab le to
a chieve its optim um pe rfo rma nce characteristics with rega rd to
aquaplaning, no ise and wear. _,.
Page 347 of 390

_____________________________________________ W __ h_a_ t_ d_o_ I_ d_o _ n_ o_ w _ ? __ _
• We recommend that you pay particular attent ion to t his fact
dur ing we t we ather and t hat you a dju st yo ur sp eed to mat ch ro ad
conditions.
• Rep lace t he fla t tir e w ith a new one a nd h ave it ins talled o n your
vehicle as soon as poss ible to resto re the handling advantages o f a
unid irectiona l t ire .•
Notes on wheel changing
P le ase re ad the in form ation=> page 326 , "N ew tires and r eplacing
t ires and wheels" if yo u are going to use a spa re t ire wh ich is different
fr om the tires on yo ur vehi cle.
After you change a t ire:
• Check the tire pressure on the spare immediately after installa
tion.
• Have the wheel bolt tightening torque checked with a torque
wren ch as soon as po ssible by yo u r autho rize d Audi deale r or a qual
ified workshop.
• With steel and alloy wheel rims, the wheel bolts are correctly
tightened at a torque of 120 ft lb (160 Nm).
• If you notice that the wheel bolts are corroded and difficult to
turn while changing a tire, they should be replaced before you check
the tightening torque.
• Replace the flat tire with a new one and have it installed on your
vehicle as soon as possible. Remount the wheel cover .
Until then, dr ive with e xtra care and at reduced speeds.
& WARNING
• If you are going to equip your vehicle with tires or rims which
differ from those which were factory installed, then be sure to
read the information =>
page 326, "New tires and replacing tires
and wheels ".
Safety first
& WARNING (co ntinued )
• Always make sure the damaged wheel or even a flat tire and
the jack and tool kit are properly secured in the luggage compart ment and are not loose in the passenger compartment.
• In an accident or sudden maneuver they could fly forward,
injuring anyone in the vehicle .
• Always store damaged wheel, jack and tools securely in the
luggage compartment. Otherwise, in an accident or sudden
maneuver they could fly forward, causing injury to passengers in
the vehicle. •
Vehicle care Do-it-yourself service Technical data
Page 348 of 390

lffll.,___F_ u_ s_e _ s_ a_n_ d_ b_u _ l_ b_ s _______________________________________________ _
Fuses and bulbs
Fuses
Replacing a fuse
A problem in the electrical system may be caused by a
blown fuse.
F ig . 2 57 Ins trum ent
pane l left: Face c over
Fig . 258 Instrument
p anel left : Content
Fac e co ver
- Locate the fuse which belongs to the component which
failed.
- Switch off the ignit ion and the electrical component
affected . - Carefu
lly pry the face cover off the instrument panel using
the ignit ion key or a screwdriver==> fig. 25 7.
- Re move the plast ic cl ip © from i ts re taine r in the face
cover=> fig. 2 58, place i t over t he ques tiona ble fuse and
remove t he f use .
- Rep lace a blown fuse (re cog niz able by the m elte d m etal
s tri p inside) wit h a fuse of the
same amp erag e.
T he ind ividu al c ircui ts are protec ted by fuses. The f use panels wi th
the fuses are located on the left and right front faces of the instru
ment pane l beh ind a cover and in t he righ t storage area in t he
luggage compartment .
Th ere is a plastic clip@ in the cover on the left side of the instrument
pane l, which ca n be used to remove the fuses . The crank @ is used for
eme rgency operat io n of the Pano ramic sliding s unroof *. You wi ll a lso
find a label o n both covers in the instrument panel w ith the fuse
layout © for the corresponding fuse panel.
& WARNING
Never replace a fuse with one that has a higher amperage rating.
• A fuse with a too high amperage could damage the electr ical
part and cau se a fire.
(D Note
• O n no account s houl d fuses be repaired (e .g. patched up with tin
foil o r wire) as th is may cause se rious damage elsewhe re in t he elec
trical circ uit or cause fire .
• If a fuse blows repeatedly, do not keep replacing i t. Instead, have
t he ca use o f the repeated short c ircu it or over load lo cate d an d fixed . .,_
Page 349 of 390
![AUDI Q7 2010 Owner´s Manual ______________________________________________ F _u_s _e_ s_ a_ n_ d _ b _u_l_b _ s _ ___.1111
(]] Tips
You a re well adv ised to keep a supply of spare fuses in your veh icle .
Fuses wit AUDI Q7 2010 Owner´s Manual ______________________________________________ F _u_s _e_ s_ a_ n_ d _ b _u_l_b _ s _ ___.1111
(]] Tips
You a re well adv ised to keep a supply of spare fuses in your veh icle .
Fuses wit](/img/6/40275/w960_40275-348.png)
______________________________________________ F _u_s _e_ s_ a_ n_ d _ b _u_l_b _ s _ ___.1111
(]] Tips
You a re well adv ised to keep a supply of spare fuses in your veh icle .
Fuses with the proper ampere ratings are available at your authorized
Audi dealer. •
Fuse Location, Instrument Panel left
Fig. 2 59 Fuse pa nel
layou t
Some of the eq uipment items listed a re opt io na l o r only availab le on
certain model configurations.
Note that the following table i s accurate at the time of going to
pre ss and is subject to change . In the event of di scr epancie s, th e
label on the in side of the cover always takes precedence.
Th e power seats are p rotected by circuit breaker s, which a utomat i
cally reset after a few seconds after the overload has been remedied.
No. Equipment
Fuse holder (red)
1
2
Not used
Not used
N ot used
4 T ire pressure monitor ing system
Amps
5
Vehicle OP-eration
No ... Equipment
5 Not used
6 L umbar supp ort dr iver's sea t
7 Window regulators (left side of veh icle)
8 Door control module (left side of vehicle)
9 Not used
1 0 E
lect ronic igni tion lock,
power steering col umn adjustment
1 1 Switch module stee ring column
12 Intell igen t power modu le convenience
Fuse holder (brown)
1 N ot used
2 Not used
3 Seat ventilatio n (left)
4 Wi per system
5 Ra in sensor
6 Horn
7 I ntell igen t po wer mo du le dr ive r
9
10 Intell
igent power module driver
(lights left side of vehicle)
I ntel ligen t power modu le dr iver
(lig hts rig ht side of vehicle)
Instrument cluster
11 Headlight washer system
12 Diagnostic connector
Fu se holder (black)
1 Headlight electronic syst em (left sid e of vehicle)
Vehicle care Do-it-yourself service
Amps
10
35
15
30
10
5
15
30
5
25
30
25
2 5
10
30
10
10
iTechnical data
Page 350 of 390

-Fuses and bulbs ..._ __________________________________________ _
No.
2
3
4
5
6
7
8
9
10
11
1 2
Equipment
Adaptive Cruise Control
N ot used
N ot used
Not used
T erminal
15 (interior)
O il level sensor
D iagnostic connector
Automatic dipping interior mirror H omelink
Control module Gateway
H eadlight range adj ustment
Amps
5
5
5
5
5
5
5
5
Fuse Location, Instrument Panel right
Fig . 260 Fuse pa nel
la yo ut
Some of the equipment i tems listed a re optiona l or only avai lab le on
certain model configu rations .
Note that the following table i s accurate at the time of going to
pre ss and is subject to change . In the ev ent of di screpancie s, the
label on the inside of the co ver always takes preceden ce.
•
The power seats are protected by circuit break ers , which automat i
cally reset aft e r a few seconds af ter the overload has been remed ied.
No . Equipment
Fuse holder (black)
1 Heated rear seats
2 Automat ic transm issio n
3 Front seat hating/seat ventilation (right)
4 Elect ronic Stability Program (ESP)
5 Door con trol module (right side of vehicle)
6 Rear electrical outlets
7 Lumbar support passenger's seat
8 C igarette ligh ter front
9 Front e lectrical outlets
Amps
20
2 0
1 5
25
10
20
25 __________ .__
10 A/C contro ls
11 Not used
12 Intelligent power module passenger
Fuse holder (brown )
1
2
Headlig ht ele ctronic s ystem (r ight side of vehi
cle)
Ride height adjustment
3 Telephone package
4 Audi side assist
5 Elect ronic Stabilization Prog ram (ES P)
6 Automatic transmission
7 Electronic Stabilization Program (ESP)
8 Shift gate automatic transmission
9 Pa rk ing system
10
15
1 0
5
5
5
5
5/20
5
5
5