height AUDI Q7 2011 Owner´s Manual
[x] Cancel search | Manufacturer: AUDI, Model Year: 2011, Model line: Q7, Model: AUDI Q7 2011Pages: 392, PDF Size: 93.29 MB
Page 87 of 392
Seats and storage
General recommendations
Why is your seat adjustment so important?
The safety belts and the airbag system can only provide
maximum protection if the front seats are correctly
adju sted.
Th ere a re various ways of adjusting t he front seats to provide safe and
comfortable support for the driver and the front passenger . Ad just
your seat properly so that :
• you can easily and quickly reach a ll the switc hes and contro ls in the
ins trumen t pa nel
• your body is properly supported thus reducing phys ica l stress and
fatigue
• the safety be lts and airbag system can offer maximum protection
===> page 211 .
In the following sections, you w ill see exact ly how you can best ad just
your sea ts .
Th ere are special regulations a nd instr uctions for install ing a child
safety seat on the front passenger's sea t. Always follow the informa
tion regarding child safety p rovided in===>
page 233, "Child Safety ".
& WARNING
Incorrect seating posit ion of the dri ver and all other passengers
can result in seriou s personal injury.
• Always keep your feet on the floor when the vehicle is in
motion -never put your feet on top of the instrument panel, out
of the window o r on top of the seat cush ion. This applies especially
to the passengers.
If your seating po sition is incorrect, you
increase the ri sk of injury in the case of sudden braking or an acci-
Controls and equip
ment Safety first
Seats and storage
& WARNING
(con tinu ed)
dent . If the airbag inflates and the seating position is incorrect ,
this could result in per sonal injury or even death .
• It is important for both the dri ver and front passenger to keep
a distan ce of at least 10 inche s (25 cm) between themselves and
the steering wheel and /or instrument panel. If you 're sitting any
closer than this , the airbag system cannot protect you properly. In
addition, the front seats and head restraints must be adjusted to
your body height so that they can give you maximum protection .
• Always try to keep as much distance as possible between your
self and the steering wheel or instrument panel.
• Do not adjust the driver's or front passenger 's seat while the
vehicle is moving. You r seat may move unexpectedly , causing
sudden loss of vehicle control and personal injury . If you adjust
your seat while the vehicle is moving , you are out of position. •
Driver's seat
The correct seat position is important for saf e and
re lax ed driving.
W e recomme nd that you a djust the drive r's sea t in the
f ollowing man ner :
- Ad just the seat in fore and aft direction so that you can
easily pus h the pedals to the floor w hile keeping your
knees slightly bent=>
& in "Why is yo ur seat a djus tme nt
so importa nt?" .
- Adjust the seatback so that when yo u sit with yo ur back
agai nst t he seatback , you can st ill grasp t he top of the
steering w heel. ..,
Vehicle care Technical data
Page 89 of 392
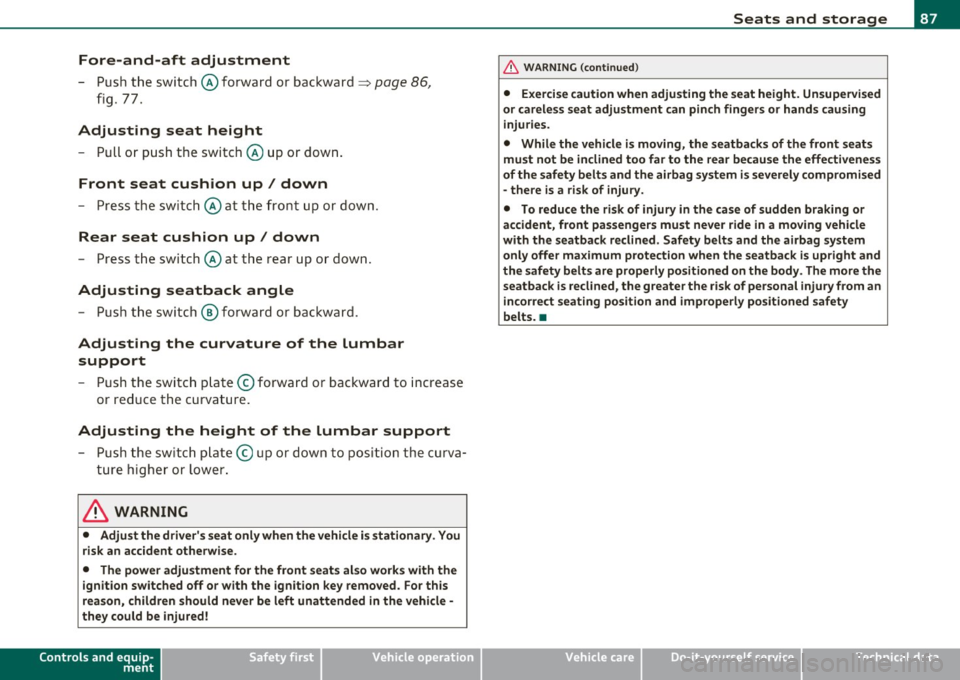
Fore-and-aft adjustment
- Push the switch@forward or backward~ page 86,
fig. 77.
Adjusting seat height
- Pull or push the switch © up or down.
Front seat cushion up/ down
- Press the switch © at the front up or down.
Rear seat cushion up/ down
- Press the switch © at the rear up or down.
Adjusting seatback angle
- Push the switch @ forward or backward.
Adjusting the curvature of the lumbar
support
- Push the switch plate © forward or backward to increase
or reduce the curvature.
Adjusting the height of the lumbar support
- Push the switch plate © up or down to position the curva
ture higher or lower.
& WARNING
• Adjust the driver's seat only when the vehicle is stationary. You
risk an accident otherwise.
• The power adjustment for the front seats also works with the
ignition switched off or with the ignition key removed. For this
reason, children should never be left unattended in the vehicle -
they could be injured!
Controls and equip
ment Safety first
Seats and storage
& WARNING
(continued)
• Exercise caution when adjusting the seat height. Unsupervised
or careless seat adjustment can pinch fingers or hands causing
injuries.
• While the vehicle is moving, the seatbacks of the front seats
must not be inclined too far to the rear because the effectiveness
of the safety belts and the airbag system is severely compromised
- there is a risk of injury.
• To reduce the risk of injury in the case of sudden braking or
accident, front passengers must never ride in a moving vehicle
with the seatback reclined. Safety belts and the airbag system
only offer maximum protection when the seatback is upright and
the safety belts are properly positioned on the body. The more the seatback is reclined, the greater the risk of personal injury from an
incorrect seating position and improperly positioned safety
belts. •
Vehicle care Technical data
Page 90 of 392
Seats and storage
Adjusting front passenger's seat manually
Applies to vehicl es: with manua lly adjustab le passenger seat
Adjustment controls
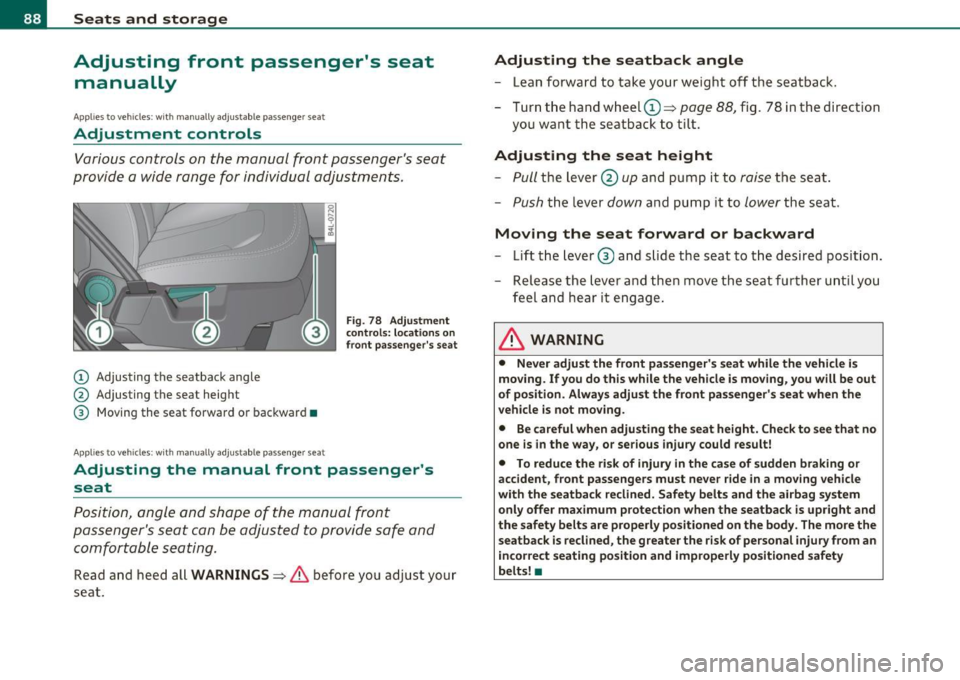
Various controls on the manual front passenger's seat
provide a wide range for individual adjustments.
(D Adjusting the seatback angle
@ Adjusting the seat height
® Moving the seat forward or backward •
Applies to veh icles : w ith manually adjustable passenger seat
Fig . 78 Adjustment
controls: locations on
front passenger's seat
Adjusting the manual front passenger's
seat
Position, angle and shape of the manual front
passenger's seat can be adjusted to provide safe and
comfortable seating.
Read and heed all WARNINGS :::;, & before you adjust your
seat.
Adjusting the seatback angle
- Lean forward to take your weight off the seatback.
- Turn the hand wheel[):::;,
page 88, fig. 78 in the direction
you want the seatback to tilt.
Adjusting the seat height
- Pull the lever @up and pump it to raise the seat.
-Push the lever down and pump it to lower the seat.
Moving the seat forward or backward
- Lift the lever® and slide the seat to the desired position.
- Release the lever and then move the seat further until you
feel and hear it engage.
& WARNING
• Never adjust the front passenger's seat while the vehicle is
moving. If you do this while the vehicle is moving, you will be out
of position. Always adjust the front passenger's seat when the
vehicle is not moving.
• Be careful when adjusting the seat height. Check to see that no
one is in the way, or serious injury could result!
• To reduce the risk of injury in the case of sudden braking or
accident, front passengers must never ride in a moving vehicle
with the seatback reclined. Safety belts and the airbag system
only offer maximum protection when the seatback is upright and
the safety belts are properly positioned on the body. The more the
seatback is reclined, the greater the risk of personal injury from an
incorrect seating position and improperly positioned safety
belts! •
Page 94 of 392
Seats and storage
Applies to veh icles : w ith third row seat ing
Folding seatback up and down (third row
seating)
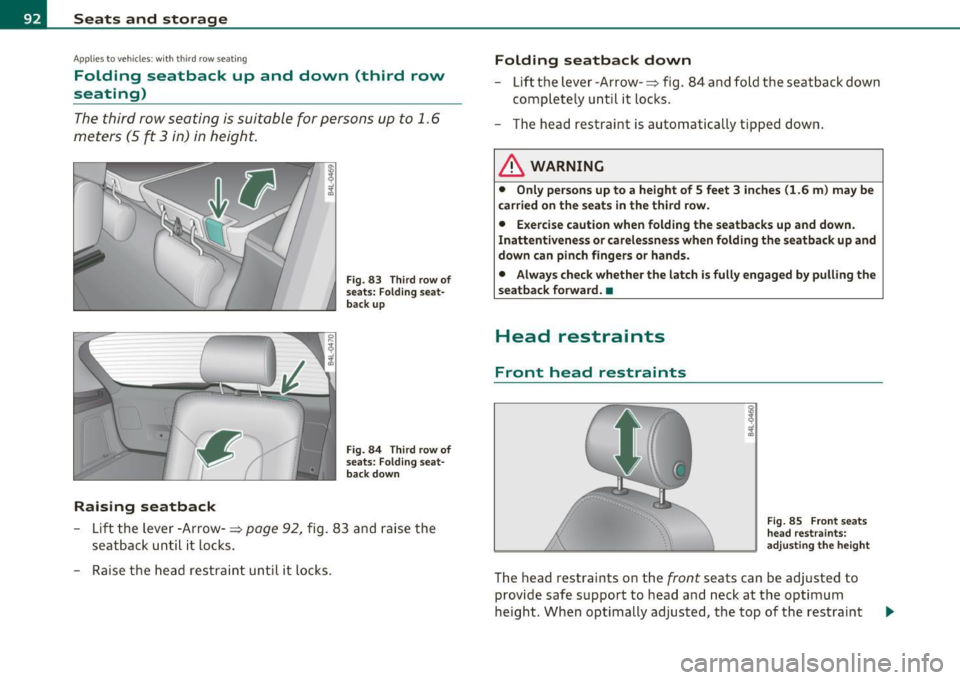
The third row seating is suitable for persons up to 1. 6
meters
(5 ft 3 in) in height.
•
Raising seatback
Fig. 83 Third row of
seats: Folding seat·
back up
Fig. 84 Third row of
seats: Folding seat
back down
- Lift the Lever -Arrow- ~ page 92, fig. 83 and raise the
seatback until it Locks.
- Raise the head restraint until it locks.
Folding seatback down
- Lift the lever-Arrow- ~ fig . 84 and fold the seatback down
completely until it locks.
- The head restraint is automatically tipped down .
& WARNING
• Only persons up to a height of 5 feet 3 inches (1.6 m) may be
carried on the seats in the third row.
• Exercise caution when folding the seatbacks up and down.
Inattentiveness or carelessness when folding the seatback up and
down can pinch fingers or hands.
• Always check whether the latch is fully engaged by pulling the
seatback forward. •
Head restraints
Front head restraints
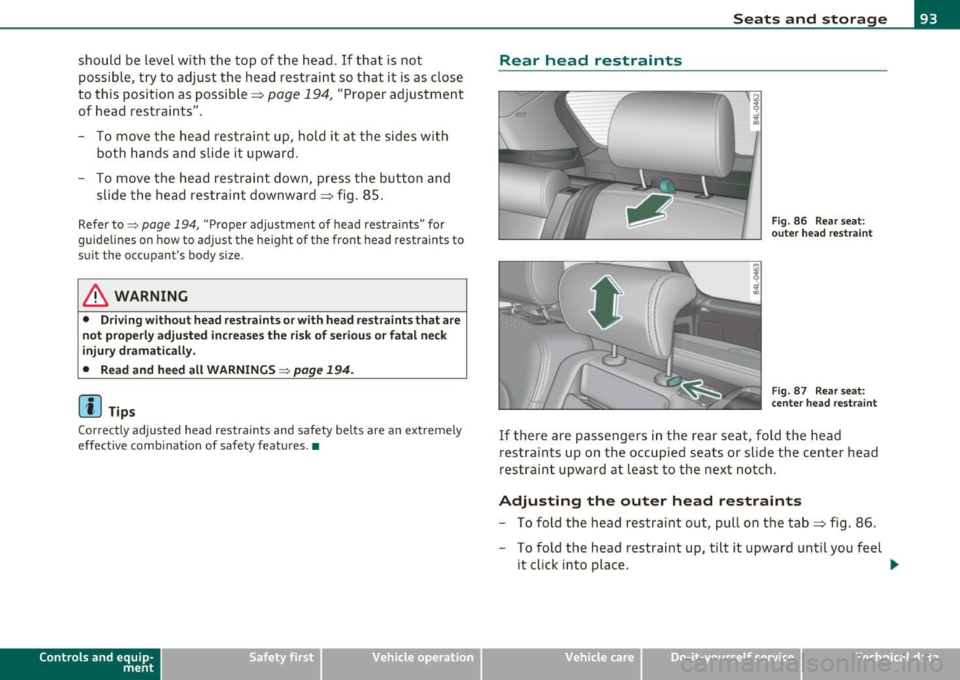
Fig. 85 Front seats
head restraints:
adjusting the height
The head restraints on the front seats can be adjusted to
provide safe support to head and neck at the optimum
height. When optimally adjusted , the top of the restraint
Page 95 of 392
should be level with the top of the head. If that is not
possible, try to adjust the head restraint so that it is as close
to this position as possible~
page 194, "Proper adjustment
of head restraints".
To move the head restraint up, hold it at the sides with
both hands and slide it upward.
- To move the head restraint down, press the button and
slide the head restraint downward ::::> fig. 85 .
Refer to~ page 194, "Proper adjustment of head restraints" for
guidelines on how to adjust the height of the front head restraints to
suit the occupant's body size .
& WARNING
• Driving without head restraints or with head restraints that are
not properly adjusted increases the risk of serious or fatal neck
injury dramatically.
• Read and heed all WARNINGS ~
page 194.
[ i] Tips
Correctly adjusted head restraints and safety belts are an extremely
effective combination of safety features. •
Contro ls a nd e quip
m en t Vehicle
OP-eration
Rear head restraints Seats and storage
Fig. 86 Rear
seat:
outer head restraint
Fig. 87 Rear seat:
center head restraint
If there are passengers in the rear seat, fold the head
restraints up on the occupied seats or slide the center head
restraint upward at least to the next notch.
Adjusting the outer head restraints
- To fold the head restraint out, pull on the tab::::> fig . 86.
- To fold the head restraint up, tilt it upward until you feel
it click into place.
~
Vehicle care Do-it-yourselt service iTechnical data
Page 102 of 392
n,.,___S_ e _ a_t _s_ a_n_ d_ s_ t_o _r _a _,g:.- e ______________________________________________ _
Setting up the cargo floor
- Open the rear lid.
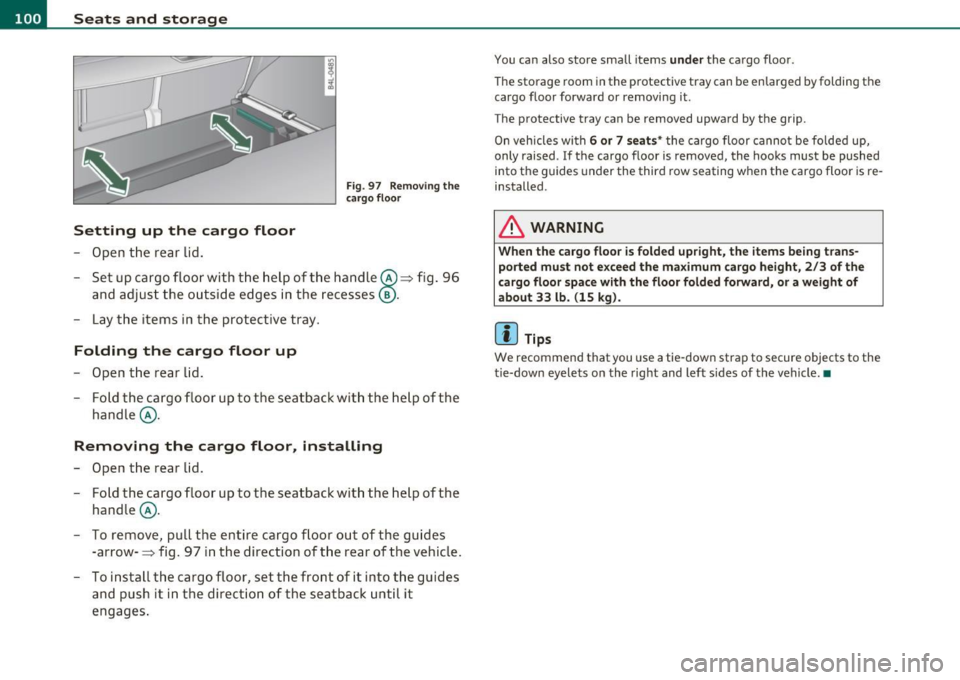
Fig. 97 Removing the
c arg o floor
- Set up cargo floor with the help of the handle @=:> fig. 96
and adjust the outside edges in the recesse s@ .
- Lay the i tems in the protective tray.
Folding the cargo floor up
-Open the rear lid.
- Fold the cargo floor up to the seatback with the help of the
handle @.
Removing the cargo floor , installing
- Open the rear lid.
- Fold the cargo floor up to the seatback with the help of the
handle @.
- To remove, pull the en tire cargo floor out of the guides
-arrow-=> fig. 97 in the direction of the rear of the vehicle .
- To install the cargo floor, set the front of it into the guides
and push it in the direction of the seatback until it
engages.
You can also store small items under the cargo floor.
The storage room in the protective tray can be enlarged by folding the
cargo floor forward or removing it .
The protective tray can be removed upward by the grip.
On vehicles with
6 or 7 seats* the cargo floor cannot be folded up,
only raised .
If the cargo floor is removed, the hooks must be pushed
into the guides under the third row seating w hen the cargo floor is re
installed .
& WARNING
When the cargo floor is folded upright, the items being trans
ported mu st not exceed the maximum cargo height, 2/3 of the
cargo floor space with the floor folded forward, or a weight of
about 33 lb. (15 kg).
[I] Tips
We recommend that you use a tie-down strap to secure objects to the
tie-down eyelets on the right and left sides of the vehicle. •
Page 127 of 392

On the road Ill _______________ __.
Applies to veh icles : w ith electrically adju stab le steer ing wheel
Electrically adjustable steering wheel
The height and reach of the stee ring wheel ca n be ele ctri
c ally adj usted to sui t th e d river.
Firs t, a djust t he dr iver's se at correct ly.
Height adjustment
Fig . 123 Sw itch for
s teering whee l ad ju st
ment
- Push t he s witch © up or down=> fig. 12 3. The st ee ring
w he el heig ht chang es f or as long as you press t he swi tch .
Reach adjustment
- Push t he switc h© forward or backward=> fig . 123 . T he
ste ering w hee l reac h changes for as long as you press the
swi tch .
The re m ust be at least 10 inches (25 cm) between you r chest and the
cen ter of the steering whee l. If you cannot sit more than 10 inches
(25 cm) from the steer ing wheel, see if adapt ive equ ipment is ava il
able to h elp you reach the pedals and increase the distance from the
steeri ng wheel.
For detailed information on how to adjust the dr iver 's seat , see
~ page 86.
Con tro ls a nd e quip
m en t Vehicle
OP-eration
The steering wheel ca n be adjusted even when the ign ition is turned
O ff. For veh icles with sea t memory, the individu al pos it io ns for the
steer ing wheel can be sto red along with t he seat pos it ion.
& WARNING
Improper use of steering wheel adjustment and imprope r seating
position can cau se seriou s per sonal injury.
• Adjust the steering wheel column only when the vehicle i s not
moving to prevent loss of vehicle control.
• Adjust the driver 's seat or steering wheel so that there is a
minimum of 10 in ches (25 cm) between your chest and the
steering wheel~
page 192, fig. 186. If you cannot maintain this
minimum distance , the airbag system cannot prote ct you prop
erly.
• If phy sical limitations prevent you from sitting 10 inches (25
cm ) or more from the steering wheel, check with you r authorized
Audi dealer to see if adaptive equipment is available .
• If the steering wheel is aligned with your face , the supple·
mental driver 's airbag cannot provide as much protection in an
accident. Always make sure that the steering wheel is aligned with
your che st.
• Always hold the steering wheel with your hands at the 9 o'clock
and 3 o'clock po sition s to reduce the risk of personal injury if the
drive r's airbag deploys.
• Never hold the steering wheel at the 12 o'clock po sition or with
your hands inside the steering wheel rim or on the steering wheel
hub. Holding the steering wheel the wrong way can cause serious
injuries to the hands, arms and head if the driver's airbag
deploy s.•
Vehicle care Do-it-yourselt service iTechnical data
Page 180 of 392
lffllL__.!.A~d~a!!p~t~iv~e~A~i r'......=S:.!u:!:s~p:.::e:.!n..::s==.:_:io~n:..:.... ________________________________________ _
Adaptive Air Suspension
Air suspension and damping
Applies to veh icles : w ith Adap tive Air Suspens ion
Description
Air suspension and damping can be adjus ted separately.
Adaptive Air Suspens ion is an e lectron ically controlled springing and
damping sys tem. This chass is sys tem makes it eas ie r on the d river by
adapting to the particular si tuation through imperceptible control
processes.
T he
Adaptive Air Su spen sion component regu lates ground clea rance
depending on vehicle speed and driver input . It funct ions indepen
dently from the load cond it io n. Ac ce le rating to a speed above a
predetermined limit will make the vehicle lower itse lf. On the other
hand, dr iv ing more slowly res ults in the vehicle r aising again at
specific speeds.
T he
damping component provides individua l control of the damping
forces . For example , w ith damping characte rist ics set to p rovide
greater comfort, damping is set somewhat harder for a brief period
only as req uir ed, for example, whe n going a ro und a curve or when
brak ing.
Sett ings
Adaptive Air Suspension provides the driver with the opportun ity to
set the chass is characte rist ics also to their individual p refe rence.
With the driving modes
Comfort, Automatic and Dynamic the dr iver
has three chass is sett ings available, ranging from comfort to spo rty.
The
Offroad mode ca n be selected for dr iv ing on poor quality
s tr etc hes of road. In addition,
Li~ provides a fif th mode, w hich can be
selected when exceptiona lly high g round clearance is needed
==> page 179, "C hass is controls ".
T he modes are set in MMI
==> page 180 .
& WARNING
The height of th e parked vehicle can change du e to temperature
fluctuations or changes in load.
0 Note
• Whenever you park yo ur vehicle, always make sure there is
ade qua te clearance above and below t he ve hicle. The height of the
parked vehicle can change as the result of temperature fluctuations,
c hanges in loa d condition and changes in the dr iv ing mode (ground
cleara nce).
• If the veh icle is be ing transported (e .g . by tow truck, tra in , sh ip,
etc.), mount the tie-down cha ins/cables over the running su rface
(circumference) of the tires. Never se cure the vehi cle by the ax le, the
suspension struts or the front or rear tow line eye. For technical
reaso ns, the p ressure in the suspension st ru ts may change dur ing the
t ransport, whic h could result in the vehicle no longer being secured
pro perly.
• If you are goi ng to tow a trailer w ith a tra iler h itch that was
not
ins talled accor ding to f actory s pecifi cations, you mus t activa te t he
t rai ler operation mode manually:::::,
page 182.
[{] Tips
• Before you ca n raise your vehicle using the vehicle jack (for
example, when c hangi ng a flat tire) or a vehicle lift, you must activate
t he jac kin g mode :::::,
page 182.
• On some mode ls, the vehicle can reach its maximum speed on ly in
t he
Automatic and Dynamic modes .•
Page 193 of 392
________________________________________________ D_ r_ i_ v _i_n ""'g "-- S_a_ f_ e_ l _,,y'-- __
Important things to do before driving
Safety is everybody's job! Vehicle and occupant safety always depends on the informed and careful driver.
For your safety and the safety of your passengers, before
driving always:
- Make sure that all lights and signals are operating
correctly.
- Make sure that the tire pressure is correct.
- Make sure that all windows are clean and afford good visi-
bility to the outside.
- Secure all luggage and other items carefully::::>
page 107.
-Make sure that nothing can interfere with the pedals.
- Adjust front seat, head restraint and mirrors correctly for your height .
- Instruct passengers to adjust the head restraints according to their height.
- Make sure to use the right child restraint correctly to
protect children ::::,
page 233, "Child Safety".
- Sit properly in your seat and make sure that your passen gers do the same::::,
page 85, "General recommenda
tions".
- Fasten your safety belt and wear it properly. Also instruct
your passengers to fasten their safety belts properly
=:> page 201. •
Controls and equip
ment Safety first Vehicle operation
What impairs driving safety?
Safe driving is directly related to the condition of the
vehicle, the driver as well as the driver's ability to concen
trate on the road without being distracted .
The driver is responsible for the safety of the vehicle and all
of its occupants. If your ability to drive is impaired, safety
risks for everybody in the vehicle increase and you also
become a hazard to everyone else on the road::::,,& . There
fore:
Do not let yourself be distracted by passengers or by using
a cellular telephone.
NEVER drive when your driving ability is impaired (by
medications, alcohol, drugs, etc.).
- Observe all traffic laws, rules of the road and speed limits
and plain common sense .
- ALWAYS adjust your speed to road, traffic and weather
conditions.
- Take frequent breaks on long trips. Do not drive for more than two hours at a stretch.
- Do NOT drive when you are tired, under pressure or when
you are stressed .
& WARNING
Impaired driving safety increases the risk of serious personal
injury and death whenever a vehicle is being used.•
Vehicle care Do-it-yourself service Technical data
Page 208 of 392
___ s_ a_ f_ e_ t_ y~ b_ e_ lt_s _____________________________________________ _
- Insert t he tongue into the correct buck le of your seat until
you hear it latch secure ly==> fig. 195 .
- Pull on the be lt to make sure tha t it is secure ly la tched in
the buck le.
Automatic safety belt retractors
Every safety be lt is equipped with an automatic be lt retractor on the
shoulder be lt. This feat ure locks the be lt whe n the belt is pulled out
fast, during hard braking and in an acc ident. The belt may also lock
w hen you dr ive up or dow n a steep hill or throug h a sharp curve.
Dur ing normal driv ing the belt lets you move freely.
Safety belt pretensioners
The safety belts are equipped w ith a belt pretensioner that helps to
t ighten the safety be lt and remove sla ck when the p re tensioner is
act ivated. The function of the pretensioner is monitored by a warn ing
light =>
page 17.
Switchable locking feature
Every sa fety be lt ex ce pt t he one on the driver sea t is eq uipped wi th a
switchab le locking feature that
must be used when the safety belt is
used to at tach a child safety seat. Be s ure to read t he importa nt info r
mation about this feature=>
page 243.
& WARNING
Imp roperly positioned safety belts can c au se se rious injury in a n
accident =>
page 206, "Safety b elt po sition ".
• Safety belts offer optimum protection only when the seatback
i s upr ight and belts are properly positioned on the body .
• Always make sure th at the rear seat backre st to which the
center rear safety belt is attached i s secur ely latched when ever the
rear cente r sa fety belt is be ing u sed . If the ba ckre st is not securely
latched, the pas senger will move forward with th e backre st during
sudde n braking, in a sudden maneuve r and especiall y in a crash .
& WARNING (continued )
• Never attach the safety belt to the buckle fo r another seat .
Attaching the belt to the wrong buckle will reduce safety belt
effectiveness and can cause ser ious personal injury.
• A pass enger who i s not properly restrained can be seriou sly
i njured by the safety belt itself when it mo ves from the stronger
part s of the body into critical area s like the abdomen.
• Alway s loc k the convertible locking retractor when you a re
securing a child safety seat in the vehicle=>
page 245. •
Safety belt position
Correct belt position is the key to getting maximum
pro tection from safety belts .
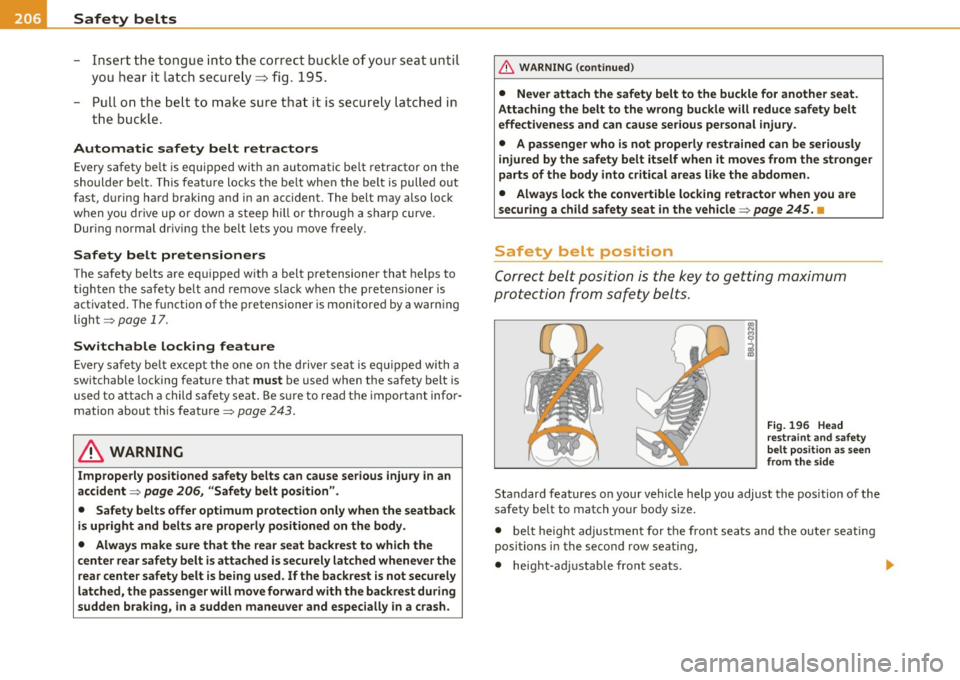
Fig. 196 Hea d
r e str aint a nd safet y
belt po sit ion a s seen
from the side
Standard features on your vehicle help you adjust the position of the
safety belt to match your bo dy size.
• belt h eigh t adjustment for the front seats and the oute r seat ing
positions in the second row seating,
• height-ad justable front seats. .,