AUDI Q7 2013 Owner´s Manual
Manufacturer: AUDI, Model Year: 2013, Model line: Q7, Model: AUDI Q7 2013Pages: 348, PDF Size: 87.72 MB
Page 101 of 348
Rear air distribution ~
Applies to vehicles: with four-zone automatic comfort air
conditioning
The automatically controlled air distribution
con be changed manually.
.. Press the Gil button.
.. Rotate the regu lator to the desired setting .
You can adj ust the air circulation so that air
flows from specific vents .
- In position
:J, all air flows from the vents in
the center console and the outlets to the
door pilla rs.
- In position
:0, air flows from the outlets in
the door p illars.
- In position
!,8, air flows from the outlets un-
der the front seats.
There are additional combinations available to
adjust air d istr ibut io n as needed.
To regulate air distribution automatically,
sw itch to
IAU TO I.
Basic settings
General
The basic climate control settings con be ad
justed in the MMI.
.,. Select: I CARI funct ion button > AC control
button . Or
.,. Se lect:
I CARI funct io n button > Car sys-
tem s*
control bu tton > A C.
The follow ing funct ions can be selected :
- Auto recirculation
c> page 99
- Synchronization c> page 99
-Supplementary heater * ¢page 100
-Rear oper ation* c> page 100
Warm and c old 99
Automatic recirculation mode
An air quality sensor detects increased con
centrations of pollutants in the outside air
and automatically switches to recirculation
mode .
We recommend that you always keep auto
matic a ir recirculation ON to p revent polluted
outside air from enteri ng the veh icle inter ior.
If the
a ir qu ality sensor l ocated in the air con
ditioning system detects polluted outs ide a ir,
the sensor dec ides whether the air pollut ion
can be reduced by the facto ry-installed pollu
ta nt fi lter or whethe r it is necessary to switc h
to air recirc ulation. With heavy conce ntra ti ons
of pollu tants, the a ir condit ion ing system is
switched automatica lly to recirc ulation mode
and the supp ly of outside air is blocked . As
soon as the concentration of pollutants in the
outside air drops, fresh air is supplied to the
vehicle interior aga in.
In the event that the windows fog up during
automat ic air rec irculat ion, you must press
the® button immediately.
Under certa in ope rating cond itions, a utomatic
air recirculation is switched off automatica lly.
With outside temperatures be low about 50 °F
(+10
°(), automatic air rec irculat ion is limited
to 30 seconds. W it h outside temperatures be
low about 30 °F ( -1 °C) a nd with the air condi
tione r switched off, the a utomatic air recircu
l ation is limited to 15 seconds.
Synchronization
One climate control setting for the driver and
front passenger seats .
With synchro nization active, the driver's set
tings a re adopted for the passenger o r vice
versa . All the othe r setti ngs that were made
are t ransferred to t he other seat . This in
cl udes all the cl ima te co ntro l settings, excep t
for the se at heating/ven tilat ion* .
If a different setting is selected at a
"synchron ized seat ", synchronization is can
c e lled.
Page 102 of 348
100 Warm and cold
Synchronization
Applies to vehicles: with four -zone automat ic comfort a ir
co ndit io ning
One climate control setting for all seats .
With synchronizat ion active, the driver's set
tings are adopted for the front passenger and
the rear left and right seats. A ll the other set
tings that were made are transferred to the
other seats. This includes all the climate con
trol settings, except for the seat heat ing/ven
tilation* .
If a different setting is se lected at a
"synchroni zed seat", synchron iz ation is can
celled.
Supplementary heater
App lies to vehicles: with d iesel eng ine
" Select : ICARI function button > AC control
button
> Suppl.heater . Or
" Select :
I C ARI funct ion button > Car sys-
tems*
contro l button > AC > Suppl. heater .
Vehicles with d iesel eng ines are equipped
with a supp lementary heater to warm the in
ter io r of the vehicle more quickly. The supp le
men tary heater switches itself on and off au
tomatically when the outside temperature is
be low SO °F (10 °C) and the engine is running,
depending on the coolant temperature, interi
or temperature and the se lected temperature.
Rear operation
Applies to vehicles: with four -zone automat ic comfo rt a ir
co nd it io nin g
The air conditioning in the rear of the vehicle
con be controlled from the cockpit .
" Se lect: I CAR I funct ion button > AC control
button
> Rear operation. Or
" Select :
I C ARI funct ion button > Car sys
tems *
control button > AC > Rear cabin set
tings.
The drive r or front passenger can control the
air conditioning in the rea r of the vehicle us
ing
his/her own controls.
Heated Seats
Heated front seats~
Applies to veh icles: w it h electrically heated fro nt seats
The seat cushion and the seotbock of the
front seats con be heated electrically.
" Press the Ill button.
" Rotate the regulator to the des ired setting.
In position O the heating for the seats is
turned off. The range of adjustment is be
tween 1 and 6 .
The heater for the front seats can be turned on when the weight of the particular seat's oc
cup ant is detected . However, the front seats
can be pre-heated for about 10 m inutes using
the activated seat heater. After th is time has
elapsed, the seat heater automatically turns
off if it does not detect an occupant's we ight
for the particular seat.
_&. WARNING
Individuals with reduced sensitiv ity to pain
or temperature could develop burns when
using the seat heating function . To reduce
the r isk of injury , these ind ividuals should
not use seat heating .
(D Note
To avoid damage to the heating elements
i n the seats, do not kneel on the seats or
place heavy loads on a small area of the
seat.
(D Tips
Please note that the weight of objects
placed on the seat wi ll also be detected.
This weight may be enough to cause the
seat heater to turn on.
Front seat ventilation [it)
Applies to veh icles: w it h front seat ve ntil at ion
The seat cushion and the seatback on the
front seats con be ventilated .
" Press the~ button.
" Rotate the regulator to the desired setting .
ll-
Page 103 of 348
When the regulator is in the O position, the
seat ventilation is switched off. The range of
adjustment is between 1 and 6.
Heated rear seats~
Applies to vehicles: with heated rear seats
The seat cushions and seatbacks of the two
outer rear seats can be heated electrically.
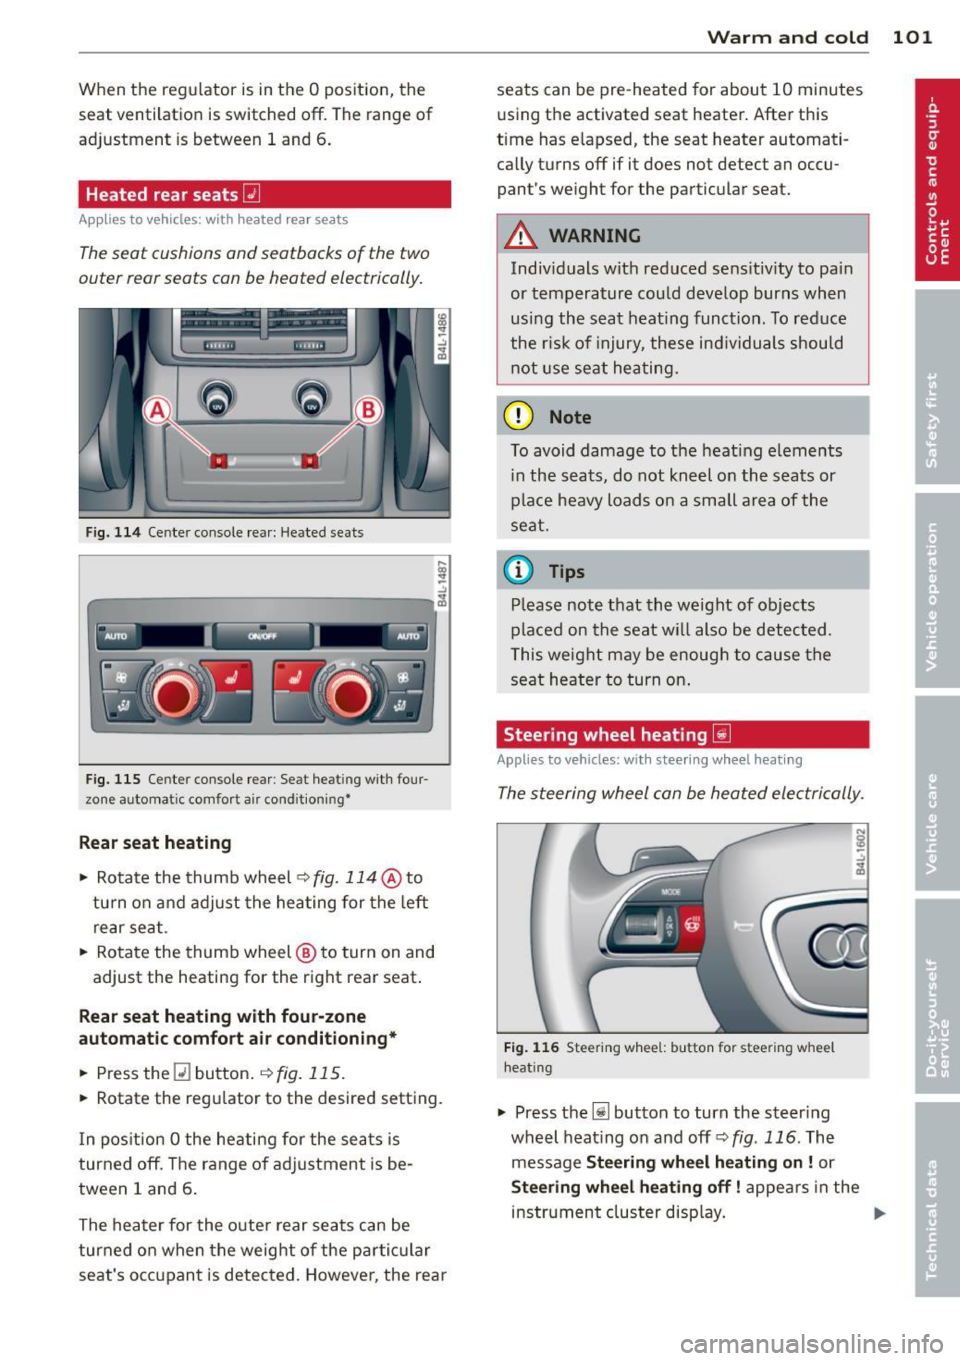
F ig. 114 Ce nter console rea r: Heated sea ts
i
-..:,
---------------<%
F ig. 1 15 Ce nter console rear : Se at heat ing with four
zone automat ic comfort a ir cond it ion ing•
Rear seat he ating
• Rotate the thumb wheel ~fig. 114 @to
turn on and adjust the heating for the left
rear seat .
• Rotate the thumb wheel @ to turn on and
adjust the heating for the right rear seat.
Rear seat heating w ith four-zone
automatic comfo rt air conditioning *
• Press the Q] button . ~ fig. 115.
• Rotate the regu lator to the desired setting .
I n pos ition O the heating for the seats is
turned off . T he range of ad justment is be
tween 1 and 6 .
The heater for the outer rear seats can be
turned on when the weight of the parti cular
seat's occ upant is detected. Howeve r, the rea r
Warm and cold 101
seats can be pre-heated for about 10 minutes
using the activated seat heater. After this
time has e lapsed, the seat heater automati
ca lly turns off if it does not detect an occu
pant's weight for the particular seat.
A WARNING
Individuals wit h reduced se ns itiv ity to pa in
or temperature could develop burns when
usi ng the seat heat ing funct ion . To reduce
the r isk of injury, these ind ividuals shou ld
not use se at hea ting.
(D Note
To avoid damage to the heat ing e lements
i n the seats, do not kneel on the seats or
place heavy loads o n a sma ll a rea of the
seat.
© Tips
P lease not e that the weight of objects
placed on the seat wi ll also be detected .
This weight may be enough to cause the
seat heater to turn on .
Steering wheel heating~
Applies to vehicles: with steering wheel heating
The steering wheel can be heated electrically.
Fig . 1 16 Steer ing wheel: button for steering whee l
heat ing
• Press the [j] button to turn the steer ing
whe el heat ing on and
off <=>fig . 116. The
message
Steering wheel h eating on! or
Steering wheel heating off! appears in the
instrument cluster disp lay. ..,.
Page 104 of 348
102 Warm and cold
A nearly constant temperature is maintained
when the steering wheel heating is switched
on.
The last setting selec ted for the stee ring
wheel heating (on or off) is automatically
saved when the vehicle is shut off and is as
signed to the remote key.
Page 105 of 348
On the road
Steering
Manually adjustable steering wheel
Applies to vehicles: with manu ally adjustable steering
w hee l
The height and reach of the steering wheel
can be adjusted.
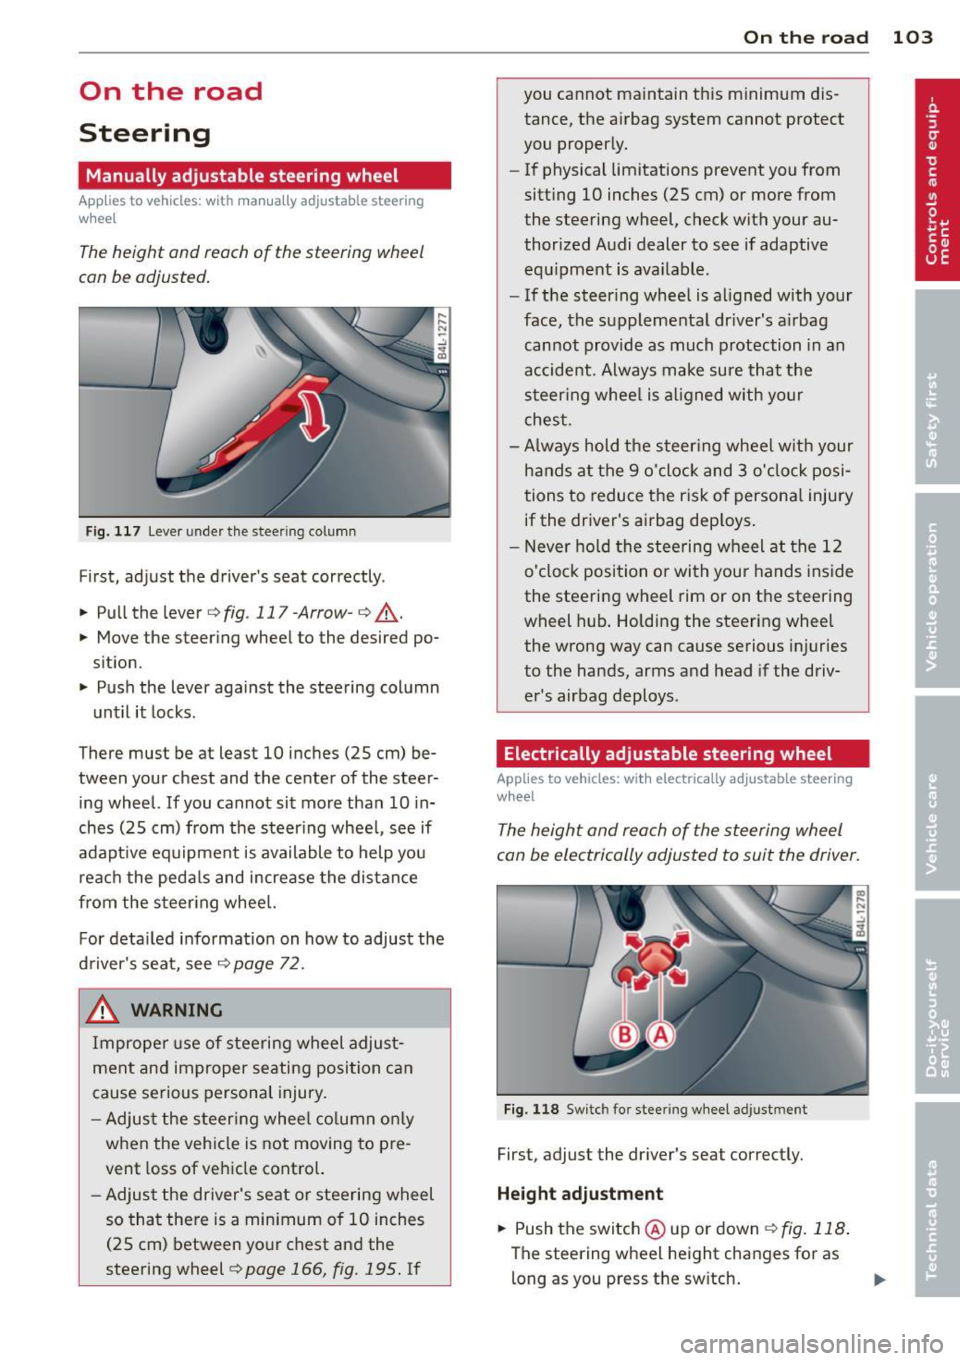
Fig. 117 Lever under the steer ing column
First, adjust the driver's seat correctly .
.. Pull the lever
c:>fig . 117-Arrow-c:> ,A .
.. Move the steering wheel to the desired po
sition.
.. Push the lever against the steering column
unt il it locks.
There must be at least 10 inches (25 cm) be
tween your chest and the center of the steer
ing wheel.
If you cannot sit more than 10 in
ches (25 cm) from the steering wheel, see if
adapt ive equipment is available to help you
reach the pedals and increase the distance
from the steering wheel.
For detailed information on how to adjust the
driver's seat, see
c:> page 72.
& WARNING
Improper use of steering wheel adjust
meht and improper seating position can
cause serious personal injury.
- Adjust the steering wheel column only
when the veh icle is not moving to pre
vent loss of vehicle control.
-
-Adjust the driver's seat or steering wheel
so that there is a minimum of 10 inches
(25 cm) between your chest and the
steering wheel
c:> page 166, fig. 195. If
On the road 103
you cannot maintain this minimum dis
tance, the airbag system cannot protect
you properly.
- If physical limitations prevent you from
sitting 10 inches (25 cm) or more from
the steering wheel, check with your au
thorized Audi dealer to see if adaptive
equipment is available.
- If the steering wheel is aligned with your
face, the supplemental dr iver's a irbag
cannot provide as much protection in an
accident. Always make sure that the
steering wheel is aligned with your
chest.
- Always hold the steer ing wheel w ith your
hands at the 9 o'clock and 3 o'clock posi
tions to reduce the risk of personal injury
if the driver's airbag dep loys .
- Never hold the steering wheel at the 12
o'clock position or with your hands inside
the steering wheel rim or on the steering
wheel hub. Holding the steering wheel
the wrong way can cause serious injuries
to the hands, arms and head if the driv
er's airbag deploys.
Electrically adjustable steering wheel
App lies to vehicles: with electrically adjustable steering
w heel
The height and reach of the steering wheel
can be electrically adjusted to suit the driver.
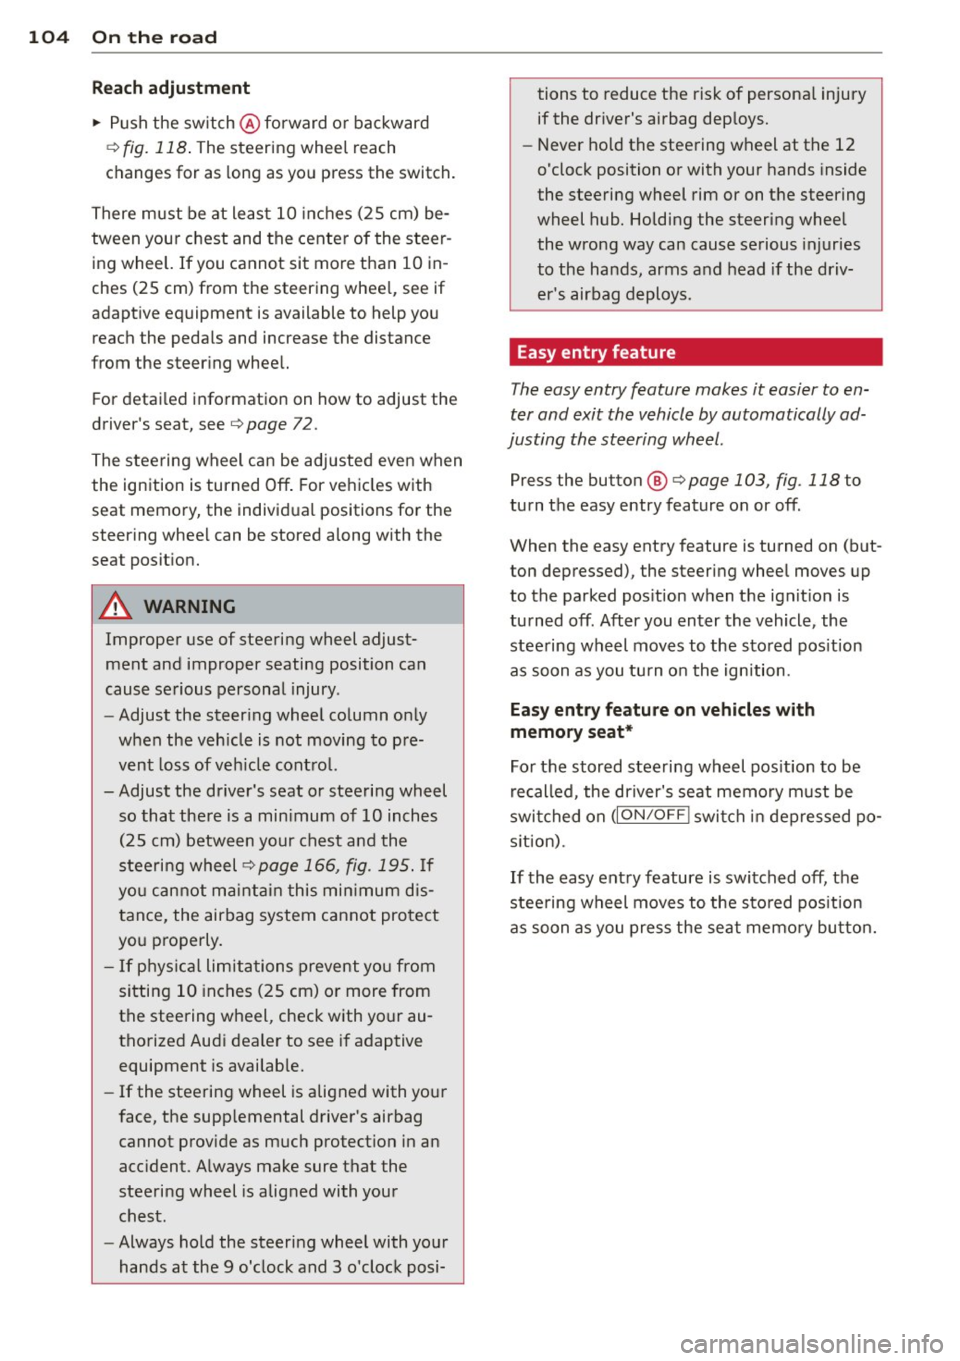
Fig. 118 Switch for stee ring wheel adjustment
First, adjust the driver's seat correctly.
Height adjustment
.. Push the switch @ up or down c:>fig. 118.
The steering wheel height changes for as
long as you press the sw itch. ..,.
Page 106 of 348
104 On the road
Reach adjustm ent
.. Push the sw itch @forward or bac kward
¢
fig. 118 . The steering whee l reach
changes for as long as yo u press the switch.
There must be at least 10 inches (25 cm) be
tween you r chest and the center of the steer
ing wheel. If you cannot sit more than 10 in
ches (25 cm) from the steering whee l, see if
adaptive equipment is available to help you
reach the pedals and increase the distance
from the steer ing wheel.
F or detai led informat ion on how to adjust the
driver's seat, see
¢ page 72.
The stee ring wheel can be adjusted even when
the ignition is turned
Off. For ve hicles with
seat memory, the individ ual positions for the
steering whee l can be stored along with the
seat posit ion.
A WARNING
Improper use of steering wheel adjust
ment and improper seating position can
cause se rious personal injury.
- Adjust the steer ing whee l co lumn on ly
when the veh icle is not moving to pre
vent loss of veh icle cont ro l.
- Adjust the driver's seat or steering wheel
so that the re is a min imum of 10 inches
(25 cm) between your chest and the
steeri ng wheel ¢
page 166, fig . 195. If
yo u ca nnot ma int ain this min imum d is
tan ce, the airbag system c annot pro tect
yo u properly.
- If phys ica l limitations prevent yo u from
sitting 10 inches (25 cm) or more from
the steering wheel, check with yo ur au
tho rized Audi dea le r to see if adaptive
equipment is availab le.
- If the steering wheel is aligned with your
face, the supp lemental driver's airbag
cannot prov ide as much protect ion in an
acc ident. A lways make sure that the
steeri ng wheel is aligned with your
chest.
- Always hold the steering wheel with your
hands at the 9 o'clock and 3 o'clock posi- tions to reduce the risk of persona
l injury
if the dr iver's airbag dep loys .
- Never hold the steering wheel at the 12
o'clock position or with your hands inside
the steering wheel rim or on the steering
wheel hub. Holding the steering wheel
the wrong way can cause serious injuries
to the hands, arms and head if the driv
er's airbag deploys.
Easy entry feature
The easy entry feature makes it easier to en
ter and exit the vehicle by automatically ad
justing the steering wheel.
Press the button @¢ page 103, fig. 118 to
turn the easy entry feature on or
off.
When the easy entry feature is turned on (but
ton depressed), the steering wheel moves up
to the parked pos ition when the ignit ion is
turned
off. After you enter the vehicle, the
stee ring wheel moves to the sto red pos it ion
as soon as you tu rn o n the ignition.
Easy ent ry feature on vehicles w ith
memory seat*
For t he stored steering wheel pos ition to be
re called, the dr iver's seat memory m ust be
swi tched on
(ION/OF F I swi tch in dep ressed po
s it ion).
If the easy ent ry feature is switched
off, t h e
stee ring wheel moves to the sto red pos ition
a s soon as you press the sea t memo ry bu tton.
Page 107 of 348
Ignition lock and ignition switch
Ignition key positions
The engine con be started or turned off with
the ignition key.
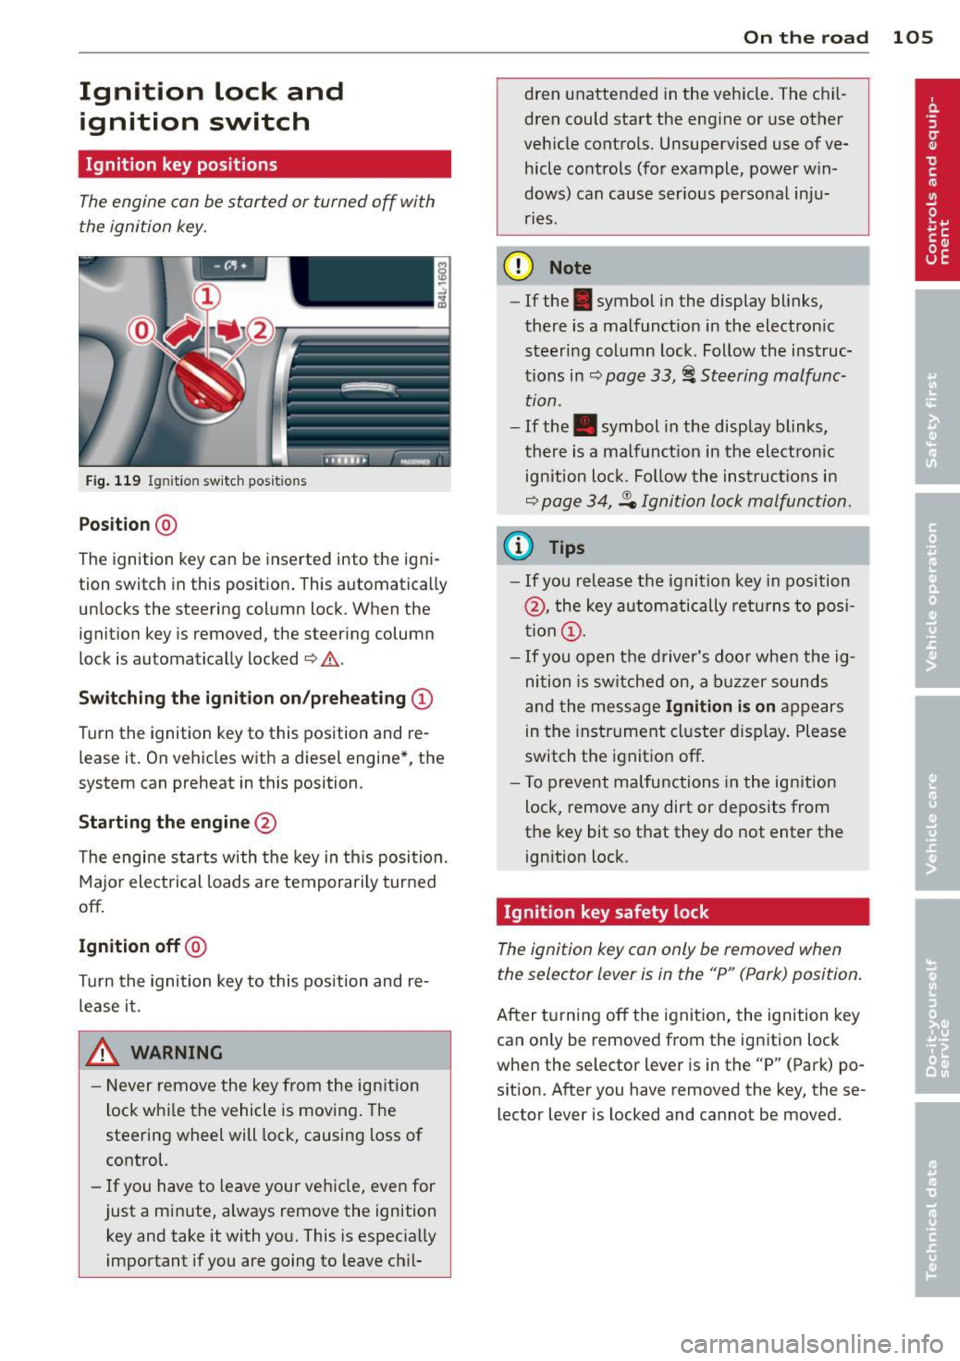
Fig. 119 Igni tion switch pos it io n s
Position @
The ignition key can be inserted into the igni
tion switch in this position . This automatically
unlocks the steering column lock . When the
ignition key is removed, the steering column
lock is automatically locked
Q .&. .
Switching the ignition on/preheating (D
Turn the ignition key to this position and re
lease it. On vehicles with a d iesel engine*, the
system can preheat in this position .
Starting the engine@
The engine starts with the key in this position.
Major electrical loads are temporarily turned
off.
Ignition off@
Turn the ignition key to this position and re
lease it.
A WARNING ,~ ~
- Never remove the key from the ign ition
lock whi le the vehicle is moving. The
steering wheel will lock, causing loss of
control.
- If you have to leave your vehicle, even for
just a minute, always remove the ignition key and take it with you. This is especially
important if you are going to leave chil-
On the road 105
dren unattended in the vehicle. The chil
dren could start the engine or use other
vehicle controls. Unsupervised use of ve
hicle controls (for example, power win
dows) can cause ser ious personal inju
ries.
(D Note
- If the . symbol in the display blinks,
there is a malfunction in the electronic
steering column lock . Follow the instruc
tions in
Q page 33, i Steering malfunc
tion .
-If the . symbol in the display blinks,
there is a malfunction in the electronic
ignition lock . Fol low the instructions in
Q page 34, .P. Ignition lock malfunction.
a) Tips
-If you release the ignition key in position
@, the key automatically returns to posi
tion (!).
- If you open the driver's door when the ig
nition is sw itched on, a buzzer sounds
and the message
Ignition is on appears
in the instrument cluster display. Please
switch the ignition off.
- T o prevent malfunctions in the ign ition
lock, remove any dirt or deposits from
the key bit so that they do not enter the
ignition lock.
Ignition key safety lock
The ignition key con only be removed when
the selector lever is in the "P" (Pork) position.
After turning off the ignition, the ignition key
can only be removed from the ignition lock
when the selector lever is in the "P" (Park) po
sition. After you have removed the key, these lector lever is locked and cannot be moved.
Page 108 of 348
106 On the road
Starting and stopping
the engine
Starting the engine
The engine can only be started with your orig
inal Audi key.
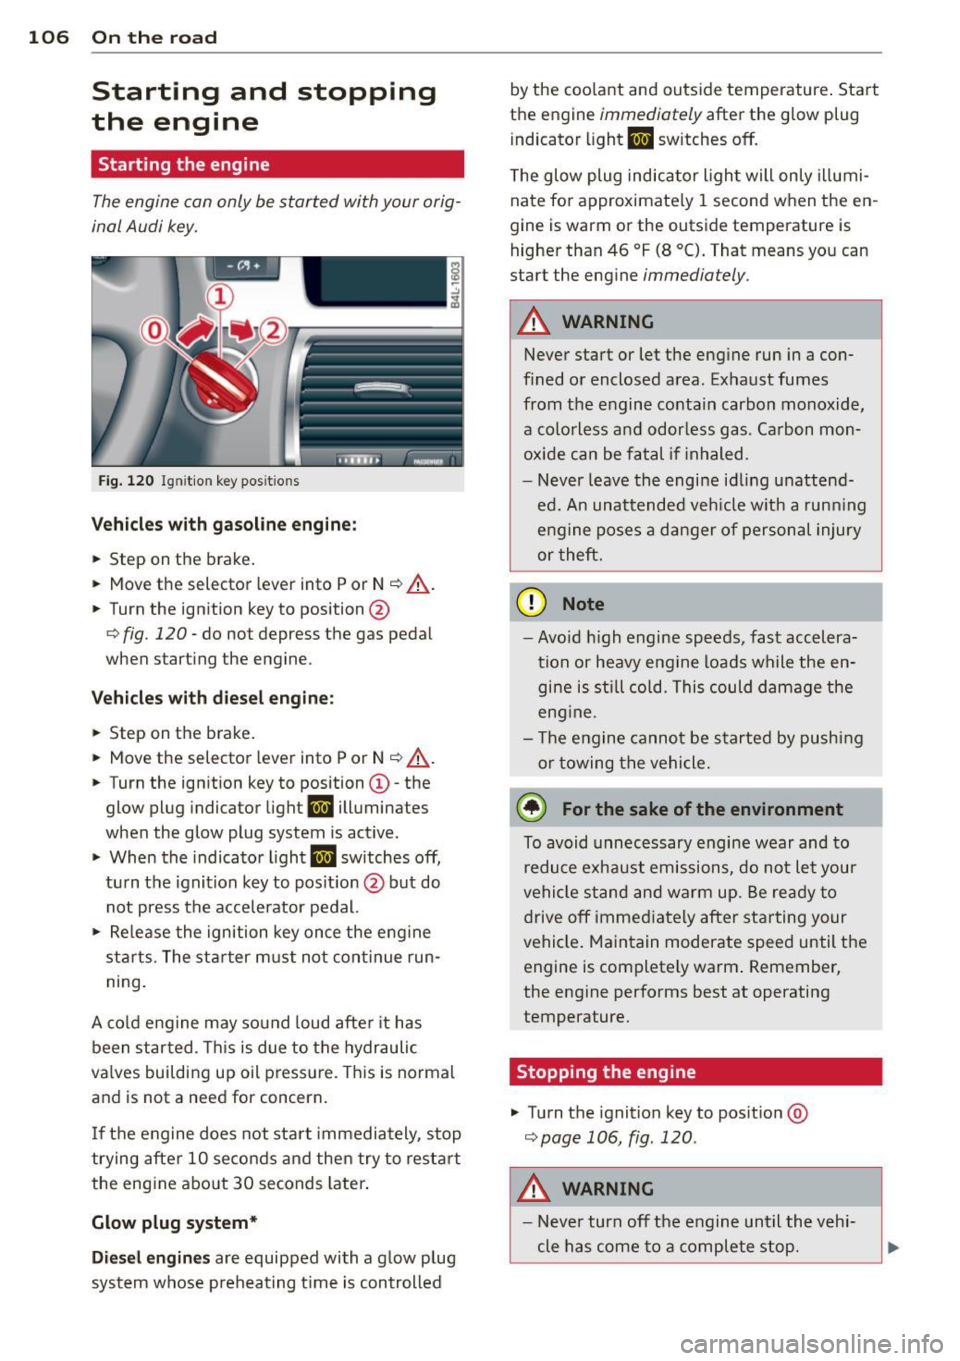
Fig. 120 I gni tion key positio ns
Vehicles with gasoline engine:
.. Step on the brake .
.. Move the selector lever into P or N
¢ A.
.. Tu rn the ignition key to position @
9 fig. 120 -do not depress the gas pedal
when starting the engine.
Vehicles with diesel engine:
.. Step on the brake.
.. Move the selector lever into P or N
¢ &.
.. Turn the ignition key to position ©- the
glow plug indicator light
m illuminates
when the glow plug system is act ive .
.,. When the indicator light
I.I switches off,
turn the ignition key to pos it ion @ but do
not press the accelerator pedal.
.. Re lease the ignition key once the engine
sta rts. The starter must not continue run
ning.
A cold engine may sound loud after it has
been started . This is due to the hydraulic
va lves building up oil pressure. This is normal
and is not a need for concern.
If the engine does not start immediately, stop
trying after 10 seconds and then try to restart
the engine about 30 seconds Later.
Glow plug system*
Diesel engines are equipped with a glow plug
system whose preheating t ime is controlled by the coo
lant and outs ide temperature . Start
the engine
immediately after the glow plug
indicator light
m sw itches off.
The glow plug indicator light will only illumi
nate for approximate ly 1 second when the en
gine is warm or the outside temperature is
higher than 46 °F (8 °C). That means you can
start the engine
immediately .
A WARNING
-Never start or let the engine run in a con-
fined or enclosed area. Exhaust fumes
from the engine contain carbon monoxide,
a colorless and odorless gas . Carbon mon
oxide can be fatal if inhaled.
- Never leave the engine idling unattend
ed. An unattended veh icle w ith a runn ing
engine poses a danger of personal injury
or theft .
(D Note
- Avo id high engine speeds, fast accelera
tion or heavy engine loads while the en gine is still cold. This could damage the
eng ine .
- Th e engine cannot be started by pushing
or towing the vehicle .
@ For the sake of the environment
To avoid unnecessary engine wear and to
reduce exhaust emissions, do not let your
vehicle stand and warm up. Be ready to
drive
off immediately after starting your
vehicle. Maintain moderate speed until the
engine is completely warm . Remember,
the engine performs best at operating
temperature.
· Stopping the engine
.,. Turn the ignition key to position @
¢page 106, fig . 120 .
A WARNING
-
-Never turn off the engine until the vehi-
cle has come to a complete stop.
Page 109 of 348
-The brake booster and servotronic only
work when the engine is running. With
the ignition turned off, you have to apply
more force when steering or braking .
S ince you cannot steer and stop normal
ly, this can lead to accidents and ser ious
injuries.
- The rad iator fan can continue to run for
up to 10 min utes even after you have
turned off the engine and removed the ign ition key. The radiator fan can also
turn on again if the engine coolant heats
up because of intense sunlight or heat
build -up in the engine compartment.
«I) Note
Do not stop the engine immed iate ly after
hard or extended dr iving. Keep the engine
running for approximately two minutes to
prevent excessive heat build-up .
Starting and stopping
the engine with
Convenience key
Starting the engine with the~
button
App lies to vehicles: with Convenie nce key
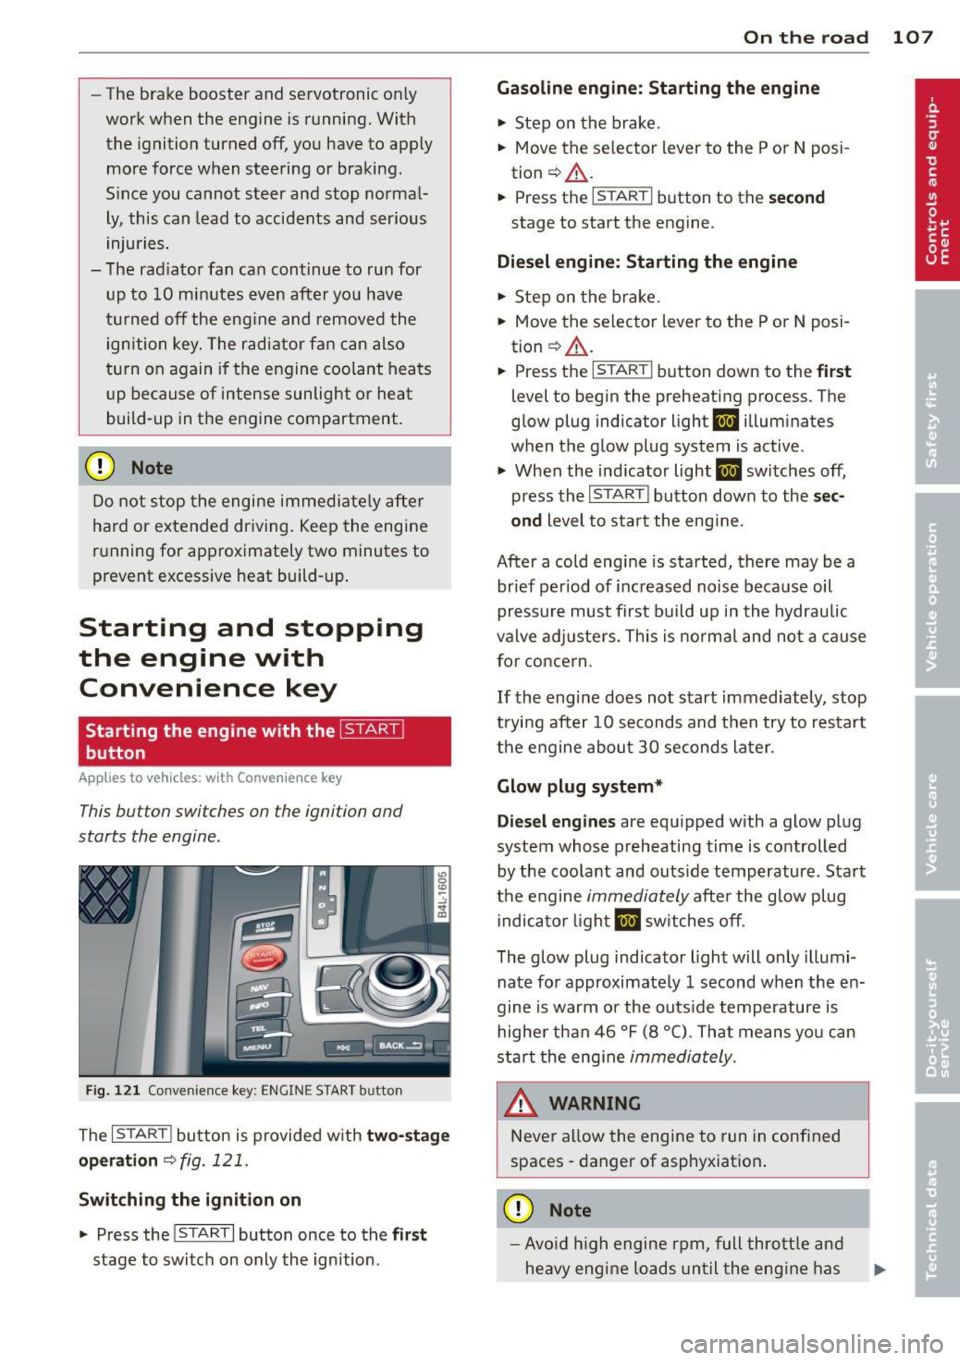
This bu tton swi tches on the ign ition and
starts the engine .
Fig. 121 Co nvenie nce k ey: ENG INE START b utton
The I S TAR T! button is provided w ith two -sta ge
o p era tion
¢ fig. 121.
Switching the ignition on
.. Press the !START I button once to the fir st
stage to switch on only the ign ition .
On th e road 107
Gasoline eng in e: St arting th e engine
.. Step on the brake.
.. Move the se lector lever to the P or N posi
tion ¢,&. .
.. Press the
r::1s=Tc:- A=RT =I button to th e seco nd
stage to start the engine .
Diesel en gine : Starting the engine
.. Step on the brake.
.. Mov e the selector lever to the P or N posi
tion ¢,&. .
.. Press the
r::1s=TAc:-=R T=I button down to the fi rst
level to begin the preheating process . The
glow plug indica tor light
II illumina tes
when t he glow plug system is active .
.. When the indicator light
II switches off,
press the
I ST ART ! button down to the se c
ond
level to star t the eng ine .
After a cold engine is started, there may be a br ief period of increased no ise because oil
pressure must first build up in the hydraulic
valve adjuste rs. This is norma l and not a cause
for concern .
If the engine does not start immediately, stop
trying after 10 seconds and then try to restart
the engine abou t 30 seconds later .
Glow plug system *
Di ese l engine s
are equ ipped with a glow plug
system whose preheating time is controlled
by the coolant and outs ide temperature . Start
the engine
immediately afte r the glow plug
indicator light
II sw itches off .
The glow plug indicator light will only illumi
nate fo r approximate ly 1 second when the en
gine is warm or the outs ide temperature is
highe r than 46 °F (8 °C) . That means yo u can
start the eng ine
immediately .
WARNING
Never allow the engine to run in confined
spaces -danger of asphyxiation .
(D Note
-Avo id h igh engine rpm, full thrott le and
heavy engine loads until the eng ine has
Page 110 of 348
108 On the road
reached operating temperat ure -other
wise yo u risk engine damage.
- The eng ine cannot be sta rted by pushing
or towing the vehicle.
@ For the sake of the environment
Do not allow the engine to warm up with
t he vehicle stationary. Start driving righ t
away . In th is way you avoid unnecessa ry
emissio ns.
@ Tips
If you open the drive r's door when the ig
nition is switched o n, a buzze r sounds and
the message
Ignition is on appears i n the
instrument cluster disp lay. Please switch
the ignition off.
Switching engine off with the~
button
App lies to vehicles: with Convenience key
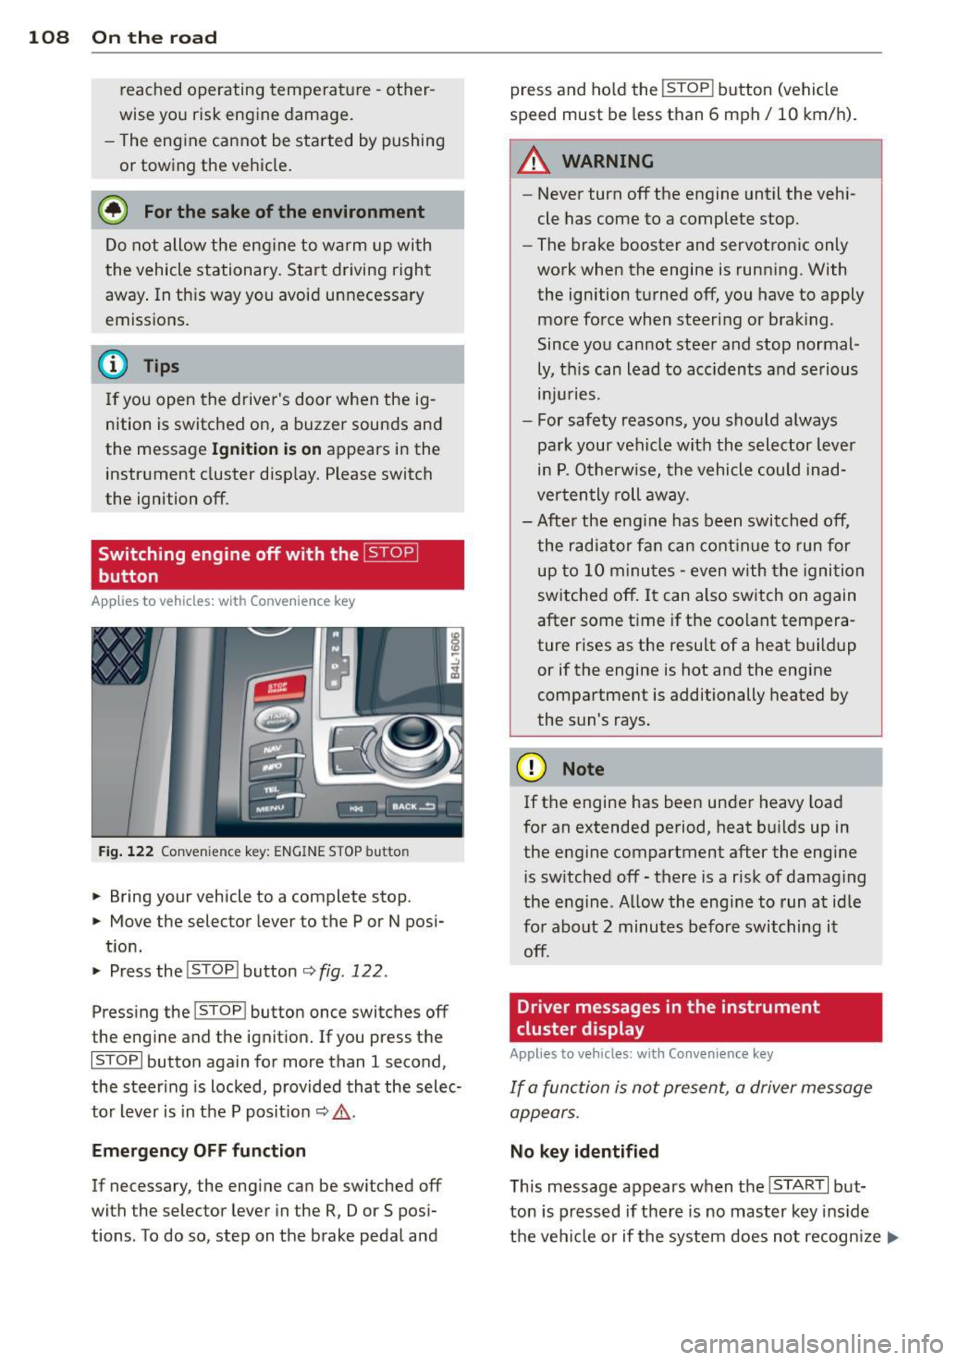
Fig. 122 Convenience key: ENGINE STOP butto n
.. Bring your vehicle to a complete stop.
.. Move the selector lever to the P or N posi-
t ion.
.. Pressthe !STOP !button
¢fig.122.
Press ing the I STOP I button once switches off
the engine and the ignition. If you press the
ISTOPI button again for more than 1 second,
the steering is locked, provided that the selec
tor lever is in t he P pos it ion
¢ & .
Emergency OFF function
If necessary, the engine can be switched off
with the selector lever in the
R, Dor S posi
tions . To do so, step on the brake peda l and press and ho
ld the !STOP ! b utton (vehicle
speed must be less than 6 mph/ 10 km/ h).
.&_ WARNING
-
- Never turn off the engine until the vehi-
cle has come to a complete stop.
- The brake booster and servotronic only
work when the engine is running. With
the ignition turned off, you have to apply mo re force when steeri ng or brak ing.
Since you cannot steer and stop normal
ly, t his can lead to acc idents and se rious
. . . in Juries.
- For safety reasons, you sho uld a lways
pa rk your vehi cle wit h the selector lever
i n P. O therwise, the vehicle could inad
ver ten tly roll aw ay.
- Afte r the eng ine has been switch ed off,
t he r adi at or f an can co ntinu e to run f or
up to 10 minu tes -even with the igni tion
switched off . It can also switch on again
after some t ime if the coolant tem pera
ture rises as the resu lt of a heat b uildup
or if the engine is hot and the engine
compa rtment is additionally heated by
the sun's rays.
(D Note
If the engine has been under heavy load
for an extended pe rio d, heat b uilds up in
the engine compartment after the engi ne
i s sw itched off -there is a r isk of damag ing
the e ng in e. A llow th e engi ne to run a t id le
fo r abo ut 2 minutes befor e switching it
off .
Driver messages in the instrument
cluster display
Applies to vehicles: with Co nvenience key
If a func tion is not present, a driver message
appears .
No key identified
This message appears when t he I STAR T I but-
ton is pr essed if there is no master key ins id e
the vehi cle or if t he system does not recogn ize
IJ,-