stop start AUDI Q7 2013 Owner´s Manual
[x] Cancel search | Manufacturer: AUDI, Model Year: 2013, Model line: Q7, Model: AUDI Q7 2013Pages: 348, PDF Size: 87.72 MB
Page 264 of 348
262 Fuel supply and filling your fuel tank
This indicator appears when there is only
enough Ad B lue left to drive the distance indi
cated in the driver information system. Please
add Ad Blue.
Ad Bluel~ 600 mi (1000 km) Refill
AdBlue! No restart in 600 miles (1000 km)!
See owner's manual
This indicato r appears when there is only
enough Ad B lue left to drive the distance indi
cated in the driver information system. Please
add Ad B lue. Otherw ise the eng ine will not
start again if you stop it once the distance in
d icated has been driven.
Refill Ad Blue! No
restart! See owner's manual
This message appears when the AdBlue tank
i s empty . Please add AdBlue. Otherwise you
will not be able to start the engine again once
you stop it.
When the minimum AdB lue leve l has been
reached, you must add Ad Blue ¢
page 262.
¢111ij Filling incorrectly
If the Ad B lue tank was filled with a diffe rent
f luid than Ad Blue and the system detects that
it is incorrect, a message w ill appear.
AdBlue ,/ 600 mi (1000 km) Ad Blue!
No re start in 600 miles (1000 km)! See own·
er's manual
This message appears when it is only poss ible
to drive the distance indicated in the dr iver in
formation system . Drive to the nearest quali
fied workshop to have the malfunction re-
pa ired . Otherwise the engine will not start
a ga in if you stop it once the distance indicated
has been driven.
AdBlue: system
fault. No restart! See owner's manual
This message appears if the system detects it
was filled incorrectly . Drive immed iate ly to
the nearest qualified workshop to have the
malfunction repaired. Otherwise you will not
be able to start the engine again once you
stop it.
Filling AdBlue
Applies to vehicles: with diesel engine
A special refill bottle must be used to fill the
AdBlue .
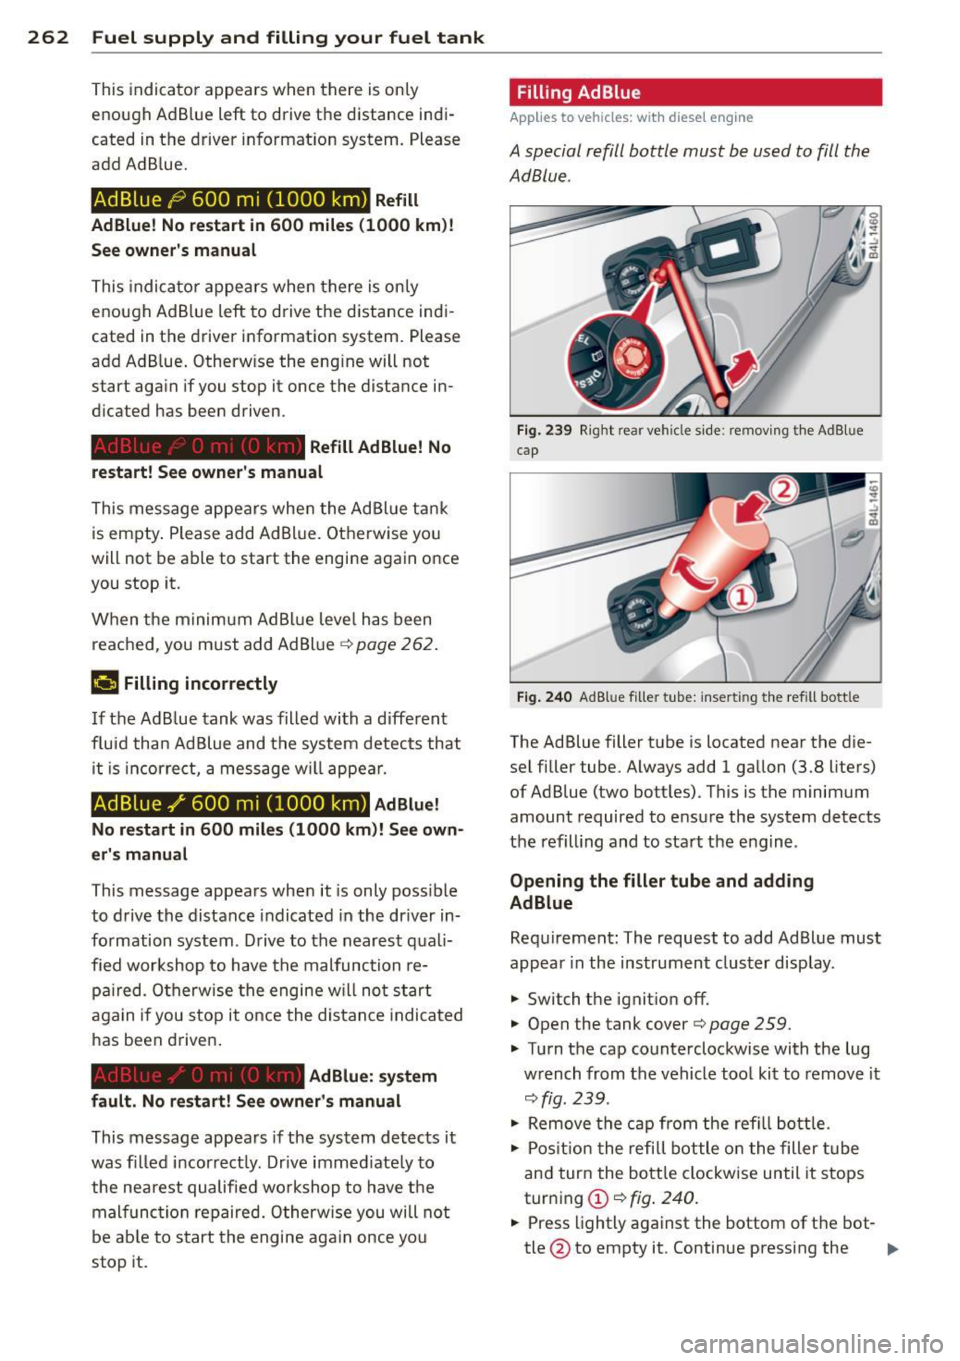
Fig. 239 Right rear veh icle s ide: removing t he AdB lue
cap
Fig. 240 AdB lu e fille r tube: insert ing the refill bott le
The Ad Blue filler tube is located near the die
sel filler tube. Always add 1 gallon (3.8 liters)
of Ad Blue (two bottles) . This is the minimum
amount required to ensure the system detects
the refilling and to start the engine .
Opening the filler tube and adding
AdBlue
Requirement: The request to add Ad Blue must
appear in the instrument cluster display.
.,. Switch the ignition off.
.,. Open the tank cover¢
page 259.
.,. Tu rn the cap counterclockwise with the lug
w rench from the vehicle tool kit to remove it
¢fig. 239.
.,. Remove the cap from the refill bottle.
.,. Position the refill bottle on the filler tube
and turn the bottle clockwise until it stops
turning @¢
fig. 240.
.,. Press lightly against the bottom of the bot-
tle @to empty it . Continue pressing the ..,.
Page 265 of 348
bottom of the bottle until it is empty or
until fluid stops f lowing into the tank.
~ Turn the bott le to the left without press ing
on the bottom.
Closing the filler tube
~ Turn the cap clockwise on the filler tube
with the lug wrench until you hear it tighten
completely.
~ Close the tank cover .
After filling
The vehicle must be driven . The system may
take up to two minutes to detect that the
Ad B lue has been filled.
~ If there was no AdBlue left in the tank and a
range of
O mi (0 km ) was displayed in the
instrument cluster, switch the ignition on
for about 15 seconds before starting the en
gine .
.&_ WARNING
Ad Blue can irritate the skin, eyes and res
piratory system. If there is contact with
the fluid, flush immediately with plenty of
water . Consult a physician if necessary .
(D Note
-Only use Ad Blue that conforms to the
standard ISO 22241-1. Do not mix any
additives with the Ad Blue and do not di
lute it with water .
- Ad Blue is not a diesel additive. Do not
add it to the diesel tank. If Ad Blue is
mixed w ith diesel fuel, it can lead to
damage to the eng ine and the Ad Blue
tank system . The Limited New Vehicle
Warranty does not cover such damage.
- AdBlue attacks surfaces such as painted
vehicle components, plast ic and carpet.
Remove the fluid as quick ly as possible
with a damp cloth and plenty of cold wa
ter . If the AdBlue has already crystal
lized, use warm water and a sponge.
AdBlue residue that is not removed w ill
crystall ize and can damage the affected
surface .
Fuel supply and filling your fuel tank 263
-Do not store the refill bottle in the vehi
cle . If it leaks, the escaping Ad Blue could
damage the vehicle interior.
- Do not allow Ad Blue to come into con
tact with clothing . If there is contact
with the fluid, flush immediate ly with
plenty of water .
(1) Tips
-Yo u can obtain refill bottles from any au
thorized Audi dealer or other qualified
workshop .
- Follow the Ad Blue manufacturer's in
struct ions for usage and storage. •
•
Page 270 of 348
268 Checking and filling
VW 502 00 (vehicles with gasoline engine) or
VW 507 00 (vehicles with diesel engine).
Changing the engine oil
The engine oil and oil filter must be changed
according to the m ileage (ki lometers) and
time intervals specified in your vehicle 's War
ranty
& Maintenance booklet. Do not exceed
these intervals -harmful deposits from old
engine oil can reduce engine performance and
can lead to expensive engine repairs.
Changing the oil at the recommended inter
va ls is so very important because the lubricat
ing properties o f oi l decrease gradually during
normal vehicle use. If you are not sure when
you have your o il changed, ask your author
i z ed Audi Service Advisor.
Under some ci rcumstances the engine oi l
should even be changed more frequently .
Change oi l more often if you drive mostly
short distances, operate the vehicle in dusty
areas or mostly under stop-and-go traffic con
d itions, or when you use your vehicle w here
temperatures stay below freez ing point for
l ong periods .
Detergent additives in the o il w ill make fresh
oil look dark after the engine has been run
ni ng for a short time . This is normal and is not
a reason to change the oil more often than
recommended.
Damage or malfunctions due to lack of
maintenance
It is essential that you change your oil at the recommended intervals using only engine oil
that complies with Audi oi l standard
VW 502 00 (vehicles with gasoli ne engine) or
VW 507 00 (veh icles with diese l engine) . Your
Limited New Vehicle Warranty does not cover
damage or malf unctio ns due to failure to fol
lo w recommended maintenance and use re
quirements as set forth in the A udi Owner's
Manual and Warranty
& Maintenance booklet.
Your dea ler will have to deny warranty cover
age unless you present to the dealer proof in
the form of Service or Repa ir Orders that all scheduled maintenance was
performed in a
timely manner.
Engine oil consumption
To provide effective lubrication and cooling for
internal engine parts, all internal combustion
engines use some o il. Oil consumption varies
from engine to engine and may change over
the life of the engine. Engines tend to use
more o il during the break-in period tha n they
do afterward, when oil consumption has sta
bilized. Depending on the way the vehicle is
driven and the operating conditions, oil con
s u mption can be up to 1 quart per 1,200
miles (1 liter per 2,000 km) . Consumption
may be higher within the first 3,000 m iles
(5,000 km) .
Under normal conditions, the rate of oil con
sumption depends on oil quality as well as vis
cosity, engine speed (rpm), outs ide tempera
ture, road conditions, the amount of oil dilu
t ion caused by condensed water or fue l resi
due, and ox idat ion of the oil. Oil co nsumption
may increase with engine wear over time, un
t il replacement of worn engine pa rts may be
come necessary.
Because of all these variables, there is no
standard or "norma l" rate of oil consumption .
We urge you to check the engine oil level at
regular intervals, preferably every time you
fill the fuel tank, and always before a long
trip.
The oil pressure warning light. is not an
indicator of low engine oil level. If the warn
ing light does not go out after starting, or
flashes while driving (above 1500 rpm), a
buzzer will sound. It indicates that the oil
pressure is too low . Stop the engine immedi·
ately, check the engine oil level and add oil if
necessary. If the engine oil level is normal,
but the light continues to flash, do not keep
driving or let the engine idle, as damage may
occur .
II-
Page 289 of 348
pressure label lists the recommended cold
tire inflatio n pressures for the vehicle at its
maximum capacity we ight a nd the tires that
were on your vehicle at the time it was man
ufactured . For recommended t ire pressures
for normal load condit ions, please see chap
ter ~
page 284 .
-Turn the valve stem cap counter-clockwise
to remove it from the tire valve .
- Place the air pressure gauge on the valve.
- The tire pressures should only be checked
and adjusted when the tires are cold . The
s light ly raised pressures of warm tires must
not be reduced .
- Adjust the tire pressure to the load you are
carrying.
- Re insta ll the va lve stem cap on the valve .
When should I check the tire pressure ?
The correct tire pressure is especially impor
tant at high speeds . The pressure sho uld
therefo re be checked at least once a month
and a lways before start ing a journey. Do not
forget to check the tire pressure for the spare
wheel.
When should I adju st the tire pre ssures?
Ad just the tire pressure to the load you are
carrying. After changing a wheel
or replacing
wheels you have to adjust the tire pressures
on all wheels. In addition, you must then
store the new tire pressures i n the t ire pres
sure mon itor ing system
~ page 300.
A WARNING
Incorrect tire pressures and/or unde rinfla
tion ca n lead sudden tire failure, loss of
cont ro l, col lision, ser ious persona l inju ry
or even death.
- Whe n the wa rning symbo l
[ti] appears in
the instrume nt cl uster, s top and inspect
the tires.
- Incorrect tire pressure and/or underinfl a
t ion can ca use inc reased t ire wear and
can affect the handling o f the veh icle and
stopp ing ability .
- Incorrect tire pressures and/or underin
flation ca n also lead to sud den tire fa il-
Tires an d wheel s 287
ure, including a blowout and sudden de
flation, ca using loss of veh icle contro l.
- The driver is responsi ble for the co rrect
tire pressures for all tires on the veh icle.
The applicable pressure values are locat
ed on a sticker o n the dr iver's s ide B-pil
lar .
- Onl y when all tires on the vehicle are fil
led to the correct pressure, the t ire pres
sure mon itor ing system can work cor
rectly .
- The use of incorrect tire pressure va lues
can lead to acc idents or other damage .
Therefore it is ess ential that th e drive r
observe t he spec ified t ire p ress ure val ues
for the tires and the cor rect pressures for
the func tion of the t i re p ress ure moni to r
ing system.
- Always in flate tires to the recommen ded
a nd correct t ire p ress ure be fore dr iv ing
off .
- D riving with unde rinf lated tires bend
mo re, letting them get too hot resulting
in tread separation, s udden tire failure
and loss of control.
- Excessive speed and/overloading can
cause heat b uild- up, sudden tire failure
and loss of control.
- If the tire pressure is too low or too high,
the t ires will wear premat urely and the
veh icle w ill not handle well.
- If the tire is not flat and you do not have
to change a wheel immediately, d rive at
red uced speed to the nearest service sta
tion to check the t ire press ure and add
air as requ ired .
(D Note
Driving w ithout valve stem caps can cause
damage to the tire valves. To prevent this,
a lways make sure that factory installed
valve s tem caps o n all whee ls are sec urely
mounted o n the valve .
@ For the sake of the environment
Underinflated tires will also increase the
fuel consumpt ion.
•
•
Page 336 of 348
334 Index
------------------------------------
Homelink® universal remote control .. 328
Remote control key ................ 328
def What does this mean when it appea rs in
the trip odometer display? ... .. .... .. 12
Defective light bulb warning . . . . . . . . . . . 23
Defrosting/defogging the windows . . . . . . 94
Defrosting/defogging windows . .. ...... 96
Determining correct load limit . .. .... . 288
Diesel fuel ... ................ ..... . 257
Diesel particulate filter . . . . . . . . . . 37,235
Digital clock . . . . . . . . . . . . . . . . . . . . . . . . 11
Digital compass ......... .. .. .. .. .. .. 69
Digital speedometer ............ .. ... . 22
Dimensions ................ ... .... . 321
Dimming the rearview mirror .. .. ...... 69
Dipstick Reading the dipstick properly . .. .. .. . 269
Distance control system
refer to Adaptive cruise contro l .... ... 113
Doors Power child safety lock .... .. .. .. .. . . 48
Driver information system . .. .. .. .. .. .. 21
Dig ital speedometer ...... .. .. .. .. . . 22
Driver information messages . . . . . . . . . 30
Open door or rear lid warning . . . . . . . . . 22
Outside temperature display .. .. ...... 22
Sound system display ....... .. .... .. 21
Driver seat
refer to Seat ing pos ition ....... .. ... 166
Driver's seat . . . . . . . . . . . . . . . . . . . . . . . . 72
Driver's seat memory ....... .. .. .. .. . . 73
Activating remote control key ..... .. .. 74
Recalling a seat position . . . . . . . . . . . . . 73
Storing a seat position . . . . . . . . . . . . . . . 73
Driving messages . . . . . . . . . . . . . . . . . . . . 30
Driving mode
refer to Adaptive Air Suspension . lSS, 157
Driving offroad
Driving through water ..... .... .... . 239
Driving tips .............. .. .. .. .. . 238
Rules of behavior ........... .. .... . 238
Sand and mud .. ...... .... ... .. .. . 239
Snow-covered ground ...... ..... .. . 239
Unpaved roads ............... .. ... 239
Driving safely ............. .... .... . 165 Driving
through water ........... .. .. 239
Driving time . . . . . . . . . . . . . . . . . . . . . . . . 24
Duplicate key . .. .. ... .......... .. .. . 38
Dust filter
Climate controls . ................. .. 91
E
Easy entry feature .. .. ........... .. .. 104
Efficiency program . . . . . . . . . . . . . . . . . . . 26
Fuel economy messages . . . . . . . . . . . . . 27
Memory levels . . . . . . . . . . . . . . . . . . . . . 25
Other equipment ..... .... ..... .. .. . 27
Electric seat adjustment
refer to Power seat . . . . . . . . . . . . . . . . . 72
Electronic differential lock (EDL)
How the system works .............. 227
Warning/indicator lights ........ .. .. . 18
Electronic immob ilizer ........... .... . 40
Electronic power control (EPC) warning/indicator light . . . . . . . . . 15
E lectronic speed limiter ............... 28
Electronic Stabilization Control (ESC)
Hill descent control . ........... .. .. 225
How the system works .............. 225
Offroad mode .... ............. .... 225
Warning/indicator lights ............. 16
Emergency flasher . . . . . . . . . . . . . . . . . . . 60
Warning/ind icator lights ........ .... . 16
Emergency locking of doors ....... .. .. . 45
Emergency operation Rear lid ....... .. .. .............. .. 48
Emergency starting ................. 314
Emergency towing ... .... .... ... .. .. 316
Energy management ................ 231
Battery power ... ............. .... 233
Driver notification ............. .. .. 233
Engine Compartment .... ................ . 266
Coolant ....... .. .. .............. . 271
Hood ......... .. .. .............. . 264
Starting . . . . . . . . . . . . . . . . . . . . 105, 106
Starting with jumper cables ..... .... 314
Stopping .. .... .. ................. 106
Engine compartment
Safety instructions ................ . 264
Working the eng ine compartment .... 264
Page 343 of 348
Seat belts
re fer to Safety belts . . . . . . . . . . . . . . . . 17 5
Seating capacity
Seating position
175
Driver . .. .. .. .. .. .. .... ... .. .. .. . 166
Front passenger . ............. ... .. 167
How to adjust the front seats . .. . ... . 167
Incorrect seat position ..... .. .. .. .. . 169
Occupants .. .. ........... .. .. .. ... 166
Rear passengers .......... .. .. .. .. . 168
Seat memory . . . . . . . . . . . . . . . . . . . . . . . 73
Seats
Number of seats ......... .. .. .. .. .
175
Seat ventilation . . . . . . . . . . . . . . . . . . . . 100
Selective catalytic reduction
refer to Ad Blue ... .. ...... .. .. .. .. . 261
Selective unlock feature ........ ... .. .. 44
Selector lever ............. .... .. .. . 138
Service and disposal
Safety belt pretensioner . . . . . . . . . . . .
182
Service interval display . . . . . . . . . . . . . . . . 23
Service position
Windshield wipers ........ .. .. .. .. ..
66
Servotronic
Power steering ............ ... ... ..
230
Shift buttons . . . . . . . . . . . . . . . . . . . . . . . 141
Side airbags
Description .............. .... .. .. .
199
How they work .............. ... ... 201
Side assist
Activating and deactivating . .. .. .. .. .
129
C leaning sensors ......... .. .. .. .. . 247
Description .............. .... .. .. . 129
Informational and alert stage signals . 131
Messages in instrument cluster display 135
MMI settings .................. ... 134
Operation . . . . . . . . . . . . . . . . . . . . . . . . 131
Safety tips . ............. .... .. ... 136
Sensor detection area ..... .. .. .. .. . 130
Side curtain airbags
Description ................. ... ...
202
How they work ........... .... .. .. . 203
Safety instructions ........ .. .. .. .. . 204
Side curtain airbags) ................. 202
Side marker lights ............ .... ... 57
Ski sack ............................ 82
Snow chains . ............. .... .. ... 296
Index 341
Sockets ..... ..... .................. 87
Sound system display
Driver information display ........... .
21
Sources of information about child re-
straints and their use . .... .... ... .. ..
224
Speed control system
refer to Adaptive cruise control ....... 113
Speedometer . . . . . . . . . . . . . . . . . . . . . . . 12
Speed rating letter code .............. 292
Speed warning system . . . . . . . . . . . . . . . . 28
Starting on hills
Hill hold . . . . . . . . . . . . . . . . . . . . . . . . .
110
Starting the engine . . . . . . . . . . . . 105, 106
What should I do if the engine does not
start? ....... ... .. ..... ..........
106
Steering ..... ..... .. ............... 103
Easy entry feature ................. 104
Electrically adjusting the steering
wheel .... .. .. .. ... ............ ..
103
Locking the steering ............... 105
Malfunction ... .... .. .. ...... ...... 33
Manually adjusting the steering wheel . 103
Steering wheel column
Adjusting electrically ............... 103
Adjusting manually ................
103
Steering wheel heating .............. 101
Steps for determining correct load limit . 288
Stopping the engine .. ........... .... 106
Storage .......... .................. 87
(upholder ......................... 85
(upholder door pockets ............ .. 86
(upholder in the rear center console .. . 78
(upholder rear center armrest ....... . 85
Glove compartment . ... ..... ... .. .. . 88
Storage compartment
Expanding . ... .... ................
79
Storage net
Footwell . . . . . . . . . . . . . . . . . . . . . . . . . .
89
Luggage compartment ............ .. 90
Seatbacks . . . . . . . . . . . . . . . . . . . . . . . . . 90
Sunroof
refer to Panoramic sliding sunroof .. .. . 54
Sun shade .. .. .. .. .. ............... . 63
Sunshade
Panoramic sliding sunroof . . . . . . . . . . . .
56
Sun visors .... .. ...... ........... .. . 62
•
•