tow AUDI Q7 2013 Owner´s Manual
[x] Cancel search | Manufacturer: AUDI, Model Year: 2013, Model line: Q7, Model: AUDI Q7 2013Pages: 348, PDF Size: 87.72 MB
Page 145 of 348
Parking systems
General information
App lies to vehicles: with rea r park assis t/Audi park ing sys
tem plus w ith rearview camera/front -and rearview cam
era
Depending on your vehicle's equipment, vari
ous parking aids will help you when parking
and maneuvering.
The
rear park assist is an acoustic park assist
system that will give you a sound warning to let you know there is something
behind the
veh icle ¢page
144 .
The Audi parking system plus with rearview
camera
audibly and visually tells you there is
something
in front of and behind the vehicle .
A rearview camera also shows you what is be
hind the vehicle ¢ page
144 .
The Audi parking system plus with front- and
rearview camera
audibly and visually tells you
there is something
in front of and behind the
veh icle. A front and rearview camera also
shows you what is in front of and behind the
veh icle¢ page
148 .
& WARNING
-Always look for traffic and check the area
around your vehicle by looking at it di
rect ly as well. The parking system cannot
replace the driver's attention. The driver
is a lways responsible for safety during
park ing and for all other maneuvers.
- Please note that some surfaces, such as clothing, are not detected by the system.
- Sensors and cameras have blind spots in
wh ich people and objects cannot be de
tected. Be especially cautious of children
and animals.
- The sensors can be displaced by impacts
or damage to the radiator grille, bumper,
wheel housing and the underbody . The
park ing systems may become impaired
as a resu lt. Have your authorized Audi
dealer or qualified workshop check their
function.
- Make sure the sensors are not covered by
stickers, deposits or any other obstruc-
Parking systems 143
tions as it may impair the sensor func
tion. For informat ion on cleaning, refer
to¢ page
247.
([) Note
-Some objects are not detected by the
system under certain circumstances:
- Objects such as barrier chains, trailer
draw bars, vertical poles or fences
- Objects above the sensors such as wall
extensions
- Objects w ith specific surfaces or struc
tures such as chain link fences or pow
der snow.
- If you continue driving closer to a low-ly
ing object, it may disappear from the
sensor range. Note that you w ill no lon
ger be warned about this obstacle.
@ Tips
-The system may provide a warning even
though there are no obstacles in the cov
erage area in some situations, such as:
- certain road surfaces or for long grass.
- externa l ultrasonic sources e .g . from
cleaning vehicles.
- heavy rain, snow or thick vehicle ex
haust.
- We recommend tha t you practice park
ing in a traff ic-free location or parking
lot to become familiar with the system.
When doing this, there should be good
light and weather cond itions.
- You can change the vo lume and pitch of
the s ignals as well as the disp lay
¢page
153.
- Please refer to the instructions for tow
ing a trailer ¢page
153.
-What appears in the MMI display is
somewhat time-delayed.
Page 148 of 348
146 Parking systems
-The camera lens en larges and disto rts
the field of vision. The object appears
both altered and inaccurate on the
screen.
- In certain situations, people or objects in
the display appear closer or further
away:
- objects that do not touch the ground,
such as the bumper of a parked vehicle,
a trailer hitch or the rear of a truck. Do
not use the help lines in this case.
- If driven from a leve l surface onto an
incline, or a downward slope.
- If driven toward protruding objects.
- If the vehicle is carrying too much load
in the rear.
(D Note
-Always read and follow the applicable
warnings
¢ (D in General information on
page 143 .
-The orange colored orientation lines in
the MMI display show the vehicle path
depending on the steering wheel angle .
The front of the vehicle front swings out more than the rear of the vehicle. Main
tain plenty of distance so that your out
side mirror or a corner of your vehicle does not collide with any obstacles.
Switching on and off
Applies to vehicles: with Audi parking system p lus w ith
rearview camera
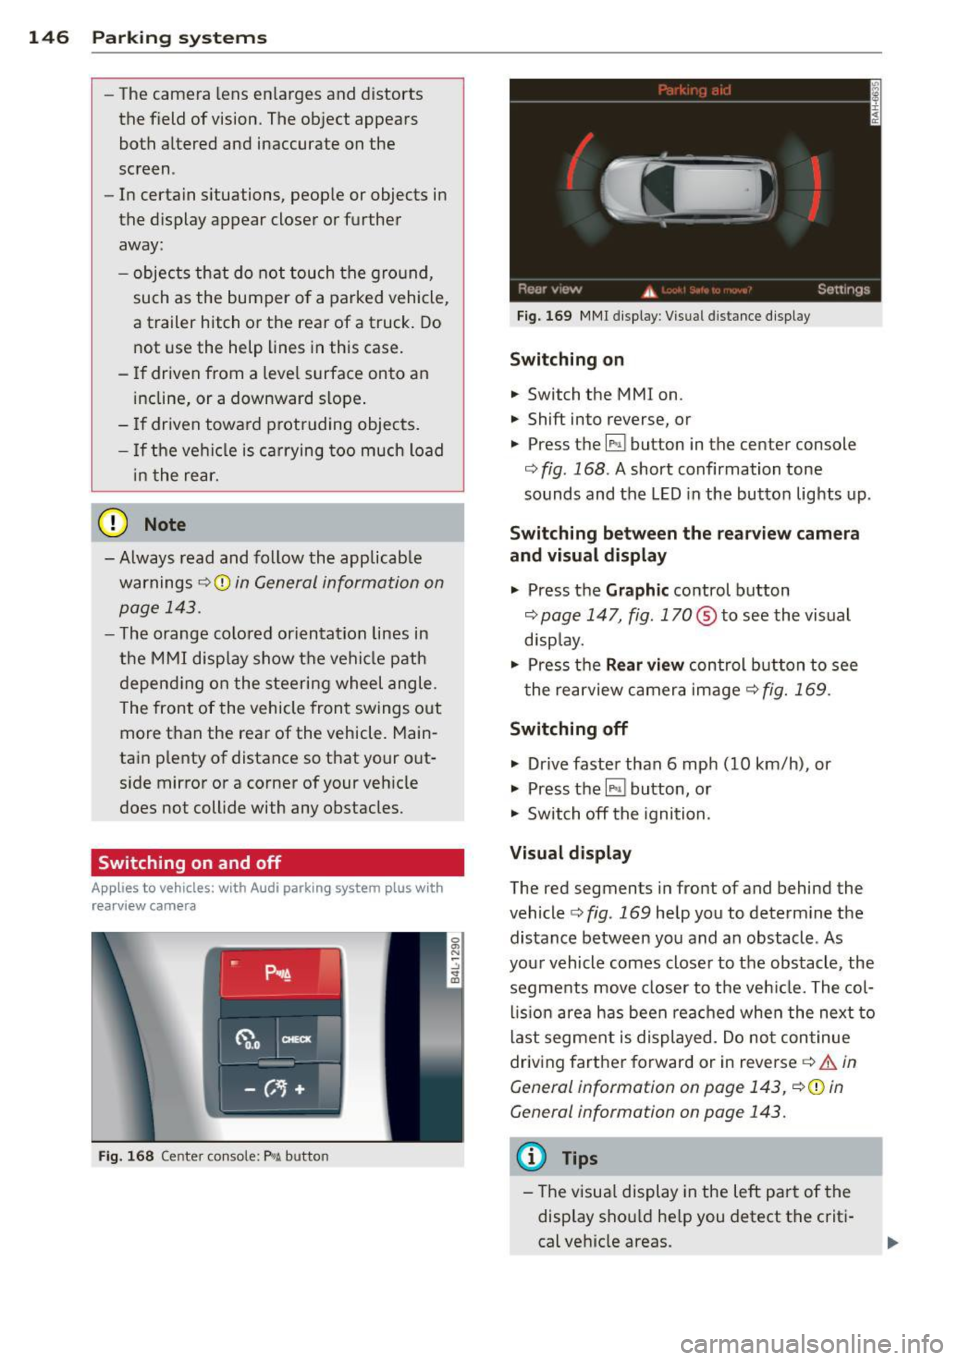
Fig. 168 Center co nsole: P"A button
Fig. 169 MMI display: Visual distance display
Switching on
.. Switch the MMI on .
.,. Shift into reverse, or
.,. Press t he[!;] button in the center console
¢ fig. 168. A short confirmation tone
sounds and the LED in the button lights up .
Switching between the rearview camera
and visual display
.,. Press the Graphic control button
¢ page 147, fig. 170 ® to see the visual
display.
.,. Press the
Rear view control button to see
the rearview camera image
c> fig. 169.
Switching off
.,. Drive faster than 6 mph (10 km/h), or
.,. Press the [!;] button, or
.,. Switch off the ignition.
Visual display
The red segments in front of and behind the
vehicle
c> fig. 169 help you to determine the
distance between you and an obstacle . As
your vehicle comes closer to the obstacle , the
segments move closer to the vehicle. The col
lision area has been reached when the next to
last segment is displayed . Do not continue
driving farther forward or in reverse
c> .&. in
General information on page 143,
c> @ in
General information on page 143.
(D Tips
-The visual display in the left part of the
display should help you detect the criti
cal vehicle areas .
Page 154 of 348
152 Parking systems
distance to this vehicle should be approxi
mately 3 ft (1 m).
• Turn the
MMI on and select the reverse
gear. The parking system is turned on and
the
parallel parking indicator is displayed.
• Press the contro l button on the
MMI con
t ro ls
(D ¢ fig . 184. The cross parking indica
tor is displayed.
• Back up and align your vehicle so the b lue
area @ borders on the rear end of the vehi
cl e or on t he pa rking space line¢ .&.
in Gen
eral information on page 148,
¢(D in Gen
eral information on page 149.
The blue area
represents an extension of the veh icle's out
line by approximately
16 ft (5 m) to the rear.
The long side of the blue area should be on
the curb. The entire blue area must f it into
the parking space .
• With the veh icle stopped, turn the steer ing
wheel to the r ight as far as it w ill go.
• Back in to the par king space until the b lue
cu rve ¢
fig. 185 touches the curb¢.&. in
General information on page 148,
~ CD in
General information on page 149 .
Stop the
vehicle.
• With the vehicle stopped, turn the steer ing
wheel to the left as far as it will go.
• Cont inue to back into the parking space un
t il the vehicle is parked pa rallel to the curb
¢ .&. in General information on page 148,
¢(Din General information on page 149.
@ marks the rear bum per. Stop the ve hicle,
at the latest, when the red orientation line
© borders an obstacle. Keep an eye on the
front of your vehicle whi le doing this .
Parking next to obstacles
When there is an obstacle (s uch as a wall)
n ex t to the parking space, choose a space w it h
mo re space on the sides. Pos ition the long
side of the blue area so that there is sufficient
space from the c urb. The area must not be on
the curb. You wi ll also need to start turn ing
the steering wheel much earlier. The re should
be a sufficient amount of space between the
curb and the blue curve, and the blue c urve
c::> fig. 185 must not touch the curb.
(D Tips
The left or rig ht orientation lines and s ur
faces will be disp layed, depending on t he
turn s ignal being used.
Trailer mode
Applies to vehicles: with Audi parking system plus with
front· and rearview camera and trailer hitch
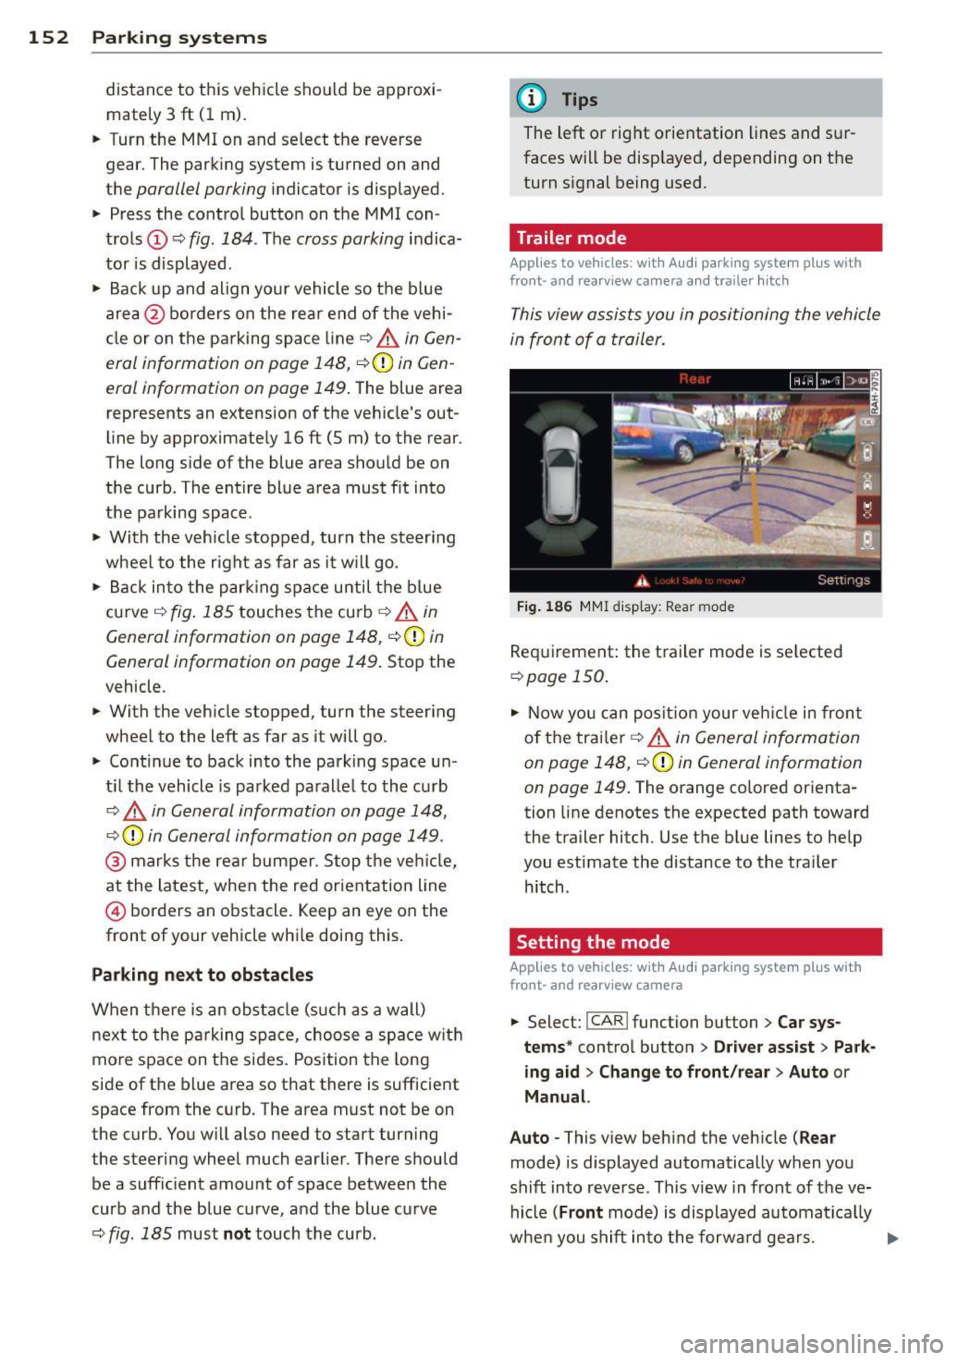
This view a ssists you in positioning the vehicle
in front of a trailer.
Fi g. 186 MM I disp lay: Rear mode
Requirement: the t railer mode is se lected
c:> page 150 .
• Now you can posi tion your veh icle in front
of the trailer ¢.&.
in General information
on page 148,
c::> (D in General information
on page 149.
The orange co lored orienta
tion line denotes the expected path toward
the trailer hitch. Use the blue lines to help
you estimate the distance to the tra ile r
h itch .
Setting the mode
Applies to vehicles: with Audi parking system plus with
front· and rearview camera
• Select: I CAR ! function button > Car sys
tems *
control button > Driv e r assist > Pa rk
ing a id
> Chang e to front/rear > Auto or
Manual.
Auto -
This view behind the vehicle ( Rear
mode) is displayed automatically when you
sh ift into reve rse . This v iew in front of the ve
hicle
( Front mode) is displayed au tomat ica lly
whe n you shift in to the forwa rd gears. ..,.
Page 155 of 348
Manual -This view behind the vehicle (Rear
mode) is a lways disp layed when you turn on
the system.
Adjusting the display and warning tones
Applies to vehicles: with rear park assist/Audi parking sys
t em plus with rearview camera/front- and rearview cam·
e ra
The display* and warning tones can be ad
justed in the MMI.
""S elect: ICARlf unction button> Systems*
control button > Parking system. Or
"" Se lect: I CAR
I function button > Car sys
tems* control button > Driver assist
> Park
ing aid.
Display*
- Off -when the parking system is switched
off, only aud ible signals are given.
-On -when the parking system is switched
on, either the visual display or the picture
from the rearview camera is disp layed .
Warning tones
- Front volume* - front sensor vo lume
- Front frequency* -front sensor frequency
- Rear volume - rear sensor volume
- Rear frequency -rear sensor frequency
- In-car entertainment fader/Music volume
while parking - when the parking system is
switched on, the volume of the active audio
source is lowered.
The new ly adjusted value is briefly heard from
the signal generator.
@ Tips
- The warning tones can also be adjusted
direct ly by the visual disp lay* or the pic
ture from the camera*. S imply press the
Settings* control button.
- Changed settings are activated when
parking system is switched on again.
- The settings are automatically stored
and assigned to the remote control key
being used. Parking
systems 153
Error messages
Applies to
vehicles: with rear park assist/Audi parking sys
tem plus with rearview camera/front- and rearv iew ca m
era
There is an error in the system if the LED in
the~ button* is blinking and you hear a con
tinuo us alarm for a few seconds after switch
ing on the park ing system or when the park
ing system is already activated .
If the error is
not corrected before you switch off the igni
tion, when you switch on the parking system
again, the LED in the ~ button* will blink. If
you activate the parking system with the but
ton in this case, the continuous warning tone
will continue to sound.
Parking system plus with front and
rearview camera*
There is another system error if:
- the~·· symbol appears in the display and
the corresponding display area is shown in
blue. The camera is not working in this area.
- all segments around the vehicles are red or
if no segments are displayed.
Drive to your authorized A udi dealer or au
thorized repair fac ility immed iate ly to have
the mal function corrected .
Trailer hitch
Applies to vehicles: with rea r park assist/Audi parking sys
tem plus with rearview camera/front- and rearview cam
era and tra iler hitch
For vehicles using the trailer socket, the park
ing system rear sensors do not turn on when
you shift into reverse gear or when you press
the~ button*. This results in the follow ing
restrictions:
Rear park assist*
There is no warning for distances to the rear.
Audi parking system plus with rearview
camera/front and rearview camera*
There is no distance warning for the rear. The
front sensors remain act ivated. The visual dis
play sw itches to the trailer towing mode. The
rearview camera image will not show the ori-
entat ion lines and the blue surfaces . ..,.
Page 157 of 348

Adaptive Air Suspension
Air suspension and damping
Description
App lies to vehicles: with Adapt ive Air S uspe nsio n
Air suspension and damping con be adjusted
separately.
Adaptive A ir Suspension is an electronically
controlled springing and damping system.
This chassis system makes it easier on the
driver by adapt ing to the particular situation
through imperceptible control processes.
The
Adaptive Air Suspension component reg
ulates ground clearance depending on vehicle
speed and driver input. It functions independ
ently from the load condition . Accelerating to
a speed above a predetermined limit will make the vehicle lower itself. On the other
hand, driving more slowly results in the vehi
cle raising again at specific speeds.
The
damping component provides individual
control of the damping forces . For example,
w ith damping characterist ics set to provide
greater comfort, damping is set somewhat
harder for a br ief per iod only as required, for
example, when go ing aro und a curve or when
braking.
Settings
Adapt ive Air Suspension prov ides the driver
with the opportun ity to set the chassis charac
ter istics also to their individual preference.
W ith the driving modes
Comfort, Automatic
and Dynamic the driver has three chassis set
tings available, ranging from comfort to spor
ty. The
Offrood mode can be selected for driv
ing on poor quality stretches of road. In addi
tion,
Lift provides a fifth mode, which can be
selected when exceptionally high ground
clearance is needed
c::;, page 155, Chassis con
trols .
The modes are set in MMI <::;,page 157.
Adaptive A ir Suspension 155
A WARNING
The height of the parked vehicle can
change due to temperature fluctuations or
changes in load .
@ Note
- Whenever you park your vehicle, a lways
make sure there is adequate clearance
above and below the vehicle. The he ight
of the parked vehicle can change as the
result of temperature fluctuations,
changes in load condition and changes in
the driving mode (ground clearance).
- If the vehicle is being transported (e.g .
by tow truck, train, ship, etc.), mount the
tie-down chains/cables over the running
surface (circumference) o f the tires. Nev
er secure the vehicle by the axle, the sus
pension struts or the front or rear tow
line eye . For technica l reasons, the pres
sure in the suspens ion struts may change
during the transport, which could result
in the vehicle no longer being secured
properly .
- If you are going to tow a trailer with a
trailer hitch that was
not installed ac
cording to factory specif ications, you
must activate the traile r operation mode
man ually
<::;,page 159.
(D Tips
-Before you can raise your vehicle using
the vehicle jack (for example, when
chang ing a flat tire) or a vehicle lift, yo u
must activate the jacking mode
c::;, page 159.
- On some models, the vehicle can reach
its maximum speed only in the
Automat
ic
and Dynamic modes.
Chassis controls
App lies to vehicles : wit h Adaptive A ir Suspensio n
Five different driving modes can be set by the
driver.
T he automatic control processes are speed
and t ime-dependent. For example, it is not
Page 161 of 348

Displaying the vehicle level
The current vehicle leve l is shown with seg
ments fi lled out in the segment disp lay @. If
on ly the bottom segment is filled out, the ve
hicle is at highway leve l. If all segments are
fi lled out, the vehicle is at high level 2 and has
the greatest amount of ground clearance pos
sible.
While the vehicle is being raised or lowered,
the target level is indicated by an arrow @
¢
fig. 189 or a white border @¢ fig. 190. The
arrow/border disappears aga in when the vehi
cle is at the target level.
Jacking mode when changing a flat tire
Applies to vehicles: with Adaptive Air Suspension
This mode must be activated in the MMI be
fore raising the vehicle with a jack or on a ve
hicle lift.
.,. Select: ICARI funct ion button> ! SETUP I
function button > Jacking mode . Or
.,. Select:
I CARI funct ion button > Car sys
tems *
control button > Servicing & checks >
Air susp.: tire change .
The vehicle jack mode must be activated be
fore changing a wheel so that the automatic
control processes fo r the a ir suspension do
not make lift ing with the vehicle jack more dif
ficult.
The check lamp
II in the instrument cluster
d isplay illuminates in vehicle jack mode.
0) Tips
The vehicle jack mode is switched off auto
mat ically at speeds above 9 mph (15 km/
h).
Towing a trailer
Appl ies to vehicles: with towing hitch and Adaptive Air
Suspension
Automatic lowering is not desirable when
towing a trailer.
.,. Se lect: ICARI function button > !SETUP I
function button > Towing mode. Or
Adaptive A ir Suspension 159
.,. Select: I CAR I function button > Car sys
tems*
control button > Vehicle settings >
Air susp.: towing.
As long as towing mode is activated, a vehicle
with a trai ler appears in the
adaptive air sus
pens ion
main menu.
Level Adjustment when towing a trailer
- Before hit ching up the trailer and before ad
jus ting the tongue weight at the trailer, the
automatic or comfort mode
must be se lect
ed so that the ve hicle can be at normal level
¢ page 157, MMI settings.
-If driving in dynamic mode is desired, this
mode
must be selected before hitching up
the trailer and before adjusting the tongue
weight. However, note that your vehicle is lowered and ground clearance is reduced.
- If you have to dr ive under difficult road con
ditions, you can select offroad or lift mode,
after hitch ing up the trailer or after adjust
ing the tongue weight .
- If the veh icle is at
normal level, and you se
lect offroad mode wh ile traveling at speeds
higher than 22 mph (35 km/h), the veh icle
w ill not be ra ised. Offroad mode will appear
as the active mode in the MMI Display.
- If the veh icle is in offroad mode at
high level
1 ,
it automatically lowers to normal level
when the vehicl e is t ravel ing at speeds ex
ceeding approximately 31 mph (SO km/h).
The vehicle is automatical ly raised to
high
level 1
again when the traveling speed falls
be low approx imately 25 mph (40 km/h).
Restrictions when operating with a trailer
When operating w ith a trailer, the lift mode
can only be selected up to about 12 mph (20
km/h) . Lift mode is automatically cance led
again when a speed of about 25 mph (40 km/
h) is exceeded.
If t he vehicle is in automatic, comfort, offroad
or lift mode before the trai ler towing mode is
activated, the dynamic mode cannot be acti
vated .
If t he vehicle is in dynamic mode before tow-
ing operation is activated, it can be driven in
IJI,-
Page 162 of 348
160 Adapti ve Air Su spen sion
this mode. If the suspension is switched from
this mode to another mode, dynamic mode
cannot be re-selected .
(D Tips
-For vehicles with a factory installed tow
ing hitch or a trailer hitch that was in
stalled later accord ing to factory specifi
cations, the system recognizes "Trailer
tow ing mode" and activates this specia l
mode automatically, as soon as the elec
trical connection on the trailer socket is
connected. The mode ceases a utomat i
ca lly when the elect rical connection to
t h e trai ler socket is d isconnected.
- If the tra iler towing mode has been acti
vated, the vehicle will not drop to the
l ow or highway level.
Cargo mode
Applies to vehicles: with Adapt ive Air Suspe nsio n
The rear of the vehicle can be lowered to
make it easier to load.
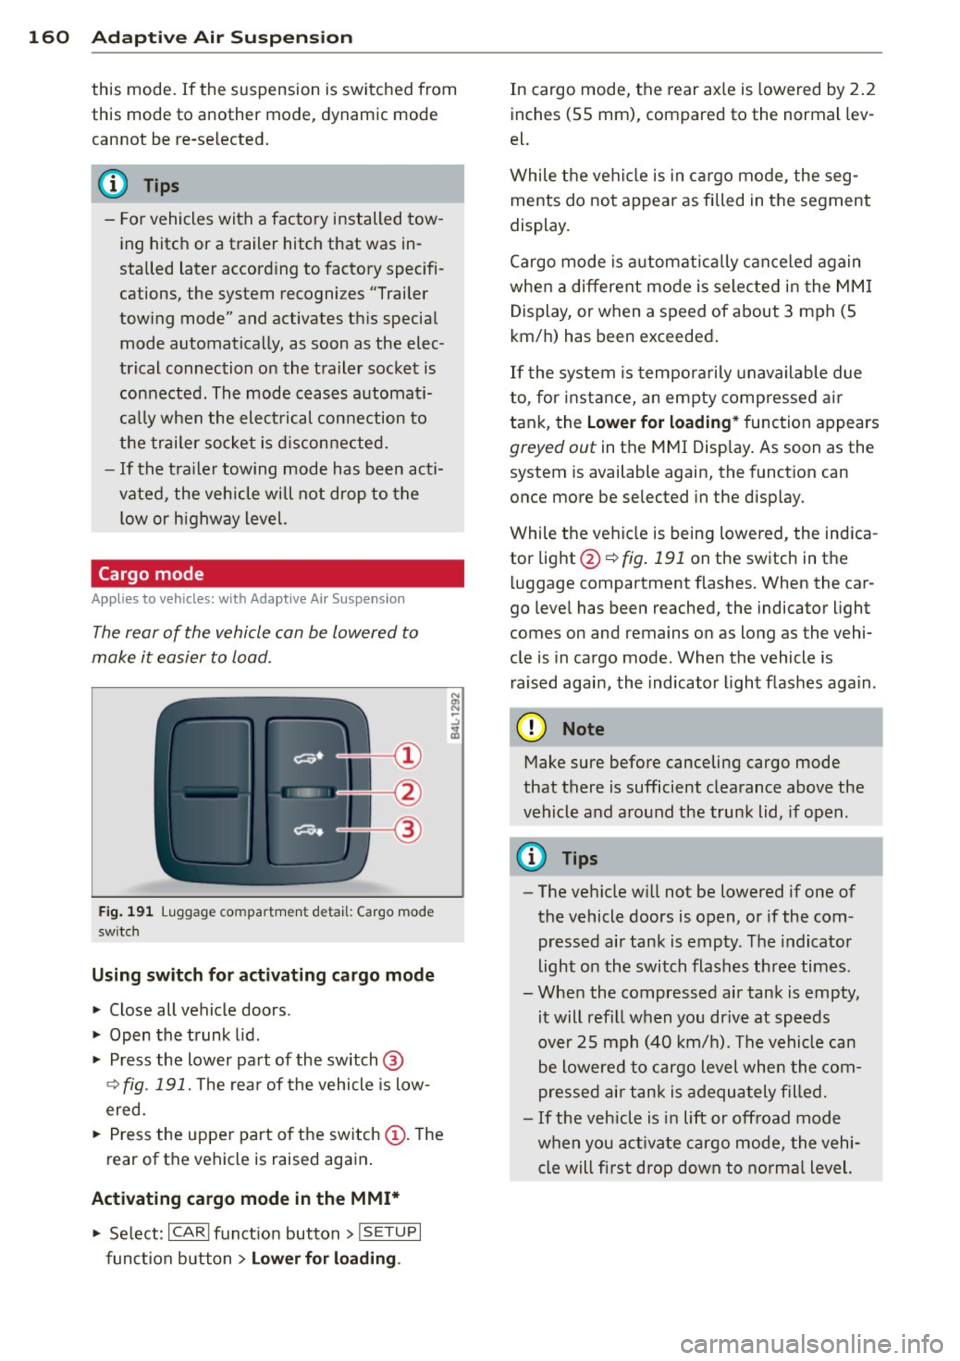
Fig. 191 Luggage compa rtment detail: Cargo mode
sw itch
Using switch for activating c argo mode
.. Close all vehicle doors .
.. Open the trunk lid.
.,. Press the lower part of the sw itch ®
~ fig. 191. The rea r of the vehicle is low
ered.
.. Press the uppe r part o f the sw itch
(D . The
rear of the vehicle is raised again.
Activating cargo mode in the MMI*
.. Se lect: ICARI funct ion button> I SE TUP I
func tion button > Lower for loading .
In cargo mode, the rear ax le is lowered by 2 .2
inches (55 mm), compared to the normal lev
el.
While the veh icle is in ca rgo mode, the seg
ments do not appear as filled in the segment
display.
Cargo mode i s automatic ally c an ce le d again
when a different mode is selected in the MM I
Display, or when a speed of about 3 mph (5
km/ h) has been exceeded.
If the system is tempora rily unavailable due
to, for instance, an empty compressed air
tank, the
Lower for loading * function appears
greyed out in the MMI Display. As soon as the
system is available again, the funct ion can
once more be selected in the disp lay.
While the vehicle is being lowered, the indica
tor light @~
fig. 191 on the switch in the
l uggage compartment flashes. When the car
go leve l has been reached, the indicator light
comes on and remains on as long as the vehi
cle is in cargo mode. When the vehicle is
r aised agai n, the indicator light flashes again.
(D Note
M ake sure before canceling cargo mode
that there is sufficient clearance above the
vehicle and a round the trunk lid, if open.
(D Tips
- The vehicle w ill not be lowered if one of
the vehicle doors is open, or if the com
pressed air tank is empty. The indicator
light on the switch flashes three times.
- Whe n the compressed air tank is empty,
it will refill when you drive at speeds
over 25 mph (40 km/ h). The vehicle can
be lowered to cargo level whe n the com
pres sed air tan k is a dequately filled.
- If the vehicle is i n lift or off road mode
when you act ivate cargo mode, the vehi
cle will fi rst drop down to no rma l level.
Page 169 of 348
~ Always keep both feet in the footwell so
that you are in control of the vehicle at all
times.
For detailed information on how to adjust the
driver's seat, see
¢ page 72.
A WARNING
Drivers who are unbelted, out of position
or too close to the airbag can be seriously
injured by an airbag as it unfolds. To help
reduce the risk of serious personal injury:
- Always adjust the driver's seat and the
steering wheel so that there are at least
10 inches (25 cm) between your breast
bone and the steering wheel.
- Always hold the steering wheel on the
outside of the steering wheel rim with
your hands at the 9 o'clock and 3 o'clock positions to help reduce the risk of per
sonal injury if the driver's airbag inflates.
- Never hold the steering wheel at the
12 o'clock position or with your hands at
other positions inside the steering wheel
rim or on the steering wheel hub. Hold
ing the steering wheel the wrong way
can cause serious injuries to the hands,
arms and head if the driver's airbag de
ploys.
- Pointing the steering wheel toward your
face decreases the ability of the supple
mental driver's airbag to protect you in a
collision .
- Always sit in an upright position and nev
er lean against or place any part of your
body too close to the area where the air
bags are located.
- Before driving, always adjust the front
seats and head restraints properly and
make sure that all passengers are prop
erly restrained.
- Never adjust the seats while the vehicle
is moving . Your seat may move unexpect
edly and you could lose control of the ve
hicle.
- Never drive with the backrest reclined or
tilted far back! The farther the backrests
are tilted back, the greater the risk of in-
Driving Safely 167
jury due to incorrect positioning of the
safety belt and improper seating posi
tion .
- Children must always ride in child safety
seats ¢
page 205. Special precautions
apply when installing a child safety seat
on the front passenger seat¢
page 184 .
Proper seating position for the front
passenger
The proper front passenger seating position
is important for safe, relaxed driving .
For your own safety and to reduce the risk of
injury in the event of an accident, we recom
mend that you adjust the seat for the front
passenger to the following position :
~ Adjust the angle of the seatback so that it is
in an upright position and your back comes
in full contact with it whenever the vehicle is
moving .
~ Adjust the head restraint so the upper edge
is as even as possible with the top of your
head. If that is not possible , try to adjust
the head restraint so that it is as close to
this position as possible¢
page 168.
~ Keep both feet flat on the floor in front of
the front passenger seat .
~ Fasten and wear safety bel ts correct
ly ¢
page 179 .
For detailed information on how to adjust the
front passenger 's seat, see ¢
page 71.
A WARNING ,_
Front seat passengers who are unbelted,
out of position or too close to the airbag
can be seriously injured or killed by the air
bag as it unfolds. To help reduce the risk of
serious personal injury:
- Passengers must always sit in an upright
position and never lean against or place
any part of their body too close to the
area where the airbags are located.
- Passengers who are unbelted, out of po
sition or too close to the airbag can be
seriously injured by an airbag as it
•
•
Page 173 of 348
Stowing luggage
Loading the luggage compartment
All luggage and other objects must be prop
erly stowed and secured in the luggage com
partment.
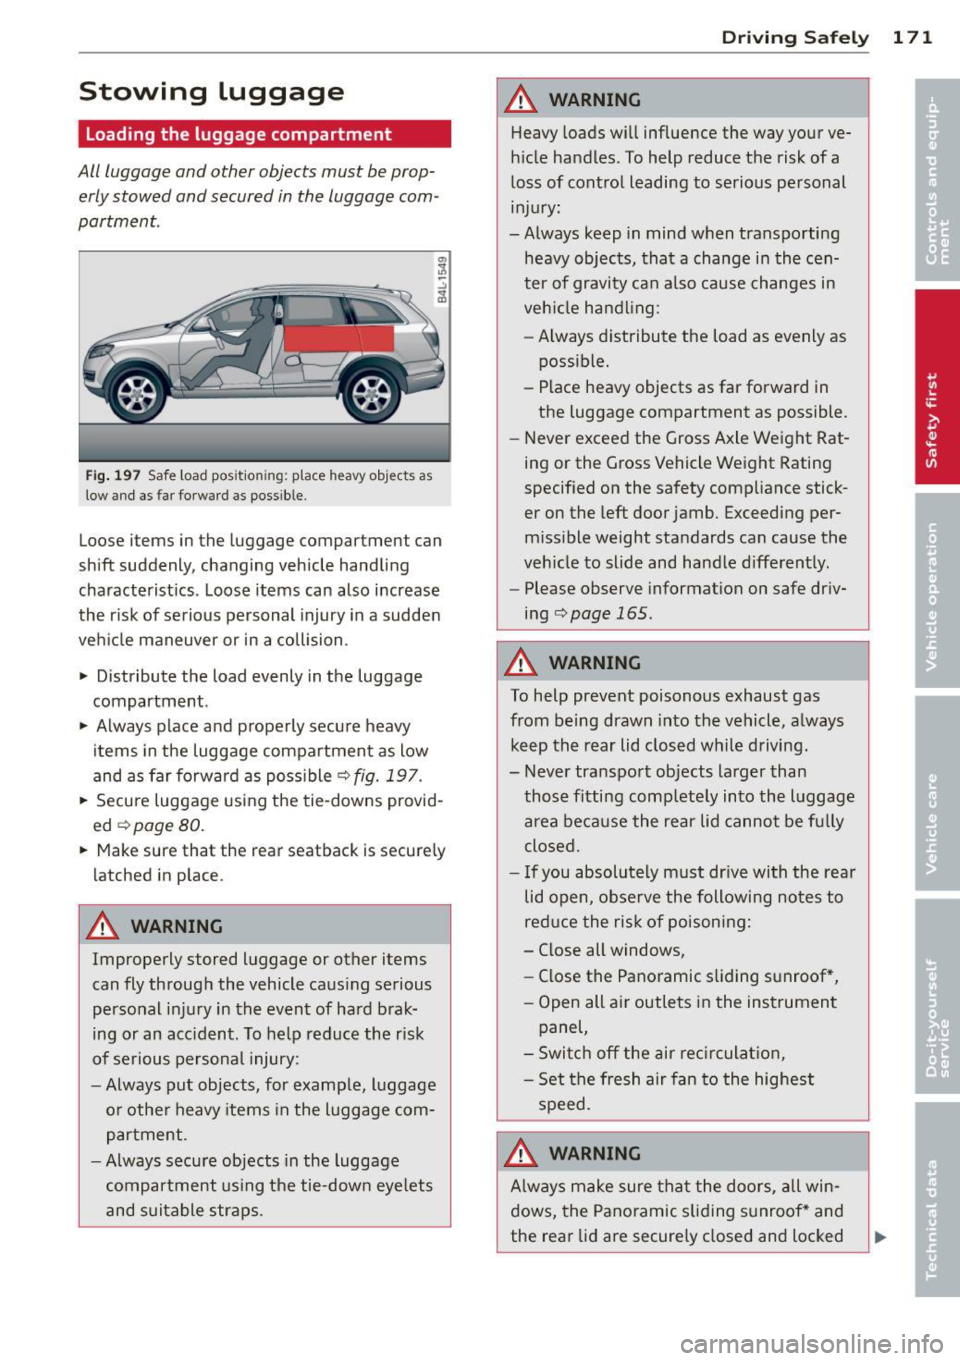
Fig . 197 Safe load pos ition ing: place heavy objects as
low and as far forward as possible.
Loose items in the luggage compartment can
shift suddenly, changing vehicle handling
characteristics . Loose items can also increase
the risk of serious personal injury in a sudden
veh icle maneuver or in a collision .
.. Distribute the load evenly in the luggage
compartment.
.. Always place and properly secure heavy
items in the luggage compartment as low
and as far forward as possible
<=>fig. 197.
.. Secure luggage using the tie-downs provid
ed
¢ page 80.
.. Make sure that the rear seatback is secure ly
latched in place.
A WARNING
Improperly stored luggage or other items
can fly through the vehicle causing serious
personal injury in the event of hard brak
ing or an acc ident. To help reduce the risk
of serious personal injury:
- Always put objects, for example, luggage
or other heavy items in the luggage com
partment.
- Always secure objects in the luggage
compartment us ing the tie-down eye lets
and suitable straps .
Drivin g Sa fely 1 71
A WARNING
Heavy loads will influence the way your ve
hicle handles. To help reduce the risk of a
loss of control leading to serious personal
injury:
-Always keep in mind when transporting heavy objects, that a change in the cen
ter of gravity can also cause changes in
veh icle handling:
- Always distribute the load as evenly as
possible.
- Place heavy objects as far forward in
the luggage compartment as possible.
- Never exceed the Gross Axle Weight Rat
ing or the Gross Vehicle Weight Rating
specified on the safety compliance stick
er on the left door jamb. Exceeding per
missible weight standards can cause the
veh icle to slide and handle differently.
- Please observe information on safe driv
ing
<=>page 165 .
A WARNING
To help prevent poisonous exhaust gas
from being drawn into the vehicle, a lways
keep the rear lid closed while driving.
- Never transport objects larger than
-
those fitting comp letely into the luggage
area because the rear lid cannot be fu lly
closed .
- If you absolutely must dr ive with the rear
lid open, observe the following notes to
reduce the risk of poisoning:
- Close all windows,
- Close the Panoramic sliding sunroof *,
- Open all air outlets in the instrument panel,
- Switch off the air rec irculat ion,
- Set the fresh a ir fan to the highest
speed.
A WARNING
A lways make sure that the doors, all win
dows, the Pano ramic s liding sunroof* and
the rear lid are securely closed and locked
Page 183 of 348
.. Inse rt the tongue into the correct buckle of
your seat until you hear it latch securely
c:> page 179, fig. 204 .
.. Pu ll on the be lt to make sure that it is se
curely latched in the buckle .
A WARNING
Improperly positioned safety belts can
cause serious personal injury in an acci
de nt.
- Expectant mothers must a lways wear the
lap po rtion of the safety belt as low as
poss ible acros s the pe lv is and be low the
ro unding of the abdomen.
- Always read and heed all WARN INGS and
other impor tant info rmation
c:> .&. in Fas
tening safe ty belts on page 179.
Unfastening safety belts
Unbuckle the safety belt with the red release
button only after the vehicle has stopped.
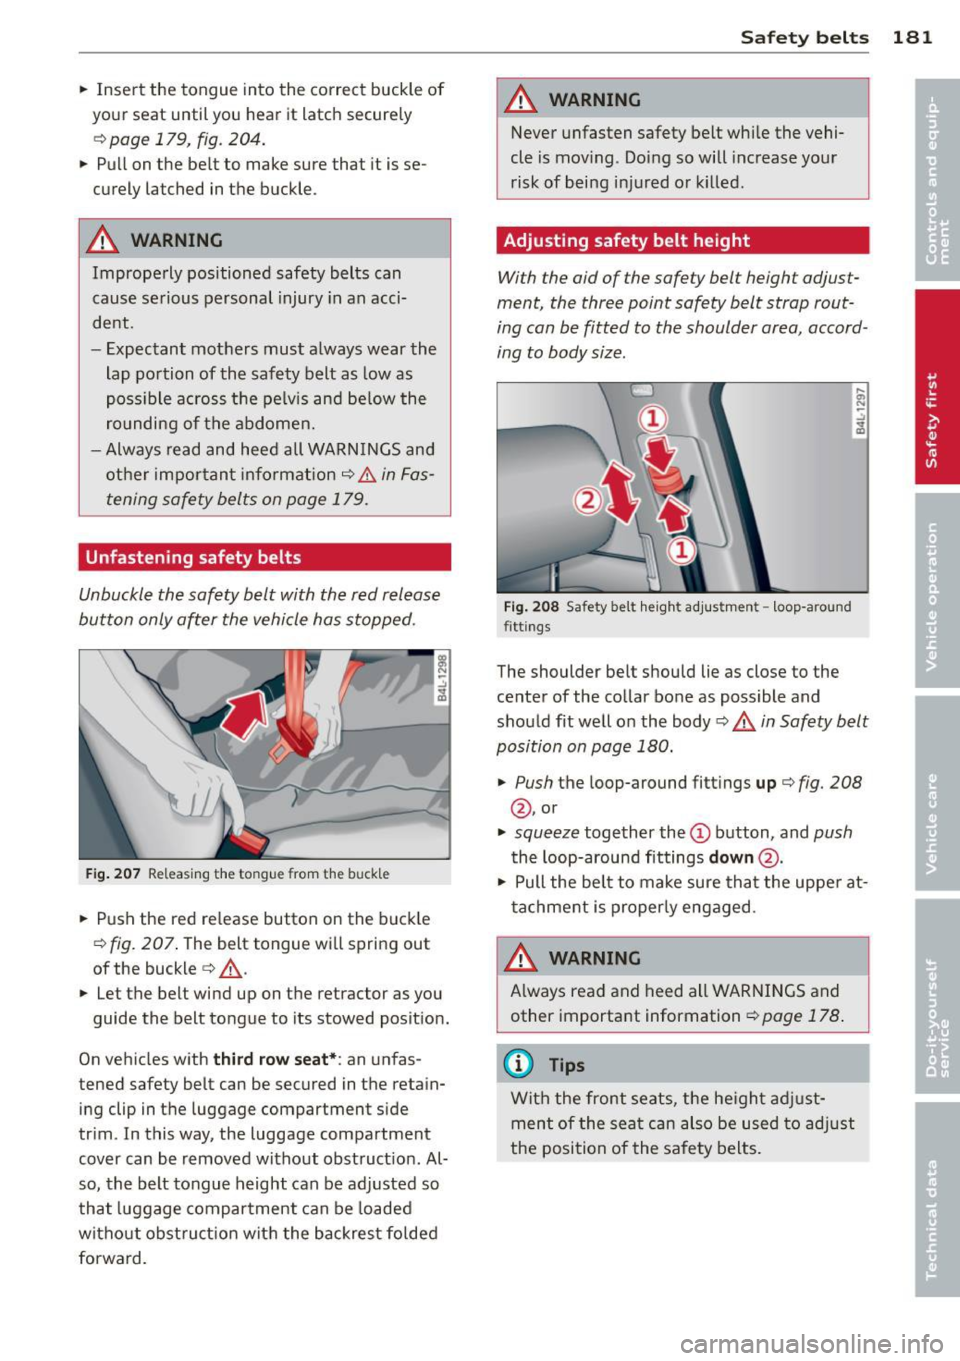
F ig. 20 7 Releas ing the to ngue from t he buck le
.. Push the red re lease button on the b uck le
c:> fig . 207 . The belt tongue wi ll spring out
of the buckle
c:> _& .
.. Let the belt wind up on the retractor as you
guide the belt to ngue to its stowed posit ion.
On vehicles with
third row seat* : an unfas
tened safety belt can be sec ured in the retain
ing clip in t he luggage compartment s ide
tr im . In this way, the luggage compartment
cover can be removed without obst ruct io n. Al
so, the belt tongue height can be adjusted so
t hat luggage compartment can be loade d
without obst ruction wit h the backres t fo lded
forward.
Safety belts 181
A WARNING
Never unfasten safety be lt whi le the vehi
cle is mov ing . Do ing so will increase you r
risk of being inj ured o r killed.
Adjusting safety belt height
With the aid of the safety belt height adjust
ment, the three point safety belt strap rout
ing can be fitted to the shoulder area, accord
ing to body size .
Fig. 208 Safety bel t heig ht adj ustment - loop-around
fittings
The shoulder belt should lie as close to the
center of the co llar bone as possible and
should fit well on the body
c:> .&. in Safety belt
position on page 180 .
.. Push
the loop-around fitt ings up c:>fig. 208
@, or
.. squeeze together the (D button, and push
the loop-around fittings down @.
.. Pull the bel t to make sure tha t the upper at
t achme nt is properly engaged .
A WARNING
-
A lways read and heed all WARNINGS and
other importa nt information
c::> page 178 .
(0 Tips
With the front seats, the he igh t adju st
men t of the sea t can also be used to ad just
the position of the sa fety belts .