air conditioning AUDI Q7 2014 Owner´s Manual
[x] Cancel search | Manufacturer: AUDI, Model Year: 2014, Model line: Q7, Model: AUDI Q7 2014Pages: 340, PDF Size: 85.02 MB
Page 4 of 340
2 Table of contents Vehicle literature .. .. .. .. .. ... .
About this Owner's Manual ...
Controls and equipment .. ... .
Ins truments and controls .. . .
General illus tration .... ... .. .. ... .
Instruments and warning /
indicator lights ........ .. .. .. . .
Ins truments . .. .. ..... ... .. .. ... .
War ning/ indi cator lights ... .. ... .. .
Driver information d isplay .. . .
Introduct ion . .. .. ..... ... .. .. ... .
Trip computer .. .. ..... ... .. .. ... .
Efficiency program ........ .. .. ... .
On-Board Diagnostic system (OBD) . . .
Elect ronic speed limiter .. .. .. .. .. . .
Speed war ning system ...... ..... . .
Auto Check Control ........ ... .. . .
Opening and closing .. .. .. .. . .
Keys .. .. .. ................ ... . .
P owe r locking system . .. .. .. .. .. . .
R ear lid .. .. .. . .......... .. .. .. . .
C hild sa fety lo ck .......... .. .. .. . .
Conven ien ce key .. ..... ... .. .. ... .
Anti-theft alarm system ... .. ... .. .
Power win dows .. ..... ... .. .. ... .
Panoramic slid ing sun roof .. .. .. ... .
Clear vision .. .. ..... ... .. .. ... .
Lights . .. .. .. . .......... .. .. ... .
Inter ior lights ............. ... ... .
V 1s 1on . ...... ........... .... ... .
W iper and washer system . ... .. .. . .
M ir rors .. .. ................ ... . .
D ig ita l compass . ...... ... .. .. .. . .
Seats and storage ......... .. . .
G en eral recomme ndat ions ... .. .. . .
P owe r fron t seat adjus tment .. .. .. . .
Se at mem ory ............ .. .. ... .
Rear seats . ... . .. ..... ..... .. ... .
Head res traints .. ..... ... .. .. ... .
A rmrest .... .. .. ..... ... .. .. ... .
5
6
8
8
8
10
10
1 4
21
21
24
26
27
28
28
30
38
38
41
4 5
48
49
so
5 1
54
57
57
61
62
63
68 70
72
72 7 3
74
7 5
7 7
78
Long center conso le . . . . . . . . . . . . . . . 79
Lugga ge compartment . ..... .... . .
Roof rack ..... .. .. ... ..... ... .. .
( upholder ... .. .. .. ... .. .. .. .. .. .
Rear asht ray ..... ............. .. .
Out let .... .... .. ............. .. .
Storage ...... ... .. ............. . 80
84
86
87
88
88
Warm and cold . . . . . . . . . . . . . . . . 92
Climate control . . . . . . . . . . . . . . . . . . 92
Rea r Air Conditioning . . . . . . . . . . . . . . 98
Bas ic sett ings . . . . . . . . . . . . . . . . . . . .
100
Heated Sea ts . . . . . . . . . . . . . . . . . . . . 101
On the road . . . . . . . . . . . . . . . . . . . 103
Stee ring .. .. ... . .. ... .. ... ... .. . 103
Ig nition lo ck and ig nition sw itch . . . . . 105
St arti ng and sto pp ing t he engine . . . . 10 6
S tar ting and stopping the engine with
Co nvenience key . . . . . . . . . . . . . . . . . .
107
Pa rking bra ke . . . . . . . . . . . . . . . . . . . . 109
Starting on h ills . . . . . . . . . . . . . . . . . . 110
Cru ise contro l . . . . . . . . . . . . . . . . . . . . 111
Adaptive cruise control . . . . . . . 113
Speed and distance control system . . 113
Driver informat io n . . . . . . . . . . . . . . . . 120
System limitations . . . . . . . . . . . . . . . . 125
Audi braking gua rd . . . . . . . . . . . . . . . 127
Audi side assist . . . . . . . . . . . . . . . 129
Lane Change Assistant. . . . . . . . . . . . . 129
Not es . . . . . . . . . . . . . . . . . . . . . . . . . . 135
Automatic transmission ... .. .
tip tron ic ... ... .. .. ........ ... .. .
Parking systems
General information
Rea r park assist .. ... ... .... ... .. .
Audi par king syste m plus with
re arview c amer a .. ............... .
A udi par kin g sys tem p lus with fron t-
and rearview camera . .. ..... ... .. .
137
137
143
143
144
14 4
148
Adjusting the display and warn ing
tones..... .... .. .. ........... ...
153
Err or messages . . . . . . . . . . . . . . . . . . 153
Traile r hitc h . . . . . . . . . . . . . . . . . . . . . 153
Page 50 of 340

48 Openin g and clo sing
- As soon as the electrical connec tion to
the trailer socket is completed on
vehicles with a factory installed towing
hitch, or a trailer hitch that was installed
later according to factory specifications,
the automatic rear lid function can only
be operated v ia the handle in the rear lid.
Rear lid emergency unlocking
If the rear lid cannot be opened, an emergen
cy release is provided .
1----------------- --,l~ N
Fig . 4 1 Section of the luggage compar tment : Access to
emerge ncy re lease
Fig . 42 Sect ion of the luggage compartment: Emer
gency release
,.. Tilt the seatback forward.
,.. Move into the t runk.
,.. Take the s crewdriver from the veh icle tool
kit. As an alternat ive, you can a lso use the
vehicle key.
• Put the flat side of the screw driver into the
recess and pry the cover up
o fig. 41 -Arrow-.
• Press the lever in the direction of the arrow
o fig . 42 to unlock the rear lid .
Child safety lock
Power child safety lock for the rear
doors
The power child safety lock t prevents the
rear doors from being opened from the in
side .
Fig . 43 Sect ion fro m driver's door: controls
The rear doors are equipped with a power
child safety lock.
It is operated with the two
safety buttons
III in the dr iver's door o fig. 43.
• Press the left and/or right safety button to
disab le the rear power window(s) and pre
vent the respective rear door from being
opened from the inside. The LED in the but
ton will light up when the child safety lock is
turned
on .
,.. Press the illum inated button again to turn
the child safety featu res
off .
When the c hild safety lock is activated, the in
te rior door opening lever is inoperative; the
doo r can only be opened from th e outside. In
addition, the window reg ulator for that doo r
is also inoperative when the child safety lock
is activa ted.
If the child safety lock has been ac tivated on
one or both sides, the butto ns in the rear for
the Panoramic slid ing su nroof* are disabled .
If the child safety lock has been act ivated on
the left
and on the right side, the rear con
tro ls are locked on veh icles with rear a ir-condi
tion ing *. Dashes" ••• " are show n in t he dis
plays for the rear climate contro ls, and the
rear air-conditioning can on ly be operated
from the climate controls in the cabin
opage 98.
Page 95 of 340
,&_ WARNING
Reduced visibility is dangerous and can
cause accidents.
-
-For safe driving it is very important that
all windows be free of ice, snow and con
densation.
- Completely familiarize yourself with the proper use and function of the heating
and ventilation system and especially
how to defog and defrost the windows.
- Never use the windshield wiper/washer
system in freezing weather until you
have warmed the windshield first, using
the heating and ventilation system. The
washer solution may freeze on the wind
shield and reduce visibility.
(D Note
- If you suspect that the climate control
system has been damaged, switch the
system off to avoid further damages,
and have it inspected by a qualified deal
ership.
Controls
Warm and cold 93
-Repairs to the Audi air conditioner re
quire special technical knowledge and
special tools. Contact an authorized Audi
dealer for assistance.
@ Tips
- Keep the air intake slots (in front of the
windshield) free from ice, snow and de
bris in order to maintain the proper func
tion of the climate control system.
- Air inside the vehicle escapes through air
vents located in the side trim panels be
neath the rear side windows. Make sure
that the outlet slots are not covered by
clothing, etc.
- Climate control works most effectively if
the windows and the Panoramic sliding
sunroof* are closed. However, if the inte
rior of a parked vehicle is extremely hot
from the sun's rays, briefly opening the
windows can speed up the cooling proc
ess.
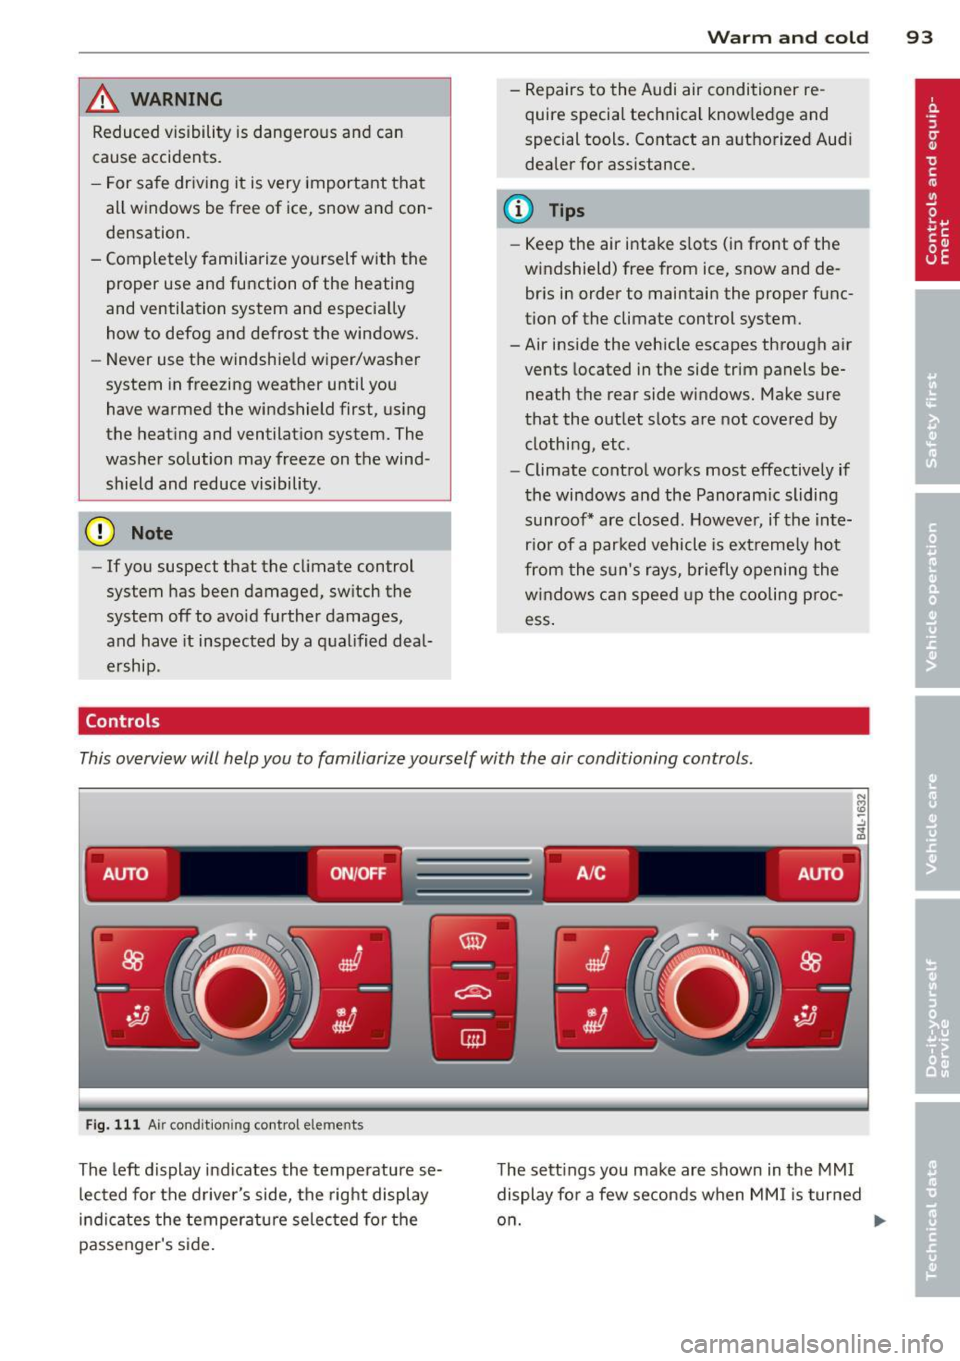
This overview will help you to familiarize yourself with the air conditioning controls.
-------. .- .--. -
AUTO ON/OFF A /C AUTO
;;__,
Fig. 111 Air condit ioning control elements
The left display indicates the temperature se
lected for the driver's side, the right display
indicates the temperature selected for the
passenger's side. The
settings you make are shown in the MMI
display for a few seconds when MMI is turned
on.
Page 100 of 340
98 Warm and cold
@ Tips
If the climate co ntrol syste m is operati ng
in cooling mode, a ir flows primari ly from
the outlets in the center conso le and in the
door pillars. To achieve adequate cooling,
you should never close the outlets com
pletely .
Using climate control economically
Using the climate controls prudently can help
save fuel.
When you use the air cond it ioner , engine pow
er is reduced and fuel consumption increases.
To save fuel, you should use the air condition
e r on ly w hen necessary . Also please note the
following points :
.,. To save fuel, tu rn off coo ling mode by press
ing the
I A/Cl button (indicator lig ht goes
out) .
.,. In add it ion, if you open the w indow o r the
Pano ram ic s liding sunroof* wh ile driving,
t ur n off cooli ng mode by p ress ing the
IA/C l
button (ind icator light goes ou t).
.,. If the vehicle is extremely hot due to the
heat of the s un, briefly open doors and win
dows.
@ For the sake of the environment
By reducing the amount of fue l yo u use,
you also reduce the amount of poll utants
emitted into the air.
Rear Air Conditioning
Rear air conditioning - controls
Applies to veh icles: w ith four -zo ne automatic comfort ai r
condit io ning
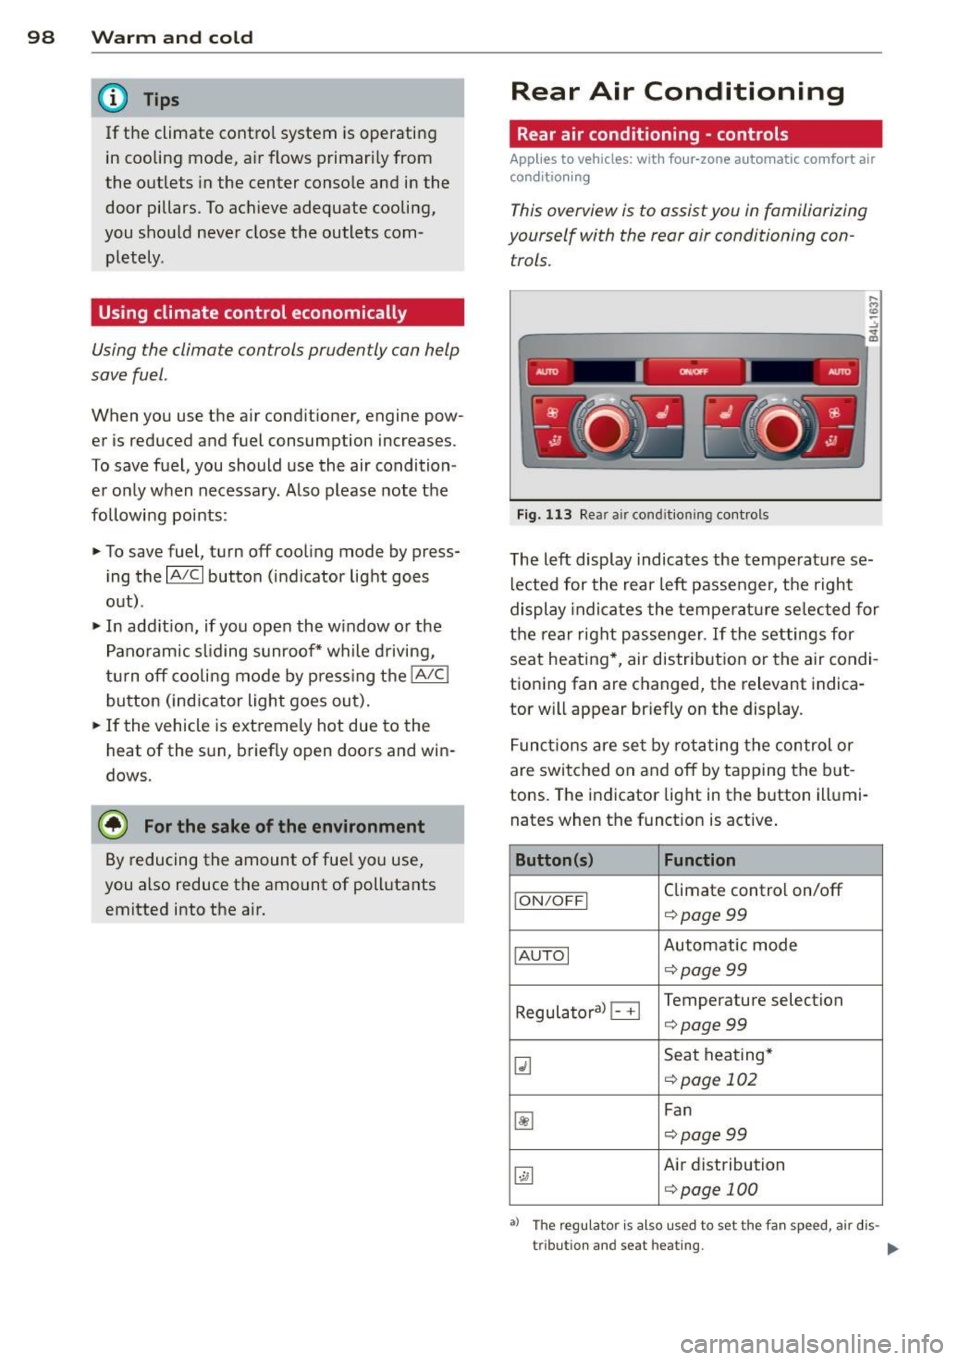
This overview is to assist you in familiarizing
yourself with the rear air conditioning con
trols.
....
"' (0 :;
-------------~ -----~
Fig. 11 3 Rea r air conditioning controls
The left display indicates the temperature se
lected for the rear left passenger, the right
display indicates the tempe ratu re se lected for
the rear r ight passenger . If the settings for
seat heating *, air dis trib ution or the air condi
tioning fan are changed, the relevant indica
tor will appear br iefly on the display .
F unc tions are se t by rota ting the control or
are switched on and off by t apping the b ut
tons. The indicator lig ht in the b utton illumi
nates when the funct ion is active .
Button(s) Function
ION/O FFI Climate control on/off
¢ page99
IAU TOI Automatic mode
¢page99
Regula to ral B Temperature selection
¢page99
~
Seat hea ting*
<=:> page 102
~
Fan
c::> page 99
~
Air distribution
¢page 100
•> The regu lator is also used to set the fan speed , air dis-
tr ibut ion and seat heating.
It,.
Page 101 of 340
Synchronizing rear air conditioning: By
pressing and holding the regulator on the rear
left side, the temperature sett ing of the rear
left side can be switched to the rear right side
and v ice versa. The new temperature is shown
in the display .
Turning on and off~
App lies to vehicles: with four-zone automatic comfort air
cond it ioning
Turning the climate control on
• Press the !ON/OFF I button, or
• Press the
!AU TO I button.
Turning the climate control off
• Press the !ON/O FF I button to switch the cli
mate control off and to block the air supply
from the outside .
The air conditioner turns back on when you
press the
temperature regulator or one of the
buttons.
(D Tips
If the power child safety lock is on, the
rea r air conditioning control element will
not operate . In this case, dashes" ••• " wi ll
appear in the air conditioning control ele
ment disp lay.
Automatic mode in rear~
Applies to vehicles: with four-zone automatic comfort air
conditioning
The automatic mode is the standard setting
for all seasons.
• Se lect temperature between 60 °F (+16 °C)
and
84 °F (+28 °().
• Press the
!AUTO I button.
Automatic operation ensures constant tem
peratu res in the inter ior and dehumidifies the
air inside the vehicle. Ai r temperature, volume
and distribution are controlled automatically
to reach or maintain the desired interior tem
perature as quickly as possible. Fluctuations
in exterior temperature and the effects of
Warm and cold 99
temperature from the position of the sun a re
compensated for automatically .
T his operating mode works on ly in the adjust
able temperature range, from
60 °F (+ 16 °()
to
84 °F ( +28 °C) . If a temperature below 60
°F (+ 16 °C) is se lected, LO appears in the dis
play . At temperatures above
84 °F (+ 28 °(),
HI is displayed . At both extreme sett ings, cli
mate control runs continuously at maximum
cooling or heating power . There is no temper
ature regulat io n.
Setting rear temperature
Applies to vehicles: with four -zone automatic comfort air
conditioning
The temperature can be separately adjusted
for the rear left and right sides.
• Rotate the regulator to the left to reduce
the temperature, or to the right to increase
the temperature .
T he selected temperature appears on the cli
mate control display.
Rear fan~
Applies to vehicles: with four-zon e automatic comfort air
conditioning
The automatically preset fan speed can be re
duced or increased.
• Press the~ button .
• Rotate the regulator to the desired fan
speed .
The climate control system automatically reg
ulates fan speed depending on inter ior tem
perature. You ca n adjust the volume of air pro
duced by the fan to your own requirements .
(D Tips
It is possible that the fan speed may
change automatically. This occurs to en
sure that the desired temperature setting
i s reached as quickly as possible.
Page 102 of 340
100 Warm and cold
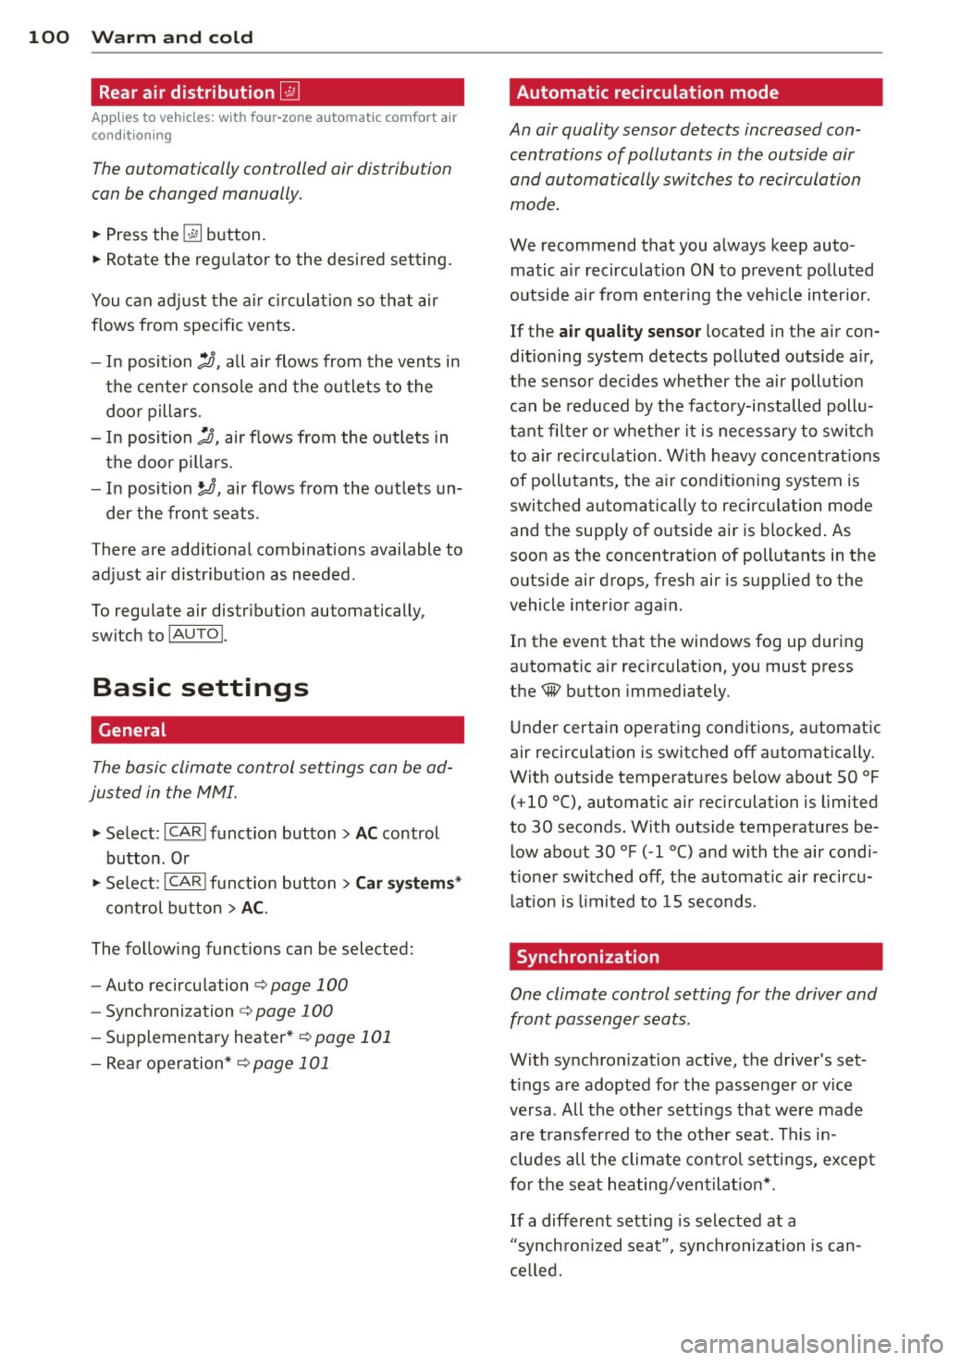
Rear air distribution ~
Applies to vehicles: wit h fou r-zone a utomat ic comfort a ir
co ndit io ning
The automatically controlled air distribution
con be changed manually.
., Press the [a button.
., Rotate the regulator to the desired setting.
You can adjust the air circulation so that air
flows from specific vents.
- In position
:J, all air flows from the vents in
the center console and the outlets to the
door pillars.
- In position
:0, air flows from the outlets in
the door pillars.
- In position~, air flows from the outlets un-
der the front seats.
There are additional combinations available to
adjust air distribution as needed.
To regulate air distribution automatically,
switch to IAUTOI.
Basic settings
General
The basic climate control settings con be ad
justed in the MMI.
., Select : I CAR ! function button > AC control
button . Or
., Select : ICAR !function button>
Car systems*
control button > AC.
The following functions can be selected:
- Auto recirculation
r::;, page 100
-Synchronization r::;, page 100
- Supplementary heater* c;,poge 101
- Rear operation* c;,poge 101
Automatic recirculation mode '
An air quality sensor detects increased con
centrations of pollutants in the outside air
and automatically switches to recirculation
mode .
We recommend that you always keep auto
matic air recirculation ON to prevent polluted
outside air from entering the vehicle interior.
If the
air quality sensor located in the air con
ditioning system detects polluted outside air,
the sensor decides whether the air pollution
can be reduced by the factory-installed pollu
tant filter or whether it is necessary to switch
to air recirculation. With heavy concentrations
of pollutants, the air conditioning system is
switched automatically to recirculation mode
and the supply of outside air is blocked. As
soon as the concentration of pollutants in the
outside air drops, fresh air is supplied to the
vehicle interior again.
In the event that the windows fog up during
automatic air recirculation, you must press
the® button immediately .
Under certain operating conditions, automatic
air recirculation is switched off automatically.
With outside temperatures below about SO °F
(+10 °(), automatic air recirculation is limited
to 30 seconds. With outside temperatures be low about 30 °F
( - 1 °() and with the air condi
tioner switched off, the automatic air recircu lation is limited to 15 seconds.
Synchronization
One climate control setting for the driver and
front passenger seats .
With synchronization active, the driver's set
tings are adopted for the passenger or vice
versa. All the other settings that were made
are transferred to the other seat . This in
cludes all the climate control settings, except
for the seat heating/ventilation* .
If a different setting is selected at a
"synchronized seat ", synchronization is can
celled.
Page 103 of 340
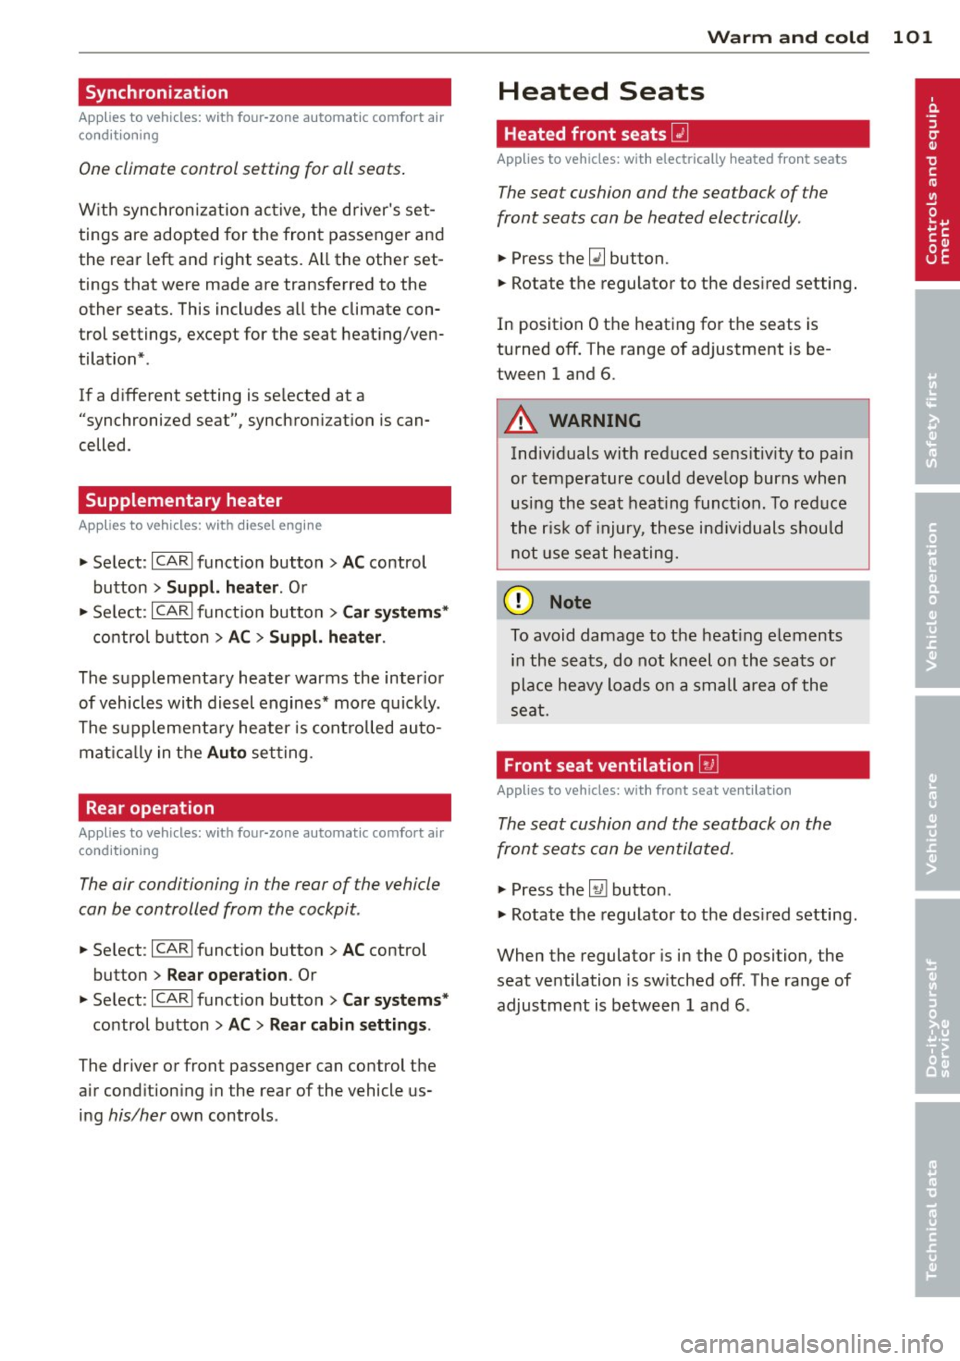
Synchronization
Applies to vehicles: with four-zone automatic comfort air
conditioning
One climate control setting for all seats .
With synchroni zation active, the driver's set
tings are adopted for the front passenger and
the rear left and right seats. All the other set
tings that were made are transfer red to the
other seats. This includes a ll the climate con
t rol settings, except for the seat heat ing/ven
tilation* .
If a different setting is se lected at a
"synchroni zed seat", synchron iz at ion is can
celled .
Supplementary heater
Applies to vehicles: with diesel engine
" Select: I CARI funct ion button > AC control
button >
Suppl. heater. Or
" Se lect :
I C ARI funct ion button > Car system s*
control b utton > AC > S uppl. h eater .
The supplementary heater warms the inter ior
of vehicles with dies el engines* mo re quick ly .
The supplementa ry heater is controlled auto
mat ica lly in the
Aut o setting .
Rear operation
Applies to vehicles: with four-zone automatic comfort air
conditioning
The air conditioning in the rear of the vehicle
con be controlled from the cockpit.
" Se lect : ICAR I funct ion button> AC control
button >
Rea r ope ration . Or
" Select:
I CARI funct ion button > C ar sy st e m s*
control button > AC > Rear cabin setting s.
The driver or front passenger can control the
air cond ition ing in the rear of the vehicle us
i ng
his/her own controls .
Warm and c old 101
Heated Seats
Heated front seats Q]
Applies to vehicles: with electrically heated front seats
The seat cushion and the seotbock of the
front seats con be heated electrically.
" Press the Ill button.
" Rotate the regulator to the des ired setting.
In position O the heat ing for the seats is
turned off. The range of adjustment is be
tween 1 and 6.
A WARNING
Indiv iduals with reduced sens itiv ity to pain
or temperature cou ld deve lop burns when
using the seat heat ing funct ion. To reduce
the r isk of injury, these ind ividuals shou ld
not use seat heating.
(D Note
To avoid damage to the heat ing e lements
i n the seats, do not kneel on the seats or
place heavy loads on a small area of the
seat.
Front seat ventilation [i]
Applies to vehicles: with front seat ventilation
The seat cushion and the seotbock on the
front seats con be ventilated.
" Press the~ button .
" Rotate the regulato r to the des ired setting.
When the regulator is in the O position, the
seat ventilation is sw itched off . The ra nge of
adjustment is between 1 and 6 .
Page 104 of 340
![AUDI Q7 2014 Owner´s Manual 102 Warm and cold
Heated rear seats [i]
Applies to vehicles: with heated rear seats
The seat cushions and seatbacks of the two
outer rear seats can be heated electrically.
Fig. 11 AUDI Q7 2014 Owner´s Manual 102 Warm and cold
Heated rear seats [i]
Applies to vehicles: with heated rear seats
The seat cushions and seatbacks of the two
outer rear seats can be heated electrically.
Fig. 11](/img/6/40279/w960_40279-103.png)
102 Warm and cold
Heated rear seats [i]
Applies to vehicles: with heated rear seats
The seat cushions and seatbacks of the two
outer rear seats can be heated electrically.
Fig. 114 Center console rea r: Heated seats
lo
=" ..,
---- ------- ------,,;g
Fig. 115 Cente r console rea r: Seat heat ing wit h fou r
zone automatic comfort
air cond it io nin g*
Rear seat heating
.. Rotat e the thumb wheel ¢ fig. 114 @to
turn on and adjust the heating for the left
rear seat .
• Rotate the thumb wheel® to turn on and
adjust the heating for the r ight rear seat.
Rear seat heating with four- zone
automatic comfort air conditioning*
.. Press the~ button.¢ fig. 115 .
.. Rotate the regulator to the desired setting .
In position O the heating for the seats is
turned off. The range of adjustment is be
tween 1 and 6.
A WARNING
Individuals with reduced sensitivity to pain
or temperature could develop burns when
using the seat heating function. To reduce
the risk of injury, these individuals should
not use seat heating.
(D Note
To avoid damage to the heating elements
in the seats, do not kneel on the seats or
place heavy loads on a small area of the
seat.
Steering wheel heating~
Applies to vehicles: wit h stee ring wheel heat ing
The steering wheel can be heated electrically.
Fig. 1 16 Stee ring whee l: butto n for steer ing w heel
h e atin g
.. Press the [ii button to turn the steering
wheel heat ing on and off
¢fig. 116 . The
message
Steering wheel heating on ! or
Steering wheel heating off! appears in the
instr umen t cluster disp lay.
A nearly constant temperature is maintained
when the steering wheel heating is switched
on.
T he last setting se lected for the steering
whee l heating (on or off) is automatically
saved when the vehicle is shut off and is as
s igned to the remote key .
Page 249 of 340
Vehicle care and cleaning 247
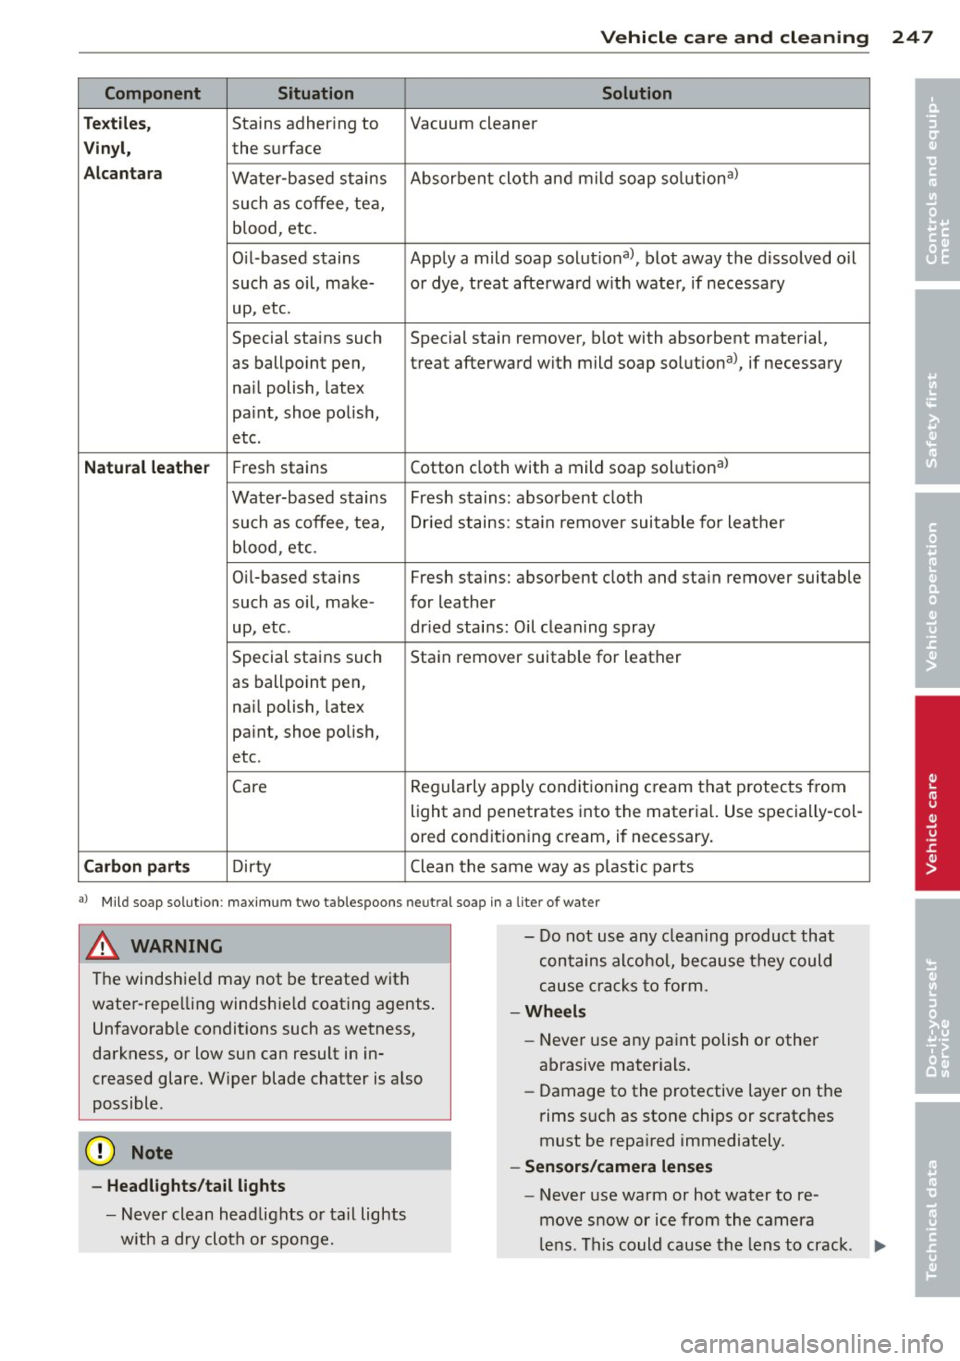
Component Situation Solution
Te xtile s,
Stains adhering to Vacuum cleaner
Vinyl, the surface
Alcantara Water-based stains Absorbent cloth and mild soap
solutional
such as coffee, tea, blood, etc.
Oil-based stains Apply a mild soap solutiona l, blot away the d issolved oil
such as oil, make- or dye, treat afterward w ith water, if necessary
up, etc.
Special stains such Special stain remover, b lot with absorbent material,
as ballpoint pen, treat afterward with mild soap solutiona l, if necessary
na il polish, latex
pa int, shoe polish,
etc.
Natural leather Fresh stains Cotton cloth with a mild soap solutiona l
Water-based stains Fresh sta ins: absorbent cloth
such as coffee, tea, Dried stains: stain remover suitable for leather
blood , etc .
Oil-based stains Fresh stains: absorbent cloth and stain remover suitable
such as oil, make- for leather
up , etc . dried sta ins: Oil cleaning spray
Special stains such Sta in remover suitable for leather
as ballpo int pen,
nai l polish, latex
paint, shoe polish,
etc.
Care Regularly apply conditioning cream that protects from
light and penetrates
into the material. Use specially-col-
ored conditioning cream, if necessary.
Carbon parts Dirty Clean the same way as plastic parts
al Mil d soap so lution: m axim um two ta bles poo ns neu tral soa p in a lite r of water
& WARNING
The windshie ld may not be treated with
water-repelling windshie ld coating agents .
Unfavorab le conditions such as wetness,
darkness, or low sun can result in in
creased glare. W iper blade chatter is also
possible.
- Headlights/tail lights
- Never clean headlights or tail lights
w ith a dry cloth or sponge. -
Do not use any cleaning product that
contains alcohol, because they could
cause cracks to form.
-Wheels
-Never use any paint polish or other
abrasive mater ials.
- Damage to the protective layer on the
rims such as stone chips or scratches
must be repaired immediately .
-Sensors/camera lenses
- Never use warm or hot water to re-
move snow or ice from the camera
len s. This could cause the lens to crack .
IJII>
•
•
Page 306 of 340
304 Fuses and bulbs
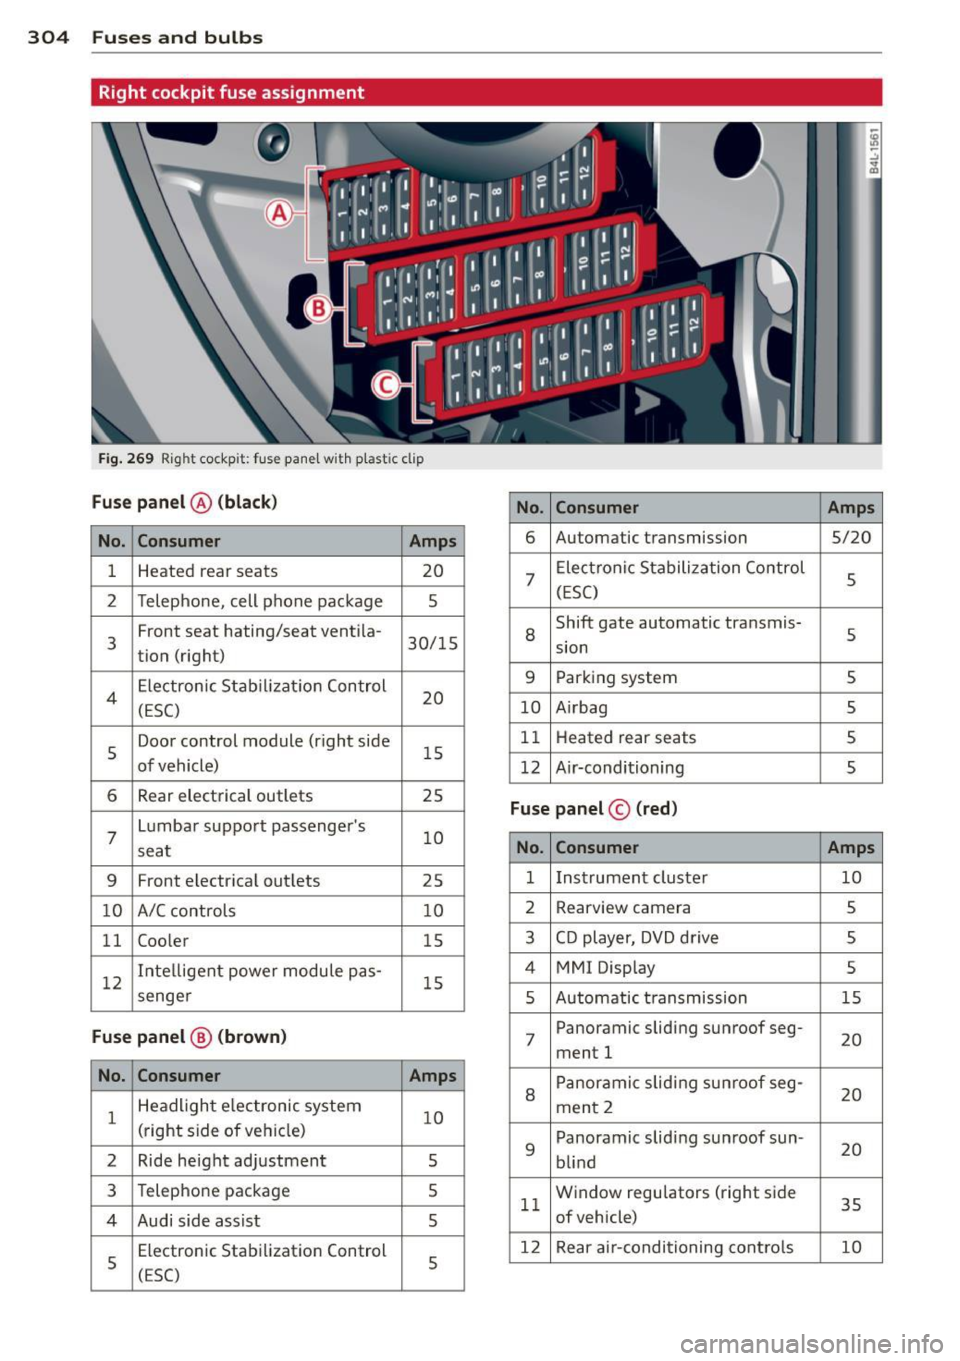
Right cockpit fuse assignment
Fig. 269 Right cockpit: fuse pane l w ith plastic clip
Fuse panel @ (black)
No. Consumer Amps
No. Consumer Amps 6
Automatic transmission
5/20
1 Heated rear seats
20
2 Telephone, cell phone package 5
7
Electronic Stabilization Control
5
(ESC)
3 Front seat
hating/seat ventila-
30/15
tion (right) 8
Shift gate automatic transmis-
s sion
4 Electronic
Stabil iz at ion Control
20
(ESC) 9 Parking system s
10 A
irbag 5
5 Door control module (right side
15
of vehicle) 11
Heat ed rear seats 5
12 A ir-conditioning
5
6 Rear electrical outlets 25
7
Lumbar support passenger's
10
seat
Fuse panel © (red)
No. Consumer Amps
9
Front electrica l outlets
25 1
Instrument cluster 10
10 A/C controls 10 2
Rearvi ew camera 5
11 Coo
ler
15 3 CD player, DVD drive
5
12 Inte
lligent powe r module pas-
15
4 MMI Display 5
senge r 5 Automatic t ransmission 15
Fuse panel@ (brown ) 7 Panoramic
sliding sunroof seg-
ment 1 20
No.
Consumer Amps
1 Headlight e
lectronic system
10
(right side of veh icle)
2 Ride height adjustment 5
8
Panoramic sliding sunroof seg-
20
ment 2
9 Panoramic
sliding sunroof sun-
20
blind
3 Telephone package 5
4 Audi side assist
5 11
W
indow regulators (right side
35
of vehicle)
s
Electronic Stabilization Control
(ESC) 5 12
Rear air-conditioning controls 10