engine AUDI Q7 2018 Owner´s Manual
[x] Cancel search | Manufacturer: AUDI, Model Year: 2018, Model line: Q7, Model: AUDI Q7 2018Pages: 398, PDF Size: 185.58 MB
Page 90 of 398
Drivin g
~ To prevent the vehicle from rolling when you
start driving, set the parking brake when stop
ping on steep hills¢
/A.
~ The parking brake will release automatically
and your vehicle will begin to move when the
doors are closed, the driver's safety belt is fas
tened, and you accelerate as usual.
Stopp ing /p a rki ng
If the selector lever is not in the "P" position
when you open the dr iver's door, the veh icle
could roll.
~ Press and hold the brake pedal¢ /A.
~ Set the parking brake.
~ To select the "P" selector lever pos it ion, press
the "P" button @on the selector lever
¢ page 86, fig . 85 .
Under certain condit ions, such as driving in the
mounta ins or when towing a trailer, it may be
helpful to switch to manual mode temporarily
and sh ift
manually to adapt to the driving condi
tions
¢ page 89.
On hills, set the parking brake first and then s hift
into the "P" position¢
page 81. This prevents too
much stress from being placed on the locking
mechanism .
.8, WARNING
- The veh icle can roll eve n when the engine is
swit ched off.
- Unintended ve hicle movement can lead to
serious injur ies.
- T o reduce the risk of an acc ident, do not
press the acce le rato r pedal whe n cha ng ing
the se lecto r lever posit ion while the ve hicle
is s ta tionary and the eng ine is ru nning.
- T o reduce the risk of an ac cident, never se
lect the "R" or "P" positions while dr iv ing .
- Do not inadvertent ly press the acce le rato r
peda l w hen the veh icle is sta tionary. Othe r
wise the risk of an acc ident in cr eases be
ca use the vehicle will start to move immed i
ate ly, even if the parking brake is set .
88
Hill descent control
The hill descent control system assists the driver
when driving down hills .
Hill descent control activates when the transm is
s ion is in the "D" or "S" pos ition and you press the
brake pedal. The transmission automat ically se
lects a gear that is suitable for the hill. Hill de
sce nt cont rol tr ies to maintain the speed ach
i eved at the t ime of braking, w it hi n phys ical and
tec hnical lim itations . If may still be necessary to
adjust the speed wit h the brake peda l.
Hill descent cont rol sw itches off once the h ill lev
els out or you press the accelerator pedal.
When operating the cru ise control system*
¢
page 95 , hill descent control is also activated
whe n the speed is set.
.8, WARNING
Hill desce nt co ntro l cannot ove rcome physical
lim itat ions, so it may not be ab le to m ainta in
a constant speed under all conditions. A lways
be ready to app ly the brakes.
Page 91 of 398
a co ...... N r--. N ...... 0
0
:E '
The tiptronic mode allows the driver to shift the
gears manually .
Fig. 86 Center console : sh ifti ng manually with the selector
l ever
Fig. 87 Steeri ng wheel: shifti ng manual ly
Shifting with th e selector leve r
You can shift into tiptronic mode while stationary
and while driv ing.
• To shift into tiptronic mode, push the selector
lever from the "D/S" position to the right . As
soon as the transmission switches over, the "M"
transm iss ion sett ing will appear i n the instru
ment cluster d isplay.
• To sh ift up a gear, tap the se lector lever for
ward
0 ~ fig. 86.
• To shift down a gear, tap the selector lever back
0 -
• To switch tiptron ic mode off, push the selector
lever back into the "D/S" pos ition.
Shifting with th e s hift paddle s
You can operate the shift padd les in the "D/S" or
" M " se lector lever positions.
• To s hift up a gear, tap the sh ift paddle
0
~ fig. 87 .
• To s hift down a gear, tap the 0 shift paddle.
D rivi ng
• To engage the lowest gear, hold the 0 shift
paddle.
• If you do not press a shift button within a short
time while in the "D/S" position, the transmis
sion will return to automatic mode. To keep
shifting using the shift paddles, move these
lector lever to the right out of the "D/S" posi
tion .
• When you want to shift out of tiptronic mode ,
press and hold the
0 shift padd le for a longer
period of time or move the selector lever back
and release it.
T he transmission automatically shifts up or down
before cr itica l engine speed is reached .
T he transmission on ly allows manua l shifting
when the eng ine speed is w ith in the perm itted
range.
(D Tips
- If you shift to the next lowest gear, the
transmission will only shif t if the engine will
not be over-revved.
- With kick-down, the transmission shifts to a
lower gear, depending on vehicle speed and
eng ine speed .
- tiptronic does not work if the transmission
is runn ing in emergency mode .
Kick-down
Kick-down enables maximum acceleration .
When you press the accelerator pedal down be
yond the resista nce point, the automatic trans
mission downsh ifts into a lower gear and the en
gine ut il iz es its full power, depending on vehicle
speed and eng ine RPM.
It sh ifts up into the next
highe r gear once the maximum specified eng ine
RPM is reached .
A WARNING ~
Please note that the whee ls cou ld spin on
slick or slippery roads when kick-down is ac
tive.
89
Page 92 of 398
Driving Transmission malfunction
• Transmi ssion: malfunction! Please stop ve
hicle and shift to P
Do not cont inue d rivi ng. Selec t the "P" selector
lever position and co ntact an authorized Au di
de aler or auth o riz e d Aud i Serv ice Facili ty fo r as
si st ance.
[O] Selector lever: malfunction! You can contin
ue driving . Please contact Service
There is a system malfunct io n in the t ransm is
sion . Drive to an author ized A udi dealer or au
thor ized A udi Se rvice Fac il ity immed iate ly to have
t he ma lfunction co rrecte d.
[O] P button: malfunction! Auto P when engine
off . Please contact Service
There is a malfunction in the "P " button on t he
selecto r leve r. The transmission a utomat ically
e ngages "P" when you switch off the eng ine.
Dr ive to an a utho rized Aud i dea le r or a uthorized
Aud i Serv ice Facility immedia tely to have t he
malfunc tion corrected.
[O] Selector lever: malfunction! Gear change on
ly possible using both paddle levers. Please con
tact Service
There is a system malfunct io n in the t ransm is
sion. You can conti nue d riving w ith rest ricted
f un ction . The selecto r leve r is not working . Gears
can only be se lec ted by tapping bo th sh ift pad
d les a t the sam e time w hen t he v ehicl e is station
a ry ~
page 8 9, fig . 87. Pa y a tten tio n t o th ese
lec ted t rans mi ssion positio n in t he ins tru ment
cluste r display. The par king lock eng ages au to
mat ica lly w hen you t urn off the engine . Drive to
an author ized A udi dealer or authorized A udi
Serv ice Facility immediately to have the mal func
tion cor rected.
[O] Transmission: Please press brake pedal and
select gear again
Pr es s t he bra ke peda l and se lec t the des ired se
lec to r l eve r pos it io n ag ain. Y ou ca n then con tinue
d riving .
[O] Transmis sion: too hot. Please adapt driving
style
90
T he transmission tem peratu re has inc reased sig
nificantly . Drive very cautio usly o r ta ke a break
from driving until the temperature ret urns to t he
no rma l range and t he indicato r light turns off.
[O] Transmission: malfunction! You can contin
ue driving. See owner's manual
T he re is a s ystem malfunc tion in the tran smi s
s io n. You m ay con tinu e dr ivin g. Drive to an au
t h ori ze d Aud i dea le r o r a uthorized Audi Se rvice
Fac ility soon to have the malf unct io n correcte d.
[il Transmission : malfunction! You can contin
ue driving in D until engine is off
There is a syst em malfunc tion in th e transmis
s io n. The trans missio n is swi tching to eme rge ncy
mo de.
If yo u tu rn th e e ngine off, you w ill not be
a ble to se le ct any o the r se le ct or lever posi tio ns
a ft er sta rting t he engine aga in . D rive to an a u
t h orized Audi dea le r or a uthorized Audi Se rvice
Facility immed iate ly to have the ma lfunction cor
r ected .
[O] Transmission: malfunction! You can contin
ue driving with limited function. Please contact
Service
T he re is a sys tem m alf unc tion in the tran smis
s io n. The transmission is switc hing to eme rgency
mode. This mode only s hifts into ce rtain gears or
will no longer shift at a ll. The eng ine may sta ll.
D rive to an author ized A udi dealer or autho rized
Audi Se rvice Facility immed iate ly to have the
malfunction corrected .
[O] Transmission: malfunction! You can contin
ue driving w ith limited function. No reverse
gear
There is a system malfunction in the tra nsmis
s io n. The transmission is switc hing to eme rge ncy
mode. Th is mode only s hifts int o ce rtain gears or
will no longer sh ift at a ll. The eng ine may sta ll.
Yo u cannot engage the reve rse gear. Dr ive to a n
a uth orize d Aud i dea le r o r auth orized Aud i Serv ice
Fac il ity i mmed iat ely to hav e the ma lfunction cor
r ec ted .
[O] Danger of rolling away! P not possible.
Please apply parking brake
Page 93 of 398

-The parking lock was released using the emer
gency release
¢ page 91. Or
- The parking lock can no longer be engaged.
Drive to an authorized Audi dealer or author
ized Audi Service Facility immediately to have
the malfunction corrected .
[il Move selector lever to automatic position
There is a malfunction in the tiptronic mode . End
tiptron ic mode by pushing the selector lever to
the left into the "D/S" position.
Parking lock emergency release
The parking lock must be released with the
emergency release when driving through moun tains/maneuvering.
Fig. 88 Drive r's side footwell : releas ing th e parking lock
us ing the eme rgency re lease
The emergency release is located under the floor
mat on the driver 's side .
Releasing the parking lock using the
emergency release
"'To prevent the vehicle from rolling unintent ion
ally, set the parking brake(®)¢
page Bl or
press the brake pedal.
"' There are two slits on the cover. Position the
screwdriver from the vehicle tool kit in one of
the slits on the cover and pry the cover off.
"' Insert the socket wrench (from the vehicle tool
k it) into the opening
c:> fig . 88.
"'T urn the socket wrench all the way clockw ise @
and press it downward @unti l it locks into
place.
~ "'L eave the socket wrench inserted c:> .&_ . ...... N r--.
~ Resetting the parking lock
0
0
~ "'Press the brake pedal and start the engine .
Driving
"' Keep the brake pedal pressed and engage the
following selector lever positions one after the
other: "N" , "D" and back to "N".
"' Turn the engine off again.
"' Grasp the socket wrench with both hands and
pull it up and out carefully to remove
c:>(D .
"'Install the cover .
When the parking lock emergency release is
used, the
[il indicator light and the "N " selector
lever posit ion turn on in the instrument cluster.
The message
Danger of rolling away! P not pos
sible. Please apply parking brake
also appears.
_& WARNING
-Only activate the emergency release while
on a level surface or a slight slope.
- The parking lock may only be released using
the eme rgency release if the parking brake
is set . If it is not functioning, secure the ve
hicle from rolling using the brake pedal or
other suitable means, such as blocking a
front and a rear wheel. An unsecured vehicle
may roll away, which increases the risk of an
accident.
- To reduce the r isk of an accident, you must
not drive when the emergency release is ac
tivated .
@ Note
-Read and follow the important instructions
about tow ing
<=> page 371.
-The risk of damage increases if you do not
remove the socket wrench carefully when
resetting the parking lock.
91
Page 94 of 398

Trail er to wing
Trailer towing
Driving with a trailer
General information
Your veh icle is primari ly intended for transport
ing peop le and luggage. Howeve r, if you dr ive
with a tra iler , follow the techn ica l requirements ,
the operation and driving tips, and the lega l reg
ulations.
Dr iving w ith a trailer affects the vehicle 's fuel
consumpt ion, performance and wear. It a lso re
quires higher concentration from the driver .
A WARNING
Do not transport any people in a trailer due to
the risk of fatal injury .
Technical requirements
Certain requirements must be met when towing
a trailer.
Trailer hitch
Only use a trailer hitch with a removab le ball
h itch mount and ball h itch. The tra ile r hitc h must
be pe rm it t ed for the vehicle, the tra iler and the
permitted tota l weight of the trailer being
pu lled . Above all, it must be secure ly and safe ly
attached to the vehicle trailer.
Never mo unt a t rai ler hitch on the bumper. The
trai ler hitc h must be mounted in a way that does
not impair the function of the bumper. Do not
make any changes to the exhaust system and the
brake system.
Check regu larly if the trai ler hitc h is securely
mounted . A lways follow the instructions given by
the trai ler hitch manufacturer .
Trailer brakes
If t he tra ile r has its own bra ke system, then fol
low the manufacturer specifica tions. Howeve r,
the brake system on the trai ler must never be
connected to the vehicle brake system.
92
Engine cooling system
D riving w ith a tra ile r means a higher load on t he
engine and the cooling sys tem. The coo ling sys
tem must be designed for additiona l load and
contain enoug h coo lant ~@ .
A WARNING -
- Never mount a "weight -distributing" or
"load-balancing" trailer coupler as the trail
er hitch. The ve hicle was not des igned for
these types of tra iler h itches. The tra iler
h itch can malfunction and t he tra ile r can
b reak off from the vehicle.
- If t he tra ile r i s equ ipped w ith elect ronic
brakes, these brakes can not be activated by
a facto ry-installed control system, whi ch in
creases the r isk of an accide nt.
- To red uce the r is k of injury, always remove
the ball hitch mount if no tra ile r is mo unt
ed.
@ Note
L onge r incl ines cannot be dr iven without a
su itab le cooli ng system, especially if the out
s ide temperatu res a re high. ot herwise, this
i nc reases the risk of eng ine da mage.
Operating instructions
Several things must be noted when towing a
trailer.
Towing capacity
The permitted towing capacity must not be ex
ceeded under any circumstances~
page 376.
You can dr ive up larger inclines if you are not us
i ng the maximum towing capacity.
The towing capacities given only apply to e leva
tions up to 3,200 ft (1,000 m) above sea level. As
the e levation increases, the engine power de
creases due to the decreasing air pressures. T his
reduces the hill climb ing ability and towing ca
pac ity . For every additional 3,200
ft (1,000 m),
t h e maximum permitted tow ing weight must be
r educed by app roximately 10% . T he pe rm itted
tow ing weight is t he comb ined we igh t of the
( loaded) vehicle and the (loaded) trailer .
Page 96 of 398
Trail er to wing
If you have to drive th rough diffic ult road condi
tions, you can raise the vehicle again after hitch
ing the trai ler or after adjust ing the tongue
weight .
{QJ Note
Applies to: vehicles with air suspension
-Changes in temperature or load can affect
the he ight of the vehicle.
- Set the a ir suspension to the standard vehi
cle heig ht, otherwise the applicab le tongue
weig ht no longer applies to your vehicle .
(D Tips
-Use chocks when parking on incl ines if the
trailer is loaded.
- We recommend also having the vehicle in spected between the inspection intervals if
you are towing a trai ler frequently.
- Avo id driving wit h a trailer du ring the vehi
cle break-i n period .
Driving with a trailer
Driving with a trailer requires extra caution.
Speed
Adhere to the legal speed l imi ts. Follow t he lega l
regulations specif ic to the country.
As the speed inc reases, the d riving stability of
the t railer dec reases . The refore you sho uld not
exceed t he max imum legal speed limit when
there are unfavorable road, weather and/or wind
conditions. This especially applies when driving
downhill.
You must a lways reduce yo ur speed as soon as
you not ice even the s lightest swinging motion of
the trailer . Never try to "straighten out" the trail
er by accelerating.
The weig ht dis trib ution is very poo r if t he ve hicle
is empty and the trailer is loaded. However if you
must drive under these circumstances, t hen drive
especia lly slowly.
94
Brak es
Brake in a time ly manner. Downs hift be fo re dr iv
i ng down hill so that the engine can assist with
braking ~&, .
When using a t railer w it h over run bra kes, fi rst
brake ge ntly t hen q uickl y. This red uces the r isk o f
jerking while braking if the trailer wheels lock up .
Engine coolant temperatur e
Pay attention specifically to the coolant tempera
ture display when there a re high outs ide temper
at ures , and whe n driving on long i nclines
~ page 11. Shift to a highe r gear in a t imely man
ner .
A WARNING
Constant braking causes the b rakes to over
h eat and substantially reduces bra king per
formance, increases b raking distance o r caus
es complete failure of the brake system.
-
Page 97 of 398
a co ...... N r--. N ...... 0
0
:E '
Description
App lies to: vehicles with speed warning system
The speed warning system helps you to stay be
low a specified maximum speed that can be set,
changed or deleted in the Infotainment system .
The speed warning system warns you if you are
exceeding the maximum speed that you have set .
A warning tone will sound as soon as your speed
exceeds the stored value slightly . The indicator
l ight also turns on in the instr ument cluster d is
p lav
[0] (USA models)/ [81 (Ca nada models) and
a message. The indica tor l igh t
[0]/ [OJ and the
message turn off if the speed fa lls back be low
the stored maximum speed.
Sett ing a threshold is recommended if you would
like to be reminded when yo u reach a certa in
maximum speed . Situations where you may want
to do so include driving in a country with a gener
al speed lim it or if there is a specified maximum
speed for winter tires.
Setting the warning threshold
Select in the I nfotai nment system:
IMENU I but
ton
> Ve hicle > le ft control button > Dri ver a ss is
tance
> Speed warning > Manual.
@ Tips
Regard less of the speed warning system, you
should always monitor yo ur speed using the
speedomete r and make sure you are following
the legal speed limit.
A ssi st a nce systems
Cruise control system
Switching on
Applies to: vehicles with cruise control system
The cruise con trol system makes it possible to
drive at a constant speed starting at 15 mph
(20 km/h) .
0
f
~
0
Fig. 89 Op era ting leve r: cru ise co ntrol sys te m
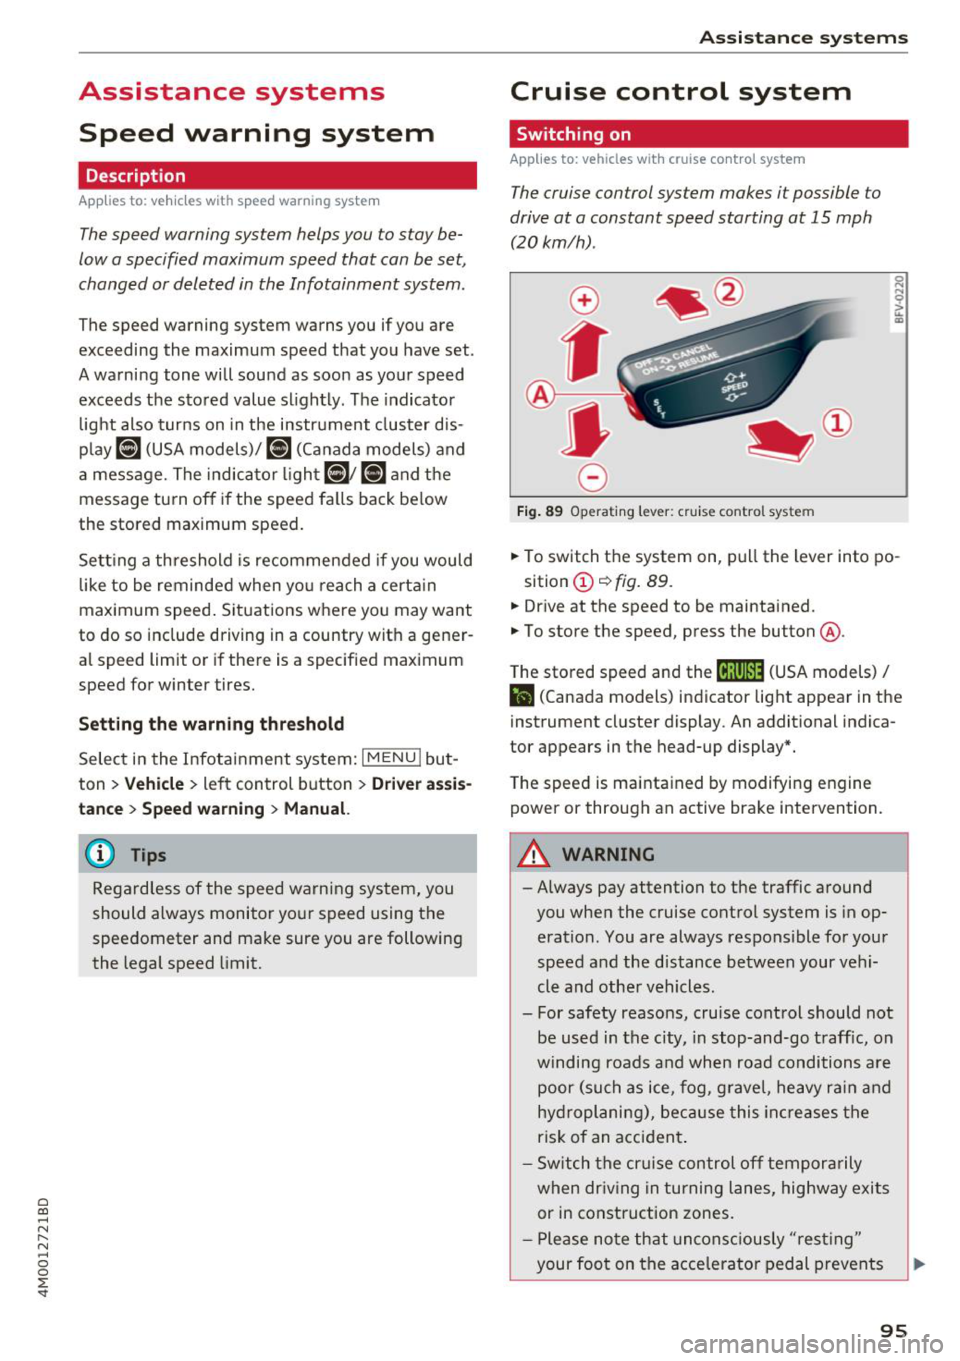
.,. To switch t he system on, pull the lever into po-
sition
(D ¢ fig. 89 .
.,. Drive at the speed to be maintained.
.,. To store the speed, press the button @.
T he stored speed and the
@jltJ~i, (USA models) /
l'I (Canada models) ind icator lig ht appear in the
instrument cluster display . An additional indica
tor appears in the head-up display*.
T he speed is mainta ined by modifyi ng engine
power or through an active brake intervention.
A WARNING
- Always pay attention to the traffic a round
you when the cruise control system is in op
eration . You are always responsible for you r
speed and the distance be tween your ve hi
cle and othe r vehicles .
- For safety reasons, cru ise cont rol should not
be used in the city, in stop -and-go t raff ic, on
winding roads a nd when road conditions a re
poor (su ch as ice, fog, g rave l, heavy ra in and
hy droplani ng), bec ause this in cr eases the
risk of an acciden t.
- S witch the cr uise con trol off tempor arily
when dr iv in g in turning lanes, highway exits
or in construction zones.
- P lease no te th at uncon sc iously "resting "
your foot on the accelerator ped al prevents
95
Page 130 of 398
Ass is tance sy stem s
Switching on/off
Applies to: vehicles with night vision assist
F ig. 125 Are a aro und th e light sw itc h: night vis ion assist
butto n
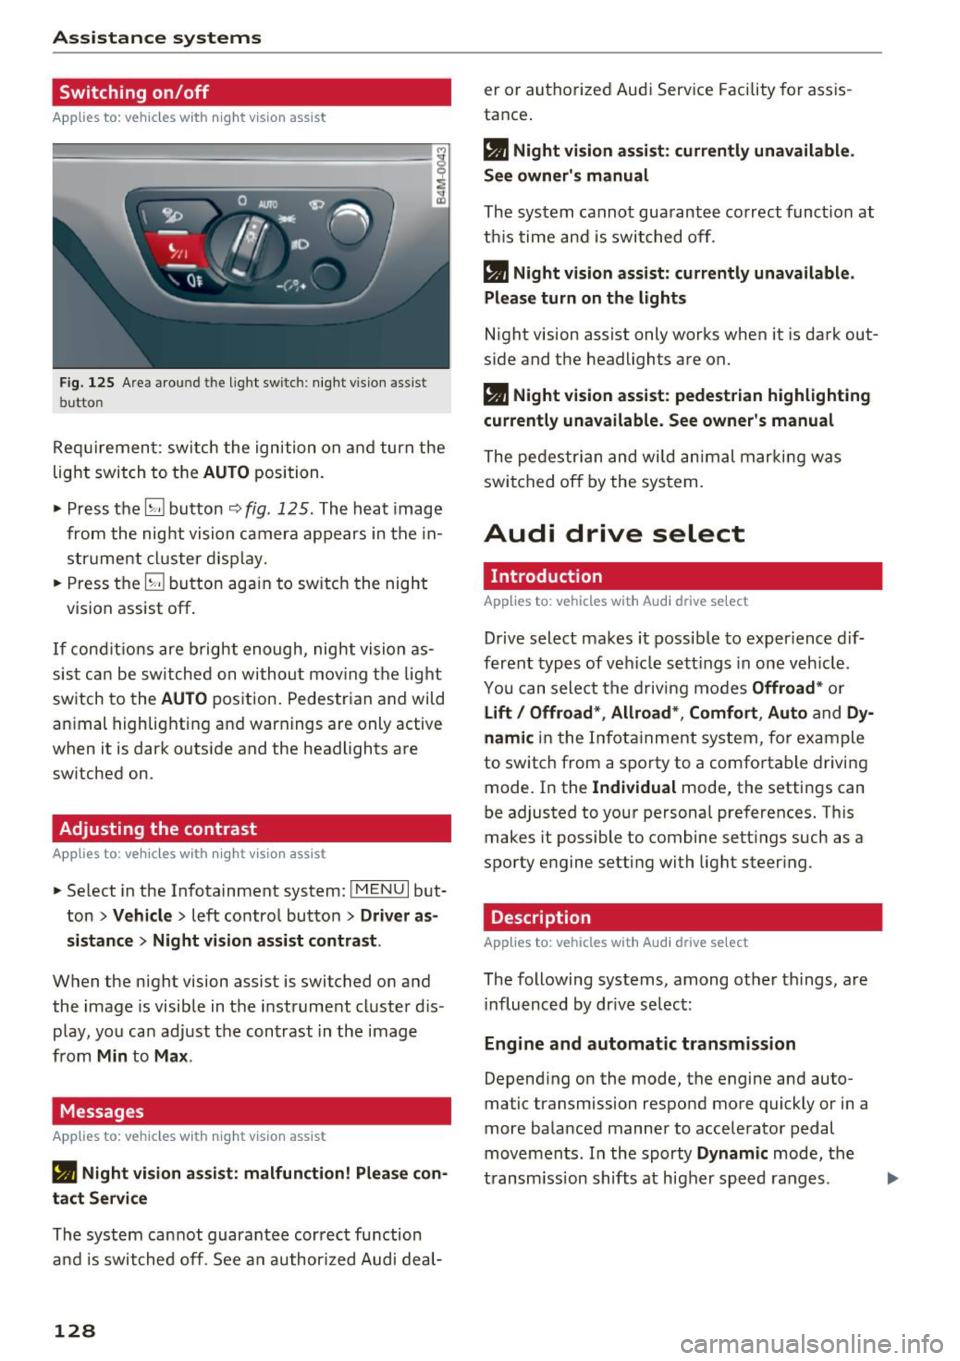
Requiremen t: sw itch the ignition on and turn the
light switch to the
AUTO position.
.. Press the~ button ~
fig. 125 . The heat image
from the nig ht vision camera appears in the in
str ument cluster d isplay.
.. Press the~ button again to switch the night
vision assist off .
If condit ions are b right enough, night vision as
sis t can be sw itched on withou t mov ing the light
switch to the
AUTO position. Pedestrian and wild
an imal highlighting and warnings are only active
when it is dark outside and the headlights are
sw itched on .
Adjusting the contrast
Applies to: vehicles with night vision assist
.. Select in the Infotainment system: IM ENU I but
ton
> Vehicl e > left control button > Driver a s
si stance
> Nig ht vis ion as sist contra st .
When the night vision assist is switched on and
the image is visible in the instrument cluster d is
p lay , you can adjust the contrast in the image
from
Min to Ma x.
Messages
App lies to: vehicles with night vision assist
• Night vi sion a ssist : malfunction! Plea se con
tact Ser vic e
The system cannot guarantee correct function
and is switched off. See a n author ized Audi deal-
128
er or authori zed Aud i Service Facility fo r assis
tance .
a Night vi sio n assi st: c urrently unav ail able .
See owner's manual
The system cannot guarantee correct funct ion at
th is time and is switched off .
a Night vision ass ist: currently un av ailabl e.
Plea se turn on the lights
Night vision assist only works when it is dark out
side and the headlights are on.
a Night vision ass ist: pedestr ian h ighlighting
curr ent ly unavailable. See owne r's manual
The pedestrian and wi ld animal marki ng was
switched off by the system .
Audi drive select
Introduction
App lies to: vehicles with Aud i drive se lect
Drive select makes it possible to exper ience dif
ferent types of vehicle sett ings in one veh icle .
You can select the d riving modes
Offroad * or
Lift / Offroad *, Allroad *, Comfort , Auto and Dy
namic
in the Infota inment system, for example
to switch from a sporty to a comfo rtable driving
mode. In the
I ndividual mode, the settings can
be adjusted to your personal preferences. This
makes it possible to combine sett ings such as a
sporty engine setting with light steer ing .
Description
Applies to: vehicles with Audi drive select
The following systems, among other th ings, are
i nfluenced by dr ive se lec t:
Engine and automatic tran smis sion
Depend ing on the mode, the engine and auto
matic transmission respond more quickly or in a
more balanced manner to accelerator pedal
movements . In the sporty
Dynam ic mode, the
transm iss ion shifts at higher speed ranges .
Page 131 of 398
a co ...... N r--. N ...... 0
0
:E '
The air suspension* is an electronically-control
l ed air suspension and damping sys tem . The ad
justment depends on the driving mode selected, steering movements, the driver's braking and ac
celerat ion, and as the road surface, vehicle speed
and load. The veh icle ground clearance depends
on the mode selected and the speed.
The ground clearance increases s ignificantly
when the vehicle is in the
All road mode . At
speeds from approximate ly 50 mph (80 km/h) to
75 mph (120 km/h), the ground clearance re
duces in stages . When the speed decreases, the
g round clea rance increases again a utomat ically.
The ground clearance is the lowest in
Dynamic
mode.
Steering
The power steering adapts. Ind irect steer ing that
moves easily as in
Comfort mode is especia lly
suited to long drives on highways. The
Dynam ic
mode provides sporty, direct steering.
All-wheel steer ing*
All-wheel steer ing increases dr iving comfort by
providing add it ional steering ability at the rear
axle. Steer ing in the opposite d irection at low
speeds dec reases the turning rad ius. Steering in
the same d irect io n a t high speeds imp roves the
r e sponse t ime whi le increas ing dr iv ing stab ility at
the same time .
Sport differential*
As a componen t of the all wheel d rive system
(quattro)
~ page 146, the sport diffe rential dis
tr ib utes the dr iv ing power to the rear ax le de
pending on the situa tion. The dis tribution of
power var ies dependi ng on the selected mode
from moderate
(Comfort ) to sporty (Dynamic ).
The goa l is a high level of agility and ability to ac
celerate on curves . The veh icle is very responsive
to steer ing.
Adaptive cruise control (ACC)*
The behavior when accelerating can be adjusted
from comfortab le to sporty, depending on the
drive select mode . Adaptive cru ise control a lso
A ssi st a nce systems
responds to the driv ing behavior of the vehicle
ahead in a more conservative or sporty manner.
Engine sound*
T he eng ine sound adap ts to the c urren t mode
and can be subtle to sporty .
(D Note
Applies to: vehicles with air suspensio n
-Make sure there is enough clearance above
and below the vehicle when pa rk ing. The
height of the ve hicle (gro und clea rance) can
change once it is par ked due to temperature
fluctuations, changes to the load conditions
and changes to the dr iving modes.
- When transporting the vehicle on a car car
r ier, train, ship or by other means, o nly tie
the vehicle down at the runn ing s urface of
the ti res, which is the outer c ircumference.
Sec uring the vehicle at the axle compo
ne nts , sus pension str uts o r towing eyes is
no t pe rm itted because the pres sure in the
air suspens ion s truts ca n change d uring
tr anspo rt . The ve hicle may not be secu red
sufficiently if this ha ppens.
(D Tips
The "S" se lector lever posi tion automatic ally
engages w hen the
Dynamic mode is selected.
Selecting the driving mode
Applies to: vehicles wi th Aud i drive select
~- ------ -
~
Fig. 1 26 Ce nter console: co ntro ls for d rive select
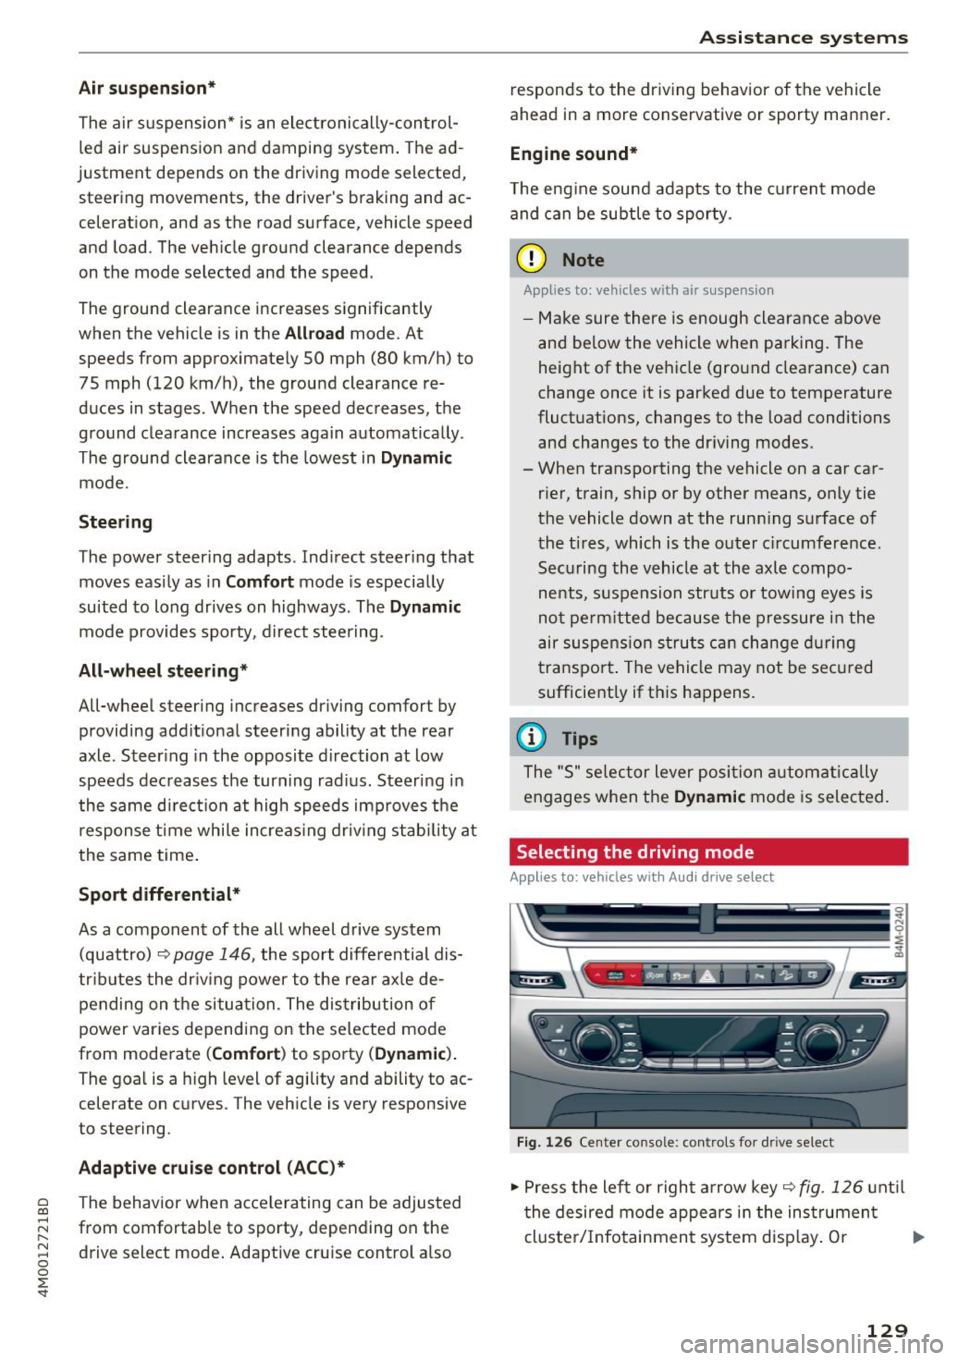
.,,. Press the le ft or righ t arrow key~ fig. 126 unt il
t he desired mode appe ars in the ins trumen t
cluste r/ Infotainmen t system disp lay. O r ..,,.
129
Page 132 of 398
Assistance systems
~ Select in the Infotainment system: IMENUI but-
ton
> Vehicle > Audi drive select.
~ Select and confirm the desired setting .
You can change the driving mode when the vehi
cle is stationary or whi le driving. If traffic per
mits, after changing modes, briefly take your
foot off the accelerator pedal so that the recent ly
selected mode is a lso activated for the engine.
Offroad * or Lift/ Offroad* -activates offroad
functions to support driving on rough terrain .
The engine, transmission and steering adjust and
the Start/Stop system* switches off. Applies to
air suspension*: the vehicle also lifts for passing
over obstacles to maintain maximum ground
clearance.
Adjusting the Individual mode
A pp lies to: ve hicles w ith Audi drive select
Allroad * -on ly for air suspension*: the vehicle
li fts to maintain higher ground clearance for dif
ficult stretches of road .
Comfort -provides a comfort-oriented vehicle
setup and is suited fo r long drives on highways.
Auto -provides an overa ll comfortable yet dy
namic driv in g feel and is suited for everyday use.
Dynamic -gives the driver a sporty driving feel
and is suited to a spo rty driving style.
Individual -c::;,page 130.
A WARNING
Pay attention to traffic when operating the
drive select to reduce the risk of an accident .
-
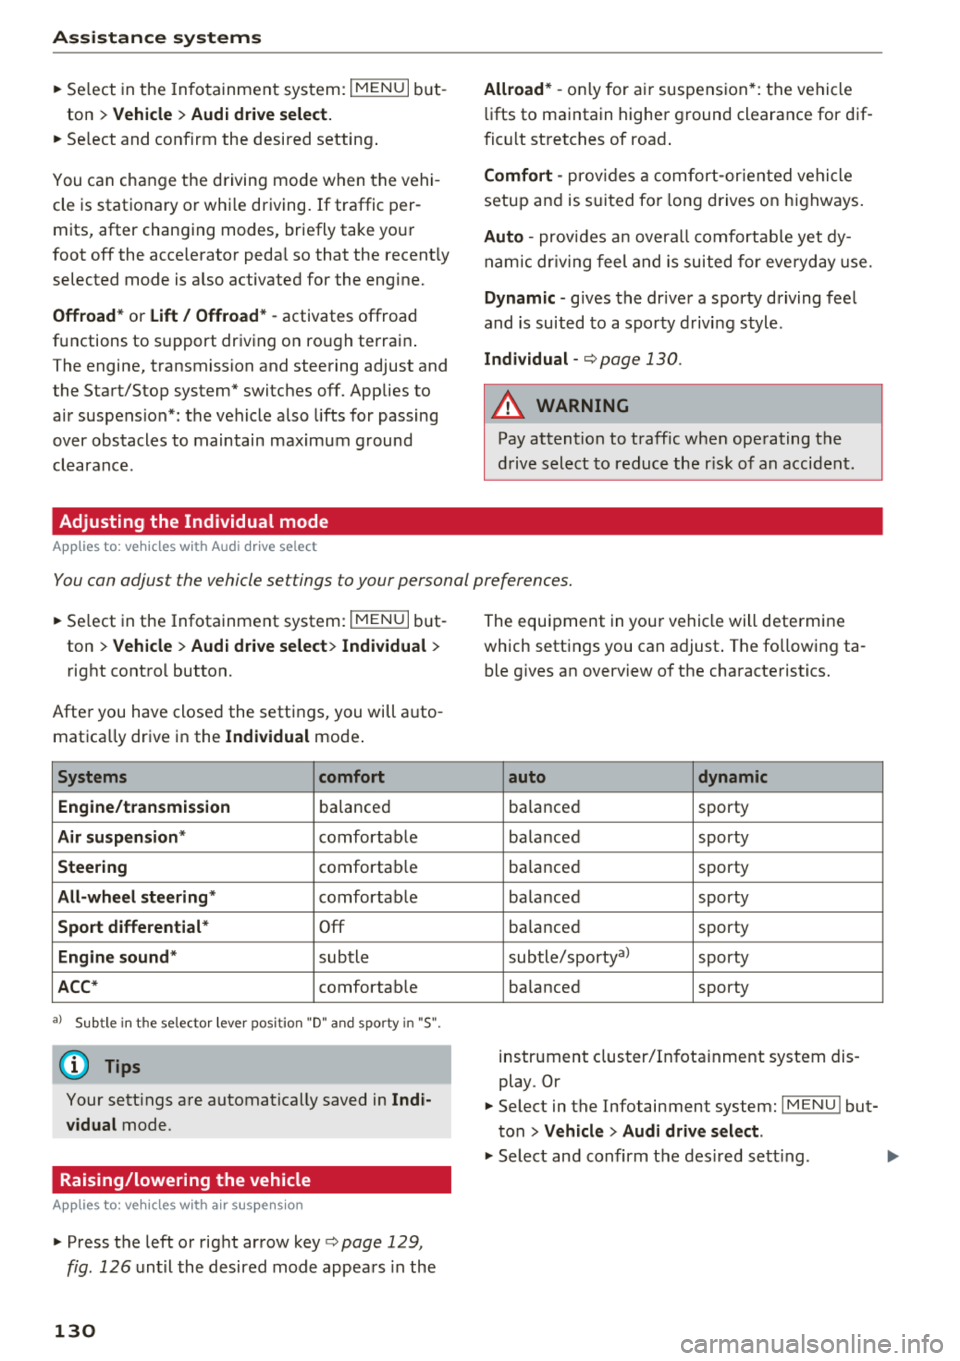
You can adjust the vehicle settings to your personal preferences.
~ Select in the Infotainment system: IMENU I but
ton
> Vehicle > Audi drive select > Individual >
right control button.
Afte r you have closed the settings, you will auto
matica lly drive in the
Individual mode .
Systems comfort
Engine/transmission
ba lanced
Air suspension * comfortable
Steering comfortable
All-wheel steering* comfortable
Sport differential * Off
Engine sound * subtle
ACC* comfortable
a l Sub tle in t he se lecto r lever posit ion "D" and sporty in "S".
(D Tips
Your settings are automatica lly saved in Indi
vidual
mode.
Raising/lowering the vehicle
A pp lies to: ve hicles w ith air susp en sion
~ Press the left or right arrow key c> page 129 ,
fig . 126
until the desired mode appears in the
130
The equipment in your vehicle will determine
which settings you can adjust . The fo llowing ta
ble gives an overview of the characteristics.
auto dynamic
ba
lanced sporty
balanced sporty
ba lanced sporty
ba la nced sporty
ba lanced sporty
subtle/sportyal sporty
ba lanced sporty
instrument cluster/Infotainment system dis
play. Or
~ Select in the Infotainment system: IMENU ! but
ton
> Vehicle > Audi drive select.
~ Select and confirm the desired setting .