door AUDI Q7 2018 Owner´s Manual
[x] Cancel search | Manufacturer: AUDI, Model Year: 2018, Model line: Q7, Model: AUDI Q7 2018Pages: 398, PDF Size: 185.58 MB
Page 124 of 398

Ass is tanc e system s
-In some situations, the system may not
function or its funct ion may be limited. For
example:
- I f vehicles a re approac hing o r be ing left
beh ind very quickly. The display may not
turn on in time .
- I n poor weather conditions s uch as heavy
rain, s now o r heavy mis t.
- On very wide lanes, in tight curves, o r if
there is a rise in the road s urface. Vehicles
in the adjacent lane may not be detec ted
because they are outside of the sensor
range.
(Ud) Note
The se nso rs can be displaced by impacts o r
damage to the bumper, whee l housing and
underbody. This can impair the system . Have
an authorized A udi dealer or authorized A udi
Serv ice Facility check their function.
(D Tips
- If the window g lass in the driver's door or
front passenger's door has been tinted, the
display in the exterior mirror may be incor
rect.
- For an explanation on conformity with t he
FCC regulations in the United States and the
Industry Canada regu lations, see
c:> page380.
Switching on/off
Applies to: ve hicles w ith Audi side assist
The system can be switched on/off in the Info
tainment system.
.. Se lect in the Infotainment system: IMENU I but
ton
> V ehicle > left contro l button > Driver a s·
sistance
> Audi side ass ist . O ff switches the
system off.
If the system is activated, the displays in the ex
ter ior mirrors will turn on briefly when the ign i
tion is sw itched on.
122
(D Tips
When yo u switch side assist on or off, the exit
warn ing system activates o r deact ivates
c:> page 123.
Setting the display brightness
App lies to : vehicles wit h Audi side ass ist
The display brightness can be adjusted in the In
fotainment system.
.. Select in the Infotainment system : IMENU! but
ton
> Vehicle > l eft control button > Dri ver as
sistance
> Audi side a ssist.
The disp lay br igh tness adjusts automatically to
the brightness of the surroundings, both in the
information and in the warning stage. I n very
dark or very bright surround ings, the automatic
adjustment will set the display to the minimum or max imum level. In such cases, you may notice
no change when ad justing the br ightness, or the
change may only be noticeable once the sur
r ound ings change.
Adjust the br ightness to a leve l where the display
i n the information stage will not disrupt your
v iew ahead. If you change the br ightness, the dis
play in the exterio r mirror w ill br iefly show the
br ightness leve l in t he i nfo rmat ion stage . The
br ightness of the warn ing st age is linked to the
brightness in the information stage and is adjust
ed a long with the information stage .
(D Tips
- The side assis t fu nct ions are no t active dur
ing the adjus tment process.
- Th e exit war ning indica to rs turn o n du ring
the adjustment process.
- Yo ur sett ings a re a utomat ic all y stored and
assigned to the remo te con trol key be ing
used .
Page 125 of 398
a co ...... N r--. N ...... 0
0
:E '
Applies to: ve hicles with exit warning system
Fig . 116 Example dis play
Fig. 117 Door: warning str ip
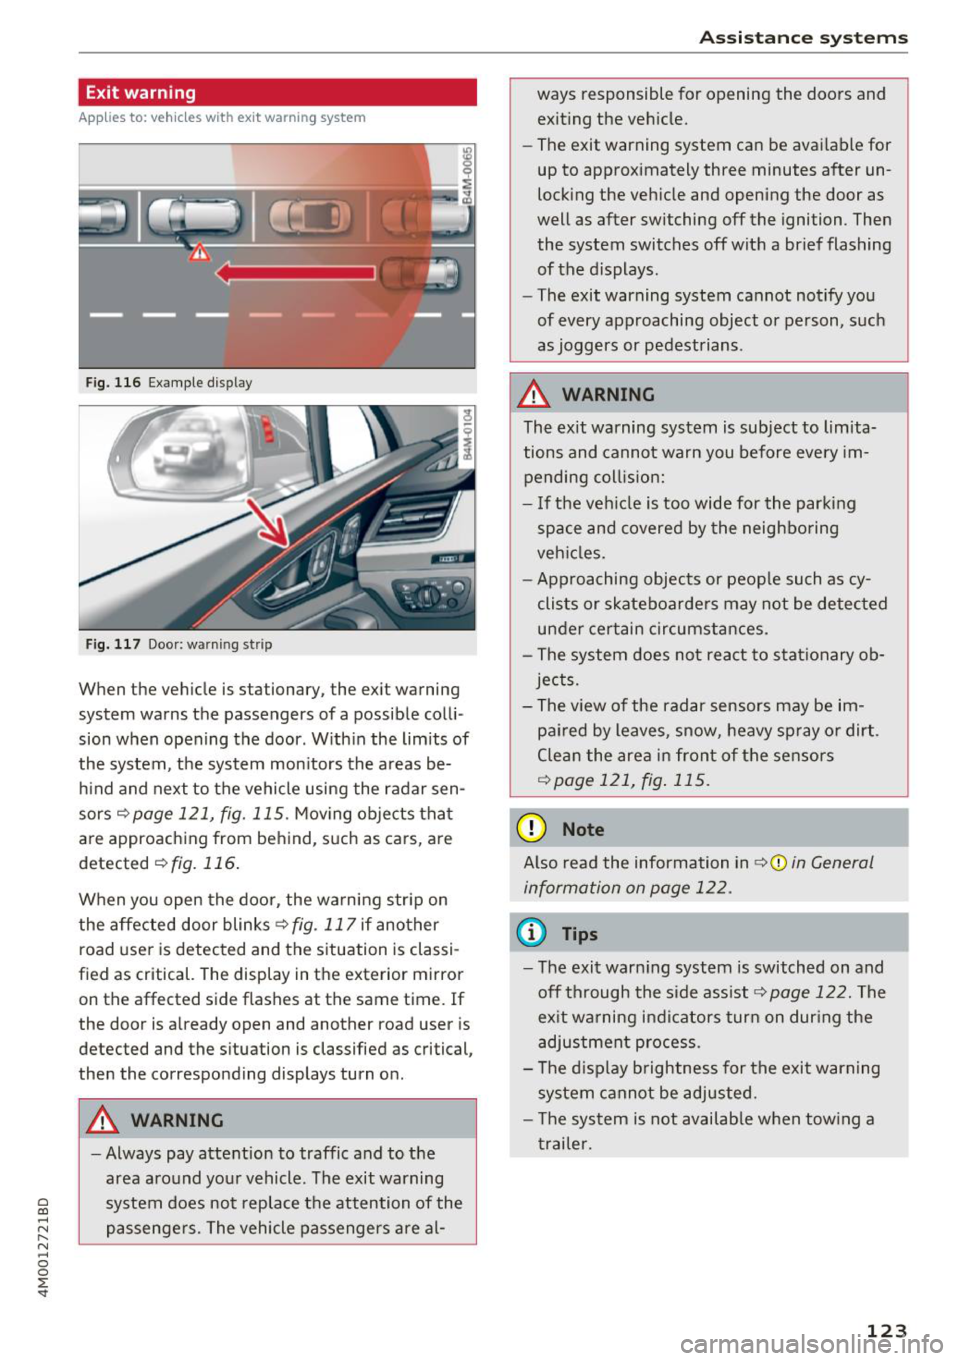
When the vehicle is stationary, the exit warning
system warns the passengers of a possible colli
sion when opening the door . Within the limits of
the system, the system monitors the areas be
hind and next to the vehicle using the radar sen
sors
c::¢> page 121, fig. 115 . Moving objects that
are approaching from behind, such as cars, are
detected
c::¢> fig. 116.
When you open the door, the warning str ip on
the affected door blinks ¢
fig. 117 if another
r oad user is detected and the situation is classi
f ied as critical. The display in the exterior mirror
on the affected side flashes at the same time . If
the door is already open and another road user is
detected and the situation is classified as critical,
then the corresponding displays turn on .
A WARNING
-Always pay attention to traffic and to the
area around your vehicle. The exit warning
system does not replace the attention of the
passengers. The vehicle passengers are al-
Assistance systems
ways responsible for opening the doors and
exiting the vehic le.
- The exit warning system can be available for
up to approximately three minutes after un
locking the vehicle and opening the door as
well as after switching off the ignition . Then
the system switches off with a brief flashing
of the displays.
- The exit warning system cannot notify you
of every approaching object or person, such
as joggers or pedestrians .
A WARNING
The exit warning system is subject to limita
tions and cannot warn you before every im
pending coll is ion:
- If the veh icle is too wide for the parking
space and covered by the neighboring
veh icles.
- Approaching objects or peop le such as cy
clists or skateboarders may not be detected
under certain circumstances.
- The system does not react to stat ionary ob
jects.
- The view of the radar sensors may be im
paired by leaves, snow, heavy spray or dirt .
Clean the area in front of the sensors
c::¢> page 121, fig. 115.
(D Note
Also read the information in c::¢,(D in General
information on page 122 .
(D Tips
-The exit warning system is switched on and
off through the side ass ist
c::¢> page 122. The
ex it warning indicators turn on dur ing the
adjustment process.
- The display brightness for the exit warning
system cannot be adjusted.
- T he system is not availab le when tow ing a
trailer.
-
123
Page 133 of 398
a co .... N r--. N .... 0
0
:E '
The lift/ Offroad mode switches to Allroad
mode when dr iving above approximately
20 mph (30 km/h) and the veh icle automati
cally lowers again. These modes may only be
used on a temporary bas is and are not intend
ed for continuous d riving.
(D Tips
- The filled-in boxes in the Infotainment sys
tem represent the current vehicle level. If
the box is wh ite or the boxes are blinking,
the veh icle is lift ing or lowe ring. If on ly the
bottom box is fi lled in, the vehicle is at the
l owest level ( le a st amount of g round clear
ance) . If all the segme nts are fi lled in, then
the vehicle is at the highest level (highest
ground clear a nee) .
- The target level is hig hligh ted wi th a
red
frame while the vehicle is lifting o r lower
i ng. The frame is then hidden when the ve
hicle reaches the target level.
- The vehicle lifts up to the highest level
when you se lect
lift / Offroad . Select an
other mode to lower the vehicle again.
Rear lowering
App lies to: vehicl es with air suspe nsio n
The rear of the vehicle con be lowered to make
loading and unloading easier .
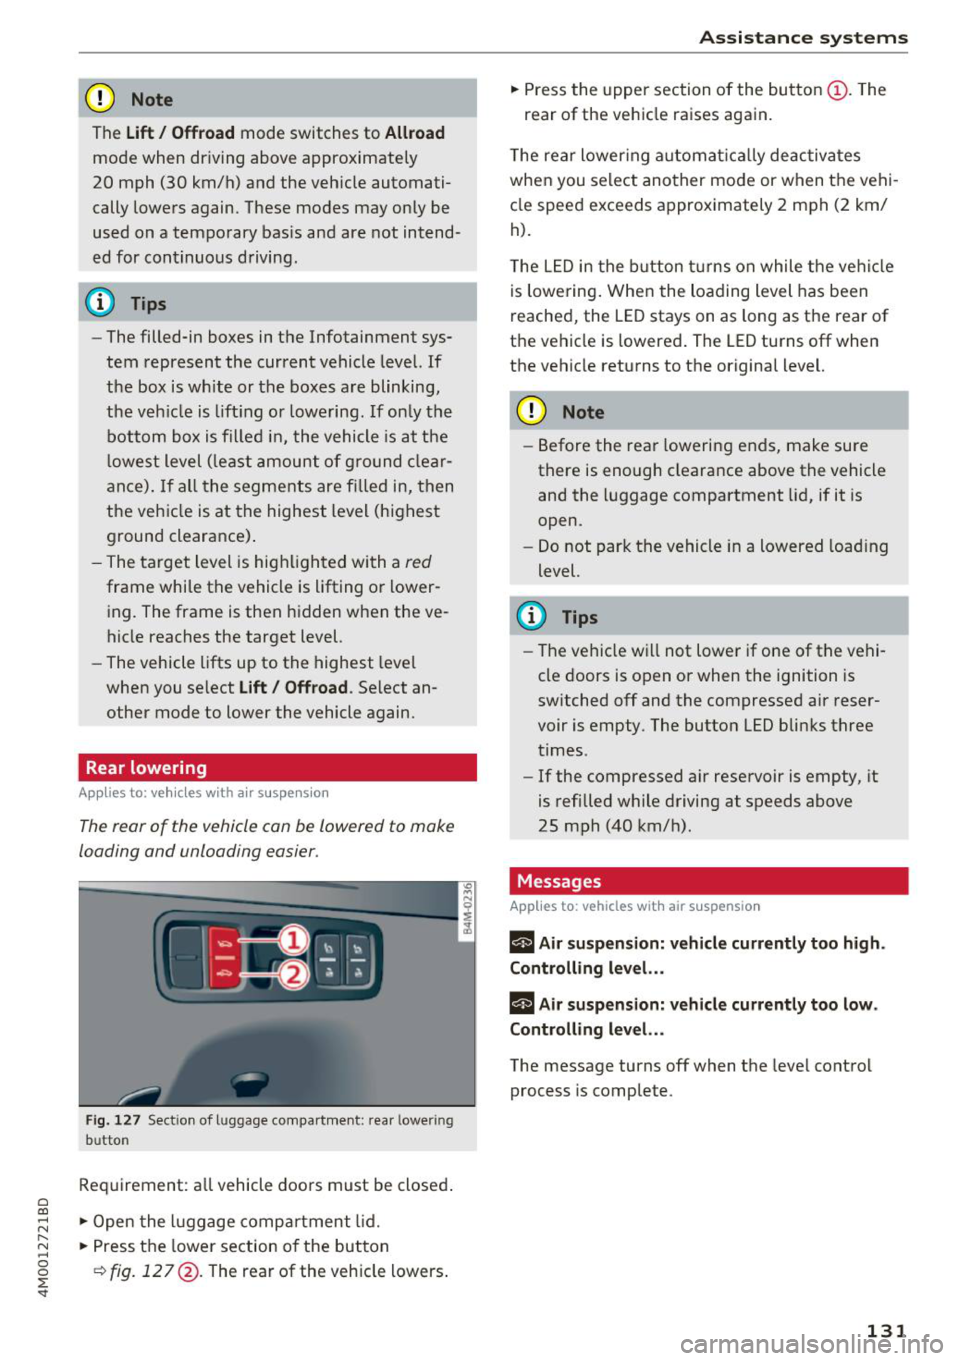
Fig . 12 7 Sect ion of l uggage co mpa rt m ent: rear lower ing
b ut ton
Req uirement: a ll vehicle doors must be closed .
" Open the l uggage compa rtment lid .
" Press the lower section of the button
¢fig . 127 @. The rear of the veh icle lowers .
Assi st a nce systems
" Press the upper section of the butto n (D. The
rear of the vehicle raises again.
T he rear lower ing a utomat ica lly deac tiva tes
when you select another mode or when the vehi
cle speed exceeds approximately 2 mph (2 km/
h).
T he L ED in the button t urns on while the ve hicl e
is lowering . When the loading level has been
reached, the LE D stays on as long as the rear of
t h e vehicle is lowered . The LED turns off when
the vehicle returns to the original level.
CD Note
- Before the rea r lowering e nds, make sure
there is enough clearance above the vehicle
and the l uggage compartment lid, if it is
open.
- Do not park the vehicle in a lowered load ing
level.
(D Tips
- The ve hicle w ill not lowe r if one of the vehi
cle doors is open
or when the ignition is
switched off and the compressed air reser
voir is empty . The butto n LED bli nks three
times .
- If the compressed air reservoir is empty, it
is refilled while driving at speeds above
25 mph (40 km/h).
Messages
Applies to: vehicles with air suspension
rl A ir s uspension: vehicle current ly too h igh.
Controlling level. ..
rl Air suspension: vehicle currently too low.
Controlling level. ..
The message turns off when t he leve l cont rol
process is complete .
131
Page 139 of 398
a co ...... N r--. N ...... 0
0
:E '
Introduction
Applies to: vehicles with peripheral cameras
With this equipment, the park ing system p lus*
¢
page 133 is supplemented w ith various pe riph
e ral cameras. The four cameras give you the fol
l owing views: area around the vehicle, front cor
ner view and rear corner view, view in front of the
vehicle and behind the vehicle .
General information
Applies to: vehicles with peripheral cameras
Fig. 137 Location of periphera l cameras
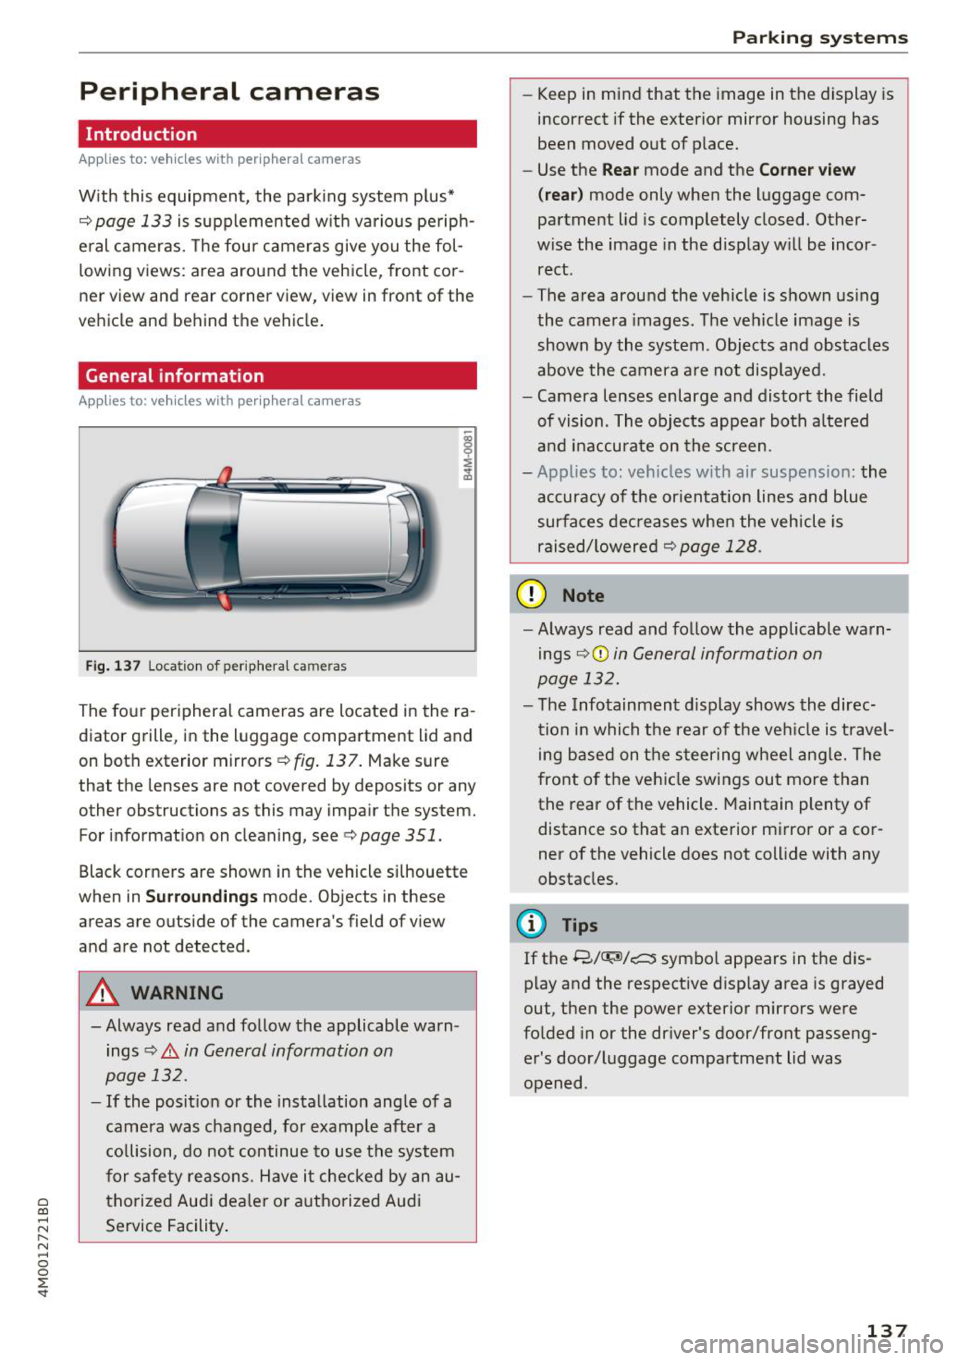
The four peripheral cameras are located in the ra
diator grille, in the luggage compartment lid and
on both exterior mirrors
¢ fig. 137. Make sure
that the lenses are not covered by deposits or any
other obstructions as this may impair the system. For information on cleaning, see¢
page 351.
Black corners are shown in the vehicle si lhouette
when in
S u rro und ing s mode. Objects in these
areas are outside of the camera's field of view
and are not detected.
A WARNING
-Always read and follow the applicable warn ings
¢.&. in General information on
page 132.
- If the position or the installation angle of a
came ra was changed, for example after a
co llision, do not continue to use the system
for safety reasons. Have it checked by an au
thorized Audi dea le r or authorized Audi
Service Facility .
Parking systems
- Keep in mind that the image in the display is
incorrect if the exterior mirror housing has
been moved out of p lace.
- Use the
Re ar mode and the Co rner view
(r ea r)
mode only when the luggage com
partment lid is completely closed. Other
wise the image in the display will be incor
rect.
- The area around the vehicle is shown using
the camera images. The vehicle image is
shown by the system . Objects and obstacles
above the camera a re not disp layed.
- Camera lenses enlarge and distort the field
of vision. The objects appear both a ltered
and ina ccurate on the screen.
- Applies to: vehicles with air suspension: the
accuracy of the or ientat ion lines and blue
surfaces dec reases whe n the veh icle is
raised/ lowered¢
page 128.
(D Note
- Always read and fo llow the applicable wa rn
ings ¢Ci)
in General information on
page 132.
- The Infotainment d isplay shows the direc
tion in which the rear of the veh icle is travel
ing based on the steering wheel ang le. The
front of the vehicle swings out more than
the rear of the vehicle. Maintain plenty of distance so that an exterior mirror or a cor
ner of the vehicle does not collide with any
obstacles.
(l) Tips
If the 8/~/c::; symbol appears in the dis
play and the respective disp lay area is grayed
out, then the power exterior mirrors were
fo lded in or the dr iver's door/front passeng
er's door/luggage compartment lid was
opened .
137
Page 169 of 398
Cl a:, ...... N
" N ...... 0
0
::r '
Applies to: vehicles with voice recognitio n system
You con operate many Infotainment functions
conveniently by speaking.
Requirement: the ignition and the MM I must be
switched on ¢
page 149, there must not be any
phone call in progress and the park ing system
must not be active .
~ Switching on: briefly press th e ~ button @
¢page 15, fig. 11 on the m ultifunction steer
ing whee l and say the desired command after
the
Beep .
~ Switching off : press and hold the~ button.
Or: press the [2] butto n.
~ Pausing : say the command Pause . To resume,
press the~ button .
~ Correcting : say the com mand Correction . Or :
simp ly say a new command du ring an an
no uncement
¢ page 245.
Input assistance
The system gu ides you throug h the input with
v isua l and audio feedbac k.
- Visual input assistance : after switching on
vo ice recogn it ion, a display w ith a selection of
poss ible commands appea rs . This command
display can be sw itched on o r off . Se lect:
IMENU I button> Se ttings > left cont rol button
> MMI settings > Speech dialog system .
- Audio input a ssis tance :
to have the poss ible
comma nds read, tu rn t he voice recogn ition sys
tem o n an d say
Help.
For the system to understand you:
Speak clearly and dis tinct ly at a normal vo lume .
Speak lo uder when d riving faste r.
Emphasize the words in the commands even ly
a n d do not leave long pauses .
C lose the doors, the windows and the sunroof* to
reduce background noise . Make su re that passen
gers are not speaking when you are giving a voice
command .
Voice recognition system
Do not d irect the vents towa rd the hands -free mi
c ro p hone, which is in the roof head liner nea r the
front interior lig hts.
Only use the system from the dr ive r's seat be
ca use the hands -free microphone is di rected to
ward that seat .
Additional settings
See¢ page 245, Spee ch dialog system .
_&. WARNING
- Dir e ct y our full atte nti on to dr iv ing. As the
d river, you have com plete re sponsibility fo r
safety in traff ic . O nly use the functions in
such a way t hat you a lways maintai n com
p lete contro l over your vehicle in all traffic
situations.
- Do not use t he voice recognition system in
emergencies beca use your voice may change
in stressfu l situations. It may take longe r to
d ia l the number o r th e system may not be
ab le to d ia l it at all. Dia l the emergency
number manually.
(D Tips
-The d ialog pauses w hen the re is a n incom
ing phone call a nd will cont inue if yo u ig
nore the call. The d ia log ends if yo u answer
t he ca ll.
- Yo u can select an item in the list us ing ei
t her the vo ice recogn it io n sys tem o r the
cont ro l knob .
Command overview
information
Applies to: vehicles with voice recognition system
T he following overv iews des cribe the comm ands
t h at can be used to ope rate the MMI using the
vo ice recognit ion system.
Alte rnative comm ands ar e separate d using a"/",
f o r ex ample say:
Telephone / (or) Navigation /
(or) Radio.
Sequences of commands used to perfo rm an ac
t io n a re iden tified w it h a "> ", fo r ex am ple s ay:
Enter address > ( then) Enter country/state . ..,
167
Page 200 of 398
Audi connect vehicle control
-Pay attention to upper-and lower -case let
ters when entering the vehicle code.
- If you do not have the 10-digit vehicl e code,
contact an authorized Audi dealer or author
ized Audi Service Facility .
Additional options
Applies to vehicles with Audi co nnect vehicle control
License subscription
The validity and expirat ion date of you r subscrip
tions are displayed. When
Warning before sub
scription expires
is activated, a message wi ll be
disp layed warning you that your license is about
to expire.
Select :
!MENU ! button> Audi connect > Display
available functions >
right control button> Li
cense subscription.
Resetting the primary user
F or examp le, you ca n reset the key user when
selling your vehicle in order to deactivate these
services .
Requirement: the ignition must be switched o n.
Select :
!M ENU ! button> Audi connect > right
control button
> Audi connect user management
> Key user > Reset key user .
Warning levels
Requirement: the primary user must have set one
or more warning levels. Secondary users can only
see if a warning level is active or not .
Select:
! MENU ! button> Audi connect > right
control button
> Alerts.
Remote locking and
unlocking
Applies to veh icles with Audi connect vehicle control
You can lock and unlock your veh icle using this
service .
Requirement
-This requires the 4-dig it PIN that you specified
during the verification on www.audiusa.com/
myaud i.
- The vehicle must be stationary.
198
-The ignition must be switched off.
Vehicle status report
Applies to vehicles w ith Aud i connect ve hicle control
The Dr iver Informat ion System collects data un
der certain conditions and sends it to a server.
When data is sto red, you can access va lues such
as these using the service :
- Remaining range,
- Fue l tank level,
- Oil level,
- If the vehicle doors are open/closed or locked/
un locked,
- mi leage,
- Next oil change
- Next service,
- Warning messages,
- If the parking lights are on/off .
A WARNING
Do not ignore messages and warning or ind i
cator lights that turn on in the vehicle be
cause of the info rmation in the status report.
This could lead to break downs in on the road ,
accidents and serious injuries.
Parking location
Applies to vehicles w it h Aud i connect ve hicle co ntrol
The vehicle collects data unde r ce rta in cond it ions
and sends it to a server .
When data is stored, you can access values such
as these using the service :
- Vehicle location display,
- Display of one's own location,
- Route to your vehicle .
If your mob ile dev ice also has a navigation func
tion, you can nav igate to your last known parking
l ocation.
Deactivating and activating parking position
- Select: !MENU!> Audi connect> Car Finder
parking position .
If you do not set./, no location information will
be sent to the server.
Page 260 of 398
Driving safety
A WARNING
Heavy loads will influence the way your vehi
cle handles . To help reduce the risk of a loss
of control leading to serious personal injury:
- Always keep in mind when transporting
heavy objects, that a change in the center of
gravity can also cause changes in vehicle
handling:
- Always distribute the load as evenly as
possible.
- Place heavy objects as far forward in the
luggage compartment as possible.
- Never exceed the Gross Axle Weight Rating
or the Gross Vehicle Weight Rating specified
on the safety compliance sticker on th e driv
er's side B-pillar. Exceeding permissible
weight standards can cause the vehicle to
slide and handle differently .
- Please observe information on safe driving
<=) page 252.
A WARNING
To help prevent poisonous exhaust gas from
being drawn into the vehicle, always keep the
rear lid closed while driving .
- Never transport objects larger than those
fitting completely into the luggage area be cause the rear lid cannot be fully closed .
- If you absolutely must drive with the rear lid
open, observe the following notes to reduce
the risk of poisoning:
- Close all windows,
- Close the sunroof*,
- Open all air outlets in the instrument pan-
el,
- Switch off the air recirculation,
- Set the fresh air fan to the highest speed .
A WARNING
Always make sure that the doors, all win
dows, the sunroof* and the rear lid are se
curely closed and locked to reduce the risk of
injury when the vehicle is not being used .
- After closing the rear lid , always make sure
that it is properly closed and locked.
258
-Never leave your vehicle unattended espe
cially with the rear lid left open. A child
could crawl into the vehicle through the lug
gage compartment and close the rear lid be
coming trapped and unable to get out . Be
ing trapped in a vehicle can lead to serious
personal injury.
- Never let children play in or around the vehi
cle .
- Never let passengers ride in the luggage
compartment . Vehicle occupants must al
ways be properly restrained in one of the
ve
hicle 's seating positions.
@ Note
If you are transporting large items with the
backrest folded down*, you should remove
the Rear Seat Entertainment (RSE)* and its
holder* to avoid damage.
© Tips
-Air circulation helps to reduce window fog
ging. Stale air escapes to the outside
through vents in the trim panel. Be sure to
keep these slots free and open .
- The tire pressure must correspond to the
load. The tire pressure label lists the recom
mended cold tire inflation pressures for the
vehicle at its maximum capacity weight and
the tires that were on your vehicle at the
time it was manufactured. For recommend ed tire pressures for normal load condi
tions, please see chapter
Q page 341 .
Tie-downs
The luggage compartmen t is equipped with four
t ie-downs to secure luggage and o ther i tems.
Use the tie-downs to secure your cargo properly
Qpage 257, L oading the luggage compartment.
In a collision , the laws of physics mean that even
smaller items that are loose in the vehicle will
become heavy missiles that can cause serious in
jury. Items in the vehicle possess ene rgy which
vary with vehicle speed and the weight of the
item . Vehicle speed is the mos t significant fac tor . ..,.
Page 266 of 398
Safety belts
Important safety instructions about safety
belts
Safety belts must always be correctly positioned
across the strongest bones of your body.
• Always wear safety belts as illustrated and de
scribed in this chapter .
• Make sure that your safety belts are always
ready for use and are not damaged.
A WARNING
Not wearing safety belts or wearing them im
properly increases the risk of serious personal
injury and death. Safety belts can work only
when used correctly.
- Always fasten your safety belts correctly be
fore driving off and make sure all passen
gers are correctly restrained.
- For maximum protection, safety belts must
always be positioned properly on the body.
- Never strap more than one person, includ
ing small children, into any belt.
- Never place a safety belt over a child sitting
on your lap.
-Always keep feet in the footwell in front of
the seat while the vehicle is being driven .
- Never let any person ride with their feet on
the instrument panel or sticking out the
window or on the seat.
- Never remove a safety belt while the vehicle is mov ing. Doing so will increase your risk of
being injured or killed.
- Never wear belts twisted.
- Never wear belts over rigid or breakable ob-
jects in or on your clothing, such as eye glasses, pens, keys, etc., as these may cause
injury.
- Never allow safety belts to become dam
aged by being caught in door or seat hard
ware.
- Do not wear the shoulder part of the belt
under your arm or otherwise out of position.
- Several layers of heavy clothing may inter
fere with correct positioning of belts and re duce the overall effectiveness of the system.
264
- Always keep belt buckles free of anything
that may prevent the buckle from latching
securely.
- Never use comfort clips or devices that cre
ate slack in the shoulder belt. However, spe
cial clips may be required for the proper use
of some child restraint systems.
- Torn or frayed safety belts can tear, and
damaged belt hardware can break in an acci
dent. Inspect belts regularly.
If webbing,
bindings, buckles, or retractors are dam
aged, have belts replaced by an authorized
Audi dealer or qualified workshop.
- Safety belts that have been worn and loaded
in an accident must be replaced with the
correct replacement safety belt by an au
thorized Audi dealer. Replacement may be
necessary even if damage cannot be clearly
seen. Anchorages that were loaded must al
so be inspected.
- Never remove, modify, disassemble, or try
to repair the safety belts yourself.
-Always keep the belts clean. Dirty belts may
not work properly and can impair the func
tion of the inertia reel
c:> table Interior
cleaning on page 353.
Safety belts
Fastening safety belts
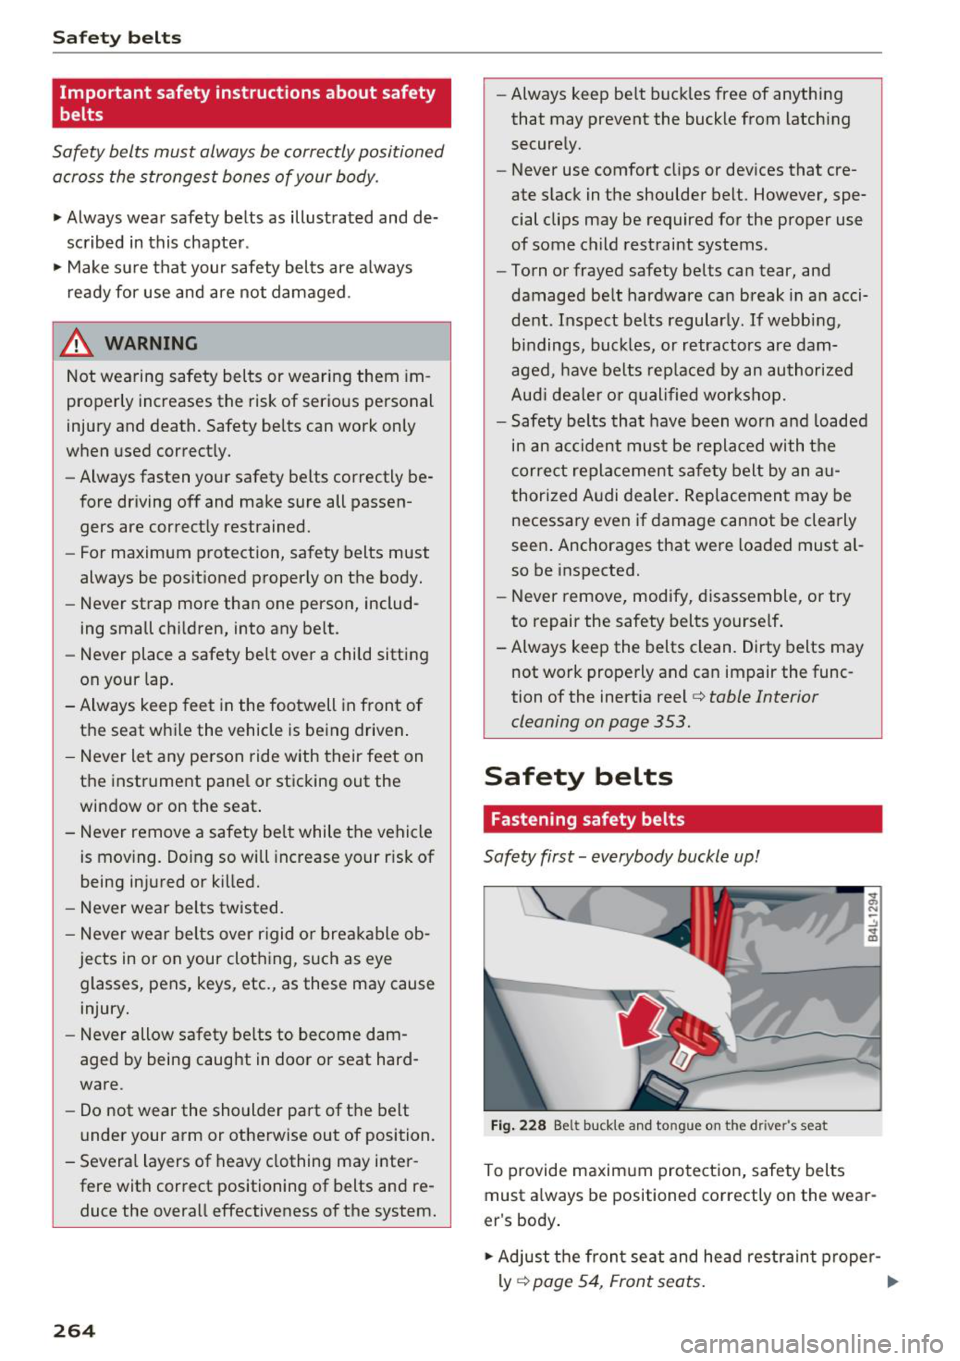
Safety first -everybody buckle up!
Fig. 228 Belt bu ckle and tongue on the driver's seat
To provide maximum protection, safety belts
must always be positioned correctly on the wear
er's body.
• Adjust the front seat and head restraint proper-
ly
c:> page 54, Front seats. ..,.
Page 274 of 398
Airbag syste m
the electronic control unit c> page 281, PASSEN
GER AIR BAG OFF-,,;, ON@ light.
Always remember, a child safety seat o r infa nt
carrier insta lled on the front seat may be st ru ck
and knocked out of position by the rapid ly inflat
ing passenger's airbag in a fronta l co llision . The
airbag cou ld greatly reduce the effect iveness of
the child restraint and even seriously injure the
child dur ing inflation.
F or this reason, and because the back seat is the
safest place for ch ildren -when properly restra in
ed according to the ir age and si ze -we strong ly
recommend that children always sit in the back
seat
c> page 291, Child safety .
A WARNING
A child in a rearward-facing child safety seat
installed on the front passenger seat w ill be
ser iously injured and can be killed if the front
airbag infla tes -even w ith an Advanced Ai rbag
System.
- T he inflating a irbag w ill hit the child safety
seat or infant carrier wi th great force and
will smash the chi ld safety seat and child
against the backrest, center armrest, door
or roof.
- Always install rear -facing child safety seats
on the rear seat .
- If you must install a rearward fac ing ch ild
safety seat on the front passenger seat be
cause of exceptiona l circumstances and the
PA SSENGER AIR BAG OFF,;; light does not
come on and stay on, immed iate ly install
the rear-fac ing ch ild safety seat in a rear
seat ing pos ition and have the airbag system
inspected by your authorized Audi dea ler .
- Forward-facing ch ild safety seats installed
on the front passenger's seat may interfere
with the deployment of the airbag and ca use serio us pe rsonal injury to the child.
A WARNING
If, in except ional circumst ances, you must in
stall a forward-f acing chi ld res train t on the
front passenger's seat:
- Always make sure the forward-f acing se at
h as been designed and ce rt ified by its man-
272 ufacturer for use on a front seat with a pas
senger front and side airbag.
- Never put the forward-facing child restraint
up against or very near the instrument pan
el.
- Always move the front passenger seat to
the highest posit ion in the up and down ad
justment range and move it back to the rearmost posit ion in the seat's fore and aft
ad justment range, as far away from the a ir
bag as poss ible, before ins tall ing the for
ward-facing chi ld restraint.
- Always make sure that the safety belt upper
anchorage is behind the ch ild rest raint and
not next to o r in fron t of the child rest raint
so th at the s afety be lt will be p roperly posi
tioned.
- Ma ke sure th at the
PASSENGER AIR BAG
OFF -,,;,
light comes on and stays on all the
time wheneve r the ign it ion is swi tched on .
A WARNING
To reduce the risk o f serious injury, ma ke sure
that the PASSENGER AIR BAG OFF-,,;; light
will be disp layed whenever a ch ild restraint is
installed on the front passenger seat and the
ignit ion is switched on.
- If the
PA SSENGER AIR BAG OFF-,,;, light
does not stay on, perform the checks descri
bed
c> page 281, Monitoring the Advanced
Airbag System .
-Take the child restra int off the front passen
ger seat and install it properly at one of the rear seat positions if the
PASSENGER AIR
BAG OFF,;;
light does not stay on .
- Have the airbag system inspected by your author ized Audi dealer immed iate ly.
- Always carefully follow instructions from
child restraint manufacturers when instal
ling child restra ints.
A WARNING
I f, in exceptional ci rcumstances, you must in
stall a forward or rearward-fac ing child re-
stra int on the fron t passenger's seat:
Ill>
Page 276 of 398
Airbag syste m
-Never hold the steering whee l at the 12
o'clock pos it ion or w ith your han ds any
where inside the steering wheel or on the steering wheel hub. Holding t he steering
wheel the wrong way increases the risk of severe injury to the arms, hands, and head if
the d river a irbag deploys.
A WARNING
Objects between you and the a irbag w il l in
crease the risk of inj ury in a crash by interfer
ing w ith the way the airbag unfo lds and/or by
being pushed into you as the airbag inflates .
- Always make sure nothing is in the front air-
bag deployment zone that could be str uck
by the airbag when it inflates.
-
- Objects in the zone of a deploying airbag
can become projectiles when the airbag de
ploys and cause serious persona l injury .
- Never hold th ings in your hands or on your
lap when the vehicle is in use.
- Never place accessor ies or other objec ts
(s uch as c up ho lders, telephone brackets,
note pads, navigation systems, or things
that are large, heavy, o r bulky) on the doors;
never attach then to the doors or the wind
shield; never place them over or near or at
tach them to the area marked ,,AIRBAG" on
the steering wheel, instrument panel or the seat backrests; never p lace them between
these a reas and yo u or any other person in
the vehicle.
- Never attach objects to the w indshield
above the passenger front airbag, s uch as
accessory GPS navigation uni ts or mus ic
players . S uch objects could ca use serio us in
jury in a collision, especially when the air bags inflate.
- Never recline the front passenger seat to transport objects . Items can also move into
the deployment area of the side a irbags or
the front a irbag during breaking o r in a sud
den maneuver. Objects near the airbags can
fly dangerous ly through the passenger com
partment and cause injury, particularly
when the seat is reclined and the airbags in
flate.
274
A WARNING
A person on the front passenger seat, espe
cially infants and small ch ildren, wi ll receive
serious in juries and can even be k illed by be
ing too close to the airbag when it inflates .
- Although the Advanced Airbag System in your veh icle is designed to turn off the front
passenger airbag if an infant o r a small child
is on the fron t passenger sea t, nobody can
absolu tely guarantee tha t deployment un
de r these specia l condi tions is impossible in
all conceivable situations that may happen
during the useful life of yo ur vehicle.
- The Advanced Airbag System can dep loy in
accordance with the ,.low risk" option for 3-
and 6-year-old children under the U.S. Fed
eral Standard if a child w ith electrical capac
itance greater than the combined capac i
tance of a typical one-year o ld infant re
strained in one of the forward facing or rea r
ward-facing chi ld seats with which yo ur ve
hicle was certified is on the front passenger
seat and the o ther conditions for airbag de-
ployment are me t.
- Accident s tatisti cs have shown th at children
are generally safer in the rear seat are a than
in the front seat ing pos ition.
- For their own s afety, all ch ildren, especi ally
12 years and younger, should alw ays ride in
the back proper ly restrained for their age
and size .
Advanced front airbag system
Your vehicle is equipped with a front Advanced
Airbag System in compliance with United States
Federal Motor Vehicle Safety Standard (FMVSS)
208, as well as Canada Motor Vehicle Safety
Standard (CMVSS) 208 as applicable at the t ime
you r vehicle was manufactured .
-
The front Advanced Airbag System supplements
the safety belts to provide add itiona l protect ion
for the driver 's and front passenger's heads and
upper bod ies in fronta l crashes. The a irbags in
flate only in frontal impacts when the vehicle de-
ce le ra tion is high e no ugh.
II>-