ESP AUDI Q7 2020 Owner´s Manual
[x] Cancel search | Manufacturer: AUDI, Model Year: 2020, Model line: Q7, Model: AUDI Q7 2020Pages: 316, PDF Size: 113.87 MB
Page 75 of 316
4M1012721BA
Sitting correctly and safely
movement of passengers wearing safety belts in
the direction of the impact and thus help to re-
duce the risk of injury. They can help to protect
the head, upper body, and lap, for example. How-
ever, there is the possibility that airbag deploy-
ment can cause injuries.
The airbag system only works when the ignition
is turned on.
If you or other vehicle passengers have physical
limitations that prevent sitting in a correct posi-
tion, modifications to the vehicle may be neces-
sary. For more information, contact an author-
ized Audi dealer or authorized Audi Service Facili-
ty, or call Audi customer support at
1-800-822-2834.
@ Tips
The side curtain airbags in your vehicle have
ejection mitigation functions. This reduces
the risk of being ejected from the vehicle inte-
rior during an accident, especially in the event
of a vehicle rollover.
OX NET Tete 1)
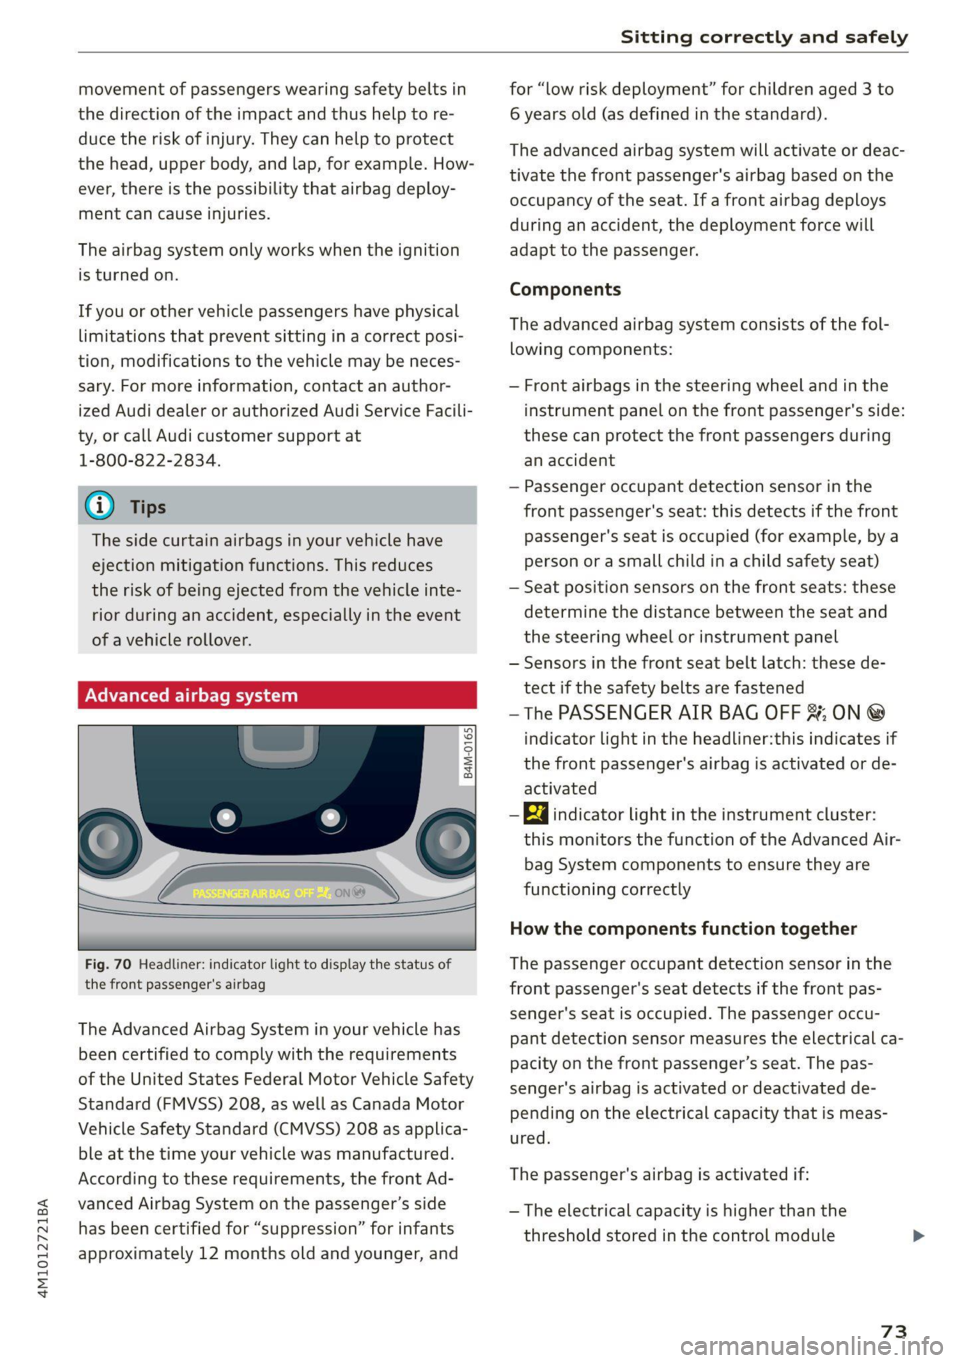
Fig. 70 Headliner: indicator light to display the status of
the front passenger's airbag
The Advanced Airbag System in your vehicle has
been certified to comply with the requirements
of the United States Federal Motor Vehicle Safety
Standard (FMVSS) 208, as well as Canada Motor
Vehicle Safety Standard (CMVSS) 208 as applica-
ble at the time your vehicle was manufactured.
According to these requirements, the front Ad-
vanced Airbag System on the passenger’s side
has been certified for “suppression” for infants
approximately 12 months old and younger, and
for “low risk deployment” for children aged 3 to
6 years old (as defined in the standard).
The advanced airbag system will activate or deac-
tivate the front passenger's airbag based on the
occupancy of the seat. If a front airbag deploys
during an accident, the deployment force will
adapt to the passenger.
Components
The advanced airbag system consists of the fol-
lowing components:
— Front airbags in the steering wheel and in the
instrument panel on the front passenger's side:
these can protect the front passengers during
an accident
— Passenger occupant detection sensor in the
front passenger's seat: this detects if the front
passenger's seat is occupied (for example, by a
person or a small child in a child safety seat)
— Seat position sensors on the front seats: these
determine the distance between the seat and
the steering wheel or instrument panel
— Sensors in the front seat belt latch: these de-
tect if the safety belts are fastened
—The PASSENGER AIR BAG OFF #;, ON @
indicator light in the headliner:this indicates if
the front passenger's airbag is activated or de-
activated
- ka indicator light in the instrument cluster:
this monitors the function of the Advanced Air-
bag System components to ensure they are
functioning correctly
How the components function together
The passenger occupant detection sensor in the
front passenger's seat detects if the front pas-
senger's seat is occupied. The passenger occu-
pant detection sensor measures the electrical ca-
pacity on the front passenger’s seat. The pas-
senger's airbag is activated or deactivated de-
pending on the electrical capacity that is meas-
ured.
The passenger's airbag is activated if:
— The electrical capacity is higher than the
threshold stored in the control module
73
Page 76 of 316
Sitting correctly and safely
— The electrical capacity is the same as or greater
than the electrical capacity of a typical adult
The passenger's airbag is deactivated if:
— The electrical capacity is lower than the thresh-
old stored in the control module
— The electrical capacity is the same as or less
than the electrical capacity of a typical one-
year-old child in a child safety seat that has
been used for certification in accordance with
FMVSS 208
If the front passenger's airbag is activated, the
PASSENGER AIR BAG ON @ indicator light
will turn on. If the front passenger's airbag is de-
activated, the PASSENGER AIR BAG OFF #;
indicator light will turn on.
The deployment force of the front airbags adapts
based on whether or not the safety belt is used
and the distance between the seat and the steer-
ing wheel/instrument panel. For example, if a
person is too close to the front airbag, the front
airbag will deploy with less force to help reduce
the risk of injury.
Meaning of PASSENGER AIR BAG OFF 3; ON
® indicator light
When the ignition is switched on, the system de-
tects whether the front passenger's seat is occu-
pied. PASSENGER AIR BAG OFF #; ON @
will turn on for several seconds during this proc-
ess. Then it will indicate whether the front pas-
senger's airbag is activated or deactivated.
— PASSENGER AIR BAG OFF #%;: the front
passenger's airbag is deactivated and will not
deploy in the event of an accident.
— PASSENGER AIR BAG ON ®:: the front pas-
senger's airbag is activated and could deploy in
the event of an accident.
If a change to the occupancy status of the front
passenger's seat is detected
PASSENGER AIR BAG OFF #; ON ®@ will
flash for several seconds and will then display the
status of the front passenger's airbag.
Always make sure the indicator light corresponds
to the occupancy of the front passenger's seat.
74
— An adult or individual of similar size in the
front passenger's seat: the front passenger's
airbag must be activated, so
PASSENGER AIR BAG ON @ must remain
on.
— An individual of smaller size (for example, an
adolescent or small adult) in the front pas-
senger's seat: the front passenger's airbag
must be activated, so
PASSENGER AIR BAG ON ® must remain
on.
— Child in a child safety seat on the front pas-
senger's seat: the front passenger's airbag
must be deactivated, so
PASSENGER AIR BAG OFF #; must remain
on.
— Front passenger's seat not occupied: the front
passenger's airbag must be deactivated, so
PASSENGER AIR BAG OFF #; must remain
on.
ZA\ WARNING
— An adult or a person with a small stature
(such as a young person or small adult) seat-
ed on the front passenger's seat will not be
protected by the passenger's airbag in the
event of a collision if the passenger's airbag
is deactivated. This increases the risk of in-
jury and death. Always make sure that
PASSENGER AIR BAG ON ®@ remains on
while driving. If
PASSENGER AIR BAG ON @ does not
turn on, make sure the front passenger is
sitting correctly in the seat > page 58 and
that there are no objects covering the front
passenger's seat (such as blankets or pil-
lows). If PASSENGER AIR BAG ON ®
still does not turn on, the front passenger's
seat must not be used. Drive to an author-
ized Audi dealer or authorized Audi Service
Facility and have the airbag system inspect-
ed.
—Achild ina child safety seat on the front
passenger's seat - especially in a rear-facing
child safety seat - can receive a severe im-
pact if the front passenger's airbag deploys,
which increases the risk of serious or fatal
injury. Always secure child safety seats on
Page 78 of 316
Sitting correctly and safely
This can cause serious or fatal injuries for
the child and passengers.
— If children use an incorrect seating position
while driving, they have a higher risk of in-
jury during a sudden braking maneuver or
accident. This especially applies to children
in the front passenger's seat or children who
have their head near the side airbag deploy-
ment area, if the airbag system is deployed
during an accident. This incorrect seating
position can cause severe or even fatal inju-
ries.
— Make sure there is enough space in front of
the child in the child safety seat. If necessa-
ry, adjust the angle and position of the seat
in front of the child safety seat.
— If you are transporting a child in a rear-fac-
ing child safety seat in the rear of the vehi-
cle, remove the Audi Entertainment mobile
device from the backrest on the front seat to
reduce the risk of injury.
— The rear side of a forward-facing child safety
seat should be positioned as close as possi-
ble to the backrest on the vehicle seat. If the
head restraints make it difficult to install a
child safety seat, adjust or remove them if
necessary > page 64. Reinstall the head re-
straints immediately once the child safety
seat has been removed.
— Always make sure that the backrest on the
seat where the child safety seat is installed
is securely locked in place and cannot move
forward. Otherwise, the backrest where the
child safety seat is secured could move for-
ward in the event of an accident or other
emergency situation.
— NEVER use a rear-facing child safety seat on
a seat with an ACTIVATED FRONT AIRBAG;
this could cause DEATH or SERIOUS INJU-
RIES to a CHILD.
— Always secure child safety seats on the
rear seats. If exceptional circumstances re-
quire the child safety seat to be placed on
the front passenger's seat, then the front
passenger's airbag must be deactivated.
Always make sure that
PASSENGER AIR BAG OFF 4%; remains
on while driving. If
76
PASSENGER AIR BAG OFF #; does not
turn on, remove the child safety seat and
install it again according to the child safe-
ty seat manufacturer instructions. If
PASSENGER AIR BAG OFF %%; still
does not turn on, the front passenger's
seat must not be used. Drive to an author-
ized Audi dealer or authorized Audi Service
Facility and have the airbag system in-
spected.
— If you must use a forward-facing child safety
seat on the front passenger's seat, move the
seat as far back as possible so that it is as
far as possible from the front passenger's
airbag. While doing this, make sure the seat
can be adjusted all the way. A child in a child
safety seat on the front passenger's seat can
receive a severe impact if the front passeng-
er's airbag deploys, which increases the risk
of serious or fatal injury.
— Replace the child safety seat after an acci-
dent because there could be damage that is
not visible.
— Even if a child is not sitting in the child safe-
ty seat, the child safety seat must be se-
cured. An unsecured child safety seat may
be thrown through the vehicle interior dur-
ing sudden braking maneuvers or an acci-
dent.
Correct positioning for children
Always secure children in a child safety seat de-
signed for the body size, weight, and age of the
child.
You can secure child safety seats in your vehicle
using the lower LATCH anchors or the safety
belts. You can also secure child safety seats to
the top tether anchor. Depending on the child
safety seat, it may also be necessary to secure it
to the top tether anchor. In Canada, securing for-
ward-facing child safety seats to the top tether
anchors is required by law.
Always transport children in the rear seats
Accident statistics show that children that are se-
cured correctly in the rear seats are safer thanin >
Page 80 of 316
Sitting correctly and safely
locations each have two lower LATCH anchors
that can be used to secure a LATCH child safety
seat. The marked points with a symbol are locat-
ed on the cushions © fig. 71 or the covers
=> fig. 72 for the lower LATCH anchors. You can lo-
cate the LATCH anchors using the marking points.
» Applies to: vehicles with a rear bench seat that
can be moved forward/back: If you are securing
a child safety seat in the second row, move the
rear seat all the way back.
> Activate the child safety lock > page 40.
> If you are securing a child safety seat in the sec-
ond row, remove the cushion between the seat
surface and the backrest.
> If you are securing a child safety seat in the
third row, remove the cover on both LATCH an-
chors.
> If you secure a child safety seat to the rear seat,
secure any unused safety belts that are within
reach of the child > A\ in Securing child safety
seats with a safety belt on page 79.
> Secure the child safety seat according to the
child safety seat manufacturer instructions.
> Pull on the child safety seat to check if both
sides are engaged correctly in the LATCH an-
chors.
> If possible, also secure the child safety seat to
the respective top tether anchor on the seat
=>page 79.
ZA WARNING
The LATCH anchors in the vehicle are only de-
signed for child safety seats with the LATCH
system. To reduce the risk of serious or fatal
injury, never secure other child restraint sys-
tems, belts, or objects to the anchors.
@) Tips
The LATCH anchors are designed for a total
weight (child and child safety seat combined)
up to 65 lbs (29 kg). If the total weight is
greater than this, the child safety seat must
be secured with the vehicle safety belt.
78
Securing child safety seats with a safety
Pyia
Follow the safety precautions > page 75. The
front passenger’s seat is a dangerous location for
a child, even with an advanced airbag system. If
exceptional circumstances require the child safe-
ty seat to be placed on the front passenger's
seat, then the front passenger's airbag must be
deactivated. Please note the important informa-
tion for this > page 76, Correct positioning for
children and > page 73, Advanced airbag sys-
tem.
Securing child safety seats
> Applies to: vehicles with a rear bench seat that
can be moved forward/back: If you are securing
a child safety seat in the second row, move the
rear seat all the way back.
> Activate the child safety lock > page 40.
> If you secure a child safety seat to the rear seat,
secure any unused safety belts that are within
reach of the child > A\, > page 80.
> If you secure a child safety seat to the front
passenger's seat, adjust the front passenger's
seat to the highest position.
» Secure the child safety seat according to the
child safety seat manufacturer instructions.
> If necessary, activate the belt retractor lock
=> page 78, Activating the belt retractor lock.
> If the child safety seat is secured on the front
passenger's seat, adjust the front passenger's
seat backrest until it rests flat against the child
safety seat. Also make sure that the upper safe-
ty belt fixture is behind the child safety seat.
> If you secure a child safety seat on the rear
seat, also secure it to the correct top tether an-
chor if possible > page 79.
Activating the belt retractor lock
If you secure a child safety seat using the vehicle
safety belt, you must activate the belt retractor
lock. Follow the child safety seat manufacturer
instructions.
The
belt retractor lock prevents the safety belt
from becoming loose while driving, which could
result in the child safety seat no longer being ad-
equately secured.
Page 81 of 316
![AUDI Q7 2020 Owner´s Manual 4M1012721BA
Sitting correctly and safely
> Secure the child safety seat according to the WXe lel] ally securing a child safety seat to
child safety seat manufacturer instructions. the top tether AUDI Q7 2020 Owner´s Manual 4M1012721BA
Sitting correctly and safely
> Secure the child safety seat according to the WXe lel] ally securing a child safety seat to
child safety seat manufacturer instructions. the top tether](/img/6/40284/w960_40284-80.png)
4M1012721BA
Sitting correctly and safely
> Secure the child safety seat according to the WXe lel] ally securing a child safety seat to
child safety seat manufacturer instructions. the top tether a
While doing so, pull out the safety belt. Insert
the safety belt into the belt latch that belongs
to that seat until it audibly locks.
> Pull the upper belt out completely and then al-
low it to retract. You will hear a clicking sound
while the belt is retracting. It will not be possi-
ble to pull the safety belt out any farther.
> Push the child safety seat into the seat and al-
low the belt to retract more.
> Make sure that the child safety seat cannot
move more than 1 inch (2.5 cm).
Deactivating the belt retractor lock
> Unbuckle the safety belt from the belt latch.
> Remove the child safety seat according to the
manufacturer instructions.
> Allow the safety belt to retract completely. The
belt retractor lock is deactivated.
ZA WARNING .
- Fig. 73 @ Second row rear bench seat / @ third row rear
—A safety belt that is not locked by the belt bench seat: top tether anchors for securing a child safety
retractor lock or a locking device cannot se- seat with an upper strap
cure a child safety seat while driving or in
the event of an accident, which increases the
risk of fatal injury. Always make sure the
belt retractor lock on the safety belt is acti-
vated if the child safety seat manufacturer
instructions require it.
— Due to the risk of fatal injury, never place a
rear-facing child safety seat on the front
passenger's seat when the front passenger's
airbag is switched on.
— For the child safety seat to offer the maxi-
mum protection, it is especially important
to route the vehicle safety belt correctly. Al- Follow the safety precautions > page 75.
ways follow the instructions from the child
safety seat manufacturer for routing the
safety belt correctly. Incorrectly fastened
safety belts can cause injuries, even during
minor accidents. > Move the head restraint behind the child safety
seat upward.
>» Secure the child safety seat according to the
child safety seat manufacturer instructions.
> Guide the upper belt on the child safety seat
under the head restraint or along both sides of >
RAZ.0186'
Fig. 74 Rear backrest: securing the upper belt to the top
tether anchor
There is a top tether anchor behind every seat in
the rear bench seat to additionally secure a child
safety seat with an upper belt.
79
Page 85 of 316
4M1012721BA
Stowing and using
— Never exceed the permitted axle and load
and vehicle weight > page 298.
— Never secure a child safety seat to the tie-
downs.
— Never leave your vehicle unattended, espe-
cially if the luggage compartment lid is
open. Children could enter the luggage com-
partment and close the luggage compart-
ment lid from the inside. This creates the
risk of fatal injury, since the children would
be locked in and may not be able to escape
by themselves.
— Do not allow children to play in or on the ve-
hicle. Close and lock the luggage compart-
ment lid as well as all other doors when you
leave the vehicle.
— Never transport passengers in the luggage
compartment. Every passenger must be cor-
rectly secured with the safety belts in the
vehicle > page 66.
— Be careful when releasing the backrest and
folding
it forward. To reduce the risk of be-
ing pinched, pay attention and check when
folding backrests forward.
— The backrest must be securely latched so
objects cannot slide forward out of the lug-
gage compartment during sudden braking.
— The backrest must be latched securely to en-
sure that the safety belt is protecting the
center seating position.
— Always pull forward on the backrest to make
sure it is check if it is correctly locked in
place.
— Applies to: vehicles with third row seats: To
reduce the risk of injury, the backrest on the
second row seats must be in the upright po-
sition and locked in place if there are pas-
sengers riding in the third row.
— Applies to: vehicles with third row seats:
When there are passengers riding in the
third row seats, remove the adjustable tie-
downs* and place the rail covers on the rails
to
reduce the risk of injuries.
CG) Note
—To reduce the risk of damage, move the rear
head restraints down > page 65 before fold-
ing the rear backrests forward.
— When folding the backrest forward, make
sure the outer safety belts are in the belt
guide recess so that they do not get pinched
in the backrest lock and damaged. Other ob-
jects should be removed from the rear
bench seat to protect the backrest from
damage.
— If you move the front seat back when the
rear seat backrest is folded forward, you
could damage the head restraints on the
rear seat.
— Make sure that the heating grid strips for
the rear window defogger are not damaged
by abrasive objects.
— Let the luggage compartment cover roll up
slowly to reduce the risk of damage.
@) Tips
— The tire pressure must be adapted to the
load > page 256.
— You can purchase straps at specialty stores.
83
Page 92 of 316
Warm and cold
Control panel in rear
You can operate certain climate control functions
in the rear using the control panel.
Customizing
A climate control function from the upper display
can be assigned to each button to the left and
right of +++ in area @).
> Press and hold the symbol for the desired func-
tion on the upper display for at least three sec-
onds. A menu that consists of two sections ap-
pears.
> If you pull the symbol toward the left section,
the button to the left of «++ will be assigned.
> If you pull the symbol toward the right section,
the button to the right of -*- will be assigned.
Press the buttons to turn the functions on or off.
One bar in the button or the LED in the button
will light up when the function is switched on.
Some buttons can have several functions as-
signed to them. The various functions can be ac-
tivated by pressing the button multiple times.
AUTO Automatic mode
The automatic mode regulates the amount of air
and air distribution automatically, so that the set
temperature is reached is quickly as possible.
REAR Rear climate control system
Applies to: vehicles with rear climate control system
To enable operation of the climate control sys-
tem from the rear of the vehicle, press REAR.
To exit this mode again, press REAR or
REAR MODE EXIT.
SYNC Synchronization
When synchronization is switched on, the tem-
perature, air distribution, and blower strength on
the driver's side is applied to all seat positions.
You can also control the synchronization directly
using a gesture. Pull two fingers together on the
lower display > page 16.
90
OFF Switching off
The climate control system is switched off. Air
supply from the outside is blocked. If you press
OFF in the front, the front and rear climate con-
trol system will switch off. If you press OFF in the
rear, the rear climate control system will switch
off. To switch the climate control system back on,
press on any button in the respective display.
A/C / ME Cooling mode
The cooling mode only functions with the blower
turned on. The air is not cooled and humidity is
not removed when cooling mode is switched off.
This can cause fog on the windows. The cooling
mode switches off automatically at low outside
temperatures.
If you activate the A/C, the cooling mode will be
automatically regulated.
If you activate A/C, the cooling mode will run with
maximum cooling output and maximum blower
speed. To reduce unnecessary energy usage, only
use this function briefly.
+ /- Temperature
Temperatures between 60 °F (+16 °C) and 84 °F
(+28 °C) can be set. If outside of this range,
LOW / LO or HIGH / HI will appear in the display.
In both settings, the climate control runs con-
stantly at the maximum cooling or heating level.
The temperature is not regulated.
S8 Blower
With \/ / A, you can manually adjust the vol-
ume of air generated by the blower to your pref-
erences. The blower should always run at a low
setting to prevent the windows from fogging and
to ensure a continuous exchange of air inside the
vehicle. To have the blower regulated automati-
cally, press AUTO.
2 Air distribution
With °/=>/%, you can select the vents where
the air will flow from. To have the air distribution
controlled automatically, press the AUTO button
or deactivate all three arrows. With “, the air
will be directed toward the windshield.
Page 93 of 316
4M1012721BA
Warm and cold
Applies to: vehicles with 4-zone automatic cli-
mate control: You can press J in the rear control
panel multiple times to adjust the air distribution
based on the direction of the arrow.
® Defrosting
The windshield and side windows are defrosted
or cleared of condensation as quickly as possible.
Align the outer air vents with the side windows.
The maximum amount of air flows mainly from
the vents below the windshield. The windshield
defogger* is also switched on at low outside tem-
peratures. The ® button will flash. Recirculation
mode switches off. The temperature should be
set at +72°F (22°C) or higher. Depending on the
outside temperature, the A/C cooling mode may
automatically switch on.
& Rear window defogger
The rear window defogger only operates when
the engine is running. It switches off automati-
cally after 10 to 20 minutes, depending on the
outside temperature.
To prevent the rear window defogger from
switching off automatically, press and hold the
& button for more than three seconds. This is
stored until the ignition is switched off.
AUTO
<>/&S Recirculation mode
In recirculation mode, the air inside the vehicle is
circulated and filtered. This prevents the unfil-
tered air outside the vehicle from entering the
vehicle interior > A\.
Pressing the <> button switches recirculation
mode on or off manually.
‘AUTO
When switched on, automatic recirculation
controls the recirculation mode automatically.
You must press the {% button if fog forms on the
windows.
« Seat heating
Applies to: vehicles with heated seats
The seat heating temperature can be set at mul-
tiple levels. Press «/ once to switch on the highest
level. Press «) again to decrease the temperature
one level at a time. The seat heating is switched
off if the button is not illuminated.
*) Seat ventilation
Applies to: vehicles with seat ventilation
The seat ventilation intensity can be set to multi-
ple levels. Press ©) once to switch on the highest
level. Press 2) again to decrease the intensity one
level at a time. The seat ventilation is switched
off if the button is not illuminated.
@ Child safety lock*
If 8 turns on in the control panel in the rear*, the
child safety lock is active and operation is blocked
=> page 40.
Ionizer
Applies to: vehicles with ionizer
Hazardous particles and germs in the air may be
reduced through ionization. This helps to im-
prove the air quality for individuals in the passen-
ger compartment.
&* Fragrance
Applies to: vehicles with fragrance function
The fragrance function will dispense a scent in
the vehicle interior. It is dispensed through the
front outer vents. This will produce a pleasant
scent. The fragrance is time-delayed, especially
at low or high temperatures. You can adjust the
fragrance function > page 92.
Residual heat
The residual heat from the coolant is used to
heat the vehicle interior. To use this function,
press and hold the & button for more than two
seconds while the ignition is switched off. The
function switches off automatically after about
15 minutes.
ZX WARNING
— You should not use the recirculation mode
for an extended period of time, because no
fresh air is drawn in and the windows can
fog when cooling mode is switched off. This
increases the risk of an accident.
— Individuals with reduced sensitivity to pain
or temperature could develop burns when
using the seat heating* function. To reduce
the risk of injury, these individuals should
not use seat heating*.
91
Page 98 of 316
Driving
— Do not leave your vehicle unattended while
the engine is running, because this increases
the risk of an accident.
— If the parking brake is set, it can release au-
tomatically when the accelerator pedal is
pressed. To reduce the risk of an accident,
do not inadvertently press the accelerator
pedal and always shift into “P” when the ve-
hicle is stopped.
— If you leave the vehicle, switch the ignition
off and take the key with you. This is espe-
cially important when leaving persons or an-
imals in the vehicle. Otherwise, the vehicle
could start unintentionally, the parking
brake could release, or electronic equipment
could activate, which increases the risk of an
accident.
— No persons or animals should be left in a
locked vehicle. Locked doors make it more
difficult for emergency workers to enter the
vehicle, which puts lives at risk.
— If you do not begin driving immediately af-
ter releasing the brake pedal, your vehicle
may begin to roll backward. Press the brake
pedal or set the parking brake immediately.
@) Note
If you have to stop on an incline, always press
the brake pedal to hold the vehicle in place to
reduce the risk of the vehicle rolling back-
ward. Do not try to hold the vehicle in place
by pressing and holding the accelerator pedal.
The transmission can overheat, which increas-
es the risk of damage.
Hill hold assist
If you take your foot off of the brake pedal when
driving on hills, the braking force will be held for
several seconds. At that time, you can start driv-
ing without the vehicle rolling backward.
Requirement: the driver's door must be closed,
the engine must be on, and the vehicle must be
traveling uphill.
> To activate hill hold assist, press and hold the
brake pedal for several seconds while the vehi-
cle is stationary.
96
Z\ WARNING
— If you do not begin driving immediately af-
ter releasing the brake pedal, your vehicle
may begin to roll backward. Press the brake
pedal
or set the parking brake immediately.
— The hill hold assist cannot hold the vehicle
on inclines in every scenario (for example,
on slippery or icy ground).
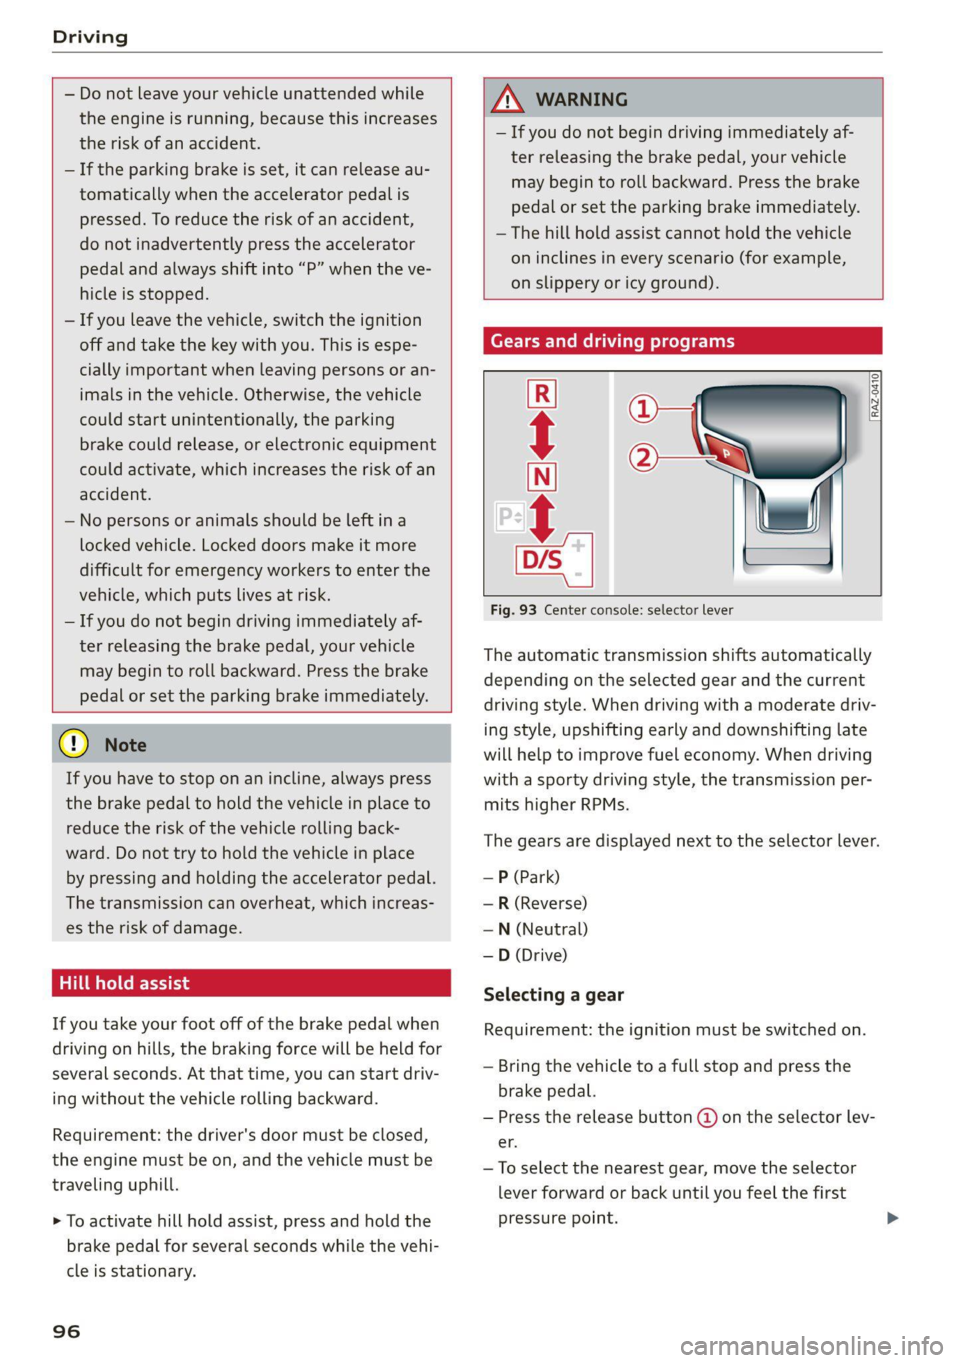
Gears and driving programs
Qs
(2—*
[RAZ-0410|
R
N
i
D/S
mn \___|
Fig. 93 Center console: selector lever
The automatic transmission shifts automatically
depending on the selected gear and the current
driving style. When driving with a moderate driv-
ing style, upshifting early and downshifting late
will help to improve fuel economy. When driving
with a sporty driving style, the transmission per-
mits higher RPMs.
The gears are displayed next to the selector lever.
— P (Park)
— R (Reverse)
—N (Neutral)
—D (Drive)
Selecting a gear
Requirement: the ignition must be switched on.
— Bring the vehicle to a full stop and press the
brake pedal.
— Press the release button @ on the selector lev-
er.
—To select the nearest gear, move the selector
lever forward or back until you feel the first
pressure point.
Page 99 of 316
4M1012721BA
Driving
—To skip a gear (for example, move from “D” to
“R”), move the selector lever past the pressure
point in the desired direction.
— The label next to the selector lever for the se-
lected gear will light up.
“N” (Neutral) gear
In the “N” gear, power is not transmitted to the
driving wheels. Use the “N” gear in a car wash
(with conveyor belts), for example.
If you unintentionally select “N” while driving
(faster than 1 mph (2 km/h)), you can also shift
back to “D” without pressing the brake pedal.
For safety reasons, the vehicle cannot be locked
when the transmission is in the "N” gear.
“Pp” (Park) gear
Requirement: the ignition must be switched on.
The vehicle is secured from rolling away by the
parking lock when in the “P” gear.
— Bring the vehicle to a full stop and press the
brake pedal.
— Press the “P” button 2) on the selector lever.
—The “P” next to the selector lever will light up.
“P” engages automatically if you switch the en-
gine off while the “D” or “R” gear is selected. If
you switch the engine off in “N”, “P” will engage
automatically after approximately 30 minutes.
If you want to switch to another gear from “P”,
the engine must be running.
If you cannot shift out of “P”, for example be-
cause the vehicle has no power, you may need to
use the emergency release for the parking lock
=> page 98.
Selecting the driving program
Various driving programs can be selected when in
the “D” gear. The programs influence when the
transmission shifts and how the accelerator ped-
al responds.
The selected driving program is displayed in the
instrument cluster.
— D (Drive): normal driving mode
—S (Sport): sporty driving mode
If you select the Dynamic mode in Audi drive se-
lect*, the “S” driving program will be activated.
When the ignition is switched off, the driving pro-
gram may be reset to “D”.
To switch between the current driving program
and “S”, push the selector lever toward the rear.
ZA WARNING
— Before starting to drive, check if the desired
gear is displayed next to the selector lever.
— Always secure your vehicle from rolling
away. Press the brake pedal or shift to “P”.
When leaving the vehicle, also set the park-
ing brake.
— Power is still transmitted to the wheels
when the engine is running at idle. To pre-
vent the vehicle from “creeping”, you must
keep your foot on the brake in all selector
lever positions (except "P" and "N") when
the engine is running.
—To reduce the risk of an accident, do not
press the accelerator pedal when changing
gears if the vehicle is stationary and the en-
gine is running.
— Never select the “R" or "P” gears while driv-
ing. Doing so could cause an accident.
— The vehicle can roll even if the ignition is
switched off.
(i) Tips
If you shift between “D” and “R” within one
second, you do not need to press the brake
pedal. This makes it possible to “rock” if it is
stuck, for example.
97