Page 37 AUDI Q7 2021 Owner´s Manual
[x] Cancel search | Manufacturer: AUDI, Model Year: 2021, Model line: Q7, Model: AUDI Q7 2021Pages: 332, PDF Size: 117.99 MB
Page 18 of 332
Instrument cluster
Short-term memory and long-term memory
The short-term memory collects driving informa-
tion from the time the ignition is switched on un-
til it is switched off. If you continue driving within
two hours after switching the ignition off, the
new values will be included when calculating the
current trip information.
Unlike the short-term memory, the long-term
memory is not erased automatically. You can se-
lect the time period for evaluating trip informa-
tion yourself.
Average consumption
The current consumption can be shown using a
bar graph. The average consumption stored in
the short-term memory is also displayed. If the
bar
is green, your vehicle is saving energy (for ex-
ample, using recuperation).
Energy consumers
The Energy consumers view lists other equip-
ment that is currently affecting fuel consump-
tion. The display shows up to three equipment
items. The equipment using the most power is
listed first. If more than three items using power
are switched on, the equipment that is currently
using the most power is displayed. A gauge also
shows the current total consumption of all other
equipment.
@) Tips
The date, time of day, and time and date for-
mat can be set in the Infotainment system
=> page 236.
16
Page 21 of 332

4M1012721BC
Touch displays
> If the General button is not displayed, swipe
toward the left or right with one finger until it
appears.
>» Press the General button.
> If the Date & time button is not displayed,
swipe upward or downward with one finger un-
tilit appears.
> Press the Date & time button.
@ Tips
If a menu or symbol is in parentheses in the
path, for example, (General) or (423), then it is
an optional menu item that does not need to
be used in every system.
You can adjust or turn off the MMI touch display
feedback.
> Applies to MMI: Select on the home screen:
SETTINGS > Display & Brightness > MMI.
Possible settings:
— Brightness
— Touchscreen feedback
Multi Media Interface
Traffic safety information
Audi recommends performing certain Infotain-
ment system functions, such as entering a desti-
nation, only when the vehicle is stationary. Al-
ways be prepared to stop operating the Infotain-
ment system in the interest of your safety and
the safety of other road users.
Z\ WARNING
Only use the Infotainment system when road,
traffic, weather, and visibility conditions per-
mit and always in a way that allows you to
maintain complete control over your vehicle.
@ Tips
Certain functions are not available while driv-
ing.
Switching on or off
Switching the MMI on or off
> To switch the MMI off, press and hold the
On/Off knob > page 30, fig. 19 until the up-
per
display and all Infotainment system func-
tions are switched off.
> To switch the MMI on, press the On/Off knob.
Restarting the MMI
>» Press and hold the On/Off knob for at least 10
seconds.
Switching displays on or off
> To switch the upper display off, press [1] on the
lower display.
> To switch the upper display on, touch the upper
display or press [@J on the lower display.
> To switch both displays on or off, press and hold
Co] on the lower display.
Introduction
You can display and operate Infotainment system
and vehicle functions using both of the Multi Me-
dia Interface (MMI) touch displays.
Configuration wizard
After starting for the first time, the configuration
wizard helps you to set up the vehicle, for exam-
ple to set the desired system language and con-
nect
a telephone.
> Follow the instructions in the display.
> Applies to: MMI: To access the configuration
wizard at a later time, select on the home
screen: HELP > Configuration wizard.
Tool tips
You can have tool tips displayed if necessary.
They introduce various MMI functions to you.
> Applies to: MMI: To open the tool tips, select on
the home screen: HELP > Tool tips > Basic in-
formation or Expert information.
> Follow the instructions in the display.
19
Page 22 of 332

Touch displays
Menus and symbols
ba KC)
een
CE
| ae ee ae
ce
Co) CoN ens PINAL}
arene} CW eared PAL auc
Ce aes)
tay WY mat ad
aa eeolicele
ao acai
RAX-0175|
Fig. 13 MMI: upper/lower display
Label Description
Overview screen
Displays selected information tiles and provides quick access to
certain functions > page 21
Quick access bar
Return to the home screen or the overview page, open menus
quickly > page 21
Display area Select a menu, apply settings, display content > page 21
Favorites ®|@|
©
|
©
Use or manage favorites > page 21
Status bar
Displays existing notifications © > page 22, status display @)
=> page 22, time
Function bar Activate functions or access attached content > page 23
Shortcuts Use shortcuts > page 23
Climate control settings
Adjust the climate control system settings > page 93
Description of common symbols Symbol Description
You can operate the default functions using the eo Search for content
symbols that follow. The symbols may be found [Open explanations for a menu
in any menu, depending on the context. Openigentinge forthe slated
Symbol Description menu
Go back one level a Open the submenu
Close the menu
20
Adjust the settings
Page 23 of 332
4M1012721BC
Touch displays
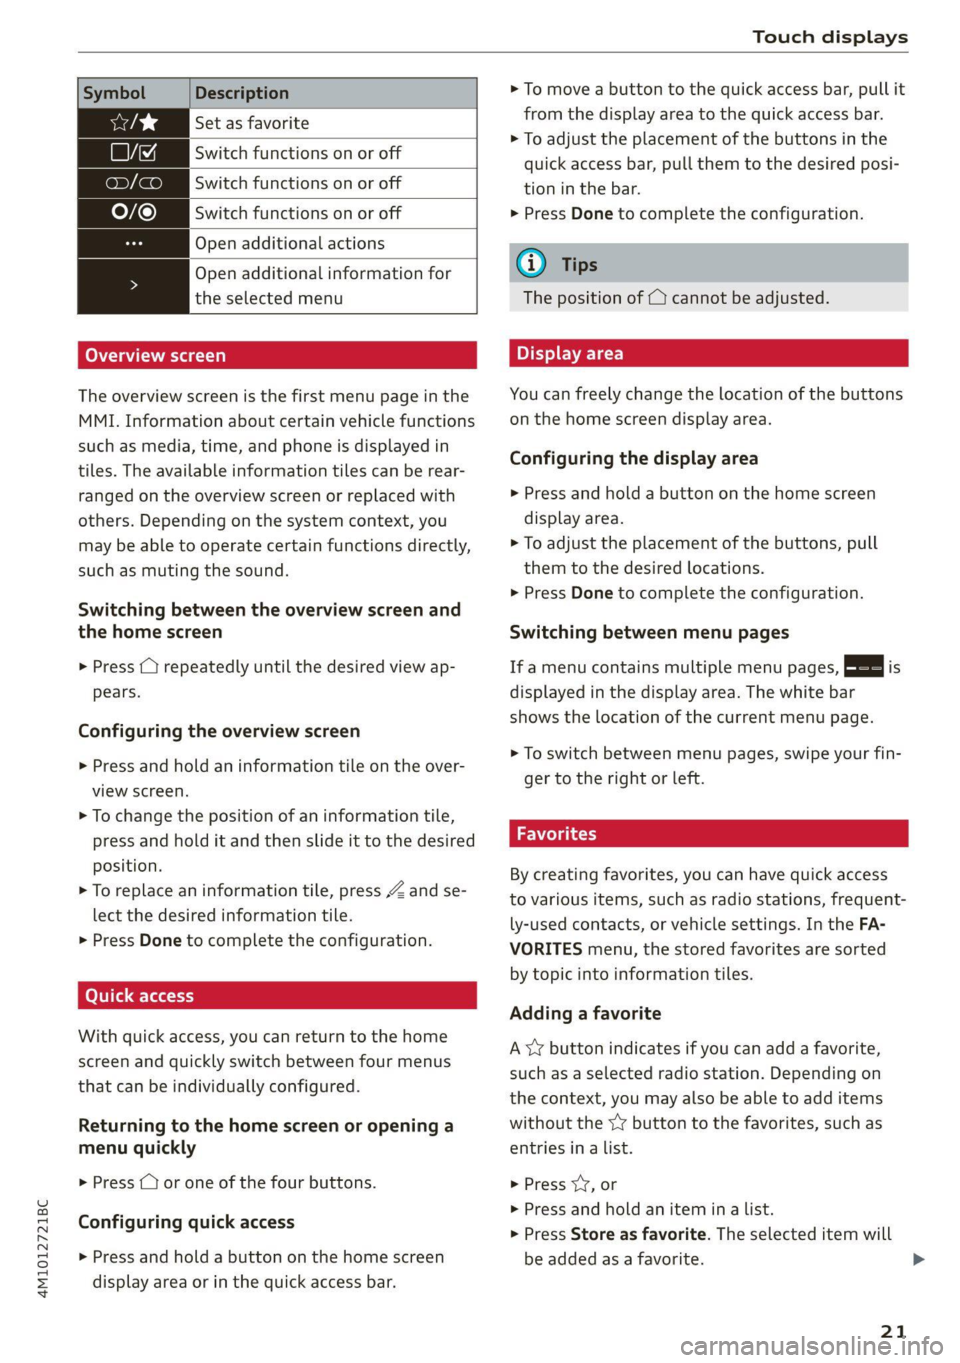
Description
Set as favorite
Switch functions on or off
Switch functions on or off
Switch functions on or off
Open additional actions
Open additional information for
the selected menu
Overview screen
The overview screen is the first menu page in the
MMI. Information about certain vehicle functions
such as media, time, and phone is displayed in
tiles. The available information tiles can be rear-
ranged on the overview screen or replaced with
others. Depending on the system context, you
may be able to operate certain functions directly,
such as muting the sound.
Switching between the overview screen and
the home screen
> Press (1) repeatedly until the desired view ap-
pears.
Configuring the overview screen
> Press and hold an information tile on the over-
view screen.
> To change the position of an information tile,
press and hold it and then slide it to the desired
position.
> To replace an information tile, press Z and se-
lect the desired information tile.
> Press Done to complete the configuration.
With quick access, you can return to the home
screen and quickly switch between four menus
that can be individually configured.
Returning to the home screen or opening a
menu quickly
> Press ( or one of the four buttons.
Configuring quick access
> Press and hold a button on the home screen
display area or in the quick access bar.
> To move a button to the quick access bar, pull it
from the display area to the quick access bar.
> To adjust the placement of the buttons in the
quick access bar, pull them to the desired posi-
tion in the bar.
> Press Done to complete the configuration.
@) Tips
The position of © cannot be adjusted.
Display area
You can freely change the location of the buttons
on the home screen display area.
Configuring the display area
> Press and hold a button on the home screen
display area.
> To adjust the placement of the buttons, pull
them to the desired locations.
> Press Done to complete the configuration.
Switching between menu pages
If a menu contains multiple menu pages, Es] is
displayed in the display area. The white bar
shows the location of the current menu page.
> To switch between menu pages, swipe your fin-
ger to the right or left.
Wel ei at)
By creating favorites, you can have quick access
to various items, such as radio stations, frequent-
ly-used contacts, or vehicle settings. In the FA-
VORITES menu, the stored favorites are sorted
by topic into information tiles.
Adding a favorite
A YY button indicates if you can add a favorite,
such as a selected radio station. Depending on
the context, you may also be able to add items
without the YY button to the favorites, such as
entries in a list.
> Press YY, or
> Press and hold an item ina list.
> Press Store as favorite. The selected item will
be added as a favorite.
21
Page 24 of 332

Touch displays
Using favorites
> Applies to: MMI: Select on the home screen:
FAVORITES. The stored favorites will be dis-
played.
> To access a stored favorite, press that favorite.
Stored favorites can only be deleted or config-
ured in the corresponding menu (such as RADIO).
Arranging information tiles
» Applies to: MMI: Select on the home screen:
FAVORITES.
> Press and hold the desired information tile.
> Pull the information tile into the desired posi-
tion.
> Press Done to confirm the configuration.
Of OB o8
O88 o@ af
O88 o8 of ef
Fig. 14 Upper display: common symbols in the status bar
[RAZ-1078,
The symbols in the status bar show you informa-
tion at a glance, such as if a mobile device is con-
nected or if there is a data connection. The most
common symbols are listed in the table.
Description
There is a data connection. The bar indi-
cates the signal strength of the data con-
nection. Data is being transmitted now.
@
There is a data connection. The bar indi-
cates the signal strength of the data con-
nection. No data is being transmitted now.
A mobile device is connected. The bar indi-
cates the signal strength of the cell phone
connection.
There is no data connection. ®
An error occurred with the mobile device
connection to the MMI. ©
22
Description
A user is selected. If a question mark ap-
pears in the symbol ;\, the guest user is ac-
tive.
A Bluetooth device is connected.
Bluetooth is switched on, but no Bluetooth
device is connected. ©
|Q|
©
Audio playback was interrupted.
The audio source is muted. ©|©
Privacy settings are enabled. The additional
symbol indicates which privacy settings are
currently activated > page 305.
©
The Integrated Toll Module is switched on.
The numbers 1 - 3+ indicate how many pas-
sengers are selected in the MMI.
®
Notification center
ales)
en
RAX-0013
Om ) fo) oO
rice 4
Ceres
Cer Tue)
Sen se ear her ea eee
econ
My
fr}
Fig. 15 Upper display: notification center
Notifications can be displayed in the upper dis-
play. After a specified time, they will be hidden
and a corresponding symbol will appear in the
status bar ©) > page 20, fig. 13. In the notifica-
tion center, you can view these notifications @
= fig. 15 and apply quick settings @.
Using the notification center
> To open the notification center, pull the status
bar downward, or
> Press the =] button on the status bar.
> To apply quick settings, press the respective
symbol @).
> To obtain additional information about a notifi-
cation, press it.
> To delete a notification, pull it toward the right
edge of the screen.
> If there are more than four notifications in the
notification center, the older notifications will >
Page 25 of 332
4M1012721BC
Touch displays
be hidden. To display the older notifications,
drag
your finger upward on the screen.
Setting which content is displayed
You can set whether some notifications should be
displayed.
> To set the displayed content, press &S, or
» Applies to MMI: Select on the home screen:
SETTINGS > Notifications.
> Select and confirm which notifications should
be displayed.
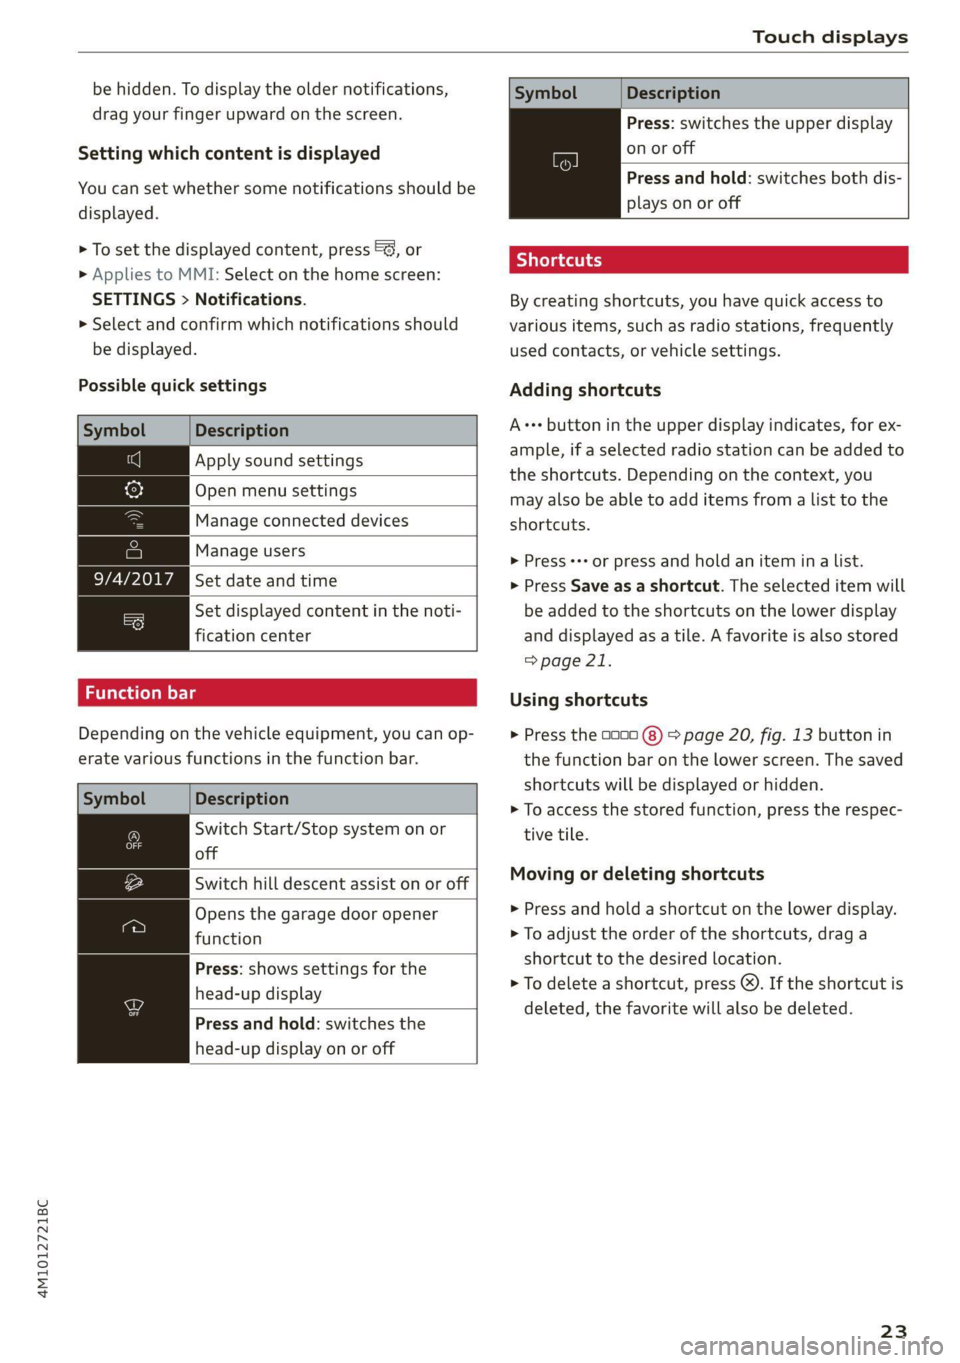
Possible quick settings
Symbol Description
Apply sound settings
Open menu settings
Manage connected devices
Manage users
Set date and time
=: Set displayed content in the noti-
fication center
Depending on the vehicle equipment, you can op-
erate various functions in the function bar.
Description
Switch Start/Stop system on or
off
Switch hill descent assist on or off
Opens the garage door opener
function
Press: shows settings for the
head-up display
Press and hold: switches the
head-up display on or off
Symbol Description
Press: switches the upper display
on or off
Press and hold: switches both dis-
plays on or off
Shortcuts
By creating shortcuts, you have quick access to
various items, such as radio stations, frequently
used contacts, or vehicle settings.
Adding shortcuts
A+++ button in the upper display indicates, for ex-
ample, if a selected radio station can be added to
the shortcuts. Depending on the context, you
may also be able to add items from a list to the
shortcuts.
> Press ++ or press and hold an item ina list.
> Press Save as a shortcut. The selected item will
be added to the shortcuts on the lower display
and displayed as a tile. A favorite is also stored
> page 21.
Using shortcuts
> Press the 0000 (8) > page 20, fig. 13 button in
the function bar on the lower screen. The saved
shortcuts will be displayed or hidden.
> To access the stored function, press the respec-
tive tile.
Moving or deleting shortcuts
> Press and hold a shortcut on the lower display.
> To adjust the order of the shortcuts, drag a
shortcut to the desired location.
> To delete a shortcut, press ®. If the shortcut is
deleted, the favorite will also be deleted.
23
Page 26 of 332
Touch displays
amma ole)
ieee ye ell
aie
les, CA, 90012
Pei
les, Los Feliz, CA, 90027
Prot)
(eer com es
Pera
(eee a l¢y 2)
[RAZ-0711
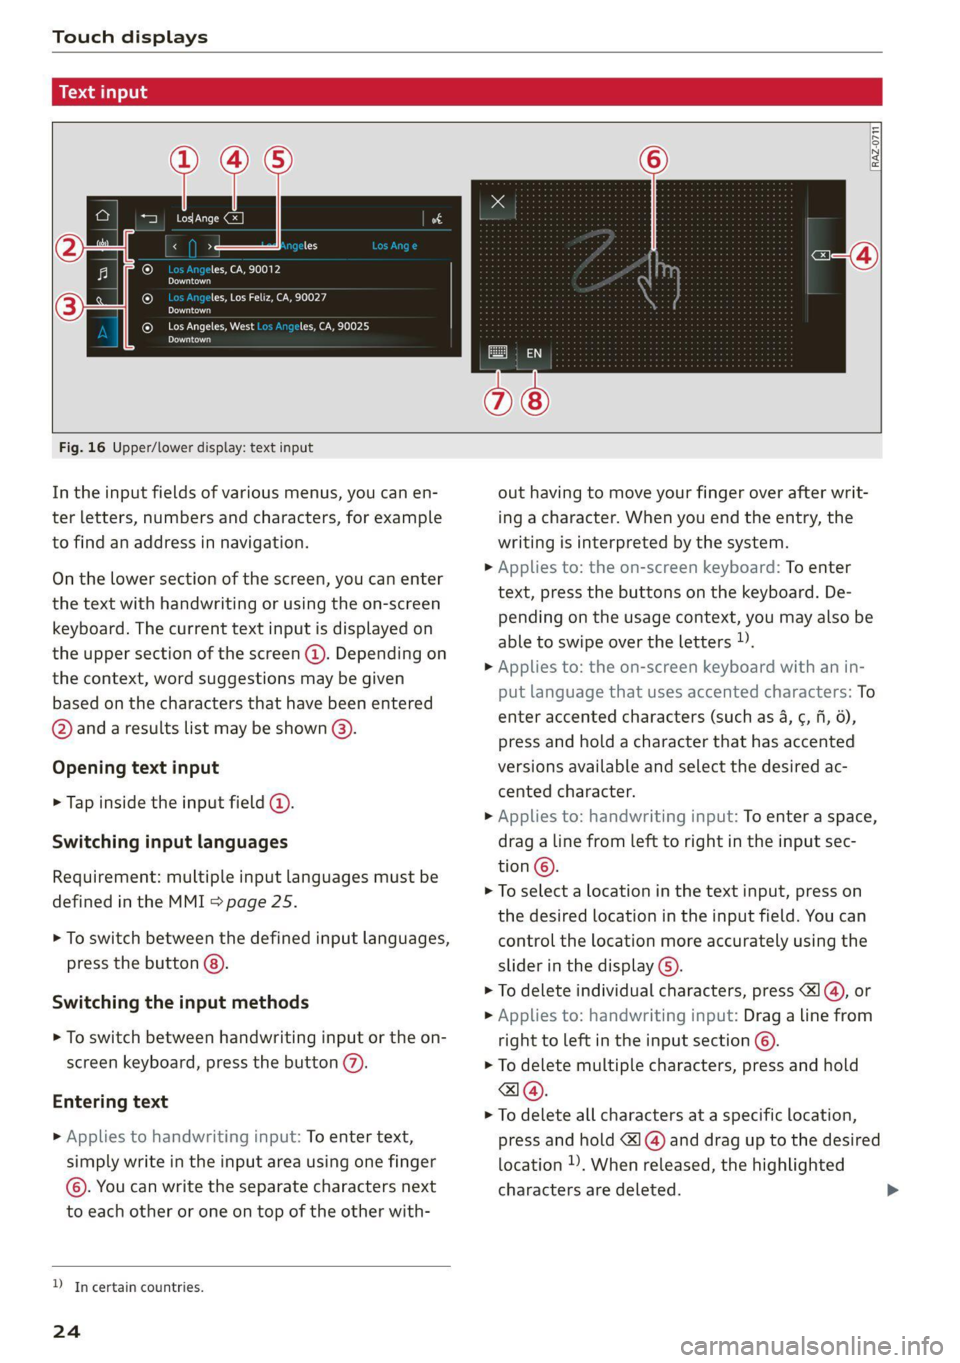
Fig. 16 Upper/lower display: text input
In the input fields of various menus, you can en-
ter letters, numbers and characters, for example
to find an address in navigation.
On the lower section of the screen, you can enter
the text with handwriting or using the on-screen
keyboard. The current text input is displayed on
the upper section of the screen @). Depending on
the context, word suggestions may be given
based on the characters that have been entered
@ and a results list may be shown @).
Opening text input
> Tap inside the input field @.
Switching input languages
Requirement: multiple input languages must be
defined in the MMI > page 25.
> To switch between the defined input languages,
press the button @).
Switching the input methods
> To switch between handwriting input or the on-
screen keyboard, press the button (7).
Entering text
> Applies to handwriting input: To enter text,
simply write in the input area using one finger
©. You can write the separate characters next
to each other or one on top of the other with-
D_ In certain countries.
24
out having to move your finger over after writ-
ing a character. When you end the entry, the
writing is interpreted by the system.
> Applies to: the on-screen keyboard: To enter
text, press the buttons on the keyboard. De-
pending on the usage context, you may also be
able to swipe over the letters )).
> Applies to: the on-screen keyboard with an in-
put language that uses accented characters: To
enter accented characters (such as 4, ¢, fi, 6),
press and hold a character that has accented
versions available and select the desired ac-
cented character.
> Applies to: handwriting input: To enter a space,
drag a line from left to right in the input sec-
tion ©.
> To select a location in the text input, press on
the desired location in the input field. You can
control the location more accurately using the
slider in the display ©).
> To delete individual characters, press
> Applies to: handwriting input: Drag a line from
right to left in the input section ©.
> To delete multiple characters, press and hold
> To delete all characters at a specific location,
press and hold <4] @) and drag up to the desired
location ). When released, the highlighted
characters are deleted.
Page 28 of 332

Head-up display
Head-up display
Description
Applies to: vehicles with head-up display
The head-up display projects certain warnings or
selected information from the assist systems on
the windshield. The display appears within the
driver's field of vision.
Switching on and off
The Y button is located in the function bar on
the lower display > page 20.
> To switch the head-up display on or off, press
and hold the Y button.
Settings in the Infotainment system
> Applies to MMI: Select on the home screen:
SETTINGS > Display & brightness > Head-up
display, or
> Press the Y button.
Possible settings:
— Display rotation
— Brightness
— Display height: you can adjust the height of the
display. Sit in the correct seating position
=> page 63 and adjust the head-up display.
— Display contents: you can set which informa-
tion should be displayed. The display of certain
information and some of the red indicator
lights cannot be hidden.
® Note
To reduce the risk of scratches on the glass
covering the head-up display, do not place any
objects in the projection opening.
@ Tips
— Sunglasses with polarization filters and un-
favorable lighting conditions can impair visi-
bility of the display.
— An optimal display depends on the seat po-
sition and the height adjustment of the
head-up display.
— A special windshield is needed for the head-
up display function.
26
— For information on cleaning, see > table In-
terior cleaning on page 282.
Page 30 of 332

Voice recognition system
> To pause voice recognition, say or press Pause
@. To reactivate voice recognition, press @)
again or briefly press the «€ button on the mul-
tifunction steering wheel.
Additional functions
Applies to: vehicles with voice recognition system
Command during voice output
If the function is switched on, you can simply say
a new command during a prompt.
> Applies to: MMI: Select on the home screen:
SETTINGS > General > Speech dialog system >
Allow commands during voice output.
Online recognizer
Applies to: vehicles with online recognizer
You can activate the online recognizer for addi-
tional functions and to improve the results of
voice recognition. A supported menu language
must be selected. When there is an active Inter-
net connection, the spoken command is evaluat-
ed in the vehicle and online.
> When you switch on the voice recognition sys-
tem for the first time, a menu for the online
recognizer will open, or
> Applies to MMI: Select on the home screen:
SETTINGS > General > Speech dialog system >
Consent to online speech recognizer.
> Read the licensing agreements and accept
them.
Amazon Alexa
Applies to: vehicles with Amazon Alexa Integration
You can activate Amazon Alexa to access certain
functions. A reduced number of commands for
Amazon Alexa are available during this.
Requirement: you must be logged in to your
myAudi account in the vehicle. The online recog-
nizer must be activated. A system language that
is supported by both the voice recognition system
and Amazon Alexa must be selected.
> Applies to: MMI: Select on the home screen:
USER > Connect to Amazon Alexa.
> Follow the instructions in the display.
> Applies to: MMI: To operate Amazon Alexa us-
ing voice commands, select on the home
28
screen: SETTINGS > General > (Speech dialog
system) > Activate the speech dialog system
with "Hey Audi".
>» Say the activation phrase “Alexa” together with
the desired command.
() Note
Read the information about Audi connect, and
be sure to note the connectivity costs section
=@ in General information on page 194.
Gi) Tips
Audi provides access to services from third
party providers. Permanent availability cannot
be guaranteed, because that depends on the
third party provider.
External voice operation
Applies to: vehicles with external speech dialog system
You can access and control the voice operation on
a connected mobile device through your vehicle.
Switching external voice operation on or off
Requirement: the ignition and the MMI must be
switched on. A cell phone must be connected to
the MMI with the Handsfree profile > page 183.
The mobile device being connected must have
voice control that can be controlled externally.
There must be no phone calls in progress and the
parking aid must not be active.
> To switch on the external voice operation, press
and hold the «€ button longer on the multifunc-
tion steering wheel.
> To switch off the external voice operation, press
and hold the «€ button longer on the multifunc-
tion steering wheel or press Cancel.
Using external voice operation
>» Say the desired command after the signal tone.
> To reactivate voice recognition when it is
paused, press the w€ button briefly on the mul-
tifunction steering wheel or press Resume.
G) Tips
Audi simply provides access to control your
cell phone with voice operation and does not >
Page 32 of 332

Global functions
Global functions
Additional function
buttons
Fig. 19 MMI On/Off knob with joystick function
Adjusting the volume
You can adjust the volume of an audio source or a
system message (for example, from the voice
recognition system) when the sound is playing.
> To increase or decrease the volume, turn the
right thumbwheel @) © fig. 18 upward or
downward, or turn the On/Off knob @) 9 fig. 19
to the right or left.
> To mute, push the right thumbwheel or the
On/Off knob.
Selecting the previous/next track or station
> Press the d
Fast forward/rewind
> Press and hold the
the desired playback position is reached.
30
Quick access steering wheel button
Depending on vehicle equipment, the button ©)
may provide quick access to various functions.
You can program the >K button with various func-
tions.
> To bring up the function that is currently set,
press the >K button.
> To perform the function that is currently set,
press and hold the >K button, or:
> Applies to MMI: Select on the home screen: VE-
HICLE > Settings & Service > Steering wheel
button assignment.
> Select and confirm the desired function.
Switching the voice recognition system on or
off
w& button @), see > page 27.
Using the telephone functions
button @), see > page 187.
Z\ WARNING
Adjust the volume of the audio system so that
signals from outside the vehicle, such as po-
lice and fire sirens, can be heard easily at all
times.