stop start AUDI Q7 2021 Owner´s Manual
[x] Cancel search | Manufacturer: AUDI, Model Year: 2021, Model line: Q7, Model: AUDI Q7 2021Pages: 332, PDF Size: 117.99 MB
Page 148 of 332

Driver assistance
the vehicle ahead is driving, the actual dis-
tance may be more or less than these target
distances.
Overriding control
Applies to: vehicles with adaptive cruise assist
RAZ-0096
Fig. 110 Lever: overriding the control
Requirement: the adaptive cruise assist must be
switched on.
Overriding control
You can completely override the control, for ex-
ample when passing or if you would like to accel-
erate more quickly.
> To accelerate manually, pull the lever toward
you in the direction of the arrow and hold it
there, or press the accelerator pedal.
> To resume the usual cruise control, release the
lever or remove your foot from the accelerator
pedal.
When you are in the Driver assistance display,
the message Overridden will appear.
Decreasing the distance
The function decreases the set distance and pro-
vides assistance, for example when merging
when a lane is ending.
> To further reduce the distance to the vehicle
ahead temporarily, pull the lever toward your-
self in the direction of the arrow and hold it in
that position.
> To resume the system control, release the lever.
The adaptive cruise assist reduces the distance
and, if necessary, accelerates the vehicle above
D_ This is not available in some countries.
146
the set speed. When you are in the Driver assis-
tance display, the message Overridden will ap-
pear.
ZA\ WARNING
— Observe the safety precautions and note the
limits of the assist systems, sensors, and
cameras > page 123.
— Resting your foot on the accelerator pedal
could override the cruise control. Braking in-
terventions and corrective actions by the
system may not occur.
Driving in stop-and-go traffic
Applies to: vehicles with adaptive cruise assist
SI 8 3
I? ny x fa
Fig. 111 Instrument cluster: safe start monitor
Stopping with adaptive cruise assist
The adaptive cruise assist also assists you in stop-
and-go traffic. Within the limits of the system,
your vehicle may brake and remain at a stop if a
vehicle driving ahead stops.
Starting to drive with adaptive cruise assist!)
As long as the message ready to drive and | is
displayed, your vehicle will begin driving when
the vehicle ahead starts to move > /\.
If you are stopped for several seconds, your vehi-
cle will no longer drive autonomously for safety
reasons, and the message will turn off.
> To extend ready to drive for several seconds or
reactivate, pull the lever briefly towards you in
the direction of the arrow > page 146, fig. 110.
> To resume manual control of the vehicle, tap
the
accelerator pedal.
Page 149 of 332

4M1012721BC
Driver assistance
Safe start monitor
The vehicle can still start to drive even if certain
obstacles are detected when starting to drive
> /\. If the surrounding area detection detects
an obstacle, you will be alerted to the danger by
the indicator light.
If you are in the Driver assistance display, the
display @ © fig. 111 and the message Warning!
will also appear. An audio signal will also sound.
Your vehicle will drive more slowly when starting.
This may also occur in some situations when
there is no apparent obstacle.
> Press the brake pedal to slow your vehicle
down.
ZA\ WARNING
— Observe the safety precautions and note the
limits of the assist systems, sensors, and
cameras > page 123.
— If the message ready to drive!) appears,
your vehicle will start driving even if there is
an obstacle between your vehicle and the ve-
hicle ahead. To reduce the risk of an acci-
dent, always make sure there are no obsta-
cles between your vehicle and the vehicle
driving ahead.
@) Tips
For safety reasons, adaptive cruise assist is
only active if:
— The driver's safety belt is fastened
— All doors and the hood are closed
— Your vehicle is not stopped for a long period
of time
D_ This is not available in some countries.
Tama n request
Applies to: vehicles with adaptive cruise assist
Fig. 112 Instrument cluster: request for driver interven-
tion
The request for driver intervention instructs you
to resume manual control of the vehicle if the
adaptive cruise assist braking function is not able
to maintain a sufficient distance to the vehicle
ahead. The system will warn you of the hazard
with the A indicator light and the message Dis-
tance!. An audio signal will also sound.
The display @ only appears when the Driver as-
sistance display is open in the on-board comput-
er > page 15.
ZA\ WARNING
Observe the safety precautions and note the
limits of the assist systems, sensors, and
cameras > page 123.
Adjusting the adaptive cruise assist
Applies to: vehicles with adaptive cruise assist
You can adjust the adaptive cruise assist to your
own preferences. The settings depend on the ve-
hicle equipment.
> Applies to MMI: Select on the home screen: VE-
HICLE > Driver assistance > (3) > Adaptive
cruise assist.
Possible settings:
Lane guidance - If lane guidance is also active
when adaptive cruise assist control is active, you
can switch it on or off.
Driving program - Depending on the driving pro-
gram and the distance that are set, the vehicle
147
>
Page 162 of 332
Driver assistance
As soon as the vehicle comes to a full stop, the
vehicle prepares for the vehicle passengers to be
rescued. The parking brake is set, “P” gear is en-
gaged, the doors are unlocked, and the interior
lighting is activated. The emergency call» will be
started if necessary once the vehicle has been
stationary
for several seconds.
Display
If /S\ is displayed for example, the emergency
assist is active.
Overriding the emergency assist
You can override emergency assist as follows
>A:
— Move the steering wheel. Or
— Press the brake pedal. Or
— Press the accelerator pedal distinctly.
When stationary, you can end the emergency as-
sist by leaving the "P" position or releasing the
parking brake > page 108.
Switching the emergency assist on and off
The system can be switched on and off in the
MMI > page 126.
Messages
a | or & is displayed when there is a malfunc-
tion, the emergency assist functions may be un-
available or may be limited.
A message that indicates the cause and possible
solution may appear with some displays. The
weather conditions may be too poor or a sensor
may be covered. Clean the area in front of the
sensors > page 125 and try to turn the system on
again later.
If the malfunction remains, drive to an author-
ized Audi dealer or authorized Audi Service Facili-
ty immediately to have the malfunction correct-
ed.
AN WARNING
— Observe the safety precautions and note the
limits of the assist systems, sensors, and
cameras > page 123.
— The emergency assist is an assist system
that should only be used in cases of emer-
gency to take over control of the vehicle and
bring it to a stop.
) This function is not available in every market and on all ve-
hicle equipment levels.
160
(i) Tips
— Depending on the severity of the detected
situation, not all safety measures will be ini-
tiated. Certain functions can be adjusted or
skipped if necessary.
— If the emergency assist was triggered, it will
only be available again after a brief period.
Page 176 of 332
Parking and maneuvering
— Park assist plus is an assist system. The driv-
er is still responsible for monitoring the ve-
hicle's surroundings and preventing colli-
sions when using the system.
— When using park assist plus to drive into or
out of a parking space, the steering wheel
turns quickly on its own. Reaching into the
steering wheel spokes while this is happen-
ing can result in injury.
— Sensors and cameras have spots in which
the surrounding area cannot be detected.
Objects, animals, and people may only be
detected with limitations may not be detect-
ed at all. Always monitor the traffic and the
vehicle's surroundings directly and do not
become distracted.
@) Tips
— You can reduce the speed specified by the
system at any time by pressing the brake
pedal.
— The system can incorrectly interpret parking
space barriers (such as parking curbs). Take
over the parking process = page 175 if the
vehicle is not completely inside the parking
space or if the vehicle tries to drive over the
parking space barrier.
— The image in the display is an enlarged and
distorted image. Under certain circumstan-
ces, objects may appear different and un-
clear on the display. This is especially true if
there are objects that do not touch the
ground, such as the bumper of a parked ve-
hicle or the rear of a truck. Drive with spe-
cial care and do not use the image if neces-
sary.
— Applies to vehicles with air suspension: The
accuracy of the orientation lines and green
surfaces in the display decreases when the
vehicle is raised or lowered with the air sus-
pension.
)_ system availability may be limited depending on the mar-
ket.
2) In preparation at the time of printing.
174
Exiting a parking space with park assist
Pye oa)
Applies to: vehicles with park assist plus
If you parked the vehicle in a parallel parking
space, park assist plus can help you drive out of
it.
> Start the engine.
> Press P@ in the lower display.
> Wait until a message appears on the upper dis-
play that requests you to select the direction to
travel in when exiting the parking space.
> Activate the turn signal on the desired side or
press that side next to the vehicle in the upper
display.
> Remove your hands from the steering wheel.
> Pay attention to the path of the vehicle. If the
traffic situation permits it, press and hold the
>>P] button @ > page 173, fig. 135 and re-
lease the brakes > A\.
> Pay attention to the path of the vehicle. If an
obstacle appears, interrupt the parking process
by releasing the [>>P] button. The vehicle re-
mains stopped.
> To resume the parking process, press and hold
the [>>P| button again.
> The process of exiting the parking space has
ended if additional corrective movements are
no longer necessary and the specified steering
wheel angle is sufficient to drive out of the
parking space. Resume control of the steering
wheel >@).
Pause park assist plus > page 175.
Z\ WARNING
— Observe the safety precautions and note the
limits of the assist systems, sensors, and
cameras > page 123.
— Press and hold the [>>P] button only if you
are sure that there are no obstacles in the
vehicle's path or under the vehicle, and that
no obstacles will move into the vehicle's
path. >
Page 180 of 332
Parking and maneuvering
@) Tips
— When parking in garages, you can be
straight in front of the garage or at a slight
angle in front of the garage. You will have
the best results when you align and stop
your vehicle as straight as possible in front
of the garage.
— If there is enough space in a two-car garage,
the system automatically selects the park-
ing position in front of the vehicle that the
driver has selected.
Parking with the myAud re
Applies to: vehicles with remote park assist plus
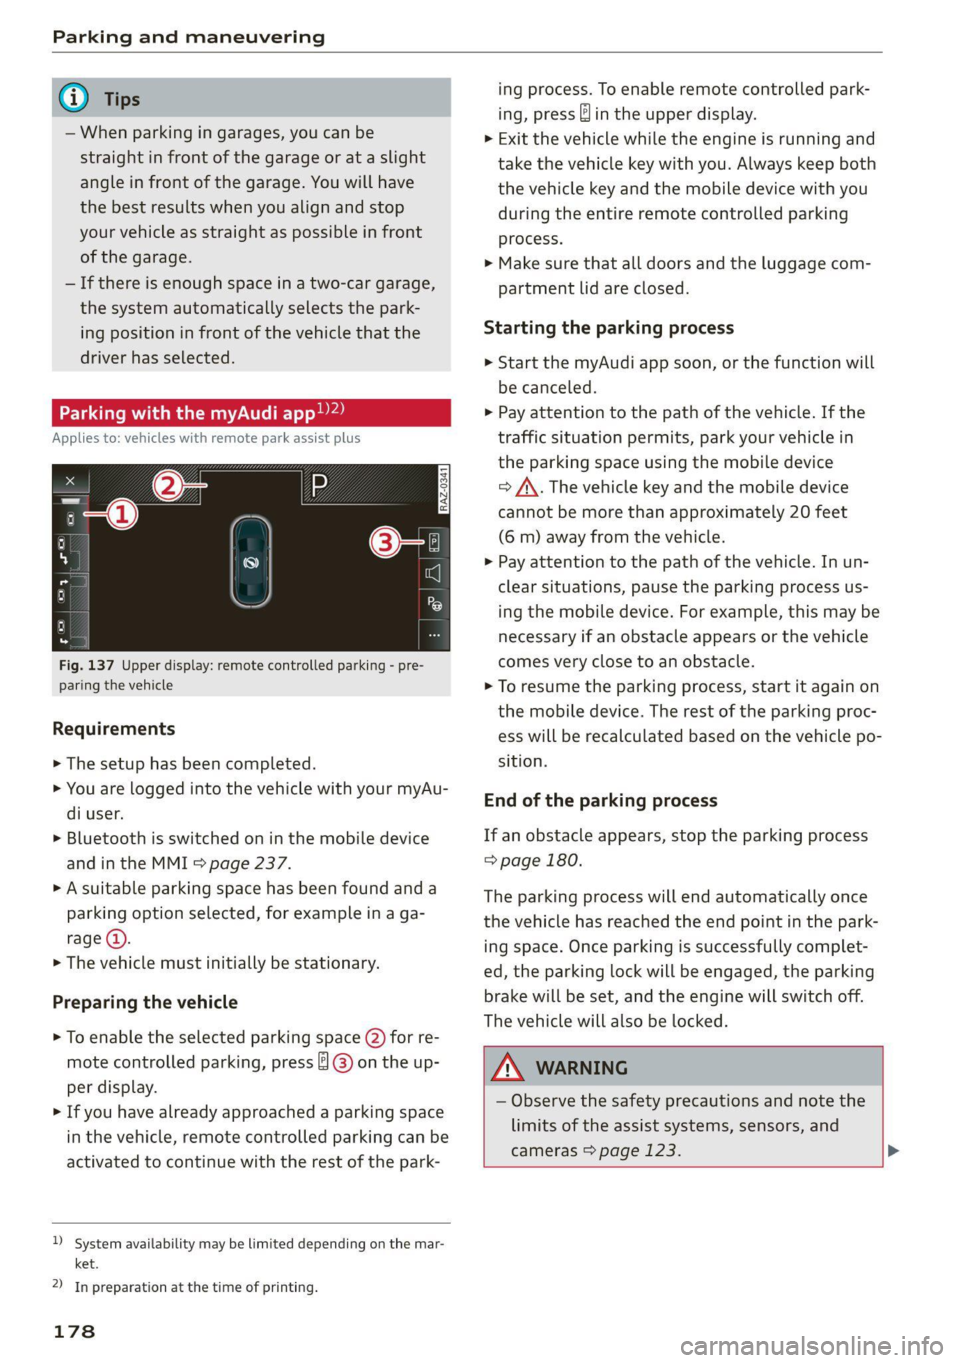
Fig. 137 Upper display: remote controlled parking - pre-
paring the vehicle
Requirements
> The setup has been completed.
> You are logged into the vehicle with your myAu-
di user.
> Bluetooth is switched on in the mobile device
and in the MMI > page 237.
> A suitable parking space has been found anda
parking option selected, for example in a ga-
rage (@).
> The vehicle must initially be stationary.
Preparing the vehicle
> To enable the selected parking space (2) for re-
mote controlled parking, press ] @) on the up-
per display.
> If you have already approached a parking space
in the vehicle, remote controlled parking can be
activated to continue with the rest of the park-
)_ system availability may be limited depending on the mar-
ket.
2) In preparation at the time of printing.
178
ing process. To enable remote controlled park-
ing, press J in the upper display.
> Exit the vehicle while the engine is running and
take the vehicle key with you. Always keep both
the vehicle key and the mobile device with you
during the entire remote controlled parking
process.
> Make sure that all doors and the luggage com-
partment lid are closed.
Starting the parking process
> Start the myAudi app soon, or the function will
be canceled.
> Pay attention to the path of the vehicle. If the
traffic situation permits, park your vehicle in
the parking space using the mobile device
> J\. The vehicle key and the mobile device
cannot be more than approximately 20 feet
(6 m) away from the vehicle.
> Pay attention to the path of the vehicle. In un-
clear situations, pause the parking process us-
ing the mobile device. For example, this may be
necessary if an obstacle appears or the vehicle
comes very close to an obstacle.
> To resume the parking process, start it again on
the mobile device. The rest of the parking proc-
ess will be recalculated based on the vehicle po-
sition.
End of the parking process
If an obstacle appears, stop the parking process
=> page 180.
The parking process will end automatically once
the vehicle has reached the end point in the park-
ing space. Once parking is successfully complet-
ed, the parking lock will be engaged, the parking
brake will be set, and the engine will switch off.
The vehicle will also be locked.
ZA WARNING
— Observe the safety precautions and note the
limits of the assist systems, sensors, and
cameras > page 123. >
Page 181 of 332
4M1012721BC
Parking and maneuvering
— Failing to pay careful attention to the vehi-
cle's surroundings increases the risk of an
accident. Park your vehicle with the mobile
device only if you are sure that no obstacle is
in the vehicle's path or under the vehicle,
and that no obstacles will move into the ve-
hicle's path.
G) Tips
— If the parking space is located in a garage, it
must be detected correctly by the vehicle.
When the parking space is detected com-
pletely, the edges of the space will be high-
lighted @).
— The parking process can only be started if
the vehicle key is located outside the vehicle
after the vehicle is prepared. Always keep
both the vehicle key and the mobile device
with you during the entire remote control-
led parking process.
— Remote controlled parking may be restrict-
ed or unavailable in situations such as the
following:
— If the ESC is restricted or switched off, or
if there is a malfunction.
— If there is another vehicle key inside the
vehicle or nearby.
— The system can incorrectly interpret parking
space barriers (such as parking curbs). Take
over the parking process > page 180 if the
vehicle is not completely inside the parking
space or if the vehicle tries to drive over the
parking space barrier.
Exiting parking spaces wit
app)
Applies to: vehicles with remote park assist plus
the myAudi
> Start the myAudi app.
> Start the engine in the myAudi app soon. When
starting, the vehicle key and mobile device
must not be more than approximately 10 feet
(3 m) away from the vehicle.
> Start the parking process with the mobile de-
vice soon. Otherwise, the function will be can-
celed.
> Pay attention to the path of the vehicle. If the
traffic situation permits, drive the vehicle out of
the parking space using the mobile device
> /\. The vehicle key and the mobile device
cannot be more than approximately 20 feet
(6 m) away from the vehicle during remote con-
trolled parking.
> The process for exiting a parking space ends
when the maximum distance is reached or if ad-
ditional corrective movements are no longer
necessary. Unlock and resume manual control
of the vehicle.
If an obstacle appears, stop the parking process
=> page 180.
ZA\ WARNING
— Observe the safety precautions and note the
limits of the assist systems, sensors, and
cameras > page 123.
— Failing to pay careful attention to the vehi-
cle's surroundings increases the risk of an
accident. Park your vehicle with the mobile
device only if you are sure that no obstacle is
in the vehicle's path or under the vehicle,
and that no obstacles will move into the ve-
hicle's path.
)_ System availability may be limited depending on the mar-
ket.
2) In preparation at the time of printing.
(i) Tips
You can interrupt the path set by the vehicle,
for example if it will drive very close to an ob-
stacle, by pausing the parking process using
the mobile device. Based on the position of
the vehicle, the system then calculates the
additional steering and driving directions for
maneuvering.
179
Page 182 of 332

Parking and maneuvering
eae atm eatle Mel tecel (eM eee atte pace
Applies to: vehicles with remote park assist plus
To stop the vehicle, you can temporarily pause re-
mote controlled parking at any time using your
mobile device.
You can also completely stop the parking process
and come to full stop immediately using the ve-
hicle key by pressing any button on the vehicle
key. Therefore, always keep the vehicle key with
you during the remote controlled parking proc-
ess.
Canceling automatically
The remote controlled parking will be canceled
automatically in the following situations, among
other things:
— If the myAudi app is not started soon after exit-
ing
the vehicle,
— If you switch off the system
— If the time limit is exceeded
— The ESC intervenes
Taking over the parking process
After canceling the parking process, the vehicle
will come to a stop and the "P" position will be
engaged. Take over control of the vehicle, end the
parking process manually, and stop the vehicle.
You can also restart the entire parking process
from inside the vehicle.
Z\ WARNING
— Observe the safety precautions and note the
limits of the assist systems, sensors, and
cameras © page 123.
— Failing to pay careful attention to the vehi-
cle's surroundings increases the risk of an
accident. Park your vehicle with the mobile
device only if you are sure that no obstacle is
in the vehicle's path or under the vehicle,
and that no obstacles will move into the ve-
hicle's path.
D_ System availability may be limited depending on the mar-
ket.
2) In preparation at the time of printing.
180
G) Tips
The parking process will be interrupted tem-
porarily if an obstacle is detected.
Maneuver assist2)”)
Fig. 138 Upper display: maneuver assist
General information
The maneuver assist supports the driver when
maneuvering and parking by monitoring the area
in front of, behind, and beside the vehicle using
sensors. If there is an impending collision with an
object, the system will intervene within its limits
and attempt to prevent the collision by applying
the brakes. The system will detect objects that
are approximately 8 inches (20 cm) high or high-
er.
Display overview
The displays @ - @ indicate the status and avail-
ability of the maneuver assist.
@ The white border indicates the availability in
this area.
The red border indicates an object nearby.
If there is no border, this indicates an inactive
area (partial availability).
Activate/deactivate maneuver assist and sta-
tus displays:
®
©®&
—*4 Maneuver assist activated. The vehicle is
bordered in white. If the sensors are parti-
ally available, the white border will only be
visible in the monitored areas.
Page 207 of 332
4M1012721BC
Navigation
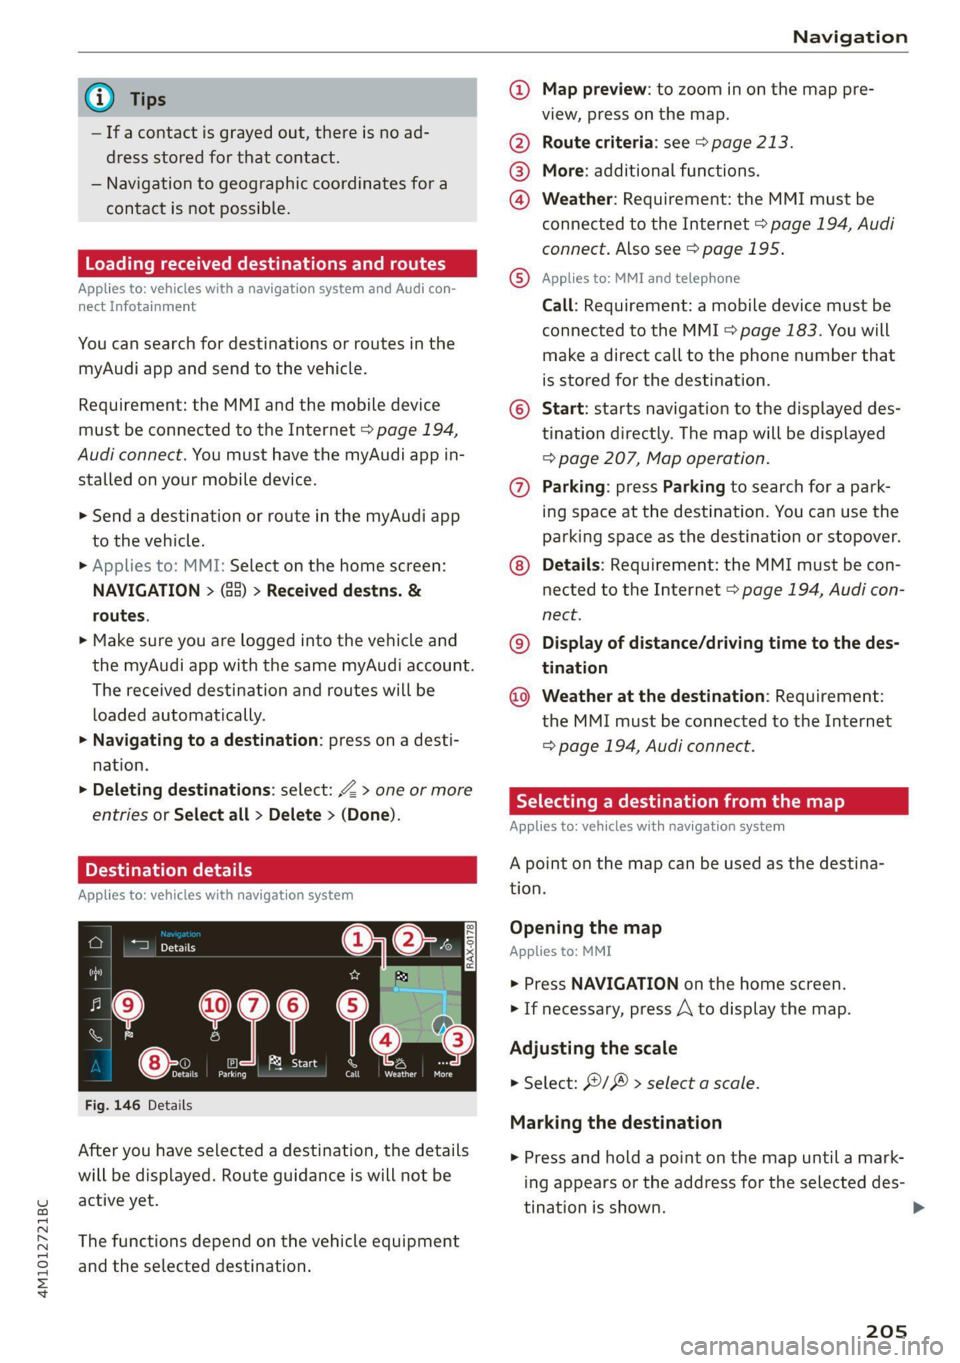
@) Tips @ Map preview: to zoom in on the map pre-
; ; view, press on the map.
— Ifa contact is grayed out, there is no ad- @ Route criteria: see © page 213.
dress stored for that contact.
— Navigation to geographic coordinates for a
contact is not possible. @
®
More: additional functions.
Weather: Requirement: the MMI must be
connected to the Internet > page 194, Audi
connect. Also see > page 195.
Loading received destinations and routes
Applies to: MMI and teleph:
Applies to: vehicles with a navigation system and Audi con- © PRES? STS EBON
nect Infotainment Call: Requirement: a mobile device must be
connected to the MMI > page 183. You will
make a direct call to the phone number that
is stored for the destination.
You can search for destinations or routes in the
myAudi app and send to the vehicle.
Requirement: the MMI and the mobile device © Start: starts navigation to the displayed des-
must be connected to the Internet > page 194, tination directly. The map will be displayed
Audi connect. You must have the myAudi app in- => page 207, Map operation.
stalled on your mobile device. @) Parking: press Parking to search for a park-
> Send a destination or route in the myAudi app ing space at the destination. You can use
the
to the vehicle. parking space as the destination or stopover.
> Applies to: MMI: Select on the home screen: Details: Requirement: the MMI must be con-
NAVIGATION > (a5) > Received destns. & nected to the Internet > page 194, Audi con-
routes. nect.
>» Make sure you are logged into the vehicle
and ©) Display of distance/driving time to the des-
the myAudi app with the same myAudi account. tination
The received destination and routes will be Weather at the destination: Requirement:
loaded automatically. the MMI must be connected to the Internet
> Navigating to a destination: press on a desti- > page 194, Audi connect.
nation.
> Deleting destinations: select: Z > one or more 7 Eh
: RY a date Meld Le MLL] 2)
entries or Select all > Delete > (Done).
Applies to: vehicles with navigation system
Applies to: vehicles with navigation system tion.
0|6:. Opening the map
om Applies to: MMI
> Press NAVIGATION on the home screen
aa 7 > If necessary, press A to display the map.
Adjusting the scale
eases
er a A
> Select: ©/ > select a scale.
Fig. 146 Details
Marking the destination
After you have selected a destination, the details
will be displayed. Route guidance is will not be
active yet.
> Press and hold a point on the map until a mark-
ing appears or the address for the selected des-
tination is shown. >
The functions depend on the vehicle equipment
and the selected destination.
205
Page 208 of 332

Navigation
Selecting map content (such as POIs) as the
destination
Requirement: map content must be displayed
=> page 212.
> Press on map content on the map (for example,
ii).
Selecting the destination
> Select: F2 > Start.
Route guidance will be activated and the map will
be displayed > page 206, fig. 147.
Stopovers and route plan
Applies to: vehicles with navigation system
You can enter additional destinations during ac-
tive route guidance.
Entering a stopover
Requirement: route guidance must be active.
> Enter a destination > page 203.
Displaying stopovers or the route plan
All destinations are listed in the route plan.
> Press on fin the side menu on the map
=> page 206, fig. 147.
Editing stopovers
> Press on Pin the side menu on the map
=> page 206, fig. 147.
> Adding a stopover: Select: Add destination >
select a destination > Add to route.
> Moving a stopover: press Z. Touch the > sym-
bol and move the entry to the desired position.
Press Done.
> Deleting a stopover: Select: Z > one or more
entries or Select all > Delete > (Done).
Stopping route guidance
Applies to: vehicles with navigation system
Requirement: route guidance must be active and
the map must be displayed.
> Applies to: MMI: Press ®( > page 206, fig. 147.
> Applies to: multifunction steering wheel: Select
in the instrument cluster: Navigation tab >
button > Cancel route guidance.
206
Map
Map functions
Applies to: vehicles with navigation system
yn >] 13:51 | E53 Dreshertown Rd
py pe Dee aay a ae LE
- oF ‘a € “epio
Fig. 148 Marked map object
Opening the map
Applies to: MMI
> Press NAVIGATION on the home screen.
> If necessary, press A to display the map.
The following list gives an overview of the infor-
mation displayed on the map. Press on any func-
tion (for example, alternative routes) to show ad-
ditional options.
Select destination > page 204
Enter a destination using intelligent search
=> page 203
Cancel route guidance > page 206
Current route
Request spoken prompt
Alternative routes > page 208
COOH
OO
Display active destinations, stopovers, or
route plan > page 206. The distance to the
destination including the calculated arrival
time is displayed.
Online traffic information > page 211
Altitude ©®
Page 209 of 332
4M1012721BC
Navigation
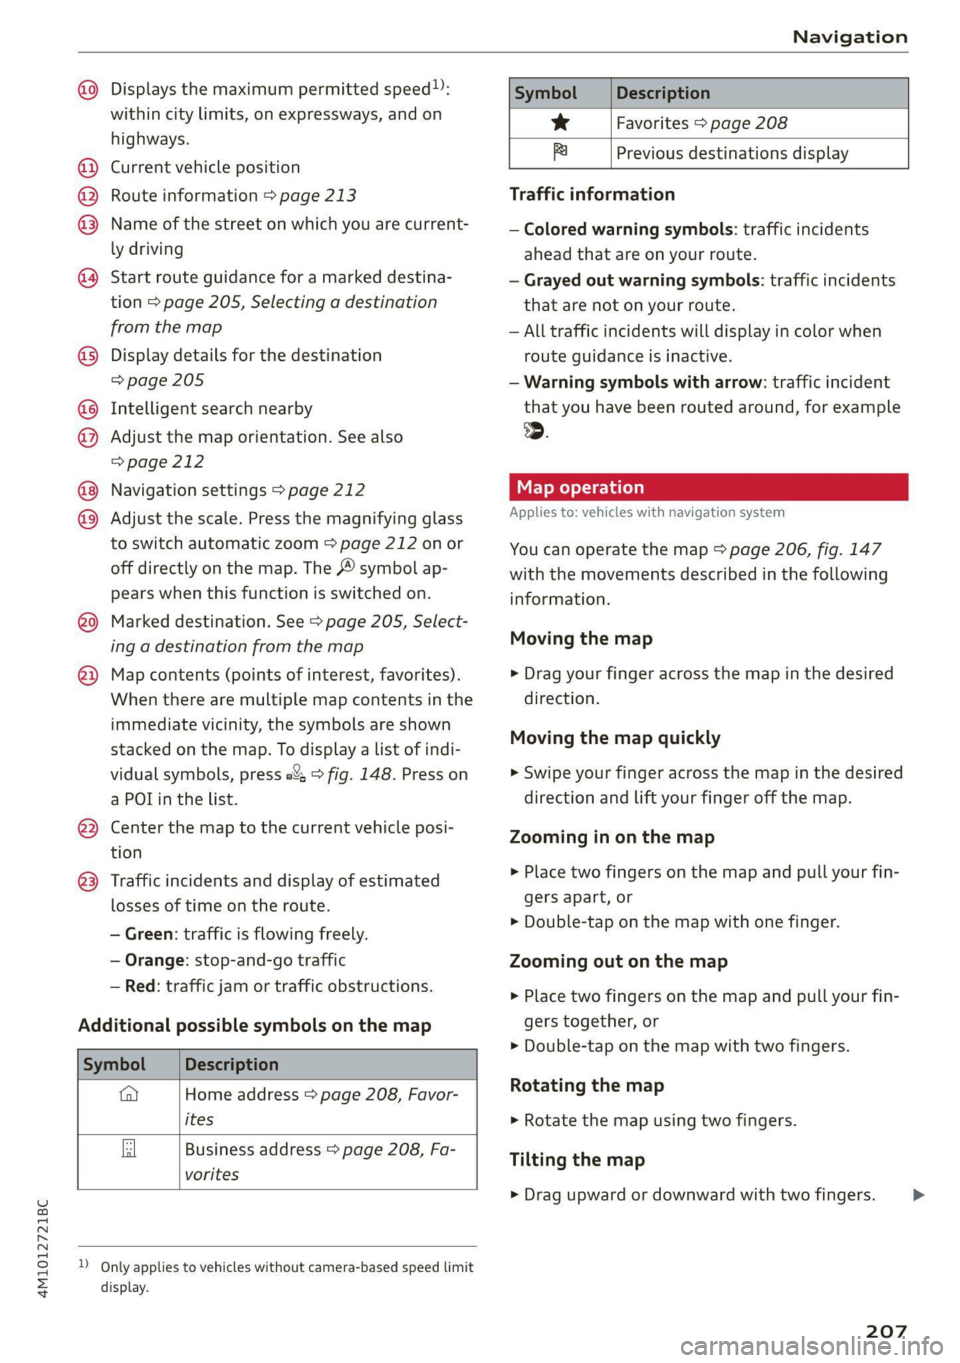
@ Displays the maximum permitted speed): Symbol Description
within city limits, on expressways, and on se Favorites > page 208
highways. S TT :
. . Bi Previous destinations display
@) Current vehicle position
@ Route information > page 213 Traffic information
© Name of the street on which you are current- —__ Colored warning symbols: traffic incidents
ly driving ahead that are on your route.
@ Start route guidance for a marked destina- — Grayed out warning symbols: traffic incidents
tion > page 205, Selecting a destination that are not on your route.
from the map — All traffic incidents will display in color when
@®) Display details for the destination route guidance is inactive.
= page 205 — Warning symbols with arrow: traffic incident
@ Intelligent search nearby that you have been routed around, for example
@ Adjust the map orientation. See also .
=>page 212
@ Navigation settings > page 212 Map operation
® Adjust the scale. Press the magnifying glass Applies to: vehicles with navigation system
to switch automatic zoom > page 212 on or You can operate the map > page 206, fig. 147
off directly on the map. The © symbol ap- with the movements described in the following
pears when this function is switched on. information.
® Marked destination. See > page 205, Select-
ing a destination from the map
Map contents (points of interest, favorites). > Drag your finger across the map in the desired
When there are multiple map contents in the direction.
immediate vicinity, the symbols are shown
stacked on the map. To display a list of indi-
vidual symbols, press a’; > fig. 148. Press on > Swipe your finger across the map in the desired
a POT in the list. direction and lift your finger off the map.
Moving the map
®
Moving the map quickly
@ — the map to the current vehicle posi- Zooming in on the map
ion
>» Place two fingers on the map and pull your fin-
gers apart, or
> Double-tap on the map with one finger.
@3) Traffic incidents and display of estimated
losses of time on the route.
— Green: traffic is flowing freely.
— Orange: stop-and-go traffic Zooming out on the map
Red: traffic jaitior traffic obstructions. » Place two fingers on the map and pull your fin-
Additional possible symbols on the map gers together, or
> Double-tap on the map with two fingers.
Symbol Description
@ Home address > page 208, Favor- Rotating the map
ites > Rotate the map using two fingers.
Business address > page 208, Fa-
vorites
Tilting the map
> Drag upward or downward with two fingers. >
D_ Only applies to vehicles without camera-based speed limit
display.
207