gearbox AUDI R8 2007 User Guide
[x] Cancel search | Manufacturer: AUDI, Model Year: 2007, Model line: R8, Model: AUDI R8 2007Pages: 210, PDF Size: 8.1 MB
Page 141 of 210
Your vehicle and the environment139
Controls
Safety
Driving tips
General maintenance
Self-help
Technical data
Sporty drivingLetting the engine warm up and cool downYou can reduce the amount of wear and tear on your vehicle during
a sporty driving session simply by adopting a more restrained
driving style while the engine is warming up and cooling down.
You should allow the engine to warm up by keeping the engine
speed below 7000 rpm until the engine oil reaches at least 90 °C. In
addition, the tyres will not develop their full grip potential until they
have had a chance to warm up on the road.
Even though the engine continues to be cooled after you switch it
off, it is particularly important to give it time to cool down before
parking. The engine, brakes, exhaust system and gearbox will all
reach very high temperatures when you adopt a sporty driving style.
Before you park the vehicle, allow it to cool down to normal temper-
ature by driving at moderate rpm speeds for several miles.Driving on a racing circuitBefore you take your car out on a racing circuit, please ensure that
it is in perfect condition. You should check the tyre tread and brake
pads for wear. It's also a good idea to increase the tyre pressure by
0.3 bar.
The oil consumption may be slightly higher than “normal” when
driving on a racing circuit ⇒page 157.
You should always check your vehicle after driving hard. Are the
brake pads ok? Do you notice any problems with the tyres (e.g. tread
worn, blistering, etc.)? Are the air intakes free of leaves and
deposits? Is the oil level ok?
Your Audi R8 dealer will be glad to carry out an inspection before
and after you use the car on a racing circuit.
Note
•
Some racing circuits (e.g. with banked curves) can affect the
behaviour of the ESP.
•
Driving the car on a racing circuit places a heavy load on all parts
of the vehicle. This can result in increased wear and tear.
Environmental compatibilityEnvironmental protection is a top priority in the design, choice of
materials and production of your new Audi. Particular importance
has been attached to the following aspects:
Design measures for economical recycling•
Joints and connections designed for ease of dismantling
•
Modular construction to facilitate dismantling
•
Increased use of single-grade materials
•
Plastic parts and elastomers are labelled in accordance with ISO
1043, ISO 11469 and ISO 1629
Choice of materials
•
Nearly all materials used can be recycled
•
Similar types of plastics grouped together for easy recycling
•
Recycled materials used in manufacture
•
Reduced vapour emissions from plastics
•
CFC-free refrigerant in air conditioner
Compliance with the laws prohibiting the use of:
•
Cadmium
•
Asbestos
•
Lead
•
Mercury
•
Chrome VI
document_0900452a816e6cc9.book Seite 139 Mittwoch, 21. Februar 2007 1:32 13
Page 189 of 210
Self-help187
Controls
Safety
Driving tips
General maintenance
Self-help
Technical data
Caution
Please note that the described method of connecting the leads is
meant for jump-starting your vehicle. If jump-starting another
vehicle, you should not connect the negative lead (–) to the negative
terminal of the discharged battery ⇒page 186, fig. 131 , but
directly to the engine block or a solid metal part bolted to the engine
block. If the battery of the other vehicle does not have a gas vent,
there is a risk that a mixture of oxygen and hydrogen gas can accu-
mulate and cause an explosion.Tow-starting and towing awayGeneral notes
Points to observe when tow-starting or towing awayIf you use a towrope:
Notes for the driver of the towing vehicle
– The towrope must be taut before driving off.
– Engage the clutch very gently when starting to move
(press the accelerator slowly if you have R tronic).
Notes for the driver of the towed vehicle
– The ignition should be switched on so that the turn
signals, horn, windscreen wipers and washers can be
used. Please ensure that the steering wheel is unlocked
when you switch on the ignition and that it moves freely.
– Put the gear lever in neutral or move the selector lever to
position N.– The brake servo and power steering only work when the
engine is running. Considerably more effort is required
on the brake pedal and steering wheel when the engine
is switched off.
– Ensure that the towrope remains taut at all times when
towing.
Towrope or towbar
It is easier and safer to tow a vehicle with a towbar. You should only
use a towrope if you do not have a towbar.
A towrope should be slightly elastic to reduce the loading on both
vehicles. It is advisable to use a towrope made of synthetic fibre or
similar material.
Attach the towrope or the towbar only to the towing anchorages
provided for this purpose ⇒page 188.
Driving technique
Towing requires some experience – especially when using a
towrope. Both drivers should be familiar with the technique required
for towing. Inexperienced drivers should not attempt to tow-start or
tow away another vehicle.
Do not pull too hard with the towing vehicle and take care to avoid
jerking the towrope. When towing on a loose surface there is always
a risk of overloading and damaging the anchorage points.
Caution
If there is no oil in the gearbox or no lubricant in the automatic
transmission the car may only be towed with the driven wheels
lifted clear of the road, or transported on a special car transporter
or trailer.
Note
•
Note the regulations concerning towing.
A4
document_0900452a816e6cc9.book Seite 187 Mittwoch, 21. Februar 2007 1:32 13
Page 190 of 210
Self-help 188•
The hazard warning lights of both vehicles must normally be
switched on. However, observe any regulations to the contrary.
•
Make sure that the towrope is not twisted, as otherwise the front
towline anchorage on your vehicle could work itself loose.
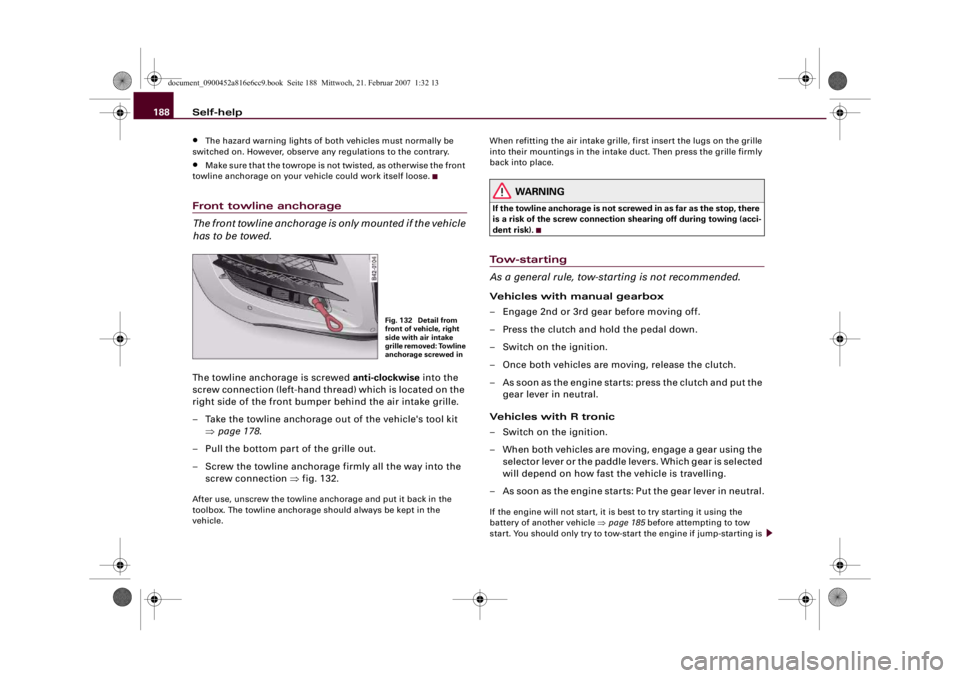
Front towline anchorage
The front towline anchorage is only mounted if the vehicle
has to be towed.The towline anchorage is screwed anti-clockwise into the
screw connection (left-hand thread) which is located on the
right side of the front bumper behind the air intake grille.
– Take the towline anchorage out of the vehicle's tool kit
⇒page 178.
– Pull the bottom part of the grille out.
– Screw the towline anchorage firmly all the way into the
screw connection ⇒fig. 132.After use, unscrew the towline anchorage and put it back in the
toolbox. The towline anchorage should always be kept in the
vehicle.When refitting the air intake grille, first insert the lugs on the grille
into their mountings in the intake duct. Then press the grille firmly
back into place.
WARNING
If the towline anchorage is not screwed in as far as the stop, there
is a risk of the screw connection shearing off during towing (acci-
dent risk).Tow-starting
As a general rule, tow-starting is not recommended.Vehicles with manual gearbox
– Engage 2nd or 3rd gear before moving off.
– Press the clutch and hold the pedal down.
– Switch on the ignition.
– Once both vehicles are moving, release the clutch.
– As soon as the engine starts: press the clutch and put the
gear lever in neutral.
Vehicles with R tronic
– Switch on the ignition.
– When both vehicles are moving, engage a gear using the
selector lever or the paddle levers. Which gear is selected
will depend on how fast the vehicle is travelling.
– As soon as the engine starts: Put the gear lever in neutral.If the engine will not start, it is best to try starting it using the
battery of another vehicle ⇒page 185 before attempting to tow
start. You should only try to tow-start the engine if jump-starting is
Fig. 132 Detail from
front of vehicle, right
side with air intake
grille removed: Towline
anchorage screwed in
document_0900452a816e6cc9.book Seite 188 Mittwoch, 21. Februar 2007 1:32 13
Page 191 of 210
Self-help189
Controls
Safety
Driving tips
General maintenance
Self-help
Technical data not successful. Tow-starting is an attempt to start the engine via the
movement of the wheels.
When tow-starting a vehicle with a petrol engine, do not tow it more
than a short distance, otherwise unburnt fuel can enter the catalytic
converter and cause damage.
WARNING
There is a high risk of accidents when tow-starting, as the towed
vehicle can easily be driven into the towing vehicle.
Caution
When tow-starting the vehicle, do not tow it further than 50 metres:
otherwise the catalytic converter could be damaged.To w i n g a w a y
Certain restrictions must be observed when towing your
vehicle.Please observe the notes ⇒page 187.
The vehicle can be towed with a towbar or towrope in the normal
way, with all four wheels on the ground. When doing so, please note
the following points:•
Make sure the gear lever is in neutral or the selector lever is in
the N position.
•
The vehicle must not be towed faster than 50 km/h.
•
The vehicle must not be towed further than 50 km. The reason
for this is: when the engine is not running, the gearbox oil pump
does not work and the gearbox is not adequately lubricated for
higher speeds or longer distances.
Caution
The vehicle must not be towed with the wheels lifted at either the
front or rear otherwise the gearbox may be damaged.
Note
If it is not possible to tow the vehicle as described above, or if it has
to be towed further than 50 km, it must be transported on a special
car transporter or trailer.
document_0900452a816e6cc9.book Seite 189 Mittwoch, 21. Februar 2007 1:32 13
Page 199 of 210

General notes197
Controls
Safety
Driving tips
General maintenance
Self-help
Technical data Vehicle identification number
6)
The vehicle identification number (chassis number) can be found
behind the windscreen (bottom left).
Vehicle data sticker
The vehicle data sticker ⇒page 196, fig. 135 is located together with
the fuses in the passenger's footwell ⇒page 190. One section of the
vehicle data sticker is attached to the inside cover of the Service
Schedule before the vehicle is handed over.
The sticker lists the following data:
Vehicle identification number (chassis number)
Vehicle type / engine power / gearbox type
Engine and gearbox code letters
Paint No. / Interior equipment No.
Optional equipment codes
Fuel consumption and emissions
Fuel consumption and emissions
Information on the vehicle's fuel consumption and emissions is
given at the bottom of the vehicle data sticker :
Urban cycle consumption (ltr./100 km)
Extra-urban cycle consumption (ltr./100 km)
Combined cycle consumption (ltr./100 km)
Combined CO
2 emissions (g/km)
The specified values were determined in accordance with the test
procedure prescribed by the currently applicable version of
Directive 80/1268/EEC. The specifications do not refer to an indi-
vidual vehicle. Other consumption figures may be achieved during
normal driving, depending on special equipment fitted, vehicle
loading, personal driving style, road and traffic conditions, environ-
mental factors and the condition of the car.
6)On some models you can also call up the vehicle identification number on
the menu display.A1A2A3A4A5A6
A6
AAABACAD
document_0900452a816e6cc9.book Seite 197 Mittwoch, 21. Februar 2007 1:32 13
Page 200 of 210
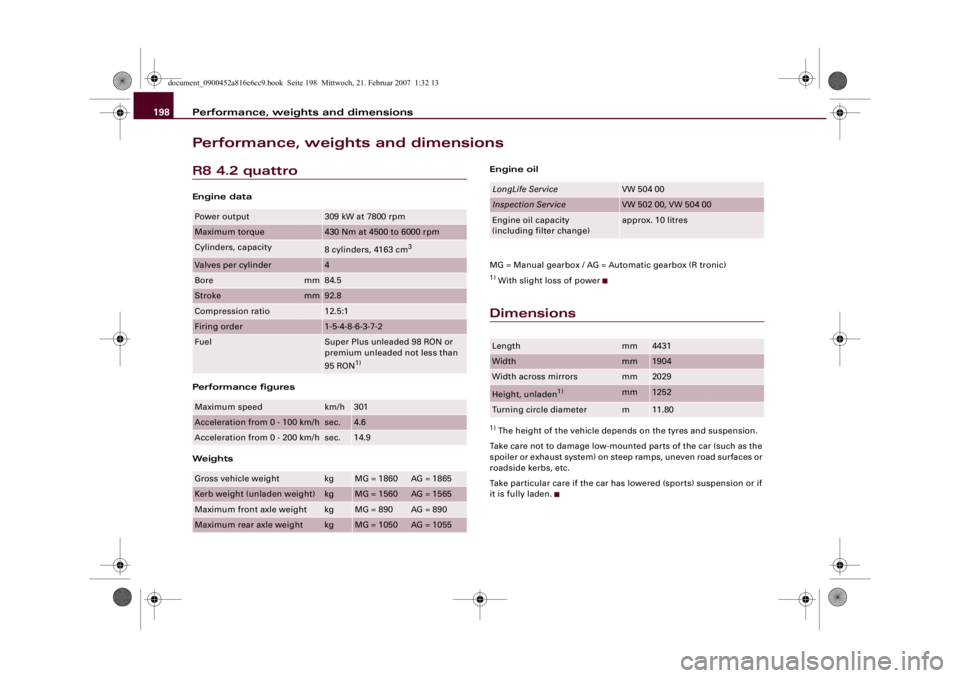
Performance, weights and dimensions 198Performance, weights and dimensionsR8 4.2 quattroEngine data
Performance figures
WeightsEngine oil
MG = Manual gearbox / AG = Automatic gearbox (R tronic)
1) With slight loss of powerDimensions1) The height of the vehicle depends on the tyres and suspension.
Take care not to damage low-mounted parts of the car (such as the
spoiler or exhaust system) on steep ramps, uneven road surfaces or
roadside kerbs, etc.
Take particular care if the car has lowered (sports) suspension or if
it is fully laden.
Power output
309 kW at 7800 rpm
Maximum torque
430 Nm at 4500 to 6000 rpm
Cylinders, capacity
8 cylinders, 4163 cm
3
Valves per cylinder
4
Bore
mm
84.5
Stroke
mm
92.8
Compression ratio
12.5:1
Firing order
1-5-4-8-6-3-7-2
Fuel
Super Plus unleaded 98 RON or
premium unleaded not less than
95 RON
1)
Maximum speed
km/h
301
Acceleration from 0 - 100 km/h
sec.
4.6
Acceleration from 0 - 200 km/h
sec.
14.9
Gross vehicle weight
kg
MG = 1860
AG = 1865
Kerb weight (unladen weight)
kg
MG = 1560
AG = 1565
Maximum front axle weight
kg
MG = 890
AG = 890
Maximum rear axle weight
kg
MG = 1050
AG = 1055
LongLife Service
VW 504 00
Inspection Service
VW 502 00, VW 504 00
Engine oil capacity
(including filter change)
approx. 10 litres
Length
mm
4431
Width
mm
1904
Width across mirrors
mm
2029
Height, unladen
1)
mm
1252
Turning circle diameter
m
11.80
document_0900452a816e6cc9.book Seite 198 Mittwoch, 21. Februar 2007 1:32 13
Page 207 of 210
Index205
Controls
Safety
Driving tips
General maintenance
Self-help
Technical data
GGarage door opener . . . . . . . . . . . . . . . . . . 95
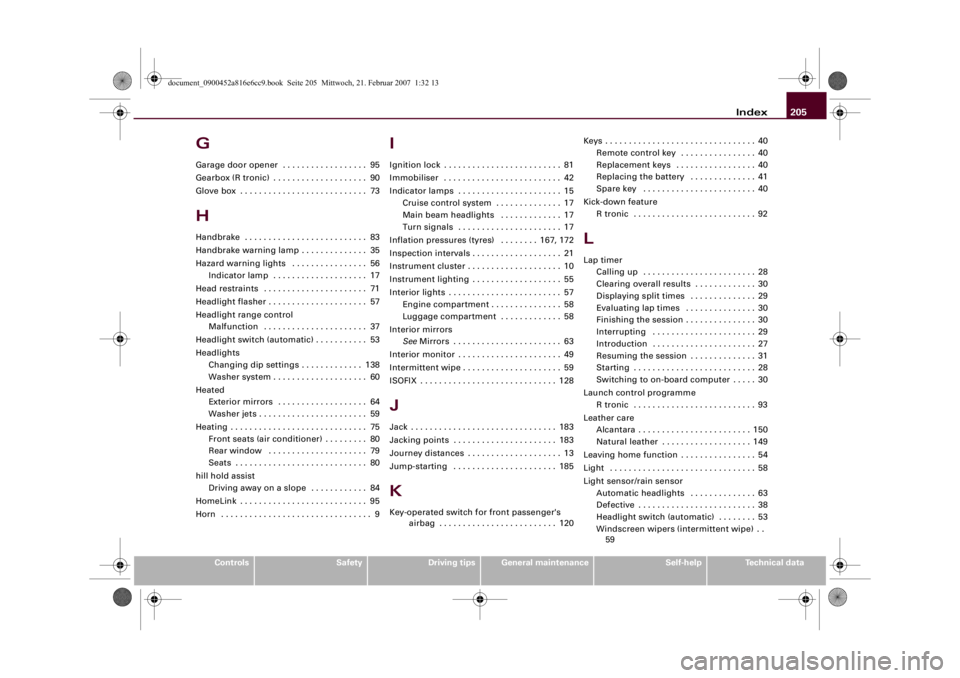
Gearbox (R tronic) . . . . . . . . . . . . . . . . . . . . 90
Glove box . . . . . . . . . . . . . . . . . . . . . . . . . . . 73HHandbrake . . . . . . . . . . . . . . . . . . . . . . . . . . 83
Handbrake warning lamp . . . . . . . . . . . . . . 35
Hazard warning lights . . . . . . . . . . . . . . . . 56
Indicator lamp . . . . . . . . . . . . . . . . . . . . 17
Head restraints . . . . . . . . . . . . . . . . . . . . . . 71
Headlight flasher . . . . . . . . . . . . . . . . . . . . . 57
Headlight range control
Malfunction . . . . . . . . . . . . . . . . . . . . . . 37
Headlight switch (automatic) . . . . . . . . . . . 53
Headlights
Changing dip settings . . . . . . . . . . . . . 138
Washer system . . . . . . . . . . . . . . . . . . . . 60
Heated
Exterior mirrors . . . . . . . . . . . . . . . . . . . 64
Washer jets . . . . . . . . . . . . . . . . . . . . . . . 59
Heating . . . . . . . . . . . . . . . . . . . . . . . . . . . . . 75
Front seats (air conditioner) . . . . . . . . . 80
Rear window . . . . . . . . . . . . . . . . . . . . . 79
Seats . . . . . . . . . . . . . . . . . . . . . . . . . . . . 80
hill hold assist
Driving away on a slope . . . . . . . . . . . . 84
HomeLink . . . . . . . . . . . . . . . . . . . . . . . . . . . 95
Horn . . . . . . . . . . . . . . . . . . . . . . . . . . . . . . . . 9
IIgnition lock . . . . . . . . . . . . . . . . . . . . . . . . . 81
Immobiliser . . . . . . . . . . . . . . . . . . . . . . . . . 42
Indicator lamps . . . . . . . . . . . . . . . . . . . . . . 15
Cruise control system . . . . . . . . . . . . . . 17
Main beam headlights . . . . . . . . . . . . . 17
Turn signals . . . . . . . . . . . . . . . . . . . . . . 17
Inflation pressures (tyres) . . . . . . . . 167, 172
Inspection intervals . . . . . . . . . . . . . . . . . . . 21
Instrument cluster . . . . . . . . . . . . . . . . . . . . 10
Instrument lighting . . . . . . . . . . . . . . . . . . . 55
Interior lights . . . . . . . . . . . . . . . . . . . . . . . . 57
Engine compartment . . . . . . . . . . . . . . . 58
Luggage compartment . . . . . . . . . . . . . 58
Interior mirrors
SeeMirrors . . . . . . . . . . . . . . . . . . . . . . . 63
Interior monitor . . . . . . . . . . . . . . . . . . . . . . 49
Intermittent wipe . . . . . . . . . . . . . . . . . . . . . 59
ISOFIX . . . . . . . . . . . . . . . . . . . . . . . . . . . . . 128JJack . . . . . . . . . . . . . . . . . . . . . . . . . . . . . . . 183
Jacking points . . . . . . . . . . . . . . . . . . . . . . 183
Journey distances . . . . . . . . . . . . . . . . . . . . 13
Jump-starting . . . . . . . . . . . . . . . . . . . . . . 185KKey-operated switch for front passenger's
airbag . . . . . . . . . . . . . . . . . . . . . . . . . 120Keys . . . . . . . . . . . . . . . . . . . . . . . . . . . . . . . . 40
Remote control key . . . . . . . . . . . . . . . . 40
Replacement keys . . . . . . . . . . . . . . . . . 40
Replacing the battery . . . . . . . . . . . . . . 41
Spare key . . . . . . . . . . . . . . . . . . . . . . . . 40
Kick-down feature
R tronic . . . . . . . . . . . . . . . . . . . . . . . . . . 92
LLap timer
Calling up . . . . . . . . . . . . . . . . . . . . . . . . 28
Clearing overall results . . . . . . . . . . . . . 30
Displaying split times . . . . . . . . . . . . . . 29
Evaluating lap times . . . . . . . . . . . . . . . 30
Finishing the session . . . . . . . . . . . . . . . 30
Interrupting . . . . . . . . . . . . . . . . . . . . . . 29
Introduction . . . . . . . . . . . . . . . . . . . . . . 27
Resuming the session . . . . . . . . . . . . . . 31
Starting . . . . . . . . . . . . . . . . . . . . . . . . . . 28
Switching to on-board computer . . . . . 30
Launch control programme
R tronic . . . . . . . . . . . . . . . . . . . . . . . . . . 93
Leather care
Alcantara . . . . . . . . . . . . . . . . . . . . . . . . 150
Natural leather . . . . . . . . . . . . . . . . . . . 149
Leaving home function . . . . . . . . . . . . . . . . 54
Light . . . . . . . . . . . . . . . . . . . . . . . . . . . . . . . 58
Light sensor/rain sensor
Automatic headlights . . . . . . . . . . . . . . 63
Defective . . . . . . . . . . . . . . . . . . . . . . . . . 38
Headlight switch (automatic) . . . . . . . . 53
Windscreen wipers (intermittent wipe) . .
59
document_0900452a816e6cc9.book Seite 205 Mittwoch, 21. Februar 2007 1:32 13