change wheel AUDI R8 2007 Owners Manual
[x] Cancel search | Manufacturer: AUDI, Model Year: 2007, Model line: R8, Model: AUDI R8 2007Pages: 210, PDF Size: 8.1 MB
Page 40 of 210
Driver information system 38The message disappears after 5 seconds. Press the adjuster/test
button ⇒page 10, fig. 2 briefly if you wish to call up the message
again.
If the display indicates that one of the lights is not working, this can
have a number of causes:•
Bulb failure ⇒page 193.
•
A “blown” fuse ⇒page 190, “Changing fuses”.
•
Defective electrical wiring.
Have the components replaced or the wiring repaired as necessary
by a qualified workshop.
WARNING
•
Bulbs are sensitive to pressure. The glass can break when you
touch the bulb, causing injury.
•
Incorrect handling of the high-voltage element of xenon gas-
discharge bulbs can have potentially fatal consequences.
Brake light failure
If the symbol
or the text BRAKE LIGHT lights up, check the
following components:
•
Brake light bulbs
•
Wiring connections
•
Brake light switch
Have the components repaired or replaced by a qualified workshop.Note
The brake light switch is only tested during the initial systems check
after starting the engine.
Applies to vehicles: with light sensor/ rain sensorLight sensor/rain sensor
This indicator lamp comes on if the automatic headlights/
automatic wipers are defective.If the
symbol appears, this means that the light sensor/ rain
sensor is not functioning. For safety reasons, the dipped beam
headlights will then be switched on permanently when the light
switch is set to the AUTO position. However, you can still switch the
lights on and off in the normal way with the light switch. If the rain
sensor is defective, the functions operated via the windscreen wiper
lever will still be available. You should have the light sensor/ rain
sensor checked by a qualified workshop as soon as possible.
Applies to vehicles: with R tronicSelector lever defective
and
Selector lever defective! No R gear!
If these symbols light up, there is a fault in the R tronic selector
lever. The indicators on the selector lever will go out or flash. It is no
longer possible to engage reverse gear. If you were using the
gearbox in manual mode, it will switch back to automatic mode.
You can continue to change gear manually. Starting in neutral (N),
pull the paddle lever on the steering wheel to engage first gear.
The gearbox will now remain in manual mode and you can select the
gears using the paddle levers.
You should have the selector lever checked by a qualified workshop
as soon as possible.
Applies to vehicles: with R tronicClutch overheating
and
Clutch is overheating ! If possible please stop vehicle.
A8
A+
document_0900452a816e6cc9.book Seite 38 Mittwoch, 21. Februar 2007 1:32 13
Page 92 of 210
Automatic gearbox 90Automatic gearboxApplies to vehicles: with R tronicDescriptionR tronic is an automatic sequential-shift gearbox using shift-by-wire
technology to operate the clutch and change the gears.
The gears are engaged manually (the principle is similar to a manual
gearbox) but they can also be shifted automatically. The engine can
be started and stopped in any gear ⇒page 82.
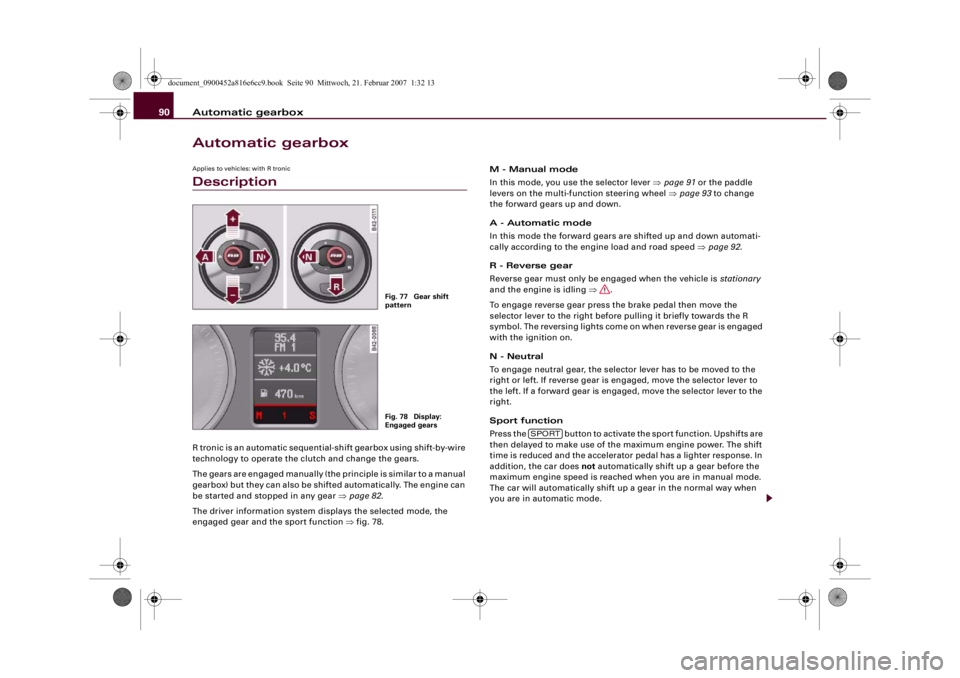
The driver information system displays the selected mode, the
engaged gear and the sport function ⇒fig. 78.M - Manual mode
In this mode, you use the selector lever ⇒page 91 or the paddle
levers on the multi-function steering wheel ⇒page 93 to change
the forward gears up and down.
A - Automatic mode
In this mode the forward gears are shifted up and down automati-
cally according to the engine load and road speed ⇒page 92.
R - Reverse gear
Reverse gear must only be engaged when the vehicle is stationary
and the engine is idling ⇒.
To engage reverse gear press the brake pedal then move the
selector lever to the right before pulling it briefly towards the R
symbol. The reversing lights come on when reverse gear is engaged
with the ignition on.
N - Neutral
To engage neutral gear, the selector lever has to be moved to the
right or left. If reverse gear is engaged, move the selector lever to
the left. If a forward gear is engaged, move the selector lever to the
right.
Sport function
Press the button to activate the sport function. Upshifts are
then delayed to make use of the maximum engine power. The shift
time is reduced and the accelerator pedal has a lighter response. In
addition, the car does not automatically shift up a gear before the
maximum engine speed is reached when you are in manual mode.
The car will automatically shift up a gear in the normal way when
you are in automatic mode.
Fig. 77 Gear shift
patternFig. 78 Display:
Engaged gears
SPORT
document_0900452a816e6cc9.book Seite 90 Mittwoch, 21. Februar 2007 1:32 13
Page 94 of 210
Automatic gearbox 92maximum engine speed is reached, unless you have activated the
sport function ⇒page 90.
If you select a lower gear, the R tronic gearbox will not shift down
until there is no risk of overrevving the engine.
You can change over to automatic mode at any time ⇒page 92.
WARNING
•
The driver should never get out of the vehicle when the engine
is running and a gear is engaged. If you have to leave your vehicle
while the engine is running, you must apply the parking brake and
engage neutral gear (N).
•
If the engine is running and a gear is engaged, you will need to
hold the car with the footbrake.
•
Do not press the accelerator while selecting a gear with the
vehicle stationary and the engine running, as this could cause an
accident.
•
To avoid rolling back on gradients always hold the vehicle with
the footbrake if you have to stop. Never attempt to hold the vehicle
with the clutch when stopping on a gradient. The clutch is disen-
gaged automatically if it is overloaded and becomes too hot - acci-
dent risk! Before the clutch is disengaged, the vehicle will jolt and
the driver information system will display a warning that the
clutch is overloaded.
•
Before you drive down a steep gradient, reduce the speed and
use the R tronic to select a lower gear.
•
Never allow the brake to drag and do not use the brake pedal
too often or for long periods. Constant braking will cause the
brakes to overheat and will considerably reduce the effectiveness
of the brakes. It will increase the braking distance and could cause
the brake system to fail.
Applies to vehicles: with R tronicAutomatic modeThe gearbox changes the forward gears up and down
automatically.Driving away from a standstill
– Press and hold the brake pedal.
– Briefly push the selector lever towards position A.
– Release the brake and press the accelerator ⇒ in
“Manual mode” on page 91.In some situations (such as when driving on mountain roads) it can
be advantageous to switch temporarily to the manual shift
programme ⇒page 91, so that the gear ratios can be selected
manually to suit the driving conditions.Applies to vehicles: with R tronicKick-down featureWhen the accelerator pedal is pressed right down past the point of
resistance at full throttle, the R tronic gearbox will shift down to a
lower gear, depending on road speed and engine speed. The upshift
to the next higher gear is delayed until the engine reaches
maximum rpm. This does not apply if you have activated the sport
function.
WARNING
Please note that if the road surface is slippery or wet, the kick-
down feature could cause the driving wheels to spin, which could
result in skidding.
document_0900452a816e6cc9.book Seite 92 Mittwoch, 21. Februar 2007 1:32 13
Page 95 of 210
Automatic gearbox93
Controls
Safety
Driving tips
General maintenance
Self-help
Technical data
Applies to vehicles: with R tronicLaunch control programmeThe launch control programme enables maximum accel-
eration.– Press the ESP switch once while the engine is running.
The ESP warning lamp
will light up in the driver infor-
mation system display.
– Press and hold the brake pedal with your left foot.
– Engage a gear.
– Press the button.
– Press the accelerator all the way down with your right
foot until the engine reaches a constant rpm speed.
– Take your left foot off the brake ⇒.
WARNING
•
Always adapt your driving style to the traffic conditions.
•
Only use the launch control programme when road and traffic
conditions permit, and make sure your manner of driving and
accelerating the vehicle does not inconvenience or endanger other
road users.
•
Please note that, when the ESP is switched off, the driven
wheels may start to spin, causing the vehicle to lose grip, in partic-
ular on slippery or wet roads - danger of skidding!
•
When acceleration has been completed, the ESP should be
reactivated by pressing the ESP switch.
Note
Accelerating with the launch control programme places a heavy
load on all parts of the vehicle. This can result in increased wear and
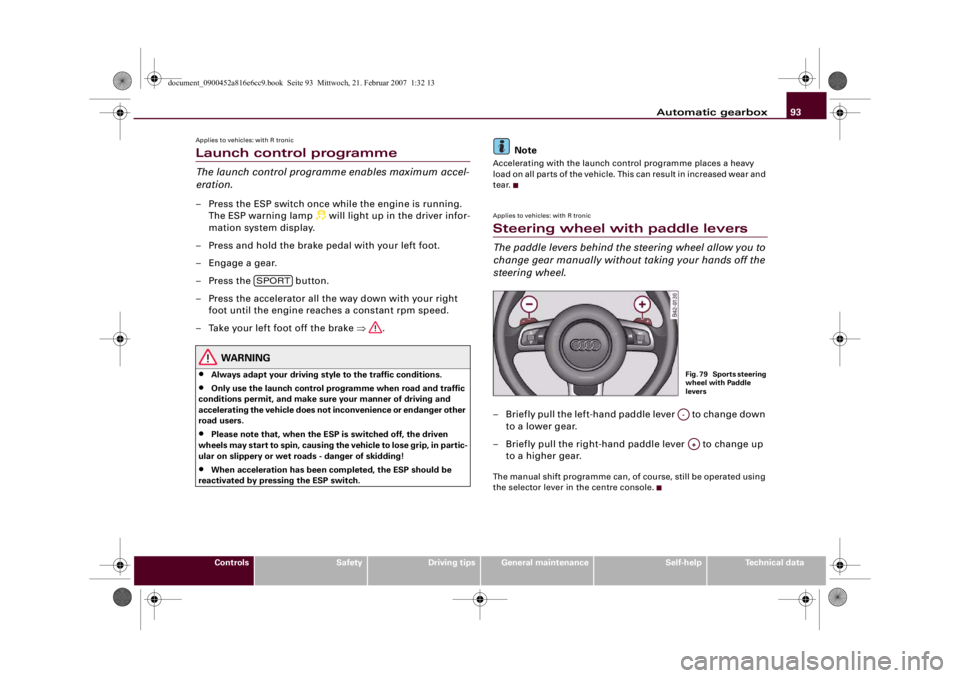
tear.Applies to vehicles: with R tronicSteering wheel with paddle leversThe paddle levers behind the steering wheel allow you to
change gear manually without taking your hands off the
steering wheel.– Briefly pull the left-hand paddle lever to change down
to a lower gear.
– Briefly pull the right-hand paddle lever to change up
to a higher gear.The manual shift programme can, of course, still be operated using
the selector lever in the centre console.
SPORT
Fig. 79 Sports steering
wheel with Paddle
leversA-A+
document_0900452a816e6cc9.book Seite 93 Mittwoch, 21. Februar 2007 1:32 13
Page 168 of 210
Wheels and tyres 166Wheels and tyresWheelsGeneral notes–When driving with new tyres, be especially careful during
the first 500 km.
– If you have to drive over a kerb or similar obstacle, drive
very slowly and as near as possible at a right angle to the
kerb.
– Inspect the tyres regularly for damage (cuts, cracks or
blisters, etc.). Remove any foreign bodies embedded in
the treads.
– Damaged wheels and tyres must be replaced immedi-
ately.
– Keep grease, oil and fuel off the tyres.
– Replace any missing valve caps as soon as possible.
– Mark the wheels before taking them off so that they
rotate in the same direction when put back.
– When removed, the wheels or tyres should be stored in a
cool, dry and preferably dark place.New tyres
New tyres do not give maximum grip straight away and should
therefore be “run in” by driving carefully and at moderate speeds for
about the first 500 km. This will also help to make the tyres last
longer.
The tread depth of new tyres may vary, according to the type and
make of tyre and the tread pattern.Concealed damage
Damage to tyres and rims is often not readily visible. If you notice
unusual vibration or the car pulling to one side, this may indicate
that one of the tyres is damaged. Reduce speed immediately if there
is any reason to suspect that damage may have occurred. Inspect
the tyres for damage. If no external damage is visible, drive slowly
and carefully to the nearest qualified workshop and have the car
inspected.
Tyres with directional tread pattern
An arrow on the tyre sidewall indicates the direction of rotation on
tyres with directional tread. Always note the direction of rotation
indicated when mounting the wheel. This guarantees optimum grip
and helps to avoid aquaplaning, excessive noise and wear.
Wheels with bolted rim flange*
Light-alloy wheels with a bolted rim flange consist of several
components. A special technique is applied to bolt these compo-
nents together. Apart from safety and true running this also ensures
that the wheel functions correctly and that there is no leakage.
Damaged rims must therefore be replaced; you must never attempt
to repair or dismantle them ⇒.
Wheels with bolted trim parts*
Light-alloy wheels can be fitted with interchangeable trim parts
which are attached to the rim using self-locking bolts. Should you
wish to replace damaged trim parts please contact a qualified work-
shop.
WARNING
Never remove the bolts on a wheel with bolted rim flange* (acci-
dent risk).
document_0900452a816e6cc9.book Seite 166 Mittwoch, 21. Februar 2007 1:32 13
Page 169 of 210
Wheels and tyres167
Controls
Safety
Driving tips
General maintenance
Self-help
Technical data
Tyre service life
Correct inflation pressures and sensible driving habits
will increase the service life of your tyres.– Check the tyre pressures at least once a month.
– The tyre pressures should only be checked when the
tyres are cold. The slightly raised pressures of warm tyres
must not be reduced.
– The pressures must be altered to suit major changes in
the load being carried.
– Avoid fast cornering and hard acceleration.
– Inspect the tyres for irregular wear from time to time.The service life of your tyres depends on the following factors:
Tyre pressure
Under-inflation or over-inflation will reduce the life of the tyres
considerably and also impair the car's handling. The inflation pres-
sures are listed on a sticker on the driver's door pillar.
Correct inflation pressures are very important, especially at high
speeds. The pressures should therefore be checked at least once a
month and before starting a journey.
Driving habits
Fast cornering, heavy acceleration and hard braking (squealing
tyres) all increase tyre wear.
Wheel balancing
The wheels on new vehicles are balanced. However, various factors
encountered in normal driving can cause them to become unbal-
anced, which results in steering vibration.Unbalanced wheels should be rebalanced, as they otherwise cause
excessive wear on steering, suspension and tyres. A wheel must
also be rebalanced when a new tyre is fitted or if a tyre is repaired.
Incorrect wheel alignment
Incorrect wheel alignment causes excessive tyre wear, impairing the
safety of the vehicle. If you notice excessive tyre wear, contact your
Audi R8 dealer.
WARNING
•
Always adapt the tyre pressure accordingly when the vehicle
load changes.
•
Under-inflated tyres flex more and can overheat at continuous
high speeds. This can cause tread separation and tyre blow-out,
which could result in an accident. Always observe the recom-
mended tyre pressures.For the sake of the environment
Under-inflated tyres will increase the fuel consumption.
document_0900452a816e6cc9.book Seite 167 Mittwoch, 21. Februar 2007 1:32 13
Page 174 of 210
Wheels and tyres 172Remove wheel covers (if fitted) and trim rings before attaching
snow chains. For safety reasons cover caps must then be fitted over
the wheel bolts. These are available from Audi R8 dealers.
Remove the chains when roads are free of snow. Otherwise they will
impair handling, damage the tyres and wear out very quickly.
Four-wheel drive: Where snow chains are compulsory on certain
roads, this normally also applies to cars with four-wheel drive. Snow
chains may only be fitted to the rear wheels (also on vehicles with
four-wheel drive).Tyre pressure monitoring systemApplies to vehicles: with tyre pressure monitoring systemIntroduction
The tyre pressure monitoring system keeps a check on the
inflation pressures of the four road wheels while you are
driving.The system warns the driver in the event of a loss of pressure by
means of symbols and messages in the instrument cluster display.
The system employs sensors on the wheels. The radio signals from
these sensors are transmitted to the tyre pressure monitoring
system.
Please bear in mind that the tyre inflation pressure is also influ-
enced by the temperature of the tyre. For every 10°C increase in the
tyre temperature the pressure will normally increase by about
0.1 bar. The tyre heats up while the vehicle is being driven and the
tyre pressure will rise accordingly. For this reason, you should only
adjust the tyre pressures when they are cold (i.e. approximately at
ambient temperature).
To ensure that the tyre pressure monitoring system works reliably,
you should check and, if necessary, adjust the tyre pressures at
regular intervals.The tyre pressures recommended for your vehicle are given on the
sticker attached to the driver's door pillar.
Initialising the tyre pressure monitoring system
The inflation pressures for two sets of wheels (e.g. with winter and
summer tyres) are stored on your vehicle. You can change between
these two sets of wheels any number of times without re-initialising
the system.
The tyre pressure monitoring system must be re-initialised by your
Audi R8 dealer if a new set of wheels is used or the electronic
sensors are renewed.
Warning lamp
lit
If the tyre pressure is more than 0.5 bar below the reference value,
the display will show the tyre symbol
with a corresponding
message, such as Tyre pressures too low ⇒.
WARNING
•
If the warning lamp
lights up you must slow down immedi-
ately and avoid any severe braking or steering manoeuvres. As
soon as you can do so safely, stop and check the tyres and the tyre
pressures.
•
Never re-adjust the tyre inflation pressure when the tyre is hot.
This can cause serious damage to the tyre or even a blow-out,
which could result in an accident.
•
Under-inflated tyres flex more and can overheat at continuous
high speeds. This can cause tread separation and tyre blow-out,
which could result in an accident.For the sake of the environment
Under-inflated tyres lead to increased fuel consumption and tyre
wear.
document_0900452a816e6cc9.book Seite 172 Mittwoch, 21. Februar 2007 1:32 13
Page 175 of 210
Wheels and tyres173
Controls
Safety
Driving tips
General maintenance
Self-help
Technical data
Note
•
Responsibility for ensuring that the tyres are correctly inflated
remains with the driver; the system can only provide assistance.
•
Only adjust the inflation pressure of the tyres when they are at
approximately ambient temperature.
•
The sensors and valves do not have to be detached or changed
round when fitting new tyres. Only the valve core needs to be
replaced, and if necessary the valve and the electronic components
in the wheel.
•
After using the Tyre Mobility System* the tyre pressure moni-
toring system may malfunction. The sensor for the tyre pressure
monitoring system must therefore be renewed by a qualified
workshop.
Applies to vehicles: with tyre pressure monitoring systemMalfunctionsIf the tyre pressure monitoring system is inoperative, the tyre
symbol or “TPMS” will appear on the display. This can have various
causes:•
One of the wheel sensors or other related components may not
be working.
•
Snow chains can interfere with the signals emitted by the
sensors so that the system cannot function properly.
•
The tyre pressure monitoring system may be inoperative due to
radio interference.
•
Radio systems operating on the same frequency, such as radio
headphones or two-way radios inside the vehicle, produce strong
electromagnetic fields which can cause temporary interference.
•
If the fault persists, take the vehicle to a qualified workshop.
document_0900452a816e6cc9.book Seite 173 Mittwoch, 21. Februar 2007 1:32 13
Page 181 of 210
Self-help179
Controls
Safety
Driving tips
General maintenance
Self-help
Technical data Your vehicle is equipped with a tyre repair kit: the Tyre Mobility
System (TMS).
In the event of a puncture you will find the TMS, which consists of a
sealing compound and an electric compressor, located under the
floor panel in the luggage compartment.
The TMS will reliably seal tyres damaged by foreign bodies,
provided that the cuts or punctures are no larger than approx. 4 mm
in diameter.
It is not necessary to remove the foreign body from the tyre.
The sealing compound must not be used:
•
on cuts and punctures larger than 4 mm ⇒page 178, fig. 124
•
if the wheel rim has been damaged
•
if you have been driving with very low pressure or a completely
flat tyre .
How to use the TMS is described in the section Repairing a tyre
⇒page 180.
The TMS can be used at outside temperatures down to – 20 °C.
WARNING
After repairing a tyre please note the following points:•
Do not drive faster than 80 km/h.
•
Avoid heavy acceleration, hard braking and fast cornering.
•
Vehicle handling could be impaired.
•
Tyres which have been sealed using the TMS are only suitable
for temporary use. Damaged tyres must be renewed. Therefore,
please drive carefully to the next available qualified workshop.
•
The TMS must NOT be used,
−on cuts and punctures larger than 4 mm
−if the wheel rim has been damaged
−if you have been driving with very low pressure or a
completely flat tyre
•
Seek professional assistance if the repair of a tyre puncture is
not possible with the sealing compound.
•
Do not allow the sealant to come into contact with your eyes,
skin or clothing.
•
If you do come into contact with the sealant immediately rinse
the eyes or skin affected with clean water.
•
Change clothing immediately if it becomes soiled with the tyre
sealant.
•
Make sure you do not breathe in the fumes!
•
If any of the tyre sealant is accidentally ingested, immediately
rinse the mouth thoroughly and drink lots of water.
−Do not induce vomiting. Immediately contact a doctor!
•
If any allergic reactions should occur get medical help immedi-
ately.
•
Keep the sealant away from children.For the sake of the environment
Used sealing compound cans should be disposed of at a proper
facility.
Note
•
If sealant should leak out, leave it to dry. When it has dried, you
can pull it off like a piece of foil.
•
Observe the expiry date stated on the sealing compound can.
Have the sealing compound exchanged by a qualified workshop.
A1
A2
A3
WARNING (continued)
document_0900452a816e6cc9.book Seite 179 Mittwoch, 21. Februar 2007 1:32 13
Page 186 of 210
Self-help 184•
The car can be damaged if the jack is not applied at the correct
jacking points. There is also a risk of injury since the jack can slip
off suddenly if it is not properly engaged.Caution
A trolley jack or lifting platform must not be applied at the points
shown ⇒page 183, fig. 128 -arrows-.Taking off / putting on the wheel
Step-by-step instructions for taking off and putting on the
wheel.Change the wheel as described below after loosening the
wheel bolts and raising the vehicle with the jack.
Taking off the wheel
–Using the hexagonal opening in the screwdriver handle
(provided in the vehicle's tool kit), unscrew the wheel bolt
nearest to the top and place the bolt on a clean surface.–Screw in the mounting pin (provided in the vehicle's tool
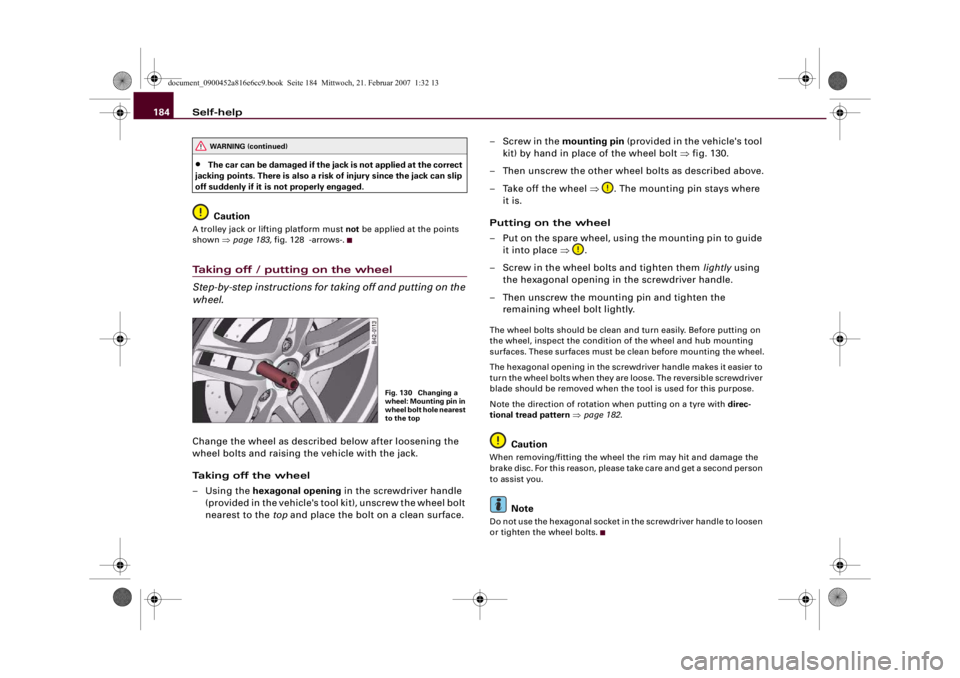
kit) by hand in place of the wheel bolt ⇒fig. 130.
– Then unscrew the other wheel bolts as described above.
– Take off the wheel ⇒. The mounting pin stays where
it is.
Putting on the wheel
– Put on the spare wheel, using the mounting pin to guide
it into place ⇒.
– Screw in the wheel bolts and tighten them lightly using
the hexagonal opening in the screwdriver handle.
– Then unscrew the mounting pin and tighten the
remaining wheel bolt lightly.
The wheel bolts should be clean and turn easily. Before putting on
the wheel, inspect the condition of the wheel and hub mounting
surfaces. These surfaces must be clean before mounting the wheel.
The hexagonal opening in the screwdriver handle makes it easier to
turn the wheel bolts when they are loose. The reversible screwdriver
blade should be removed when the tool is used for this purpose.
Note the direction of rotation when putting on a tyre with direc-
tional tread pattern ⇒page 182.
Caution
When removing/fitting the wheel the rim may hit and damage the
brake disc. For this reason, please take care and get a second person
to assist you.
Note
Do not use the hexagonal socket in the screwdriver handle to loosen
or tighten the wheel bolts.
WARNING (continued)
Fig. 130 Changing a
wheel: Mounting pin in
wheel bolt hole nearest
to the top
document_0900452a816e6cc9.book Seite 184 Mittwoch, 21. Februar 2007 1:32 13