oil pressure AUDI R8 2007 Owners Manual
[x] Cancel search | Manufacturer: AUDI, Model Year: 2007, Model line: R8, Model: AUDI R8 2007Pages: 210, PDF Size: 8.1 MB
Page 5 of 210
Contents3
Controls
Safety
Driving tips
General maintenance
Self-help
Technical data Child safety
. . . . . . . . . . . . . . . . . . . .
Points to remember if children are
travelling in the car . . . . . . . . . . . . .
Child safety seats . . . . . . . . . . . . . .
Fitting child safety seats . . . . . . . .
Driving tips
. . . . . . . . . . . . . . . .
Intelligent technology
. . . . . . . . . .
Electronic stabilisation program
(ESP) . . . . . . . . . . . . . . . . . . . . . . . . . .
Rear spoiler . . . . . . . . . . . . . . . . . . .
Brakes . . . . . . . . . . . . . . . . . . . . . . . .
Power steering . . . . . . . . . . . . . . . . .
Four-wheel drive (quattro®) . . . . . .
Dry sump lubrication system . . . .
Your vehicle and the
environment
. . . . . . . . . . . . . . . . . . .
Running in . . . . . . . . . . . . . . . . . . . .
Emission control systems . . . . . . .
Driving abroad . . . . . . . . . . . . . . . . .
Sporty driving . . . . . . . . . . . . . . . . .
Environmental compatibility . . . . .
General maintenance
. .
Care of vehicle and cleaning
. . .
General notes . . . . . . . . . . . . . . . . . .
Care of exterior . . . . . . . . . . . . . . . . .
Care of interior . . . . . . . . . . . . . . . . .
Fuel and filling the tank
. . . . . . . .
Petrol . . . . . . . . . . . . . . . . . . . . . . . . .
Filling the tank . . . . . . . . . . . . . . . . .
Checking and topping up fluidsEngine lid . . . . . . . . . . . . . . . . . . . . . .
Engine oil . . . . . . . . . . . . . . . . . . . . . .
Cooling system . . . . . . . . . . . . . . . . .
Brake fluid . . . . . . . . . . . . . . . . . . . . .
Battery . . . . . . . . . . . . . . . . . . . . . . . .
Windscreen washer . . . . . . . . . . . . . Wheels and tyres
. . . . . . . . . . . . . . .
Wheels . . . . . . . . . . . . . . . . . . . . . . . .
Tyre pressure monitoring system .
Accessories and modifications
to the vehicle
. . . . . . . . . . . . . . . . . .
Accessories, replacement parts and
repairs . . . . . . . . . . . . . . . . . . . . . . . .
Modifications . . . . . . . . . . . . . . . . . .
Radio transmitters and business
equipment . . . . . . . . . . . . . . . . . . . . .
Self-help
. . . . . . . . . . . . . . . . . . . . .
Self-help
. . . . . . . . . . . . . . . . . . . . . . . .
Breakdown kit . . . . . . . . . . . . . . . . . .
Repairing a tyre . . . . . . . . . . . . . . . . .
Changing a wheel . . . . . . . . . . . . . .
Jump-starting . . . . . . . . . . . . . . . . . .
Tow-starting and towing away . . .
Fuses and bulbs
. . . . . . . . . . . . . . . .
Fuses . . . . . . . . . . . . . . . . . . . . . . . . . .
Bulbs . . . . . . . . . . . . . . . . . . . . . . . . . .
Technical data
. . . . . . . . . . . .
General notes
. . . . . . . . . . . . . . . . . .
Notes . . . . . . . . . . . . . . . . . . . . . . . . . .
Vehicle identification data . . . . . . .
Performance, weights and
dimensions
. . . . . . . . . . . . . . . . . . . . .
R8 4.2 quattro . . . . . . . . . . . . . . . . . .
Dimensions . . . . . . . . . . . . . . . . . . . .
Capacities . . . . . . . . . . . . . . . . . . . . . 122
122
123
126
131
132
132
134
134
136
136
137
138
138
138
138
139
139143
144
144
144
147
152
152
152
155
155
157
159
161
162
164
166
166
172
174
174
174
175177
178
178
178
182
185
187
190
190
193
195
196
196
196
198
198
198
199
document_0900452a816e6cc9.book Seite 3 Mittwoch, 21. Februar 2007 1:32 13
Page 17 of 210
Instruments and warning/indicator lamps15
Controls
Safety
Driving tips
General maintenance
Self-help
Technical data
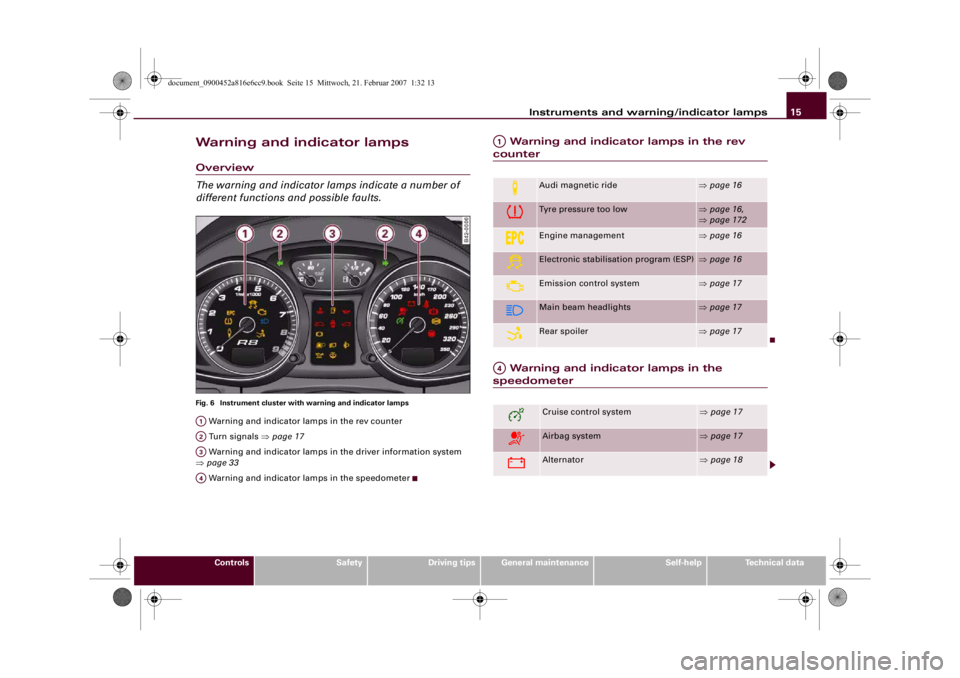
Warning and indicator lampsOverview
The warning and indicator lamps indicate a number of
different functions and possible faults.Fig. 6 Instrument cluster with warning and indicator lamps Warning and indicator lamps in the rev counter
Turn signals ⇒page 17
Warning and indicator lamps in the driver information system
⇒page 33
Warning and indicator lamps in the speedometer
Warning and indicator lamps in the rev
counter
Warning and indicator lamps in the speedometer
A1A2A3A4
Audi magnetic ride
⇒page 16
Tyre pressure too low
⇒page 16,
⇒page 172
Engine management
⇒page 16
Electronic stabilisation program (ESP)
⇒page 16
Emission control system
⇒page 17
Main beam headlights
⇒page 17
Rear spoiler
⇒page 17
Cruise control system
⇒page 17
Airbag system
⇒page 17
Alternator
⇒page 18
A1A4
document_0900452a816e6cc9.book Seite 15 Mittwoch, 21. Februar 2007 1:32 13
Page 35 of 210
Driver information system33
Controls
Safety
Driving tips
General maintenance
Self-help
Technical data
Clearing speed limit
– Switch off the ignition.
– Briefly press the adjuster/test button in the instrument
cluster ⇒page 32, fig. 29. The mileage recorder display
and the digital clock will light up.
– Press the adjuster/test button for at least 2 seconds. The
display will show the speed limit which is currently set.
– Now press and hold the button on the wind-
screen wiper lever ⇒page 32, fig. 30 until the
crossed-out warning symbol for speed limit 2 appears on
the display.The display lighting for the mileage recorder and digital clock goes
off again a few seconds after the button is released.
Note
This speed limit function can also be operated via the on-board
computer ⇒page 25, “Selecting options from the menu”.Notes and symbolsRed symbols
A red symbol warns of a serious malfunction.–Stop the vehicle.
– Switch off the engine.
– Check the function displayed. Obtain professional assist-
ance if necessary.
A red symbol is accompanied by three warning chimes. The symbol
will keep flashing until the fault is corrected. If several faults are
detected at the same time, the symbols are displayed one after the
other for about 2 seconds at a time.
Note
•
You can press the left adjuster button to display a message that
gives you more information.
•
On vehicles equipped with a navigation system the warning
symbol is displayed in the top section of the display while the route
guidance is active.
Yellow symbols
A yellow symbol indicates a malfunction or other item
requiring attention.
Reset
AB
BRAKE
Fault in the brake system
⇒page 35
COOLANT
Coolant level too low / coolant
temperature too high
⇒page 35
OIL
PRESS.
Engine oil pressure too low
⇒page 36
Tyre pressure monitoring sys-
tem*
⇒page 36
Fuel level low
⇒page 36
Check engine oil level
⇒page 37
Engine oil sensor defective
⇒page 37
document_0900452a816e6cc9.book Seite 33 Mittwoch, 21. Februar 2007 1:32 13
Page 36 of 210
Driver information system 34Yellow symbols are accompanied by one warning chime. The func-
tion indicated should be checked as soon as possible. If several
faults are detected at the same time, the symbols are displayed one
after the other for about 2 seconds at a time.
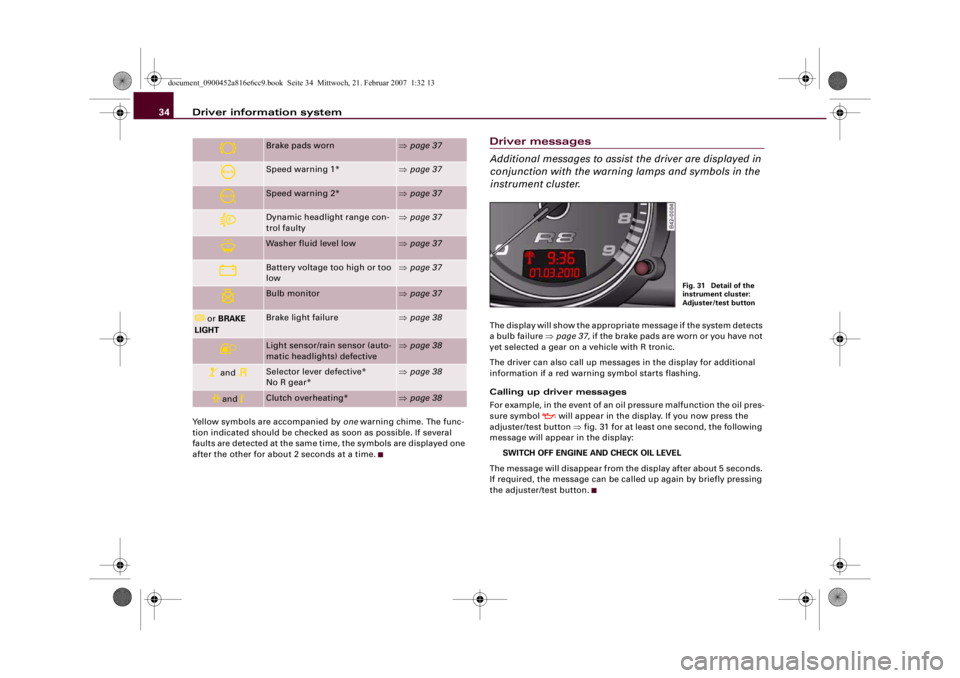
Driver messages
Additional messages to assist the driver are displayed in
conjunction with the warning lamps and symbols in the
instrument cluster.The display will show the appropriate message if the system detects
a bulb failure ⇒page 37, if the brake pads are worn or you have not
yet selected a gear on a vehicle with R tronic.
The driver can also call up messages in the display for additional
information if a red warning symbol starts flashing.
Calling up driver messages
For example, in the event of an oil pressure malfunction the oil pres-
sure symbol
will appear in the display. If you now press the
adjuster/test button ⇒fig. 31 for at least one second, the following
message will appear in the display:
SWITCH OFF ENGINE AND CHECK OIL LEVEL
The message will disappear from the display after about 5 seconds.
If required, the message can be called up again by briefly pressing
the adjuster/test button.
Brake pads worn
⇒page 37
Speed warning 1*
⇒page 37
Speed warning 2*
⇒page 37
Dynamic headlight range con-
trol faulty
⇒page 37
Washer fluid level low
⇒page 37
Battery voltage too high or too
low
⇒page 37
Bulb monitor
⇒page 37
or BRAKE
LIGHT
Brake light failure
⇒page 38
Light sensor/rain sensor (auto-
matic headlights) defective
⇒page 38
and
Selector lever defective*
No R gear*
⇒page 38
and
Clutch overheating*
⇒page 38
Fig. 31 Detail of the
instrument cluster:
Adjuster/test button
document_0900452a816e6cc9.book Seite 34 Mittwoch, 21. Februar 2007 1:32 13
Page 38 of 210
Driver information system 36•
The engine compartment of any motor vehicle is a dangerous
place. Before carrying out any work in the engine compartment,
switch off the engine and allow it to cool down. Please observe the
important safety warnings ⇒page 155, “Working on components
in the engine compartment”.Caution
Do not drive on if the symbol
has come on to indicate a fault in
the cooling system, otherwise there is a risk of damaging the
engine.
Engine oil pressure too low
If the engine oil pressure is too low the fault must be recti-
fied immediately.If the
symbol flashes in the display, the oil pressure is
too low. The following message will appear in the display
together with the symbol:
Switch off engine and check oil level
– Stop the vehicle.
– Switch off the engine.
– Check the engine oil level ⇒page 157.
– Obtain professional assistance if necessary.
If the engine oil level is too low
If the engine oil level is too low, add more oil ⇒page 158.If the engine oil level is correct
If the
symbol flashes and the engine oil level is correct, obtain
professional assistance. Do not drive on. Do not continue to run the
engine, not even at idle speed.
Applies to vehicles: with tyre pressure monitoring systemTyre pressure monitoring system
The tyre pressure should be corrected as soon as possible
if it is too low.If the
symbol appears, the tyre pressure on at least one
of the wheels is too low. The message Tyre pressures too
low will be displayed.
–Stop the vehicle.
– Check the tyre(s).
– Adjust the tyre pressure ⇒page 167.
For more detailed information on the tyre pressure monitoring
system please refer to ⇒page 172.Fuel level low
When this symbol
comes on for the first time, there are about
10 litres of fuel left in the tank. You should fill up as soon as possible
⇒page 152.
If this warning symbol lights up although the fuel tank is sufficiently
filled, there is a malfunction in the fuel tank system. The display will
also show the driver message Tank system malfunction ! Contact
workshop. Please take the vehicle to a qualified workshop.
WARNING (continued)
document_0900452a816e6cc9.book Seite 36 Mittwoch, 21. Februar 2007 1:32 13
Page 84 of 210
Driving 82Starting the engine
Turn the key to this position to start the engine. While the engine is
being started the headlights are switched back to side lights and
other major electrical equipment is switched off. After the engine
has started the ignition key returns to position by itself.
The ignition key has to be turned back to position before re-
starting the engine. The starter inhibitor in the ignition lock
prevents the starter motor from engaging when the engine is
running, as this could cause damage.
WARNING
•
Wait for the vehicle to come to a standstill before removing the
ignition key from the lock. Otherwise the steering lock could
engage suddenly, which could cause an accident.
•
Always take the key with you when leaving the vehicle – even
if you only intend to be gone for a short time. This is especially
important if children are left in the car. They might otherwise be
able to start the engine or use power-operated equipment such as
the electric windows - this could lead to injuries.Note
If the battery has been disconnected and then reconnected it will be
necessary to leave the key in position for about 5 seconds before
starting the engine.Starting the engineThe engine can only be started with an original Audi key.On vehicles with R tronic, the engine can be started in
neutral (N) or in any gear (1 - 6 or R).
– Apply the handbrake firmly ⇒.– Push the clutch pedal all the way down (vehicles with
manual gearbox).
– Press and hold the brake pedal.
– Turn the ignition key to position ⇒page 81, fig. 72
without pressing the accelerator.
– Release the ignition key as soon as the engine starts; the
starter motor must not be allowed to run on with the
engine. Neutral gear (N) will be engaged on vehicles with
Rtronic.
When starting from cold the engine may be a little noisy for the first
few seconds until oil pressure has built up in the hydraulic tappets.
This is quite normal, and no cause for concern.
If the engine fails to start straight-away, switch off the starter after
about 10 seconds and try again after about half a minute.
WARNING
•
Never run the engine in confined spaces. The exhaust gases are
toxic.
•
If the engine is running and a gear is engaged, you will need to
hold the car with the footbrake.Caution
Avoid high engine speeds, full throttle and extreme load conditions
until the engine has reached its normal operating temperature,
otherwise this can damage the engine.
For the sake of the environment
Do not warm up the engine when the vehicle is stationary. You
should drive off immediately whenever possible. This will help avoid
unnecessary exhaust emissions.
A3
A2A1
A2
A3
document_0900452a816e6cc9.book Seite 82 Mittwoch, 21. Februar 2007 1:32 13
Page 136 of 210
Intelligent technology 134Rear spoilerThe automatic rear spoiler increases the car's stability.The rear spoiler can be extended or retracted manually or automat-
ically.
Automatic mode (normal operation)•
Automatic extension: The rear spoiler is automatically extended
at road speeds above approximately 100 km/h.
•
Automatic retraction: The rear spoiler is automatically retracted
at road speeds below approximately 35 km/h.
Manual mode
•
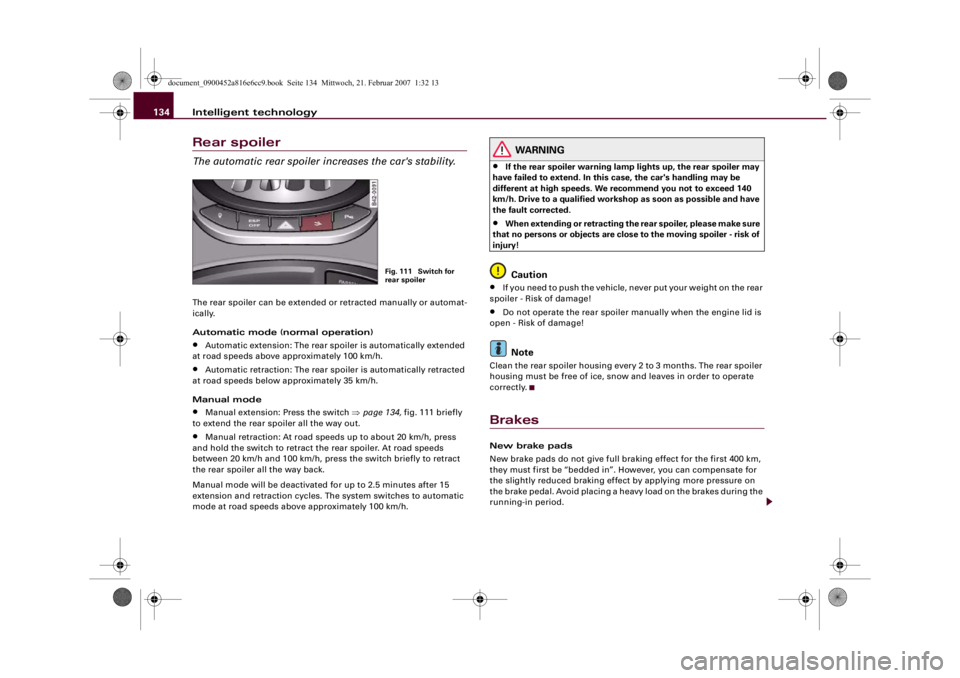
Manual extension: Press the switch ⇒page 134, fig. 111 briefly
to extend the rear spoiler all the way out.
•
Manual retraction: At road speeds up to about 20 km/h, press
and hold the switch to retract the rear spoiler. At road speeds
between 20 km/h and 100 km/h, press the switch briefly to retract
the rear spoiler all the way back.
Manual mode will be deactivated for up to 2.5 minutes after 15
extension and retraction cycles. The system switches to automatic
mode at road speeds above approximately 100 km/h.
WARNING
•
If the rear spoiler warning lamp lights up, the rear spoiler may
have failed to extend. In this case, the car's handling may be
different at high speeds. We recommend you not to exceed 140
km/h. Drive to a qualified workshop as soon as possible and have
the fault corrected.
•
When extending or retracting the rear spoiler, please make sure
that no persons or objects are close to the moving spoiler - risk of
injury!Caution
•
If you need to push the vehicle, never put your weight on the rear
spoiler - Risk of damage!
•
Do not operate the rear spoiler manually when the engine lid is
open - Risk of damage!Note
Clean the rear spoiler housing every 2 to 3 months. The rear spoiler
housing must be free of ice, snow and leaves in order to operate
correctly.BrakesNew brake pads
New brake pads do not give full braking effect for the first 400 km,
they must first be “bedded in”. However, you can compensate for
the slightly reduced braking effect by applying more pressure on
the brake pedal. Avoid placing a heavy load on the brakes during the
running-in period.
Fig. 111 Switch for
rear spoiler
document_0900452a816e6cc9.book Seite 134 Mittwoch, 21. Februar 2007 1:32 13
Page 137 of 210
Intelligent technology135
Controls
Safety
Driving tips
General maintenance
Self-help
Technical data We ar
The rate of wear on the brake pads depends a great deal on how you
drive and the conditions in which the vehicle is operated. Negative
factors are, for instance, city traffic, frequent short trips or hard
driving with abrupt starts and stops.
Wet roads; road salt
When you are driving at a speed higher than 70 km/h and have the
windscreen wipers switched on (at or above intermittent setting 4)
the brake pads are very briefly brought into contact with the brake
discs. This automatic process which goes unnoticed by the driver is
carried out at regular intervals and is intended to improve braking
response in wet conditions.
In certain conditions, such as in heavy rain, or after washing the car
or driving through water, the full braking effect can be delayed by
moisture (or in winter by ice) on the discs and brake pads. The
brakes should be “dried” by pressing the pedal to restore full
braking effect.
The effectiveness of the brakes can also be temporarily reduced if
the car is driven for some distance without using the brakes when
there is a lot of salt on the road in winter. The layer of salt that accu-
mulates on the discs and pads can be removed with a few cautious
brake applications.
Corrosion
There may be a tendency for dirt to build up on the brake pads and
corrosion to form on the discs if the car is used infrequently, or if
you only drive low mileages without using the brakes very much.
If the brakes are not used frequently, or if corrosion has formed on
the discs, it is advisable to clean off the pads and discs by braking
firmly a few times from a moderately high speed ⇒.
Faults in the brake system
If the brake pedal travel should ever increase suddenly, this may
mean that one of the two brake circuits has failed. Drive immedi-
ately to the nearest qualified workshop and have the fault rectified. On the way to the dealer, be prepared to use more pressure on the
brake pedal and allow for longer stopping distances.
Low brake fluid level
Malfunctions can occur in the brake system if the brake fluid level is
too low. The brake fluid level is monitored electronically.
Brake servo
The brake servo amplifies the pressure you apply to the brake pedal.
It only works when the engine is running.
WARNING
•
When applying the brakes to clean off deposits on the pads and
discs, select a clear, dry road. Be sure not to inconvenience or
endanger other road users; do not risk an accident.
•
Never let the car coast with the engine switched off (this can
cause accidents).Caution
•
Never let the brakes “drag” by leaving your foot on the pedal
when you do not really intend to brake. This overheats the brakes,
resulting in longer stopping distances and greater wear.
•
Before driving down a long, steep gradient, it is advisable to
reduce speed and select a lower gear. In this way you will make use
of the engine braking effect and relieve the load on the brakes. If you
still have to use the brakes, it is better to brake firmly at intervals
than to apply the brakes continuously.Note
•
If the brake servo is out of action due to a malfunction, or if the
car has to be towed, you will have to press the brake pedal consid-
erably harder to make up for the lack of servo assistance.
•
If you wish to equip the car with accessories such as a front
spoiler or wheel covers, it is important that the flow of air to the
document_0900452a816e6cc9.book Seite 135 Mittwoch, 21. Februar 2007 1:32 13
Page 139 of 210
Intelligent technology137
Controls
Safety
Driving tips
General maintenance
Self-help
Technical data pery roads just because the car still has good acceleration in these
conditions (accident risk).
•
On wet roads bear in mind that the front wheels may start to
“aquaplane” and lose contact with the road if the car is driven too
fast. If this should happen, there will be no sudden increase in
engine speed to warn the driver, as with a front-wheel drive car. So
do not drive too fast in the wet: adjust your speed to suit the
conditions (accident risk).
Dry sump lubrication systemLarge lateral and longitudinal forces act on the engine and vehicle
when a sporty driving style is adopted. A dry sump system ensures
that the engine continues to be supplied with oil and lubricated
optimally under these conditions.
In a “normal” car, the oil is stored in the oil sump and is pumped
from there to the lubrication points inside the engine. The oil then
flows from there back into the oil sump. In extreme situations this
can cause air to be sucked into the oil pump with the result that the
oil pressure is no longer high enough.
In a dry sump lubrication system, the oil is stored in a separate oil
tank instead of the oil sump (which is “dry”). While one pump sends
oil to the engine, a second pump returns the oil from the engine to
the oil tank. The tall and slim shape of the oil tank means that the oil
pressure can be kept constant even in extreme conditions.
In addition, the oil sump is much lower on vehicles with dry sump
lubrication. This means that the engine can also be arranged lower
down for a lower centre of gravity and improved handling.
WARNING (continued)
document_0900452a816e6cc9.book Seite 137 Mittwoch, 21. Februar 2007 1:32 13
Page 141 of 210
Your vehicle and the environment139
Controls
Safety
Driving tips
General maintenance
Self-help
Technical data
Sporty drivingLetting the engine warm up and cool downYou can reduce the amount of wear and tear on your vehicle during
a sporty driving session simply by adopting a more restrained
driving style while the engine is warming up and cooling down.
You should allow the engine to warm up by keeping the engine
speed below 7000 rpm until the engine oil reaches at least 90 °C. In
addition, the tyres will not develop their full grip potential until they
have had a chance to warm up on the road.
Even though the engine continues to be cooled after you switch it
off, it is particularly important to give it time to cool down before
parking. The engine, brakes, exhaust system and gearbox will all
reach very high temperatures when you adopt a sporty driving style.
Before you park the vehicle, allow it to cool down to normal temper-
ature by driving at moderate rpm speeds for several miles.Driving on a racing circuitBefore you take your car out on a racing circuit, please ensure that
it is in perfect condition. You should check the tyre tread and brake
pads for wear. It's also a good idea to increase the tyre pressure by
0.3 bar.
The oil consumption may be slightly higher than “normal” when
driving on a racing circuit ⇒page 157.
You should always check your vehicle after driving hard. Are the
brake pads ok? Do you notice any problems with the tyres (e.g. tread
worn, blistering, etc.)? Are the air intakes free of leaves and
deposits? Is the oil level ok?
Your Audi R8 dealer will be glad to carry out an inspection before
and after you use the car on a racing circuit.
Note
•
Some racing circuits (e.g. with banked curves) can affect the
behaviour of the ESP.
•
Driving the car on a racing circuit places a heavy load on all parts
of the vehicle. This can result in increased wear and tear.
Environmental compatibilityEnvironmental protection is a top priority in the design, choice of
materials and production of your new Audi. Particular importance
has been attached to the following aspects:
Design measures for economical recycling•
Joints and connections designed for ease of dismantling
•
Modular construction to facilitate dismantling
•
Increased use of single-grade materials
•
Plastic parts and elastomers are labelled in accordance with ISO
1043, ISO 11469 and ISO 1629
Choice of materials
•
Nearly all materials used can be recycled
•
Similar types of plastics grouped together for easy recycling
•
Recycled materials used in manufacture
•
Reduced vapour emissions from plastics
•
CFC-free refrigerant in air conditioner
Compliance with the laws prohibiting the use of:
•
Cadmium
•
Asbestos
•
Lead
•
Mercury
•
Chrome VI
document_0900452a816e6cc9.book Seite 139 Mittwoch, 21. Februar 2007 1:32 13