ESP AUDI R8 SPYDER 2011 Owner's Manual
[x] Cancel search | Manufacturer: AUDI, Model Year: 2011, Model line: R8 SPYDER, Model: AUDI R8 SPYDER 2011Pages: 244, PDF Size: 59.74 MB
Page 69 of 244
Front passenger's seat
Always move the front passenger seat into the rearmost position .
To avoid contact with the airbag while it is de
p loying, do not sit any closer to the instru
ment panel than necessary and always wear
the three-point safety belt provided adjusted
correctly . We recommend that you adjust the
passenger's seat in the following manner:
.,. Move the front passenger seat into the rear
most position of the fore and aft adjustment
range
c:::> &. in Why is your seat adjustment
so important? on page
66.
.,. Bring the backrest up to an (almost) upright
position.
Do not ride with the seat reclined .
.,. The idea l position for the head restraint is
with the upper edge of the restraint leve l
with the top of your head
c:::> page 68. You
shou ld
not lower the top of the restra int be
low the level of your eyes .
.,. Place your feet on the floor in front of the
passenge r's seat .
Power seats
Adjustment switches
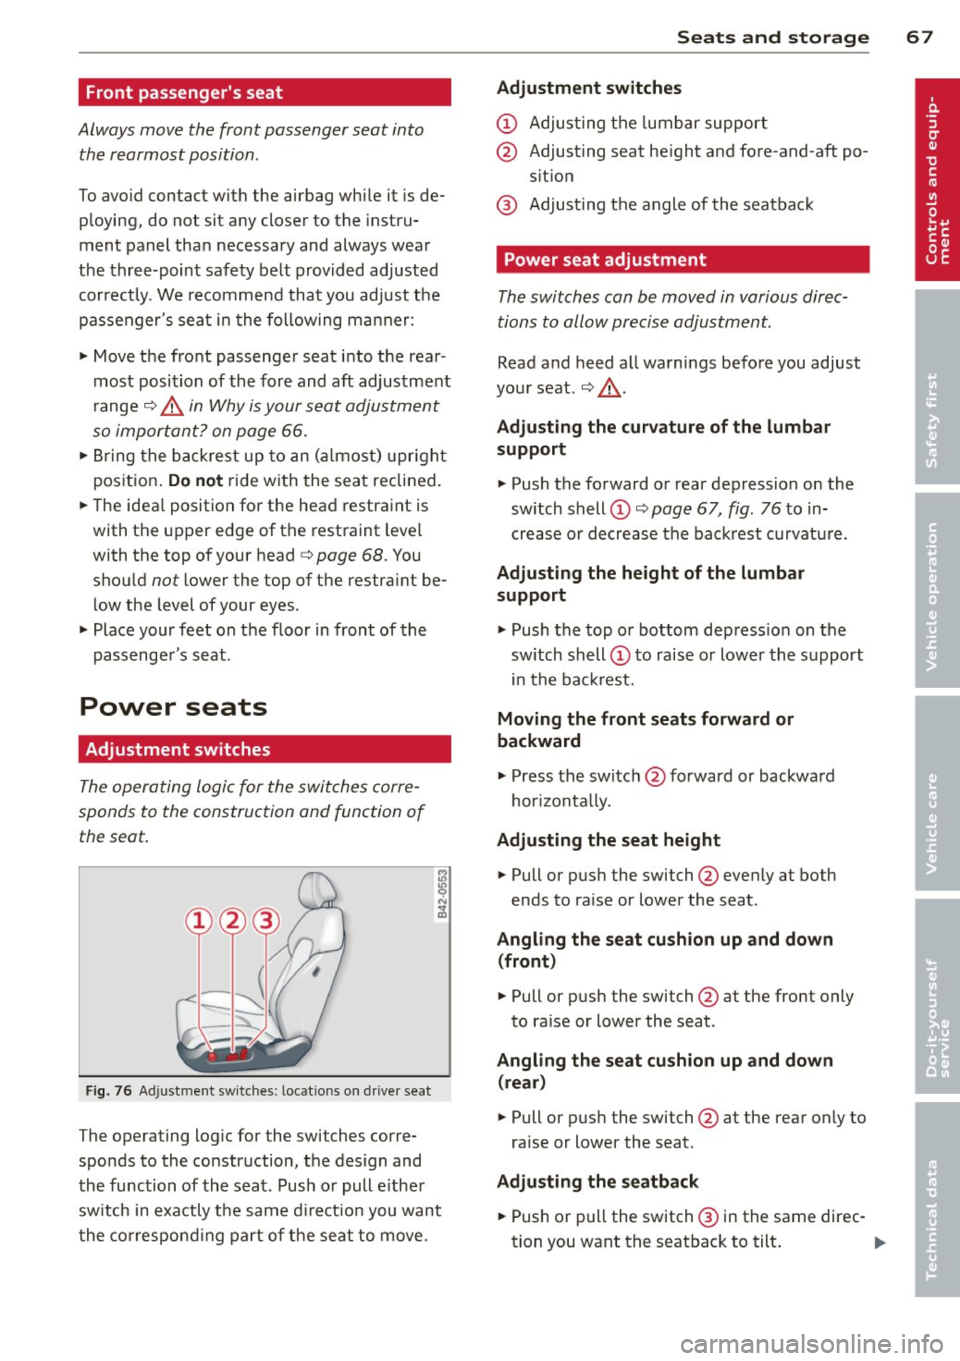
The operating logic for the switches corre
sponds to the construction and function of
the seat.
Fig . 76 Ad just men t sw itches: locations on driver sea t
The operating log ic for the switches corre
sponds to the construction, the design and
the function of the seat . Push or pull e ithe r
sw itch in exactly the same direction you want
the corresponding part of the seat to move.
Seats and storage 67
Adjustment switches
CD Adjusting the lumbar support
@ Adjusting seat height and fore-and-aft po
sit ion
@ Adjusting the angle of the seatback
Power seat adjustment
The switches can be moved in various direc
tions to allow precise adjustment.
Read and heed all warnings before you adjust
your seat.
c:::> &. .
Adjusting the curvature of the lumbar
support
.,. Push the forward or rear depression on the
sw itch shell
CD c:::> page 67, fig. 76 to in
crease or decrease the backrest curvature.
Adjusting the height of the lumbar
support
.,. Push the top o r bottom depress ion on the
sw itch shell
CD to raise or lower the support
i n the backrest.
Moving the front seats forward or
backward
.,. Press the switch @forward or backward
hor izont ally.
Adjusting the seat height
.,. Pull or pus h the switch @even ly at both
ends to ra ise or lower the seat .
Angling the seat cushion up and down
(front)
.,. Pull or push the switch @at the front only
to ra ise or lower the seat .
Angling the seat cushion up and down
(rear)
.,. Pull or pus h the switch @at the rear only to
raise or lower the seat.
Adjusting the seatback
... Push or pull the switch ® in the same direc-
tion you want the seatback to tilt . ..,.
Page 82 of 244
80 On the road
The parking brake warning light_
(USA)/ . (CON) illuminates when the parking
brake is set and you switch on the ignition.
A WARNING
-
Always release the parking brake com
pletely. A partially engaged brake will
overheat the rear brakes, reduce their ef
fectiveness and cause excessive wear. This could lead to brake failure and an accident .
(D Note
Only after the vehicle has come to com
plete stop, should you firmly set the park
ing brake and
move the gearshift lever into
a gear.
Parking
To prevent a parked vehicle from rolling
away, there are a few things you should do .
.. Stop the vehicle using the brake pedal.
.. Set the parking brake firmly .
.. Switch off the engine.
.. Engage a gear
q ,&. .
What else you should do when parking
your vehicle on an incline or decline
Turn the steering wheel so that if the vehicle
should start to roll, it will roll into the curb.
A WARNING
This is how you can reduce the risk of in
jury when leaving your vehicle.
- Never park the vehicle where it can come
in contact with dry grass, spilled fuel or
any other flammable materials.
- Never allow anyone - especially small
children - to remain in the vehicle when
it is locked. Locked doors make it more
difficult for rescuers to access the pas
senger compartment in the event of an
emergency. Danger to life!
- Never leave children unsupervised in the
vehicle. Children could release the park
ing brake or
move the gearshift lever out
-
of gear. The vehicle could start to roll
away and cause an accident.
- No matter what the season is, the tem
perature in a parked vehicle can reach
dangerous levels.
Starting on hills
Applies to vehicles: with hill hold assist
Hill hold assist makes it easier to start on
hills .
The system is activated when the brake pedal
is depressed
for a few seconds.
After releasing the brake pedal, the brake
power is held for a
brief moment to prevent
the vehicle from rolling back when starting.
During this time, you can easily begin to
move
your vehicle.
A WARNING
-- If you did not begin moving immediately
after releasing the brake pedal, the vehi
cle could begin to roll backward under
certain circumstances. Depress the brake
pedal immediately or engage the parking
brake.
- If the engine stalls, depress the brake
pedal immediately or engage the parking
brake.
- To prevent the vehicle from rolling back
unintentionally when starting in stop
and-go traffic, keep the brake pedal de
pressed for a few seconds before driving
off.
(D Tips
You can find out if your vehicle is equipped
with "hill hold assist" at an authorized Au
di dealer.
Page 83 of 244
Cruise control
Introduction
The cruise control system keeps the speed
constant .
The cruise control system makes it possible to
drive at a constant speed over 20 mph (US
model) or 30 km/h (Canadian model). This is
true only to the extent that engine power or
engine braking effect allow . Using the system
takes the strain off the "gas peda l foot" -es
pec ial ly on long tr ips.
In the control mode, the indicator light in the
instrument cluster is lit
(Dj;(i )~i~ (US model) ,111
(Canadian model).
The cruise control system automatically
switches itself off imm ed iately under the fol
lowing cond itions:
- Pressing the brake pedal.
- Pressing the clutch pedal.
A WARNING
-Always pay attention to traffic even when
the cruise control system is switched on.
You are always responsible for your
speed and the distance between your ve hicle and other vehicles.
- For safety reasons, the cruise control sys tem shou ld not be used in the city, in
stop-and-go traffic, on twisting roads
and when road conditions are poo r (such
as ice, fog, gravel, heavy rain and hydro
planing) -risk of accident.
- Turn off the cr uise control system tem
porarily when entering turn lanes, high
way exit lanes or in construction zones.
- Please note that inadvertently "rest ing"
your foot on the accelerator peda l causes
the cruise control system not to brake .
This is because the cruise contro l system
is overridden by the driver's acceleration.
(D Note
On manual transmission vehicles: If you
shift into neutral with the cruise contro l
On th e road 81
system switched on, always depress the
clutch pedal! Otherwise the engine will
race and could be damaged as a result .
(D Tips
When driving on steep downward grades,
the cruise control system cannot keep the
speed constant. The vehicle's own weight
increases the speed. Shift into a lower gear
i n plenty of t ime or brake the vehicle with
the foot brake .
Saving the speed
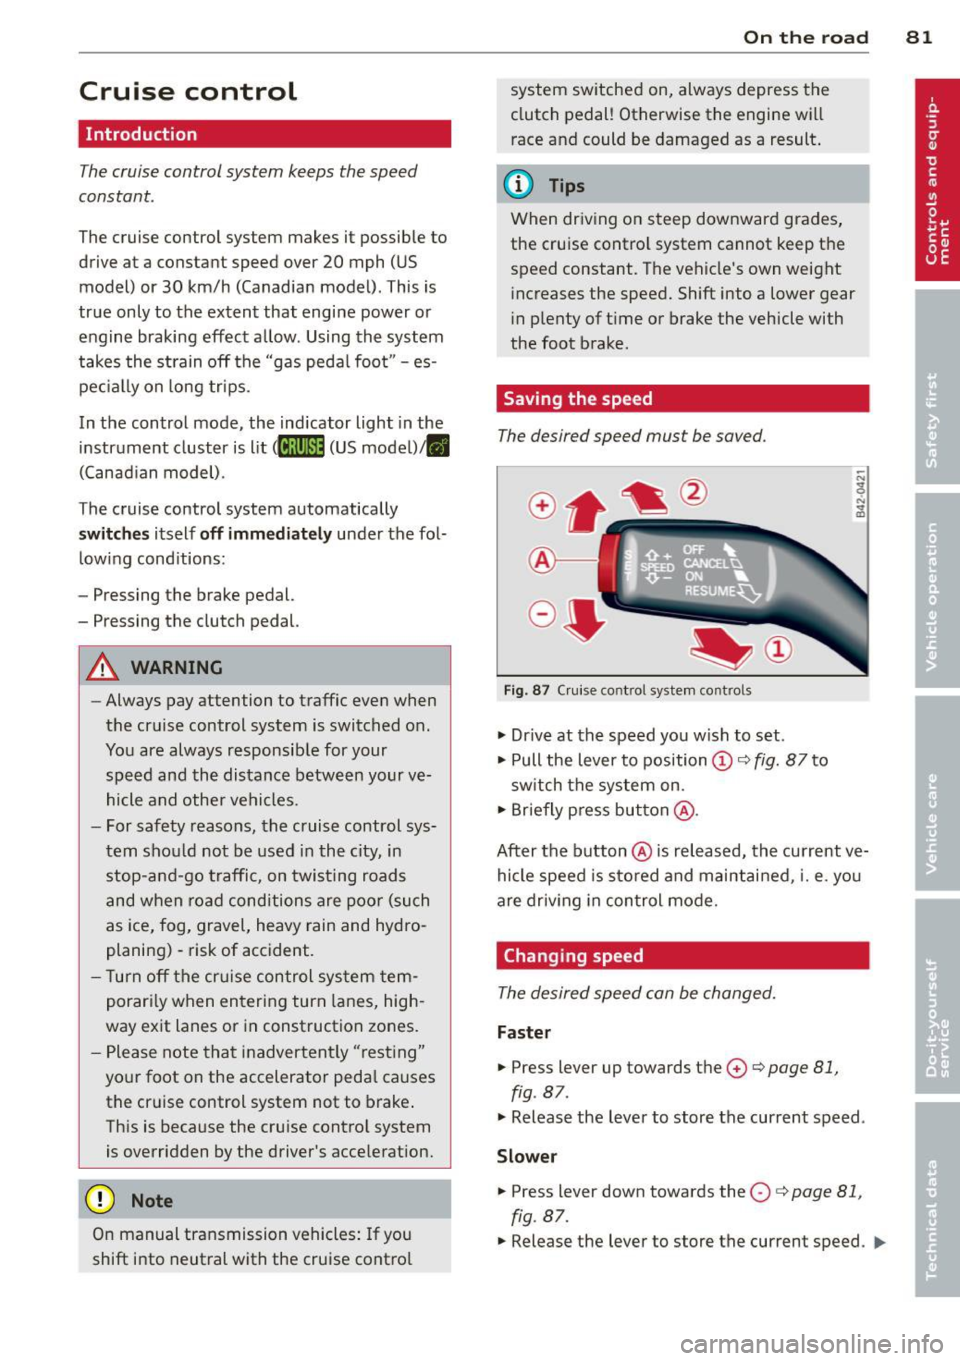
The desired speed must be saved.
Fig. 87 C ruise control system controls
.,. Dr ive at the speed you w ish to set.
.,. Pull the lever to position
(D c:> fig. 87 to
sw itch the system on.
.,. Briefly press button @.
After the button @is released, the current ve
hicle speed is sto red and maintai ned, i.e. you
are driv ing in control mode.
Changing speed
The desired speed can be changed.
Fas ter
.,. Press lever up towards the 0 c:> page 81,
fig. 87.
.,. Release the lever to store the current speed .
Slower
.. Press lever down towards the O c:> page 81,
fig. 87.
.,. Release the lever to store the current speed. IJJl-
Page 86 of 244
84 Manual transmission
Manual transmission
Launch Control
Program
Applies to vehicles: with VlO engi ne and manua l trans
mission
The Launch Control Program enables maxi
mum acceleration.
Requirement : The engine must be at operat
ing temperature and the steering wheel must
not be turned.
• With the engine runn ing, press the
[!I but
ton one time. The ESP indicator light
fi in
the Driver Information System display illu
minates and the message
ESP sport· Warn
ing! Restricted stability
appears.
• Press the clutch and hold it down.
• Engage the first gear.
• Press the accelerator peda l all the way down
until the engine speed remains steady at
6500 RPM.
• Release the clutch carefully~.&_ .
.&_ WARNING
-Always adapt your driving to the traffic
flow.
- Only use Launch Control when road and
traffic conditions a llow it and other driv
ers wi ll not be endangered or annoyed by
your driv ing and the vehicle's accelera
tion.
- Please note that the driving wheels can
spin and the vehicle can break away
when ESP is sw itched off, especially
when the road is slippery.
- Once you have accelerated, you should
switch the ESP back on by pressing the
l:m
button.
(D Tips
- When accelerating using the Launch
Control program, all vehicle parts are
subject to heavy loads. This can result in
i ncreased wear.
- The Launch Control Program only func
tions when the parking brake is released and
the vehicle speed is less than 3 mph
(5 km/h).
Page 89 of 244
Automatic operation
Applies to vehicles: with R tronic
The forward gears are shi~ed up or down au
tomatically.
S tartin g from a stop
.. Press and hold the brake pedal.
.. Tap the se lector lever towards A.
.. Release the brake pedal and acce lerate
c::, A.
in Manual operation on page 86.
Under certain circumstances (driving in the
mounta ins for example), it can be beneficial
to switch temporarily to the manua l shift pro
gram
c::> page 86 in order to adjust the gear ra
tios to driving conditions manually.
Kick-down
Applies to vehicles : with R tronic
When you depress the accelerator pedal be
yond the resistance point, R tronic downshifts
into a lower gear, depending on vehicle speed
and engine rpm . The ups hift into the next
h igher gear takes place once the max imum
specified engine speed is reached. Exception:
You have activated the sport funct ion.
A WARNING
Please note that the d rive whee ls can spin
if kick -down is used on a smooth slippery
road - there is a risk of skidding .
Launch Control
Program
Applies to vehicles : with R tronic
The Launch Control Program enables maxi
mum acceleration.
Requirement: The engine must be at operat
ing temperature and the steering wheel must
not be turned .
.. With the engine running, press the
[!I but
ton one t ime. The ESP indicator light
fi in
the Driver Information System display illu minates and the message
ESP sp ort -W arn
in g! Re str icte d s tab ility
appears .
Autom ated manual tr an sm iss ion 8 7
.. Press the brake pedal with your left foot and
hold it down.
.. Engage a gear.
.. Press the
ISPORT I button on the selector lev
er cover.
.. Press the accelerator pedal w ith your right
foot simultaneously unt il the eng ine has
reached a constant speed .
.,. Remove your left foot from the brake
c::, ,& .
A WARNING
-Always adapt your dr iv ing to the traffic
f low.
- On ly use La unch Control when road and
traffic conditions allow it and other driv
ers will not be endangered or annoyed by
your driving and the vehicle's accelera
tion.
- Please note that t he driving wheels can
spin and the vehicle can break away
when ESP is switched off, especially
when the road is slippery .
- Once the starting procedure is complete,
you should sw itch ESP on again by press
ing the
[!I switch.
(D Tips
When accelerat ing using the Launch Con
trol program, all vehicle parts are sub ject
to heavy loads. This can result in increased
wear.
Steering wheel with
shift paddles
Applies to veh icles: with R tronic
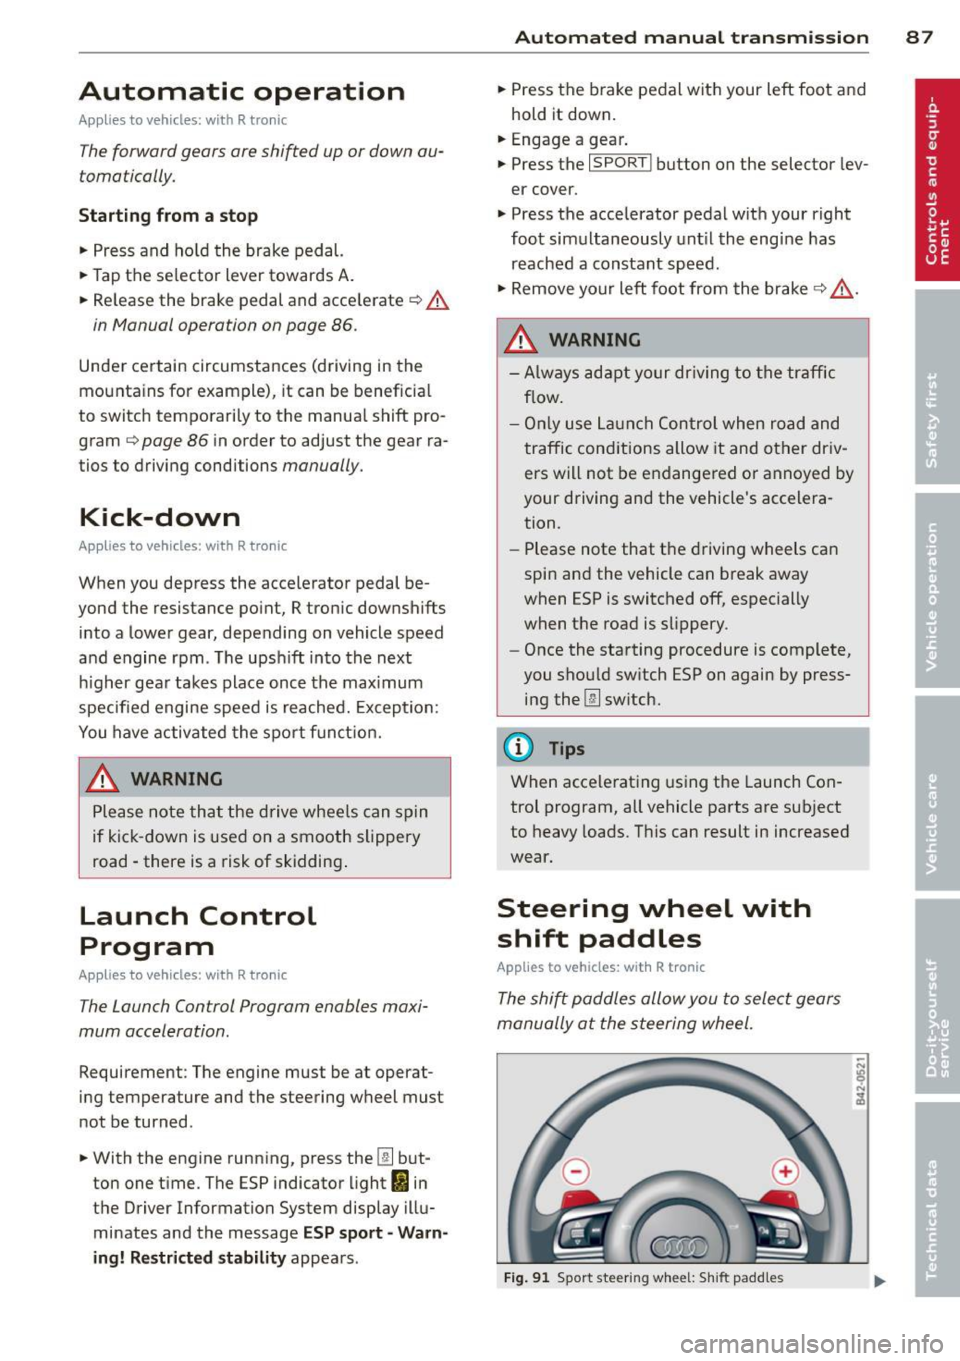
The shi~ paddles allow you to select gears
manually at the steering wheel.
F ig . 91 Sport steering wheel: S hift padd les
Page 92 of 244
90 Parking system
Rear view camera coverage area
The rearview camera shows you the area behind your vehicle in the navigation system dis
play. This area roughly corresponds to the
area in
¢ fig. 94 and (!) ¢fig. 95. Orientation
lines and colored surfaces are projected in the
area shown, which can help you with parking
and maneuvering. Objects that are located in
an area that is not captured by the camera@
¢ fig. 95 and that are closer to the bumper
will not appear on the navigation system dis play.
We recommend that you practice parking with
the rearview camera in a traffic-free location
or parking lot to become familiar with the sys
tem, the orientation lines, and their function.
There should be sufficient light and good
weather conditions when doing so.
In the navigation system display, objects or
vehicles appear closer or further away if:
Objects or vehicles appear closer or farther
away in the navigation system if:
- you are driving in reverse gear from a level
surface onto an incline, or a downward
slope,
- you are driving in reverse gear toward pro-
truding objects.
The accuracy of the o rientation lines and blue
surfaces diminishes if:
- the rearview camera does not provide a reli able image, for example, in poor visibility
conditions or if the lens is dirty,
- the image on the screen is not visible due to
sun glare and reflection .
Caring for the rearview camera lens
The rearview camera is located in the center
of the vehicle above the rear license plate bracket. In order for the rearview camera to
function properly , the camera lens must be
kept clean and free of snow and ice .
- Dampen the lens with a household alcohol
based glass cleaner , and clean the lens with
a dry cloth. - Remove
snow with a hand brush and ice
preferably with a de-icing spray
¢ (D .
A WARNING
--
-The parking system cannot replace the
driver's attention. The driver alone is re
sponsible for parking and similar driving maneuvers .
- Sensors have blind spots in which objects
cannot be detected. Pay special attention
to small children and animals because
the sensors cannot always detect them .
- Always keep your eyes on the vehicle's
surroundings, using the rearview mirror
as well.
- Do not allow yourself to be distracted from traffic by the rearview camera pic
tures in the navigation system display .
- If the position and the installation angle
of the camera has changed, for example,
after a rear end collision, do not continue
to use the system for safety reasons .
Have it checked by an authorized Audi
dealer or other qualified workshop.
(D Note
-Low obstacles already s ignaled by a
warning can disappear from the system's detection range as they are approached
and will not continue to be signaled. Ob
jects such as barrier chains, trailer draw
bars, narrow painted vertical poles or
fences may not be detected by the sys
tem, posing risk of damage.
- Never use warm or hot water to remove
snow or ice from the rearview camera
lens because the lens could crack.
- Never use products that are abrasive
when cleaning the lens.
Page 94 of 244
92 Parking system
Reverse parking
Applies to vehicles: with park ing system advanced
Parking mode 1 con be used when parking in
a garage or into a parking space.
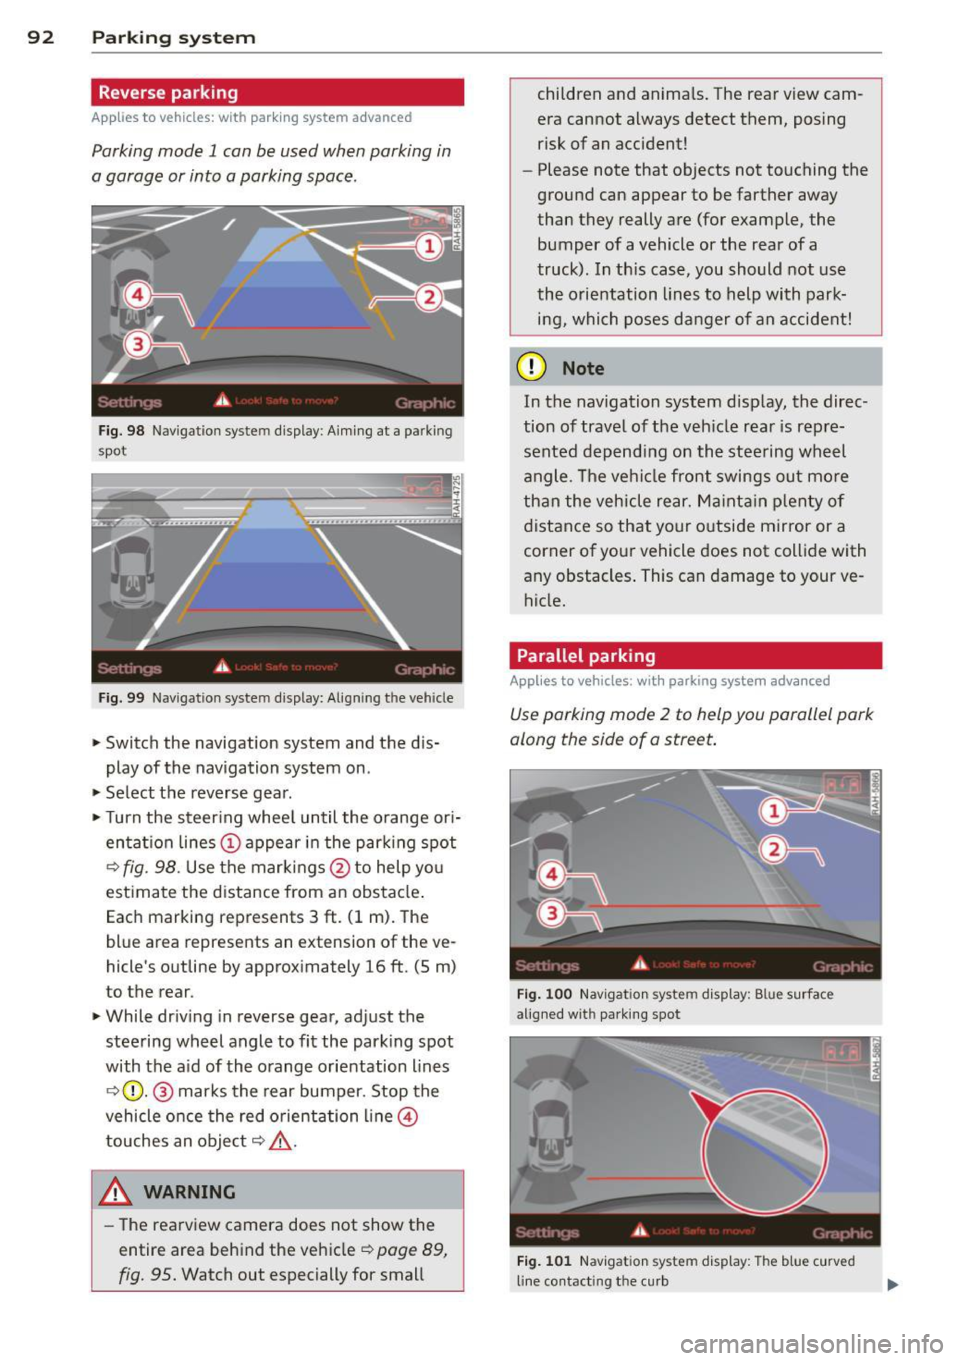
Fig. 98 Navigat ion syste m display : Aiming at a pa rk in g
spot
Fig. 99 Navigation syste m display: Align ing t he ve hicle
> Switch the navigation system and the dis
play of the navigation system on .
.,. Select the reverse gear .
.,. Turn the steer ing whee l until the orange ori
entat ion lines (;) appear in the parking spot
¢ fig. 98. Use the markings@to help yo u
estimate the distance from an obstacle .
Each marking represents 3
ft. (1 m). The
blue area represents an extension of the ve
hicle 's outline by approximately 16
ft. (5 m)
to the rear.
> While driving in reverse gear, adjust the
steering wheel angle to fit the parking spot
with the aid of the orange orientation lines
¢ (}). @ marks the rear bumper. Stop the
vehicle once the red orientation line@
touches an object¢,&. .
A WARNING
-The rearview camera does not show the
entire area behind the vehicle ¢
page 89,
fig. 95.
Watch out especially for small children and anima
ls. The rear view cam
era cannot always detect them, posing
risk of an accident!
- Please note that objects not touching the
ground can appear to be farther away
than they really are (for example, the
bumper of a vehicle or the rear of a
truck) . In th is case, you should not use
the orientation lines to help with park·
ing, which poses danger of an accident!
(D Note
In the navigation system display, the direc·
tion of travel of the vehicle rear is rep re
sented depending on the steering wheel
angle . The vehi cle front swings out more
than the vehicle rear. Maintain plenty of
distance so that your outside mirror or a
corner of your vehicle does not collide with
any obstacles . This can damage to your ve
hicle.
Parallel parking
Applies to vehicles: with parking system advanced
Use parking mode 2 to help you parallel park
along the side of a street.
Fig. 100 Navigat ion sy stem display : B lu e surfac e
alig ned wit h parking spot
Fig. 101 Navigation system display : T h e b lue curved
line contact ing t he curb
Page 95 of 244
The following steps apply only when there is
no obstacle such as a wall near the parking
spot. Otherwise, please read the information
prov ided in the "Parking Next to Obstacles"
section.
~ Activate the turn signal.
~ Position yo ur vehicle parallel to the edge of
the street, approximately 3 ft. (1 m) from a parked vehicle .
~ Switch the navigation system and the nav i
gat ion system display on.
~ Se lect reverse gear . The parking aid tu rns on
and par king mode 1 appears on the display .
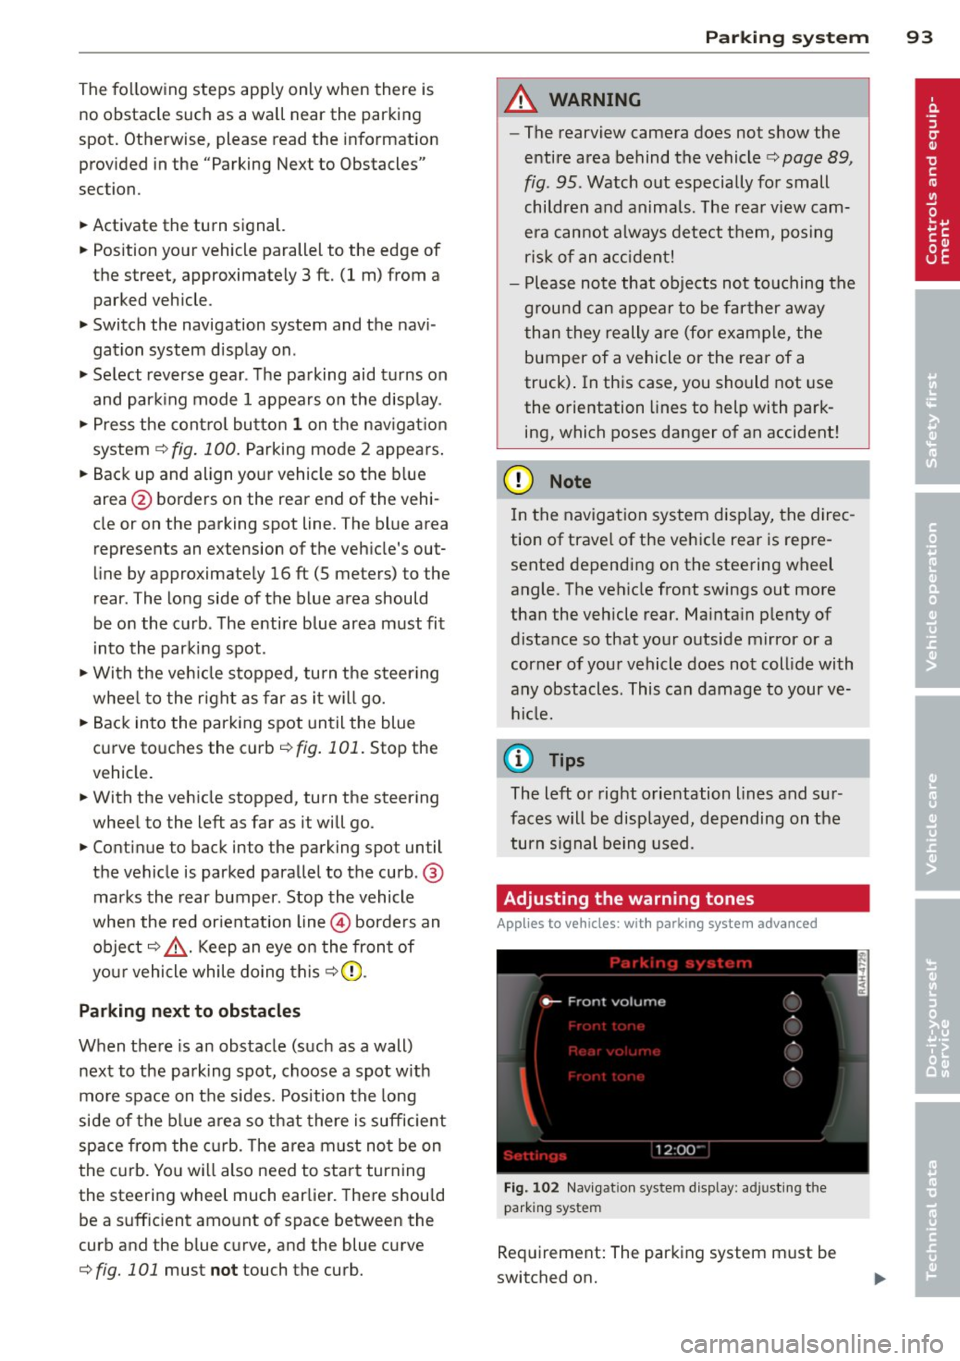
~ Press the control bu tto n 1 on the nav igat io n
system ¢
fig. 100. Parking mode 2 appea rs .
~ Backup and align yo ur vehicle so the b lue
area @ borders on the rear end of the vehi
cle or on the parking spot line. The bl ue area
represents an extension of the veh icle's out
line by approximate ly 16 ft (5 meters) to the
rear . The long side of the blue area should
be o n the curb . The entire blue area must fit
i nto the parking spot .
~ With the veh icle s topped, tu rn the s teer ing
whee l to the r ight as far as it w ill go.
~ Back into the park ing spot until the blue
cu rve to uches the curb¢
fig. 101. Stop the
vehicle.
~ With the veh icle stopped, turn the steer ing
wheel to the left as far as it will go .
~ Continue to back into the parking spot un til
the vehicle is parked para llel to the curb .@
marks the rear bumper. Stop the vehicle
when the red orientation line@ borde rs an
object ¢.&, . Keep an eye o n the fron t of
yo ur vehicle while do ing this ¢Ci) .
Parking next to obstacles
When t here is an obstacle (such as a wall)
next to the pa rking spot, choose a spot w it h
mo re space on t he sides. Position the long
side of the b lue a rea so that there is sufficient
space from the curb. The a rea m ust no t be on
the c urb. You w ill also need to start turn ing
the steeri ng wheel much earlie r. T he re should
be a s uffic ient amo unt of space between the
curb and the blue c urve, and the blue c urve
¢
fig. 101 must not touch the curb.
Par king system 93
A WARNING
-The rearview camera does not show the
entire area behind the vehicle¢
page 89,
fig. 95 . Watch out especially for small
children and anima ls . The rea r view cam
e ra can no t always de tect t hem, pos ing
ris k of an accident!
- P lease note that objects not touching the
g rou nd can appear to be far ther away
than they really are (for example, the
bumper of a vehicle or the rea r of a
truck) . In this case , you sho uld not use
the o rientation lines to help with park
ing, which poses danger of an accident!
(D Note
In the navigation system disp lay, the direc
tion of trave l of the vehicle rear is repre
sented depend ing on the stee ring wheel
angle. T he veh icle front swings out more
than the vehicle rear. Ma inta in p lenty of
distance so that you r o utside m irror or a
corner of you r vehicle does no t coll ide with
any obstacles. This can damage to your ve hicle.
(0 Tips
The left o r right o rientation lines and su r
faces will be disp layed, depending on the
turn s ignal being used .
Adjusting the warning tones
Applies to vehicles: wi th parking sys tem adva nced
Fi g. 102 Nav igat io n system d isplay: a djusting t he
park ing s yste m
Req uirement: The parking system m ust be
switched on.
Page 101 of 244
Driving Safely
General notes
Safe driving habits
Please remember -safety first!
This chapter contains important information,
tips, instructions and warnings that you need
to read and observe for your own safety, the
safety of your passengers and others . We have
summarized here what you need to know
about safety belts, airbags, child restraints as
well as child safety. Your safety is for us
priori
ty number 1.
Always observe the information
and warnings in this section - for your own
safety as well as for that of your passengers.
The information in this section applies to all
model versions of your vehicle . Some of the
features described in this sections may be
standard equipment on some models, or may
be optional equipment on others. If you are
not sure, ask your authorized Audi dealer.
A WARNING
- Make certain that you follow the instruc
tions and heed the WARNINGS in this
Manual. It is in your interest and in the
interest of your passengers.
- Always keep the complete owner's litera
ture in your Audi when you lend or sell
your vehicle so that this important infor
mation will always be available to the
driver and passengers.
- Always keep the owner's literature handy
so that you can find it easily if you have
questions.
Safety equipment
The safety features are part of the occupant
restraint system and work together to help
reduce the risk of injury in a wide variety of
accident situations .
Your safety and the safety of your passengers
should not be left to chance. Advances in
technology have made a variety of features
available to help reduce the risk of injury in an
Driving Safely 99
accident. The following is a listing of just a
few of the safety features in your Audi:
- sophisticated safety belts for driver and all
passenger seating positions,
- safety belt pretensioners ,
- front airbags,
- knee airbags,
- side airbags in the seats
- adjustable head restraints,
- adjustable steering column.
These individual safety features can work to
gether as a system to help protect you and
your passengers in a wide range of accidents.
These features cannot work as a system if
they are not always properly adjusted and
properly used!
Safety is everybody's responsibility!
Important things to do before driving
Safety is everybody's job! Vehicle and occu
pant safety always depends on the informed and careful driver.
For your safety and the safety of your passen
gers,
before driving always:
~ Make sure that all lights and signals are op
erating correctly .
~ Make sure that the tire pressure is correct.
~ Make sure that all windows are clean and af
ford good visibility to the outside.
~ Secure all luggage and other items carefully
r=:> page 70.
~ Make sure that nothing can interfere with
the pedals.
~ Adjust front seat, head restraint and mirrors
correctly for your height .
~ Instruct passengers to adjust the head re
straints according to their height .
~ Make sure to use the right child restraint
correctly to protect children¢
page 138,
Child Safety.
~ Sit properly in your seat and make sure that
your passengers do the same¢
page 66,
Seats and storage. .,..
•
•
Page 102 of 244
100 Driving S afel y
• Fasten your safety be lt and wear it properly .
Also instruct your passengers to fasten their
safety belts properly ¢
page 109.
What impairs driving safety?
Safe driving is directly related to the condi
tion of the vehicle, the driver as well as the
driver 's ability to concentrate on the rood
without being distracted.
The driver is responsible for the safety of the
vehicle and all of its occupants. If your ability
to drive is impaired, safety risks for everybody
in the vehicle increase and you also become a
hazard to everyone else on the road ¢
.&,.
Therefore:
• Do not let yourself be distracted by passen
gers or by using a cellular telephone .
• NEVER dr ive when your dr iving ability is im
paired (by medicat ions, alcohol, drugs, etc.) .
• Observe all traffic laws, rules of the road
and speed limits and plain common sense.
• ALWAYS adjust your speed to road, traff ic
and weathe r condit ions.
• Take frequent breaks on long trips. Do not
drive for more than two hours at a stretch .
• Do NOT drive when you are tired , under
pressure or when you are stressed.
A WARNING , .
Impaired driving safety increases the risk
of serious personal injury and death when
ever a vehicle is being used.
Proper occupant
seating positions
Proper seating position for the driver
The proper driver seating position is impor
tant for safe, relaxed driving.
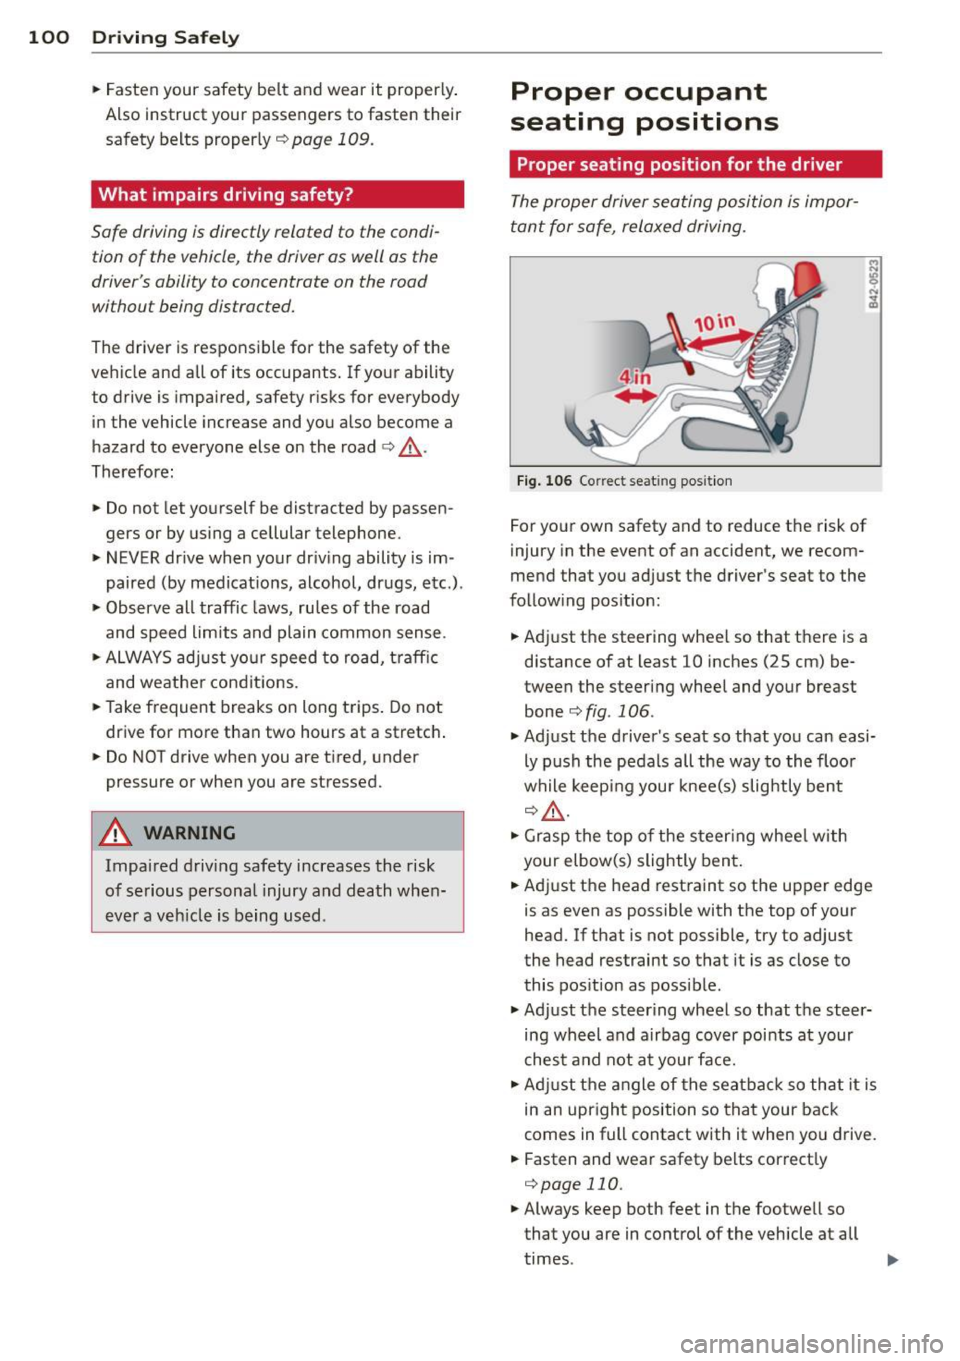
Fig. 106 Correc t seat ing posit ion
For your own safety and to reduce the risk of
injury in the event of an accident, we recom
mend that you adjust the driver's seat to the
following position:
• Adjust the steering wheel so that there is a
distance of at least 10 inches (25 cm) be
tween the steering wheel and your breast
bone ¢
fig. 106 .
• Adjust the driver's seat so that you can easi
ly push the pedals all the way to the floor
while keeping your knee(s) slightly bent
¢.&_ .
• Grasp the top o f the steer ing whee l w ith
your elbow(s) slightly bent.
• Adjust the head restraint so the upper edge
is as even as possible with the top of your
head. If that is not possible, try to adjust
the head restraint so that it is as close to
this position as possible .
• Adjust the steering wheel so that the steer
ing wheel and airbag cover points at your
chest and not at your face.
• Adjust the angle of the seatback so that it is
in an upright position so that your back
comes in full contact with it when yo u drive.
• Fasten and wear safety be lts correctly
¢ page 110.
• Always keep both feet in the footwell so
that you are in control of the vehicle a t all
times .