lock AUDI R8 SPYDER 2015 Workshop Manual
[x] Cancel search | Manufacturer: AUDI, Model Year: 2015, Model line: R8 SPYDER, Model: AUDI R8 SPYDER 2015Pages: 232, PDF Size: 58.36 MB
Page 151 of 232
..... N
r-N "': ..... \!) 1.1'1
N 1.1'1 .....
-Never use gasoline, stain remover, ben
zene, paint thinner or other solvents to re
move.
-Windows
- Remove snow and ice on windows and ex-
terior mirrors with a plastic scraper. To avoid scratches, move the scraper only in
one direction and not back and forth.
- Never remove snow or ice from windows
and mirrors using warm or hot water be
cause this could cause cracks to form.
- To avoid damage to the rear window de
fogger, do not apply any stickers on the
heating wires on the inside of the window.
-Decorative parts/trim
- Never use chrome care or cleaning prod-
ucts.
-Paint
-To reduce the risk of scratches, the vehicle
must be free of dirt and dust before pol
ishing or waxing.
- To prevent paint damage, do not polish or
wax the vehicle in direct sunlight.
- To reduce the risk of paint damage, do not
polish away rust film.
- Remove cosmetics and sunblock immedi
atedly. Otherwise, the paint could be dam
aged.
-Trim
- To reduce the risk of damage, do not treat
the trim around the panorama sunroof
with paint polish.
- Decorative decals
-To reduce the risk of damage, do not use
any rough powder or abrasive cleaning
products.
- To reduce the risk of damage, do not pol
ish decorative parts that have a matte fin
ish.
- Displays
-To avoid scratches, do not use dry cleaning
methods on displays.
- Controls
- Make sure that no fluids enter the con-
trols, because this could cause damage.
- Safety belts
Vehicle care and cleaning
- Do not remove the safety belts to clean
them.
- Never clean safety belts or their compo
nents chemically or with corrosive fluids
or solvents and never allow sharp objects
to come into contact with the safety belts .
This could cause damage to the belt web bing .
- If there is damage to the webbing, the
connections, the retractors or the buckles,
have them replaced by an authorized Audi
dealer or a qualified workshop.
- Textiles/Vinyl/ Alcantara
- Never treat Vinyl/Alcantara with leather
care products, solvents, floor polish, shoe
polish, stain remover or similar products.
- To avoid damage , have stubborn stains re
moved by an authorized Audi dealer or a
qualified workshop.
- Never use steam cleaners, brushes, hard
sponges, etc. when cleaning.
- Do not turn on the seat heating* to dry
the seat.
- Objects with sharp edges such as zippers,
rivets on clothing or belts can cause dam
age to the surface.
- Open hook and loop fasteners, for exam
ple on clothing, can damage seat covers.
Make sure hook and loop fasteners are
closed.
- Natural leather
- Never treat leather with solvents, floor
polish, shoe polish, stain remover or simi
lar products .
- Objects with sharp edges such as zippers,
rivets on clothing or belts can cause dam
age to the surface .
- Never use steam cleaners, brushes, hard
sponges, etc. when cleaning .
- Do not turn on the seat heating* to dry
the seat.
- To help prevent the leather from fading,
do not leave the vehicle in direct sunlight
for long periods of time. If leaving the ve
hicle parked for long periods of time, you
should cover the leather to protect it from
direct sunlight . .,.
149
Page 154 of 232
Fuel supply and filling your fuel tank
fill up at busy gas stations where the seasonal
adjustment is more like ly to be made in time.
0 Note
- Methanol fuels which do not meet these re
quirements may cause corrosion and dam
age to plastic and rubber components in the
fuel system.
- Do not use fuels that fail to meet the spec i
fied criteria in this chapter.
- If you are unable to determine whether or
not a particular fuel blend meets the speci
fications, ask your service station or its fuel
supplier.
- Do not use fuel for which the contents can
not be identified.
- Fuel system damage and performance prob
l ems resulting from the use of fuels differ
ent from those specified are not the respon
sibility of Audi and are not covered under
the New Vehicle or the Emission Control
System Warranties.
- If you experience a loss of fuel economy or
driveability and performance problems due
to the use of one of these fuel blends, we
recommend that you switch to unb lended
fuel.
Gasoline additives
A major concern among many auto manufactur
ers is carbon deposit build-up caused by the type
of gasoline you use.
A lthough gasol ine grades differ from one manu
facturer to another, they have certain things in
common. All gaso line grades contain substances
that can cause deposits to collect on vita l engine
parts, such as fuel injectors and intake valves. A l
though most gasoline brands include additives to
keep engine and fuel systems clean, they are not
equally effect ive .
Audi recommends using TOP TIER Detergent Gas
oline. For more information on TOP TIER Deter
gent Gasoline, please go to the official website (www.toptiergas .com).
152
After an extended period of using inadequate
fuels, built-up carbon deposits can rob your en gine of peak performance .
([) Note
Damage or malfunction due to poor fuel qual
ity is not covered by the Audi New Vehicle
Limited Warranty.
Fuel tank
· Fuel filler neck
The fuel filler neck is located on the right rear
s id e panel behind the fuel filler flap.
If the unlocking system should fail, you can still
open the flap manually -for detailed instructions
see
~page 154.
You can find the fuel tank capacity of your vehicle
i n
Technical Data .
The label on the inside of the fuel filler flap tells
you the correct fuel for your vehicle. For more in
formation about fuel specifications, see
~ page 151 .
Your vehicle fue l tank has an on-board refueling
vapor recovery system. This feature helps to pre
vent fuel vapors from escap ing from the tank and
polluting the environment while you refuel your
vehicle. In order to fill the tank properly while
protecting the environment, please follow this
refueling procedure carefully.
& WARNING
-Under normal operating conditions, never car
ry additional fuel containe rs in your car . Gas
canisters and other containers used to trans port f uel can be dangerous. Such containers,
full or empty, may leak and could cause a fire
in a collision. If you must transport fuel to
use for your lawn mower, snow blower, etc., be very careful and always observe local and
state laws regarding the use, transpo rtation
and storage of such fuel containers. Make cer
tain the container meets indus try s tandar ds
(ANSI/ASTM F8S2 -86).
Page 155 of 232
.... N
l'
N "1: .... I.O
"' N
"' ....
(D Note
Never drive yo ur vehicle unti l the fuel tank is
completely dry . The irregular supp ly of fuel
can cause misfir ing. Gasoline co uld enter into
the exhaust system and damage the catalyt ic
converter .
Refueling
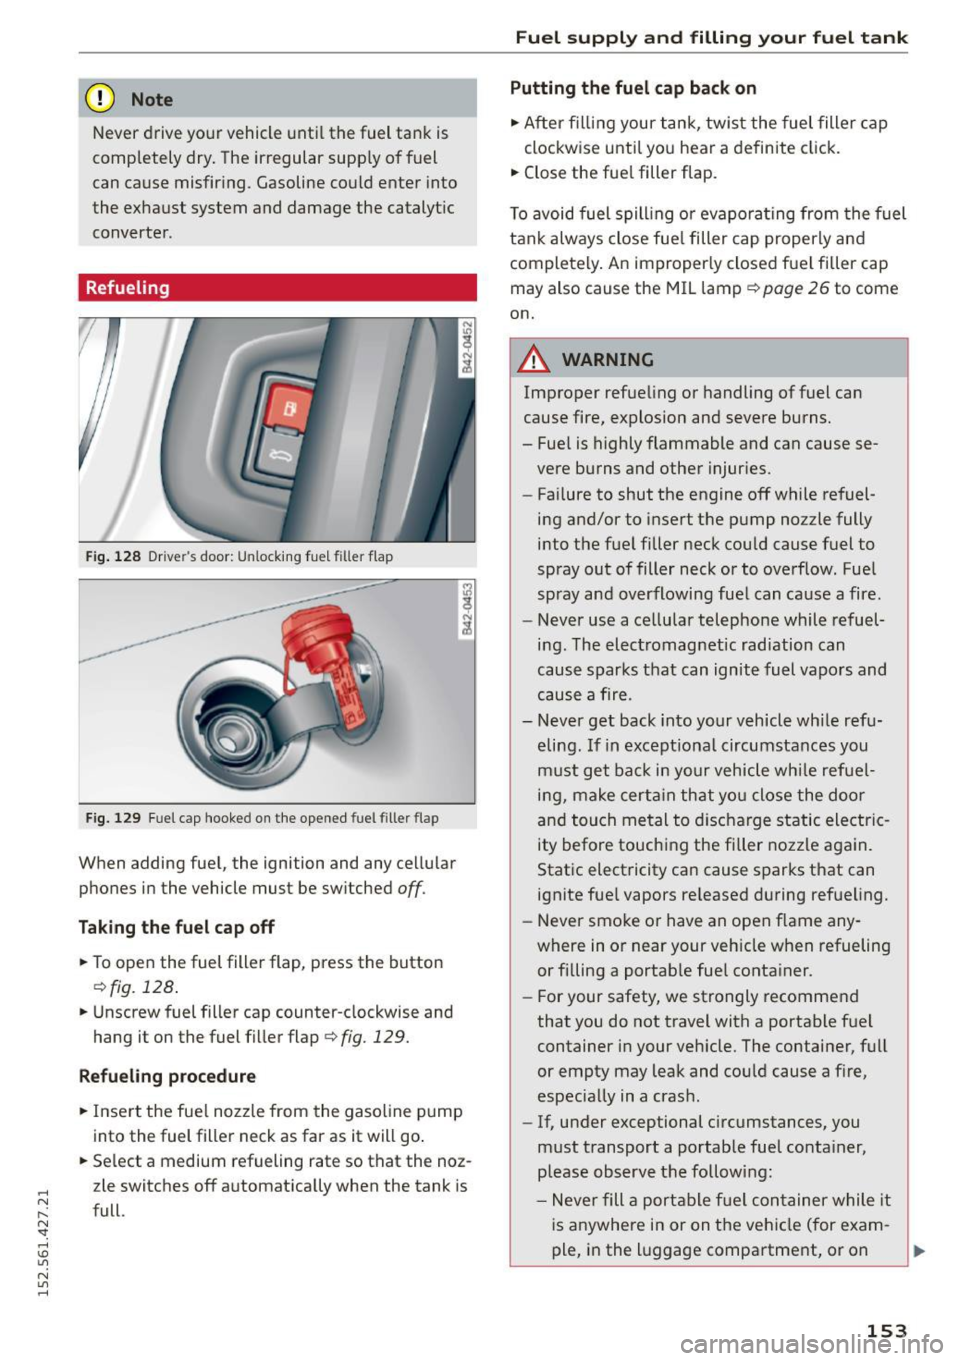
F ig. 12 8 Drive r's door: Unlocking f uel filler f lap
F ig . 129 Fu el cap hooke d on th e opene d fu el fil ler fla p
When adding fuel, the ignition and any cellular
phones in the vehicle must be sw itched
off .
Taking the fuel cap off
.. To open the fuel filler flap, press the button
¢ fig. 128 .
.. Unscrew fuel filler cap counte r-clockwise and
hang it on the fuel filler flap
¢ fig. 129.
Refueling procedure
.. Inse rt the fue l nozz le from the gasoline pump
into the fuel filler neck as far as it will go .
.. Se lect a medium refueling rate so that the noz
z le switches off automat ica lly when the tank is
full.
Fuel supply and filling your fuel tank
Putting the fuel cap back on
.,. After f illing your tank, twis t the fuel filler cap
clockw ise unti l yo u hear a definite cl ick .
.. Close the fue l filler flap.
T o avoid fuel spill ing o r evapora ting from the fuel
tank always close fue l filler cap properly and
complete ly . An improper ly closed f uel filler cap
may also cause the MIL lamp ¢
page 26 to come
on.
A WARNING
--Improper refue ling or handling of fuel can
cause fire, explosion and severe burns.
- Fue l is highly flammable and can cause se
vere burns and other injur ies.
- Fa ilure to shut the engine off while re fuel
ing and/or to insert the pump nozzle fully
into the fue l filler neck cou ld cause fuel to
spray out of filler neck or to overflow. Fue l
sp ray an d overflowing fue l can ca use a fire.
- Never use a ce llular telepho ne while refuel
ing . T he elec tromagnetic radiation can
cause sparks that can ignite fuel vapo rs and
cau se a fire .
- Never get back into yo ur vehicle wh ile refu
e ling . If in except iona l circumst ances you
m ust get ba ck in yo ur vehicle whi le refuel
i n g, make cert ain that yo u close the doo r
a nd tou ch me tal to disch arge st atic electric
ity before touch ing the filler nozzle aga in.
Static elect ricity ca n cause s parks that can
ignite fue l vapors re leased d uring refueling.
- Never smoke o r have an open f lame any
where in or near your veh icle w hen refueling
or fi lling a portab le fue l conta iner.
- For your safety, we strongly recomme nd
that you do not travel with a portable f uel
container in your veh icle. The container, f ull
or empty may leak and cou ld cause a f ire,
especia lly in a cras h .
- If, under exceptional c ircumstances, you
must t ransport a po rtab le fuel conta iner,
p lease observe t he follow ing :
- Never fill a por table fuel co ntainer while it
is anywhere in or on the veh icle (for exam -
p le, in the l uggage compa rtme nt, or on ..,.
153
Page 156 of 232
Fuel supply and filling your fuel tank
the trunk). Static electricity can build up
while filling and can ignite fuel vapors
causing a fire.
- Always place a portable fuel container on
the ground before f illing.
- Always keep the fi ller nozzle comp letely
inside the portable container before and
during filling.
- If filling a portable container made of
metal, the filler nozzle must always be in
contact with the container. This will help prevent static electricity from discharging
and cause a fire .
- Never sp ill fuel inside the vehicle or lug
gage compartment. Fuel vapors are highly
f la mmab le.
- Always observe local and state/provincial
laws regarding the use, storage and trans
portat ion of fuel containers.
- Make certain the fuel container meets in
dustry standards (ANSI/ ASTM F8S2 -86) .
(D Note
If any fuel has spilled onto the car, it should
be removed immediately to prevent damage
to the paint .
@ For the sake of the environment
As soon as the correctly operated nozzle
switches off automatically for the first time,
the tank is full. Do not try to add more fuel
because fuel may spill out. In addition, the
expansion space in the fuel tank will be filled -
causing the fuel to overflow when it becomes
warm and pollute the enviro nment.
@ Tips
- Running your engine while refueling may
cause vapors to escape or even fue l to spill
out of the tank. This would then shut off the
fuel nozzle before the tank is full.
- Do not refuel your vehicle w ith the ignition
switched on . The fuel gauge may otherwise
not indicate the correct fuel level after refu
e ling.
154
Unlocking the fuel filler flap by hand
You can open the fuel filler flap by hand if the
power locking system should fail .
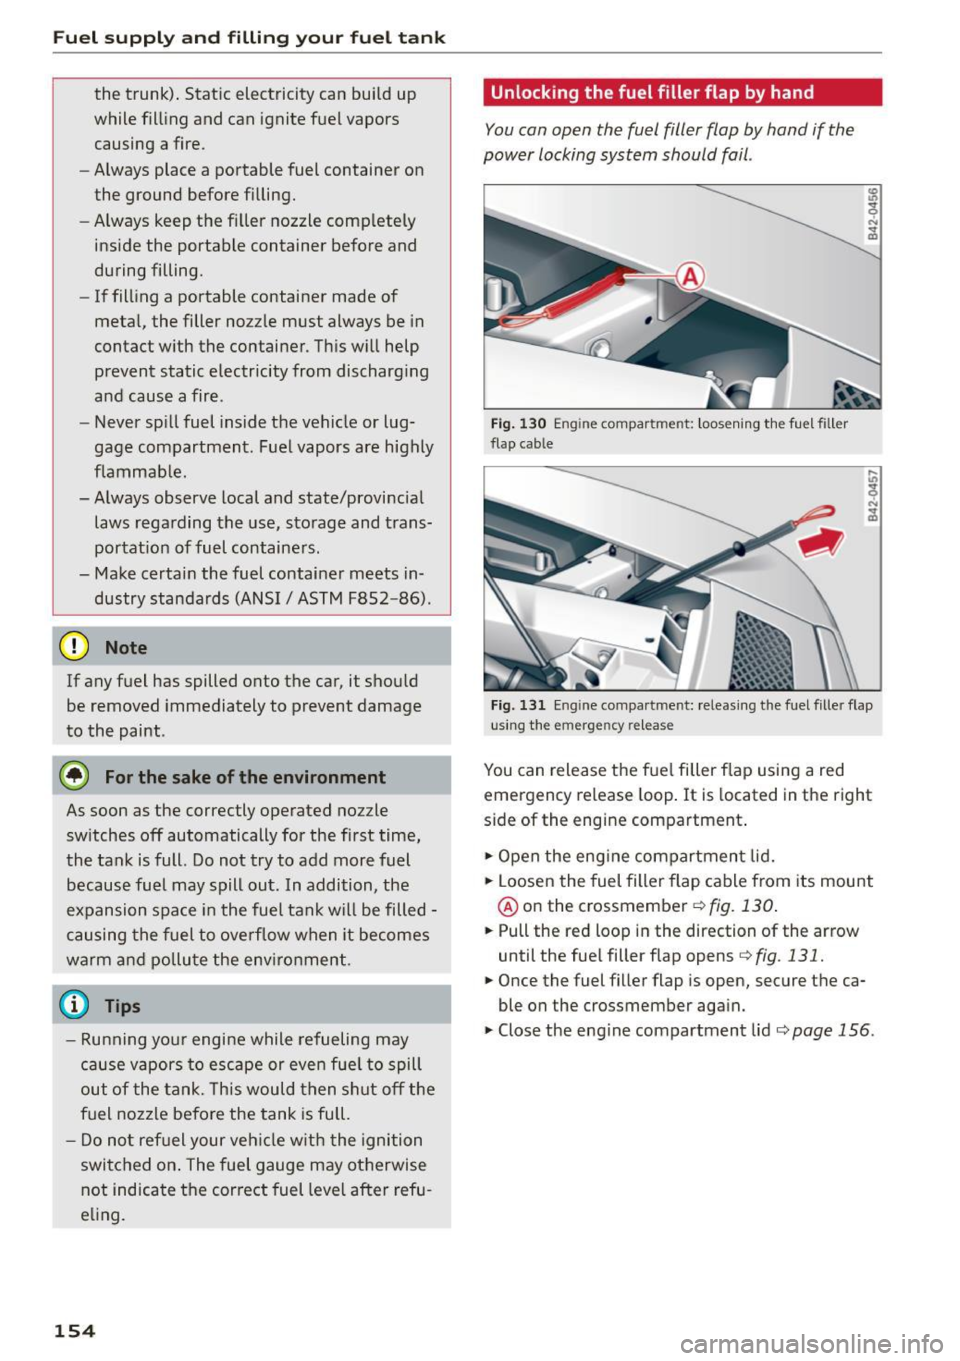
Fig. 130 Engine compartme nt: loosening the fuel filler
flap cable
Fig. 131 Eng ine compa rtment: releasing the fuel filler flap
using the emergency re lease
You can release the fue l filler f lap using a red
emergency release loop . It is located in the right
side of the engine compartment .
.,. Open the engine compartment lid.
.,. Loosen the fuel filler flap cable from its mount
@ on the crossmember
r::;, fig. 130 .
.,. Pull the red loop in the direction of the arrow
until the fue l filler flap opens
r::;, fig. 131.
.,. Once the fuel filler flap is open, secure the ca
ble on the crossmember again .
.,. Close the eng ine compartment lid
r::;, page 156.
Page 162 of 232
Checking and filling
Checking the engine oil level
App lies to veh icles: w ith S tro nic
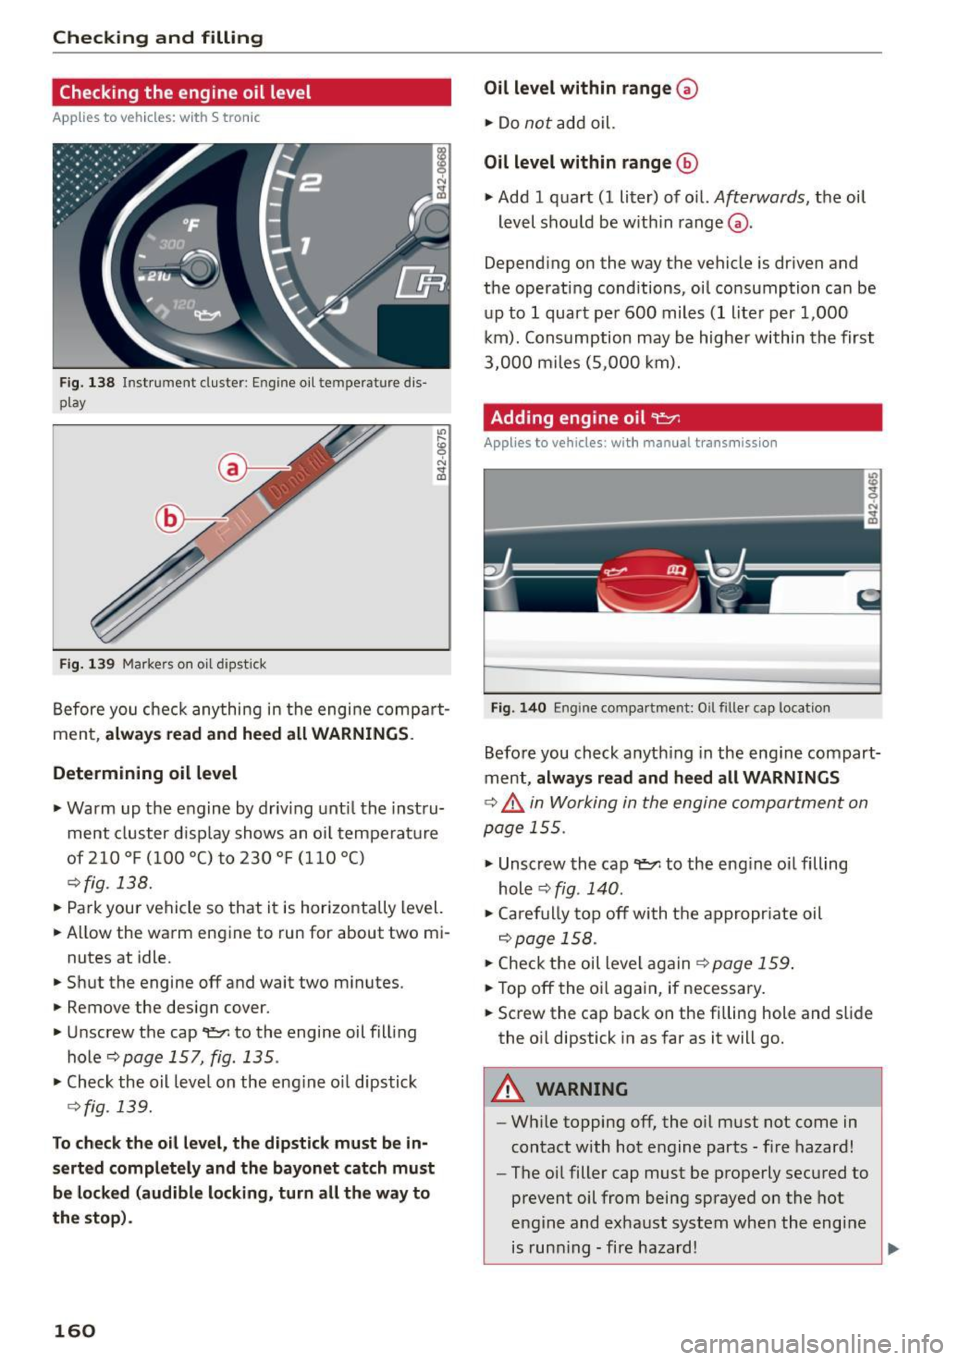
Fig. 138 Inst rumen t cl uste r: Eng ine oil temperature dis
play
Fig. 139 Markers on o il dipstic k
Before you check anything in the engine compart
ment,
always read and heed all WARNINGS .
Determining oil level
• Warm up the engine by driv ing until the inst ru
ment cluster display shows an o il temperature
of 210 ° F (100 °C) to 230 ° F (110 °C)
¢fig. 138.
"Park your vehicle so that it is horizonta lly level.
• Allow the warm engine to run for about two mi-
nutes at idle.
• Shut the engine off and wait two minutes.
• Remove the design cover.
" Unscrew the cap
'l:::,-: to the engine oil fil ling
hole¢
page 157, fig . 135 .
• Check the oil level on the engine oil dipstick
¢ fig . 139.
To check the oil level, the dipstick must be in
serted completely and the bayonet catch must
be locked (audible locking, turn all the way to
the stop).
160
Oil level within range (v
" Do not add oil.
Oil level within range@
• Add 1 quart (1 liter) of o il. A~erwards, the oil
level should be w ithin range
(v .
Depending on the way the vehicle is driven and
the operating cond itions, oil consumption can be
up to 1 quart per 600 miles (1 liter per 1,000
km). Consumption may be higher within the first
3,000 miles (5,000 km).
Adding engine oil~
Applies to vehicles: wi th manual t rans miss ion
Fig . 140 Engine compartment: Oil fille r cap location
Befo re you check anyth ing in the eng ine compart
ment,
always read and heed all WARNINGS
¢ .&. in Working in the engine compartment on
page 155.
"Unscrew the cap ce:;,, to the eng ine oi l filling
hole ¢
fig. 140 .
"Carefully top off with the appropriate oil
<=)page 158.
"Check the oil level again ¢ page 159 .
"Top off the oil again, if necessary.
" Screw the cap back on the filling hole and slide
the oi l dipstick in as far as it will go.
A WARNING
- Wh ile topping off, the o il must not come in
contact with hot engine parts - f ire hazard!
- The oil filler cap must be properly secured to
prevent oil from being sprayed on the hot
engine and exhaust system when the engine
is runn ing - fire hazard! .,._
Page 165 of 232
..... N
r-N "': ..... \!) ..,.,
N ..,., .....
"' Press and ho ld the rear window switch too unti l
the convertible top moves into the service posi
t ion
r::!) fig. 142.
Opening th e cool ant e xp ansi on tank cov er
"' Stop the engine and allow it to coo l.
"' Switch the ignition off.
"' Carefu lly remove the bolts in the cover(!) using
a screwdriver and remove the cover. The cool
ant reservoir is located be low
c:> fig. 143 .
Check ing th e engine coolant l eve l
"' Place a rag or cloth on the cap of the coo lant
expansion tank and turn the cap
ca re full y to
the left (counter-clockwise)
c:> A .
"'Read the coo lant level inside the coolant expan
s ion tank
c:> fig . 143. With a co ld engine, it
must be above the "min" mark. W ith a hot en
gine, it can be a little above the ind icated
range .
To obtain an accurate read ing, the eng ine must
be switched off.
The expansion tank in your vehicle is equipped
with an electric coolant level sensor
r::!) page 14.
We still recommend you check the coolant level
from time to time .
Coolant lo ss
Coolant loss may indicate a leak in the cooling
system . In the event of coolant loss, the cooling
system should be inspected immediately by your
author iz ed Audi dealer. It is not enough merely
to add coolant.
In a
s e a led system, losses can occur only if the
boiling point of the coo lant is exceeded as a re
sult of overheat ing.
A WARNING
- The cooling system is under pressure. Do
not open the cap of the coolant expans ion
tank when the engine is hot. You risk being
sca lded.
-
- The coolant add itive, and therefore the cool
ant itself, is hazardous to health. Keep the
c oolant additive in the or igina l co ntainer out
of the re ach of children.
It is a poison haz
ard.
Ch eck ing and fillin g
(D Note
Do not add any type of radiator leak sea lant
to your vehicle's engine coolant . Add ing radia
tor repair fluid may adversely affect the func
tion and performance of your cooling system
and could result in damage not covered by
your New Veh icle Limited Warranty.
Adding coolant
Befo re you check a nyth ing in the eng ine compart
ment,
alwa ys read and he ed all WARNING S
r::!) A in Working in the engine compartment on
page 155.
"' Add coolant m ixed in the correct rat io
c:> page 161, Coolant.
"' Twist the cap on again tightly.
"'Tighten the cap(!) <::!)page 162, fig. 143 again .
Replacement engine coo lant must conform to ex
act specifications
c:> page 161, Coolant .
We recommend using only coolant add it ive Gl2+
+, G l3
or in an emergency Gl2 +. Do not use a
different additive. In an emergency use pla in wa
ter unt il you ca n get the correct add itive and can
restore the co rrect ratio . This should be done as
soon as possib le .
If you have los t a considerab le amount of cool
ant, then you shou ld add cold antifreeze and cold
water only when the engine is co ld .
Always use
new engine coo lant when refilling .
Do not fill coolant above the "max" mark. Excess
coolant will be forced out through the pressure
relief valve in the cap when the eng ine becomes
hot.
A WARNING
- The cooling system is under pressure and
can get very hot. Reduce the risk of scalding
from hot coolant by following these steps .
- Turn off the engine and allow it to cool
down .
- Protect your face, hands and arms from escaping fluid and steam by covering the
cap with a large, thick rag.
163
Page 166 of 232
Checking and filling
-Turn the cap slowly and very carefully in a
counter-clockwise direction while applying
light, downward pressure on the top of
the cap .
- To avoid being burned, do not spill anti
freeze or coolant on the exhaust system or hot engine parts. Under certain condi
tions, the ethylene glycol in engine cool
ant can catch fire .
- Antifreeze is poisonous. Always store anti
freeze in its original container and well out of the reach of children .
- If you drain the coolant, it must be caught
and safely stored in a proper container
clearly marked "poison".
CD Note
-Coolant pollutes the environment and could
cause an engine fire . Excess coolant will be
forced out through the pressure relief valve
in the cap when the engine becomes hot.
-If, in an emergency, only water can be add
ed, the correct ratio between water and an
tifreeze
¢ page 161 must be restored as
soon as possible.
@ For the sake of the environment
Drained coolant should not be reused. Always
dispose of used coolant while observing all
environmental regulations.
Brake fluid
Have the brake fluid changed by an experienced
technician.
Brake fluid absorbs moisture from the air. If the
water content in the brake fluid is too high, cor
rosion in the brake system may result after a peri
od of time. The boiling point of the brake fluid
will also decrease considerably and decrease
braking performance.
Therefore, the brake fluid must be changed
every
two years.
Always use new brake fluid which con
forms to Federal Motor Vehicle Standard "FMVSS
116 DOT 4".
164
Brake fluid is replaced according to the Audi
maintenance service schedule . Your authorized
Audi dealer is equipped with the necessary spe
cial tools and replacement parts, has the neces
sary expertise, and can dispose of the used fluid .
A WARNING
-Brake fluid is poisonous . It must be stored
only in the closed original container out of
the reach of children!
- Brake failure can result from old or inappro priate brake fluid. Observe these precau
tions:
- Use only brake fluid that meets SAE speci
fication
J 1703 and conforms to Federal
Motor Vehicle Standard
116. Always check
with your authorized Audi dealer to make
sure you are using the correct brake fluid .
The correct type of brake fluid is also indi cated on the brake fluid reservoir.
- The brake fluid must be new . Heavy use of
the brakes can cause a vapor lock if the brake fluid is left in the system too long.
This can seriously affect the efficiency
of
the brakes as well as your safety . This
could result in an accident.
CD Note
Brake fluid will damage the paint of your vehi
cle.
@ For the sake of the environment
Because of the problem of proper disposal of
brake fluid as well as the special tools re
quired and the necessary expertise, we rec
ommend that you have the brake fluid
changed by your authorized Audi dealer.
Battery
General information '
Your vehicle is equipped with a special battery, an
ACM battery . This battery is located in the lug
gage compartment and must be replaced with an
original equipment battery. Under normal oper
ating conditions, the battery is
maintenance-
free. ..,_
Page 196 of 232
Tires and wheels
Ask your authorized Audi dealer or qualified
workshop for permitted
winter tire sizes. Use on
ly radial winter tires.
Winter tires lose their effectiveness when the
tread is worn down to a depth of 0.157 inch
(4 mm).
Only drive with winter tires under winter condi
tions. Summer tires handle better when there is
no snow or ice on the roads and the temperature
is above 45 °F (7 °().
Please always remember that winter ti res may
have a lower speed rating than the tires originally
installed on your vehicle at the time it was manu
factured . Please see¢ page 189, Speed roting
(letter code) for a listing of the speed rat ing let
ter codes and the maximum speed at which the
t ires can be driven.
The speed rating letter code(¢ page 174) is on
the side wall of the tire ¢page 186.
A WARNING
Winter tires have maximum speed limits that
may be lower than your vehicle's maximum
speed. Always know the maximum speed be
fore driving off . Never drive faster than the
speed permitted for your specific winter tires .
This will cause damage to the tires leading to
an accident and serious personal injury to you
and your passengers.
A WARNING
Driving faster than the maximum speed for
which the winter tires on your vehicle were designed can cause tire failure including a
blowout and sudden deflation, loss of contro l,
crashes and serious personal injuries. Have
worn or damaged tires replaced immediately.
- Winter tires have maximum speed rating that may be lower than your vehicle's maxi
mum speed .
- Never drive faster than the speed for which
the winter or other tires installed on your
vehicle are rated.
194
-
A WARNING ,_ -
Always adjust your driving to the road and
traffic conditions . Never let the good accelera
tion of the winter tires and all-wheel drive
tempt you into taking extra risks. Always re
member:
- When braking, an all-wheel drive vehicle
handles in the same way as a front drive ve
hicle.
- Drive carefully and reduce your speed on icy
and slippery roads, even winter tires cannot
help under black ice conditions.
@ For the sake of the environment
Use summer tires when weather conditions
permit . They are quieter, do not wear as
quickly and reduce fuel consumption.
, Snow chains
Snow cha ins may be fitted only to the rear
wheels , and only to certain tire sizes. Ask your au
thorized Audi dealer on which tire sizes snow
chains can be used.
The snow chains must have low-profile links and
must not be thicker than 0.53 inch (13 .5 mm) ,
including the lock.
Remove wheel center covers before putting snow
chains on your vehicle ¢Ci) . For safety reasons
cover caps must then be fitted over the wheel
bolts . These are available from authorized Audi
dealers .
A WARNING
Using the wrong snow chains for your vehicle
or installing them incorrectly can increase the
risk of loss of control leading to serious per
sonal injury .
- Snow chains are available in different sizes.
Always make sure to follow the instructions
provided by the snow chain manufacturer .
- When driving with snow chains, never drive
faster than the speed permitted for your
specific snow chains .
- Always observe local regulations.
Page 203 of 232
....
Preliminary steps
Applies to vehicles: with Tire Mobility System
Some preliminary steps are necessary for tire re
pair.
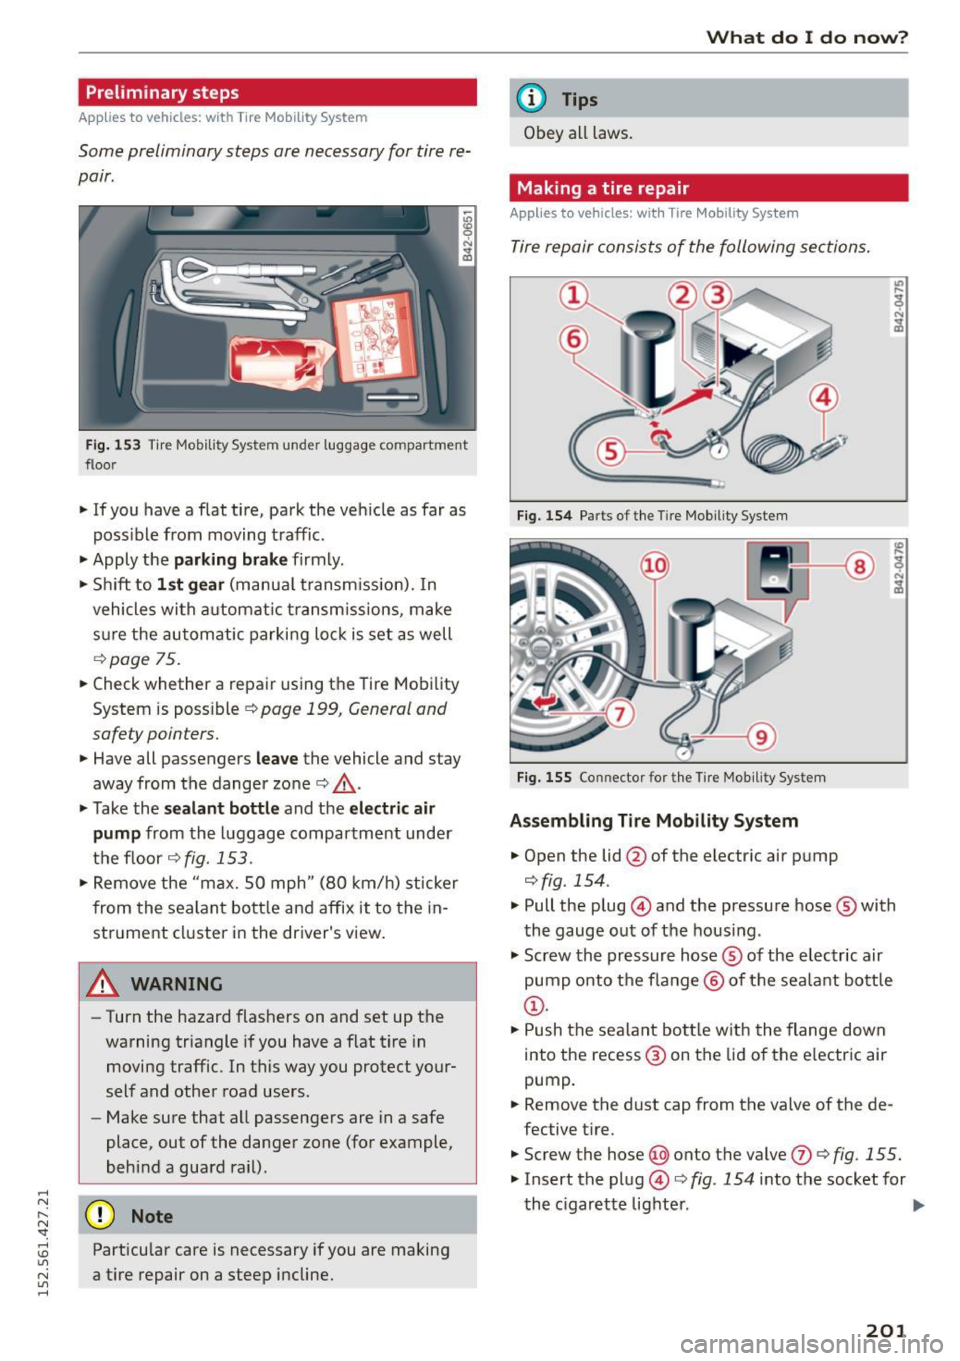
Fig . 153 Tire Mobility System under luggage compartment
floor
.. If you have a flat tire, park the veh icle as far as
poss ible from moving traff ic .
.. Apply the
parking brak e firmly .
.. Sh ift to
1 st ge ar (manual t ransm ission). In
vehicles wi th a utomat ic t ransm issions, make
s ur e the automatic parking lock is set as well
r::!) page 7 5 .
.. Check whether a repair using the Tire Mobi lity
System is poss ible ¢
page 199, General and
safety pointers .
.. Have all passengers lea ve the vehicle and stay
away from the danger zone
c:> &_ .
.. Take the sea lant bottle and the electri c air
pump from the luggage compa rtment under
the f loor
c:> fig. 153.
.. Remove the "max. 50 mph" (80 km/h) sticker
from the sealant bott le and affix it to the in
strument cluster in the driver's view.
A WARNING
- Turn the hazard flashers on and set up the
warning triangle if you have a flat tire in
moving traffic. In this way you protect your
self and other road users.
- Make sure that all passengers are in a safe
place, out of the danger zone (for example,
behind a guard rail).
~ (D Note
"1: .... I.O
"' N
"' ....
Particular care is necessary if you are making
a t ire repair on a steep incline.
What do I do no w?
(D Tips
Obey all laws.
Making a tire repair
Applies to vehicles: with Tire Mob ility System
Tire repair consists of the following sections.
Fig. 154 Parts of the Tire Mob ility System
Fi g. 1 55 Connector for the Tire Mobility System
Assembling Ti re Mobili ty System
.. Open the lid@ of the electr ic air pump
¢fig. 154 .
.,. Pull the plug @and the pressure hose ® with
the gauge out of the housing .
.,. Screw the pressure hose ® of the electric air
pump onto t he f lange @ of the sea lant bottle
@ .
.. Push the sealant bott le w it h the flange down
into the recess @ on the lid of the electr ic air
pump .
.. Remove the dust cap from the valve of the de
fective tire.
.. Screw the hose@) onto the valve
(J) r::;, fig. 155.
.,. Insert the plug @r::;, fig. 154 into the socket for
the c igarette lighter .
IJi-
201
Page 205 of 232
.... N
l'
N "1: .... I.O
"' N
"' ....
What should I be aware of when changing a tire?
Tires with unidirectional tread design
Tires with unidirectional tread design must be
mounted with their tread pattern pointed the
right direction .
A unidirectiona l tire can be ident ified by arrow s
on th e sidewall ,
which point in the di rection of
the rotat ion. You mus t fo llow the spe cified direc
tion of rotation. This is necessary in order fo r
these tires to develop the ir opt imum characteris
tics regarding grip, road noise, wear, and hydro
p laning .
Anti-theft wheel bolts
A special adopter is needed to turn the anti-the~
wheel bolts.
2
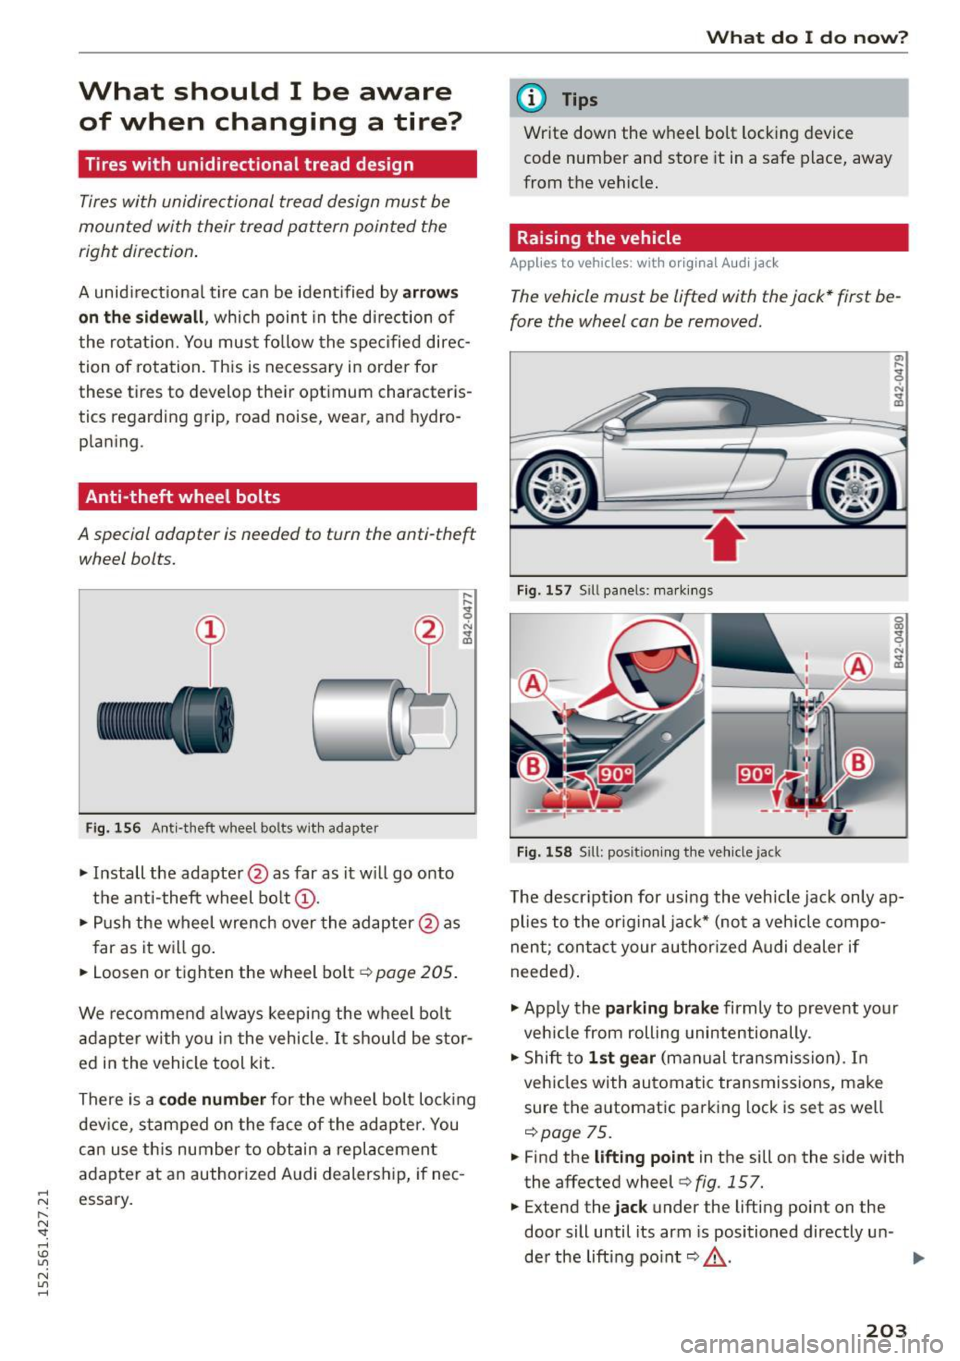
Fi g. 1 56 A nti-theft wheel bo lts wit h adapter
.. Install the adapter @as far as it w ill go onto
the ant i-theft wheel bolt @ .
.. Pu sh the wheel wrench over the adapter @as
far as it will go .
.. Loosen or tighten the wheel bolt ¢
page 205 .
We re commend a lways keepi ng the wheel bo lt
adapter with yo u in the vehicle . It s hould be s tor
ed in the vehicle tool kit.
There is a
c od e number for the w heel bolt lock ing
dev ice, stamped on the face of the adapte r. You
can use th is number to obt ain a repl acement
adapter at a n author ized A udi dealers hip, if nec
essary.
What do I do no w?
(D Tips
Write down the wheel bo lt lock ing device
code number and store it in a safe place, away
from the vehicle.
Raising the vehicle
Appl ies to veh icles : w ith or ig inal A udi jack
The vehicle must be li~ed with the jock* first be
fore the wheel can be removed.
•
F ig. 157 Sill panels: ma rk in gs
Fig. 158 Sill: posit io nin g the ve hicle jack
The descr ipt ion for usi ng the veh icl e jac k only ap
plies to the or ig inal ja ck* (not a veh icle compo
nen t; contact your au thor ized A udi dealer if
needed) .
.. App ly th e
parking brake firmly to prevent your
veh icle from rolling unintentionally.
.. Shift to
1 st gear (manual tra nsmission). I n
veh icles with automatic transmissions, make
sure t he a utomat ic parking lock is set as we ll
r:!) page 75.
.. Find the lifting point in the sill on the side with
the affected wheel<=>
fig. 157 .
.. Extend the jack under the lifting point on the
door sill until its arm is positioned directly un-
der the lifti ng po int
r:!) ,&. . ..,_
203