change time AUDI R8 SPYDER 2015 Owners Manual
[x] Cancel search | Manufacturer: AUDI, Model Year: 2015, Model line: R8 SPYDER, Model: AUDI R8 SPYDER 2015Pages: 232, PDF Size: 58.36 MB
Page 18 of 232
Instruments and warning /indicator light s
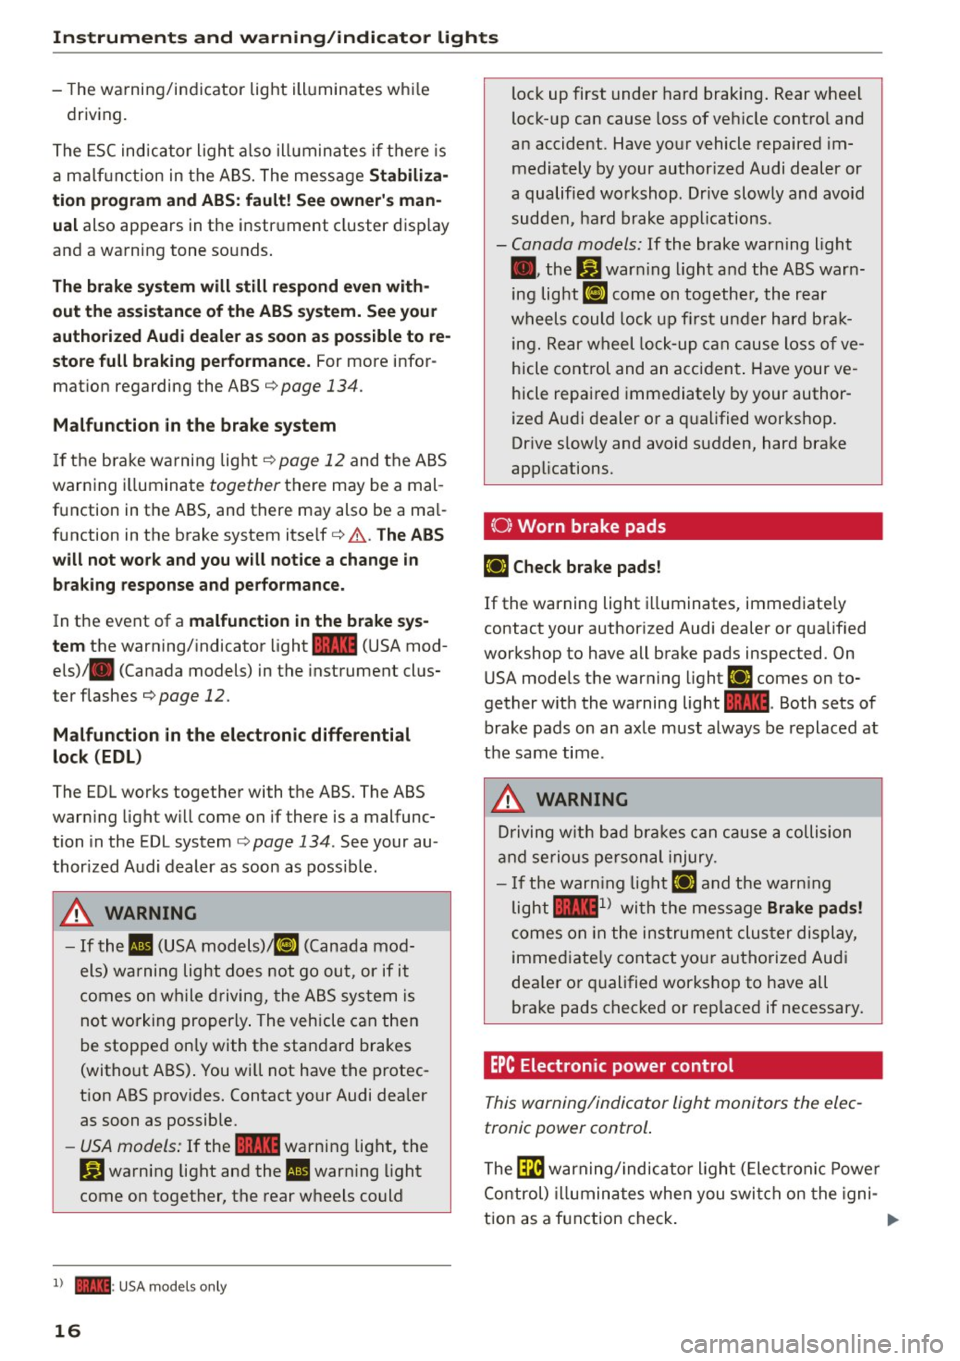
-The warning/indicator light ill uminates whi le
driving.
The ESC ind icator light a lso illuminates if there is
a ma lf u nction in the ABS. The message
Stabiliza
tion p rogr am and ABS: fault! See o wner 's man
ual
also appears in the instr ument cluster disp lay
and a warning tone sounds .
The b rake sy stem will still respond even with
out the ass is tance of th e ABS sy stem. See your
a utho riz ed Audi dealer a s soon as po ssible to re
s tore full braking perfo rmance.
For more infor
mat ion regarding the ABS
¢ page 134.
Malfunction in th e brake s ystem
If the b rake warning light¢ page 12 and the ABS
warning i lluminate
together there may be a mal
function in the ABS, and there may also be a ma l
function in the brake system itself ¢ & .
The ABS
will not wo rk and you w ill notice a change in
bra king response and per formance.
In the event of a malfun ct ion in the br ake sy s
tem
the warning/indicator light 1111 (USA mod
els)/ . (Canada models) in the instrument clus
ter flashes¢
page 12.
Malfunction in th e electronic diffe renti al
lock (EDL )
The EDL works together with the ABS. The ABS
warn ing light w ill come on if there is a malfunc
tion in the EDL system¢
page 134 . See your au
thor ized Audi dealer as soon as possible.
.&_ WARNING
- If the II (USA models) ;tiJ (Canada mod
els) warning light does not go out, or if it
comes on while driving, the ABS system is
not working properly . The vehicle can then
be stopped only with the standard brakes
(without ABS) . You will not have the protec
t ion ABS prov ides. Contact your Audi dealer
as soon as possible.
- USA models: If the 1111 warning light, the
J_i) warning light and the II warn ing light
come on together, the rear wheels could
l ) - : USA models only
16
-
lock up first under hard braking . Rear wheel
lock- up can cause loss of veh icle contro l and
an accident. Have your vehicle repaired im mediately by your author ized Audi dealer or
a qualified workshop. Dr ive slowly and avoid
sudden, ha rd brake applications.
- Canada models: If the brake warning light
• • the
JjJ warn ing light and the ABS warn
ing light
EIJ come on togethe r, the rear
wheels could lock up fi rst under hard bra k
ing. Rear wheel lock-up can c ause loss o f ve
hicle control and an accident. Have your ve
hicle repai red immediately by your author
ized Audi dealer or a qualified workshop.
Dr ive slow ly and avoid sudden, hard brake
applications.
(0) Worn brake pads
£i1 Check brake pads!
If the warning light i lluminates, immediate ly
contact your authorized Audi dealer or qualified
workshop to have all brake pads inspected. On
USA mode ls the warning light £i1 comes on to·
gether w ith the warning light 1111 . Both sets of
brake pads on an ax le must always be replaced at
the same time .
.&_ WARNING
Driving w ith bad bra kes can cause a collision
and se rious personal injury.
- If the warn ing light
£i1 and the warn ing
light
llll1 l with the message Brake pad s!
comes on in the ins trumen t clus ter display,
immed iate ly contact yo ur authorized Audi
dea le r or q ualified workshop to have all
brake pads checked or rep laced if necessary.
EPC Electronic power control
This warning/indicator light monitors the elec
tronic power control .
The~ warning/indicator l igh t (E lec tronic Powe r
Control) illuminates when you swi tch on the igni
tion as a function check .
Page 23 of 232
.... N
l'
N "1: .... I.O
"' N
"' ....
Trip computer
Introduction
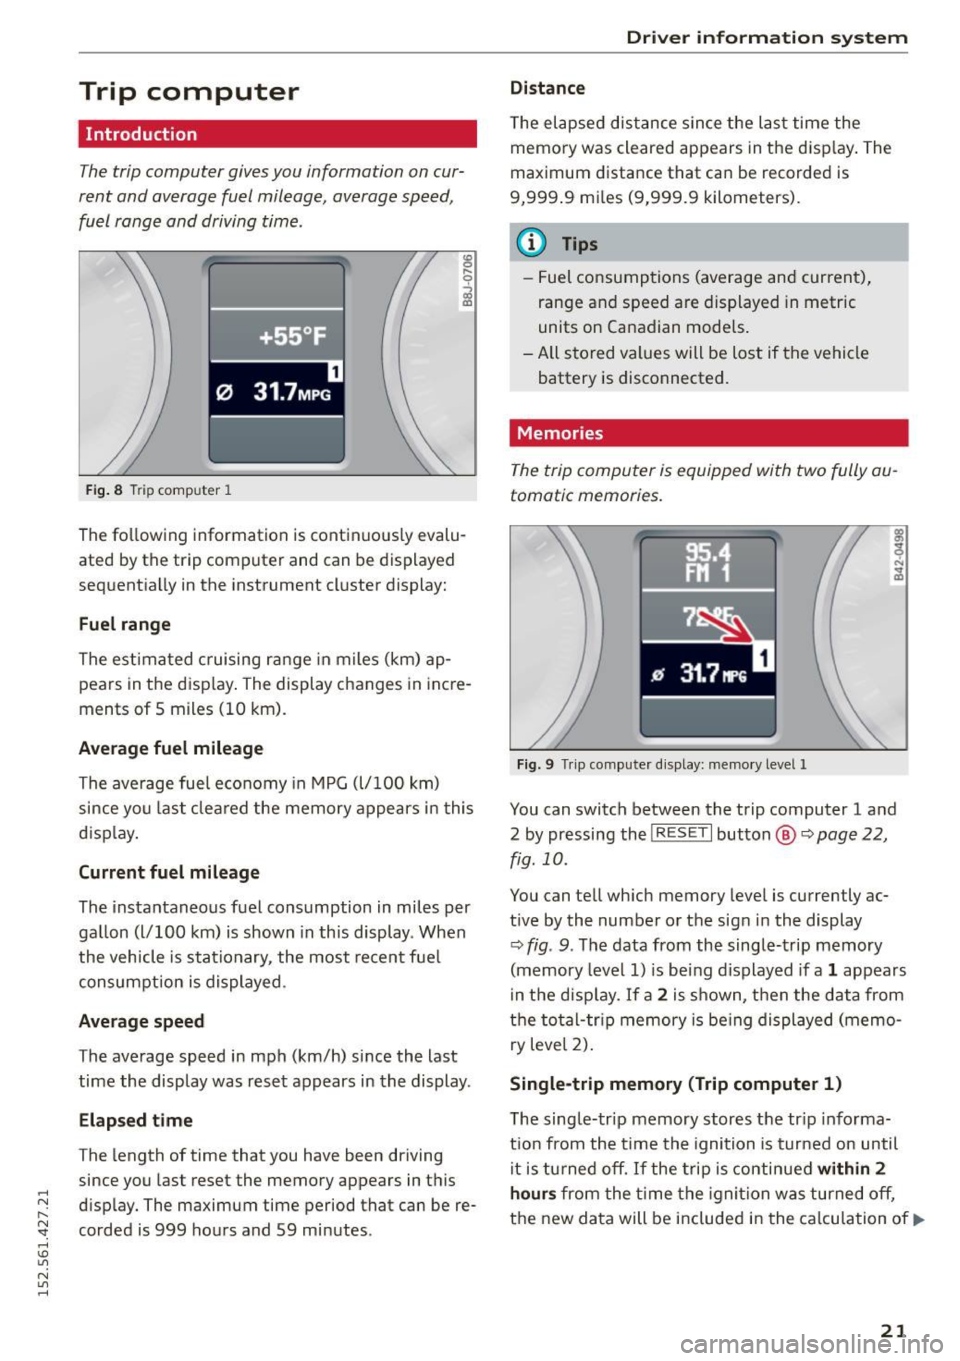
The trip computer gives you information on cur
rent and average fuel mileage, average speed ,
fuel range and driving time.
Fig. 8 T ri p comp uter 1 ,....
0
;;i ID
The following
information is continuously evalu
ated by the trip computer and can be displayed
sequentially in the instrument cluster display:
Fuel range
The estimated cruising range in m iles (km) ap
pears in the disp lay. The display changes in incre
ments of 5 miles (10 km) .
Average fuel mileage
The average fuel economy in MPG (l/100 km)
since you last cleared the memory appears in this
d isplay.
Current fuel mileage
The instantaneous fuel consumption in miles per
gallon (l/100 km) is shown in this display . When
the vehicle is stationary , the most recent fuel
consumption is displayed.
Average speed
The average speed in mph (km/h) since the last
time the display was reset appears in the display .
Elapsed time
The length of time that you have been driving
since you last reset the memory appears in this
disp lay. The maximum time period that can be re
corded is 999 hours and 59 minutes .
Driver information system
Distance
The elapsed distance since the last time the
memory was cleared appears in the disp lay. The
maximum distance that can be recorded is
9,999 .9 mi les (9,999.9 kilometers).
(D Tips
- Fuel consumptions (average and current),
range and speed are displayed in metric
units on Canadian models .
- All stored values will be lost if the vehicle battery is disconnected.
Memories
The trip computer is equipped with two fully au
tomatic memories.
Fig. 9 Trip computer d is play: memo ry level 1
You can switch between the trip computer 1 and
2 by pressing the
! R ESET I button @ ~page 22,
fig. 10.
You can tell which memory level is currently ac
t ive by the number or the sign in the display
Q fig . 9. The data from the single-trip memory
(memory level 1) is being displayed if a
1 appears
in the disp lay.
If a 2 is shown, then the data from
the total-tr ip memory is being displayed (memo
ry level 2).
Single -trip memory (Trip computer 1)
T he single-trip memory stores the tr ip informa
tion from the time the ignition is turned on until
it is turned off. If the trip is continued
within 2
hours from the time the ignition was turned off,
the new data will be included in the calculation of.,.
21
Page 25 of 232
.... N
l'
N "1: rl I.O
"' N
"' ....
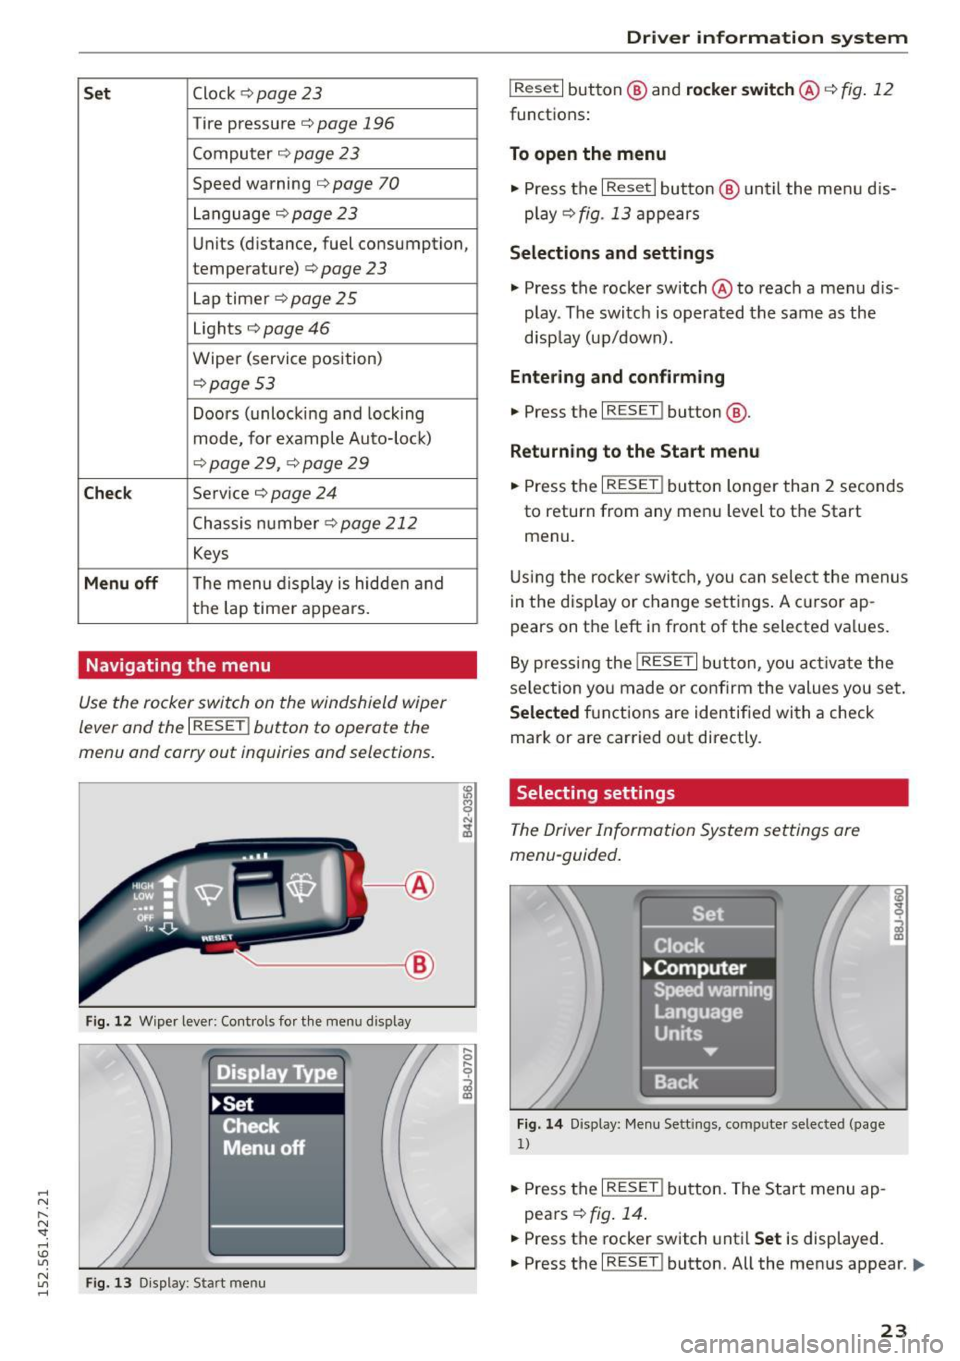
Set Clock ¢ page 23
Tire pressure c::> page 196
Computer c::> page 2 3
Speed warning c::> page 70
Language c::>page23
Units (distance, fuel consumption,
temperature)
c::> page 23
Lap timer c::> page 25
Lights c::> page 46
Wiper (service position)
c::>page 53
Doors (unlocking and locking
mode, for example Auto-loc k)
c::> page 29, ¢ page 29
Chec k Service c::> page 24
Chassis number c::>page 212
Keys
Menu off The menu display is hidden and
the lap time r appears.
Navigating the menu
Use the rocker switch on the windshield wiper
lever and the
I RESET ! button to operate the
menu and carry out inquiries and selections.
-----®
Fig. 12 Wiper lever: Cont rols fo r th e menu d isplay
Fi g. 13 Display: Start menu
Dr iver inform atio n sy stem
I Reset I button @ and rocker switch @ c::> fig. 12
functions:
To open the menu
• Press the I Reset I button @ until the menu d is
play
c::> fig . 13 appears
Selection s and settings
• Press the rocker switch @ to reach a menu dis
play . The switc h is operated the same as the
disp lay (up/down).
Entering and confirming
• Press the I RESET ! button@.
Returning to the Start menu
.. Press the I RESET ! button longer than 2 seconds
to return from any menu level to the Start
menu.
U sing the rocke r switch, you can select the menus
in the disp lay or change settings . A c ursor ap
pears on the left in front of the selected va lues.
By pressing the
! RESET I button, you activa te the
selection yo u made or confirm the values you set .
Selected fu nctions are identified with a check
mark or are car ried out directly.
Selecting settings
The Driver Information System settings are
menu-guided.
Fi g. 14 Display: Me nu Sett ings, computer selected (page
1)
.. Press the I RESET ! button. The Start menu ap
pears
c::> fig . 14 .
.. Press the rocker switch until Set is displayed.
.. Press the
I RESET ! button. All the menus appear. Ill-
23
Page 26 of 232
Driver information system
• Press the rocker switch until the desired line is
highlighted (cursor)~
fig. 14.
• Press the !R ESE T I button.
• If necessary, scroll by se lecting and activating
the symbol for "Next page" or "Previous page".
When you have selected the Computer menu and
activated it by p ressing the
! RESET I button, two
computer levels appear (computer 1 and comput
er 2) . Now you have to select the level you want
using the rocker switch and activate it with the
I RESET I button .
Service interval display
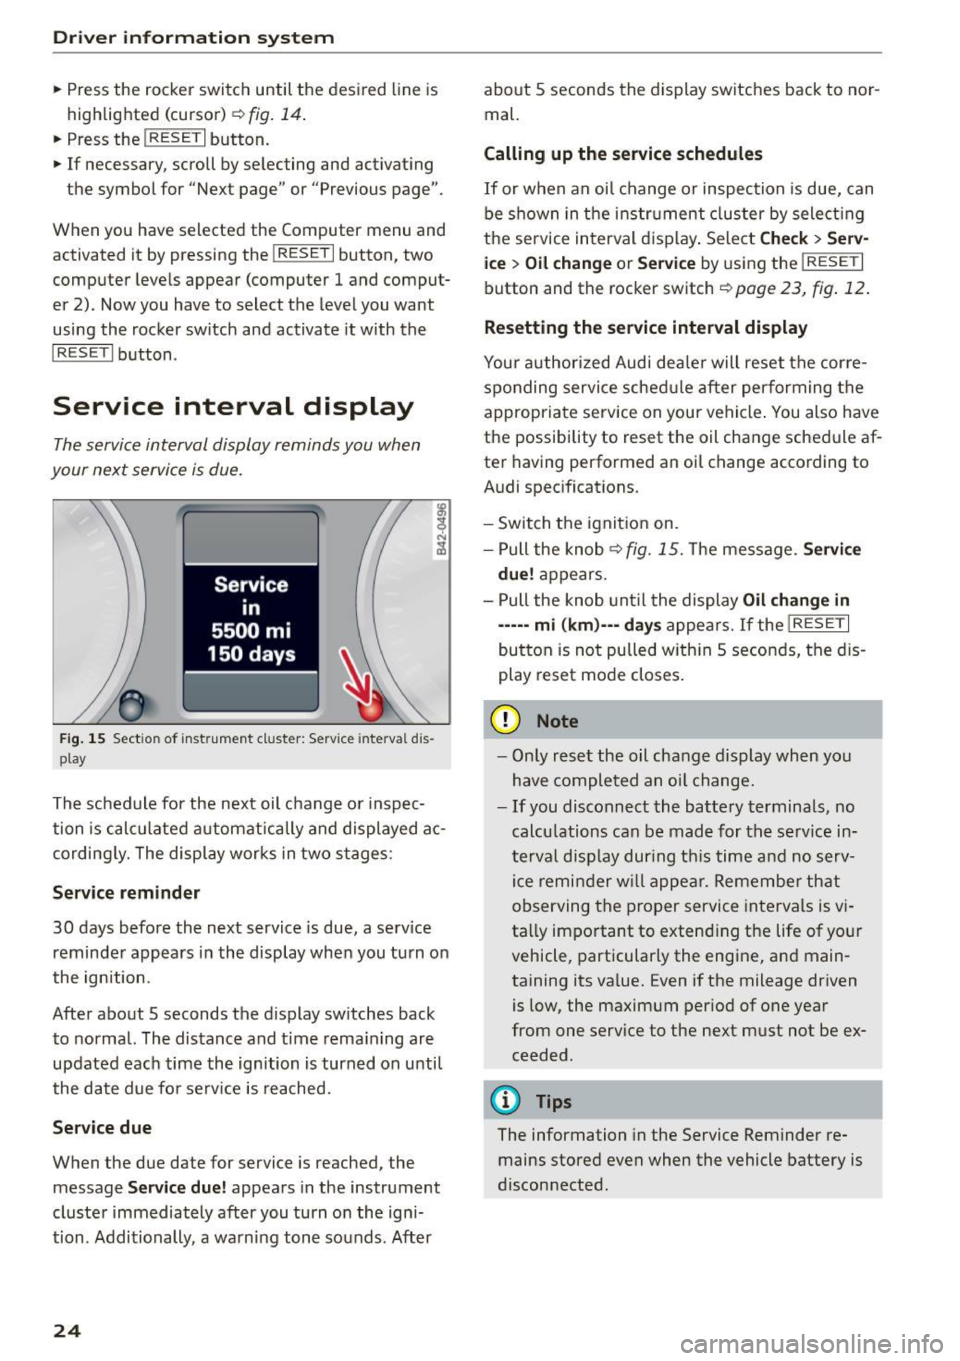
The service interval display reminds you when
your next service is due.
Fig. 15 Sectio n of inst rument cl uster: Serv ice in terva l dis
pl ay
The schedule for the next oil change or inspec
tion is calculated automatically and displayed ac
cording ly. The display works in two stages:
Service reminder
30 days before the next service is due, a serv ice
reminder appears in the display when you turn on
the ignition.
After about 5 seconds the display sw itches back
to normal. The distance and time remaining are
updated each time the ignition is turned on unti l
the date due for serv ice is reached.
Service due
When the due date for service is reached , the
mes sage
Service due! appears in the instrument
cluster immediately after you turn on the igni
tion . Additionally, a warning tone sounds. After
24
about 5 seconds the display switches back to nor
mal.
Calling up the service schedules
If or when an oil change or inspection is due, can
be shown in the instrument cluster by select ing
the se rvice interval display. Select
Check> Serv
ice
> Oil change or Service by using the I RESET I
button and the rocker switch ¢ page 23, fig. 12.
Resetting the service interval display
Your authorized Audi dealer will reset the corre
sponding service schedule after performing the
appropriate service on your vehicle . You also have
the possibility to reset the oil change schedule af
ter having performed an oi l change according to
Audi specifications.
- Switch the ignition on.
- Pull the knob<>
fig. 15. The message. Service
due!
appears.
- Pull the knob until the display
Oil change in
-----mi (km)---days appears. If the I RESE T I
button is not pulled with in 5 seconds, the dis
play reset mode closes.
(D Note
-Only reset the oil change display when you
have completed an oil change.
-If you disconnect the battery terminals, no
calculations can be made for the service in
terval display during this time and no serv
ice reminder will appear. Remember that
observing the proper service intervals is vi
tally important to extend ing the life of your
vehicle, particularly the engine, and main
taining its va lue. Even if the mileage driven
is low, the maximum per iod of one year
from one service to the next must not be ex
ceeded.
@ Tips
The information in the Service Reminder re
mains stored even when the vehicle battery is
disconnected .
Page 49 of 232
.... N
l'
N "1: .... I.O
"' N
"' ....
The leavin g home function i lluminates the area
around the vehicle when un locking it .
A WARNING
-Never use daytime running lights to see
where you are going. They are not bright enough and w ill not let you see far enough
ahead for safety, especially at dusk or when it is dark . Be aware of changes in outside
light cond itions when you are dr iv ing and re·
spond by switching on your low beams.
- Automatic head· and taillight control is only
intended to assist the d river. This feature
does not relieve the driver of his responsibi l
ity to check t he headlights a nd to turn t hem
on manually according to the cur rent lig ht
and visibility conditions. For example, fog
and rain cannot be detected by the light
sensors. Consequent ly, always switch the
headlights on under these weather cond i·
tions and when dr iv ing in the da rk.
- Crashes can happen when yo u cannot see
the road ahead and when you cannot be
seen by other motorists.
- Always turn on the headlights so that you
can see ahead and so that others can see
your car from the back.
- Please observe lega l regulations when using
the light ing systems described .
@ Tips
-Always observe the specific local regulations
for your area when to use your lights.
- Turn on low beams as evening app roaches
or in conditions of poor visib ility.
- Do not attach stickers to the windshie ld in
front of the sensors as this can disab le the
automat ic head- and taill ight control and
the automatic glare-dimming of the rear·
v iew mirror(s) *.
- If you remove the ignit ion from the ign it ion
lock while the headlights are still on, a buz
zer w ill sound as long as the dr iver's door is
open to remind you to t urn off the lights .
- In the AUTO mode, the low beams are
turned off when the ignition is t urned off.
The remaining lights ar e turned off when
t h e key is taken ou t of the ignition.
Cle ar vi sion
-In cool or damp weather conditions the
head lights may fog
over temporarily on the
inside .
- The c ritical factor is the temperature dif
ference between the inter io r and the exte·
rior of the hea dlight lens .
- W ith the mai n beams switched on, the
lig ht-em itting area w ill be free of conden
sation after a short time, however the
e d ges of the glass may still be fogged.
- This physical phenomeno n has no effect
on the life of your veh icle's lighti ng sys
tem .
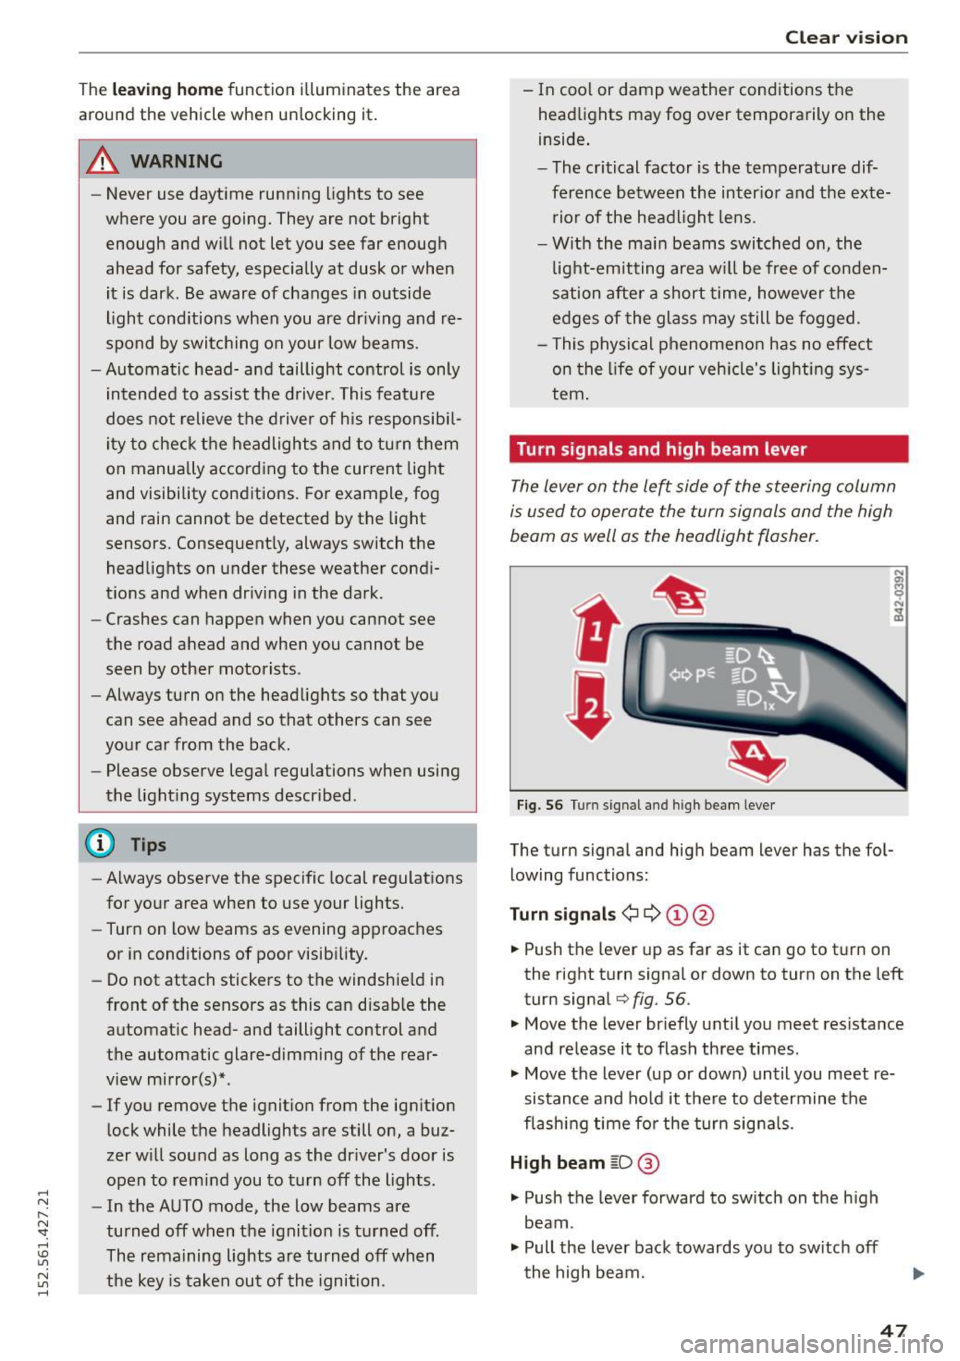
Turn signals and high beam lever
The lever on the left side of the steering column
is used to operate the turn signals and the high
beam as well as the headlight flasher.
t
t
Fig . 56 Turn signal and high bea m leve r
The turn signa l and high beam lever has the fo l
lowing functions :
Turn signal s¢¢ ©@
.,. Push the lever up as far as it can go to t urn on
the right turn signa l or down to turn on the left
turn signal
q fig. 56.
.,. Move the lever br iefly u ntil you meet res istance
and re lease it to flash three times.
.,. Move the lever (up or down) until you meet re
sistance and hold it there to determine the
flash ing time fo r the turn signa ls .
High beam ~D @
.,. Push the lever forward to sw itch on the h igh
beam.
.,. Pull the lever back towards yo u to switch off
the high beam.
47
Page 63 of 232
.... N
l'
N "1: rl I.O
"' N
"' ....
Warm and cold Climate controls
Controls
Warm and cold
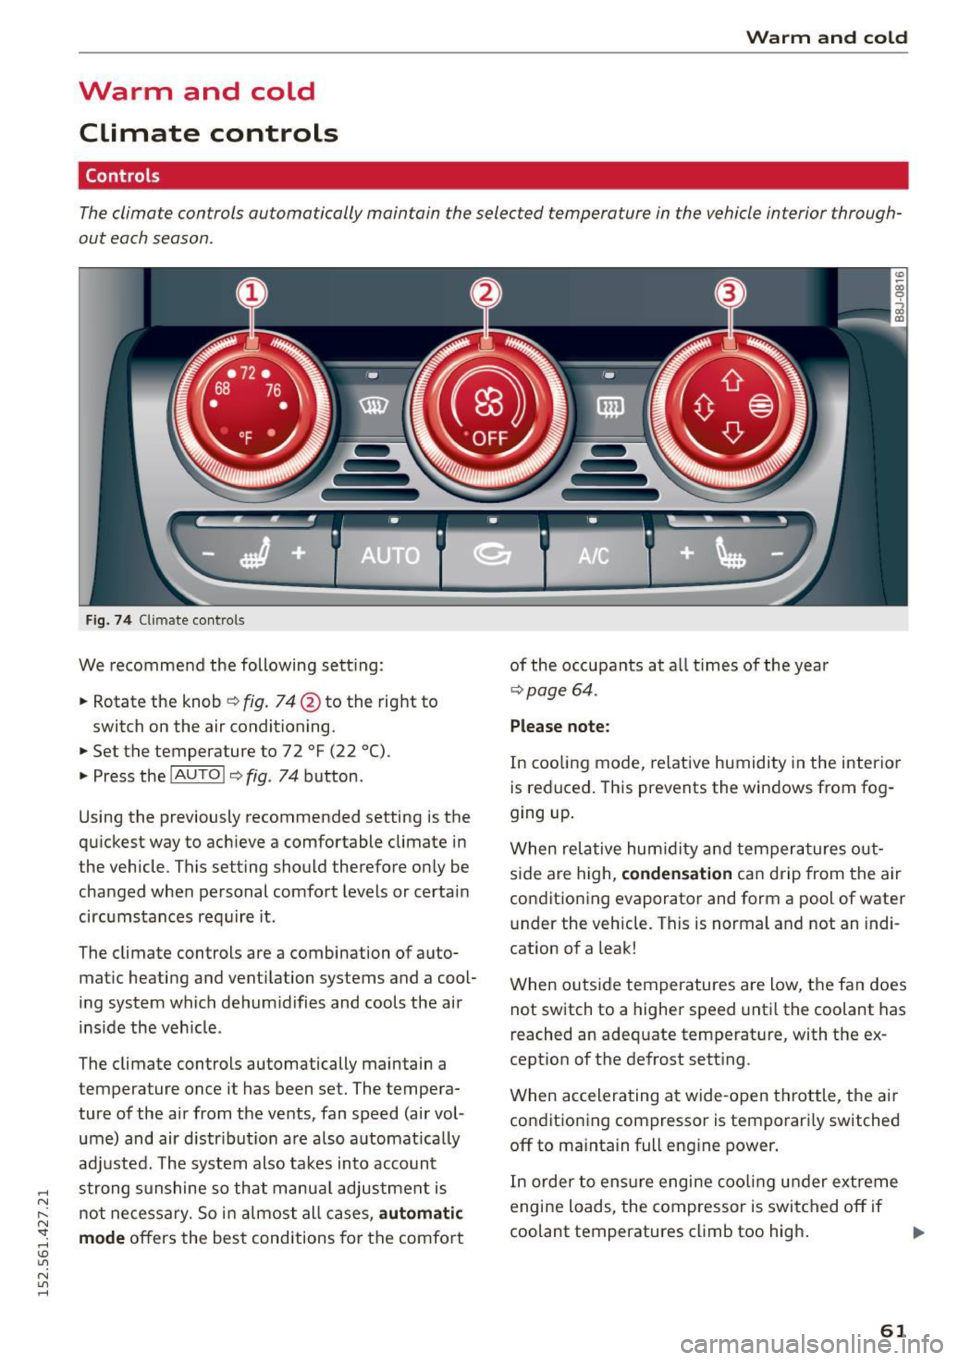
The climate controls automatically maintain the selected temperature in the vehicle interior through
out each season .
Fig . 74 Cl imate co ntrols
We recommend the following sett ing :
.. Rotate the knob
Q fig. 74 @ to the right to
switch on the air conditioning .
.,. Set the temperature to 72
°F (22 °() .
.. Press the !AU TO ! Q fig . 74 button .
Using the previously recommended setting is the
qu ickest way to ach ieve a comfortable climate in
the vehicle . This setting should therefore on ly be
changed when personal comfort levels or certain
circumstances req uire it .
The climate controls are a combination of a uto
mat ic heating and vent ilation systems and a cool
ing system which dehum idifies and cools the air
ins ide the veh icle .
The climate controls automatically maintain a
temperature once it has been set. The tempera ture of the air from the ve nts, fan speed (air vol
ume) and air d istr ibut ion are also a utomat ically
adj usted. The system also takes into account
strong sunshine so that manua l adjustment is
n o t necessary. So in almost all ca ses,
automatic
mode
offers the best conditions for the comfo rt of the occupants at a
ll times of the year
Q page 64 .
Please note :
In cooling mode , relative humidity in the interior
is reduced. This prevents the windows from fog
ging up .
When relative hum idity a nd temperatures o ut
s ide are high,
condensation can drip from the air
condit ioning evaporator and form a pool of water
under the vehicle . This is normal and not an indi
cation of a leak!
When outs ide temperatures are low, the fan does
not switch to a higher speed unti l the coolant has
reached an adequate temperat ure, with the ex
cept ion of the defrost setting .
When accelerating a t wide-open throttle, the ai r
condit ioning compressor is temporari ly switched
off to ma intain full eng ine power .
In order to ensure engine coo ling under ext reme
engine loads, the compressor is switched off if
coolant temperatures climb too high .
IJl>
61
Page 84 of 232
Parking syste m
Switching on /off
App lies to veh icles: w ith park ing system advanced
SPORT •
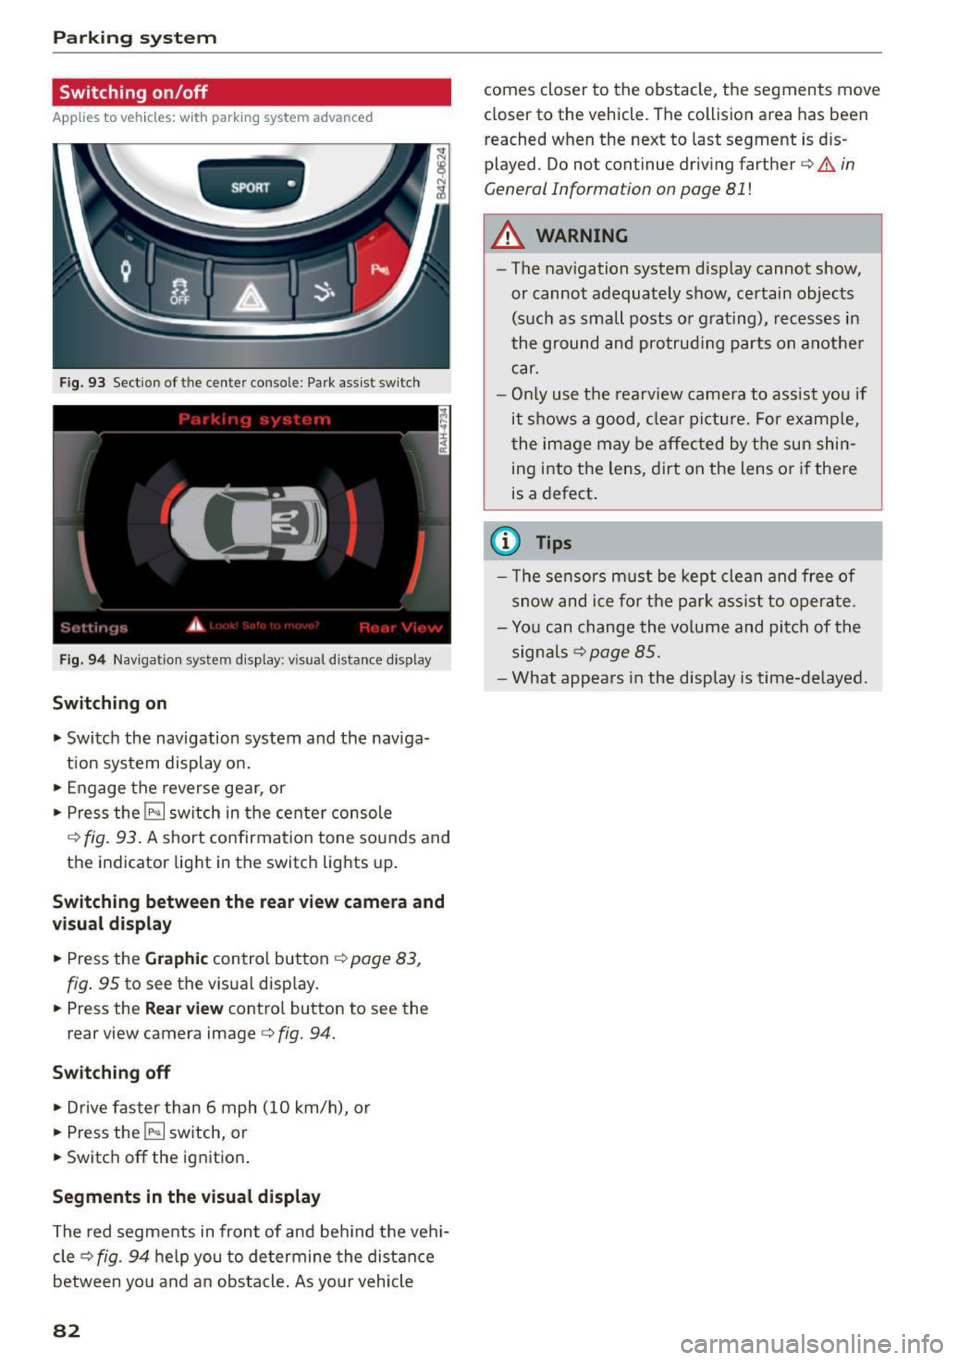
Fig. 93 Section of the cente r conso l-e : Park ass ist sw itch
F ig . 94 Naviga tio n sys tem display : v isual distance display
Sw itching on
... Switch the navigation system and the nav iga
tion system display o n .
... Engage the reverse gea r, or
... Press the
!l¾ I switch in the center console
Q fig. 93. A short confirmation tone sounds and
the indicator light in the switch lights up.
Switching betwe en th e rear view c amera and
vi su al d isplay
... Press the Graphic control button ¢ page 83,
fig . 95
to see the visual disp lay .
... Press the
Rea r v iew contro l button to see the
rear view camera image¢
fig. 94.
Switch ing off
... Drive faster than 6 mph (10 km/h), or
... Press the
!P-<. I switch, or
... Switc h off the ignition .
Segments in the visual d isplay
The red segments in front of and be hind the vehi
cle¢
fig. 94 help you to determine the distance
between you and a n obstacle. As your vehicle
82
comes closer to the obstacle, the segments move
closer to the vehicle . The collision area has been
reached when the next to last segment is dis
played. Do not continue driving farther
Q & in
General Information on page 81
!
A WARNING
-The navigation system display cannot show,
or cannot adequately show, certain objects (such as small posts or grating), recesses in
the ground and protrud ing parts on another
car.
- Only use the rearv iew camera to assist you if
it s hows a good, clear pictu re. For examp le,
the image may be affected by t he sun shin
ing i nto the lens, dirt oh the lens or if there
is a defect .
(1) Tips
- The sensors m ust be kept clean and free of
snow and ice for the park ass ist to operate.
- Yo u can change the vo lume and pit ch of the
signa ls
Qpage 85.
-What appears in the display is time-delayed.
Page 87 of 232
.... N
l'
N "1: .... I.O
"' N
"' ....
outside mirror or a corner of your veh icle does
not collide with any obstacles . This can dam
age to your veh icle .
@ Tips
The left or right orientation lines and surfaces
w ill be displayed , depending on the turn sig
na l being used .
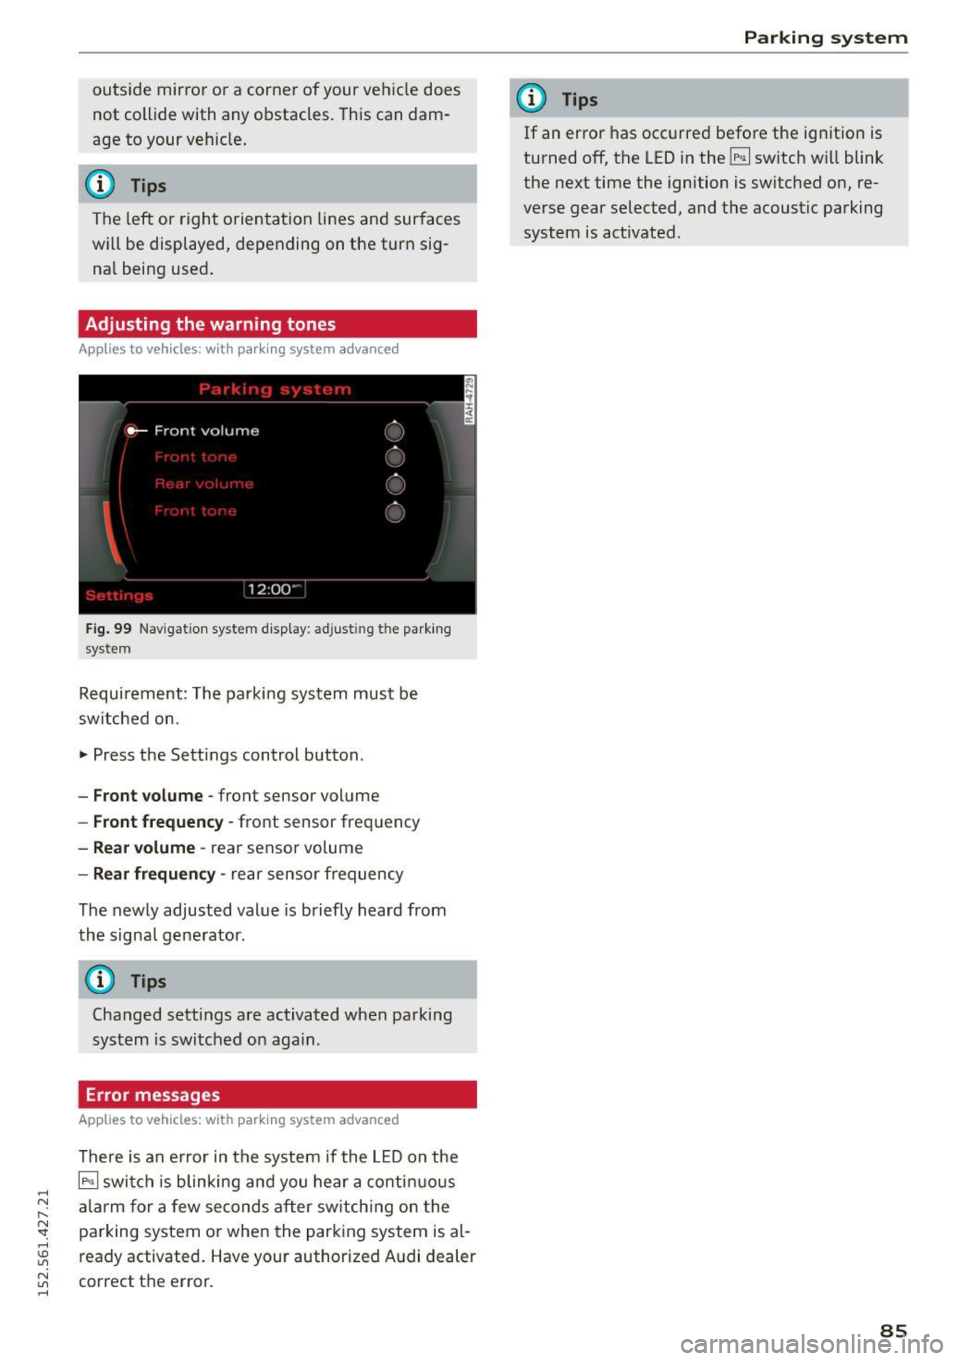
Adjusting the warning tones
Applies to vehicles: with pa rking system advanced
Fig . 9 9 Nav igatio n system d isp lay: adjusting th e park ing
system
Requi rement: The parking system must be
switched on.
• Press the Settings control button .
-Front volume -front sensor volume
-Front frequency -front sensor frequency
- Rear volume -rear sensor volume
-Rear frequen cy -rear sensor frequency
The newly adjusted value is briefly heard from
the signa l gene rator.
0) Tips
Changed settings are activated when parking
system is switched on aga in .
Error messages
Applies to vehicles: with park ing system advanced
There is an e rror in the system if the L ED on the
~ switch is blinking and you he ar a co nti nu ous
ala rm for a few seconds a fter sw itch ing on the
pa rking system or when the park ing system is al
ready activated . Have your authorized A udi dealer
correct the e rror.
Par king system
(D Tips
If an error has occ urre d before the ignition is
turned off, the LED in the ~ switch wi ll blink
the next time the ignition is switc hed on, re
verse gear selected, and t he acoustic pa rking
system is act ivated .
85
Page 136 of 232
Intelligent technology
Intelligent technology
Notice about data
recorded by vehicle
control modules
Your vehicle is not equipped with an Event Data
Reco rder (EDR) , insta lled by some manufactu rers
for the express pu rpose of captur ing data fo r re
trieval after an accident or crash event. ED R 's are
sometimes called "crash recorders" .
Some state laws restrict the retr ieval or down
loading of da ta stored by EDR's that were instal
led in a vehicle for the express p urpose of retriev
ing data after an accident or crash event without
the owner's consent.
Al though you r vehicle is not eq uipped w ith an
E DR, it is equipped with a number of electronic
control modu les for vario us vehicle systems such
as, for example, engine function, emission con
trol, as we ll as for the airbags and safety belts.
These electronic control modules also record ve
hicle-related data during norma l vehicle opera
tion for diagnostic and repair purposes . The re
cording capacity of the electronic contro l mod
ules is lim ited to data (no sound is recorded) and
only a small amount of data is actually recorded
over a very l imited per iod of t ime and stored
when a system fault or other condition is sensed by a control unit. Some of the data then stored
may re late to veh icle speed, direction, braking as
well as restraint system use and performance in
the event of a crash o r other cond ition . Stored
data can only be read and downloaded with spe
cial equipment.
Electronic Stabilization
Control (ESC)
Description
ESC helps to improve road holding and vehicle
dynamics to help reduce the probability of sk id
d ing and loss of veh icle contro l.
It works only
when the engine is runn ing. ESC detects certain
d ifficult driving situations, including when the ve
h icle is beginn ing to spin (yaw) out of control and
he lps you to get the veh icle back under control by
134
selective ly braking the wheels, and/or reducing
engine power and providing steering assistance
to help ho ld the veh icle on the driver's intended
course. The ind icator light
GJ in the instrument
cluster blinks when ESC is taking act ion to help
you contro l the vehicle .
ESC has limitations. It is important to remember
that ESC cannot overcome the laws of physics. It
will not always be able to help out under all con
dit ions you may come up against. For example,
ESC may not always be able to help you master
s ituations where there is a sudden change in the
coefficient of fric tion of the road surface. When
there is a sect ion of dry road that is suddenly cov
ered with water, slush or snow, ESC cannot per
f orm the same way it would on the dry surface . If
the vehicle hydrop lanes (rides on a cushion of wa
ter instead of the road surface), ESC will not be
able to help you steer the vehicle because contact
with the pavement has been interrupted and the
vehicle cannot be braked or steered . During fast
corner ing, particularly on wind ing roads, ESC
cannot always dea l as effectively with difficult
driv ing situations as at lower speeds .
Always adjust your speed and driving style to road, traffic and weather condit ions . ESC cannot
overr ide the veh icle's phys ica l limits, increase the
available traction, or keep a vehicle on the road if
road departure is a result of driver inattention.
Instead, ESC improves the possibility of keeping
the vehicle under control and on the road during
extreme maneuvers by using the driver's steering
inputs to help keep the vehicle going in the in
tended direction. If you are traveling at a speed
that causes you to run off the road before ESC
can prov ide any assistance, you may not experi
ence the benefits of ESC.
ESC includes and/or works together with the an
ti-lock brake system (ABS), brake assist sys tem
and anti -slip regulation (ASR) . ESC is sw itched on
all the t ime . In certai n situations when you need
less tract ion, you ca n sw itch off ESC by p ress ing
the button
l!l . Be sure to sw itch ESC on again
when you no longe r need less traction. .,..
Page 160 of 232
Checking and filling
(D Tips
The coolant expansion tank is located under the convertible top storage bay lid
¢page 163.
Engine oil
Engine oil specificat ions
The engine oil used must conform to exact speci
fications .
The service interval display in the instrument
cluster of your vehicle will inform you when it is
time for an oil change . We recommend that you
have your oil changed by an authorized Audi Serv
ice Advisor.
If you have to top off the oil between oil changes,
use the Audi oil quality standard specified in the
table.
Audi oil quality standard
Gasoline
VW 502 00 or
engine vw 504 00
Using the proper engine oil is important for the
functionality and service life of the engine. Your
engine was factory-filled with a high-quality oil
which can usually be used throughout the entire
year.
(D Note
Your Limited New Vehicle Warranty does not
cover damage or malfunctions due to failure
to follow recommended maintenance and use
requirements as set forth in the Audi Owner's
Manual and Warranty
& Maintenance booklet.
- Use only a high quality engine oil that ex-
pressly complies with the Audi oil quality
standard specified for your vehicle's engine .
Using any other oil can cause serious engine
damage.
- Do not mix any lubricants or other additives
into the engine oil. Doing so can cause en
gine damage.
158
(D Tips
If you need to add oil and there is none availa
ble that meets the Audi oil quality standard
your engine requires, you may add a total of
no more than 0.5 quart/liter of a high-quality
"synthetic"oil that meets the following speci
fications.
- ACEA A3 or API SM with a viscosity grade of
SAE OW-30, SAE 5W-30 or SAE 5W-40.
- For more information about engine oil that
has been approved for your vehicle, please
contact either your authorized Audi dealer
or Audi Customer Relations at
1 (800) 822-2834 or visit our web site at
www.audiusa.com or www.audicanada.ca.
Engine oil consumption
The engine in your vehicle depends on on ade
quate amount of oil to lubricate and cool all of
its moving ports.
In order to provide effective lubrication and cool
ing of internal engine components, all internal
combustion engines consume a certain amount
of oil. Oil consumption varies from engine to en
gine and may change significantly over the life of
the engine. Typically, engines with a specified break-in period (see
¢ page 142) consume more
oil during the break-in period than they consume
after oil consumption has stabili zed.
Under normal conditions , the rate of oil con
sumption depends on the quality and viscosity of
the oil, the RPM (revolutions per minute) at
which the engine is operated, the ambient tem perature and road conditions . Further factors are
the amount of oil dilution from water condensa
tion or fuel residue and the oxidation level of the
oil. As any engine is subject to wear as mileage
builds up, the oil consumption may increase over
time until replacement of worn components may
become necessary.
With all these variables coming into play, no
standard rate of oil consumption can be estab
lished or specified. There is no alternative to reg
ular and frequent checking of the oil level, see
Note.