door lock AUDI RS5 CABRIOLET 2013 Owner's Manual
[x] Cancel search | Manufacturer: AUDI, Model Year: 2013, Model line: RS5 CABRIOLET, Model: AUDI RS5 CABRIOLET 2013Pages: 286, PDF Size: 71 MB
Page 82 of 286
80 On the road
(0 Note
If the . symbol i n the display or the
1111 (USA models) ;II (Canada mo dels)
ind icator light in the instr ument cluster
flashes, there is a malfunction in the brake
system. By press ing the
ISETI button, you
can br ing up a driver message which ex
p lains the malfunction in more detail. If
the dr ive r message
Parking brake! ap
pears, there is an operating malfunction in
t he par king brake which you should have
repaired immediately by an a uthorized
Aud i dea le r or other q ualified workshop
¢page 15.
@ Tips
-You can apply the pa rking brake at any
time - even with the ignition switched
off. The ignit ion must be t urned on in or
der to release the parking brake.
- Occas iona l noises when the parking
brake is applied and re leased are norma l
and are not a cause for concern.
- When the vehicle is parked, the parking
brake goes through a se lf-test cycle at
regular intervals. Any assoc iated noises
are normal.
Parking
Parking
> Press the brake pedal to stop the vehicle .
> Pull the button @¢page 79, fig . 92 to set
t h e pa rking brake.
> Move t he selec to r lever to P.
> Turn the eng ine off¢ A.
In addition on inclines and grad es
> Turn the steer ing whee l so that your vehicle
will ro ll against the curb in case it should
sta rt to move .
.&_ WARNING
-Whe n you leave your veh icle -even if on
ly briefly - a lways remove the ign ition
key . This applies part icu larly when chil
dren remain in t he vehicle . Otherwise the children could start the eng
ine, release
the park ing brake or operate electrical
equ ipment (e.g. power windows). There
is the risk of an acc ident.
- When the veh icle is locked, no one - par
ticularly not children should rema in in
the vehicle . Locked doors make it more
difficul t for emergency wo rke rs to get in
to the vehicle - putting lives at r isk.
Starting from rest
The starting assist function ensures that the
parking brake is released automatically upon starting.
Stopping and applying par king brake
> Pull the switch @¢ page 79, fig. 92 to ap-
ply the parking brake.
Sta rting and automatically relea sing the
parking b rake
> When you sta rt to dr ive as usual, the park
ing brake is automat ically released and your
veh icle beg ins to move.
When stopping at a traffic signal or stopping in city traffic on vehicles with an a utomatic
transmission, the parking brake can be ap
plied . The vehicle does not have to be held
with the footbrake . T he parking brake elimi
nates the tende ncy to creep w ith a dr ive range
engaged. As soo n as yo u drive
off as usu a l,
the parking bra ke is re leased automatically
and the vehicle starts to move .
Starting on slopes
When starting on inclines, the sta rting assist
preve nts t he veh icle from u nintent ionally roll
i ng back. The br aking for ce of the park ing
brake is no t re leased unt il suff icien t driving
f orce has been built up at the w heels.
(D Tips
Fo r saf ety reaso ns, the pa rking br ake is re
l eased a utom atically on ly when t he d riv
er's safety belt is engaged in the buckle.
Page 89 of 286

lever is left in N (Neutral) for more than ap
prox imately 2 seconds, without the brake ped
a l being pressed .
Release button
The release button on the selector lever pre
ve nts the leve r from being accide ntally s hifted
into certain positions. Depending on the direc
tion of the shift, the se lector lever locks at d if
ferent positions. The positions are h ighlighted
in the ill ustration
c!> fig . 97.
Ignition key safety interlock
The key cannot be removed from the ignition
un less the se lector lever is in the P park posi
tion . When the ignition key is removed, the
se lector lever wi ll be locked in the P pos ition.
Driving the automatic transmission
Fi g. 98 Shift gate on t he cente r conso le: selector lever
wit h release butto n
Starting the engine
.. The selector lever must be in P or N.
Starting off
.. Press and ho ld the brake pedal.
.. Press and ho ld the release button in these
lector lever handle, se lect the desi red se lec
tor lever pos ition such as D/S and release
the b utton.
.. Wait br iefly until the transmission has shift
ed (you will feel a slight movement).
.. Remove your foot from the brake pedal and
acce le rate.
Stopping temporarily
.. Keep the vehicle stationary us ing the brak
ing pedal, for examp le at traffic lights.
Transm ission 87
.. Do not press the accelerator peda l when do
ing this .
.. To prevent the vehicle from ro lling when yo u
start driv ing, set the parking brake when
stopping on steep inclines
c!> _&. .
.. The parking brake will release automat ica lly
and the vehicle will start mov ing once you
p ress the acce lerator pedal.
Stopping /parking
If the selector lever is not in the P position
when you open the driver's door , the veh icle
could roll . The message
Transmis sion: Car
may roll! Shift to park! appears .
.. Press and hold the brake peda l until the ve-
hicle has come to a complete stop .
.. App ly the parking brake co
page 80 .
.. Select the P selector lever posit ion co_&. .
Stopping on an incline
.. Always press the brake pedal to ho ld the ve
hicle in place and prevent it from "rolling
back" co_&. . Do
not try to prevent the vehi
cle from "rolling back" when a gear is en
gaged by increas ing the engine speed co(!).
Starting on an incline
.. Activate the parking brake .
.. With the driving gear selected, press the ac
celerato r pedal carefully . The parking brake
w ill release automatically if your seat belt is
fastened .
U nder certa in circumstances, such as driving
in the mounta ins, it may be usefu l to sw itch
temporarily to the manual sh ift p rogram in or
d er to ad just the gears to the driv ing cond i
ti ons by hand co
page 89.
On slopes, activate the parking brake first and
then move the selector leve r to the P position .
T his prevents too much st ress from being
placed on the locking me chanism .
&_ WARNING
- T he vehicle can also roll when the engine
is s topped.
~
Page 105 of 286

Have your authorized Audi dealer or au
thorized Audi Service Facility check their
function.
@ Tips
- If the window glass in the driver's door
or front passenger's door has been tint
ed, the display in the exterior mirror may be misinterpreted .
- For Declaration of Compliance to United
States FCC and Industry Canada regula
tions
¢ page 267.
Activating and deactivating
Applies to vehicles: with Audi side assist
Fig. 118 Drive r's d oor : Sid e ass ist bu tton
.. Press the button ¢.&. in General informa
tion on page 102
to switch the system on/
off . The LED in the button turns on when
side assist is switched on.
Adjusting the display brightness
Applies to vehicles: with Audi side assist
The signal brightness can be set in the radio
orMMI* .
.. Select : ICARI function button> Audi side as
sist.
.. Select : I CARI function button > Car systems*
control button > Driver assist > Audi side
assist.
The display brightness adjusts automatically
to the brightness of the surroundings, both in
the information and in the warning stage. In
very dark or very bright surroundings, the dis play is already set to the minimum or maxi
mum level by the automatic adjustment. In
Audi side assist 103
such cases, you may notice no change when
adjusting the br ightness, or the change may
only be noticeable once the surroundings
change.
Adjust the brightness to a level where the dis
play in the information stage will not disrupt
your view forward. If you change the bright
ness, the display in the exterior mirror will
briefly show the brightness level in the infor
mation stage. The brightness of the warning
stage is linked to the brightness in the infor
mation stage and is adjusted along with the
information stage adjustment.
(D Tips
- Side assist is not active while you are
making the adjustment.
- Your settings are automatically stored
and assigned to the remote control key
being used.
Driver messages
Applies to vehicles: wit h Aud i side ass ist
If side assist switches off by itself, the LED in
the button turns off and a message will ap
pear in the instrument cluster display:
Audi side assist unavailable: Sensors blocked
The radar sensors' vision is affected . Do not
cover the area in front of the sensors with bike
wheels, stickers, dirt or other objects. Clean
the area in front of the sensors, if necessary
¢page 101, fig . 117.
Audi side assist: Currently unavailable
Side assist cannot be switched on temporarily
because there is a malfunction (for example,
the battery charge level may be too low) .
Audi side assist: System fault!
The system cannot guarantee that it will de
tect vehicles correctly and it is switched off.
The sensors have been displaced or are faulty.
Have the system checked by an authorized
Audi dealer or authorized Audi Service Facility
soon.
Page 127 of 286
area because the rear lid cannot be fully
closed.
-If you absolutely must drive with the rear
lid open, observe the following notes to
reduce the risk of poisoning:
- Close all windows,
- Close the power top,
- Open all air outlets in the instrument
panel,
- Switch off the air recirculation,
- Set the fresh air fan to the highest
speed.
A WARNING
Always make sure that the doors, all win
dows, the power top and the rear lid are
securely closed and locked to reduce the
risk of injury when the vehicle is not being
used.
-After closing the rear lid, always make sure that it is properly closed and locked.
- Never leave your vehicle unattended es
pecially with the rear lid left open. A
child could crawl into the vehicle through
the luggage compartment and close the
rear lid becoming trapped and unable to
get out. Being trapped in a vehicle can
lead to serious personal injury.
- Never let children play in or around the
vehicle.
- Never let passengers ride in the luggage
compartment. Vehicle occupants must
always be properly restrained in one of
the vehicle's seating positions.
(D Tips
- Air circulation helps to reduce window
fogging. Stale air escapes to the outside
through vents in the trim panel. Be sure
to keep these slots free and open.
- The tire pressure must correspond to the
load. The tire pressure is shown on the
tire pressure label. The tire pressure la bel is located on the driver's side B-pillar.
The tire pressure label lists the recom mended cold tire inflation pressures for
the vehicle at its maximum capacity
.
Driving Safely 125
weight and the tires that were on your
vehicle at the time it was manufactured.
For recommended tire pressures for nor
mal load conditions, please see chapter
¢page 226.
Tie-downs
App lies to vehicles : wi th t ie-downs
The luggage compartment is equipped with
four tie-downs to secure luggage and other
items.
Use the tie-downs to secure your cargo prop
erly ¢
page 124, Loading the luggage com
partment .
In a collision, the laws of physics mean that
even smaller items that are loose in the vehi
cle will become heavy missiles that can cause
serious injury. Items in the vehicle possess en
ergy which vary with vehicle speed and the
weight of the item. Vehicle speed is the most significant factor.
For example, in a frontal collision at a speed
of 30 mph (48 km/h), the forces acting on a 10-lb (4.5 kg) object are about 20 times the
normal weight of the item . This means that
the weight of the item would suddenly be
about 200 lbs. (90 kg). You can imagine the injuries that a 200 lbs. (90 kg) item flying
freely through the passenger compartment
could cause in a collision like this.
A WARNING
Weak, damaged or improper straps used
to secure items to tie-downs can fail dur ing hard braking or in a collision and cause
serious personal injury.
- Always use suitable mounting straps and
properly secure items to the tie-downs in
the luggage compartment to help pre
vent items from shifting or flying for
ward as dangerous missiles.
- When the rear seat backrest is folded
down, always use suitable mounting
straps and properly secure items to the
tie-downs in the luggage compartment
to help prevent items from flying
•
•
Page 135 of 286
The front seats are equipped with belt posi
tioners so it is easier to fasten the safety be lts . The belt positioners automatically ex
tend when the door closes and the ignition
switches on ¢
fig. 147.
The belt positioner returns to its starting posi
tion again when
- the tongue in the belt latch engages o r the
belt was not fastened within 60 seconds .
- yo u sw itch the igni tion off.
- you ope n the door.
_& WARNING
- O nly you r autho rized Aud i de ale r shou ld
wor k on the sys tem or remove and instal
ling system components when perform
ing other work .
- T he be lt positioners could cause in jury or
damage if they pinc h peop le or objects
when extending or retracting .
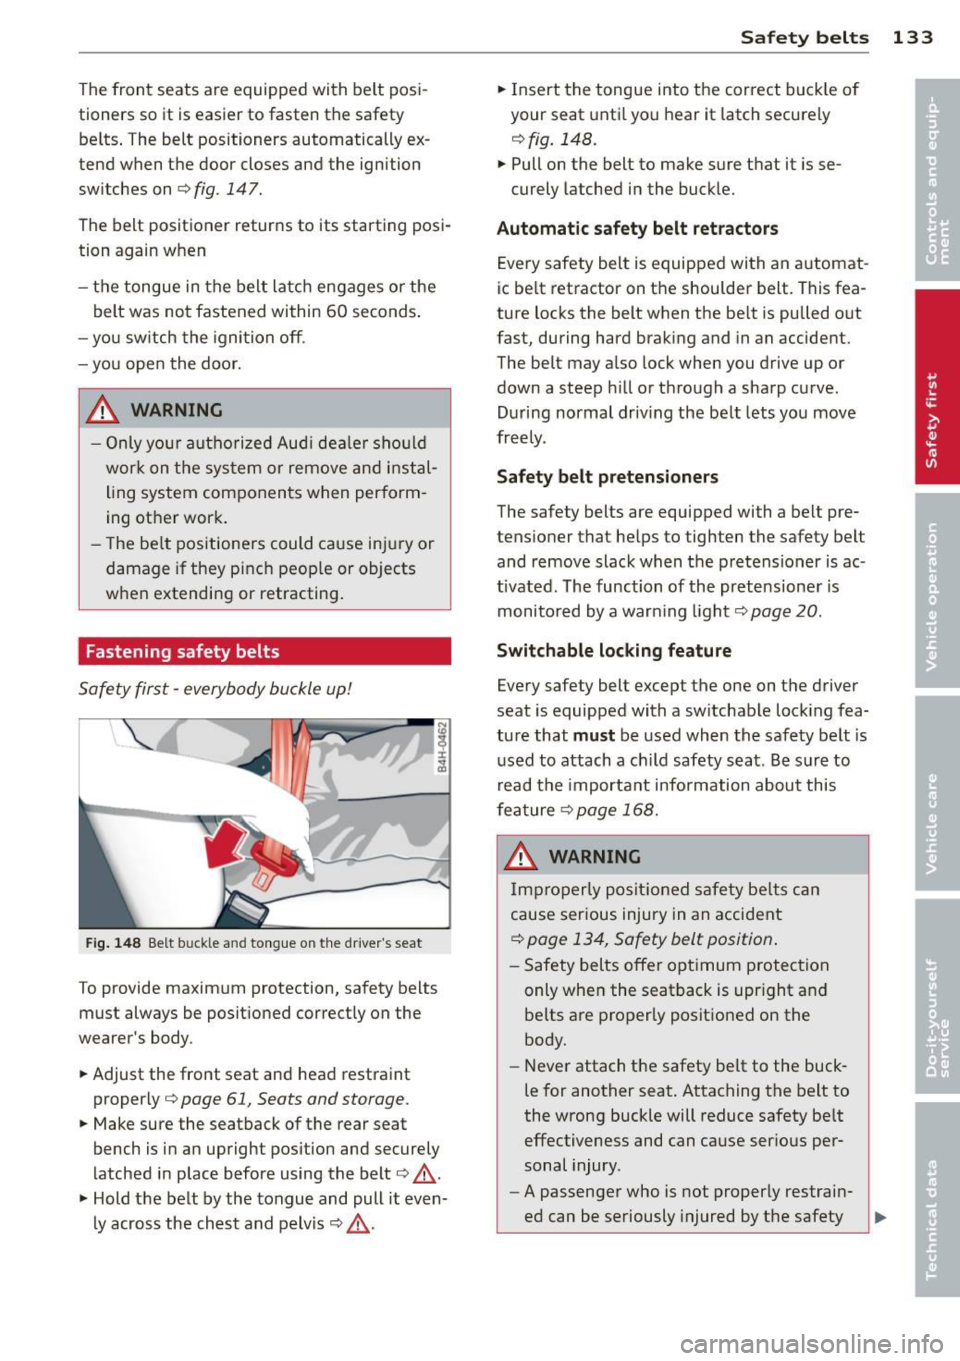
Fastening safety belts
Safety first -everybody buckle up!
Fig . 14 8 Be lt buckle and tongue on t he driver's seat
To provide maximum protection, safety belts
must always be posit ioned correctly on the
wearer's body .
~ Adjust the front seat and head restraint
properly¢
page 61, Seats and storage.
~ Make sure the seatback of the rear seat
bench is in an upright pos ition and securely
latched in place before using the belt¢ ..
&.
~ Hold the belt by the tongue and pull it even-
ly across the chest and pelvis¢,&..
Safety belts 133
~ Insert the tongue into the correct buck le o f
your seat unti l you hear it latch securely
¢ fig. 148.
~ Pull on the belt to make sure that it is se-
curely latched in the buckle.
Automat ic safety belt r etractor s
Every safety belt is equipped with an automat
ic be lt ret ractor on the shoulder belt. This fea
ture locks the belt when the be lt is pulled out
fast, during hard brak ing and in an accident.
The belt may also lock when you drive up or
down a steep h ill or th rough a sharp cu rve.
During normal driv ing the belt lets you move
freely.
Safety belt pretensioners
The safety belts are equipped with a belt pre
tensioner that helps to tighten the safety belt
and remove slack when the pretensioner is ac
tivated. The function of the pretensione r is
monito red by a warn ing light¢
page 20.
Switchable locking fe ature
Every safety belt except the one on the driver
seat is equipped with a sw itchable lock ing fea
ture that
must be used when the safety belt is
used to attach a ch ild safety seat . Be s ure to
read the important information about this
feature
¢page 168.
_& WARNING
Imp roperly posit ioned safety be lts can
cause serious injury in an accident
¢ page 134, Safety belt position .
-Safety belts offer opt imum protection
only when the seatback is upr ight and
be lts are properly posit io ned on the
body.
-
- Never attach the safety be lt to the buck
le for another seat. Attaching the belt to
the wrong buckle will reduce safety be lt
effectiveness and can cause ser ious per
sonal injury.
- A passenger who is not properly restrain-
ed can be seriously injured by the safety .,.
Page 151 of 286
If the fron t passenger seat is not occupied,
the front airbag will not deploy, and the
PAS
SENGER AIR BAG OF F
light will stay on. Nev
er in sta ll a rearward-fac ing ch ild restra int on
t he fron t passenger seat, the safest place for
a child in any kind of child restraint is at one
of the seating positions on the rear seat
¢ page 138, Child restraints on the front seat
- some important things to know
and
¢ page 158, Child Safety .
If the PASSENGER AIR BAG OFF light c om es
on
when one of the conditions listed above is
met, be sure to check the light regularly to
make certa in that the
PAS SENGER AIR BAG
O FF
ligh t stays on cont inuous ly whenever the
ignition is on . If the
PASSENGER AIR BAG
OFF
light does not appear and not stay on all
the time, stop as soon as it is safe to do so
and
- reactivate the system by turning the ignition
off and then t urning it on again;
- remove and reinstall the child restraint .
Make sure that the child restraint is properly
installed and that the sa fety be lt for the
front passenger seat has been correct ly
routed around the child restraint a s desc ri
bed in the child restraint manufacturer 's in
structions;
- make sure that the convertible locking fea
ture on the safety be lt for the front passen
ger seat has been activated and that the
safety belt has been pulled tight . The belt
mus t not be loose o r have loops of slack so
that the sensor below the safety be lt latch
on the seat can do its job
¢ page 168 .
-make su re that th ings that may increase the
weight of t he ch ild and child safe ty seat are
not being transported on the front passen
ger seat ;
- make su re that the safety bel t tension sen
sor is not b locked . Shake t he safety belt
l atch on the front passenger seat back and
forth;
- If a strap or tether is being used to tie the
child safety seat to the front passenger
seat, make sure that it is not so tight that it
A irbag system 149
causes the weight -sensing mat to measure
more weight than is act ually on the seat .
If the PASSENGER AIR BAG OFF light still
doe s not come on
and does not stay on con
tin uous ly (when the ignition is switched on) ,
- take the child rest ra int off the front passen-
ge r seat and install it properly a t one of the
rear seat positions. Have the airbag system
inspected by yo ur authorized Audi dealer
immediate ly .
- move the child to a rear seat position and
make sure t hat the c hild is properly restrain
ed in a c hild restra int that is app ropriate for
its size and age.
T he
PASSENGER AIR BAG OFF light sho uld
NOT come on when the ignition is on and an
adult is sitting in a proper seating position on
the front passenger seat. If the
PASSENGER
AIR BAG OFF
ligh t comes on and stays on or
flashes for about 5 seconds wh ile driving, un
der these c ircumstances , make sure that:
- the adult on the front passenger seat is
properly seated on the center of the seat
cushion wi th his or her back up aga inst the
backrest and the backrest is not recl ined
¢ page 119, Proper occupant seating posi
tions,
- the adult is not tak ing weight off the seat by
holding on to the passenger assist handle
above the front passe nger door or support
ing their weight on the armrest ,
- the safety belt is being properly wo rn and
t ha t there is not a lot of s lack in the safety
be lt webbing ,
- ac cesso ry seat covers or cushions o r other
t hings tha t may cause an incorrect reading
or impression on the we ight-sensing mat
under the upho lstery of the seat have been
removed from the front passenger seat,
- a sa fety belt exten der has not been left in
the safety belt latch for the front passenger
seat.
In add it ion to the
PASSENGER AIR BAG OFF
li ght in the cente r of the instrumen t panel,
the message
PASSENGER AIR BAG OFF or
PASSENGER AIR BAG ON wi ll briefly appear ll-
•
•
Page 166 of 286
164 Child Safet y
Child safety seats
Infant seats
Babies and infants up to about one year old
and 20 lbs. or 9 kg need special rearward-fac
ing child restraints that support the back,
neck and head in a crash.
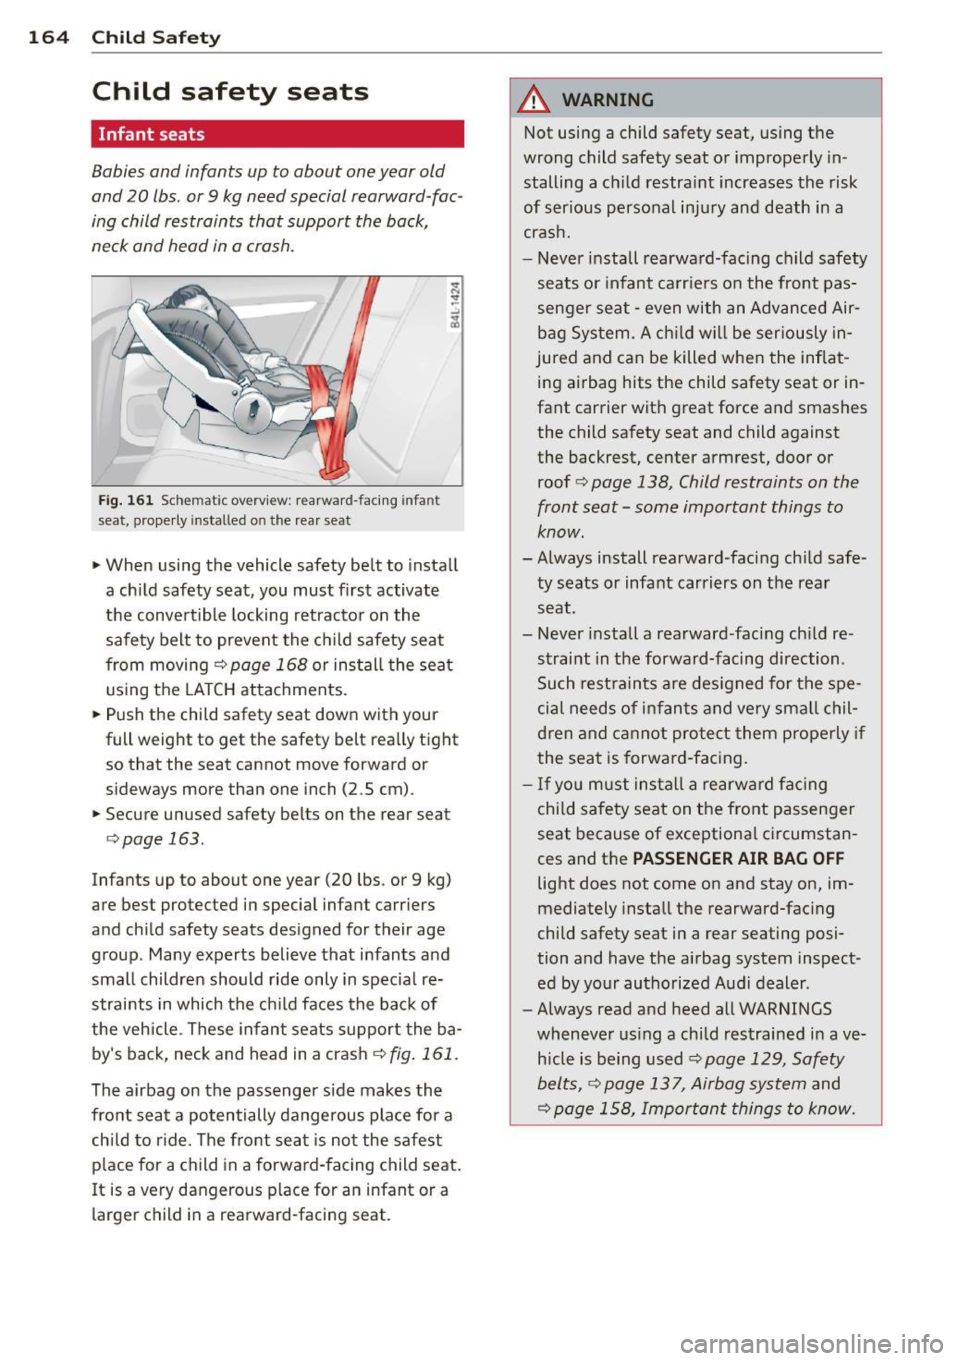
-- /
Fig . 161 Sche matic overview: rearward- facing infant
seat, properly installed o n the rear seat
> When using the vehicle safety belt to install
a ch ild safety seat, you must first activate
the convertible locking retractor on the
safety belt to prevent the child safety seat
from moving ¢
page 168 or install the seat
using the LATCH attachments.
> Push the child safety seat down with your
full weight to get the safety belt rea lly tight
so that the seat cannot move forward or
sideways more than one inch (2.5 cm).
> Secure unused safety belts on the rear seat
¢page 163.
Infants up to about one year (20 lbs. or 9 kg)
are best protected in special infant carriers
and child safety seats designed for their age
group . Many experts believe that infants and
small children should ride only in spec ial re
straints in which the chi ld faces the back of
the vehicle . These infant seats support the ba
by's back, neck and head in a crash ¢
fig. 161 .
The airbag on the passenger side makes the
front seat a potentially dangerous place for a
child to r ide . The front seat is not the safest
p lace for a child in a forwa rd-facing child seat.
I t is a very dangerous p lace for an infant or a
larger child in a rearward-facing seat.
A WARNING
-Not using a child safety seat, using the
wrong child safety seat or improperly in
stalling a ch ild restra int increases the risk
of ser ious personal in ju ry and death in a
crash.
- Never install rearwa rd-facing child safety
seats or infant ca rr ie rs on the front pas
senger sea t -even with an Advanced Air
bag Sys tem. A c hild will be ser iously in
jured and can be killed whe n the inflat
ing ai rbag hits the child safety seat or in
fant carrier with great force and smashes the child safety seat and child against
the backrest, center armrest, door or
roof ¢
page 138, Child restraints on the
front seat -some important things to
know.
- Always install rearward-facing ch ild safe
ty seats or infant carriers on the rear seat .
- Never install a rearward-facing ch ild re
straint in t he forward-facing direction .
Such rest ra ints are des igned for the spe
cial needs of infan ts and very sma ll chil
d ren and cannot protect them p roperly if
the seat is forward -facing.
- If you m ust ins ta ll a rearwa rd fac ing
chi ld safety seat on the front passenger
seat because of exceptiona l circumstan
ces and the
PASSENGER AIR BAG OFF
light does not come on and stay on, im
mediately install t he rearward-fac ing
child safety seat in a rear seating posi
tion and have the airbag system inspect
ed by your authorized Aud i dealer .
- Always read and heed all WARNINGS
whenever us ing a child restrained in ave
h icle is being used
¢ page 129, Safety
belts, ¢ page 137, Airbag system
and
¢ page 158, Importan t things to know.
Page 193 of 286
(D Note
-Never try to remove dirt, mud or dust if
the surface of the vehicle is dry. Never
use a dry cloth or sponge, since this
could scratch your vehicle's pa int or w in
dows .
- Never wash your car in bright sunlight.
Drops of water act as magnifying lenses
and may damage your paint.
- When you wash your car in the w inter: if
you r inse your vehicle w ith a hose, be
careful not to aim the stream of water
direct ly at locks, or at door or hatch
openings - they can free ze shut.
- Never use sponges des igned to remove
i nsects, or any kitchen scouring sponges
or similar products. They can damage
you r paint finish.
- Never use a dry cloth o r sponge to clean
the headligh ts. On ly use we t cloths or
sponges to prevent scratches.
It i s best
to use soapy wate r.
- You sho uld remove debris (su ch as in
sects) from the head ligh t lenses on a
r egular basis, for example when refuel
ing your vehicle . Never use a dry cloth or
sponge to clean the head lights. Only use
wet cloths or sponges to prevent
scratches.
It is best to use soapy water.
@ For the sake of the environment
On ly wash the vehicle in facilit ies specially
designed for that purpose. Th is w ill reduce
the risk of d irty water contaminated with
oil from entering the sewer system. In
some areas, wash ing vehicles outs ide of
these facilit ies is prohib ited.
Washing your vehicle with a power
washer
Cleaning the exterior of your car with a high
pressure power washer is safe as long as you observe a few simple rules .
~ Before us ing the powe r washe r, make sure
yo u have re ad an d u nderstood the WARN-
Cleaning and protec tion 19 1
INGS ¢ A in General information on
page 189 .
~ Always follow the operating instr uctions for
the power washer.
~ Make sure that the jet on the spray hose pro
duces a "fan shaped sp ray" .
~ Do not hold the sp ray nozzle too close to
soft mater ials .
Never use a pow er washer to clean the power
top itself.
Keep a distance from soft materia ls s uch as
rubber hoses or insulating material as well as
sensors and camera lenses.
When cleaning the vehicle with a power was h
er
always follow the operating instructions .
This applies part icu larly to the operating pres
sure and the spraying d istance. Do not point
the spray d irectly at the seals around the s ide
windows, around the doo rs, on the rea r lid or
o n the powe r top. Likewise, do not po int it di
re ct ly at tires, rubbe r hoses, insulat io n ma te
ria l or senso rs
¢ page 193. Hold the spray
nozzle at leas t 1.3 ft (0. 4 m) away from the
vehicle.
Do no t use a high-p ressu re power was her to
remove snow and i ce .
Do not use a jet which sprays water in a d irect
stream o r one that has a rotat ing jet.
Water temperature should not exceed 140 °F (60
°() .
A WARNING
Neve r wash t ires with a jet t hat sprays wa
ter in a direct stream . Thi s could cause in
v isi ble d amage to the t ire s and weaken
them, even if the spr ay is from a re lative ly
l ong dis tance and for a sho rt time. Dam
aged and weakened tires can fail and cause
accidents and personal in jury.
([) Note
- Never use a power washer to clean the
powe r top itse lf .
•
•
Page 206 of 286
204 Fuel suppl y and filli ng your fu el t ank
transport fue l to use for your lawn mower,
snow blower, etc., be very careful and al
ways observe local and state laws regard
ing the use, transportat ion and storage of
such fuel containers . Make certain the con
tainer meets industry standards (ANSI/
AS TM F852 -86) .
(D Note
Never drive your vehicle until the fuel tank
is completely empty. The irregular supply
of fuel can cause misfiring . Gasoline could
e nte r the exhaust system and damage t he
catalyt ic converter.
Refuelling
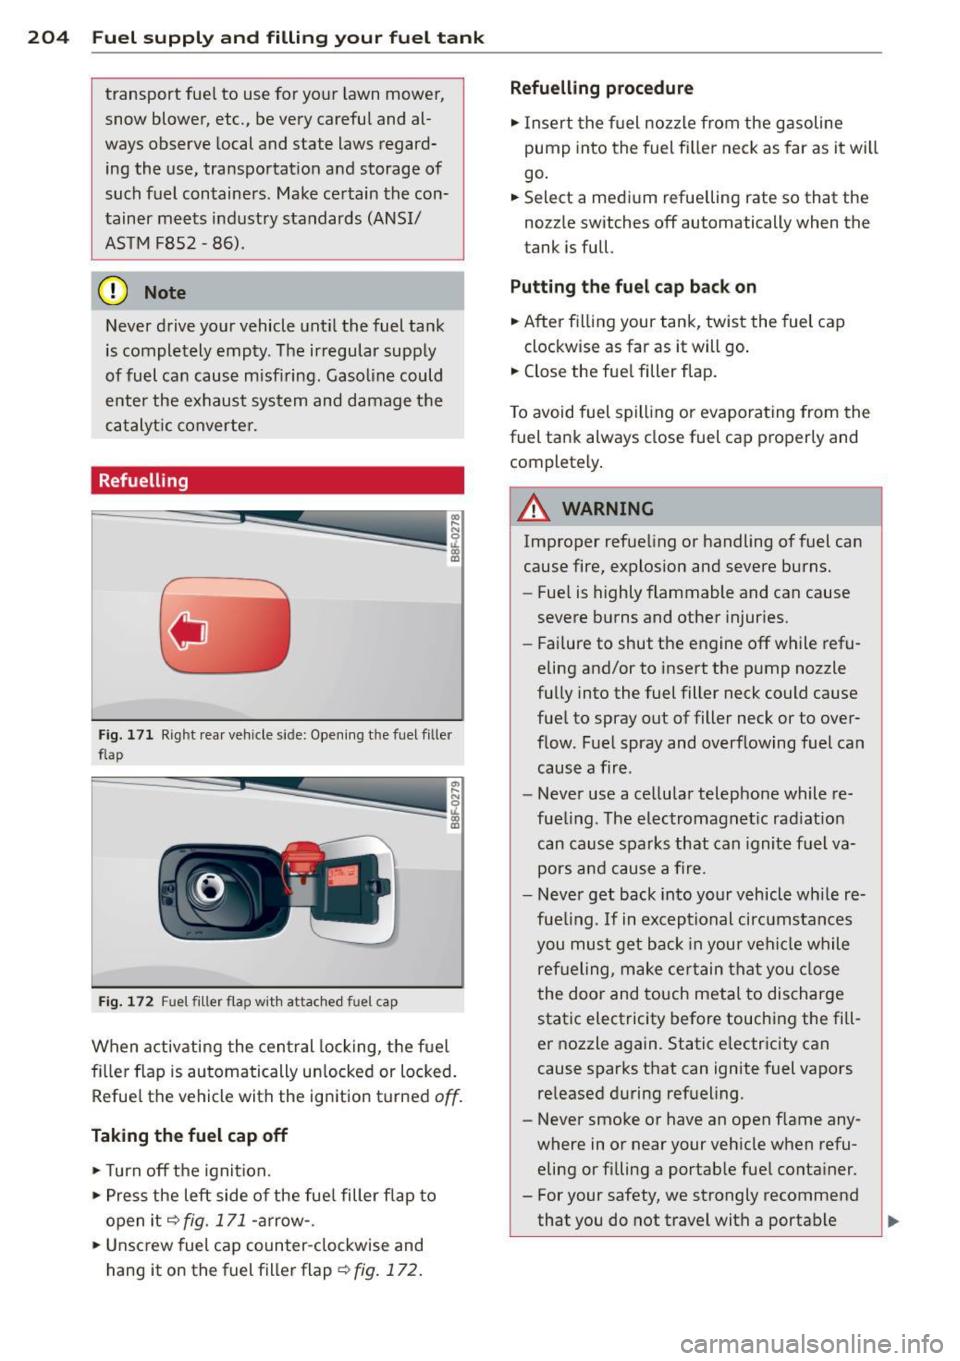
Fig. 171 Rig ht rea r veh icle s ide: Ope ning the fuel fille r
f lap
Fi g. 1 72 Fuel filler fla p with attached fuel c ap
When activating the central locking, the fuel
fi ller flap is automatically un locked or locked.
Refue l the vehicle with the ignition turned
off .
Taking th e fu el cap off
,.. Turn off the ignit ion.
,.. Press the left side of the fue l filler flap to
open it q fig .171-a rrow -.
"" Unsc rew fuel cap counter -clockwise and
hang it on the fuel filler flap
~ fig. 172 .
Refuell ing proc edur e
,.. Insert the fuel nozzle from the gasoline
pump into the fuel fille r neck as far as it will
go .
,.. Sele ct a med ium r efuelling rate so that the
no zz le switches off automatically when the
tank i s full.
Putting the fu el cap back on
,.. After fi lling your tank, twist the fuel cap
clockwise as far as it will go .
,.. Close the fue l fill er flap.
T o avoid fuel spilling or evaporating from the
fuel tank always close fuel cap properly and complete ly .
A WARNING
-
Improper refue ling or handling of fuel can
cause fire, explosion and severe burns.
- Fue l is highly flammable and can cause
severe burns and other injur ies.
- Failure to shut the engine off while refu
eling and/or to insert the pump nozzle
fully into the fuel filler neck could cause
fuel to spray out of filler neck or to over
flow . Fuel spray and overflowing fuel can
cause a fire .
- Never use a cellular telephone while re
fueling . The electromagnet ic rad iat ion
can cause sparks that can ignite fuel va
pors and cause a fire .
- Never get back into your vehicle white re
fueling .
If in exceptional circumstances
you mu st get back in your vehicle while
ref ueling, make ce rtain that you close
the door and touch metal to discharge static electricity before touching the fill
er nozzle again. Static e lectricity can
cause sparks that can ignite fuel vapors
released during ref ueling .
- Never smoke or have an open f lame any
where in or near your veh icle when refu
eling or filling a portab le fuel conta iner.
- For your safety, we strongly recommend
that you do not travel with a portable
Page 254 of 286

252 Fuses a nd bulb s
No.
5 Sound actuator/exhaust
sound tun
ing
6 Headlight range control sys-
tern/cornering light
7 Headlight (cornering light)
Control modules (electro
-
mechanical parking brake,
8 shock absorber, quattro
I
sport, trailer hitch), DCDC
converter
9 Adaptive cru ise control
10 Shift gate
11 Side ass ist
12 Headlight range control,
parking system
13 Airbag
14 Rear wiper (allroad)
15 Auxi
liary fuse (instrument
panel)
16 Auxiliary fuse terminal 15
(engine area)
Fu
se pa nel@ (b ro w n)
2 Brake light sensor
3 Fuel pump
4
5 Left seat heating with/with-
out seat vent
ilat ion
6 E5C
7 Horn
-Front left door (window reg·
8 ulator, central locking, mir-
ror, switch, lighting)
9 Wiper moto r
1 0 ESC
Two-door models: rear left
window regu lator, Fo ur-door
11 mode
ls: rear left door (win-
dow regu lator, central lock-
ing, switch, lighting)
12 Rain and light sensor
Fu se panel © (red)
3 Lumbar support
Amps
5/ 15
5/7,5 7,5
5
5
5
5
5
5
15
10
40
5
25
5
15/30
5
15
30
30
25
30
5
10
No . Consumer
4 Dynamic steering
6
7
8
9
Interior lighting (Cabriolet)
Windshield washer system ,
headlight washer system
Vehicle electrical system
control module 1
Vehicle electrical system
control module 1 Left rear window regulator
motor (Cabriolet)/sunroof
10 Vehicle e
lectr ical system
con trol module 1
11 Right rear window regulator
(Cabriolet)/sun shade motor
12 Anti-theft alarm warning
system
Right cockpit fuse assignment
Amps
35
5
35
20
30
7,5/20
30
7,5/20
5
Fig. 202 R ight cockpi t: fuse pane l wit h plast ic cl ip
No. Con sumer Amps
F u se panel @ (black )
5 Steering column switch
5
module
7 Term
inal 15 diagnos tic con-
nector 5
•
....