engine AUDI RS5 COUPE 2015 Repair Manual
[x] Cancel search | Manufacturer: AUDI, Model Year: 2015, Model line: RS5 COUPE, Model: AUDI RS5 COUPE 2015Pages: 254, PDF Size: 64.12 MB
Page 196 of 254
Checking and Filling
"' Place a thick rag over th e coolant expansion
tank and
carefully turn the cap counter-clock
wise
¢ ,& .
"'Read the engine coolant level inside the coolan t
expansion tank
¢ fig . 164, ¢page 189,
fig. 16 1.
With a cold engine , the coolant level
should be between the ' 'MIN" and "MAX " mark
ings
¢ fig . 165 -arrows- . When the engine is
warm, the level may be slightly above the
"MAX" marking.
"'Add coolant mixed in the correct ratio, if neces
sary ¢
page 192 . Coolant may be a maximum
of 1 mm above the MAX marking.
"' Twist the cap on again
tightly .
The location of the coolant expansion tank can be
seen in the engine compartment illustration
¢ page 189.
To obtain an accurate reading , the engine must
be switched off.
The expansion tank in your vehicle is equipped
with an electric coolant level sensor.
When the coolant level is too low, the warning
light in the Auto-Check System¢
page 17 will
blink until you add coolant and the level has been
restored to normal. Even though there is an elec
tric coolant level sensor, we still recommend you
check the coolant level from time to time.
Coolant loss
Coolant loss may indicate a leak in the cooling
system. In the event of coolant loss, the cooling
system should be inspected immediately by your
authorized Audi dealer. It is not enough merely
to add coolant.
In a
sealed system, losses can occur only if the
boiling point of the coolant is exceeded as a re
sult of overheating.
Adding coolant
Replacement engine coolant must conform to ex
act specifications ¢
page 192, Coolant.
We recommend using only coolant additive Gl2+
+ , G l3
or in an emergency Gl2+ . Do not use a
different additive . In an emergency use plain wa
ter until you can get the correct additive and can
194
restore the correct ratio. This should be done as
soon as possible.
If you have lost a considerable amount of cool
ant, then you should add cold antifreeze and cold
water only when the engine is cold.
Always use
new engine coolant when refilling.
Do not fill coolant above the "MAX" mark. Excess
coolant will be forced out through the pressure
relief valve in the cap when the engine becomes
hot.
,&_ WARNING
- The cooling system is under pressure and
can get very hot. Reduce the risk of scalding
from hot coolant by following these steps.
- Turn off the engine and allow it to cool
down .
- Protect your face, hands and arms from
escaping fluid and steam by covering the
cap with a large, thick rag .
- Turn the cap slowly and very carefully in a
counter-clockwise direction while applying
light, downward pressure on the top of
the cap .
- To avoid being burned, do not spill anti
freeze or coolant on the exhaust system or
hot engine parts. Under certain condi
tions, the ethylene glycol in engine cool
ant can catch fire.
- Antifreeze is poisonous. Always store anti
freeze in its original container and well out
of the reach of children.
- If you drain the coolant, it must be caught
and safely stored in a proper container
clearly marked "poison".
(D Note
- Do not add any type of radiator leak sealant
to your vehicle's engine coolant. Adding ra
diator repair fluid may adversely affect the
function and performance of your cooling
system and could result in damage not cov
ered by your New Vehicle Limited Warranty.
- Coolant pollutes the environment and could
-
cause an engine fire. Excess coolant will be .,.
Page 197 of 254
"' N
0:: loo
rl I.O
"' N
"' rl
forced out through the pressure relief valve
in the cap when the engine becomes hot.
- If, in an emergency, only water can be add
ed, the correct ratio between water and an
tifreeze
q page 192 must be restored as
soon as possib le.
@ For the sake of the environment
Drained coolant should not be reused . Always
dispose of used coolant while observ ing a ll
environmental regulations.
Radiator fan
The radiator fan switches on automatically by it
self.
The radiator fan is driven by the engine via the V
be lt. The viscous clutch regulates the speed of
the fan according to the temperature of the cool
ant.
An auxiliary e lectr ic radiator fan * switches on and
off depending on coo lant temperature and other
veh icle operating conditions.
Afte r you switch the engine off, the a uxiliary fan
can cont inue running for up to 10 minutes -even
with the ignition off. It can even switch on again
l ater by itself
Q .&. , if
- the temperature of the engine coolant rises due
to the heat bui ld-up from the eng ine in the en
gine compartment, or
- the engine compartment heats up because the
vehicle is parked in intense sunlight.
_& WARNING
- To reduce the r isk of personal injury never
touch the radiator fan.
- The aux iliary e lectr ic fan is temperature con
trolled and can switch on suddenly even
when the engine is not running.
- The auxiliary radiator fan switches on auto
matically when the engine coo lant reaches a
certain temperature and will continue to run
until the coolant temperature drops.
Ch eck in g and Fillin g
Brake fluid
Checking brake fluid level
The broke fluid level con be checked with a quick
glance.
F ig . 1 66 Engine compartment: Cover on the brake fluid
r eservoir
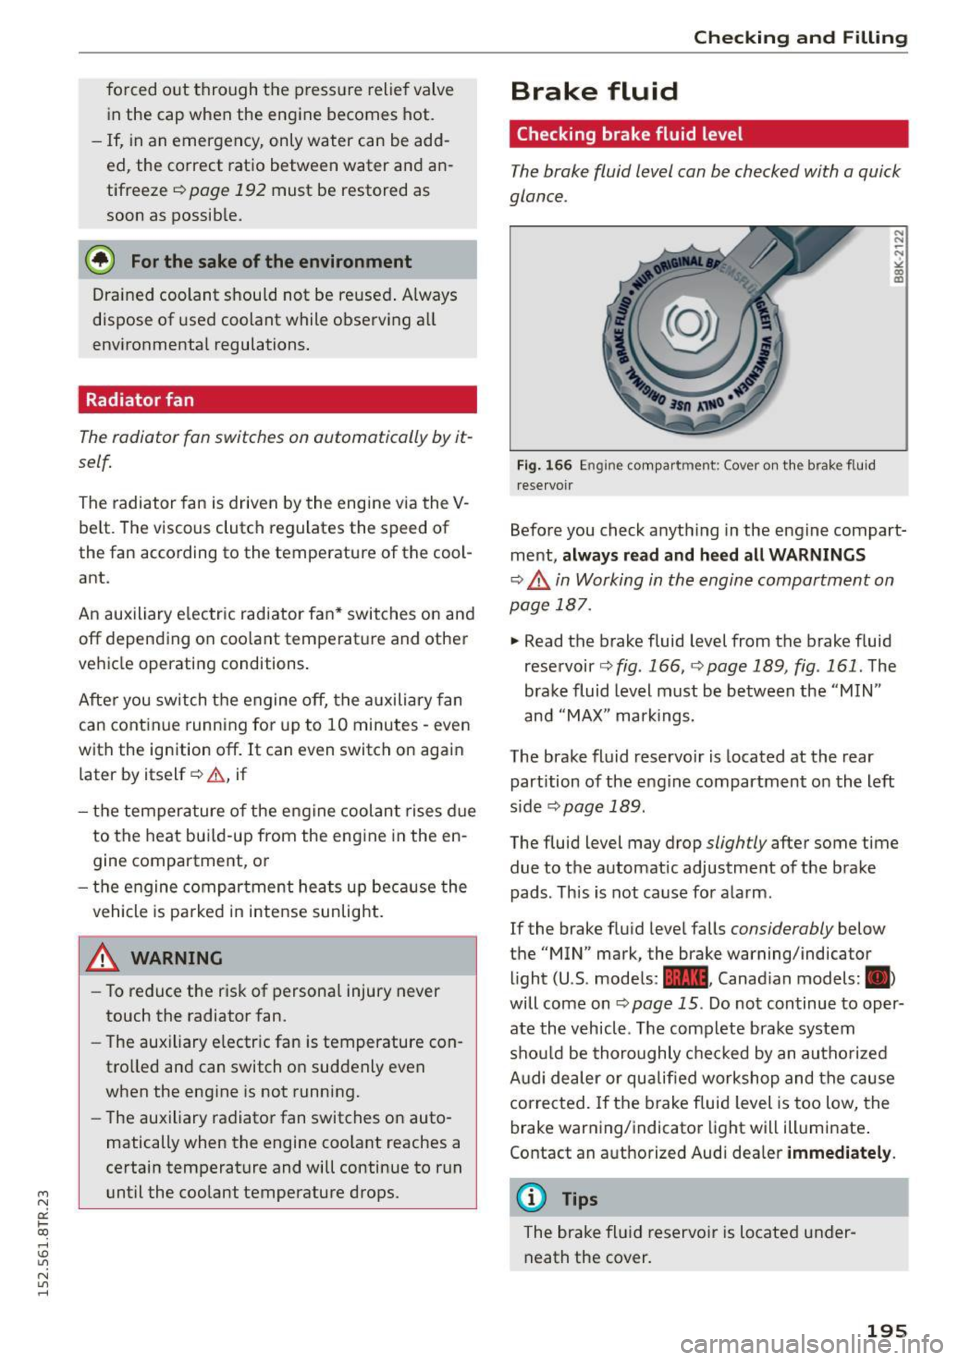
Before you check anyth ing in the engine compart
ment,
a lw ays r ead and h eed all WARNING S
q ,& in Working in the engine compartment on
page 187.
., Read the brake fluid level from the brake fluid
reservoir
q fig. 166, r:> page 189, fig. 161. The
brake fluid level must be between the "MIN"
and "MAX" markings.
The brake fluid reservo ir is located at the rear
part ition of the engine compartment on the left
s ide
q page 189.
The fluid level may drop slightly after some time
due to the automatic adjustment of the brake
pads. This is not cause for alarm.
If the brake fluid level falls
considerably below
the "MIN" mark, the brake warning/indicator
light (U.S. models:
1111 , Canad ian models: .
will come on
Q page 15 . Do not continue to oper
ate the vehicl e. The complete brake system
shou ld be thoroughly chec ked by an autho rized
A udi dealer or qualified workshop and the cause
corrected. If the brake fluid level is too low, the
brake warning/indicator light will illuminate .
Contact an a uthorized Audi dea ler
immedi ately .
(0 Tips
The brake fl uid reservoir is located under
neath the cover.
195
Page 200 of 254
Checking and Filling
-Before work is done on the electrical sys
tem, disconnect the negative ground cable .
- Before performing any work on the electri
cal system, switch off the engine and igni
tion as well as any electrical equipment. The
negative cable on the battery must be dis
connected . If you are just going to replace a
light bulb, then it is enough to switch off
the lights.
- Before disconnecting the battery, switch off
the ant i-theft alarm system! Otherwise you
will set off the alarm.
- When disconnecting the battery, first dis
connect the negative cable and then the
positive cable.
- Before reconnecting the battery, make sure
all electrical consumers are switched off. Re
connect the positive cable first and then the
negative cable. Never interchange the ca
bles -this could start a fire!
- Never charge a frozen or a thawed-out bat
tery. It could explode! If a battery has fro
zen, then it must be replaced. A discharged
battery can freeze over at 32°F (0°C) .
- Make sure the vent hose is always attached
to the opening on the side of the battery.
- Never use batteries which are damaged.
There is the danger of an explosion! Always
replace a damaged battery.
A WARNING
California Proposition 65 Warning:
- Battery posts, terminals and related acces
sories contain lead and lead compounds,
chemicals known to the State of California
to cause cancer and reproductive problems.
Wash hands after handling.
(D Note
- Do not disconnect the vehicle battery when
the ignition is switched on or when tile en
gine is running, otherwise, you will damage
electronic components in the electrical sys
tem.
- If your vehicle is going to stand for a long
period of time without being driven, protect
the battery from "freezing", otherwise it
198
will be damaged and will then have to be re
placed.
Battery charging
Starting the engine requires a well charged bat
tery.
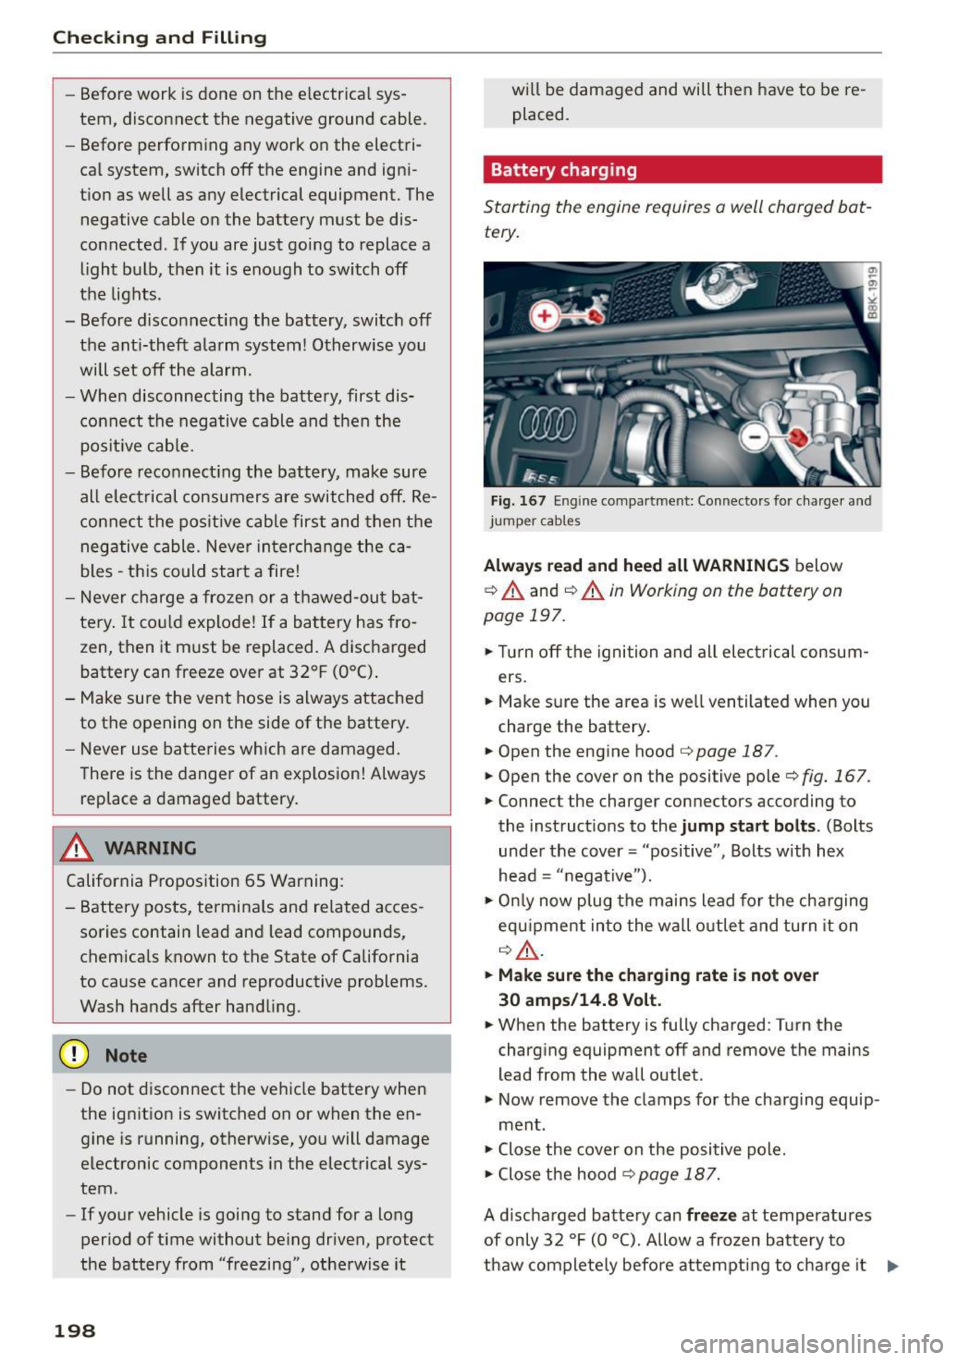
Fig. 167 Eng ine compartment: Connectors for charger and
jumper cables
Always read and heed all WARNINGS below
¢
A and ¢ A in Working on the battery on
page 197.
.,. Turn off the ignition and all electrical consum
ers.
.,. Make sure the area is well ventilated when you
charge the battery.
.,. Open the engine hood
¢ page 187.
.,. Open the cover on the positive pole¢ fig. 167.
.,. Connect the charger connectors according to
the instruct ions to the
jump start bolts . (Bolts
under the cover= "positive", Bolts with hex
head = "negative").
.,. Only now plug the mains lead for the charging
equipment into the wall outlet and turn it on
¢ &, .
.,. Make sure the charging rate is not over
30 amps/14.8 Volt.
.,. When the battery is fully charged : T urn the
charging equipment off and remove the mains
lead from the wall outlet.
.,. Now remove the clamps for the charging equip -
ment .
.,. Close the cover on the positive pole.
.,. Close the hood¢
page 187.
A discharged battery can freeze at temperatures
of only 32 °F (0 °C). Allow a frozen battery to
thaw completely before attempting to charge it
Ill>
Page 201 of 254
M N
0:: loo ,...., \!) 1.1'1
N 1.1'1 ,....,
q &.. However, we recommend not using a
thawed battery again because the battery casing
can be cracked due to ice formation and can leak
battery acid.
Batt ery chargi ng (Maximum cha rging rate of
30 amp s/14 .8 Volt )
When charging at
low voltages (e.g. with a trickl e
cha rger ), the battery cables do not have to be
d isconnected first. The battery caps shou ld
not
be opened when charg ing a battery.
It is not necessary to remove the battery from
the luggage compartment.
Fast charging th e battery (char ging rat e
above 14 .8 Vo lt s)
For technical reasons do not use a battery charg
er that uses voltage greater than 14.8 Volts to
charge your vehicle's battery.
A WARNING
Charging a battery can be dangerous.
- Always follow the operating instructions
provided by the battery charger manufactur
er when charging your battery.
- Never charge a frozen battery. It may ex
plode because of gas trapped in the ice. Al
low a frozen battery to thaw out first.
- Do not reuse batteries which were frozen.
The battery hous ing may have cracked and
weakened when the battery froze.
- Charge the battery in a well ventilated area.
Keep away from open flame or electrical
spark. Do not smoke. Hyd rogen gas generat
ed by t he battery is explos ive.
- To reduce the danger of explosion, never
co nnect or disconnect cha rger cables while
the cha rger is operating.
- Fast charg ing a battery is dangerous and
should only be attempted by a competent
tec hnician with the p roper equipment.
- Battery acid that may spill du ring charg ing
sho uld be washed off w ith a so lution of
wa rm w ater and baking soda to ne utralize
the acid .
Checking and Fillin g
(D Note
Never use a fast charger as a booster to start
the engine . This will ser iously damage sensi
tive electronic components, s uch as control
units, relays, radio, etc., as well as the battery
charger.
Battery replacement
The new battery must hove the some specifica
tions and dimensions as the original equipment
battery.
Intelligent energy management in your vehicle is
responsible for distributing the electrical energy
t h roughout your vehicle
q page 175. The intelli
gent energy management system w ill keep the
engine battery charged better then vehicles with
out this system. To make s ure the addit ional elec
t rical energy is ava ilab le once again afte r yo u
have changed the battery, we recommend that
you install batteries of the same type and man u
facture on ly (the same as those insta lled at the
t ime yo ur vehicle was delivered). Specifications
are listed on the battery hous ing. Your author
ized Audi dealer must code the battery in the en
ergy management system to enab le you to use
the e nergy management fu nctions correctly after
replacing the battery.
If it is not possib le to use a battery of this type,
the new battery must have the same capac ity,
voltage ( 12-volts), amperage, construction and
plug sealing.
When installing the battery, make sure the igni
t ion and all electr ica l consumers are turned off.
(D Note
Make sure the ventilat ion hose on the side of
the battery is connected, otherwise fumes or
battery acid can leak out.
@ For the sake of the environment
Because of the prob lem of proper disposal of
a battery, we recommend your authorized
Audi dealer change the battery for you. Bat
teries contain sulfur ic acid and lead and must
a lways be d isposed of properly in compliance ..,.
199
Page 202 of 254

Checking and Fill in g
with all environmental reg ulations. D isposing
of vehicle batteries improperly is
very danger
ous to the env ironment.
Windshield/headlight*
washer container
F ig . 168 Engin e com partm en t: Cover o n the win d shi eld
and head lig ht• was he r fl ui d co ntainer
The washer flu id container is marked with the
symbo l~ on its cap
~fig . 168 , ~ page 189,
fig . 161.
(") N
-N
"' co a,
• Before you check anyth ing in the eng ine com
partment,
alw ay s re ad and he ed all WARN
IN GS ~ ,& in Working in the engine compart
ment on page 187 .
• Lift the fi ller cap tong ue to add w asher fl uid .
You can fill the container to the top.
• Press the cap back onto the filler neck after f ill-
ing the container .
You ca n find the rese rvoir
c apa city in the tab le in
~ page 234.
Clean water sho uld be used when fill ing up . If
possible, use soft water to prevent sca ling on the
washer jets. Always add a glass cleane r solu tion
(with frost protection in the winter) .
@) Note
Do not mix engine coo lant antifree ze or any
other add itives to fi ll up the windshie ld wash
er reservoir .
200
Page 210 of 254
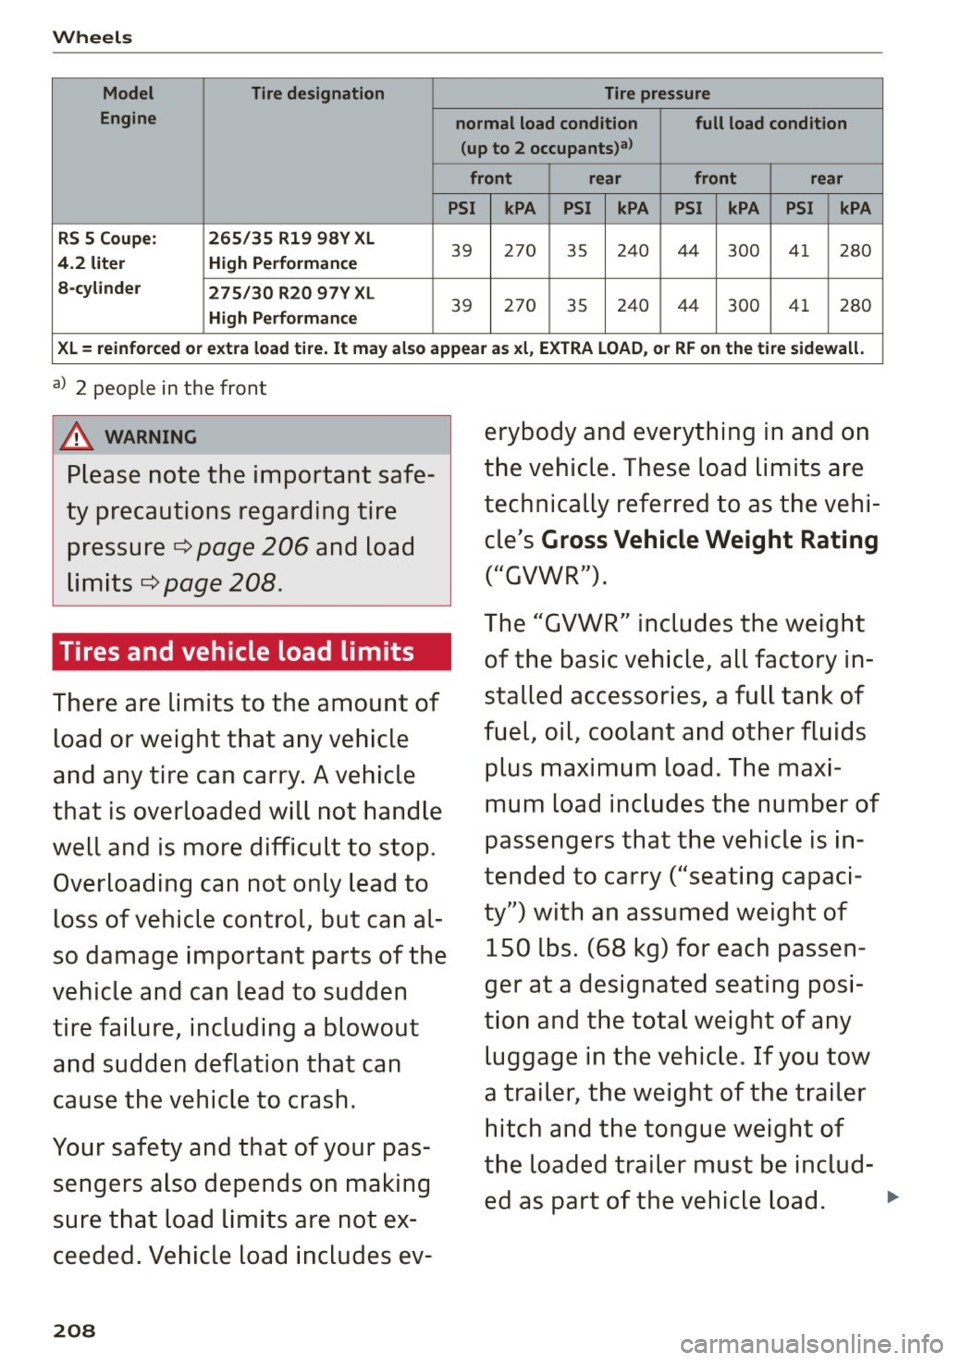
Wheels
Model Tire designation Tire pressure
Engine normal load condition full load condition
(up to 2 occupants)a l
front rear front rear
PSI kPA PSI kPA PSI kPA
PSI kPA
RS 5 Coupe: 265/35 Rl9 98V XL
4.2 liter High Performance
39 27
0
35 2
40 44
300 41
280
8-cylinder
275/30 R20 97V XL
High Performance
39 270 35 240
44 300 41 280
XL= reinforced or extra load tire. It may also appear as xl, EXTRA LOAD, or RF on the tire sidewall.
a) 2 people in the front
_& WARNING
Please note the important safe
ty precautions regarding tire pressure ¢
page 206 and load
limits ¢
page 208.
Tires and vehicle load limits
There are limits to the amount of
load or weight that any vehicle
and any tire can carry. A vehicle
that is overloaded will not handle
well and is more difficult to stop. Overloading can not only lead to
loss of vehicle control, but can al
so damage important parts of the
vehicle and can lead to sudden
tire failure, including a blowout and sudden deflation that can
cause the vehicle to crash .
Your safety and that of your pas sengers also depends on making
sure that load limits are not ex
ceeded. Vehicle load includes ev-
208
erybody and everything in and on
the vehicle. These load limits are
technically referred to as the vehi cle's
Gross Vehicle Weight Rating
("GVWR").
The "GVWR" includes the weight of the basic vehicle , all factory in
stalled accessories, a full tank of
fuel, oil, coolant and other fluids plus maximum load . The maxi
mum load includes the number of
passengers that the vehicle is in
tended to carry ("seating capaci
ty") with an assumed weight of
150 lbs. (68 kg) for each passen
ger at a designated seating posi
tion and the total weight of any luggage in the vehicle . If you tow
a trailer, the weight of the trailer hitch and the tongue weight of
the loaded trailer must be includ- ed as part of the vehicle load. ..,.
Page 218 of 254

Emergency assistance
Emergency assistance
Vehicle tool kit
The tools ore stored underneath the floor panel
in the luggage comportment.
Fig . 174 Luggage compartme nt: too l kit
W hen you need access to the veh icle tool k it or
jack*, you will need to ta ke o ut the cover.
The vehicle tool kit includes :
- Tire repa ir kit (Tire Mobility System)
- Plastic clip for removing wheel bolt caps*
- Alignment pi n for cha nging the whee l
- Screwdr iver w ith reve rsible blade
- Too l for chang ing light bu lbs
- Reversible bit (reversible Torx bit for changing
light bu lbs)
- Rod for jack
- Jack*
- Lug wrench
-Towing eye
Some of the ve hicle items listed above are p rovid
ed on ce rtai n models only or a re optional extras.
Before return ing the jack * to its place, retract the
jack arm fully.
_& WARNING
-
- Never use t he screw d river hex head to
t ig ht en whee l bol ts, s in ce the bolts c annot
atta in the necessary tightening tor que if you
use the hex head, potentia lly ca us ing an ac
c ident.
- The factory -supp lied jac k is intended only
for yo ur vehicle model. Under no c ircum
stances should it be used to lift heavy
216
veh icles o r othe r loads; you risk i njuring
yourse lf.
- Never start the engine when the vehicle is
raised, which could cause an accident.
- Support the vehicle securely w ith appropri
ate stands if work is to be performed under
neath the vehicle; otherwise, there is a po
tential risk for injury.
Tire repair set
General and safety pointers
Tire repair is intended only for temporary, short
term use .
Fig . 1 75 Tire damage for which the Tire Mobility System is
not su ited
Your vehicle is equipped with a tire repa ir kit, the
Tire Mobility System (TMS) .
In the event of a tire fail ure, the TMS is in the
l uggage compartment under the floor. It consists
of the t ire sealant and an electric air pump.
Using
TMS , tire damage caused by foreign bodies
u p to abo ut
0.16 inch (4 mm ) in diameter can be
sealed reliably .
The foreign object must stay in the tire.
The tire sealant must not be used:
- for cu ts or pu nctures in the tire w hich a re larger
than 0 .16 inch (4 mm)
r=;,fig.175 @
-for d amage to the rim @
- if yo u h ave been drivi ng with very low t ire pres-
sures o r ti res wit h no air @
Using the
TMS is descr ibed in the section
¢page 217.
Page 221 of 254

M N
0:: loo ,...., \!) 1.1'1
N 1.1'1 ,....,
A WARNING 1=
You or your passengers cou ld be injured while
chang ing a wheel if you do not follow these
safety precautions:
- If you have a flat t ire, move a safe distance
off the road . Turn off the engine, turn the
emergency flashers on and use other warn
ing devices to alert other motorists.
- Make sure that passengers wait in a safe
place away from the vehicle and well away
from the road and traff ic.
- To help prevent the veh icle from mov ing
sudden ly and possibly slipping off the jac k,
always fully set the pa rking brake and block
the whee l diagona lly opposite the w heel be
ing changed with the folding chocks or oth
er objects. When one front wheel is lifted
off the ground, placing the Automatic Trans
mission in "P" (Park) will
not prevent the ve
hicle from moving.
- Before you change a wheel, be sure the
ground is level and firm. If necessary, use a
sturdy board under the jack.
- Always store the vehicle tool kit, the jack *
and the replaced tire in the luggage com
partment
c> page 117.
(D Note
If you are changing the wheel on a steep in
cline, use a rock or sim ilar object to block the
opposite whee l to prevent the vehicle from
mov ing.
{!) Tips
Obey a ll laws.
Changing a wheel
When you change o wheel, follow the sequence
described below step-by-step and in exactly that
order.
1. Remove the wheel bolt caps*. F or more de
tails see also ¢
page 220 , Wheels with
wheel bolt caps .
2. Loosen the wheel bolts¢ page 220.
Emerge ncy ass is tanc e
3. Locate the proper mounting point for the
jack and alig n the jack below that point
¢ page 221 .
4. Lift the car with the jack¢ page 221.
5. Remove the wheel with th e fla t tire and then
install the other wheel¢
page 222 .
6. Tighten all whee l bolts lightly.
7 .
Lower the vehicle with the jack .
8. Use the wheel bolt wrench and
firmly t ighten
all wheel bo lts in a crisscross pattern
¢page 220.
9. Replace the wheel bolt cap s* .
A WARNING
A lways read and fo llow all WARNINGS and in
formation
¢ &. in Raising the vehicle on
page221
and ¢page 223.
After changing a wheel
A wheel chonge is not complete without the do
ing the following.
.. Always store the vehicle tool kit, the jack*, and
the replaced tire in the luggage compartment
¢ page 117.
.. As soon as possib le, have the t ightening tor
ques
on all wheel bolts checked with a torque
wrench . The correct t ightening to rque is 90 ft
lbs. (120 Nm) .
.. Have the flat tire
replaced as soon as possible .
(D Tips
-If you not ice that the wheel bo lts a re cor
roded and difficult to tur n while changing a
tire, they should be replaced before you
check the tigh tening torque.
- Dr ive at reduced speed until you have the
tightening to rques che cked.
219
Page 227 of 254
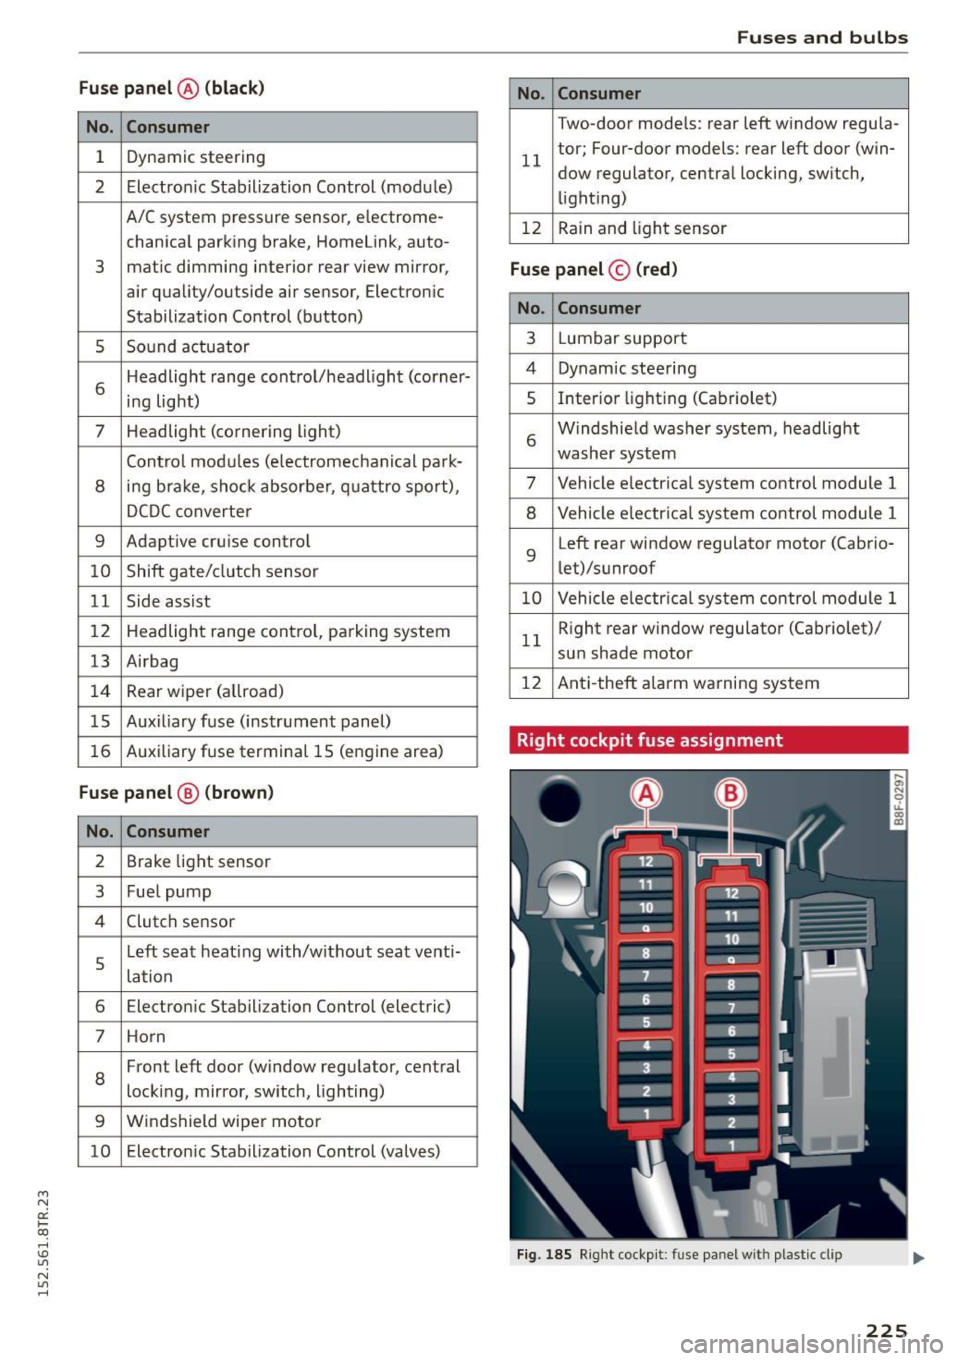
"' N
0:: loo
rl I.O
"' N
"' rl
Fu se pa nel @ (black )
No. Consumer
1 Dynamic steering
2 Electron ic Stabilization Control (module)
A/C system pressure sensor, electrome-
chanical parking brake, HomeLink, auto-
3 mat
ic dimming interior rear view mirror,
air quality/outside air sensor, Electron ic
Stabilization Control (button)
s Sound actuator
6 Headlight range control/headl
ight (corner-
ing light)
7 Headlight (cornering light)
Control modu les (electromechanical park-
8 ing brake, shock absorber, q uattro sport),
DCDC converte r
9 Adaptive
cruise control
10 Shift gate/clutch sensor
11 Side assist
1 2 Headlight range cont ro l, parking system
13 Airbag
14 Rear
wiper (a llroad)
15 Auxiliary fuse (instrument panel)
16 Auxiliary
fuse termina l 15 (engine area)
Fuse p anel @ (brown )
No. C onsumer
2 Brake light sensor
3 Fuel pump
4 Clutch sensor
5
Left seat heating with/without seat venti-
lation
6 Electronic Stabilization Control (electric)
7 Ho rn
8
Front left door (window regulator, central
locking, mirror, switch, lighting)
9 Windshield wiper motor
10 Electronic Stabilization Control (valves) Fu
ses a nd bulb s
No. Consumer
Two-door mode ls: rear left window regula-
11 tor; Four-door
models: rear left door (win-
dow regulator, central locking, switch,
light ing)
12 Rain and l
ight sensor
Fuse panel © (r e d )
No . Con sumer
3 Lumbar support
4 Dynamic steering
5 Inter
ior l ight ing (Cabriolet)
6 Windshie
ld washer system, headlight
washer system
7 Vehicle electrica l system control module 1
8 Vehicle electr ica l system control module 1
9 Left rear
window regulator motor (Ca brio-
let)/su nroof
10 Vehicle electr ica l system co ntrol module 1
11 Right rear
window regulator (Cabriolet)/
sun shade motor
12 Anti-theft
alarm warning system
Right cockpit fuse assignment
Fig. 185 Right cockpit: fu se panel with plastic cl ip
225
Page 229 of 254
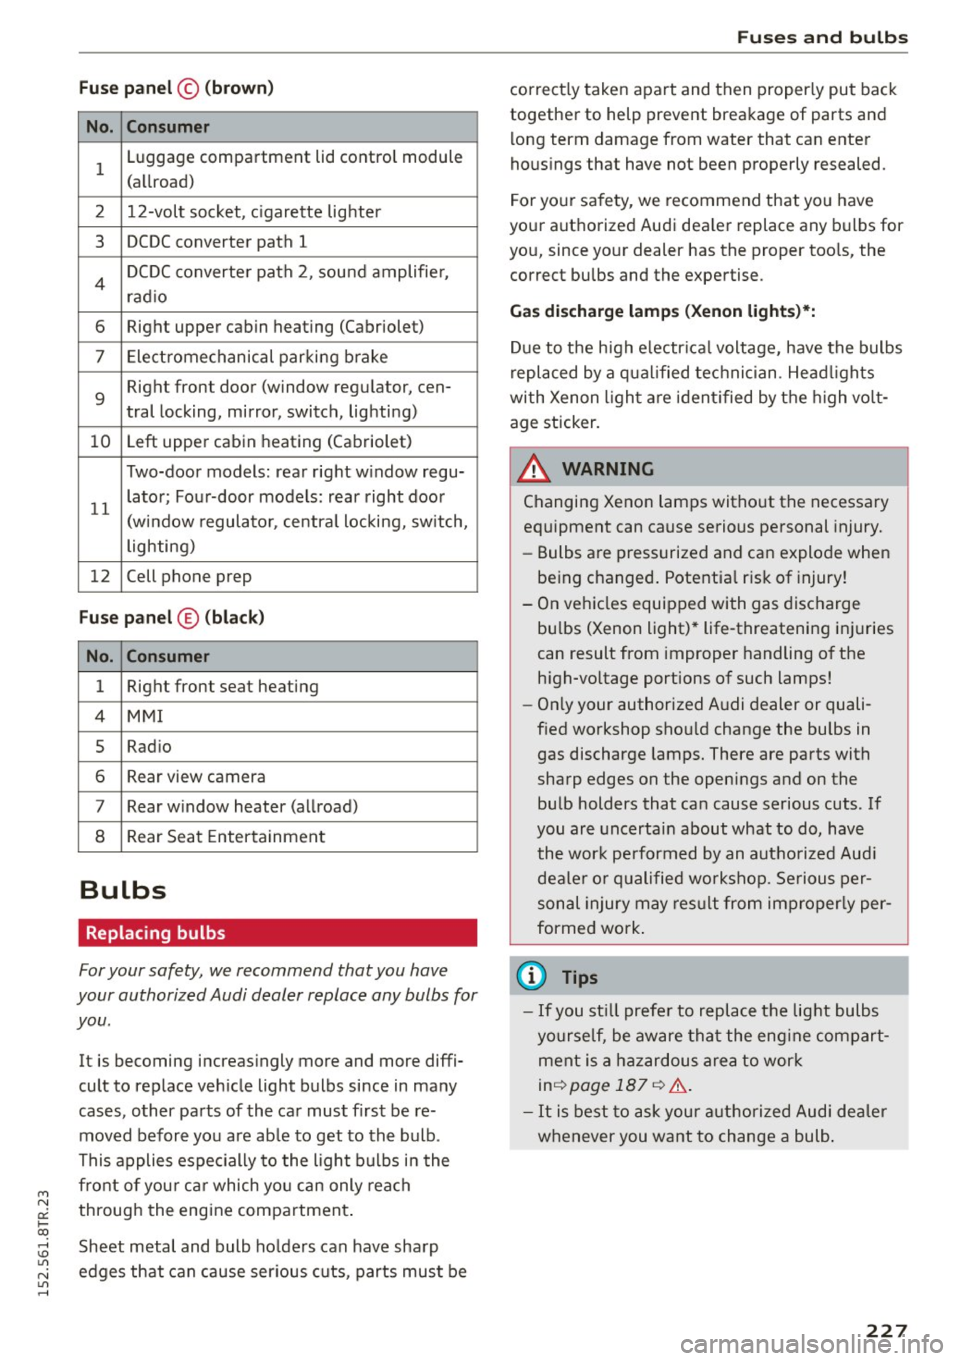
M N
0:: loo ,...., \!) 1.1'1
N 1.1'1 ,....,
Fuse panel© (brown)
No. Consumer
1 Luggage compartment lid control module
(allroad)
2 12-volt socket, cigarette lighter
3 DCDC converter path 1
4 DCDC converter path 2, sound amplifie r,
rad io
6 Right upper cabin heating (Cabriolet)
7 Electromechanical parking brake
9
Right front door (window regulator, cen-
tral locking, mirror, switch, lighting)
10 Left upper cabin
heating (Cabriolet)
Two-door models: rear right w indow regu-
11 lator; Four-door models: rear
right door
(window regulator, central locking, switch,
lighting)
12 Cell phone prep
Fuse
panel © (black)
No. Consumer
1 Right front seat heating
4 MMI
5 Radio
6 Rear view camera
7 Rear window heater (allroad)
8 Rear
Seat Entertainment
Bulbs
Replacing bulbs
For your safety, we recommend that you have
your authorized Audi dealer replace any bulbs for
you .
It is becoming increasingly more and more diffi
cult to replace vehicle light bulbs since in many
cases , other parts of the car must first be re
moved before you are ab le to get to the bulb .
This applies especially to the light bulbs in the
front of you r ca r which you can only reach
through the engine compartment .
Sheet metal and bulb holders can have sharp
edges that can cause ser ious cuts, parts must be
Fuses and bulbs
correct ly taken apart and then properly put back
together to help prevent breakage of parts and
long term damage from water that can enter
housings that have not been properly resealed.
For your safety, we recommend that you have
your authorized Audi dea ler replace any bulbs for
you, since your dealer has the proper tools, the
correct bulbs and the expertise.
Gas discharge lamp s (Xenon lights)*:
Due to the high electr ical voltage, have the bulbs
replaced by a qualified technician . Head lights
with Xenon light are identified by the high volt
age sticker.
A WARNING
Changing Xenon lamps without the necessary
equipment can cause serious personal injury.
- Bulbs are pressurized and can explode when
being changed . Potential risk of injury!
- On vehicles equipped with gas discharge
bu lbs (Xenon light) * life -threatening injuries
can result from improper handling of the
high -vo ltage portions of such lamps!
-On ly your authorized Audi dealer or quali
fied workshop shou ld change the bulbs in
gas discharge lamps. There are parts with
sharp edges on the openings and on the
bulb holders that can cause serious cuts . If
you are uncertain about what to do, have
the wor k performed by an autho rized Audi
dealer or qualified workshop. Serious per
sonal injury may result from improperly per
formed work .
(D Tips
-If you st ill prefer to replace the light bulbs
yourself, be aware that the eng ine compart
ment is a hazardous area to work
inq page 187 q &..
-It is best to ask your authorized Audi dealer
whenever you want to change a bulb.
227