brake fluid AUDI RS5 COUPE 2015 Owners Manual
[x] Cancel search | Manufacturer: AUDI, Model Year: 2015, Model line: RS5 COUPE, Model: AUDI RS5 COUPE 2015Pages: 254, PDF Size: 64.12 MB
Page 5 of 254
M N
0:: loo ,....,
Airbag system . . . . . . . . . . . . . . . . . . . . 128
Important information . . . . . . . . . . . . . . . 128
Front ai rbags . . . . . . . . . . . . . . . . . . . . . . . 132
Mon ito ring the Advanced A irb ag Sys tem . 138
Knee airbags . . . . . . . . . . . . . . . . . . . . . . . . 142
Side airbags . . . . . . . . . . . . . . . . . . . . . . . . 144
Side curta in a irbags . . . . . . . . . . . . . . . . . . 1 47
Ch ild safety . . . . . . . . . . . . . . . . . . . . . . 150
Important informat ion . . . . . . . . . . . . . . . 150
Ch ild seats . . . . . . . . . . . . . . . . . . . . . . . . . 155
Secur ing c hild seats . . . . . . . . . . . . . . . . . . 159
L A TC H system (Lower anchorages and
tethers for chi ldren) . . . . . . . . . . . . . . . . . . 163
Addit ional info rmation
167
Driver messages . . . . . . . . . . . . . . . . . 168
Smart Technology . . . . . . . . . . . . . . . 16 8
N otice about data recorded by the Event
Data Recorder and vehicle cont rol
modules . . . . . . . . . . . . . . . . . . . . . . . . . . . 168
Electronic Stabili za tion Control (ESC) . . . . 169
Rear spoiler . . . . . . . . . . . . . . . . . . . . . . . . 171
Braking . . . . . . . . . . . . . . . . . . . . . . . . . . . . 172
Elect ro-mechanical power assist , dynamic
steer ing . . . . . . . . . . . . . . . . . . . . . . . . . . . 174
Dr iving w ith your quat tro . . . . . . . . . . . . . 17 4
E ne rgy management . . . . . . . . . . . . . . . . . 17 5
Driving and the environment . . . . 177
B rea kin g in . . . . . . . . . . . . . . . . . . . . . . . . . 177
Avoid damaging the vehi cle . . . . . . . . . . . . 17 7
D riving through water on roads . . . . . . . . 177
Warming up and cooling down . . . . . . . . . 178
Cata lytic converter........ .... .. .. .. . 17 8
Shutt ing down veh icle . . . . . . . . . . . . . . . . 179
Economical and environmentally-friend ly
driving . . . . . . . . . . . . . . . . . . . . . . . . . . . . 179
Operating instructions . . . . . . . . . . . 181
Care and cleaning . . . . . . . . . . . . . . . . 181
Ge ne ral i nfo rmat ion . . . . . . . . . . . . . . . . . 181
Ca r washes ............... ...... ... .
Pl acing your veh icle out of se rv ice 18
1
18 2
Fuel and Refueling . . . . . . . . . . . . . . . 183
F ue l... .. .. ................. .. .... . 183
~ Refue ling . . . . . . . . . . . . . . . . . . . . . . . . . . 184
N l/'I ,....,
Tab le of conten ts
Checking and Filling . . . . . . . . . . . . .
187
Hood . . . . . . . . . . . . . . . . . . . . . . . . . . . . . . 187
Engine compartment . . . . . . . . . . . . . . . . . 189
Engine oil . . . . . . . . . . . . . . . . . . . . . . . . . . 189
Cooling system . . . . . . . . . . . . . . . . . . . . . . 192
Brake fluid . . . . . . . . . . . . . . . . . . . . . . . . . 195
Battery . . . . . . . . . . . . . . . . . . . . . . . . . . . . 196
Windsh ie ld/headlight* washer conta iner. 200
Wheels .. .. .. .. .. ... .. ... ..... .. .. 201
Whee ls and T ires . . . . . . . . . . . . . . . . . . . . 201
T ire pressu re monito ring system 213
Troubleshoot ing .............. ... 216
Emergency assistance ... .. .. ... . 216
Vehicle tool kit . . . . . . . . . . . . . . . . . . . . . . 216
T ire repa ir set .. . .. .......... .... .. . . 216
Rep lac ing whee ls . . . . . . . . . . . . . . . . . . . . 2 18
Fuses and bulbs . . . . . . . . . . . . . . . . . . 224
F uses ... .. .. .. .. .. .... .... ... .. .. .. 224
B ul bs . . . . . . . . . . . . . . . . . . . . . . . . . . . . . . 2 27
Emergency situations . . . . . . . . . . . . 228
Genera l . . . . . . . . . . . . . . . . . . . . . . . . . . . . 2 28
Starting by pushing or towing . . . . . . . . . . 228
Starting with jumper cabl es . . . . . . . . . . . 228
U se of jumper cables . . . . . . . . . . . . . . . . . 229
Towing with a tow truck . . . . . . . . . . . . . . . 230
Raising the vehicle . . . . . . . . . . . . . . . . . . . 232
Technical data . . . . . . . . . . . . . . . . . . . . 233
Technical data . . . . . . . . . . . . . . . . . . . . 233
Vehicle identification . . . . . . . . . . . . . . . . . 233
Weights . . . . . . . . . . . . . . . . . . . . . . . . . . . 233
D imens io ns . . . . . . . . . . . . . . . . . . . . . . . . . 234
Capaci ties . . . . . . . . . . . . . . . . . . . . . . . . . . 234
Gasoli ne engines . . . . . . . . . . . . . . . . . . . . 235
Consumer information . . . . . . . . . . 236
W arranty cove rages . . . . . . . . . . . . . . . . . . 236
Operatin g your ve hicl e outs ide the U.S.A.
o r Canada . . . . . . . . . . . . . . . . . . . . . . . . . . 236
Audi Se rvice Repair Manuals and
Literature . . . . . . . . . . . . . . . . . . . . . . . . . . 236
Maintenance . . . . . . . . . . . . . . . . . . . . . . . . 236
3
Page 17 of 254
M N
0:: loo ,...., \!) 1.1'1
N 1.1'1 ,....,
BRAKE /((f) ) Brake system
The ligh t illu min ates when t he igni tion is switch
ed on.
It goes ou t after the engine h as bee n
started . This indicates t hat the brake war ning
light is f unctioning p ro p er ly .
If the brake warning light doe s not light up
when the engine is cranking, there may be a malfunction in the electrical system . In this
case , contact your authorized Audi dealer.
If the b rake system wa rning/ind icator light tu rns
on, there is a br ak e system malfunc tion.
1111 (USA mod els )/ . (Canada models) Stop
vehicle and check brake fluid level
If the indicator light turns on and the message
appears, proceed as follows:
~ P ull off the road.
~ Stop the vehicle.
~ Turnoff the engine.
~ Check the brake fluid level c::> page 195.
~ Contact you r nearest author ized repa ir facility if
n ecessary .
Warning! Fault in brake system. Contact dealer
If the ABS indicator light ~ (U SA mode ls)l [i]
(Canada models), the ESC indicato r light
J.i) and
the brake system indicator light
1111 (USA mod
e ls)/ . (Canada models) turn on and the mes
sage appears, the ABS, ESC and braking d istribu
tion are not wor king
c::> .&. .
Carefully drive to your authorized Audi dealer im
mediately to have the malfunct io n corrected
c::> .&. .
1111 (USA models )ta (Canada models ) Park
ing brake system fault ! See owner's manual
- If the indicator light and the message appear
when stationary or after switching the ign i·
tion on ,
check if you can re lease the park ing
brake. After releasing the parking brake, care
fully drive to your authorized Aud i dealer im
med iate ly to have the malfunction corrected . If
yo u cannot release the pa rking brake, see k pro
fessional ass ista nce.
- If the indicator light and the message appear
while driving , the emergency b ra ki ng funct io n
Instruments and indicator lights
may no t be ava ilable . It may not be possible to
set the parking brake or re lease it once it has
been set. Seek professiona l assistance .
( U SA mode ls):
If the war ning ligh t 1111 and the
warning light
Ill appear togethe r, immedia tely
contact your authorized Audi dealer or qua lified
wor kshop to have all b rake pads inspected
c::> page 19.
When the light comes on, an au dible warning sig
nal is also given.
A WARNING
-- Always observe the warn ings in
c::> page 187, before opening the h ood and
checking the brake flu id.
- Driving with low brake fluid is a safety haz
ard. Stop the car and get professional ass is
tance.
- If the 1111 (USA models) . (Canada mod
e ls) brake system indicator light turns on to
gether with t he ABS and ESC ind icator
lig hts, the ABS/ESC regulat ing funct ion may
have fa iled. Functions that stabilize the ve
h icl e are no longe r available. This co uld
c a use t he ve hicle to swerve and increas e t he
ris k of s liding. Drive carefu lly to the neares t
author ized Audi dealer or other qualified
wo rkshop and have the malf unct ion co rrect
ed.
- If the b rake wa rning/in dicator light does
not go out after a few seconds and the pa rk
ing brake is released, or lights up wh ile you
are driving, the fl uid level in the brake f lu id
rese rvoir is too low. If y ou believe t hat it is
safe to do so, proceed immediately at low
speed to the nea rest authorized A udi dealer
or qualified workshop and have t he b rake
sy stem inspec ted.
- Always keep in min d that after s evera l brak e
a pplicat ions, you wi ll n eed gre ate r pr essure
o n th e br ake pe dal t o s to p you r ve hicle . Do
no t rely on st rained bra kes to respond with
maxim um stop ping power i n cr itica l s itua
tions . You must a llow for increased braking
d istances. The extra d istance used up by
fading brakes could lead to an accident .
15
Page 22 of 254
Instruments and indicator lights
co mes on in the i nstrument cl uster display,
immediately contac t your author ized Audi
dealer or qualified workshop to have all
brake pads checked o r replaced if necessary.
EPC Electronic power control
This warning/indicator light monitors the elec
tronic power control .
The (m warning/indicator light (Electronic Power
Control) i llum inates when yo u switch the ignition
on as a function check.
(D Tips
If this warning/indicator light ill uminates
while you are dr iv ing, then the re is a malfunc
tion in the eng ine electronics. Have the mal
fu nction corrected as soon as possible by your
author ized A udi dealer or a qualified repair fa
cility.
o Malfunction Indicator Lamp (MIL)
The Malfu nction Indicator Lamp (M IL) is part of
the On-Board Diagno stic (OB D II) system . The
symbo l
('4 lights up whe n the ign ition is switch
ed on and will turn off afte r th e engine has star t
ed an d has sett le d at a constant idle speed . This
indicates that the MIL is working proper ly.
The warning ligh t illumina tes when there is a
malfunct ion in the engine e lectronic system .
Contact your authorized A udi dealer and have the
malfunctio n corrected .
An improperly close d fu e l fi ller cap may also
cause the MIL li ght to il lum inate ¢
page 185 .
For mo re info rmat io n ¢page 28.
!?) Engine speed limitation
Applies to vehicles: with engine speed limitation
(Iii Do not ex ceed max. engine speed of XXXX
rpm
The engine speed is automatically lim ited to the
speed d isp layed in the dr iver information system.
T his protect s the eng ine from overheat ing.
20
The eng ine speed limita tion deactivates once the
engine is no longe r in the critical temperature
r ange and you have re leased t he accelerator ped
a l once .
I f the engine speed limitation was activated by
an engine contro l ma lf u nction, the indicato r light
(m also turns on. Make sure that the speed does
not g o above the speed disp layed. Dr ive to your
authorized Aud i dea ler immediately to have the
malfunction cor rected .
~~, Engine oil sensor
• Oil level! S ensor defective
If the symbol illuminates, contact yo ur author
i zed Audi dealer and have the oil sensor inspect
ed . Until you have this done, check the oil level
each time you refue l just to be on the safe s ide
¢ page 191.
ffi Tank system
IIJ Please refuel
If the indicato r light turns on for the first t ime
and t he m essage appea rs, there are about
2 .1- 2. 4 gallons (7 -9 liters) of fuel left i n the
t ank . T ime to re fuel
¢page 184.
D Fuel tank syst em malfunction! Contact deal
er
If the indicator light turns on and this message
appears , there is a malfunct io n in the tank sys
tem .
Drive to your authorized A udi dealer immediate ly
to have the malfunct ion corrected.
' G> Windshield washer fluid level
II Please refill washer fluid
If the symbol illuminates, add w indshield washer
fl uid to t he washer system and also to the head
li ght washer system*¢
page 200 .
~ Windshield wipers
El Windshield wiper defective
Page 175 of 254

brake rotors and brake pads. The brakes must be
dried first with a few carefu l brake applications .
At h igher speeds and with the w indshield w ipers
turned on, the brake pads press against the brake rotors for a sho rt amount of time. This occurs at
regular intervals without the driver noticing and
prov ides for better brake response time under
wet conditions.
The effectiveness of the brakes can be reduced
when the vehicle is driven on a salt-covered road
and the brakes are not used. Likew ise, you clean
off accumulated salt coating from brake discs
and pads with a few cautious applications of the
brake ¢,&. .
Due to their surface characteristics, ceram ic
brake rotors* absorb moisture in such conditions.
This can cause a temporary reduction in braking
force compared to dry brakes . You can compen
sate for this by press ing the brake pedal harder .
Corrosion
There may be a tendency for dirt to bui ld up on
the brake pads and corrosion to form on the discs
if the car is not driven regularly or only for short
trips with little use of the brakes .
If the brakes are not used frequently, or if corro
sion has formed on the discs, it is advisable to
clean off the pads and discs by brak ing firmly a
few t imes from a moderately high speed¢& .
Fa ul ts i n the brake sys te m
If you should notice a sudden increase in brake
pedal travel, then one of the two brake circuits
may have failed¢&.
Low brak e flu id l eve l
Malfunctions can occur in the brake system if the
brake fluid level is too low. The brake fluid leve l is
monitored e lectronically.
Brake boo ste r
The brake booster increases the pressure that you
genera te with the brake pedal.
It works only M
"" when the engine is running.¢ & 0:: l-oo ,...., \!) 1.1'1
N 1.1'1 ,....,
Smart T echno log y
Brake lining wear statu s
Brake lining wear may be checked by visual in
spection of the condition of the brake pads
thro ugh the openings in the wheel. If necessary,
the wheel may be removed for this inspection
¢ page 218, Replacing wheels .
A WARNING ...__
-New brake pads don't have the best stop
ping power and must be "broken-in" during
the initial 250 miles (400 kilometers) . The
break-in per iod can be cons iderably longer
for vehi cles w ith ceramic b rake rotors*. You
can compensate for this by p ress ing the
b rake peda l more fi rmly. This a lso applies
later when new pads are installed.
- You shou ld perform braking maneuvers for
the purpose of cleaning the brake system
only if road conditions permit. Other road
users must not be put at risk -you may
cause an accident!
-
- Before descend ing a steep grade, reduce
speed and sh ift transmission into a lower
gear or lower dr iving range. Do not ride the
brakes or hold the pedal down too long or
too often . This could cause the brakes to get
hot and dimin ish braking effic iency .
- Do not "ride the brakes" by rest ing your foot
on the pedal when you do not intend to
brake. This may cause the brakes to over
heat, premature wear and increased stop
p ing distance.
- Under certain cl imatic and operat ing condi
tions such as passing t hrough water, dr iv ing
in heavy rain or after washing the veh icle,
the effect iveness of the brakes can be re
duced . In winter, ice can accumulate on the
brake pads, linings, discs and drums . Care
fu lly apply brakes for a test. Brakes will dry
and ice coatings will be cleaned off after a
few careful brake applications.
- Driving for an extended period of time on salt-covered roads without using your
brakes can a lso affect braking efficiency.
Clean off accumulated salt coating from brake discs and pads with a few careful
brake applications.
173
Page 189 of 254
"' N
0:: loo
rl I.O
"' N
"' rl
Checking and Filling Hood
Releasing and opening the engine hood
The engine hood is released from inside the vehi
cle.
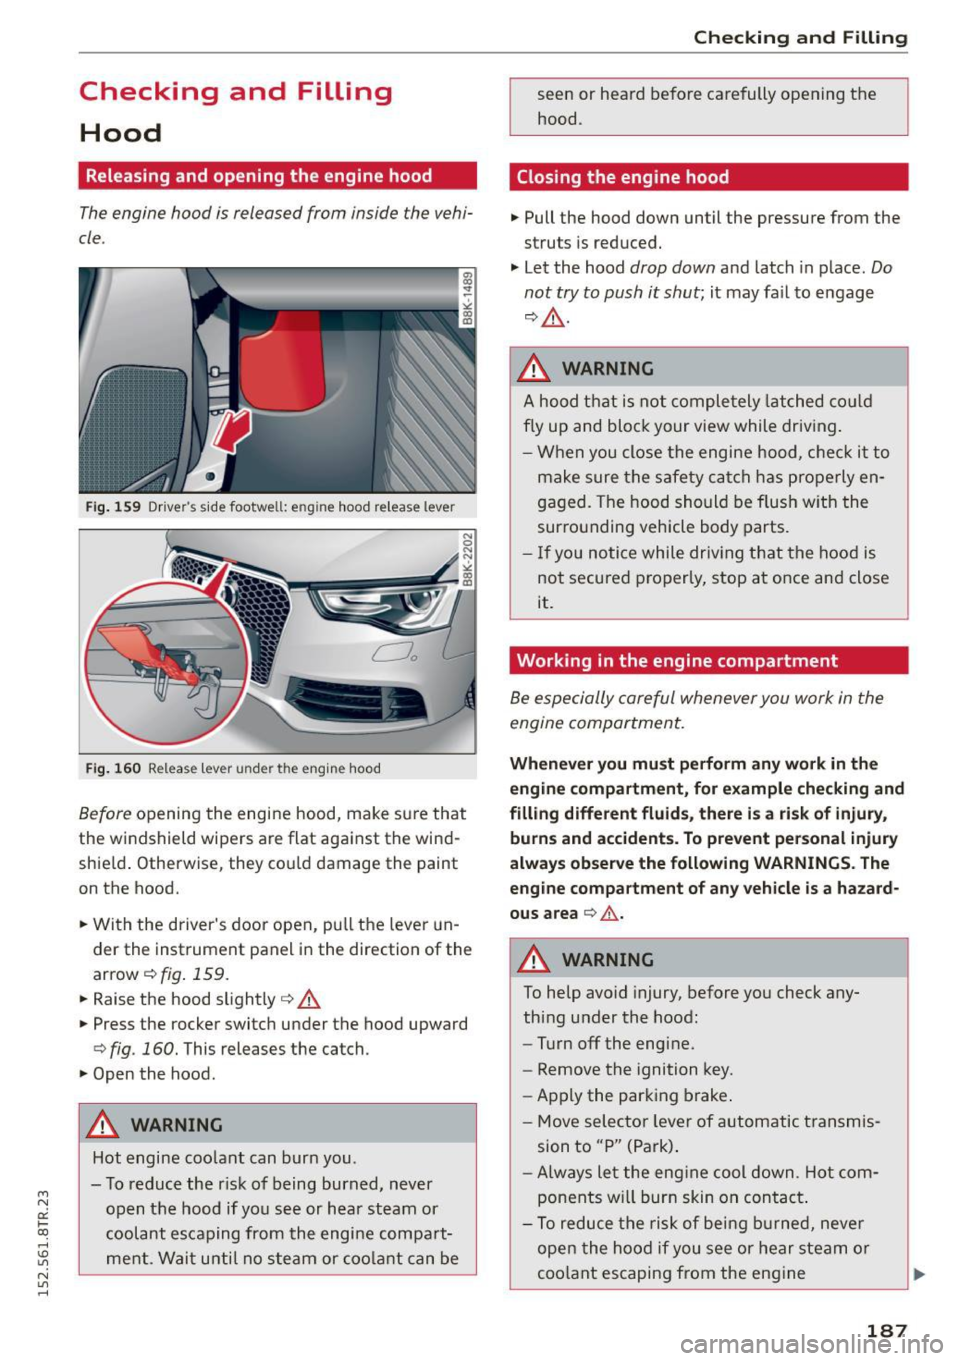
Fig. 159 Driver's side footwell: e ng in e hood release lever
Fig. 160 Releas e lev er un der t he e ngin e hood
Before opening the engine hood, make sure that
the windshield wipers are flat against the wind
shield . Otherwise, they could damage the paint
on the hood.
.. With the driver's door open, pu ll the lever un
der the instrument panel in the direction of the
arrow
c::> fig . 159.
.. Ra ise the hood slightly c::> &.
.. Press the rocker switch under the hood upward
c::> fig . 160. This releases the catch .
.. Open the hood.
A WARNING
Hot engine coolant can burn you.
- To reduce the r isk of being burned, never
open the hood if you see or hear steam or
coolant escaping from the engine compa rt
ment. Wait until no steam or coolant can be
Checking and Filling
seen or heard before carefully opening the
hood .
Closing the engine hood
.. Pull the hood down until the pressure from the
struts is reduced.
"' Let the hood
drop down and latch in place. Do
not try to push it shut;
it may fa il to engage
c::> &. -
A WARNING
A hood that is not comp letely latched could
fly up and block your view while driving.
- When you close the engine hood, check it to
make sure the safety catch has properly en
gaged . The hood should be flush with the
surrounding vehicle body parts.
- If you notice while driv ing that the hood is
not secured properly, stop at once and close
it.
Working in the engine compartment
Be especially careful whenever you work in the
engine compartment.
-
Whenever you must perform any work in the
engine compartment, for example checking and
filling different fluids , there i s a risk of injury ,
burns and accidents. To prevent personal injury
always observe the following WARNINGS . The
engine compartment of any vehicle is a hazard
ous area
c:> .&. .
A WARNING
-
To help avoid injury, before you check any-
thing under the hood:
- Turn off the engine.
- Remove the ignition key .
- Apply the parking brake.
- Move selector lever of automatic transmis-
sion to "P" (Park) .
-Always let the engine cool down. Hot com
ponents wi ll burn skin on contact .
- To reduce the risk of being burned, never
open the hood if you see or hear steam o r
coo lant escaping from the engine
187
Page 190 of 254
Checking and Filling
compartment. Wait until no steam or cool
ant can be seen or heard before carefully
opening the hood.
- Keep children away from the engine com
partment.
- Never spill fluids on hot engine compo
nents. They can cause a fire.
- Never touch the radiator fan. The auxiliary
electric fan is temperature controlled and
can switch on suddenly.
- Never open the coolant reservoir cap when
the engine is still warm . The coolant system
is pressurized and hot coolant could spray
out .
- Protect your face, hands and arm from
steam or hot engine coolant by placing a
thick rag over the cap when you open the coolant reservoir .
- Do not remove the engine cover under any
circumstances . This increases the risk of
burns .
- If work on the fuel system or the electrical
system is necessary :
= Always disconnect the battery.
- Never smoke or work near heaters or open
flames. Fluids in the engine compartment
could start a fire.
- Keep an approved fire extinguisher imme
diately available.
- To avoid electrical shock and personal injury
while the engine is running or being started,
never touch:
- Ignition cables
- Other components of the high voltage
electronic ignition system.
- If you must perform a check or repair with
the engine running:
- First, fully apply the parking brake, move
selector lever of automatic transmission
to "P" (Park) .
- Always use extreme caution to prevent
clothing, jewelry, or long hair from getting
188
caught in the radiator fan, V-belts or other
moving parts, or from contacting hot
parts. Tie back hair before starting, and do
not wear clothing that will hang or droop
into the engine.
- Minimize exposure to emission and chemi
cal hazards
¢ A .
A WARNING
California Proposition 65 Warning:
- Engine exhaust, some of its constituents,
and certain vehicle components contain or
emit chemicals known to the State of Cali
fornia to cause cancer and birth defects and
reproductive harm. In addition, certain flu
ids contained in vehicles and certain prod
ucts of component wear contain or emit
chemicals known to the State of California
to cause cancer and birth defects or other
reproductive harm.
- Battery posts, terminals and related acces
sories contain lead and lead compounds,
chemicals known to the State of California
to cause cancer and reproductive harms.
Wash hands after handling.
([) Note
When adding fluids, always make sure that
they are poured into the proper container or
filler opening, otherwise serious damage to
vehicle systems will occur.
@ For the sake of the environment
To detect leaks in time, inspect the vehicle
floor pan from underneath regularly. If you
see spots from oil or other vehicle fluids, have
your vehicle inspected by an authorized Audi dealer .
Page 191 of 254
"' N
0:: I-co
rl I.O
"' N
"' rl
Check in g and Fillin g
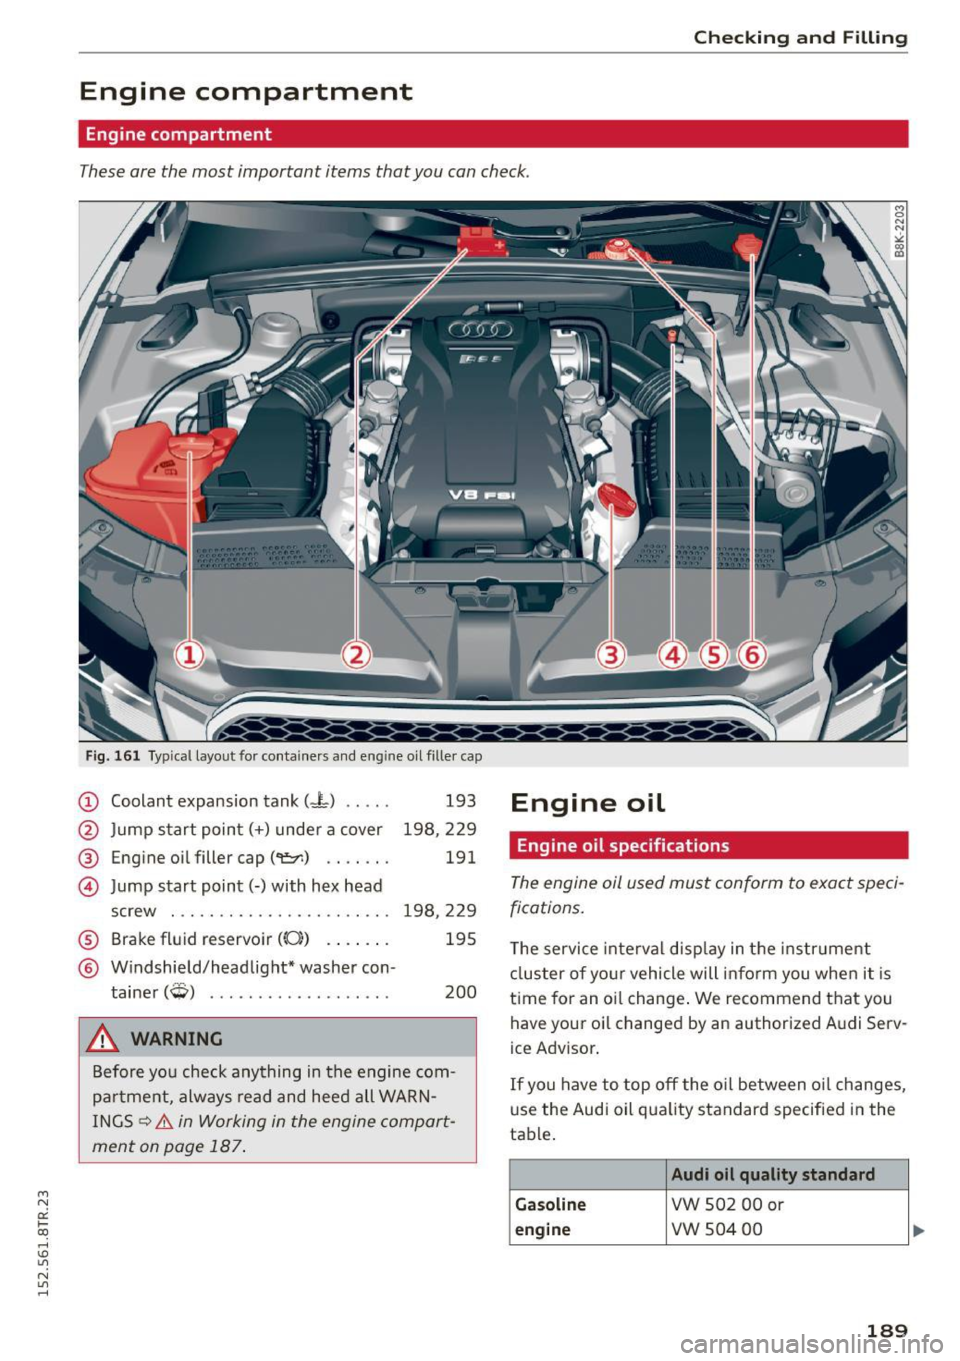
Engine compartment
Engine compartment
These are the most important items that you can check.
Fig. 161 Typical layout for containers and eng ine oil filler cap
(D Coolant expansion tank (.J-) .. .. .
@ Jump start point(+) under a cover
@ Engine oil filler cap(~) .... .. .
@ Jump start point(-) with hex head
screw . ............... ...... .
® Brake fluid reservoir ((0) .. .. .. .
@ Windshield/headlight* washer con-
tainer
(Q) .................. .
&, WARNING
193
198,229
191
198,229 195
200
Before you check anything in the engine com
pa rtment, always read and heed all WARN
INGS
~ .&. in Working in the engine compart
ment on page 187 .
Engine oil
Engine oil specifications
The engine oil used must conform to exact speci
fications.
T he service interval disp lay in the instr ument
cluster of your vehicle will inform you when it is
time for an oi l change. We recommend that you
have your oil changed by an authorized A udi Serv
ice Advisor .
If you have to top off the o il between o il changes,
use the Audi oil qua lity standard specified in the
table .
Audi oil quality standard
G as oline
VW S02 00 or
eng ine vw 504 00
1 8 9
Page 197 of 254
"' N
0:: loo
rl I.O
"' N
"' rl
forced out through the pressure relief valve
in the cap when the engine becomes hot.
- If, in an emergency, only water can be add
ed, the correct ratio between water and an
tifreeze
q page 192 must be restored as
soon as possib le.
@ For the sake of the environment
Drained coolant should not be reused . Always
dispose of used coolant while observ ing a ll
environmental regulations.
Radiator fan
The radiator fan switches on automatically by it
self.
The radiator fan is driven by the engine via the V
be lt. The viscous clutch regulates the speed of
the fan according to the temperature of the cool
ant.
An auxiliary e lectr ic radiator fan * switches on and
off depending on coo lant temperature and other
veh icle operating conditions.
Afte r you switch the engine off, the a uxiliary fan
can cont inue running for up to 10 minutes -even
with the ignition off. It can even switch on again
l ater by itself
Q .&. , if
- the temperature of the engine coolant rises due
to the heat bui ld-up from the eng ine in the en
gine compartment, or
- the engine compartment heats up because the
vehicle is parked in intense sunlight.
_& WARNING
- To reduce the r isk of personal injury never
touch the radiator fan.
- The aux iliary e lectr ic fan is temperature con
trolled and can switch on suddenly even
when the engine is not running.
- The auxiliary radiator fan switches on auto
matically when the engine coo lant reaches a
certain temperature and will continue to run
until the coolant temperature drops.
Ch eck in g and Fillin g
Brake fluid
Checking brake fluid level
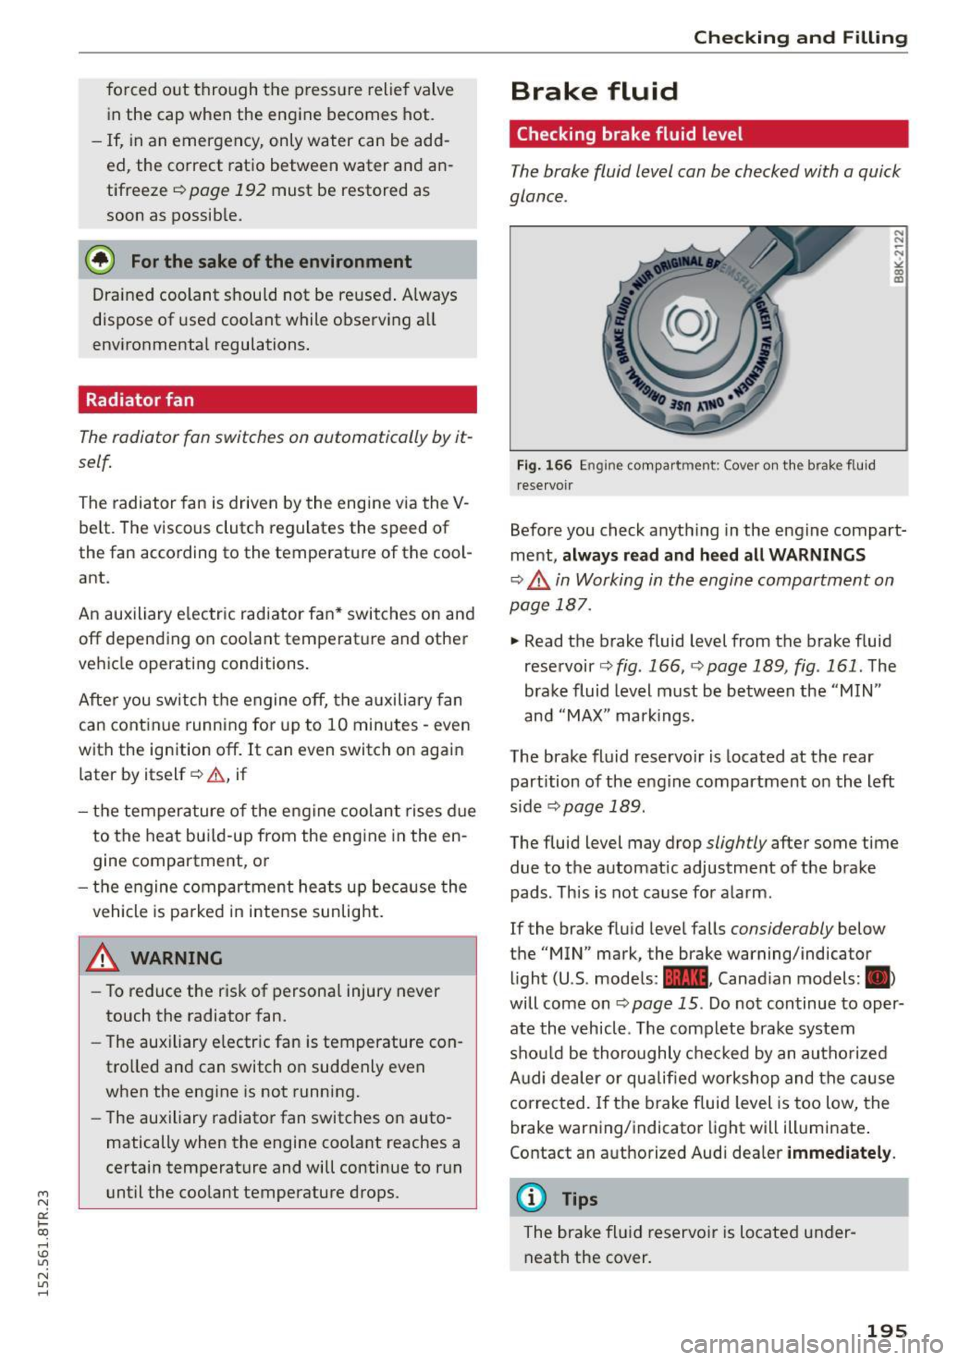
The broke fluid level con be checked with a quick
glance.
F ig . 1 66 Engine compartment: Cover on the brake fluid
r eservoir
Before you check anyth ing in the engine compart
ment,
a lw ays r ead and h eed all WARNING S
q ,& in Working in the engine compartment on
page 187.
., Read the brake fluid level from the brake fluid
reservoir
q fig. 166, r:> page 189, fig. 161. The
brake fluid level must be between the "MIN"
and "MAX" markings.
The brake fluid reservo ir is located at the rear
part ition of the engine compartment on the left
s ide
q page 189.
The fluid level may drop slightly after some time
due to the automatic adjustment of the brake
pads. This is not cause for alarm.
If the brake fluid level falls
considerably below
the "MIN" mark, the brake warning/indicator
light (U.S. models:
1111 , Canad ian models: .
will come on
Q page 15 . Do not continue to oper
ate the vehicl e. The complete brake system
shou ld be thoroughly chec ked by an autho rized
A udi dealer or qualified workshop and the cause
corrected. If the brake fluid level is too low, the
brake warning/indicator light will illuminate .
Contact an a uthorized Audi dea ler
immedi ately .
(0 Tips
The brake fl uid reservoir is located under
neath the cover.
195
Page 198 of 254
Checking and F ill in g
Changing brake fluid
Have the brake fluid changed by an experienced
technician .
Brake fluid absorbs moisture from the a ir. If the
water content in the brake fluid is too high, cor
rosion in the brake system may result after a peri
od of time. The boiling point of the brake fluid
will also dec rease conside rably and dec rease
b ra ki ng perfo rman ce.
Therefore, the brake flu id must be changed
e ve ry
two y ear s.
Always use new b rake fluid wh ic h con
forms to Fede ral Motor Vehicle Standard " FMVSS
1 16 DOT 4".
The brake fluid reservoir can be difficult to reach,
therefo re , we recommend that yo u have the
b rake fluid changed by your authori zed
Audi
dealer . Your dealer has the cor re ct too ls , the
righ t brake fluid an d the know-how to do t his for
you.
A WARNING
- Brake fluid is po isonous. It must be stored
only in the closed orig inal container out of
the reach of children!
- Brake fai lure can result from old o r inappro
pr iate bra ke fluid . Observe these p recau
t ions:
- Use on ly bra ke fluid t hat meets SA E speci
fication
J 17 03 and confo rms to Fede ral
M otor Vehicle S tand ard 116 . Always check
wit h your author ized Audi dea ler to make
sure yo u are using the correct brake f lui d.
The cor rect type of b rake fluid is a lso indi
cated on the bra ke fluid reservo ir.
- The brake fluid m ust be new. Heavy use of
the bra kes can cause a va por l ock if the
brake fluid is left in the system too long.
This ca n ser iously affect the effic iency of
the brakes as we ll as your safety . This
co uld res ult in an accident.
@ Note
Brake f lu id will damage the paint of y our vehi
cle.
196
® For the sake of the environment
Because of t he prob lem of prope r disposal of
brake fluid as well as the special tools re
q uired and the necessary expert ise, we rec
ommend that yo u have the brake f lu id
changed by your autho rized Aud i dea le r.
Battery
General information
Under normal operating conditions, the battery
i n your A ud i does not need any maintenance .
With
high outside temperatures or long dai ly
drives we recommend that you have the e lectro
l yte level checked by an aut horized Aud i dea ler or
qualified workshop . The e lectrolyte leve l should
also be chec ked each time the batte ry is cha rged
¢ page 198.
Have the battery checked when you take your ve
hicle i n for service . You are well adv ised to re
place a battery that is older than 5 years .
With certain types of airbag deployment, the bat
tery is disco nnected from the ve hicle elect rical
system for safety reasons
¢ A in Repair , care
and disposal of the airbags on page 141 .
Disconnecting the battery terminals
Some vehicle functions (power window reg ula
tors, for example) are lost if the battery te rm i
nals are d isconnected . These funct ions have to be
r elearned after the battery t ermina ls are con
nected again . To prevent t his, the battery sho uld
o nl y be disconnected from the ve hicle e lectr ica l
system when absolute ly necessary fo r rep airs.
Vehicles not driven for long periods
If you do not drive your vehicle ove r a period of
several days or weeks, electrical components are gradua lly cut back or sw itched off . T his reduces
energy cons umption and mainta ins start ing ca
pabili ty ove r a longer period¢
page 175.
Some of the convenience funct ions may not ope r
ate, such as the inter ior lights or the power s eat
adjus tment . The conve nien ce f unct io ns w ill be
ava ila ble again when you tu rn on the ig nition an d
star t the eng ine. ..,..
Page 243 of 254
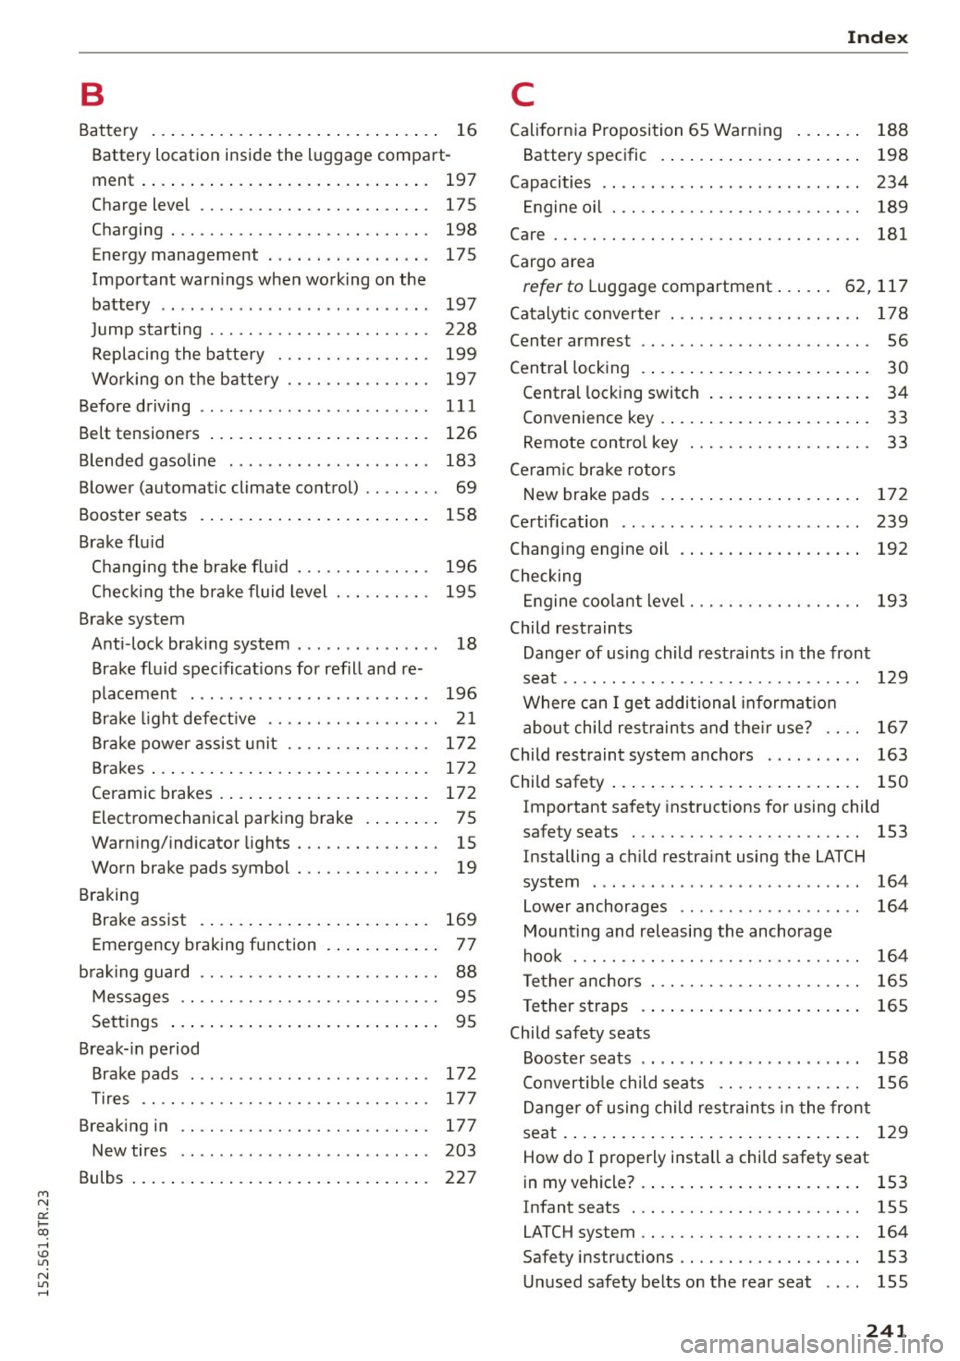
M N
0:: loo ,...., \!) 1.1"1
N 1.1"1 ,....,
B
Battery ..... .. ................ ..... . .
16
Battery location inside the luggage compart-
ment. ..... .. ................ ..... . 197
Charge level . . . . . . . . . . . . . . . . . . . . . . . . 17 5
Charging . . . . . . . . . . . . . . . . . . . . . . . . . . . 198
Energy management .... .. .. .. .. .. .. .
Important warnings when working on the
battery .. ... ............. ...... ... .
Jump starting ............ .. .. .. .... .
Replacing the battery ..... .. .. .. .. .. .
Working on the battery .... .. .. .. .. .. .
Before driving ................ ... ... . .
Belt tensioners ...................... .
Blended gasoline .......... .... .. .. .. .
Blower (automatic climate control) .. .. .. . .
Booster seats ................ ... .... .
Brake flu id 175
197
228
199 197
111
126
183
69
158
Changing the brake flu id . . . . . . . . . . . . . . 196
Checking the brake fluid level . . . . . . . . . . 195
Brake system Anti -lock braking system . . . . . . . . . . . . . . . 18
Brake fluid specifications for refill and re
placement . . . . . . . . . . . . . . . . . . . . . . . . . 196
Brake light defect ive . . . . . . . . . . . . . . . . . . 21
Brake power assist unit . . . . . . . . . . . . . . . 172
Brakes ..... .. ................ ..... . 172
Ceramic brakes.............. ... .... . 172
Electromechanical parking brake . . . . . . . . 75
Warning/indicator lights . . . . . . . . . . . . . . . 15
Worn brake pads symbol . . . . . . . . . . . . . . . 19
Braking Brake assist . . . . . . . . . . . . . . . . . . . . . . . . 169
Emergency braking function . . . . . . . . . . . . 77
brak ing guard . . . . . . . . . . . . . . . . . . . . . . . . . 88
Messages
Settings
. . . . . . . . . . . . . . . . . . . . . . . . . . .
... ................ ... .... ..
Break-in period
Brake pads ............... ... ... ... .
Tires .... .. .......... · · · · · · · · · · · · · ·
Breaking in .. ............. .... .. .... . 95
95
172
177 177
New tires . . . . . . . . . . . . . . . . . . . . . . . . . . 203
Bulbs . . . . . . . . . . . . . . . . . . . . . . . . . . . . . . . 227
Index
C
California Proposition 65 Warning ... .. . .
Battery specific . ................. .. .
Capacities .. .. .. .. .... ...... ... .. .. . .
Engine oil ... .. . .. ............ .. .. . .
Care ... .... .... ................... . .
Cargo area 188
198
234 189
181
refer to Luggage compartment . . . . . . 62, 117
Catalytic converter . . . . . . . . . . . . . . . . . . . . 178
Center armrest . . . . . . . . . . . . . . . . . . . . . . . . 56
Central locking . . . . . . . . . . . . . . . . . . . . . . . . 30
Central locking switch . . . . . . . . . . . . . . . . . 34
Convenience key . . . . . . . . . . . . . . . . . . . . . . 33
Remote contro l key . . . . . . . . . . . . . . . . . . . 33
Ceram ic brake rotors
New brake pads . . . . . . . . . . . . . . . . . . . . . 172
Certification . . . . . . . . . . . . . . . . . . . . . . . . . 239
Changing engine oil . . . . . . . . . . . . . . . . . . . 192
Checking Engine coolant level. . . . . . . . . . . . . . . . . . 193
Child restraints
Danger of using child restraints in the front
seat.. .. .. .. .. .. ............... .. .. 129
Where can I get additional informat ion
about child restraints and their use? . . . . 167
Child restraint system anchors . . . . . . . . . . 163
Child safety . . . . . . . . . . . . . . . . . . . . . . . . . . 150
Important safety instructions for using child
safety seats . . . . . . . . . . . . . . . . . . . . . . . . 153
Installing a child restraint using the LATCH
system ....... .. ..... ........... .. .
Lower anchorages ................ .. .
Mounting and releasing the anchorage
hook ..... .. .. .. .. ............... . .
Tether anchors
Tether straps .... ................ .. .
Child safety seats 164
164
164
165
165
Booster seats . . . . . . . . . . . . . . . . . . . . . . . 158
Convertib le child seats . . . . . . . . . . . . . . . 156
Danger of using child restraints in the front
seat . . . . . . . . . . . . . . . . . . . . . . . . . . . . . . . 129
How do I properly install a child safety seat
in my vehicle? .... ................ ... 153
I nfant seats . . . . . . . . . . . . . . . . . . . . . . . . 155
LATCH system . . . . . . . . . . . . . . . . . . . . . . . 164
Safety instruc tions . . . . . . . . . . . . . . . . . . . 153
Unused safety belts on the rear seat 155
241