start stop button AUDI RS5 COUPE 2015 Owners Manual
[x] Cancel search | Manufacturer: AUDI, Model Year: 2015, Model line: RS5 COUPE, Model: AUDI RS5 COUPE 2015Pages: 254, PDF Size: 64.12 MB
Page 18 of 254
Instruments and indicator lights
l:.'J,/(® ) Electromechanical parking brake
Th e w arning/indicator light monitors th e elec
tromechanical parking brake.
If the indicator light . (USA models)/ . (Cana
da models) turns on, the parking brake was set.
The warning/indicator light will go o ut when the
parking brake is re leased.
• (USA models) ;a (Canada model s) Ca u
tion : Vehicle parked too steep
If th e i nd ic ator lig ht blinks and t he message ap
pe ars, there is not enoug h brak ing power to keep
t he vehicle from roll ing. The b ra kes have over
heated . The vehicle cou ld roll away even on a
sma ll incline.
Press brake p edal to relea se parking brake
To release the parking brake, press t he brake ped
a l and press the button(®) or start driving with
start ing assist at the same time ~
page 76.
Ple ase release park ing brake
To release the parking brake man ua lly, press the
brake peda l and press the button(®) at the same
time. The park ing brake only releases automat i
cally if the driver's safety be lt is fastened.
l'iJ Parking brake!
If th e II indicator ligh t turns on and thi s mes
sage ap pears , the re is a parking b rake ma lf u nc
tion. D rive to your authorized A udi dealer o r
qualified wor kshop immediate ly to have the mal
function corrected .
t Safety belts
This warning/indicator light reminds you to put
on your safety belt.
The . warning/in dicator light ill uminates when
the ignition is switched on to remind the drive r
and (on USA models on ly) any front passenger to
put on the safety belt. Add itionally, an acoustic
warn ing (gong) will also sound.
F or mo re Information ~
page 120, Safety belt
warning light.
16
0 Battery
The . war ning/ indica to r li ght illum ina tes w hen
yo u sw itch on the ig nition and m ust go ou t aft er
the engine has star ted.
• Alternator fault : Battery is not being charg·
ed
If the indicato r light turns on and the message
appears, there is a malfunct io n in the gene rator
o r vehicle e lectr ica l system .
Drive to your authorized A udi dealer or qualified
workshop immediately . Beca use the vehicle bat
te ry is d ischarging, tur n off all unnecessary elec
t rical eq uipme nt such as th e radio. Se ek prof es
s io nal assis tance if the battery cha rge leve l is too
l ow .
(•) low battery: Battery will be charged while
driving
If the indicator light turns on and the message
appears , there may be limited starting ab ility .
If this message t urns off after a little while , the
battery charged eno ugh while dr iv ing .
If the message does not turn off, have yo ur au
thorized Audi dea ler or qualified workshop co r
r ect the malfunction .
~ Engine oil pressure
The red engine oil pressure warning symbol re
quires immediate service or repair. Driving with a
low-oil-pressure indication is likely to inflict se
vere damage to the engine .
• Turn off engine! Oil pressure too low
If the indic ator li ght turns on and the message
appe ars, the o il pressure is too low.
~ Pull off the road .
~ Stop the vehicle .
~Tur noff the engi ne.
~ Che ck the engine oil level~ page 191.
~ If the eng ine o il level is too low, add eng ine oil
~ page 191. M ake sure that the oil p ress ure
warning symbol. appears no longer in the
disp lay before you start driving aga in. ..,_
Page 29 of 254
"' N
0:: loo
rl I.O
"' N
"' rl
If the engine oil temperature is be low 140 ° F
(60 °C) , th <>
Ii symbol followed by three hy
phens"- --" and the °C un it is shown.
At an engine oil temperature above 140 °F
(60 °C) the engine has reached its operating tem
perature. The engine oil temperature may be
higher if there is heavy engine load and high tem
peratures outside. This is not a cause for concern
as long as the.
¢page 16 or the 1\1 ¢page 17
warn ing light in the display does not flash.
Lap timer
Introduction
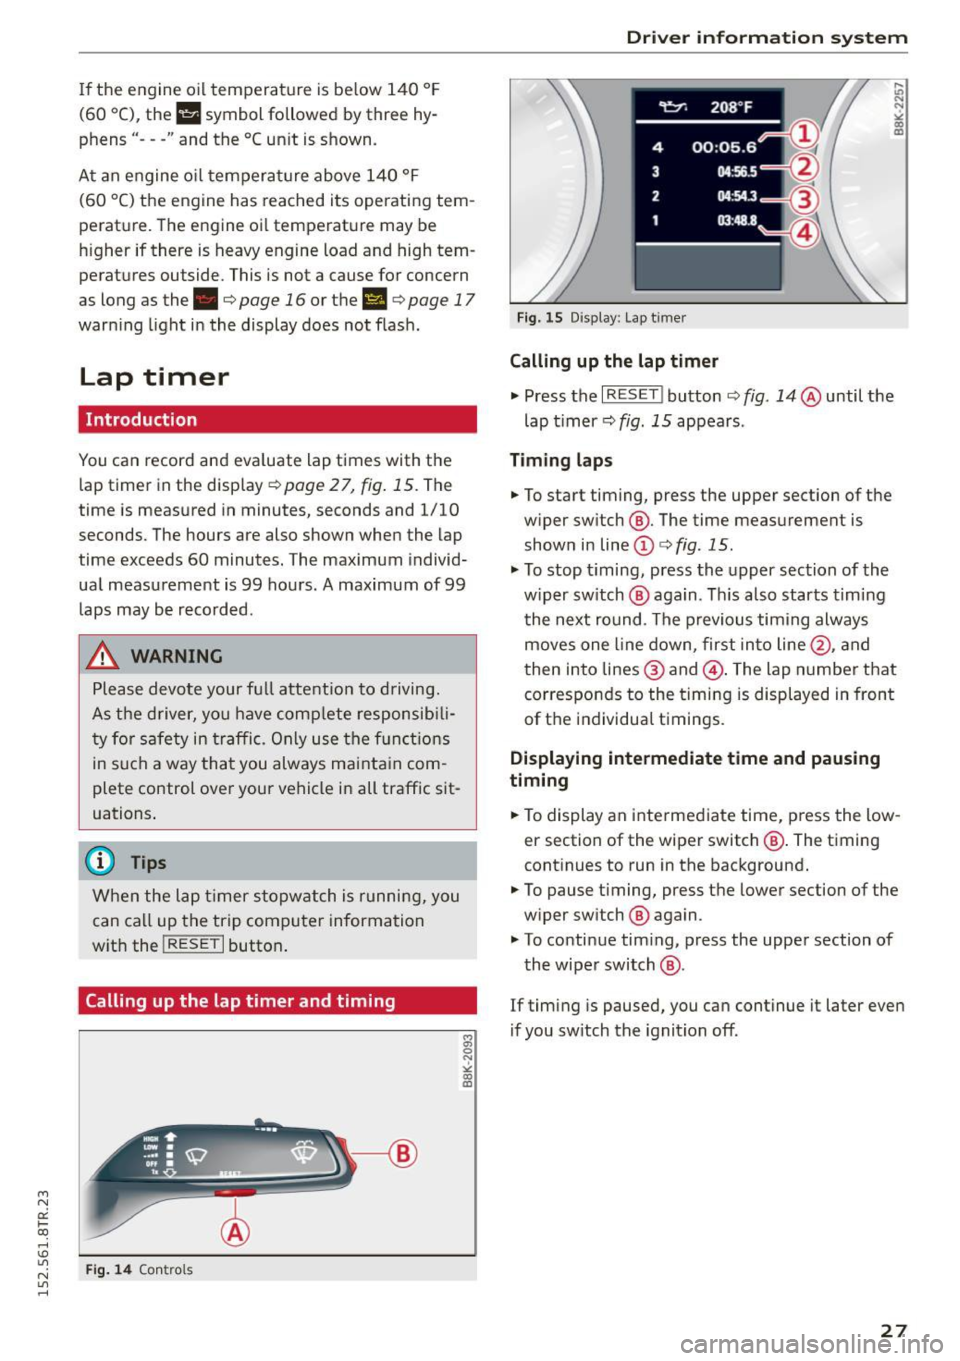
You can record and evaluate lap times with the
lap timer in the display
¢page 27, fig. 15. The
time is measured in minutes, seconds and 1/10
seconds. The hou rs are also shown when the lap
time exceeds 60 minutes. The maximum individ
ual measurement is 99 hours. A maximum of 99 laps may be recorded.
A WARNING
Please devote your full a ttention to driving.
As the driver, you have comp lete responsib ili
ty for safety in traffic. Only use the functions
in such a way that you always ma inta in com
plete control over your vehicle in all traffic sit
uations .
(D Tips
When the lap timer stopwatch is running, you
can ca ll up the trip computer information
w ith the
! RESE T I button .
Calling up the lap timer and timing
Fig. 14 Contro ls
Dri ver information system
Fig. 15 Disp lay : Lap t imer
Calling up the lap timer
.,. Press the I RESET ! button ¢ fig. 14 @until the
lap timer ¢
fig. 15 appears .
Timing laps
.,. To start timing, press the upper section of the
w iper sw itch @. The time measurement is
shown in line
(D ¢ fig . 15.
.,. To stop timing, press the upper section of the
w iper sw itch @ aga in. This also starts timing
the next round. The previous timing always
moves one line down, first into line@, and
then into lines @ and @. The lap number that
corresponds to the timing is displayed in front
of the individual t imings.
Displaying intermediate time and pausing
timing
.,. To display an intermediate time, press the low
er section of the wiper switch @. The timing
continues to run in the background .
.,. To pause timing, press the lower section of the
w iper sw itch @ again .
.,. To continue tim ing, press the upper section of
the wiper switch @.
If timing is paused, you can continue it later even
if you sw itch the ignition off .
27
Page 30 of 254
Driver information system
Evaluating times and continuing or
resetting timing
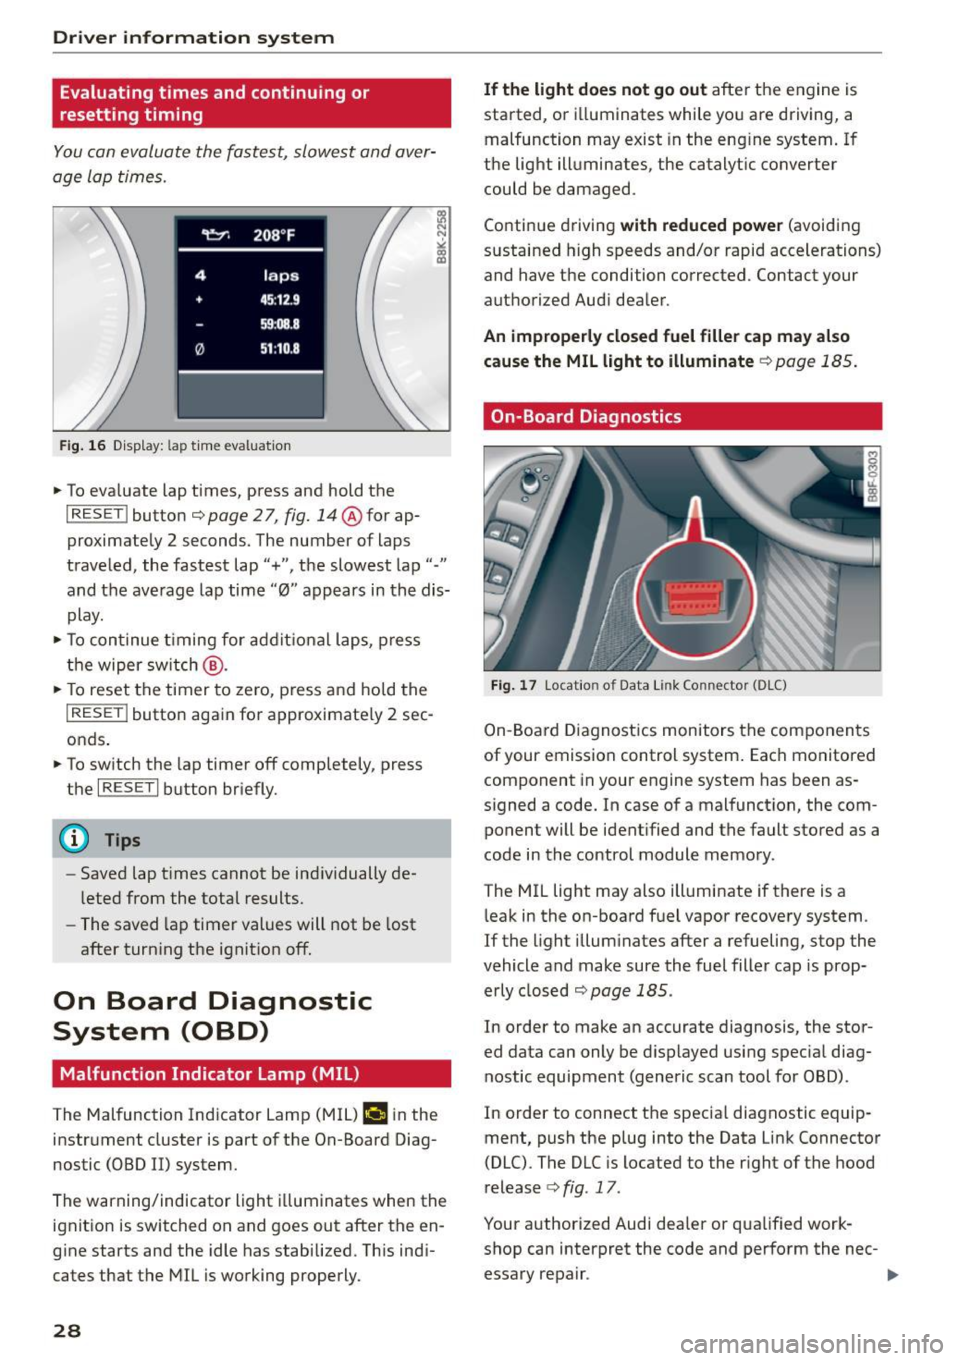
You can evaluate the fastest, slowest and aver
age Lap times.
Fig . 16 D isplay: lap t ime evaluat ion
... To eva luate lap times, press and hold the
I RESET ! button c::;, page 2 7, fig. 14@for ap
proximately 2 seconds. The number of laps
traveled, the fastest lap"+", the slowest lap"-"
and the average lap time "0" appears in the dis
play .
... To continue timing for addit ional laps, press
the wiper sw itch @.
... To reset the timer to zero, press and hold the
I RESE T! button again for approximate ly 2 sec
onds .
... To switch the lap timer off completely, press
the
I RESE T I button briefly.
(D Tips
-Saved lap t imes cannot be ind ividually de
l eted from the total results.
- The saved lap timer values will not be lost
after turn ing the ignit ion off.
On Board Diagnostic
System (OBD)
Malfunction Indicator Lamp (MIL)
The Malfunction Indicator Lamp (MIL) ¢.ij in the
instrument cluster is part of the On-Board Diag
nostic (OBD II) system.
The warning/indicator light illuminates when the
ignit ion is switched on and goes out after the en
g ine starts and the idle has stabilized. Th is ind i
cates that the MIL is working properly.
28
If the light does not go out after the engine is
started, or i lluminates while you are driving, a
malfunction may exist in the eng ine system. If
the light illuminates, the catalytic converter
could be damaged .
Continue driving
with reduced power (avoiding
sustained high speeds and/or rapid accelerations)
and have the condition corrected. Contact your
authorized Audi dealer.
An improperly closed fuel filler cap may also
cause the MIL light to illuminate
c::;, page 185.
On-Board Diagnostics
Fig. 17 Locatio n of Data Link Co nnector (O LC)
On-Board Diagnostics monitors the components
of your emission control system. Each monitored component in your engine system has been as
signed a code. In case of a malfunction, the com ponent will be identified and the fault stored as a
code in the control module memory.
The MIL light may also illuminate if there is a
leak in the on-board fuel vapor recovery system.
If the l ight illuminates after a refueling, stop the
vehicle and make sure the fuel filler cap is prop
erly closed
c::;, page 185.
In order to make an accurate diagnosis, the stor
ed data can only be displayed using special diag
nostic equipment (generic scan tool for OBD).
In order to connect the specia l diagnostic equip
ment, push the plug into the Data Link Connector
(DLC). The DLC is located to the right of the hood
release
c::;, fig . 17 .
Your authorized Audi dealer or qua lified work
shop can interpret the code and perform the nec- essary repair . .,,_
Page 36 of 254
Open ing a nd clos ing
¢ .&. in General description on page 30. Do not
reach inside the door handle.
The vehicle can be locked and unlocked at any door. The remote control key cannot be more
than 1.5 m away from the door hand le . It makes
no difference whether the master key is in your
jacket pocket or in your brief case .
I f you grip the door handle while locking, this can
adversely affect the locking function.
It is not possible to re-open the door for a brief
period directly after closi ng it . This allows you to
ensure that the doors are properly locked.
It depends on the sett ings i n the radio or MM !*
whether the entire vehicle is unlocked or one of
the doors ¢
page 35.
A WARNING
Read and follow all WARNINGS ¢.& in Gener
al description on page 30.
(D Tips
I f your vehicle has been stand ing fo r an ex
tended period, please note the fol low ing :
- The proxim ity sensors are deactivated after
a few days to save power. You then have to p ull on the door handle once to unlock the
vehicle and a second time to open t he vehi
cle.
- To prevent the battery from being dis
charged and to preserve your vehicle's abili
ty to start for as long as possible, the ener
gy management system gradually switches
off unnecessary convenience functions.
It is
possib le that you will not be able to unlock
your vehicle using these convenience func
tions .
- For Declaration of Compliance to United
States FCC and Industry Canada regulations
¢ page 239.
34
Locking and unlocking the vehicle from
inside
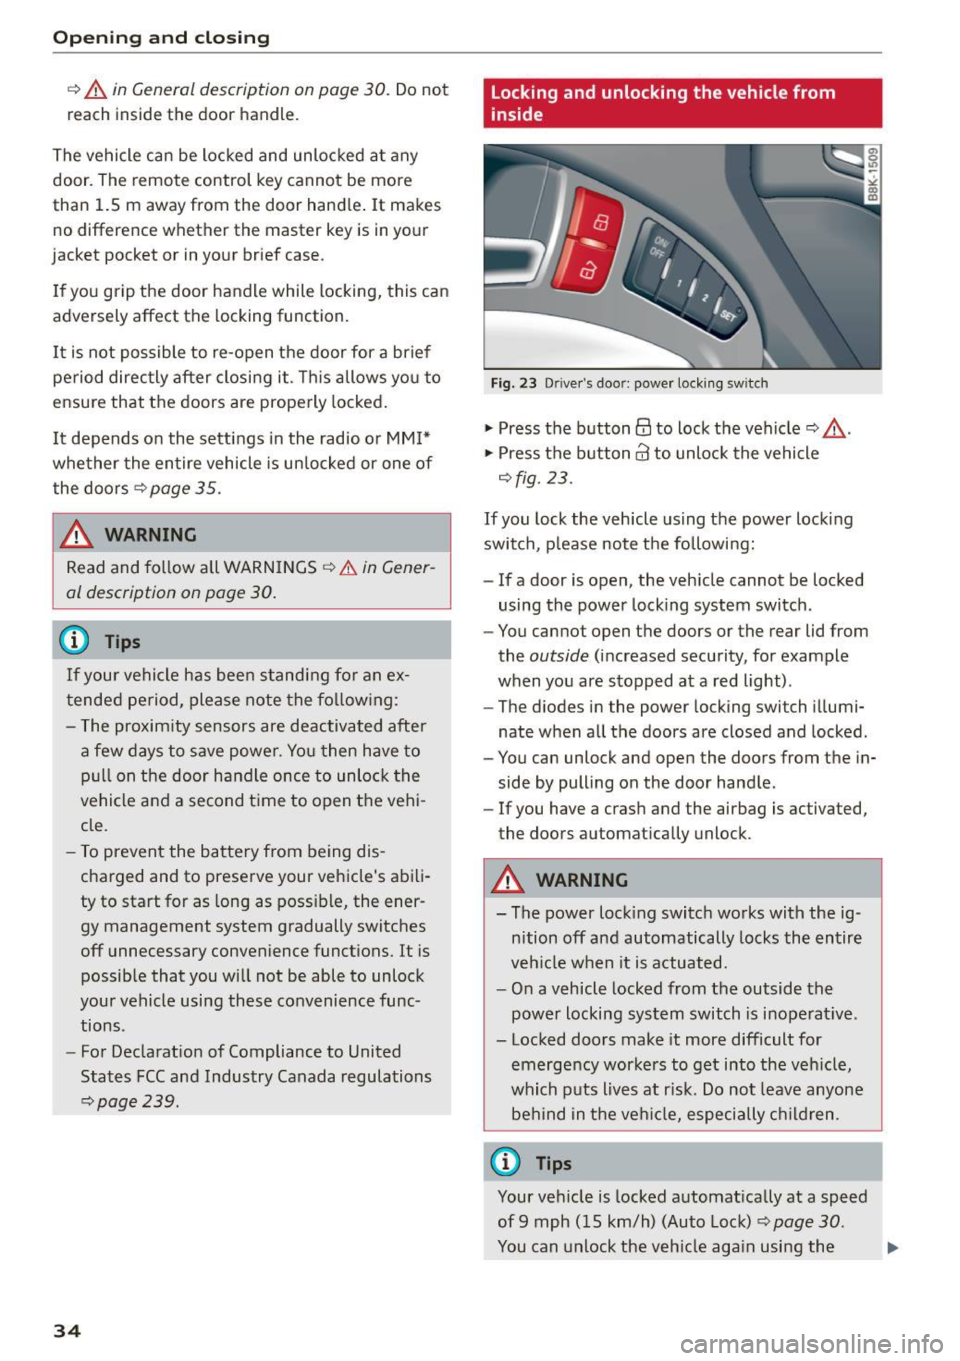
Fig. 23 Driver's doo r: power lock ing sw itch
.,. Press the button@ to lock the vehicle¢_&. .
.,. Press the button@ to unlock the vehicle
¢fig. 23 .
If you lock the veh icle using the power locking
switch , please note the following:
- If a door is open, the veh icle cannot be locked
using the power lock ing system switch.
- You cannot open the doors or the rear lid from
the
outside (increased security, for example
when you are stopped at a red light) .
- The d iodes in the power locking switch illumi
nate when all the doors are closed and locked .
- You can unlock and open the doors from the in
side by pulling on the doo r handle .
-If you have a crash and the airbag is activated,
the doors automatically unlock .
A WARNING
- The power locking switch works with the ig
nition off and automatically locks the entire
vehicle when it is actuated.
- On a vehicle locked from the outside the
power locking system switch is inoperat ive .
- Locked doors make it more difficult for
emergency workers to get into the veh icle,
which puts lives at r isk. Do not leave anyone
be hind in the veh icle, especially children .
('O Tips
Your vehicle is locked automatically at a speed
of 9 mph (15 km/h) (Auto Lock) ¢
page 30.
You can unlock the veh icle aga in using the ..,.
Page 75 of 254
"' N
0:: loo
rl I.O
"' N
"' rl
.. Take the adapter for the emergency key out of
the glove compartment
r=:> fig. 76.
.. Push the emergency key
r=:> fig. 77fully into the
adapter. Make sure that the Audi rings are fac
ing up.
.. Press the emergency key in the adapter down
until it latches audibly.
.. Insert the adapter with the emergency key for
ward into the ignition switch. The engine can
now be started as usual.
Stopping the engine
Applies to vehicles: with ig ni tion lock
.. Bring the vehicle to a full stop.
.. Automatic transmission: Move the selector lev
er to the P or N position.
.. Press on the ignition key. The engine is turned
off .
.. You can now remove the key.
Steering lock
The steering locks when you remove the ignition
key. The locked steering helps prevent vehicle
theft.
Emergency off
If it is necessary in unusual circumstances, the
engine can be switched off while the vehicle is
moving. The engine will be switched off if you
press on the key for an extended period.
A WARNING
- Never turn off the engine before the vehicle
has come to a complete stop. The full func
tion of the brake booster and the power
steering is not guaranteed . You must use
more force to turn or brake if necessary. Be
cause you cannot steer and brake as you
usually would, this could lead to crashes
and serious injuries.
- For safety reasons, you should always park
your vehicle with the selector lever in P. Oth
erwise, the vehicle could inadvertently roll
away.
- The radiator fan can continue to run for up
to 10 minutes even after you have turned
off the engine and removed the ignition key.
Driving
The radiator fan can also turn on again if the
engine coolant heats up because of intense
sunlight or heat build-up in the engine com
partment.
- Always take the key with you whenever you
leave your vehicle. Otherwise, the engine
could be started or electrical equipment
such as the power windows could be operat
ed. This can lead to serious injury.
- Never leave children or persons requiring as
sistance unattended in the vehicle. The
doors can be locked using the remote trans
mitter, preventing people from escaping
from the veh icle on their own in the event of
an emergency. Depending on the time of
year, people inside the vehicle can be ex
posed to very high or very low tempera
tures.
(D Note
If the engine has been under heavy load for
an extended period, heat builds up in the en
gine compartment after the engine is switch
ed off -there is a risk of damaging the engine.
Allow the engine to run at idle for about two minutes before switching it off.
Convenience key
Starting the engine
Applies to vehicles: wi th convenience key
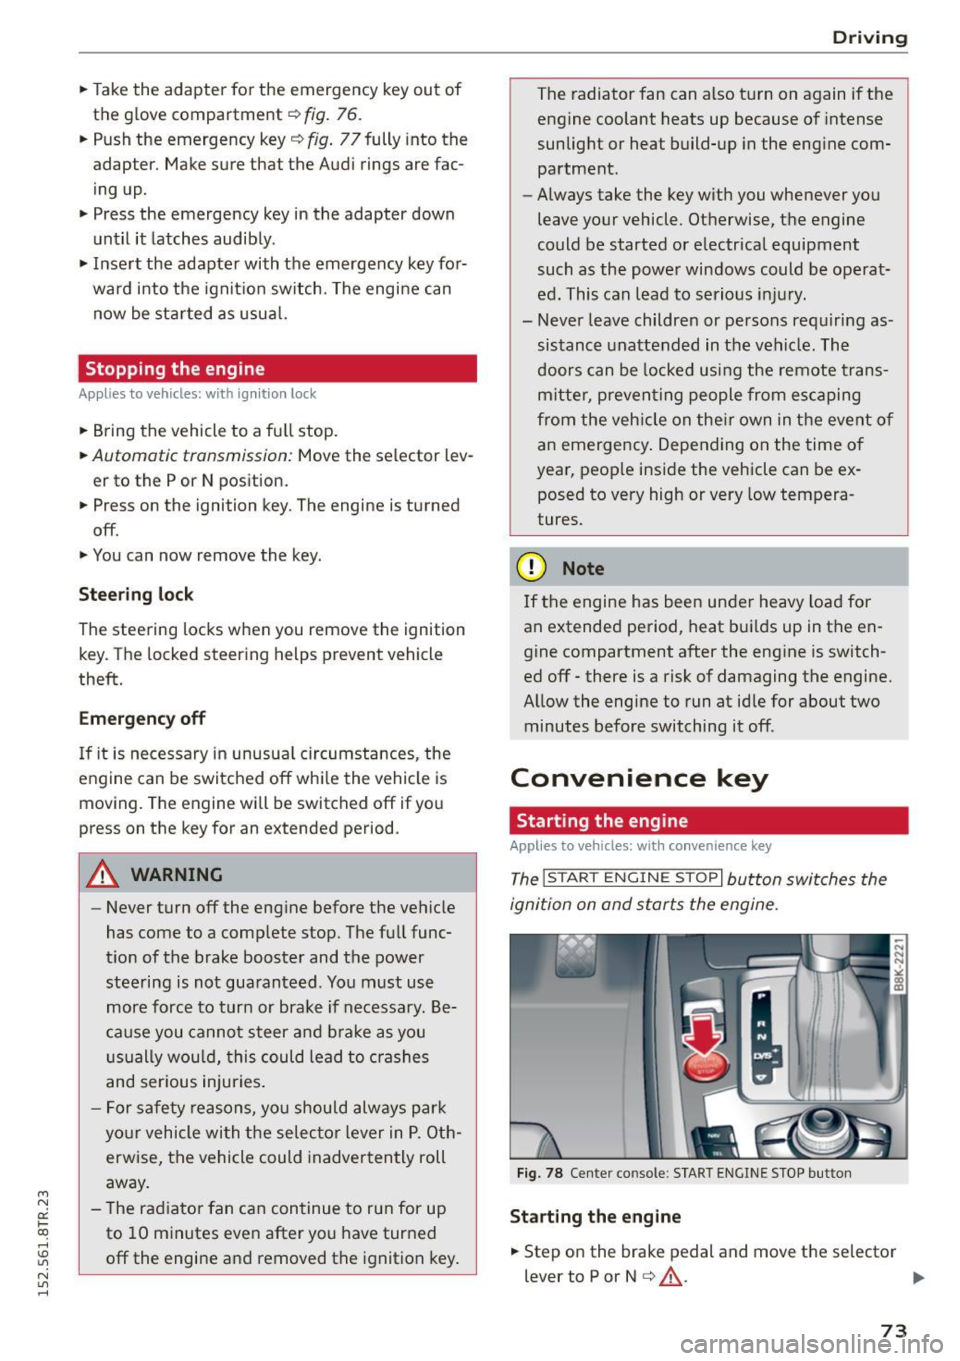
The !START ENGINE STOPI button switches the
ignition on and starts the engine.
Fig. 78 Center co nsole : START ENGINE STOP button
Starting the engine
.. Step on the brake pedal and move the selector
lever to P or N
¢ &_ . .,.
73
Page 76 of 254

Driving
"'Press on the I START ENGINE STOPI button
¢ fig. 78 -the engine wi ll start.
Switching the ignition on /off
If you would like to sw itch the ignition on with
out start ing the e ng ine, fo llow these steps:
"' Press the
!START ENGINE STOPI button with -
out pressing the brake pedal.
"'T o sw itch the ignition off, press the but to n
again.
If the engine sho uld not start immed iately, the
starting p rocess is a utomat ically stopped after a
short time. Repeat sta rting procedure.
When starting the engine, major e lectr ica l loads
are sw itched off temporar ily .
After a cold engine is started, there may be a brief period of increased noise because oil pres
sure must first build up in the hydraulic valve ad
justers. This is normal and not a cause for con
cern.
_& WARNING
- Never allow t he engine to ru n in co nfine d
spaces -dange r of asp hyxiation.
- Never turn off the engine unti l the vehicle
h as come to a comp lete stop.
- Always ta ke t he key with yo u w heneve r you
leave your vehi cle. Otherw ise, the eng ine
c ou ld be started or ele ct rical eq uipment
s u ch as the power w indows co uld be operat
ed. This can lead to serious injury.
- Never leave ch ild ren o r persons requ iring as
sistance unattended in the vehicle. The doo rs can be locked using the remote trans
mitter, preventing peop le from escap ing
from the vehicle on their own in the event of
an emergency. Depending on the time of
year, people inside the vehicle can be ex
posed to very high o r ve ry low tempe ra-
tu res.
(D Note
- Avoid high eng ine rpm, fu ll throttle and
heavy engine loads until the engine has
r eached operating tempe rat ure - otherwise
you r isk eng ine damage.
74
-
@ For the sake of the environment
Do not let the engine run while pa rked to
warm up. Begin dr iv ing immediately. Th is re
d uces unnecessary em issions.
(!} Tips
- After starting a col d en gine, t here may be a
br ie f per iod of increased noise because the
oil pressure must first bui ld up in the hy
draulic valve adjusters. This is norma l and
not a cause for concern.
- If you leave the veh icle with the ignition
switched on, the ig nition w ill switch off af
ter a ce rtain period of time. Please note that
e lect rical equipment such as exte rior lights
wi ll switch off as well when that happens.
Switching engine off
App lies to vehicles: wi th convenience key
"' Br ing your vehi cle to a comple te stop.
"' Move the se lector lever to the P o r N pos ition.
"' Press the
I START ENGINE STOP ! button
c::> page 73, fig. 78 .
Steering lock
The steer ing lo cks w hen yo u tur n the eng ine off
u sing the
I START ENGINE STOP I button a nd open
the d river's doo r. The loc ked steering helps pre
vent ve hicle theft .
Emergency off
If necessary, the e ngine can be switched off with
the se lec to r lever in the R or D/S posi tions. The
engine s tops if you press a nd ho ld the
I START ENGI NE STOP I button at speeds below
6 mph (10 km/ h) and press the brake peda l.
_& WARNING
-Never turn off the engine before the vehicle
has come to a complete stop. The full func
tion of the brake booster and the power
steer ing is not guaranteed. You must use
more force to turn or b rake if necessary. Be
caus e you cannot stee r and brake as you
usually wo uld, this cou ld lead to crashes
a nd se rio us in juries.
~
Page 77 of 254
"' N
0:: loo
rl I.O
"' N
"' rl
-For safety reasons, you should always park
your vehicle with the selector lever in P. Oth
erwise, the vehicle could inadvertently roll
away .
- The rad iator fan can continue to run for up
to 10 m inutes even after you have turned
off the engine and removed the ignition key .
The rad iator fan can also turn on aga in if the
engine coolant heats up be cause of intense
s u nlight or heat bui ld-up in the engine com
partment.
- Always ta ke t he key with you wheneve r you
leave your vehicle. Otherwise, the eng ine
cou ld be started or electrical eq uipment
s u ch as the power windows cou ld be operat
ed. This can lead to serious injury.
(D Note
If the e ng ine has been under heavy load for
an extended per iod, heat builds up in the en
gine compartment after the engine is swi tch
ed off -there is a risk of damag ing the engine.
Allow the engine to run at idle for about two
m inutes before switch ing it off.
Driver messages
Ignitio n is on
This message appears and a war ning tone sounds
if you open the driver's door when the ignition is
switched on.
No ke y ide ntifi ed
This message appears when the
I STAR T ENGIN E STOP I button is pressed if t here
i s no master key inside the vehicle o r if the sys
tem does not recogni ze it. For example, the mas
ter key ca nnot be recognized if it is covered by an
object (e .g . alum inum br ie f case) which
screens
the radio signal. Electronic devices such as cell
phones can also interfere w ith the rad io signa l.
Press br ake pedal to sta rt engine
This message appears if you do not press the
b rake peda l to s tart the engine.
Shift to N or P to start engine
Dr ivi ng
This message appears when attempt ing to start
t h e engine if the se lector lever for the automatic
transmission is not in the P or N position. The en
gine can on ly be started w ith the selector in
these positions.
El I s the key in the vehicle?
T his mess age appears if the mas ter key is re
moved from the vehicle wi th the e ngine runn ing .
If the master key is no longer in the ve hicle, you
cannot switch on the ignition after stopping the
engine and you also cannot start the engine
again . Moreover, you cannot lock the vehicle from
t h e outside with the key.
Shift to P otherwise vehicle can roll away . Door s
do not lo ck
if le ve r is not in P.
This message appears for safety reasons along
with a warning signal. It appea rs if the selector
lever for the automatic transmission is not in the
P position when switch ing off the ignition. Move
the selector lever to the P position, otherwise the
vehicle is not secured against rolling away. You
also cannot lock the vehicle us ing the locking
button* on the door handle o r us ing t he remote
key .
Convenience key defe cti ve! Use ign ition lock
This message appears if the engine must be
started or stopped using the ign ition key and not
the
I STAR T ENGINE ST OP ! button.
Electromechanical
parking brake
Operation
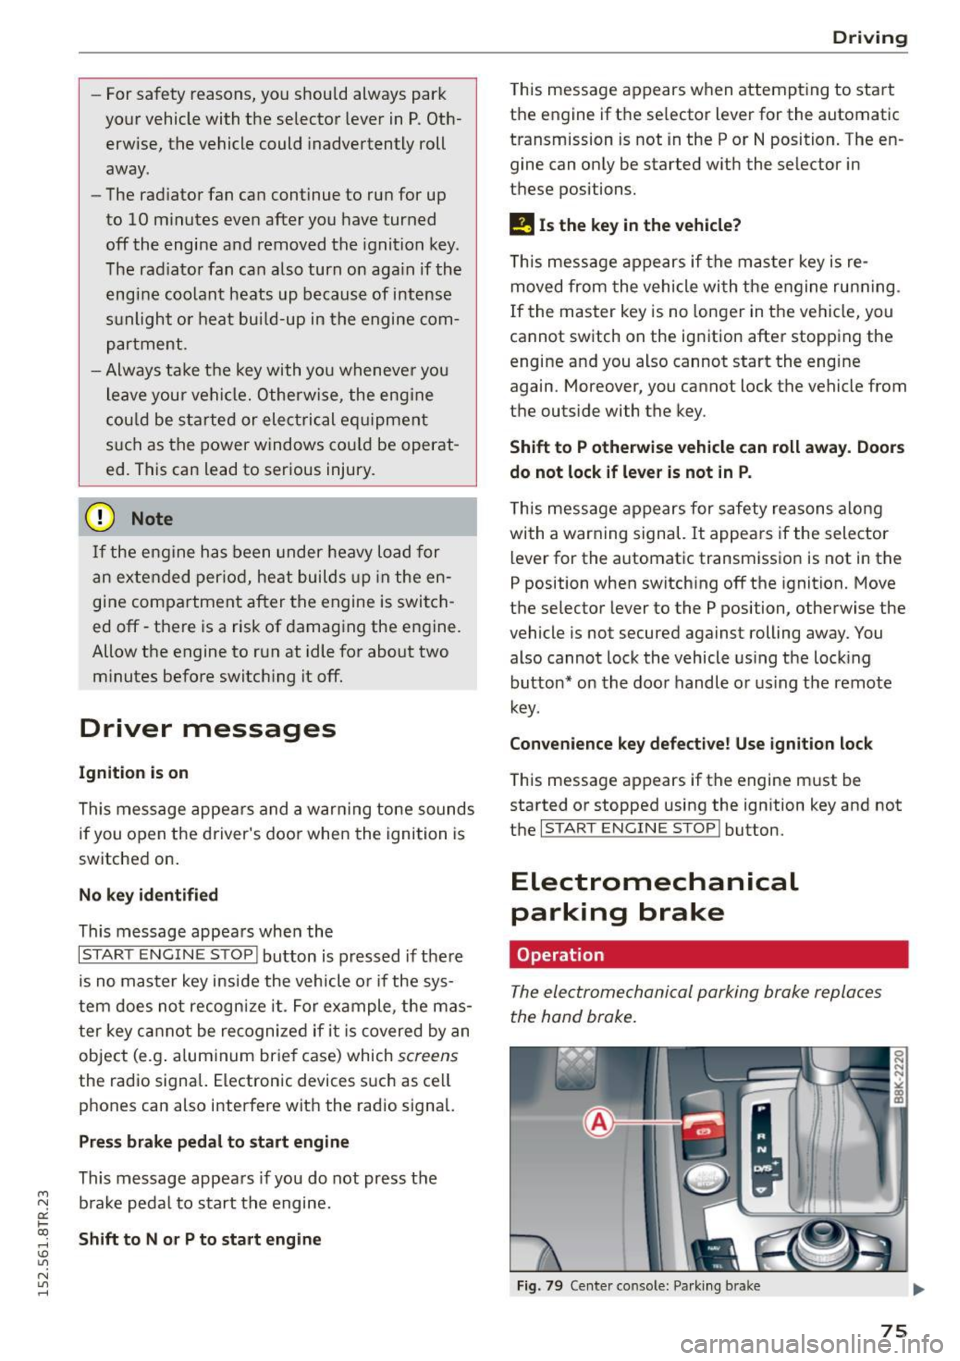
The electromechanical parking broke replaces
the hand broke.
Fig . 79 Center co nso le: Pa rk in g b ra ke
75
Page 85 of 254

"' N
0:: loo
rl I.O
"'
(Neutral) for more than approximately 2 seconds,
without the brake pedal being pressed.
Release button
The release button on the selector lever prevents
the lever from being accidentally shifted into cer
tain positions. Depending on the direction of the
shift, the selector lever locks at different posi
tions . The positions are highlighted in the i llus
tration ¢
fig. 84.
Ignition key safety interlock
The key cannot be removed from the ignition un
l ess the selecto r lever is in the P park position .
When the ignition key is removed, the selector
lever will be locked in the P position.
Driving the automatic transmission
M N 0 0 .,:.
gi
Fig. 85 Shift gate on the center conso le: selector lever with
release butto n
Starting the engine
.,. The selector lever must be in P or N.
Starting off
.,. Press and hold the brake pedal.
.,. Press and ho ld the release button in the se lec
tor lever handle, select the desired selector lev
er position such as D/S and release the button.
.,. Wait briefly until the transmission has shifted
(you will feel a slight movement).
.,. Remove your foot from the brake pedal and ac
celerate.
Stopping temporarily
.,. Keep the vehicle stationary using the braking
pedal, for example at traffic lights.
.,. Do not press the accele rator pedal when doing
~ t hi s. rl
Automatic transmission
.,. To prevent the vehicle from rolling when you
start driving, set the parking brake when stop
ping on steep inclines¢ &_.
.,. The parking brake wi ll release automatica lly
and the vehicle will start moving once you press
the acce lerator pedal.
Stopping /parking
If the selector lever is not in the P position when
you open the driver's door, the vehicle could ro ll.
The message
Transmission: Car may roll! Shift
to park!
appears.
.,. Press and hold the brake peda l until the vehicle
has come to a complete stop.
.. App ly the parking brake¢
page 76.
.,. Select the P selector lever posit ion ¢ &_ .
Stopping on an incline
.,. Always press the brake pedal to hold the vehi
cle in p lace and prevent it from "ro lling back"
¢ &_ . Do
not try to prevent the veh icle from
"rolling back" when a gear is engaged by in
creasing the engine speed ¢(D .
Starting on an incline
.,. Activate the parking brake .
.,. With the driving gear selected, press the acce l
erator pedal carefu lly. The parking brake will re
lease automatically if your seat belt is fastened.
Und er certain circumstances, such as driving in
the mountains, it may be useful to switch tempo rarily to the manual shift program in order to ad
just the gears to the driving conditions by hand
¢page 85 .
On s lopes, activate the parking brake first and
then move the selector lever to the P position.
This prevents too much stress from being placed on the locking mechanism .
_& WARNING
-
-The vehicle can also roll when the engine is
stopped.
- Unintended vehicle movement can cause se
rious injury.
- Never leave your vehicle with the engine
running while in gear. If you must leave your
~
83
Page 87 of 254

"' N
0:: loo
rl I.O
"' N
"' rl
Manual shift program
Using the manual shift program you can man
ually select gears.
Fig. 86 Center conso le: shift in g th e gea rs manually
Fig. 87 S teerin g wh eel: shift paddl es
Gear selection with selector lever
The tiptronic mode can be selected either with
the vehicle stationary or on the move.
• Push the selector lever to the right from D/S.
An M appears in the instrumen t cluste r display
as soon as the transm ission has shifted.
• To upshift, push the selector lever forward to
the plus position
0 c::> fig. 86.
• To downshift, push the lever to the minus posi-
tion
0 .
Gear selection with shift paddles*
The shift padd les are activated when the selector
lever is in D/S or the tiptronic manual shift pro
gram.
• To upshift , touch the shift paddle on the right
(vc::>fig. 87.
• To downshift, touch the shift paddle on the left
0 -
• If you do not press a shift paddle within a short
time while in the D/S position, the transmission
will return to automatic mode . To keep shifting
Automatic transmission
using the shift padd les, move the selector lever
to the right out of the D/S position.
When accelerating, the transmission does
not
automatically shift to the next gear shortly be
fore the maximum permitted engine RPM is
reached .
If you have selected a lower gear than the current
one, the automatic transmission will shift down
only when the engine wi ll not be over-revved.
With kick-down , the transmission shifts into a
lower gear depending on speed and engine RPM.
@ Tips
Tiptronic is inoperative when the transmission
is in the fail-safe mode.
Kick-down
Kick-down enables maximum acceleration .
When you depress the accelerator peda l beyond
the resistance point, the automatic transmission downsh ifts into a lower gear, depending on vehi
cle speed and engine speed. The upshift into the
next higher gear takes place once the maximum
specified eng ine speed is reached .
& WARNING
Please note that the wheels can spin if kick
down is used on a smooth slippery road -
there is a risk of skidding .
Launch Control Program
The Launch Control Program provides the best
acceleration possible when starting from a stop.
Requirement: The engine must be at ope rat ing
temperature and the steering wheel must not be
turned .
• Press the
I.$ OFF ! button c::> page 170 while the
eng ine is running. The
II indicator l ight illumi
nates in the instr ument cluster and
Stabiliza
tion control (ESC): Sport. Warning! Restricted
stability
appears in the driver information sys -
tem display.
IJJ,,
85
Page 103 of 254

Audi drive select Driving settings
Introduction
App lies to vehicles: with Audi drive select
Drive select provides the possibi lity to experience
d ifferent types of vehicle settings in one vehicle.
F or instance, using the three
Comfort, Auto and
Dynamic modes, the driver can switch from a
sporty to a comfortable driving mode with the
press of a button.
Addit ionally, in vehicles with
MM I*, the vehicle
setup for
Individual* mode can be customized by
you. This makes it possib le to combine settings
such as a sporty engine tuning with comfortab le
steering .
A WARNING
-
Improper use of the Audi drive select can
cause collisions, other acc idents and serious
personal injury.
Description
App lies to vehicles: with Audi drive select
The vehicle setup in each mode depends on the
veh icle's featu res . However, the engine, automat
ic transmission and steering are always involved.
Engine and automatic transmission
Depending on the mode, the engine and the au
tomatic transmission respond quicker or in a
more balanced manner to accelerator pedal
movements. In the sporty dynamic mode, the au
tomatic transmission shifts at higher RPMs . Th e
engine sound is adjusted by opening or clos ing
the exhaust doors for the respective mode.
Steering
The steering adapts in te rms of steering effort
and steering ratios . Indirect steering that moves
eas ily, like the steering in comfort mode, is best
suited to long drives on a highway. In contrast,
~ dynamic mode provides sporty, direct steering.
0::
~ The follow ing applies to vehicles with dynamic ,....,
~ steering*: the steering ratio changes based on ve-
~ hicle speed in order to maintain optimum steer -,....,
Audi drive select
ing effort for the driver at all times. This sets the
steering to be less sensitive at higher speeds in
order to provide improved vehicle control. At re
duced speeds, however, steering is more direct in
order to keep the steering effort as minimal as
possible when the driver is maneuvering the vehi
cle. At low and average speeds, dynamic steer ing
additionally provides more responsive steering
performan ce.
Sport differential*
As a component of the all wheel drive system
(quattro)
<=> page 174, the sport differential* dis
tributes the driving power to the rear axle de
pend ing on the s ituation . The distribution of
power varies depending on the mode selected.
T he goal is a high level of agility and ability to ac
ce lerate on curves. The vehicle is very responsive
to steering .
Audi adaptive cruise control*
The behav ior when accelerating can be adjusted
from comfortable to sporty, depending on the
drive select mode. Adaptive cruise control also
responds to the driving behavior of the vehicle
ahead in a more conservative or sporty manner.
Engine sound*
T he sound of the eng ine is adapted to the select
ed mode and ranges from subtle to sporty.
(D Tips
-In some models, the maximum vehicle
speed can only be reached in the
Auto and
Dynamic modes.
- Selecting the
Dynamic mode results in spor
ty shifting characteristics. The S gear posi
tion engages automatically.
- In vehicles that have dynamic steering*, op
erating noise is heard when starting or stop
ping the engine. This does not indicate a
problem .
101