change wheel AUDI RS7 SPORTBACK 2014 User Guide
[x] Cancel search | Manufacturer: AUDI, Model Year: 2014, Model line: RS7 SPORTBACK, Model: AUDI RS7 SPORTBACK 2014Pages: 292, PDF Size: 73.56 MB
Page 191 of 292
Intelligent technology Notice about data
recorded by vehicle
control modules
Your vehicle is not equipped with an Event Da
ta Recorder (EDR), installed by some manu
facturers for the express purpose of capturing
data for retrieval after an accident or crash
event. EDR's are sometimes called "crash re
corders".
Some state laws restrict the retr ieval or down
loading of data stored by EDR's that were in
stalled in a vehicle for the express purpose of
retrieving data after an accident or crash
event without the owner's consent.
Although your vehicle is not equipped with an
EDR, it is equipped with a number of electron
ic control modules for various vehicle systems
such as, for examp le, engine function, emis
sion control, as well as for the airbags and
safety belts.
These electronic control modules also record
vehicle-related data during norma l vehicle op
eration for diagnostic and repair purposes.
The recording capacity of the electronic con
trol modules is limited to data (no sound is re
corded) and only a small amount of data is ac
tually recorded over a very limited period of
time and stored when a system fault or other
condition is sensed by a control unit. Some of
the data then stored may relate to vehicle
speed, direction, braking as we ll as restraint
system use and performance in the event of a
crash or other condition. Stored data can only be read and downloaded with special equip
ment.
Electronic Stabilization
Control (ESC)
Description
ESC helps to improve road holding and vehicle
dynamics to help reduce the probability of
skidding and loss of veh icle control. It works
only when the engine is running. ESC detects
Intelligent technology 189
certain difficult driving situations, including
when the vehicle is beginning to spin (yaw)
out of control and helps you to get the veh icle
back under control by se lectively braking the
wheels, and/or reducing engine power and
providing steering ass istance to help hold the
vehicle on the driver's intended course. The in
dicator light
JjJ in the instrument cluster
blinks when ESC is taking action to help you
control the vehicle.
ESC has limitations .
It is important to remem
ber that ESC cannot overcome the laws of
physics.
It will not always be able to help out
under all conditions you may come up against.
For example, ESC may not always be able to
help you master situations where there is a
sudden change in the coefficient of friction of
the road surface. When there is a section of dry road that is suddenly covered with water,
slush or snow, ESC cannot perform the same
way it would on the dry surface. If the vehicle
hydroplanes (rides on a cushion of water in
stead of the road surface), ESC will not be
able to help you steer the vehicle because con
tact with the pavement has been interrupted
and the vehicle cannot be braked or steered .
During fast cornering, particularly on winding
roads, ESC cannot always deal as effectively
with difficult driving situations than at lower
speeds.
Always adjust your speed and driving style to
road, traffic and weather conditions. ESC can
not override the vehicle's physical limits, in
crease the available traction, or keep a vehicle
on the road if road departure is a result of
driver inattention. Instead, ESC improves the
poss ibility of keeping the vehicle under con
trol and on the road dur ing extreme maneu
vers by usin g the driver 's steering inputs to
help keep the vehicle going in the intended di
rection. If you are traveling at a speed that
causes you to run off the road before ESC can
provide any assistance, you may not experi
ence the benefits of ESC.
ESC includes and/or works together with the
anti- lock brake system (ABS), brake assist sys -
tem, anti-slip regu lation (ASR), electronic
Ill>
•
•
Page 192 of 292
190 Intelligent technology
differential lock (EDL), dynamic steering* and
selective whee l torque control. ESC is switch
ed on all the t ime. In certa in situations when
you need less traction, you can switch off ASR
by pressing the button
[ill c> page 191,
fig. 180. Be sure to switch ASR on again when
you no longe r need less traction .
Anti-loc k br ak ing system (ABS)
ABS prevents the wheels from locking up
when braking. The vehicle can still be steered
even during hard brak ing. Apply steady pres
sure to the brake pedal. Do not pump the ped
al. A puls ing in the brake pedal ind icates that
the system is he lp ing you to b rake the vehicle.
B rake as sist sys tem
The brake assist system can decrease braking
d istance. It increases braking power when the
driver presses the brake pedal quick ly in emer
gency situations. You must p ress and hold the
b rake pedal until the situation is over. I n
vehicles w ith adaptive cru ise cont rol*, the
b rake assist system is more sens it ive if the
d istance detected to the vehicle ahead is too
smal l.
Anti-slip regulation (ASR)
ASR reduces engi ne power when the d rive
wheels begin to spin and ad apts the fo rce to
the road condit ions. This makes i t easier to
start, accelerate and drive up hills .
Electronic differential lock (EDL)
The EDL brakes wheels that are spinning and
transfers the d rive powe r to the other d rive
wheel o r whee ls if the vehi cle is equipped wi th
a ll-w hee l drive* . This function is available up
to about 75 mph (120 km/h).
I n extreme cases, ED L automat ica lly swit ches
off to help keep the brake o n the braked whee l
from overheating . EDL wi ll switch on again au
tomatically when conditions have returned to
norma l.
Dynamic steering*
On vehi cles w ith dy namic stee ring*, ESC helps
stabilize the steering i n critical s ituations.
Selective wheel torque control
T he sele ctive whee l torq ue con trol ope rates
when driving through c urves . The front whee l
on the inside of th e curve o r both wheels on
the inside of the curve are braked selectively
as needed. This minimizes sliding in the front
whee ls and allows for more precise driving
t hr ough curves. The appl icable system may
not act ivate when dr iv ing in wet or snowy con
ditions .
,&. WARNING
-ESC, ABS, ASR, EDL, dy namic steeri ng*
and the select ive wheel torq ue con trol
c a nnot ove rcome the laws of physics.
T his is especially important on slippery
or wet roads.
If the systems begin acting
to stabilize your veh icle, yo u should im
mediately change your speed to match
the road and traffic conditions. Do not
let the increased safety provided by
these systems tempt you to take r isks.
Doing so will increase the risk of a loss of
veh icle cont ro l, collision and ser ious per
sonal injur ies.
- Always adapt your speed to road, traffic
and wea ther conditions. The risk of los
ing con trol of t he vehicle increases when
d riving too fast, espec ially through
curves and on slippery or wet roads, and
when dr iving too close to vehicles up
ahead. ESC, ABS, the brake assist sys
tem, ASR, EDL, dynam ic steering* and
the selective wheel torque contro l can
not prevent collisions .
- Always accelerate with special care on
even, smooth su rfaces such as those that
are wet or covered with ice and snow .
The drive wheels can spin eve n w ith
these assistan ce systems that cannot al
ways he lp to re duce the risk of loss of ve
h icle control.
(D Tips
- ABS and ASR o nly wo rk correctly when
all four wheels are equipped with identi
cal tires. D iffe ren t tire si zes can lead to a
reduction in engine power.
-
...
Page 232 of 292
230 Tires and wheels
Groove
means the space between two adjacent tread
ribs .
Load rating (code)
means the maximum load that a tire is rated
to carry for a given inflation pressure. You
may not find this informat ion on all tires be
cause it is not req uired by law.
Maximum load rating
means the load rating for a t ire at the max i
mum permissible inflation pressure for that
tire.
Maximum loaded vehicle weight
means the sum of:
(a) Curb weight
(b) Accessory weight
(c) Vehicle capacity we ight, and
(d) Production options weight
Maximum (permissible) inflation pressure
means the maximum cold inflation pressure
to which a tire may be inflated. Also called
"maximum inflation pressure ."
Normal occupant weight
means 150 lbs. (68 kilograms) times the
number of occupants seated in the vehicle up
to the total seating capacity of your vehicle .
Occupant distribution
means distribution of occupants in a vehicle.
Outer diameter
means the overa ll diameter of an inflated new
tire.
Overall width
means the linear distance between the exteri
ors of the sidewalls of an inflated tire, includ
ing elevations due to labeling, decorations, or
protective bands o r ribs .
Ply
means a layer of rubber-coated parallel cords.
Production options weight
means the combined weight of those insta lled
regular production options weighing over 5
lbs. (2.3 kg) in excess of those standard items
which they replace, not previously considered
in curb weight or accessory we ight, including
heavy duty brakes, ride levelers, roof rack,
heavy duty battery, and special tr im .
Radial ply tire
means a pneumat ic tire in which the ply cords
that extend to the beads are laid at substan
t ia lly 90 degrees to the center line of the
tread .
Recommended inflation pressure
see<=> page 229, Cold tire inflation pressure.
Reinforced tire
means a t ire design to operate at higher loads
and at h igher inflation pressures than the cor
responding standa rd tire. Reinforced tires
may be identified as "XL" "xl" "EXTRA LOAD"
' ' '
or "RF" on the sidewa ll.
Rim
means a metal support for a tire or a tire and
tube assembly upon which the tire beads are
seated.
Rim diameter
means nom inal diameter of the bead seat. If
you change your wheel s ize, you will have to
purchase new tires to match the new rim di
ameter.
Rim size designation
means r im diameter and width .
Rim width
means nominal distance between rim flanges.
Sidewall
means that portion of a tire between the
t read and bead.
Page 235 of 292
Tires an d wheel s 233
you have stored. The system does not recog
nize the load condition of your vehicle.
The effectiveness of the ti re pressu re monitor
ing sys tem w ill be impaired if you store no r
mal load pressures but then operate the vehi
cle at its maximum load¢,& .
See the illustration ¢
fig. 195 for the location
of the label on dr iver's side B-pillar (color of
the actual labe l and exact location on the ve
hicle wi ll vary slig htly) .
Note that the fo llowing tab le is accurate at
the t ime o f go ing to press and is subject to
Model/ Tire de
signation
c h ange. In the event of discrepancies, the ti re
pressure label is located on the driver's side B
pillar always takes precedence .
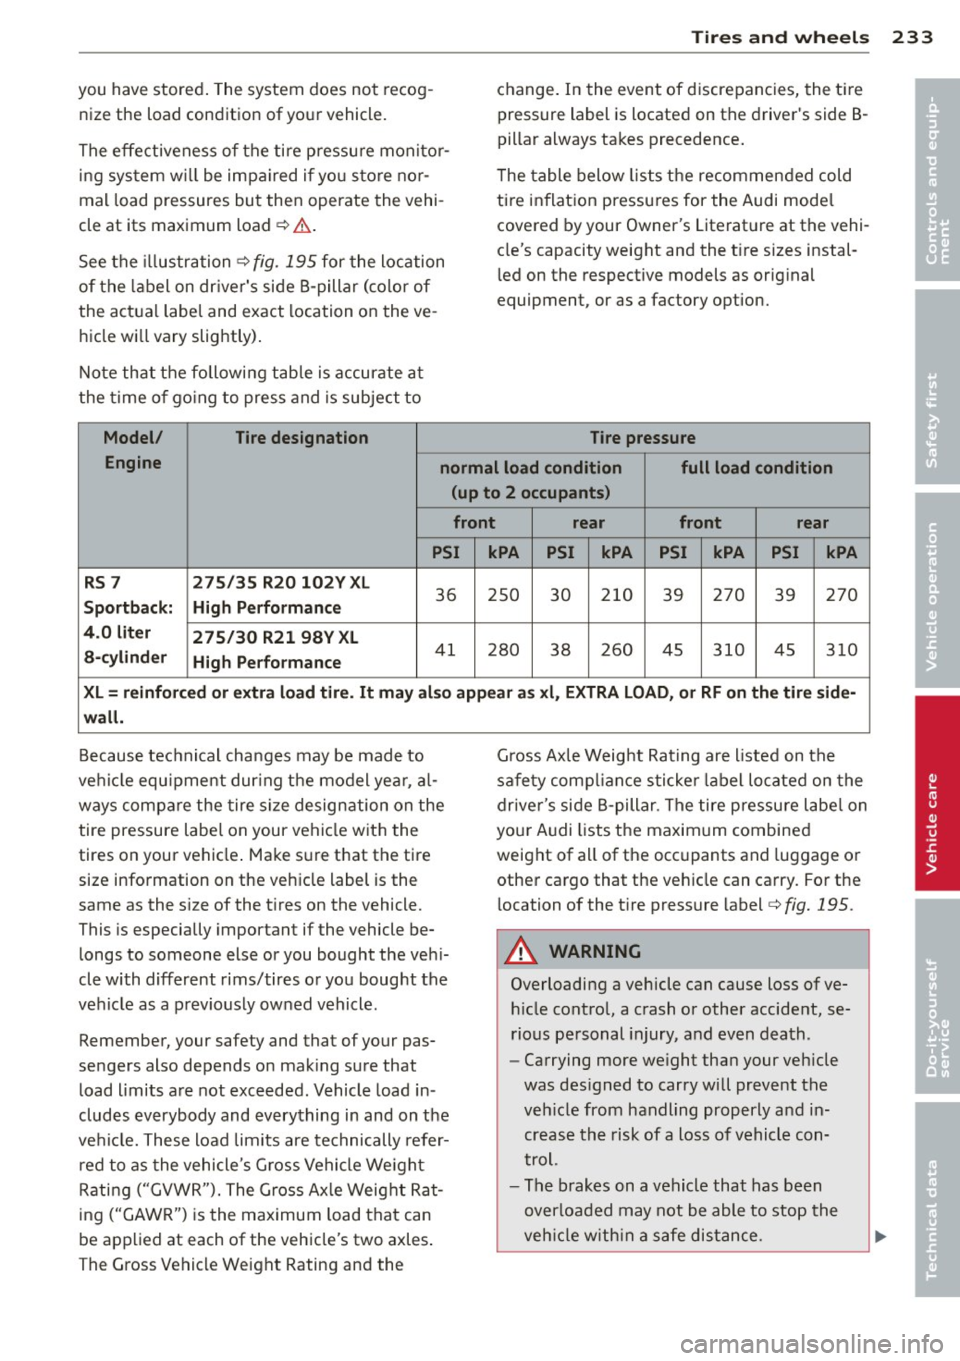
T he table below lists the recommended cold
ti re inflat ion pressures for the Audi mode l
covered by your Owner's Literat ure at the vehi
cle's capacity weight and the t ire sizes instal
l ed on the respective models as orig inal
equipment, or as a factory option.
Tire pressure
Engine normal load condition full load condition
(up to 2 occupants )
front r ear front rear
PSI kPA PSI kPA PSI kPA PSI kPA
RS 7 275/35 R20 102V XL
36 2S0 30 210 39 270 39 270 Sportback: High P erformanc e
4.0 lit er
275 /30 R21 98V XL
a -cy linder
High Performance
41 280 38 260 45 310 4S 3 10
X L = r einfor ced or extra load tir e. It ma y al so appear a s xl , EXTRA LOAD, or RF on th e tire side -
w all.
Because tec hnical changes may be made to
ve hicl e equ ipment dur ing the model yea r, a l
ways compare the tire s ize designation on the
tire pressure label on your vehicle with the
tires on your vehicle . Make s ure that the tire
size information on the vehicle label is the
same as the s ize of the t ires on the vehicle.
This is especially important if the vehicle be
longs to someone else or you bought the veh i
cle with different rims/tires or you bought the
veh icle as a previously owned vehicle.
Remember, your safety and that of your pas
sengers also depends on mak ing sure that
load limits are not exceeded . Vehicle load in
cludes everybody and everything in and on the
ve hicl e. These load limits are technically refer
r ed to as the vehicle's G ross Vehicle We ight
Rating ("GVWR"). The Gross Ax le Weight Rat
ing ("GAWR") is the maximum load that can
be applied at each of the vehicle's two axles .
The Gross Vehicle We ight Rating and the G
ross Ax le Weig ht Rating are listed on the
sa fety comp liance sticke r label lo cated on the
driver's side B-pillar . The tire pressu re labe l on
your A udi lists the maximum combined
weight of all of the occ upants and luggage o r
other cargo that the veh icle can carry. For the
location of the t ire pressure label ¢
fig. 195.
A WARNING
-Overloading a vehicle can cause loss of ve-
h icle contro l, a crash or other accide nt, se
rious personal injury, and even death.
- Carrying more we ight than your veh icle
was des igned to carry will prevent the
veh icle from handling properly a nd in
crease the risk of a loss of vehicle con
trol.
- The brakes on a vehicle that has been
overloaded may not be able to stop the
veh icle w ith in a safe distance.
•
•
Page 248 of 292
246 Tires and wheels
Refer to ¢page 243 for mo re detailed infor
mation regarding winter tires .
Tire pressure
monitoring system
(D General notes
Each tire, including the spare (if provided) ,
should be checked monthly when cold and in
flated to the inflation pressure recommended by the vehicle manufacturer on the vehicle
placard or tire inflation pressure label. (If your
vehicle has tires of a different size than the
size indicated on the vehicle placard or tire in
flation pressure label, you shou ld determine
the proper tire inflation pressure for those
tires).
As an added safety feature, your vehicle has
been equipped with a tire pressure monitor ing
system (TPMS) that illuminates a low tire
p ressure telltale when one or more of your
tires is significantly under-inflated. According
ly, when the low tire pressure telltale illumi
nates, you should stop and check your tires as
soon as possible, and inflate them to the proper pressure. Driving on a significantly un
der-inflated tire causes the tire to overheat
and can lead to tire failure . Under -inflation al
so reduces fuel efficiency and tire tread life,
and may affect the vehicle's handling and
stopping ab ility.
Please note that the TPMS is not a subst itute
for proper tire maintenance, and it is the driv
e r's responsib ility to ma inta in correct tire
pressure, even if under-inflation has not
reached the level to trigger illumination of the
TPMS low tire pressure telltale.
Your veh icle has also been equ ipped w ith a
TPMS malfunction indicator to indicate when
the system is not operating properly. The
TPMS malfunction indicator is combined with
the low tire pressure telltale . When the sys
tem detects a malfunction, the te lltale will
flash for approximately one minute and then remain continuously illuminated. This se- quence will continue upon subsequent vehicle
start-ups as
long as the malfunction exists.
When the malfunction indicator is illum inat
ed, the system may not be ab le to detect or
signal low tire pressure as intended . TPMS
malfunctions may occur for a variety of rea
sons, including the installation of replace
ment or alternate tires or wheels on the vehi
cle that prevent the TPMS from functioning
properly. Always check the TPMS malfunction
telltale after replacing one or more tires or
wheels on your vehicle to ensure that the re
placement o r alternate ti res and wheels allow
the TPM S to cont inue to function properly.
Description
The tire pressure monitoring system monitors
the pressure in the four tires when driving.
The system uses sensors that measure the
temperature and pressure in the tires. Theda
ta is sent from these sensors to the control
module by radio frequency.
The tire pressure monitoring system shows
the current pressures and temperatures of the
tires in the Infotainment system
¢page 247.
It also compares the current tire pressures
with the stored pressures and gives a warning in the driver information system if the tire
pressure is different from what is stored
¢ page 247.
The system does not detect if the stored tire
pressures match the recommended tire pres
sures. You must resave the tire pressures
¢page 248:
- eve ry time the tire p ressu res change, for ex
ample when the load in the vehicle changes,
- after replacing a t ire, or
- if wheels w ith new wheel sensors are used .
_&. WARNING
-The tire pressu re monitoring sys tem as
sists the driver in monitoring tire pres
sures. The driver is responsible for having
the tires inflated to the correct pressure. ..,.
Page 249 of 292
-Do not change the tire pressure when the
temperature of the tire is high. This
could result in serious damage to the tire
and even cause the tire to burst, increas
ing the risk of an accident.
- A tire with low pressure flexes more. This
heats the tire up too much . Th is could
cause the tread to separate and even
cause the tire to burst, increasing the
risk of an accident .
- The tire pressure monitoring system
does not warn about damage or defects
in the tire construct ion that could cause
the tire to burst, for examp le. Inspect
your ti res regularly.
@) For the sake of the environment
Low tire pressure increases fuel consump
tion and tire wear.
(D Tips
-If tires are replaced, the sensors/valves
do not need to be removed or replaced.
Just replace the valve stem and, if neces
sary, the valve and the wheel electronics.
If you have questions, see your author
ized Audi dealer or a qualified workshop.
- Using the tire mobility kit can results in
an incorrect display or a malfunction in
the tire pressure monitoring system.
Have the sensors replaced by an author
ized Audi dealer or a qualified workshop.
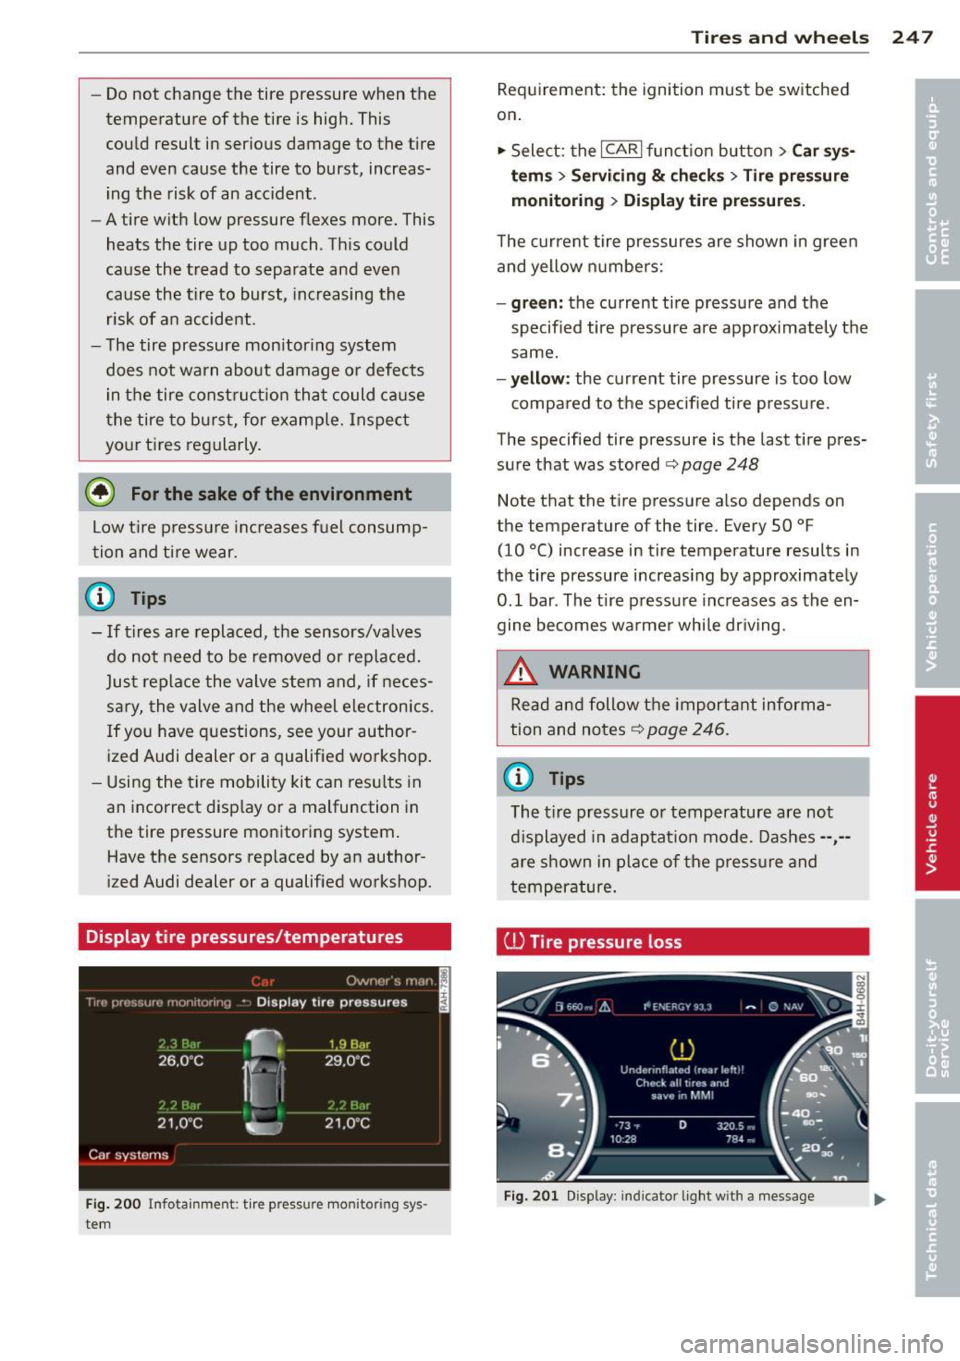
Display tire pressures/temperatures
Fig. 200 Infotai nm en t: t ire pres sur e mo nito rin g sys
tem
Tires and wheels 247
Requirement: the ignition must be switched
on .
'" Select: the
I CAR I function button > Car sys
tem s
> Servicing & checks > Tire pressure
monitoring
> Di sp lay tire pressures.
The current tire pressures are shown in green
and yellow numbers:
-green: the current tire pressure and the
specified tire pressure are approximately the
same.
-yellow: the current tire pressure is too low
compared to the specified tire pressure.
The specified tire pressure is the last tire pres
sure that was stored
c::> page 248
Note that the tire pressure also depends on
the temper ature of the tire . Every 50 °F
(10
°() increase in tire temperature results in
the tire pressure increas ing by approximately
0.1 bar . The tire pressure increases as the en
gine becomes warmer while driving .
.&_ WARNING
Read and follow the important informa
tion and notes
c::> page 246 .
© Tips
The t ire pressure or temperature are not
displayed in adaptat ion mode. Dashes--,-
are shown in place of the pressure and
temperature.
ill Tire pressure loss
Fig. 201 Disp lay: in dic ator light w ith a message
-
Page 250 of 292
![AUDI RS7 SPORTBACK 2014 User Guide 248 Tires and wheels
If the [fJ] indicator light turns on, the pressure
in at least one tire is too low or new sensors
were not adapted:
[f!l indicator lights turns on after t AUDI RS7 SPORTBACK 2014 User Guide 248 Tires and wheels
If the [fJ] indicator light turns on, the pressure
in at least one tire is too low or new sensors
were not adapted:
[f!l indicator lights turns on after t](/img/6/57649/w960_57649-249.png)
248 Tires and wheels
If the [fJ] indicator light turns on, the pressure
in at least one tire is too low or new sensors
were not adapted:
[f!l indicator lights turns on after turning
the ignition on
The tire pressure is too low compared to the
specified pressure.
.,. Check and store the tire pressure(s) the next
time it is possible¢
page 248.
[f!l indicator light turns on while driving
Wheels with new sensors were not adapted or
the tire pressure has reached a critical level
compared to the spec ified pressure.
.,. Avoid unnecessary steering and braking ma
neuvers .
.,. Adapt your driving style to the situation .
.,. Stop as soon as possible and check the
ti re(s).
.,. If it is possible to continue driving, see an
authorized Audi dealer or a qualified work
shop immediately and have your tire(s) re
paired or replaced.
A WARNING
Read and follow the important informa
tion and notes
~page 246.
Storing new tire pressures
-
Correctly stored tire pressure specifications
are necessary for reliable tire pressure moni
toring.
.,. Check the tire pressures in all wheels.
.,. If necessary, correct the tire pressure ac
cording to the specifications on the sticker
on the side of the driver's door . Only correct
the pressure in tires whose temperature is
approximately the same as the ambient
temperature. If the temperature of the tire
is higher than ambient temperature, the tire
pressure must be increased approximately
0.2 bar above the value on the sticker.
.,. Switch on the ignition.
.,. Select :
I CARI function button > Car systems
> Tire pressure monitoring > Store tire pressures.
After storing,
the tire pressure
monitoring system measures the current
tire pressures and stores them as the new
specified pressures.
,. If the changed tire pressures are not dis
played in the Infotainment system, drive the
veh icle for approx imately 10 minutes so
that the sensor signal from the wheels is re
ceived aga in .
During this adaptation phase,--,--is displayed
for the pressure and temperature and the tire
pressure monitoring system is only partially
available.
It only provides a warning if one or
more tire pressures is be low the min imum
permitted spec ified pressure . If this is the
case, the
[fJ] indicator light appears with a
message.
A WARNING
Read and follow the important informa
tion and notes¢
page 246.
Malfunctions
Fig. 202 Display : indicator light with a message
-
If the tire pressure monitoring system is not
available,
the m indicator light appears in
the driver information system. The
[fJ] indica
tor light also blinks for approximately one mi
nutes each time the ignition is switched on.
The tire pressure monitoring system cannot be selected in the Infotainment system. The
malfunction could be caused by the following
examples:
- If the message appears at the end of the
adaptation phase, the system cannot detect
the wheels installed on the vehicle. This may
resu lt from one or more wheels being ..,.
Page 256 of 292
254 What do I do now?
After a tire repa ir, have the sealant bottle
rep laced at a dealership. This restores full
functionality to the Tire Mob ility System.
Changing a wheel
Before changing a wheel
Observe the following precautions for your
own and your passenger's safety when chang
ing a wheel .
• After you experience a tire fa ilure, pull the
car well away from moving traffic and try to
reach
level g ro und before you stop¢ /.1..
• All passengers sho uld le ave the car a nd
move to a sa fe loca tion (fo r instance, beh ind
t h e guardrai l) ¢
/.1. .
• Engage the pa rking b rake to prevent your
vehicle from ro lling unintentionally ¢
/.1..
• Move selector leve r to position P ¢ &_ .
• Take the jack out of the luggage compart
ment
¢ page 250.
A WARNING
You or your passe ngers cou ld be injured
w hile c hanging a whee l if you do not fol
low t hese safety p re cau tions:
-If you have a flat t ire, move a safe dis
tan ce off the road. Tur n off the e ng in e,
tu rn the e mergen cy fla shers o n and use
other wa rning dev ices to alert o ther mo
torists.
- M ake su re th at passengers wai t in a safe
place away from the ve hicl e an d well
away from the road and traff ic.
- T o help p revent the veh icle from mov ing
s u dden ly and possibly slipping off the
jack, a lways fully set the parking bra ke
and bloc k the whee l diagona lly opp osite
the whee l being cha nged. When one
front whee l is lifted off the gro und, plac
ing the A utomat ic Transmiss io n in P
(Pa rk) will
not pre vent the vehicle from
moving. -
Before you change a wheel, be s ure t he
ground is level and firm. If necessary,
use a sturdy board under the jack.
- Always store the vehicle tool kit, the jack
and the rep laced tire in t he luggage com
partment
¢page 129.
(D Note
If you are changing the whee l on a steep
i ncl ine, use a roc k or similar object to
block the opposite whee l to prevent the
vehicle from moving.
(D Tips
- Before changing the wheel, you must ac
tivate the jacking mode, so that t he au
tomatic cont rols for the Adaptive Air
Suspension* do not ma ke it mo re d iff i
cult to lift the veh icle w it h the jack
¢page 256.
- Obey all laws.
Changing a wheel
When you change a wheel , follow these
quence described below step-by-step and in
exactly that order .
l. Activate the vehicle jack mode*
¢ page 256.
2. Remove the wheel bolt caps* . For more
details see also ¢
page 255, Wheels with
wheel bolt caps.
3. Loosen the wheel bolt s ¢page 255.
4. Loc ate the p roper moun ting point fo r the
j ack an d align the jack be low that poin t
¢page 256.
5. Raise the car with the jack¢ page 256.
6. Remove the wheel with the flat tire and
then insta ll the other whee[¢
page 258.
7. Tighte n all whee l bolts lightly .
8.
Lower the vehicle wi th the jack .
9 . Use the wheel bolt w rench and
firmly
t ig ht en al l w heel bo lt s¢ page 255.
10. Re place the wheel bolt caps* .
Page 257 of 292
11. Deactivate the vehicle jack mode* in the
MMI:
! CARI function button> (C ar)* sys
tem s
control button > Servicing & chec ks
> Air susp. : jack mo de> Off .
The vehicle jack mode* switches off automati
cally at speeds above 6 mph (10 km/h).
A WARNING
Always read and follow all WARNINGS and
information
c:> .&. in Raising the vehicle on
page 257
and c::> page 259.
After changing a wheel
A wheel change is not complete without the
doing the following .
.. Always store the vehicle tool kit, the jack*
and the replaced tire in the luggage com
partment
c::> page 129.
.. As soon as possible, have the tighten ing
torqu es
on all wheel bolts checked with a
torque wrench . The correct tightening tor
que is 90 ft lb (120 Nm) .
.. Have the flat tire
re pl ace d as soon as poss i
ble.
@ Tips
- If you notice that th e whee l bolts are
corroded and difficult to turn wh ile
changing a t ire, they should be replaced
before you check the tighten ing torque .
- Drive at reduced speed unt il you have the
tightening torq ues checked .
- After changing a wheel, the tire pressure
i n a ll four tires must be checked/cor rect
ed and the tire pressure mon itoring indi
cator must be stored in the MM I
c::>page248 .
What do I do now ? 255
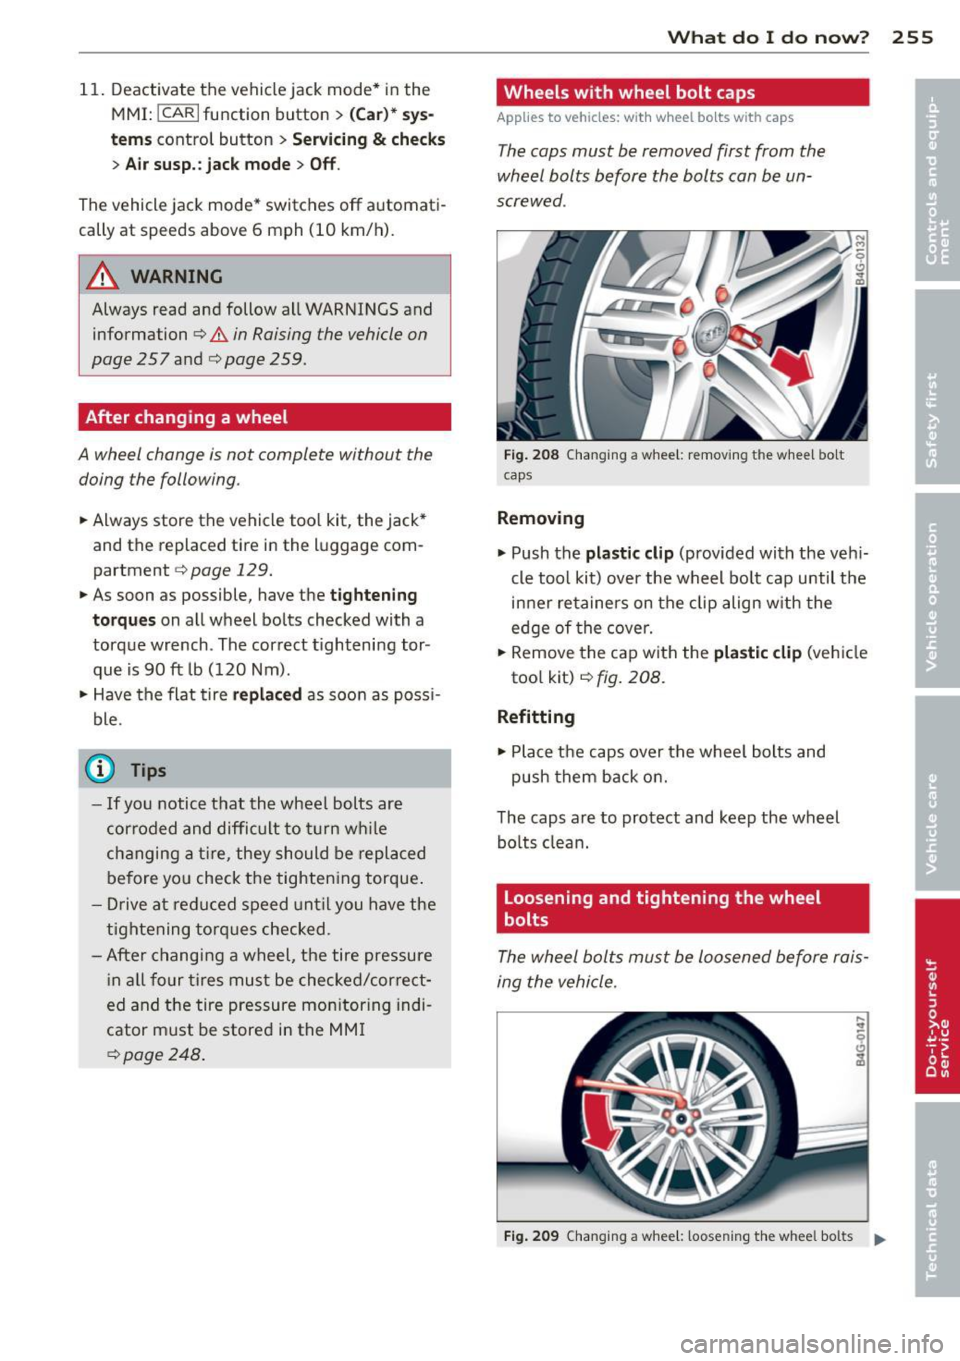
Wheels with wheel bolt caps
Applies to vehicles: with wheel bolts with caps
The caps must be removed first from the
wheel bolts before the bolts can be un
screwed .
Fig. 208 C hanging a whee l: removi ng the wheel bo lt
caps
Removing
.. Push the pla stic clip (provided with the veh i
cle too l kit) over the wheel bo lt cap until the
inner retainers on the clip align w ith the
edge of the cove r.
.,. Remove the cap with the
plas tic clip (ve hicle
too l kit)
c::> fig. 208 .
Refitting
.,. Place the caps over the whee l bolts and
push them back on.
The caps are to protect and keep the wheel bolts clean.
Loosening and tightening the wheel
bolts
The wheel bolts must be loosened before rais
ing the vehicle.
Fig. 209 Changing a wheel: loosening t he wheel bolts ..
Page 258 of 292
256 What do I do now?
Loosening
.,. Slide the wheel wrench onto the wheel bolt
as far as it will go.
.,. Take tight hold of the
end of the wrench
handle and turn the wheel bolts
counter
clockwise
about one single turn in the direc
t ion of arrow
c:;, fig. 209.
Tightening
.,. Slide the wheel wrench onto the wheel bolt
as far as it will go .
.,. Take tight hold of the
end of the wrench
hand le and turn each wheel bolt
clockwise
until it is seated.
_& WARNING
- Do not use force or hurry when changing
a wheel -you can cause the vehicle to slip
off the jack and cause serious personal injuries.
- Do not loosen the wheel bolts more than
one turn
before you raise the vehicle with
the jack. -You risk an injury.
@ Tips
- Never use the hexagonal socket in the
handle of the screwdriver to loosen or
tighten the wheel bolts.
- If a wheel bolt is very tight, you may find
it easier to loosen by carefully pushing
down on the end of the wheel bolt
wrench with
one foot only. As you do so,
hold on to the car to keep your balance
and take care not to slip.
Ra ising the vehicle
The vehicle must be lifted with the jack first
before the wheel can be removed .
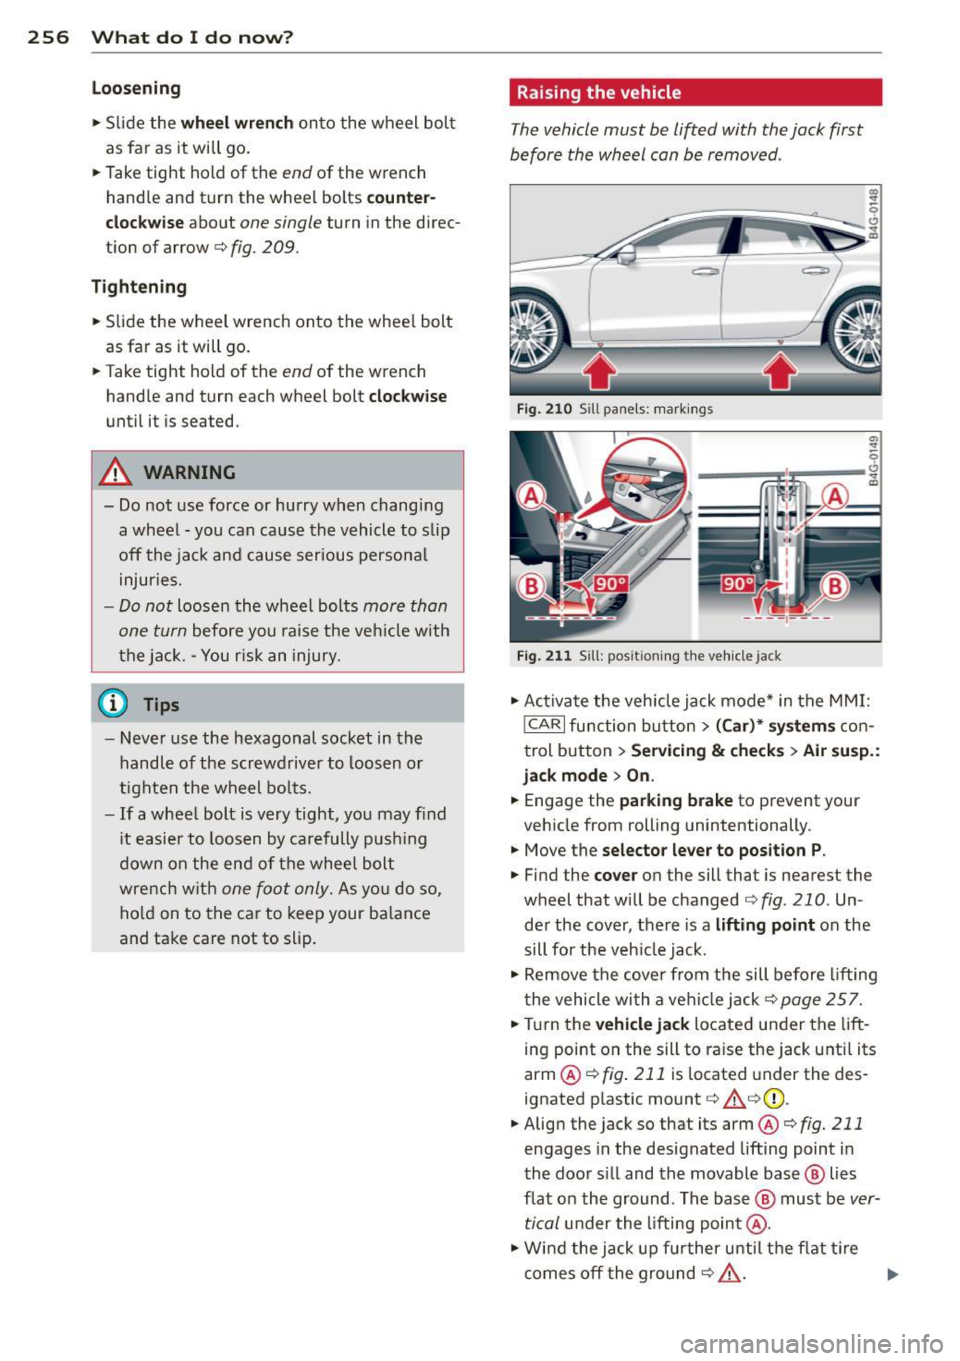
Fig. 210 Sill pane ls : markings
; q
--~~~~~-~
Fig. 211 Sill: posit ioning the Ve hicle jack
.,. Activate the vehicle jack mode* in the MMI:
!CARI function button> (Car)* systems con
trol button>
Servicing & checks> Air susp.:
jack mode
> On.
.,. Engage the parking brake to prevent your
vehicle from rolling unintentionally.
.,. Move the
selector lever to position P .
.,. Find the cover on the sill that is nearest the
wheel that will be changed
c:;, fig. 210 . Un
der the cover, there is a
lifting point on the
sill for the vehicle jack .
.,. Remove the cover from the sill before lifting
the vehicle with a vehicle jack
c:;, page 257 .
.,. Turn the vehicle jack located under the lift
ing point on the sill to raise the jack until its
arm @
c:;, fig. 211 is located under the des
ignated plastic mount
c:;, &c:;,(I) ,
.,. Align the jack so that its arm @ c:;, fig. 211
engages in the designated lifting point in
the door s ill and the movable base @ lies
flat on the ground . The base @ must be
ver
tical
under the lifting point @ .
.,. Wind the jack up further until the flat tire
comes off the ground
c:;, & . ..,.