brake pads AUDI RS7 SPORTBACK 2014 Owners Manual
[x] Cancel search | Manufacturer: AUDI, Model Year: 2014, Model line: RS7 SPORTBACK, Model: AUDI RS7 SPORTBACK 2014Pages: 292, PDF Size: 73.56 MB
Page 15 of 292
Instrument s and warnin g/indic ator ligh ts 13
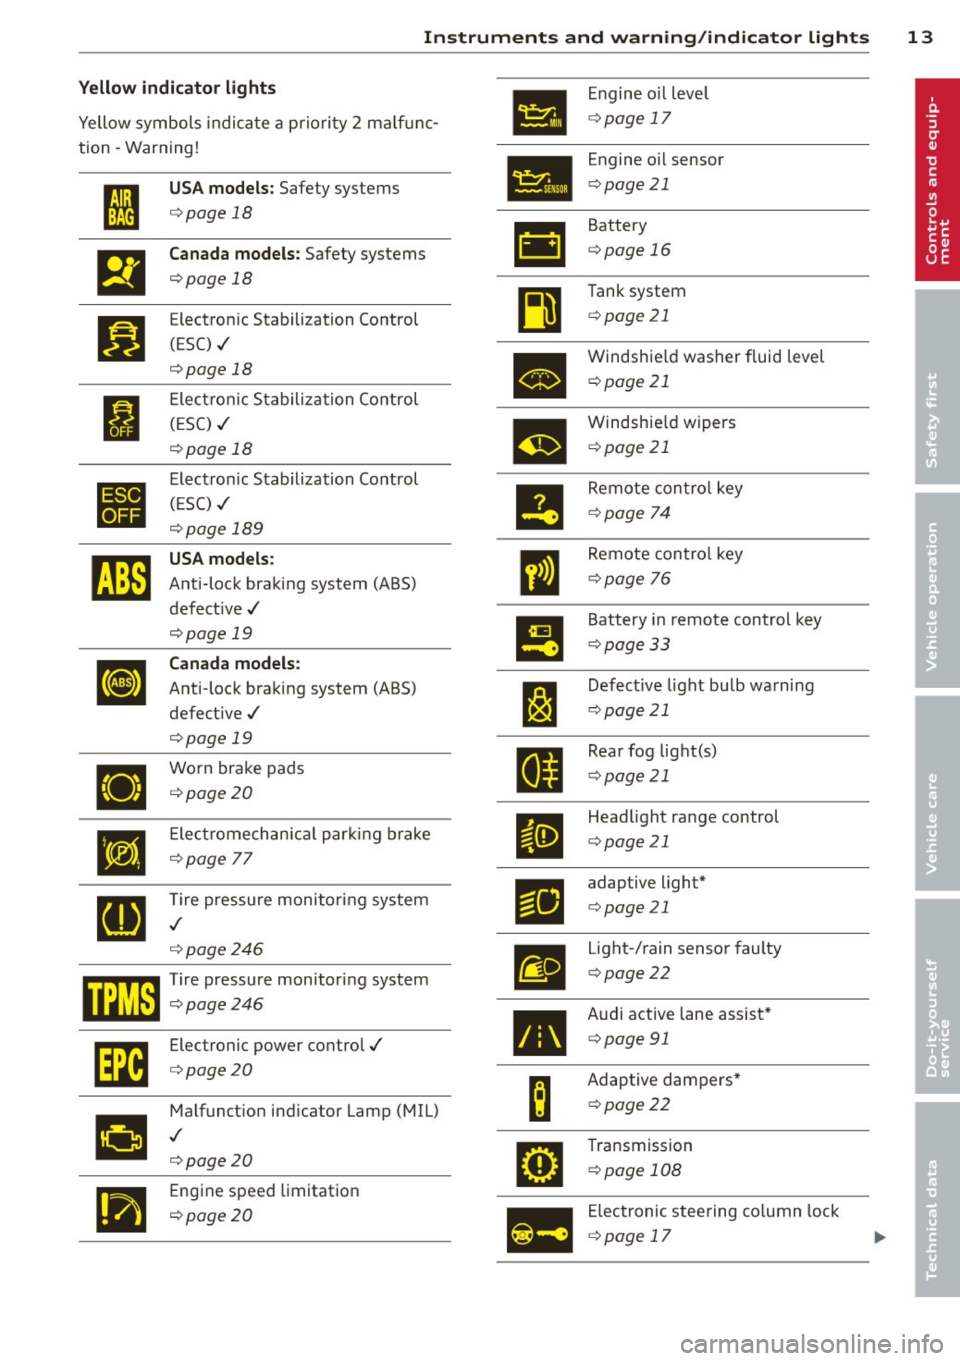
Yellow indi cator li ght s
•
Engine o il level
Yellow symbols indica te a priority 2 ma lf u nc-
c> page 17
tion -Warning!
Engine oil sensor
• I
US A models : Safety systems c>page 21
c> page 18
• Battery
&1
El
Canad a models : Safety systems c>page 16
c>page 18
Tank system
~
Bl
Electronic Stabilization Control c>page 21
(ESC) ./
c>page 18
•
Windshie ld washer fluid level
c> page 21
Electronic Stabiliza tion Control
I (ESC) ./
m
Windshie ld wipers
c> page 18 c>
page 21
•
Electronic Stabilization Control
Remote control key
( E SC) ./
II c>page 74
c>page 189
rJi3
USA models :
ll
Remote contro l key
Anti-lock braking system (ABS)
c>page 76
defect ive ./
c>page 19
!9
Battery in remote control key
Canada models :
c>page 33
[I] Anti-lock braking system (ABS)
J:I
Defective light bulb warning
defect ive ./
c>page 21
c>page 19
Rear fog lig ht(s)
•
Worn brake pads
II c>page 21
c>page20
•
E lect romechan ica l par king brake
II
Head light range control
c>page 21
c>page
77
[g
Tire pressure monitoring system
Fil
adaptive light*
c> page 21
./
c>page246
m
Light-/rain sensor faulty
mm Tire pressure monitor ing system c> page 22
c:::>page246
•
Audi active lane assist*
Im
Electronic power control./ c>page 91
c:::>page20
B
Adaptive dampers*
Malfunct ion ind icator Lamp (MIL)
c>page22
•
./
c>page20
•
Transmission
c> page 108
.,
Engine speed limitation
c> page20
Ill
Electronic steering column lock
c> page 17
Page 17 of 292
Instrument s and warnin g/indic ator ligh ts 15
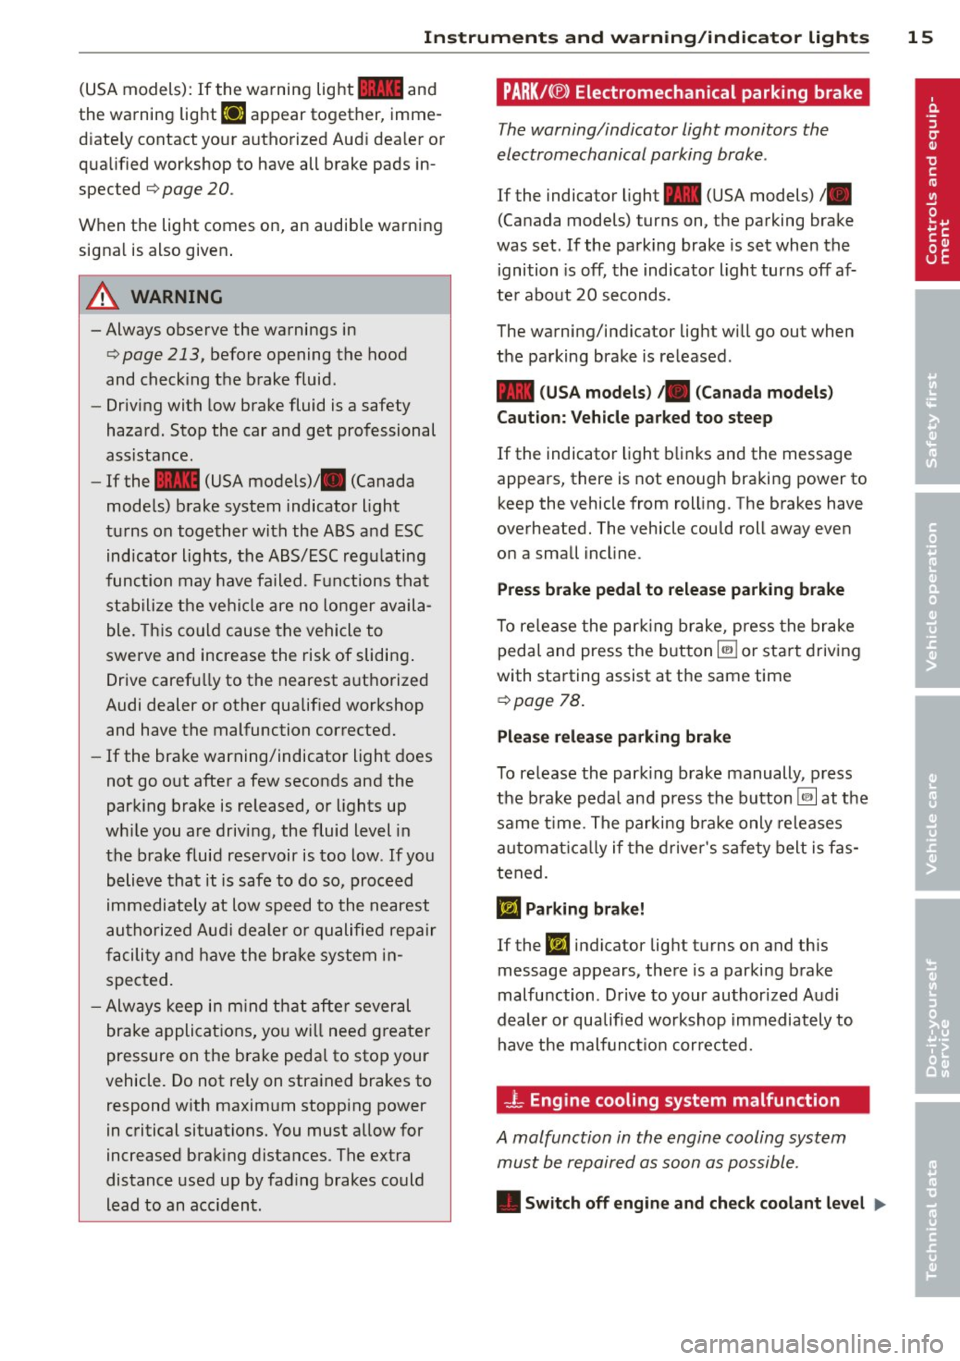
(USA models): If the warnin g light 1111 and
the warning light
EiJ appear together, imme
d iate ly contact your authorized Aud i dea ler or
qua lified workshop to have all brake pads in
spected
¢ page 20 .
When t he light comes on, an audib le warning
signal is also given .
A WARNING
-Always observe the warnings in
¢ page 213, before opening the hood
and checking the brake fluid.
- Driv ing with low brake fluid is a safety
hazard . Stop the car and get professional
assistance.
- If the 1111 (USA models)/ . (Canada
mode ls) brake system indicator light
tu rns on together with the ABS and ESC
indicator lights, the ABS/ESC regu lating
function may have failed. Functions tha t
stabilize the ve hicl e are no longer availa
ble. This cou ld cause the vehicle to
swerve and increase the risk of sliding .
Drive carefully to the nearest a uth orized
Audi dealer or other qualified workshop
and have the malfunction corrected.
- If the brake warning/indicator light does
not go out after a few seconds and the
park ing brake is released, or lights up
wh ile you are drivi ng, the fluid level in
the brake fluid reservoir is too low .
If you
b elieve that it is safe to do so, proceed
immediately at low speed to the nearest
autho riz ed Au di d ealer o r qualifie d re pair
f acili ty and have the bra ke system in
spected.
- Always kee p in m ind tha t afte r several
brake applicat ions, yo u will nee d greater
pressure on the brake peda l to stop your
vehicle. Do not re ly on strained brakes to
respond w ith maxim um stopping power
in critical situations. You must allow for
increased braking distances . The extra
distance used up by fad ing brakes could
lead to an acc ident.
PARK!< ®> Electromechanical parking brake
The warning/indicator light monitors the
electromechanical parking brake .
If the indicator light- (USA models)/ .
(Canada models) turns on, the parking brake
was set . If the park ing brake is set when the
ignition is off, the indicator light turns off af
te r abo ut 20 seconds.
The warning/indic ator light will go out when
the parking brake is re leased .
-(USA models ) ,. (Canada models )
Caut ion: Vehicle parked too steep
If the indicator light b links and the message
appears, there is not enough braking power to
keep the vehicle from roll ing. The brakes have
overheated. The vehicle could roll away even
o n a small incl ine .
Press brake pedal to release parking brake
To re lease the par king brake, press the brake
peda l and press the button ~ or start driv ing
with starting assist at the same time
¢ page 78.
Pl eas e r elease parking brake
To re lease the park ing b rake manually , press
the b rake peda l and press the button~ at the
same time. The parking b ra ke only releases
a ut omat ica lly if the d river 's sa fe ty belt is fas
tened.
Ill Parking brake!
If the DI indicator lig ht turns on and th is
message appears, there is a parking brake
malfu nction . D rive to your authorized Audi
deal er or qualified workshop immediately to
have the malfun ct io n corrected.
-L Engine cooling system malfunction
A malfunction in the engine cooling system
must be repaired as soon as possible .
• Switch off engine and check coolant lev el liJI,
Page 22 of 292
20 Instruments and warning /indicator lights
accident. Have your vehicle repaired im
mediately by your authorized Audi dealer
or a qualified workshop. Drive slowly and
avoid sudden, hard brake applications .
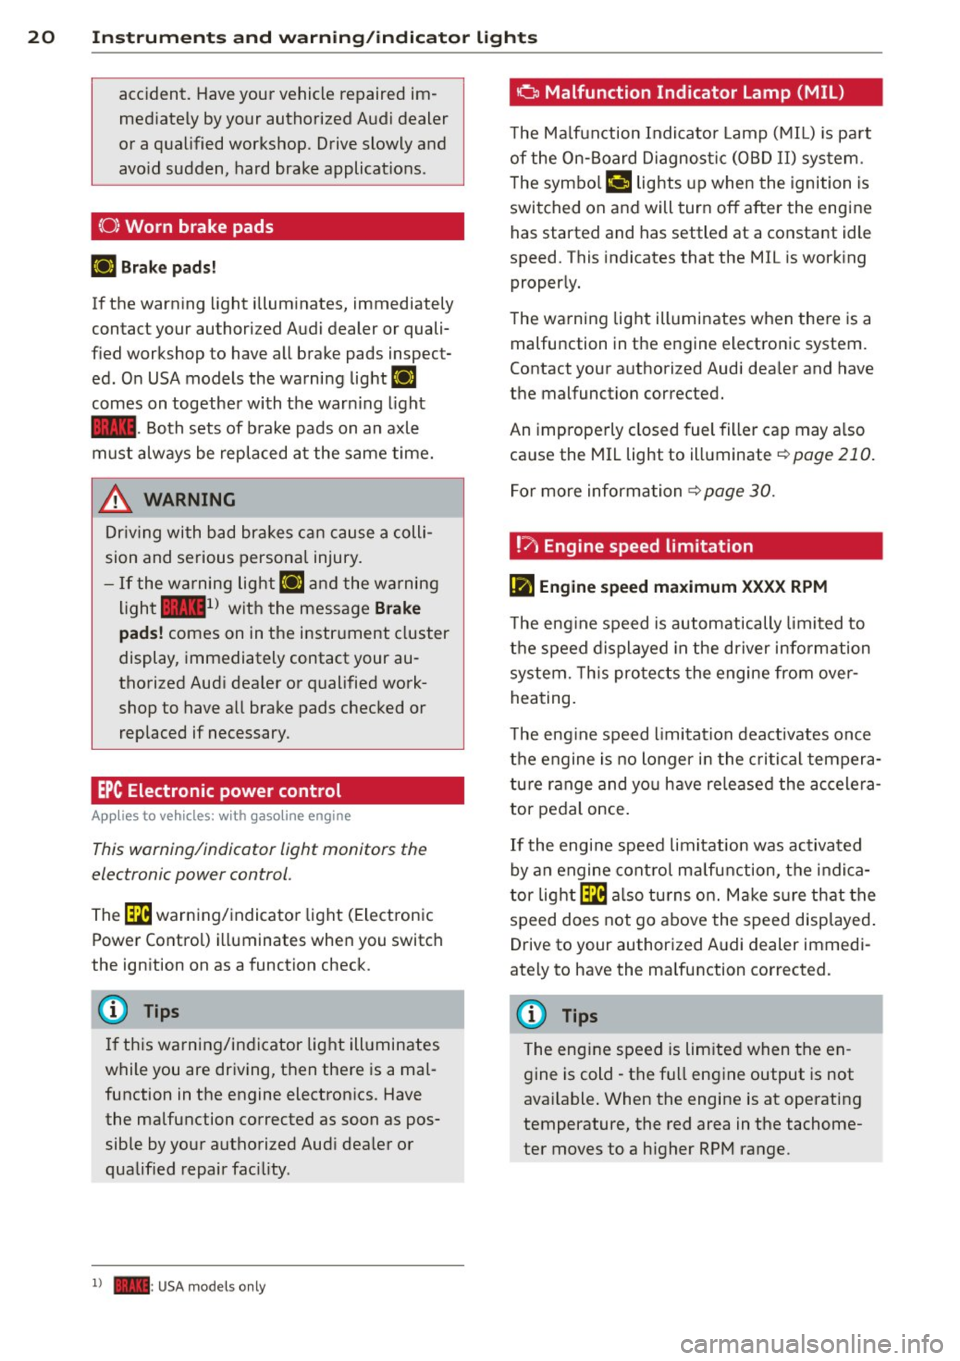
(0) Worn brake pads
EIJ Brake pads!
If the warn ing light illuminates, immediately
contact your authorized Audi dealer or quali
fied workshop to have all brake pads inspect
ed. On USA models the warning light
EIJ
comes on together with the warn ing light
1111-Both sets of brake pads on an axle
must always be replaced at the same time.
A WARNING
Driv ing with bad brakes can cause a colli
sion and serious personal injury.
-If the warning light EIJ and the warning
light
11111> with the message Brake
pads!
comes on in the instrument cluster
display, immediately contact your au
thorized Audi dealer or qualified work
shop to have all brake pads checked or replaced if necessary.
EPC Electronic power control
App lies to vehicles: with gaso line engine
This warning/indicator light monitors the
electronic power control .
The ~ warning/indicator light (Electronic
Power Control) illuminates when you switch
the ignition on as a function check .
(D Tips
If this warning/indicator light illuminates
while you are driving, then there is a mal
function in the engine electronics. Have
the malfunction corrected as soon as pos sible by your authorized Aud i dealer or
qualified repair facility.
l) - : USA models only
-
o Malfunction Indicator Lamp (MIL)
T he Ma lfunction Indicator Lamp (MIL) is pa rt
of the On-Board Diagnostic (OBD II) system.
The symbo l
¢.j lights up when the ignition is
switched on and will turn off after the engine
has started and has settled at a constant idle
speed. This indicates that the MIL is work ing
properly.
The warning light illuminates when there is a
malfunction in the engine electronic system.
Contact your authorized Audi dea ler and have
the malfunction corrected.
An improperly closed fuel filler cap may a lso
cause the MIL light to illuminate
¢ page 210.
For more information
¢ page 30.
!?) Engine speed limitation
lfl Engine speed maximum XXXX RPM
The eng ine speed is automatically limited to
the speed displayed in the driver information
system. This protects the engine from over
heating.
T he eng ine speed limitation deactivates once
the engine is no longer in the critical tempera
ture range and you have re leased the accelera
tor pedal once.
If the engine speed limitation was activated
by an engine control malfunction, the indica
tor light ~ also turns on. Make s ure that the
speed does not go above the speed displayed.
Drive to your authorized Audi dealer immedi
ately to have the malfunction corrected.
@ Tips
The engine speed is limited when the en
gine is cold - the full engine output is not
available . When the engine is at operating
temperature, the red area in the tachome
ter moves to a h igher RPM range.
Page 195 of 292
Braking
General information
What affects braking efficiency?
Operating condit ions and d riv ing hab it s
The brakes on today's automobi les are sti ll
subject to wear, depending largely on operat
ing conditions and dr iving habits
c:> A . On
vehicles that are either driven mostly in stop
and-go city traffic or are driven hard, the brake pads should be checked by your author
i zed Audi dealer more often than specified in
the
Warr ant y & Maint enan ce bookle t. Failure
to have your b rake pads inspected can res ult
i n red uced brake performance.
On steep slopes, you should use the brak ing
effect of the engine. This way, you p revent un
necessa ry wea r on the brake system.
If you
must use yo ur brakes, do not ho ld the brakes
down continuously. Pump the brakes at in ter
va ls.
Moistu re or road salt
Unde r ce rtain conditions, for example, when
driving through wate r or very heavy rain, or
even after washing your vehicle, the braking
effect can be reduced d ue to moisture (or in
freezing conditions ice) on the brake pads . A
few careful brake app lications should dry
off
the brake pads or remove any ice coatings.
When you are driving at higher speeds with
the windshield wipers on, the brake pads will
briefly touch the brake discs in regular inter
vals so as to improve reaction t ime when brak
ing on wet surfaces . You the driver w ill not no
tice anything .
The effectiveness of the brakes can be reduced
when the vehicle is dr iven on a salt-covered
road and the brakes are not used . Here too,
you should clean
off accumulated salt coat ing
from b rake discs and pads with a few careful
applications of the brake
c:> ,&. .
Cor ro sion
There may be a tendency for dirt to build up
on the brake pads and corrosion to form on
Int ellig ent technolog y 193
the d iscs if the car is not driven regu larly or
only for short trips with litt le use of the
brakes.
If the brakes a re not used frequently, o r if cor
rosion has formed on the discs, it is adv isable
to clean
off the pads and discs by braking
firmly a few times from a moderately high
speed
c:> ,&. .
Fault s in the brak e syste m
If you shou ld notice a sudden increase in
brake pedal trave l, then one of the two brake
circuits may have fai led ¢
A.
Low brake fluid lev el
Malfunctions can occu r in the bra ke system if
the b rake fluid level is too low. The brake flu id
level is monitored elec tronica lly.
Brake booster
The brake booster works with vacuum pres
su re which is created only whe n the engine is
runn ing ¢,&. .
Brake lining we ar s tatus
Brake lining wear may be checked by visual in
spection of the condition of the brake pads
through the open ings in the w heel. If neces
sary, the wheel may be removed fo r thi s in
spe ction ¢
page 2 54, Changing a wheel.
_& WARNING
-You should perform braking maneuvers
for the purpose of cleaning the brake system only if road conditions permit .
Other road users must not be put at risk -
you may ca use an accident!
- Before descend ing a steep grade, reduce
speed and sh ift transmission into a lower
gear or lower dr iving range. Do not ride
the brakes or hold the pedal down too long or too often . Th is could cause the
brakes to get hot and diminish braking
efficiency.
- Do not " ride the brakes" by rest ing your
foot on the pedal when you do not intend
to b rake. This may cause the brakes to
•
•
Page 196 of 292
194 Intelligent technology
overheat, premature wear and increased
stopping distance.
- Under certain climatic and operating
condit ions such as passing through wa
ter, driving in heavy ra in or after wash ing
the vehicle, the effect iveness of the
brakes can be reduced. In winter, ice ca n
accumulate on the brake pads, linings ,
discs and d rums . Carefully apply brakes
for a test . B rakes wi ll dry a nd ice coat
ings will be cleaned off after a few c are
f ul brake app lications .
- Driv ing fo r an ex tende d pe riod of time on
salt-covere d roads w ithout us ing yo ur
brakes can also affect braking efficiency.
Clean off accumulated salt coating from
brake discs and pads w ith a few caref ul
brake applicat ions.
- If you damage the front spoiler, or if you
install a different spoiler, be sure the air
flow to the front brakes is not obstruct ed. Otherwise the brake system could
overheat reducing the effectiveness of
the ent ire brake system .
- Failure of one brake c ircuit will impair
the braking capability res ulting in an in
creased stopp ing distance. Avoid driv ing
the vehicle and have it towed to t he near
est Au di dea le r o r q ualified w ork sh o p.
- Never let the vehicle ro ll to a stop w ith
the e ngine shu t off.
- If the brake booster is not working, the
bra ke pedal must be p ressed conside ra
bly harder to make up for the la ck of
booster assistance.
Electro-mechanical
power assist, dynamic
steering
The electro-mechanical power assist helps
the driver when steering .
Power steering adapts electronically based on
the vehicle speed .
Indicator lights and messages
• Steering defective! Stop the vehicle
If this indicato r light turns on and stays on
and t his message appears, the power steering
may have failed.
D o
not con tinue dr iv ing . See your author ized
Audi dealer or other qualified repair facility
for assistance .
'I-lj Steering: Sy stem fault You can continue
driving
If the indicato r light turns on and the mes
sage appea rs, the stee ring may be more diffi
cul t to move o r more sens itive th an usua l. The
stee ring wheel may a lso be at an ang le when
driving straight .
D rive slowly to you r authorized Aud i dea le r or
qualified wo rkshop to have the ma lf u nct ion
corre cted.
(:rij Dynamic st eering: Initializing
If this driver message appears and the indica
tor light is f lashing on the instrument panel,
dynam ic steer ing* is being rei nitia lized . Afte r
sta rting the engine, the stee ring wheel will
move s ligh tly. Re- ini tiali zation mig ht be ne c
essa ry if the stee ring wheel w as moved h ard
to the left and r ight wh ile the vehicle was not
moving . The display goes out as soon as initi
alization is complete.
D rive slowly to you r authorized Audi de aler or
qualified wo rkshop to have the ma lf u nct ion
corrected.
_& WARNING
Have t he dynamic stee ring * system mal
f u nction repa ired as soon as possible by an
a uthorized Audi dea ler or qua lified wor k
shop - risk of acc ident !
(D Tips
If the . or (:rij indicator light on ly stays
on for a short time, yo u may continue driv
i ng.
- The dynamic steering * stab ility systems
are not avai lab le in the event of a system
ma lf u nction.
- For add itiona l information on dynamic
steering *, refer to
c> page 96.
Page 200 of 292
198 Driving and environment
Driving and
environment
The first 1,000 miles
(1,500 km) and
afterwards
New engine
The engine needs to be run-in during the first
1,000 miles (1,500 km).
For the fir st 600 miles (1,000
kilometers ):
.,. Do not use full throttle.
... Do not d rive at engine speeds that are more
than 2/3 of the max imum permitted RPM.
... Avoid high engine speeds.
From 600 to 1,000 mile s (1 ,000 to
1,500 kilometers):
... Speeds can gradually be increased to the
max imum pe rm iss ible road or eng ine speed .
During and after break-in period
.,. Do not rev the eng ine up to high speeds
when it is cold. Th is app lies whether the
transm ission is in N (Neutra l) or in gear.
After the break-in period
... Do not exceed maximum engine speed un
der any circumstances.
.,. Upshift into the next hig her gear
before
reaching the red area at the end of the tach
ometer scale
c:> page 10.
During the first few hours of driving, the en
g ine's interna l friction is higher than later
when all the moving parts have been broken
in . How well this break- in process is do ne de
pends to a conside rable extent on th e way the
ve hicl e is driven during the first 1,0 00 miles
(1, 500 k ilome ters).
0 Note
E xtremely high engi ne speeds are auto
mat ica lly reduced. However, these rpm
lim its are progr amme d for an engine well
r u n- in, not a new engine .
{® For the sake of the environment
Do not drive with unnecessarily high en
g ine speeds - upshifting ear ly saves fuel,
reduces no ise and protects the environ
ment.
, New tires
If your vehicle is runni ng on new tires, drive
part icularly caref ul for the first 350 miles
(500 kilomete rs) afte r fitt ing.
A WARNING
N ew tires tend to be sl ippery and mus t al
so be "b roken -in" . Be s ure to remember
this dur ing the fi rst 350 mi les ( 500 kilo
meters) . Brake gently . Avoid fo llow ing
closely behind other vehicles or other sit
uations that m ight require sudden, hard
braking .
New brake pads
Remember that new brake pads do not have a
full bra king effect dur ing the fi rst 250 m iles
(400 kilomete rs) afte r they a re insta lled.
New brake pads have to be "burnished in" be
fo re t hey have optima l grab
c:> A .
During the break- in period, you should avoid
putting severe loads on the brakes. Severe
l oads include, for example, sudden hard brak
i ng, in particular at very high speeds or, for
example, on mounta in passes .
A WARNING
New b ra ke pa ds don't have t he bes t stop
pi ng power and m us t be "broke n-in " dur
i ng the in itial 1 00 to 150 mi les (15 0 to
2 00 k ilometers) of no rma l city driving . You
can compensate for this by pressing th e
br ake peda l mo re f irm ly . This also applies
l ater when new pads are installed.
Page 201 of 292
Avoid damaging the
vehicle
When you are driving on poor roads, or over
curbs, steep ramps, etc., make certain that
low-lying parts such as spoilers and exhaust
system parts do not bottom out and get dam
aged.
T his is especially true for vehicles with low
slung chassis (sports chassis) * and fully load
ed veh icles .
Driving through water
on roads
Note the following to avoid vehicle damage
when driving through water, for example on
flooded roads:
- T he water must not be any h igher than the
bottom of the veh icle body.
- Do not d rive faster than wa lking speed.
..&, WARNING
After driving through wate r, m ud, slush,
etc., the brakes may be slow to take effect
because o f wet brake rotors and pads . Dry
the brakes first by braking carefully to re
store the full braking effect.
(D Note
- Vehicle components such as the eng ine,
transmission, suspension or e lectrical
system can be severely damaged by driv ing through water.
- Check the depth o f the water before driv
ing through it.
- Do not s top the veh icle, drive in reverse
or switc h the engine off when driving
through water.
- Keep in mind that oncoming vehicles may create waves that raise the water
level and make it too deep for your vehi
cle to drive through safely.
- Avoid driving thro ugh sa lt water because
it can ca use corrosion.
-
Dri vin g and en vironm ent 199
Warming up and
cooling down
By carefully warming up and cooling down
your vehicle, you can help ensure that it is not
overstressed unnecessar ily during sporty dr iv
ing.
When warming up, the vehicle is dr iven at a
maximum engine speed of 6000 RPM in order
to raise the engine o il temperature to a mini
mum of 140
°F (60 °() . The t ires a lso on ly
reach the ir full road holdi ng capabi lity once
they have warmed up.
The cooli ng fan can cont inue to run in your ve
hicle after the engine is switched off . Howev
er, driving the veh icle to coo l it down is pa rti c
ul arly important. Dur ing spo rty driving , the
engine and b rakes, the exhaust system, and
the transmission a ll become extremely hot.
Before you park the vehicle, you should drive
it for a few miles/kilometers at light load in
the low rpm range to allow it to cool down .
Catalytic converter
App lies to vehicles: wi th gaso line e ngi ne
It is very important that your emission con
trol system (catalytic converter) is function
ing properly to ensure that your vehicle is run
ning in an environmentally sound manner.
"' Always use lead-free gasoline c:> page 208,
Fuel supply .
"' Never run the tank down all the way to emp
ty.
"' Never put too much mo to r o il in yo ur eng ine
c:> page 218, Adding engine oil "t:::r..
"' Never try to push -or tow -start you r vehicle .
T he catalytic co nve rter is an efficient "clean
u p" dev ice bui lt into t he exhaus t system of
the ve hicle . The cata lytic converter bu rns
many of the pollutants in the exha ust gas be
fore they are re leased into the atmosphere.
T he exclus ive use of unleaded fuel is c ritical ly
i mportant for the life of the catalyt ic convert -
er and proper functioning of the engine .
Iii>
•
•
Page 225 of 292
Before you check anything in the engine com
partment,
always r ead and heed all W ARN
ING S ~ A in Working in the engine compart
ment on page 213.
.. Read the brake fluid level from the brake
fluid reservoir ¢
fig. 192, ~ page 215,
fig . 188.
The brake fluid level must be be
tween the "MIN" and "MAX" markings.
The location of the brake fl uid reservoir can be
seen in the engine compartment illustration
¢page 215.
The fluid level may drop slightly after some
time due to the automatic adjustment of the brake pads . This is not cause for alarm .
If the brake fluid level falls considerably be
l ow the "MIN" mark, the brake wa rning/indi
cator light
1111 (U .S . models)/ . (Canadian
models) will come on
~ page 14. Do not con
tinue to operate the vehicle. The comp lete
brake system shou ld be thoroughly checked
by an authorized Audi dealer or other quali
f ied fac ility and the cause corrected . If the
b rake fluid level is too low, the brake warn ing/
i ndicator light w ill illuminate . Contact an au
thor ized Audi dealer
imm ediately .
Changing brake fluid
Have the brake fluid changed by an experi
enced technician .
Brake fluid absorbs moisture from the a ir . If
the water content in the brake fluid is too
hi gh, cor rosion in the brake system may result
after a per iod of t ime . The bo iling po int of the
b rake fluid w ill also decrease considerab ly and
decrease braking performance.
Therefore, the brake flu id must be changed
ev ery two ye ars. A lways use new b rake fluid
which confo rms to Federal Motor Vehicle
Standard "FMVSS
116 DO T 4".
The brake flu id rese rvoi r ca n be difficult to
r each, therefo re , we recommend that yo u
h ave the brake fl uid changed by you r autho r
i zed
Audi de aler . Your dea le r has the correct
Checkin g and fillin g 223
tools, the right brake fl uid and the know -how
to do this for you .
A WARNING
-Brake flu id is poisonous. It must be stor
ed only in the closed or iginal container
out of the reach of children!
- Brake failure can resu lt from o ld or inap
propriate brake f lu id. Observe these pre
cautions:
- Use only b rake fluid tha t meets SA E
spe cificat ion
J 17 03 and conforms to
Federa l Moto r Ve hicl e Standard
116.
Always check with your authorized Audi
dealer to make sure yo u are using the
correct brake fluid. The correct type of
brake f luid is also ind icated on the
brake f luid reservoir .
- The brake fluid must be new. Heavy use
of the brakes ca n cause a vapor lock if
the brake fluid is left i n the system too
long. This can se riously affect the effi
c iency of the b rakes as well as your
safety , T his could result in an accident.
(!) Note
Brake fluid will damage the paint of your
vehicle.
@) For the sake of the environment
Because of the prob lem of proper disposal
of brake fluid as well as the spec ial too ls
r equired and the necessary expertise, we
r ecommend that you have th e brake flu id
changed by you r autho rized Aud i dea le r.
Battery
General information
Under normal operating cond itions, the bat
tery in your Audi does not need any ma inte
nance . With
high outside temperatu res or
lo ng da ily drives we recommend that you have
the e lectrolyte leve l che cked by a se rv ice fa
c il ity. The ele ctroly te leve l should also be
chec ked each t ime the battery is cha rged
~ page 226 . Iii>
•
•
Page 280 of 292
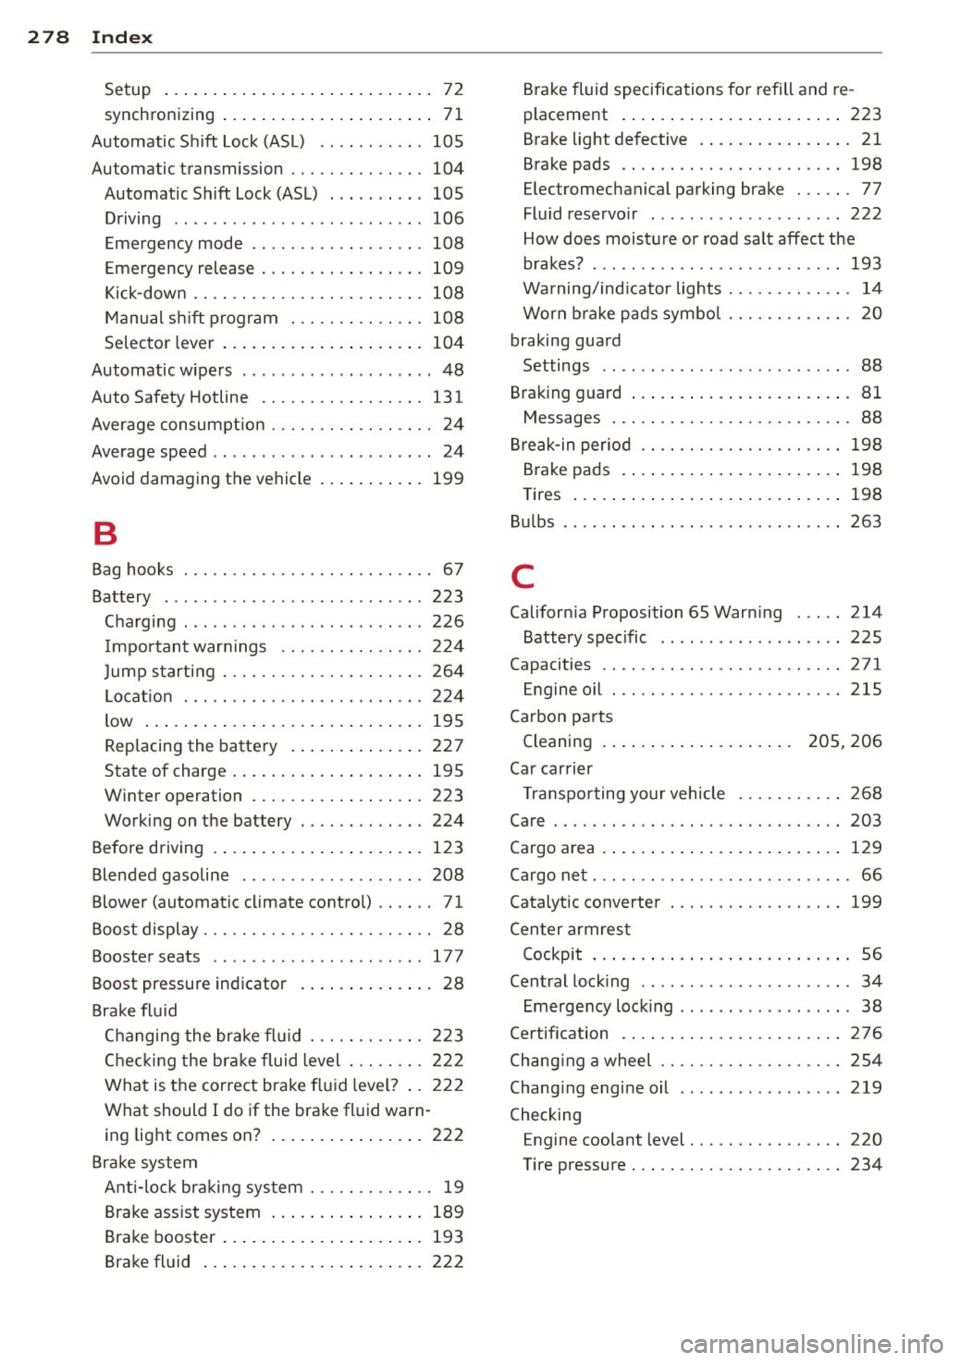
278 Index
Setup . . . . . . . . . . . . . . . . . . . . . . . . . . . . 72
synchronizing ............. ... .... .. 71
Automatic Shift Lock (ASL) .......... . 105
Automatic transmission . . . . . . . . . . . . . . 104
Automatic Shift Lock (ASL) . .. .. .. .. . 105
Driving .... .. ........ .... ... .. .. . 106
Emergency mode ........... .. .. ... 108
E mergency release ........ .. .. .. .. . 109
Kick -down ............... .... .... . 108
Manual shift program ......... .. .. . 108
Selector lever ............. ... .... . 104
Automatic wipers . .. ........ ... .. .. .. 48
Auto Safety Hotline . . . . . . . . . . . . . . . . . 131
Average consumption ....... .. .. .. .. . . 24
Average speed . . . . . . . . . . . . . . . . . . . . . . . 24
Avoid damaging the vehicle ........ .. . 199
B
Bag hooks . . . . . . . . . . . . . . . . . . . . . . . . . . 67
Battery ... .. .. .. ............ ... .. . 223
Charging ... .. .. .. .......... ... .. . 226
I mportant warnings ...... .. .. .. .. . 224
Jump starting .. ........ .. .. .. .. .. . 264
L ocat ion ..... ........... ........ . 224
l ow ... .... ................ ..... . 195
Rep lacing the battery ...... ... .. .. . 227
State of charge ............ ... .. .. . 195
Winter operation ......... .... .... . 223
Working on the battery .... .. .. .. .. . 224
Before driving . . . . . . . . . . . . . . . . . . . . . . 123
Blended gasoline .... ...... .. .. .. .. . 208
Blower (automatic climate control) . . . . . . 71
Boost display . . . . . . . . . . . . . . . . . . . . . . . . 28
Booster seats ... .... ...... .. .. .. .. . 177
Boost pressure indicator .......... .. .. 28
Brake fluid Changing the brake fl uid ... .... .. .. . 223
Check ing the brake fluid level . .. .. .. . 222
What is the correct brake fluid leve l? .. 222
What should I do if the brake fluid warn-
ing light comes on? ........ .... ... . 222
Brake system Anti-lock braking system ..... .. ...... 19
Brake assist system ........ ... .. .. . 189
Brake booster ............. ... .... . 193
Brake fluid ............... ... .... . 222 Brake fluid specifications for refill and re
placement
. . . . . . . . . . . . . . . . . . . . . . . 223
Brake light defective . . . . . . . . . . . . . . . . 21
Brake pads ...... ............. .... 198
Electromechanical parking brake . .... . 77
Fluid reservoir . .. ................ . 222
How does moisture or road salt affect the
brakes? ....... .. .. ........ ... ... . 193
Warning/ind icator lights ...... .. .. .. . 14
Worn b rake pads symbo l ........ .. .. . 20
braking guard
Settings . . . . . . . . . . . . . . . . . . . . . . . . . . 88
Braking guard ..... ............. ... .. 81
Messages . .. .. .. .. ........... .... . 88
Break-in per iod .... ............. .... 198
Brake pads .... .. ................ . 198
Tires .... ..... .. .. .............. . 198
Bu lbs .. .. .. .. .. .. .. .. ...... ... .. .. 263
C
California Proposition 65 Warn ing .... . 214
Battery specific .. ..... ......... ... 225
Capacities .. .... .. ................. 271
Engine oil ....... ............. .... 215
Carbon parts Cleaning . . . . . . . . . . . . . . . . . . . . 205, 206
Car carrier Transporting your vehicle ....... .. .. 268
Care ... .. .. .. .. .. ............. .. .. 203
Cargo area . ..... .. ............. ... . 129
Cargo net . . . . . . . . . . . . . . . . . . . . . . . . . . . 66
Catalytic converter .............. .. .. 199
Center armrest Cockpit . . . . . . . . . . . . . . . . . . . . . . . . . . . 56
Central locking .. .. .......... ...... .. 34
Emergency locking ... ....... ...... .. 38
Certification ..................... .. 276
Changi ng a wheel .. ... .......... .. .. 254
Changing engine oil .......... ...... . 219
Checking Engine coolant level ............ .... 220
Tire pressure ... .. ... .......... .. .. 234