AUDI RS7 SPORTBACK 2015 Owners Manual
Manufacturer: AUDI, Model Year: 2015, Model line: RS7 SPORTBACK, Model: AUDI RS7 SPORTBACK 2015Pages: 302, PDF Size: 74.76 MB
Page 261 of 302
"' N
a:: I.J "". rl I.O
"' rl
"' rl
What do I do now? Emergency warning
triangle
App lies to vehicles: with emerge ncy warning triangle
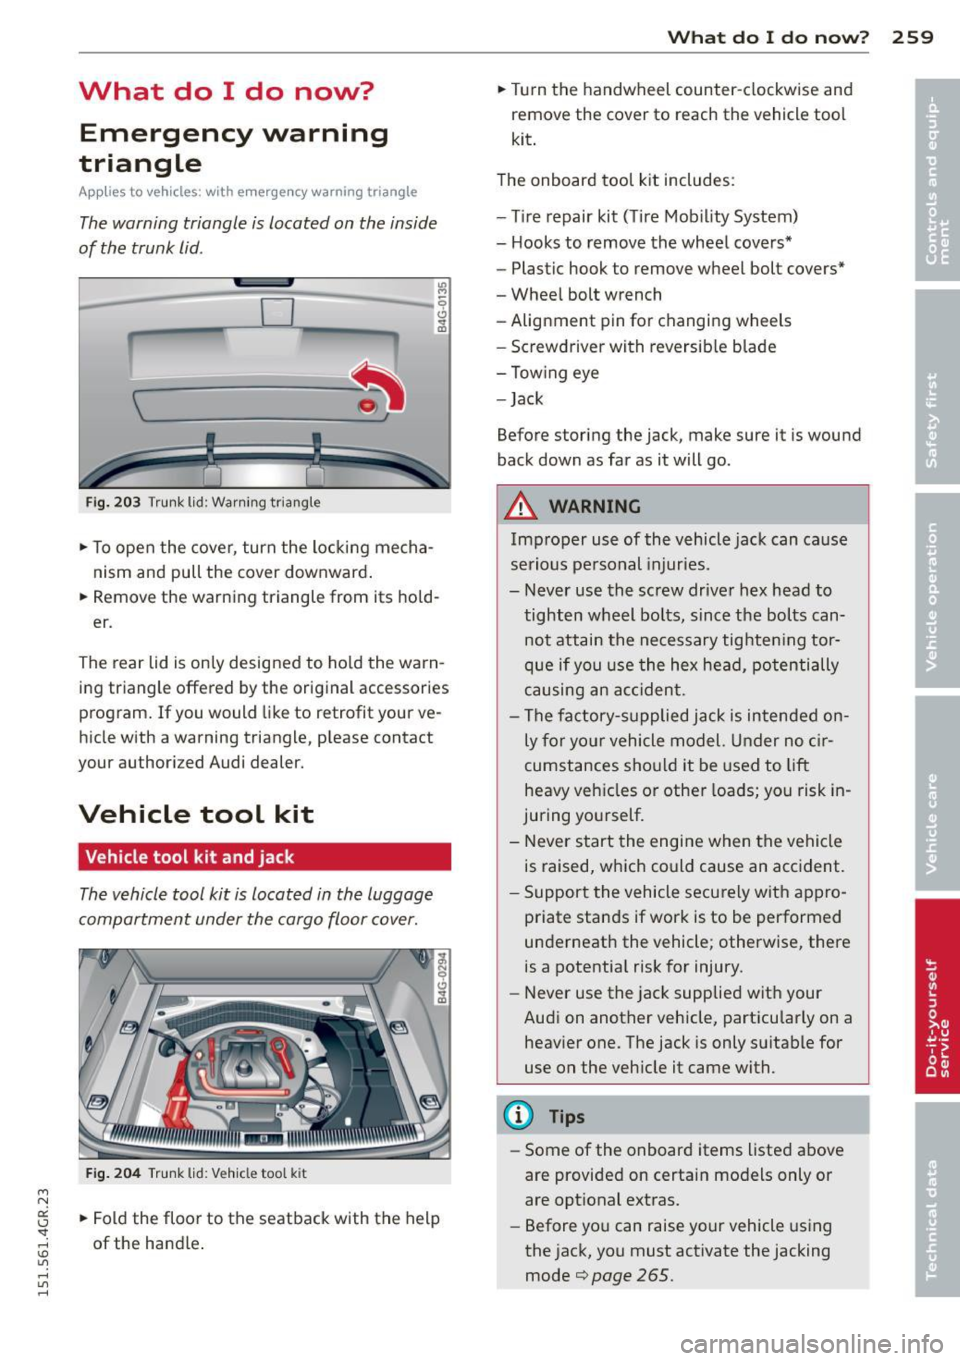
The warning triangle is located on the inside
of the trunk lid .
D -
!I l
Fig. 203 Trun k lid: Warn ing triang le
.,. To open the cover, turn the locking mecha
nism and pull the cover downward . "'
M ~
~ .. m
.,.
Remove the warning triangle from its hold
er .
The rear lid is only designed to ho ld the warn
ing triangle offered by the original accessories
program. If you would like to retrofit your ve
hicle with a warning triangle, p lease contact
your authori zed Audi dealer.
Vehicle tool kit
Vehicle tool kit and jack
The vehicle tool kit is located in the luggage
compartment under the cargo floor cover.
F ig . 204 Trunk lid: V eh icl e too l kit
.,. Fold the floor to the seatback with the help
of the handle .
What do I d o now ? 259
.,. Turn the handwheel counter-clockwise and
remove the cover to reach the vehicle tool
kit .
T he onboard too l kit includes:
- T ire repair kit ( Tire Mobility System)
- Hooks to remove the wheel covers*
- Plastic hook to remove wheel bolt covers*
- Wheel bolt wrench
- Alignment pin for changing wheels
- Screwdriver with reversib le blade
- Tow ing eye
- Jack
Before storing the jack, make sure it is wound
back down as far as it will go.
A WARNING
Imp roper use of the vehicle jack can ca use
serious pe rsonal injur ies.
- Never use the screw driver hex head to
tighten wheel bo lts, since the bolts can
not attain the necessary tighten ing tor
que if you use the hex head, potentially
causing an ac cident .
- The fac tory-supplied jack is intended on
ly for yo ur vehicle model. Under no c ir
cumstances should it be used to lift
heavy vehicles or other loads; you risk in
juring yourself.
- Never start the engi ne when the vehicle
is raised, which could cause an acc ident.
- Support the vehicle securely with appro
priate stands if work is to be performed
underneat h the vehicle ; otherwise, there
is a potentia l risk for injury.
- Never use the jack supplied wit h your
Audi on another vehicle, particularly on a heav ier one. The jack is only su itable for
use on the veh icle it came with.
@ Tips
- Some of the on board items listed above
are provided on certa.in models only or
are opt ional extras.
- Before you can raise your vehicle using
the jack, you must activate the jacking
mode¢
page 265 .
Page 262 of 302
260 What do I do now?
Tire repair
General and safety pointers
Tire repair is intended only for temporary,
short -term use .
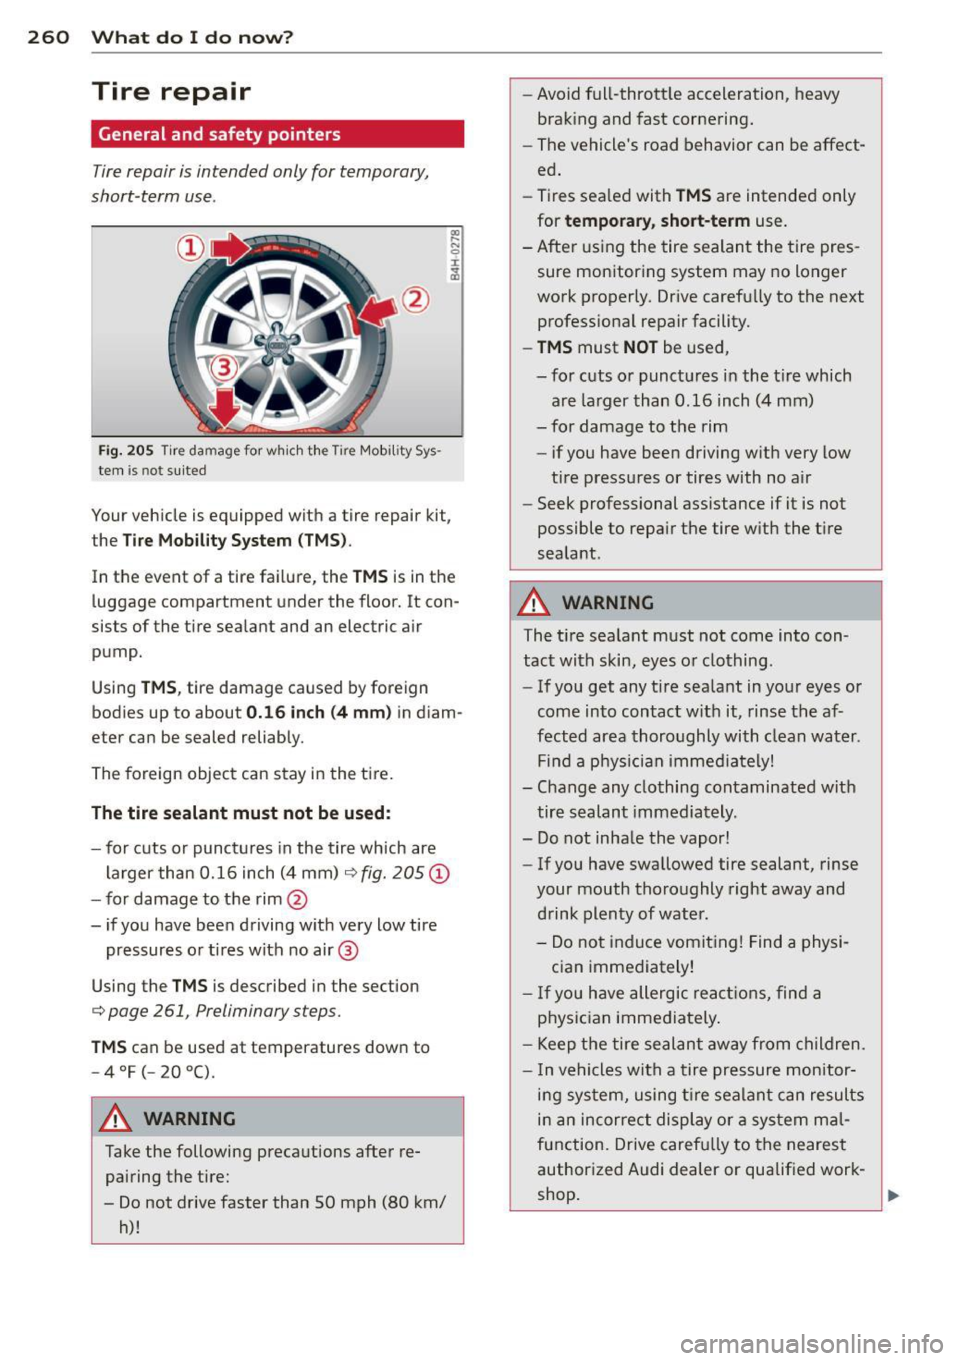
Fig. 205 Tire da mage for wh ic h the Tire Mob ility Sys ·
tern is not suited
Your vehicle is equipped with a tire repair kit,
the
Tire Mobility System (TMS ).
In the event of a tire failure, the TMS is in the
luggage compartment under the floor. It con
sists of the tire sealant and an electric air
pump.
Using
TMS, tire damage caused by foreign
bod ies up to about
0.16 inch (4 mm) in diam
eter can be sealed reliably.
The foreign object can stay in the tire.
The tire sealant must not be used:
-for cuts or punctures in the tire which are
larger than 0.16 inch (4 mm)
c:> fig. 205@
-for damage to the rim@
- if you have been driving with very low tire pressures or t ires with no air@
Using the
TMS is described in the section
c:> page 261, Preliminary steps.
TMS can be used at temperatures down to
-4 °F (- 20 °().
A WARNING
Take the following precautions after re
pairing the tire:
- Do not drive faster than 50 mph (80 km/ h)! -
Avoid full-throttle acceleration , heavy
braking and fast cornering.
- The vehicle's road behavior can be affect
ed.
- Tires sea led with
TMS are intended only
for
temporary, short-term use.
-After using the tire sealant the tire pres
sure monitoring system may no longer
work properly. Drive carefully to the next
professional repair facility.
- TMS must NOT be used,
- for cuts or punctures in the t ire which
are larger than 0.16 inch (4 mm)
- for damage to the rim
- if you have been driving with very low
tire pressures or tires with no air
- Seek professional assistance if it is not
possible to repair the tire with the tire
sealant.
A WARNING
The tire sea lant must not come into con
tact with skin, eyes or clothing.
- If you get any ti re sealant in your eyes or
come into contact w ith it, rinse the af
fected area thoroughly with clean water .
Find a phys ician immediately!
- Change any clothing contaminated with
tire sealant immediately .
- Do not inhale the vapor!
- If you have swallowed tire sealant, rinse
your mouth thoroughly right away and
drink plenty of water.
- Do not induce vomiting! Find a physi
cian immediately!
- If you have allergic reactions, find a
physician immediately.
- Keep the tire sealant away from children.
- In vehicles with a tire pressure monitor-
ing system, using tire sealant can results
in an incorrect display or a system mal
function. Drive carefu lly to the nearest
authorized Audi dealer or qualified work-
shop.
~
Page 263 of 302
"' N
a:: I.J "". rl I.O
"' ,....,
"' rl
(D Note
Do not use commercially available tire
sealants . The electrical components of the
tire pressure monitoring system will no
longer work properly.
@ For the sake of the environment
Used sealant bottles can be dropped off at
a recycling facility.
(D Tips
- If sealant has run out, allow it to dry.
Then you can peel it off.
- Have the tire sealant replaced every 4 years at a dealership .
Preliminary steps
Some preliminary steps ore necessary for tire
repair.
• If you have a f lat ti re, park the veh icle as far
as possib le from moving traffic.
• Apply the
parkin g br ake firmly.
• Move the
selector le ve r to the P po sit io n.
• Check whether a repair using the Tire Mob ili
ty System is possible
Q page 260, General
and safety pointers.
• Have all passengers le ave the vehicle and
stay away from the danger zone
q &_ .
• Take the sealant b ottle and the e le ctri c air
pump
from the luggage compar tment un
der the floo r
Q page 259, fig. 204.
• Remove the "max. 50 mph" (80 km/h) stick
er from the sealant bottle and affix it to the
instrument cluster in the driver's view .
A WARNING
-Turn the hazard flashers on and set up
the warning triang le* if you have a flat
t ire in moving traffic. In this way you pro
tect you rs elf and other road users .
- Make sure that all passengers are in a
safe place, out of the dange r zone (for
example, behind a guard ra il).
-
What do I d o now ? 261
(D Note
Partic ular care is necessary if you are mak
i ng a tire repair on a steep incl ine.
(D Tips
Obey all laws.
Making a tire repair
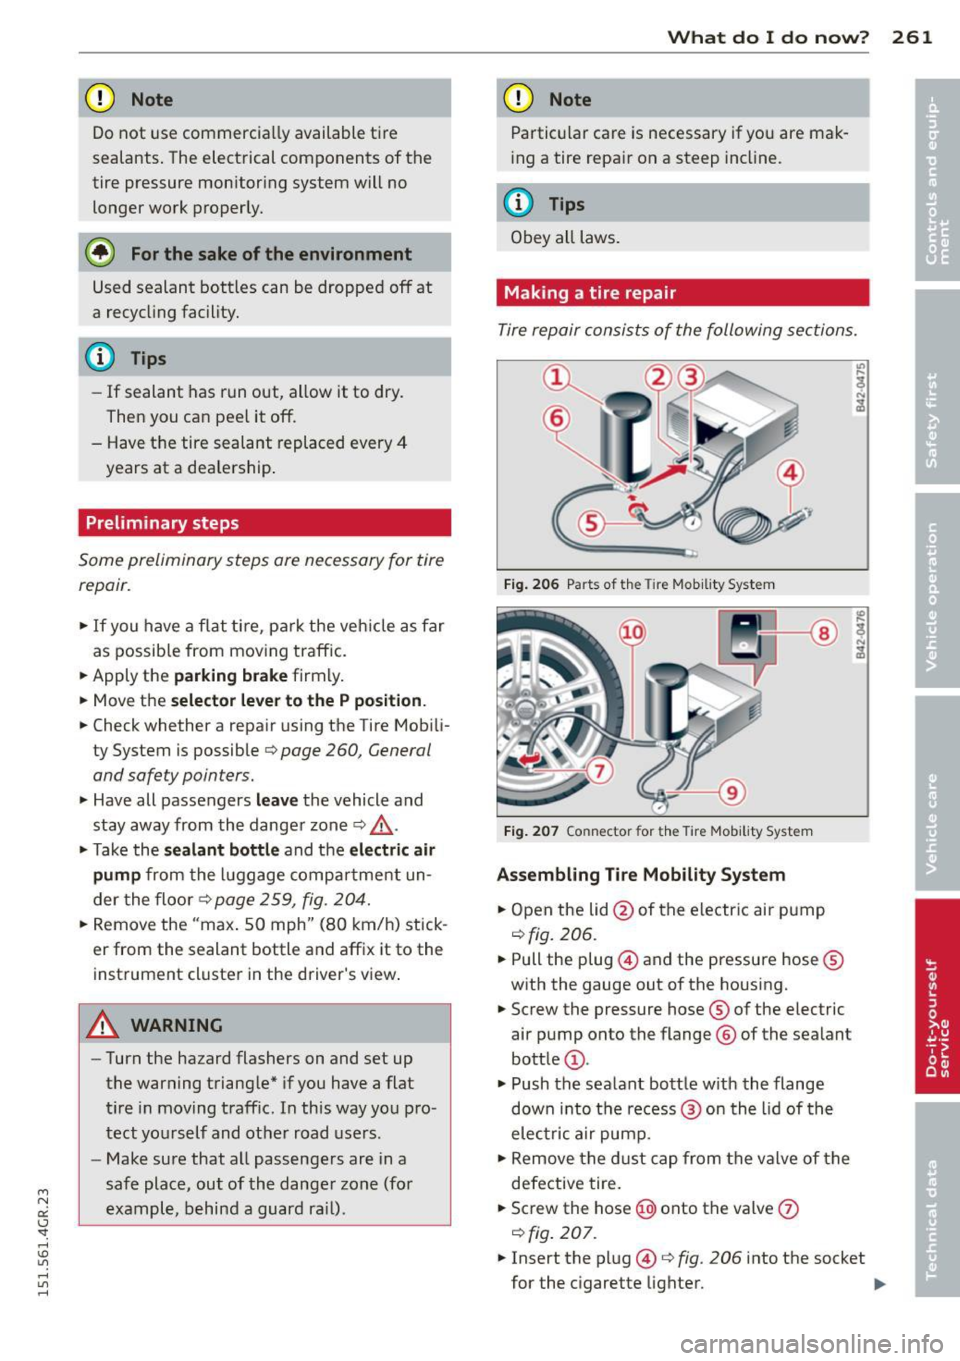
Tire repair consists of the following sections.
Fig . 206 Pa rts of t he Tire Mob ility System
Fi g. 207 Co nnector for the Tire Mobility System
A ssem bling Ti re Mobility Syst em
• Open the lid@ of the electric air pump
qfig. 206.
• Pull the plug© and the pressure hose ®
with the gauge out of the housing.
• Screw the pressure hose ® of the electric
air pump onto the flange ® of the sealant
bott le (!) .
• Push the sealant bottle w ith the flange
down into the recess @ on the lid of the
electric air pump.
• Remove the dust cap from the valve of the
defective tire.
• Screw the hose @onto the va lve
0
q fig. 207.
• Insert the plug© Q fig. 206 into the socket
for the c igarette lighter. .,.
Page 264 of 302
262 What do I do now?
• Switch on the ignition.
Inflating tire
• Move the switch @~ fig. 207 on the elec
tric a ir pump
ll to posit ion I. After 5 mi
nutes, tir e pressure must have reached at
least 1.8 bar.
• Switch the electric air pump off -switch in
position
0. If the required tire pressure of at
l east 1.8 bar has not been reached, follow
the instructions in the section
Re-inflating
tire.
Re-inflating tire
• Remove the hose from the valve and pull the
plug out of the socket.
• Drive the vehicle slow ly 33 feet (10 meters)
backward or forward. This helps to distrib
ute the sealant better.
• Remove the empty inflation bottle and
screw the hose®~
fig. 206 from the elec
t ric pump directly onto the va lve.
• Insert the plug@~
fig. 206 into the socket
for the cigarette lighter.
• Switch on the ignition.
• Move the switch @~
fig. 207 on the e lec
tric air pump
ll to position I. After 5 mi
nutes, tire pressure must have reached at
least 1.8 bar.
• Switch the electric air pump off -switch in
pos it ion
0 . If the requ ired tire pressure of at
least 1.8 bar has not been reached, it is not
poss ible to make a repa ir with the tire seal
ant. Seek professional assistance.
Disassembling Tire Mobility System
• Remove the hose from the valve and pull the
plug out of the socket.
• Screw the dust cap onto the valve .
• Place the empty sealant bottle back in the
original packaging and clip it in place under
the floor so that no tire sealant can run out
into the vehicle.
• Place the electric air pump in the luggage
compartment for the time being.
1l The electr ic air p ump sho uld never ru n fo r long er than
6 minut es.
• Start driving right away so that the sealant
is distributed in the tire .
A WARNING
=
- Follow the manufacturer 's safety instruc-
tions on the decal for the air pump and
the sealant bottle.
- If a tire pressure of 1.8 bar cannot be
achieved after pumping for 5 minutes,
the t ire is too severely damaged. Do not
continue to dr ive .
- Seek professional ass istance if it is not
possible to repa ir the tire w ith the tir e
sealant.
(D Tips
- Do not operate the electric air pump for
more than 6 minutes without stopping,
otherwise it can overheat . When the air
pump has cooled down, you can continue
to use it.
- If sealant has escaped, allow it to dry,
then you can pee l it off.
Final check
After driving for a short distance, tire pressure must be checked
• After driving for about 10 min utes, stop and
check the tire pressure.
• If tire pressure is sti ll at least 1.3 bar, in
flate the tire to specif ied pressure (see driv
er's side B-pillar), drive to the next repair
shop and have the tire and the sealant bot
tle replaced .
• If tire pressure is less than 1.3 bar, the tire
is too severely damaged . Do not continue to
drive. Seek professional assistance.
A WARNING
If tire pressure is less than 1.3 bar after
driving for 10 minutes, the tire is too se
verely damaged. Do not continue to drive.
Seek professional ass istance .
-
Page 265 of 302
M N
0:: <.J 'SI: ,...., \!) ..,.,
,...., ..,., ,....,
@ Tips
After a tire repair, have the sealant bottle replaced at a dealership. This restores full
functionality to the Tire Mobility System.
Changing a wheel
Before changing a wheel
Observe the following precautions for your
own and your passenger's safety when chang
ing a wheel .
.. After you experience a tire failure, pull the
car well away from moving traffic and try to
reach
level ground before you stop c:> &, .
.. All passengers should leave the car and
move to a safe location (for instance, behind
the guardrail)
c:> &, .
.. Engage th e parking brake to prevent your
vehicle from rolling unintentionally
c:> &, .
.. Move selector lever to position Pc:> &, .
.. Take the jack out of the luggage compart
ment
c> page 259.
A WARNING
You or your passengers could be injured
while changing a wheel if you do not fol
low these safety precautions:
- If you have a flat tire, move a safe dis
tance off the road. Turn off the engine,
turn the emergency flashers on and use
other warning devices to alert other mo
torists.
- Make sure that passengers wait in a safe
place away from the vehicle and well
away from the road and traffic.
- To help prevent the vehicle from moving
suddenly and possibly slipping off the
jack, always fully set the parking brake
and block the wheel diagonally opposite
the wheel being changed . When one
front wheel is lifted off the ground, plac ing the Automatic Transmission in P
(Park) will
not prevent the vehicle from
moving.
What do I do now? 263
- Before you change a wheel, be sure the
ground is level and firm. If necessary,
use a sturdy board under the jack.
- Always store the vehicle tool kit, the jack
and the replaced tire in the luggage com
partment
c:>page 126.
([) Note
If you are changing the wheel on a steep
incline, use a rock or similar object to
block the opposite wheel to prevent the
vehicle from moving .
(l) Tips
- Before changing the wheel, you must ac
tivate the jacking mode, so that the au
tomatic controls for the Adaptive Air
Suspension* do not make it more diffi
cult to lift the vehicle with the jack
c:>page265 .
-Obey all laws .
Changing a wheel
When you change a wheel , follow these
quence described below step -by -step and in
exactly that order.
l. Activate the vehicle jack mode"
c:>page 265.
2. Remove the wheel bolt caps* . For more
details see also
c:> page 264, Wheels with
wheel bolt caps.
3. Loosen the wheel bolts c:>page 264.
4. Locate the proper mounting point for the
jack and align the jack below that point
c:> page 2 65.
5. Raise the car with the jack r::> page 265.
6. Remove the wheel with the flat tire and
t hen in stall the other wheelr::>
page 267 .
7. Tighten all wheel bolts lightly .
8.
Lower the vehicle with the jack .
9 . Use the wheel bolt wrench and
firmly
tighten all wheel bolts c:> page 264.
10. Replace the wheel bolt caps*.
•
•
Page 266 of 302
26 4 What do I do n ow ?
11. Deactivate the vehicle jack mode* in the
MMI:
! CARI funct ion button> (Ca r)* sys
tems
control button > S er vicing & checks
> A ir su sp. : ja ck mode > Off.
The vehicle jack mode* switches off automati
cally at speeds above 6 mph (10 km/h).
A WARNING
Always read and follow all WARNINGS and information
Q A in Raising the vehicle on
page 266
and Q page 268 .
After changing a wheel
A wheel change is not complete without the
doing the following.
• Always store the vehicle tool kit, the jack *
and the replaced tire in the luggage com
partment
Q page 126.
• As soon as possible, have the tighten ing
torques
on all wheel bolts checked with a
torque wrench . The correct tightening tor
que is 90 ft lb ( 120 Nm) .
• Have the flat tire
re pl ac ed as soo n as poss i
ble .
@ Tips
- If you notice that the wheel bolts are
corroded and difficult to t urn w hile
changing a t ire, they should be replaced
before yo u check the tighten ing torque .
- Drive at reduced speed unt il you have the
tightening torques checked.
- After changing a wheel, t he tire pressure
i n a ll four tires must be checked/cor re ct
ed and the tire pressure mon itoring indi
cator must be stored in the MM I
¢page 257.
' Wheels with wheel bolt caps
Applies to vehicles: with wheel bolts with caps
The caps must be removed first from the
wheel bolts before the bolts can be un
screwed .
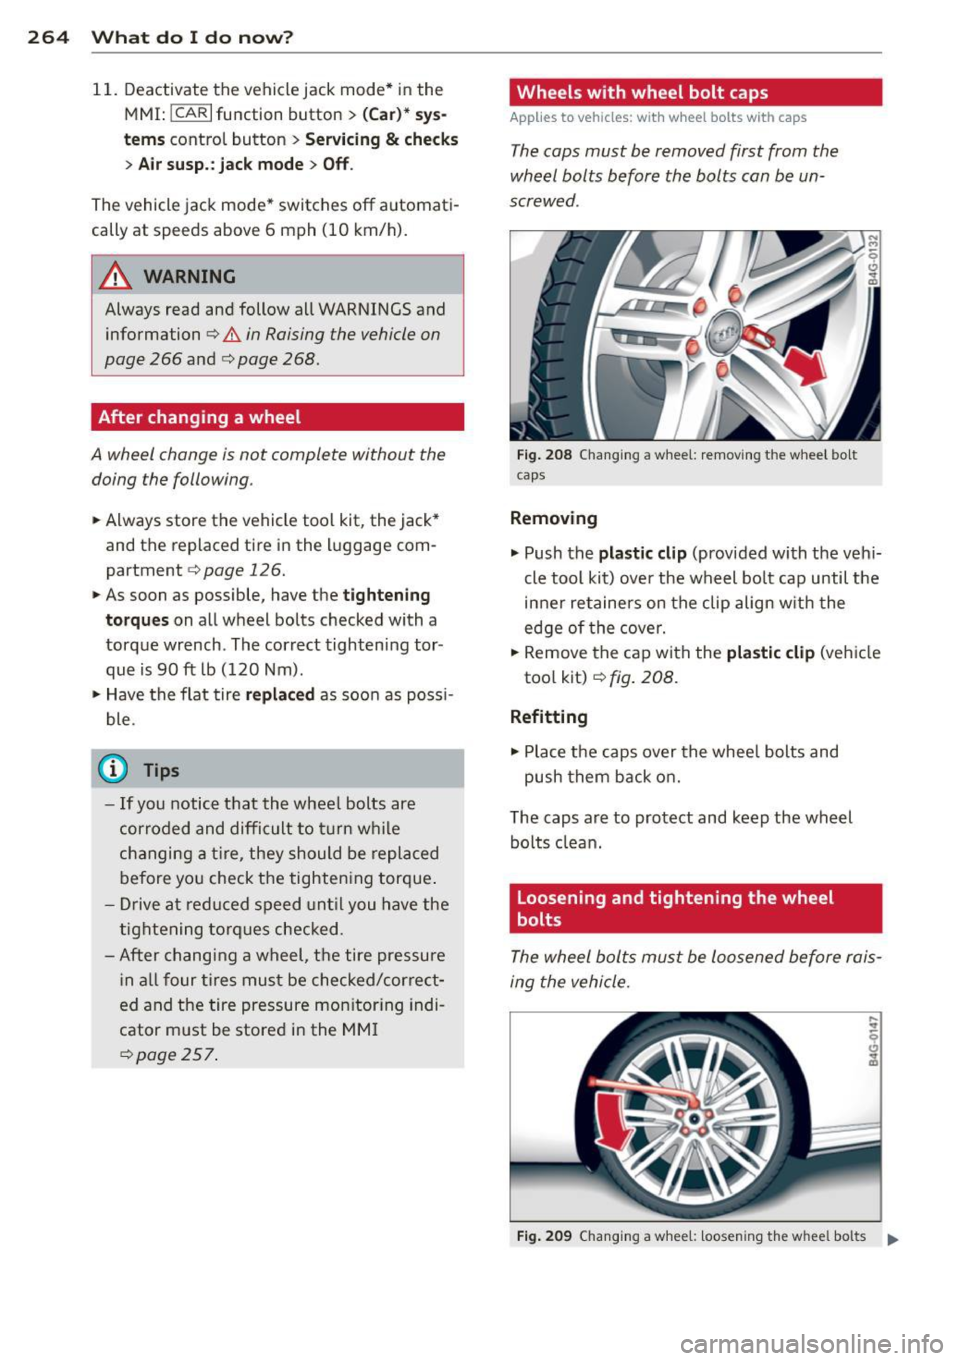
Fig. 208 Cha nging a whee l: removing t he wheel bo lt
c aps
Removing
.. Push the
pla st ic clip (prov ided with the veh i
cle tool kit) over the wheel bo lt cap until the
inner retainers on the clip align w ith the
edge of the cover.
• Remove the cap with the
pl as tic clip (vehicle
too l kit)
~ fig. 208.
Refitting
.. Place the caps over the whee l bolts and
push them back on.
The caps are to protect and keep the wheel bolts clean.
Loosening and tightening the wheel
bolts
The wheel bolts must be loosened before rais
ing the vehicle.
F ig . 209 Chang ing a whee l: loosening t he w hee l bolts .,.
Page 267 of 302
"' N
a:: I.J "". rl I.O
"' rl
"' rl
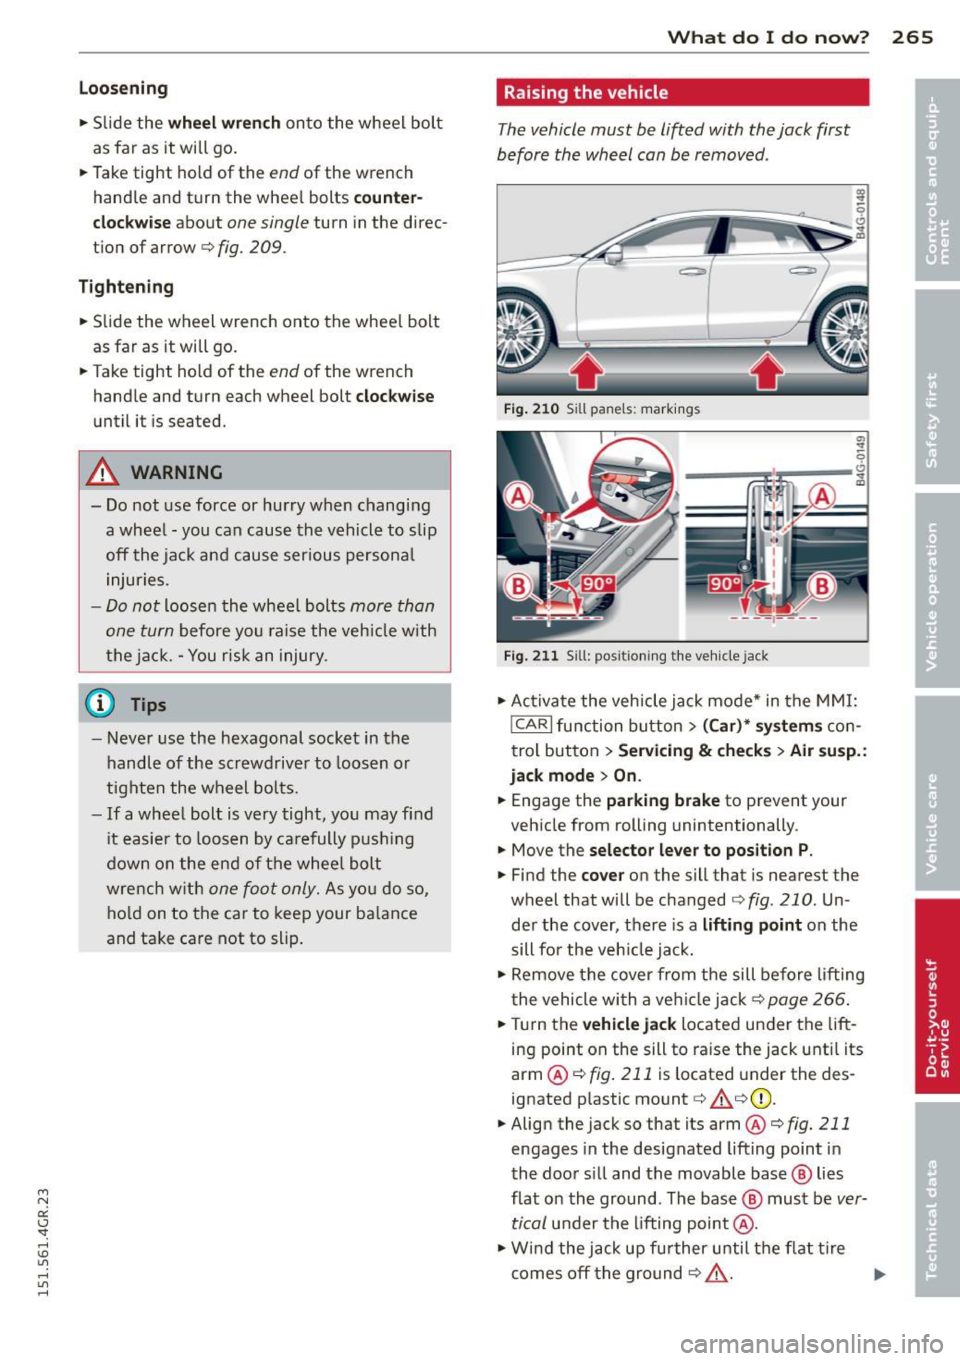
Loosening
• Slide the wh eel wr ench onto the wheel bolt
as far as it will go.
• Take tight hold of the
end of the wrench
handle and turn the whee l bolts
counter
cl oc kwis e
about one single turn in the direc
tion of arrow c:>
fig. 209.
Tightening
• Slide the wheel wrench onto the whee l bolt
as far as it will go.
• Take tight hold of the
end of the wrench
handle and turn each wheel bolt
clockwi se
until it is seated.
A WARNING
- Do not use force or hurry when chang ing
a wheel -you can cause the vehicle to slip
off the jack and cause serious persona l
injuries.
- Do not loosen the wheel bolts more than
one turn
before you raise the veh icle w ith
the jack. -You risk an injury .
@ Tips
-Never use the hexagonal socket in the
handle of the screwdrive r to loosen or
tighten the wheel bo lts.
- If a whee l bolt is very tight, yo u may find
i t easier to loosen by ca refully push ing
down on the end of the wheel bolt
wre nch w ith
one foot only. As yo u do so,
ho ld on to the car to keep your ba lance
and take care not to slip .
What do I d o now ? 265
Raising the vehicle
The vehicle must be lifted with the jack first
before the wheel can be removed .
Fig . 210 Sill panels: markings
Fig. 211 Sill: pos ition ing the veh icle jack
• Ac tiva te the vehicle jack mode* in the MM I:
!CAR I fu nction button > (Car) * system s con
trol button>
Se rvicing & ch eck s> Air susp. :
jack mode > On .
• Engage the parking brake to prevent your
veh icle from rolling unintentionally .
• Move the
selector le ver to position P .
• Find the co ver on the sill that is nearest the
wheel that will be changed c:>
fig. 210. Un
de r the cover, t here is a
lifting po int on the
sill for the veh icle jack.
• Remove the cover from the sill before l ifting
the vehicle with a ve hicle jack c:>
page 266.
•Turn the vehicle jack located under the lift
ing point on the sill to raise the jack unti l its
arm @ c:>
fig. 211 is located under the des
ignated plastic mount c:> &_ c:>(D.
• Align the jack so that its arm @c:>
fig. 211
engages in the designated lifting point in
the door s ill and the movable base @ lies
flat on the ground. The base@ must be
ver
tical
under the lifting point @.
• W ind the jack up fu rther until the flat t ire
comes off the ground c:> &_ .
~
Page 268 of 302
266 What do I do now?
Position the vehicle jack only under the desig
nated lifting points on the sill
r::!;> fig. 210.
There is exactly one location for each wheel.
The jack must not be positioned at any other location¢ ,&.¢(D .
An
un stable surfa ce under the jack can cause
the vehicle to slip off the jack. Always prov ide
a firm base for the jack on the ground. If nec
essary place a sturdy board or similar support
under the jack . On
hard, slippery surfaces
(such as tiles) use a rubber mat or sim ilar to
prevent the jack from slipping¢.&..
A WARNING
-You or your passengers could be injured
wh ile chang ing a wheel if you do not fol
low these safety precautions:
- Position the vehicle jack only at the
designated lifting points and align the
jack . Otherwise, the vehicle jack could
slip and cause an injury if it does not
have sufficient hold on the vehicle.
-A soft or unstable surface under the
jack may cause the veh icle to slip off
the jack. Always provide a firm base for
the jack on the ground.
If necessary,
use a sturdy board under the jack.
- On hard, slippery surface (such as tiles)
use a rubber mat or sim ilar to prevent
the jack from s lipping.
- T o help prevent injury to yourself and
yo ur passenge rs:
- Do not raise the vehicle unti l you are
sure the jack is securely engaged.
- Passengers must not remain in the ve
hicle when it is jacked up.
- Make sure that passengers wait in a
safe p lace away from the vehicle and
well away from the road and traffic.
- Make sure jack position is correct, ad
just as necessary and then continue to ra ise the jack.
- Changes in temperature or load can af
fect the height of the vehicle.
(D Note
Do not lift the vehicle by the sill. Position
the veh icle jack only at the designated lift
ing points on the sill. Otherwise, your vehi
cle will be damaged.
(D Tips
The vehicle jack mode * switches off auto
matically at speeds above 6 mph (10 km/
h).
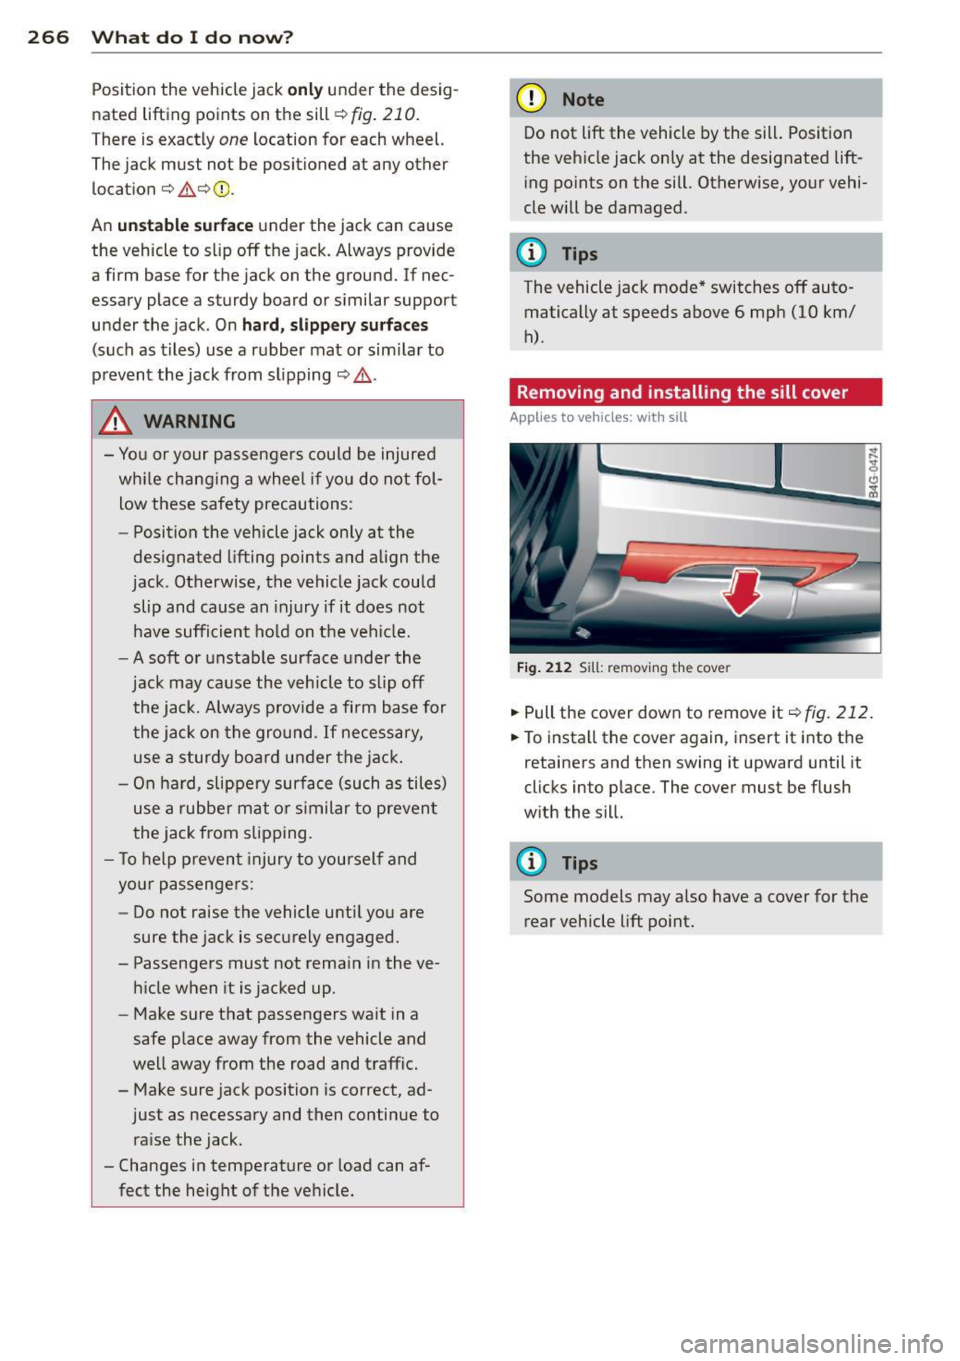
Removing and installing the sill cover
Applies to vehicles: with sill
Fig. 212 Sill: remov ing the cover
.. Pull the cover down to remove it¢ fig. 212.
.. To install the cover again, insert it into the
retainers and then swing it upward until it
clicks into place. The cover must be flush
with the sill.
@ Tips
Some models may also have a cover for the
rear vehicle lift point.
Page 269 of 302
Taking the wheel off/installing a wheel
Follow these instructions step-by-step for
changing the wheel.
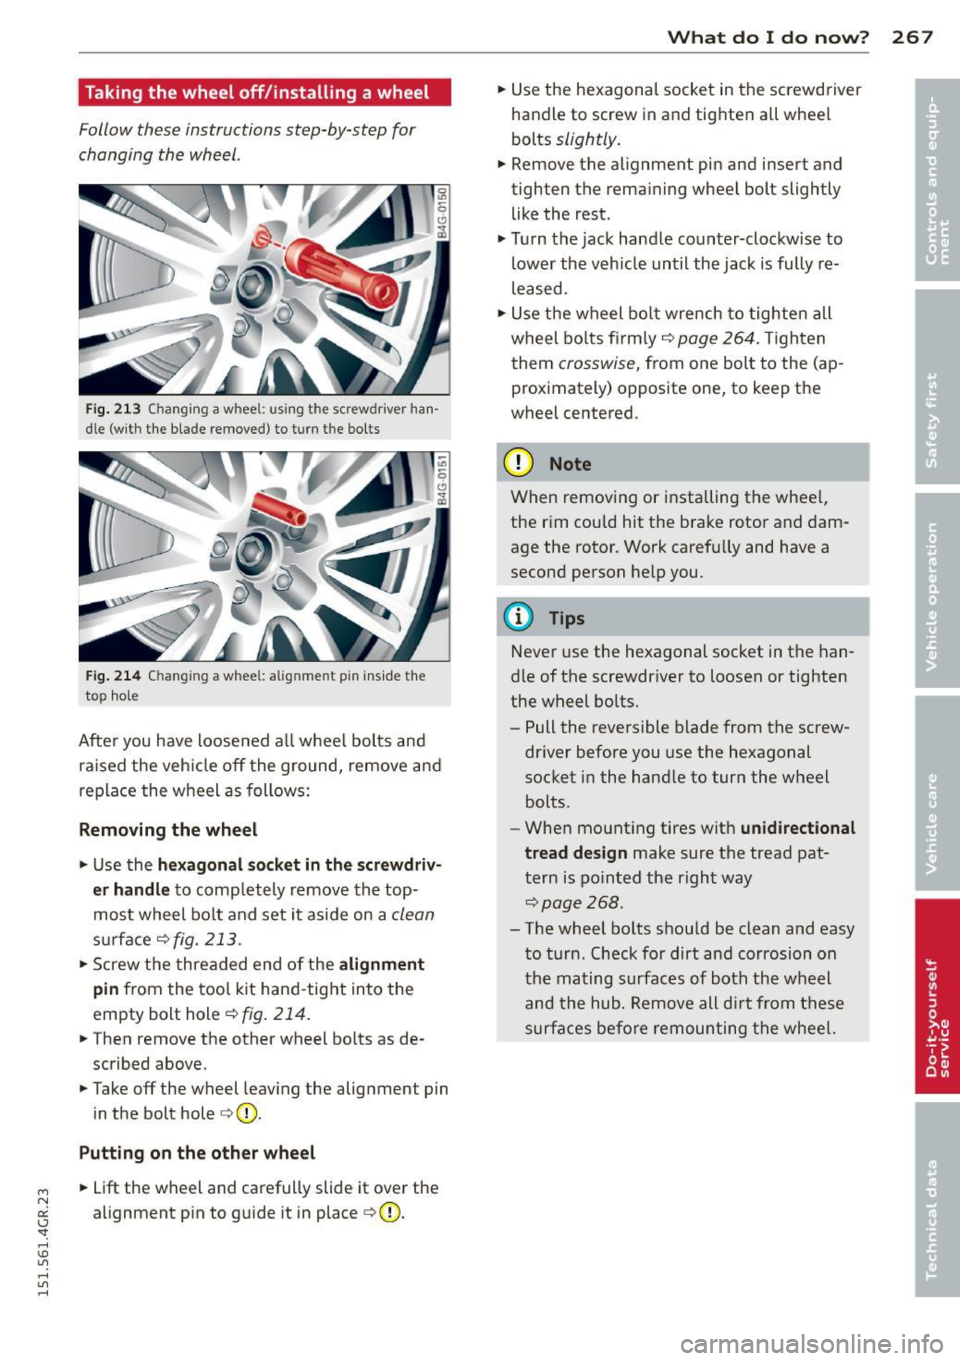
Fig. 213 Changing a wheel: using the screwdriver han
dle (with the blade removed) to turn the bo lts
F ig . 214 Changing a wheel: alignment pin ins ide the
top hole
After you have loosened a ll wheel bolts and
ra ised the veh icle off the ground, remove and
replace the wheel as follows:
R emoving the wheel
.. Use the hex agon al so ck et in th e screw driv
e r handle
to comp letely remove the top
most wheel bo lt and set it aside on a
clean
s u rface ¢fig. 213.
.. Screw the threaded end of the alignm ent
pin from the tool k it hand -tight into the
empty bolt hole¢
fig. 214.
.. Then remove the other wheel bo lts as de
scribed above .
.. Take off the wheel leaving the alignment pin
in the bolt hole ¢(D .
Putting on the oth er w heel
"' .. Lift the wheel and carefully slide it over the N
a:: alignment pin to guide it in place ¢(D. I.J -
"' rl
What do I d o now ? 267
.. Use the hexagonal socket in the screwdriver
handle to screw in and tighten all wheel
bolts
slightly.
.. Remove the alignment pin and insert and
tighten the remaining wheel bolt slightly like the rest.
.. Turn the jack handle counter-clockwise to
lower the veh icle until the jack is fully re
leased .
.. Use the wheel bo lt wrench to tighten all
wheel bo lts firm ly¢
page 264. Ti ghten
them
crosswise, from one bolt to the (ap
proximately) opposite one, to keep the
wheel centered.
(D Note
When removing or installing the whee l,
the rim could hit the brake rotor and dam
age the rotor. Work carefully and have a
second person help you.
@ Tips
Never use the hexagonal socket in the han
dle of the screwdriver to loosen or tighten
the w heel bolts.
- Pull the reversible blade from the screw
dr iver before you use the hexagonal
socket in the handle to turn the wheel
bolts.
- When mounting tires w ith
unidi rectional
tread design
make sure the tread pat
tern is po inted the right way
~page 268.
-The wheel bo lts shou ld be clean and easy
to turn. Check for dirt and corrosion on
the mating surfaces of both the wheel
and the hub. Remove all d irt from these
surfaces before remounting the whee l.
Page 270 of 302
268 What do I do now?
Tires with unidirectional tread design
Tires with unidirectional tread design must be
mounted with their tread pattern pointed in the right direction .
Using a replacement tire with a tread
pattern intended for use in a specific
direction
When using a re p la cemen t tir e wi th a tread
pattern inte nded for use in a speci fic dire c
tion, please note the fo llow ing :
- T he direction of rotation is marked by a n ar
row on the side o f the tire .
-If the r eplacement tire has to b e insta lled in
t h e inc orre ct direction, use the rep la ce m ent
tir e on ly tempor arily s ince the t ire will not
be able to a chieve its op timum perfo rm ance
characteris tics with regard to aqua planing,
noise and wear .
- W e recommend that you pay particular a t
tent io n to this fact du ring wet weat her and
t h at you adjust your spee d to matc h roa d
condit ions .
- Repl ace the flat tire w ith a new one and
have it installed on your veh icle as soon as
poss ible to resto re the handling advantages
of a unid irect iona l tire .
Notes on wheel changing
Please read the information 9 pag e 245, New
tires and replacing tires and wheels
i f you are
go ing to use a rep lacemen t tire w hich is dif
feren t fro m th e tires on you r veh icle.
After you cha nge a t ire :
-Check the t ire pressure on the replacement
tire immediately after installation.
- Have the wheel bolt tightening torque
checked with a torque wrench as soon as
possible by your authorized Audi dealer or
a qualified service station .
- With steel and alloy wheel rims , the wheel
bolts are correctly tightened at a torque of
90 ft lb (120 Nm) .
- If you notice that the wheel bolts are cor
roded and difficult to turn while changing a tire
, they should be replaced before you
check the tightening torque.
- Replace the flat tire with a new one and
have it installed on your vehicle as soon a s
possible. Remount the wheel cover.
Until then , drive with extra care and at re
duced speeds.
A WARNING
- If yo u are going to e quip your ve hicl e
wit h tires or rims which differ from those
which were factory installed, then be sure to read the information
9 page 245,
New tires and replacing tires and
wheels .
-Always make sure the damaged wheel o r
even a flat tire a nd the jack a nd tool kit
ar e prope rly secu red in the luggage com
pa rtment an d are no t loose in the pas
s e nge r compa rtm en t.
- In an accid ent or sudde n man euver they
co uld f ly forw ard, inju ring anyo ne in the
ve hicl e.
- Always s to re damaged wh eel, jack a nd
t oo ls se curely in the luggage co mpa rt
men t. Ot he rwi se, in an a ccident or sud
d en maneuve r they co uld f ly forw ard,
causing inj ury to p assen gers in the ve hi
cle.
(D Note
Do not use comm erc ia lly availabl e tire
se alant s. Oth erwise, the e lec trical co mpo
nen ts of the tire press ure moni to ring sys
tem will no longer work p rope rly a nd t he
senso r fo r the tire pressure mon itor ing
system w ill have to be rep lace d by quali
fied workshop.