seats AUDI RS7 SPORTBACK 2016 User Guide
[x] Cancel search | Manufacturer: AUDI, Model Year: 2016, Model line: RS7 SPORTBACK, Model: AUDI RS7 SPORTBACK 2016Pages: 282, PDF Size: 70.78 MB
Page 63 of 282
pockets on the coat hooks. During sudden
braking or in an accident- especially if the
airbag is deployed -these objects could in
jure any passengers inside the vehicle .
- To reduce the risk of personal injury in an
accident or sudden stop, always keep the
glove compartment closed while driving.
- Read and follow all WARNINGS
q page 155, Important safety instructions
on the side airbag system.
- Hang clothes in such a way that they do not
impair the driver's vision.
- The coat hooks must only be used for light
weight clothing . Do not leave any heavy or
sharp edged objects in the pockets which
may interfere with the side curtain airbag
deployment and can cause personal injury in
a crash .
- Do not use coat hangers for hanging cloth
ing on the coat hooks as this can interfere
with proper deployment of the side curtain
airbags in an accident.
- Do not hang heavy objects on the coat
hooks, as they could cause personal injury in
a sudden stop.
CD Note
Objects located on the rear shelf that rub
against the rear window could damage the
heat ing wires for the rear window defogger.
Roof rack
Description and mounting locations
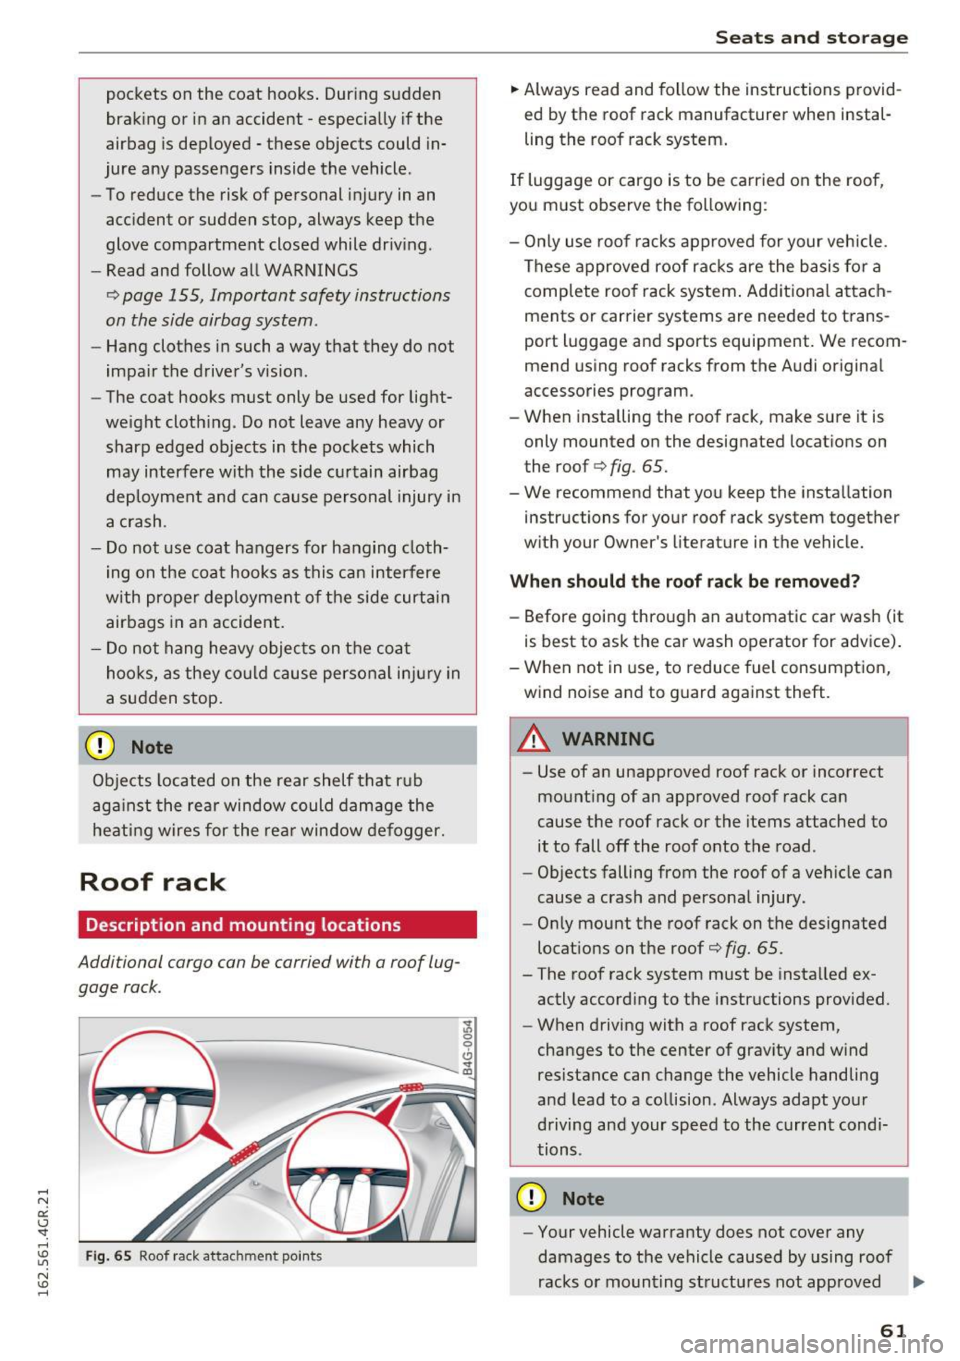
Additional cargo can be carried with a roof lug
gage rack.
Fig. 65 Roof rack attac hment point s
'J, 0 9 Cl sr CD
Seats and storage
.,. Always read and follow the instructions provid
ed by the roof rack manufacturer when instal
ling the roof rack system.
If luggage or cargo is to be carried on the roof,
you must observe the following :
- Only use roof racks approved for your vehicle.
These approved roof racks are the basis for a
complete roof rack system. Additional attach
ments or carrier systems are needed to trans
port luggage and sports equipment. We recom mend using roof racks from the Audi original
accessories program.
- When installing the roof rack, make sure it is
only mounted on the designated locations on
the roof
q fig. 65.
- We recommend that you keep the installation instructions for your roof rack system together
with your Owner's literature in the vehicle.
When should the roof rack be removed?
-Before going through an automatic car wash (it
is best to ask the car wash operator for advice).
- When not in use, to reduce fuel consumption,
wind noise and to guard against theft.
_8 WARNING
=
- Use of an unapproved roof rack or incorrect
mounting of an approved roof rack can
cause the roof rack or the items attached to it to fall off the roof onto the road.
- Objects falling from the roof of a vehicle can
cause a crash and personal injury.
- Only mount the roof rack on the designated
locations on the roof¢
fig. 65.
- The roof rack system must be installed ex
actly according to the instructions provided.
- When driving with a roof rack system,
changes to the center of gravity and wind
resistance can change the vehicle handling
and lead to a collision. Always adapt your
driving and your speed to the current condi
tions.
CD Note
- Your vehicle warranty does not cover any
damages to the vehicle caused by using roof
racks or mounting structures not approved ..,.
61
Page 65 of 282
.. Distribute the load as evenly as possible .
.. Place heavy objects as far forward as possib le
¢ fig. 66 .
.. Secure luggage items with the cargo net* or
with non-elastic retaining straps to the tie
down r ings*
¢ page 64.
A WARNING
-loose objects in the luggage compartment
can slide about s udden ly and alter the vehi
cle's handling characte ristics.
- loose objects in the passenger compa rt
ment can fly forward during abrupt mane u
vers or ac ciden ts a nd injure oc cupants.
- Always store objects in the luggage com
partment and use sui table straps, particu
larly with heavy objects.
- When you transport heavy objects, always
remember that a change in the cente r of
grav ity may result in a change in the ve hi
cle's handling characteristics .
- Follow a ll warnings
¢ page 118, Driving
safety.
@ Tips
The tire pressure must be adjusted to the load
- see the t ire pressu re sticker lo cated on the
driver's s ide B-pillar.
Luggage compartment cover
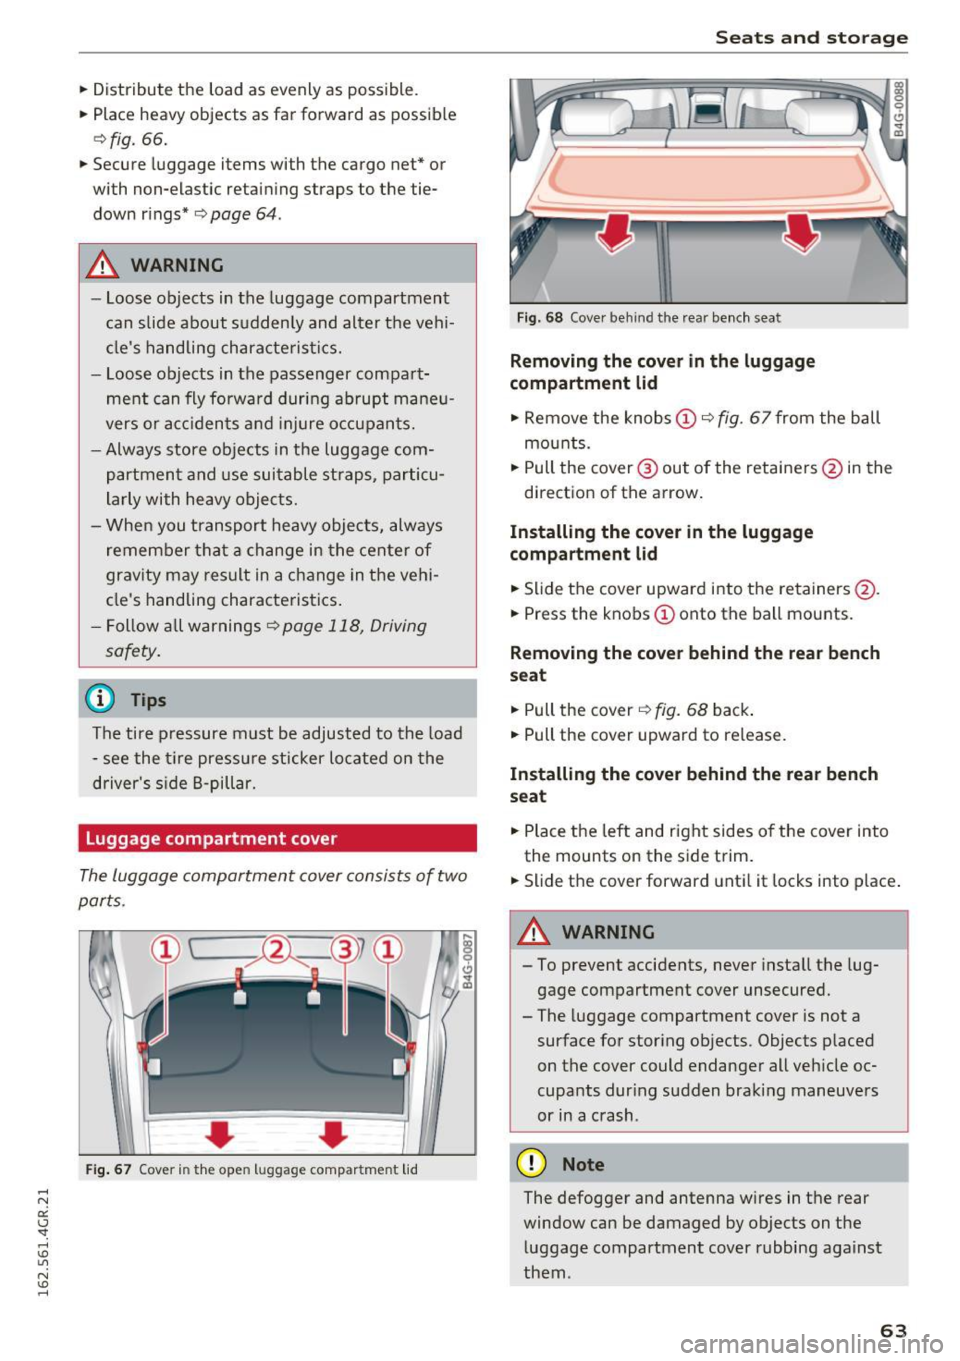
The luggage compartment cover consists of two
parts.
• • Fig. 67 Cove r in the ope n lu gg age compartme nt lid
Seats and storag e
Fig. 68 Cover beh in d th e rear be nch sea t
Removing the cover in th e luggage
compartment lid
.,. Remove the knobs (D ¢ fig. 67 from the ball
mounts .
.. Pull the cover @ out of the retainers @in the
direction of the arrow.
Installing the cover in the luggage
compartment lid
.,. Slide the cover upward into the retainers @.
.. Press the knobs
seat
.. Pull the cover ¢ fig. 68 back.
.. Pull the cover upward to release.
Installing the cove r behind the rea r bench
se at
.. Place the left and right sides of the cover into
the mounts on the side trim.
.. Slide the cover forward until it locks into place .
A WARNING -~·
- To prevent accidents, never install the lug-
gage compartment cover unsecured.
- The luggage compartment cover is not a surface for stor ing objects . Objects p laced
on the cover could endanger all veh icle oc
cupants dur ing sudden braking maneuvers
or in a crash .
(D Note
The defogger and antenna w ires in the rear
window can be damaged by objects on the luggage compartment cover rubbing against
them .
63
Page 66 of 282
Seats and storage
Enlarging cargo capacity of the vehicle
interior
The seat backs can be folded forward to enlarge
the cargo capacity.
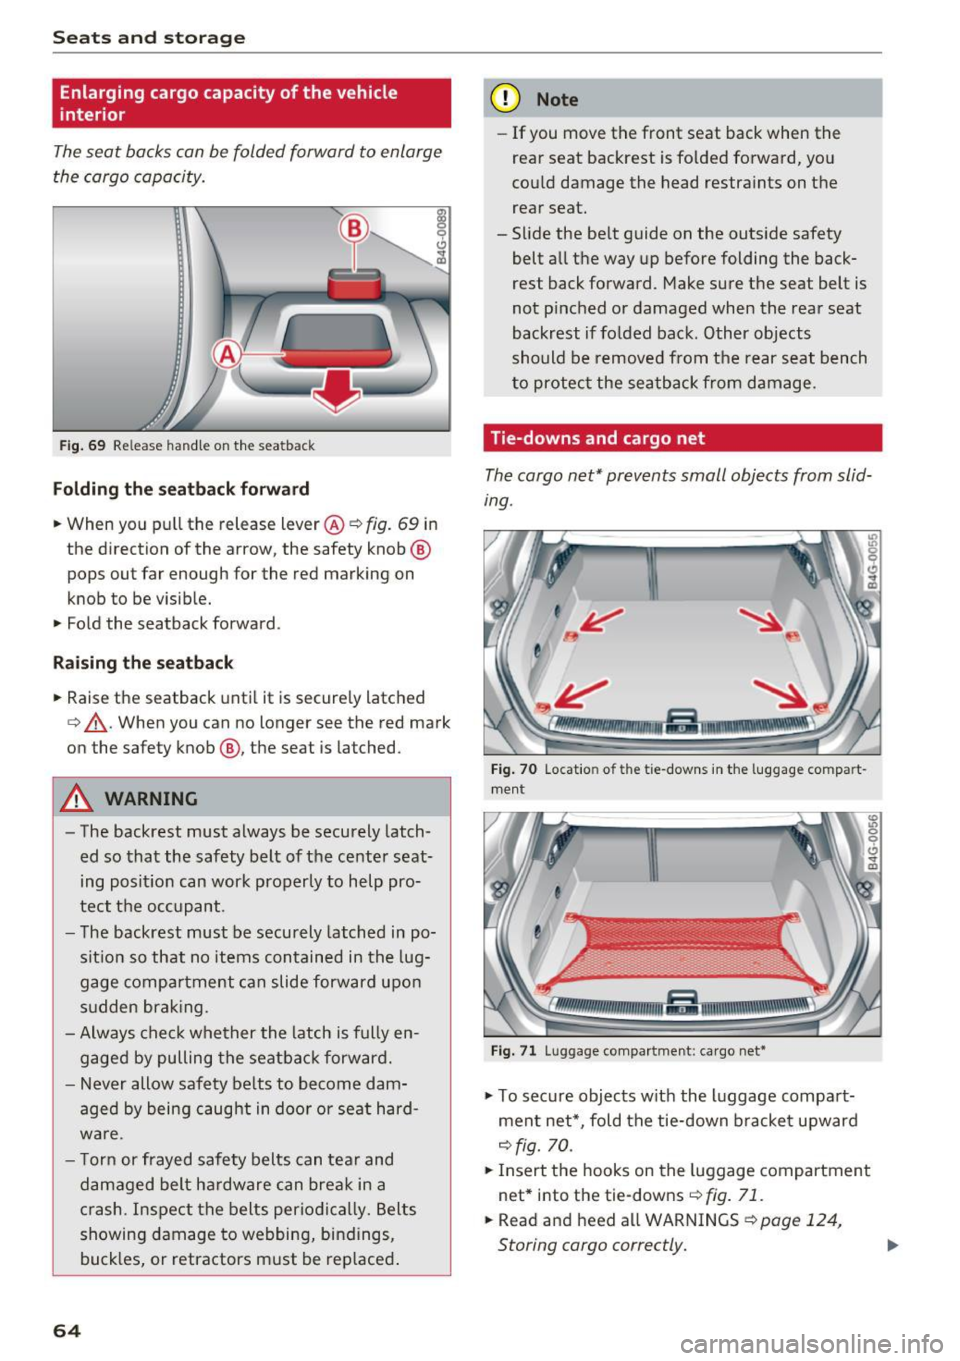
Fig. 69 Release h andle on the seatback
Folding the seatback forward
.,. When you pull the release lever@¢ fig. 69 in
the direction of the arrow, the safety knob @
pops out far enough for the red marking on
knob to be visib le.
• Fold the seatback forward.
Raising the seatback
• Raise the seatback until it is securely latched
¢ &, .When you can no longer see the red mark
on the safety knob@, the seat is latched.
A WARNING
-The backrest must always be securely latch
ed so that the safety belt of the center seat
ing position can work properly to help pro
tect the occupant.
- The backrest must be securely latched in po
sition so that no items contained in the lug
gage compartment can slide forward upon
sudden braking.
- Always check whether the latch is fully en
gaged by pulling the seatback forward.
- Never allow safety belts to become dam
aged by being caught in door or seat hard
ware.
- Torn or frayed safety belts can tear and
damaged belt hardware can break in a
crash. Inspect the belts periodically. Belts
showing damage to webbing, bindings,
buckles, or retractors must be replaced.
64
(D Note
- If you move the front seat back when the
rear seat backrest is folded forward, you
could damage the head restraints on the
rear seat.
- Slide the belt guide on the outside safety
belt all the way up before folding the back
rest back forward. Make sure the seat belt is
not pinched or damaged when the rear seat
backrest if folded back. Other objects
should be removed from the rear seat bench
to protect the seatback from damage .
Tie-downs and cargo net
The cargo net* prevents small objects from slid
ing .
Fig. 70 Locat ion of the tie -downs in the lugg age compart
ment
Fig. 71 Lugg age compa rtment: cargo net*
• To secure objects with the luggage compart
ment net*, fold the tie-down bracket upward
¢ fig. 70 .
• Insert the hooks on the luggage compartment
net* into the tie-downs ¢
fig. 71.
• Read and heed all WARNINGS ¢ page 124,
Storing cargo correctly. ..,.
Page 67 of 282
,&_ WARNING
Weak, damaged or improper straps used to
secure items to tie-downs can fail during hard
braking or in a collision and cause serious per·
sonal injury.
- Always use suitab le retaining straps and
properly secure items to the tie -downs in
the luggage compartment to help prevent
items from shifting or flying forward.
- Never attach a child seat tether strap to a
t ie-down.
- For strength-related reasons, the mounting
hooks can on ly be used to secure objects
we ighing up to 10 lb. (5 kg). Heavier objects
will not be adequately secured -there is a
r isk of inj ury.
Storage hooks
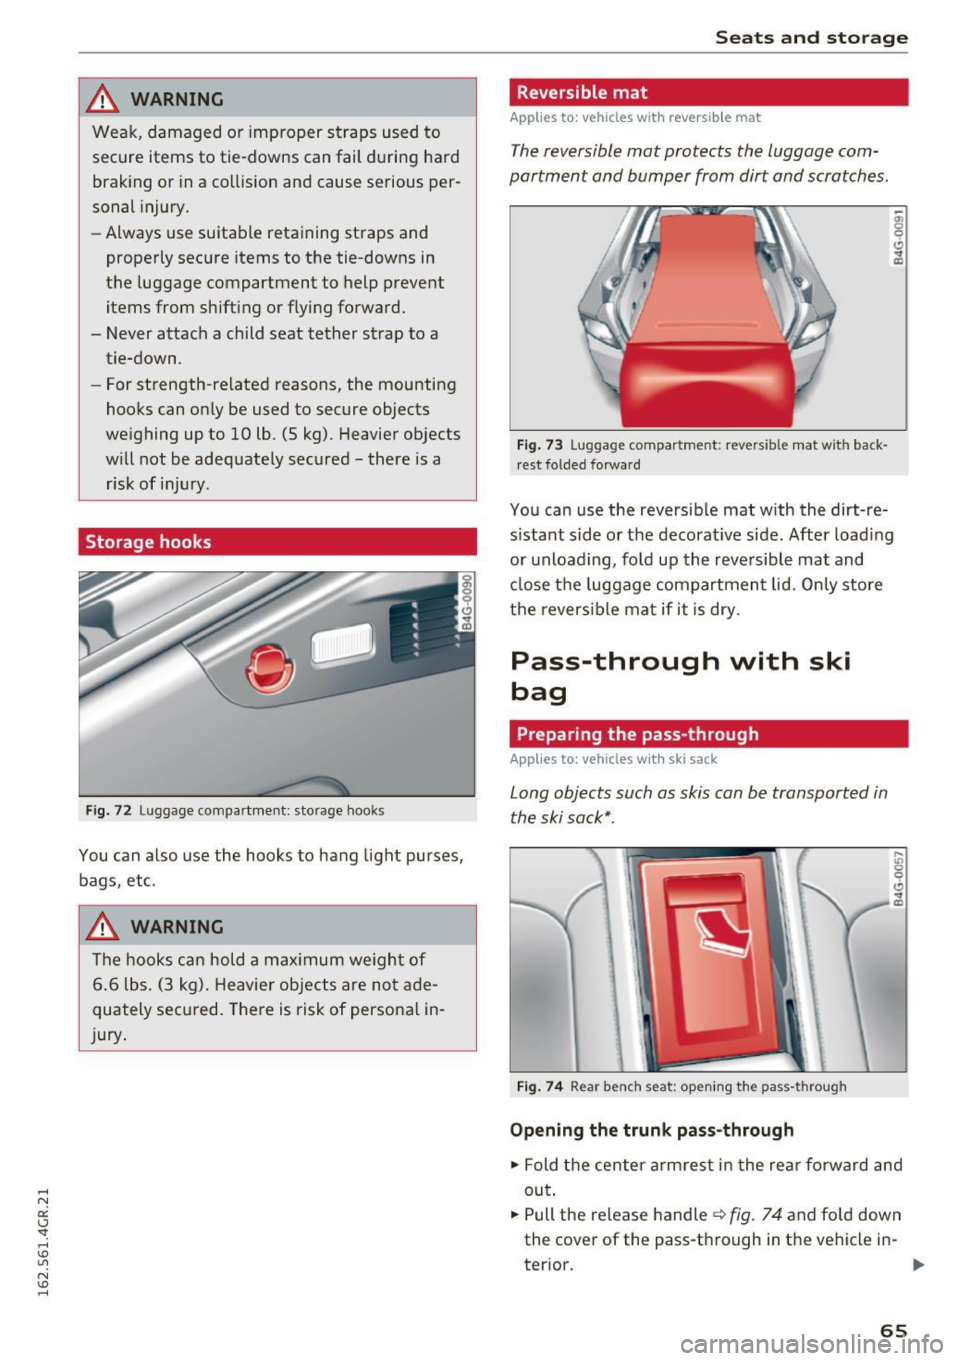
Fig. 72 Luggage compartment: storage hooks
You can also use the hooks to hang light purses,
bags, etc.
& WARNING
-
-
Th e ho oks can hold a max imum weight of
6 .6 lbs. (3 kg). Heavier objects are not ade
quately secu red. There is risk of personal in
Jury .
Seats and storag e
Reversible mat
Applies to: veh icles w ith revers ib le m at
The reversible mat protects the luggage com·
partment and bumper from dirt and scratches .
Fig. 73 Luggage compartment: reversible mat with back
rest folded forward
You can use the reversib le mat w ith the dirt-re
s istant side or the decorat ive side. After loading
or unloading , fold up the reve rsible mat and
cl ose the luggage compartment lid. Only store
the reversible mat if it is dry.
Pass-through with ski
bag
Preparing the pass -through
Applies to : veh icles w it h sk i sack
Long objects such as skis can be transported in
the ski sack* .
Fig . 74 Rear bench seat : open ing the pass-through
Opening the trunk pass -through
.,. Fold the center a rm res t in the rear forward and
out .
.,. Pull the release handle¢
fig. 74 and fold down
the cover of the pass-through in the vehicle in-
terior. .,,.
65
Page 71 of 282
system runs continuously at maximum cooling or
heating power. There is no temperature regula
tion.
Adjusting the blower~
You can adjust the volume of air generated by the
b lower to your preference. To have the blower
regulated automatica lly, press the
IAUTOI but
ton.
~ Adjusting air distribution
You can manually select the vents where the air
will flow. To have the air distribution reg ulated
automatically , press the
IAUTO ! button.
~ Adjusting seat heating*/seat ventilation*
Pressing the button switches the seat heating/
seat ventilat ion on at the highest setting (leve l
3). The LEDs indicate the temperature level. To
reduce the temperature, press the button again.
To switch the seat heating/seat ventilation off,
press the button repeated ly until the LED turns
off .
Afte r 10 minutes, the seat heating automatically
switches from level 3 to level 2.
I@ FRONT I Switching the defroster on/off
The windshield and s ide windows are defrosted
or cleared of condensation as qu ickly as possib le.
The maximum amount of air flows mainly from
the vents below the windshield. Recirculation
mode switches off. The temperature shou ld be
set to approximate ly 22
°C.
The IAU TOI button switches the defroster off.
IQiD REARI Switching the rear window defogger
on/off
The rear window heate r o nl y operates when the
engine is running.
It switches off automatical ly
after a few minutes, depending on the outs ide
temperature.
To prevent the rear w indow heater from switch
in g off automatically , press and hold the
IQiil REAR I
button for more than 2 seconds. This is stored
until the ignition is switched off.
Warm and cold
I SYNC ! Synchronization
When synchronization is switched on, the set
tings for the driver's s ide are applied to the front
passenger's side (except for seat heating/ventila
tion *). The settings in the rear are also synchron
ized. Synchronization switches off if the settings
are adjusted on the front passenger's side or in
the rear.
You can synchronize the settings in a row by
pressing and holding a control. For example, to
apply the settings for the front passenger's side
to the driver's side, press and hold the control on
the front passenger's s ide. The same applies to
the rear.
Residual heat*
With the ign ition turned off, you can activate the
residual heat function by pressing the~ button
<=> fig. 77. The residual heat from the coolant is
used to heat the veh icle inter ior. The residual
heat function sw itches off automat ica lly after
about 30 minutes.
Air vents
You can open or close the center and rear vents in
the cockpit and the
vents in the rear center con
sole and door pillars using the ridged thumb
whee ls. The levers adjust the direction of the air
flow from the vents.
_&. WARNING
-You should not use the recirculation mode
for an extended period since no fresh air is
drawn in. With the air-conditioning switch
ed off, the windows can fog up, which in
creases the risk of an accident.
- Individuals with reduced sensitivity to pain
or temperature could develop burns when
using the seat heat ing funct ion. To reduce
the risk of injury, these individuals should
not use seat heating .
(D Note
To avoid damage to the heating elements in
the seats, do not kneel on the seats or place
heavy pressure on one point of the seat.
69
Page 74 of 282
Driving
There must be at least 10 inches (25 cm) be
tween your chest and the center of the steering
wheel. If you cannot sit more than 10 inches (25
cm) from the steer ing wheel, see if adaptive
equipment is available to help you reach the ped
als and increase the distance from the steering
wheel.
For detai led information on how to adjust the
driver's seat, see
¢ page 53.
In vehicles with the memory function*, the steer
ing column sett ings are stored together with the
seat position.
A WARNING
Improper use of steer ing whee l adjustment
and improper seating position can cause ser i
ous pe rsonal injury.
- Adjust the steering wheel column only when
the vehicle is not moving to prevent loss of
vehicle control.
- Adjust the driver's seat or steering wheel so
that there is a minimum of 10 inches (25
cm) between your chest and the steer ing
wheel
r::.> page 119, fig. 141. If you cannot
mainta in this min imum distance, the airbag
system cannot protect you properly.
- If phys ica l limitations prevent you from sit
t ing 10 inches (25 cm) or more from the
steering wheel , check with your authorized
Audi dealer to see if adaptive equ ipment is
available.
- If the steering wheel is aligned with your
face, the supp lemental driver's airbag can
not provide as m uch protection in an acci
dent. Always make sure that the steering
wheel is aligned w ith your chest.
- Always hold the steer ing whee l with your
hands at the 9 o'clock and 3 o'clock posi
tions to reduce the risk of personal injury if
the driver's airbag deploys .
- Never hold the steer ing wheel at the 12
o'clock posit ion or w ith your hands inside
the steering wheel rim or on the steering
wheel hub . Holding the steer ing whee l the
wrong way can cause ser ious injuries to the
hands, arms and head if the driver's airbag
deploys.
72
-
Easy seat entry
Applies to: vehicles with power steering wheel adjustment
Easy seat entry makes it easier to enter and exit
the vehicle by adjusting the steering column au
tomatically .
.,. In the Infotainment system, select the ICARI
function button > ( Car )* Systems control but
ton
> Vehicle settings > Seats > Driver's seat>
Easy seat entry > On .
When easy seat entry is switched on, the steer ing
column goes back up into the park position when
the ignit ion is switched off . After enter ing the ve
hicle, the steering col umn returns to t he sto red
pos ition once the ign it ion is swi tched on.
Starting and stopping
the engine
Starting the engine
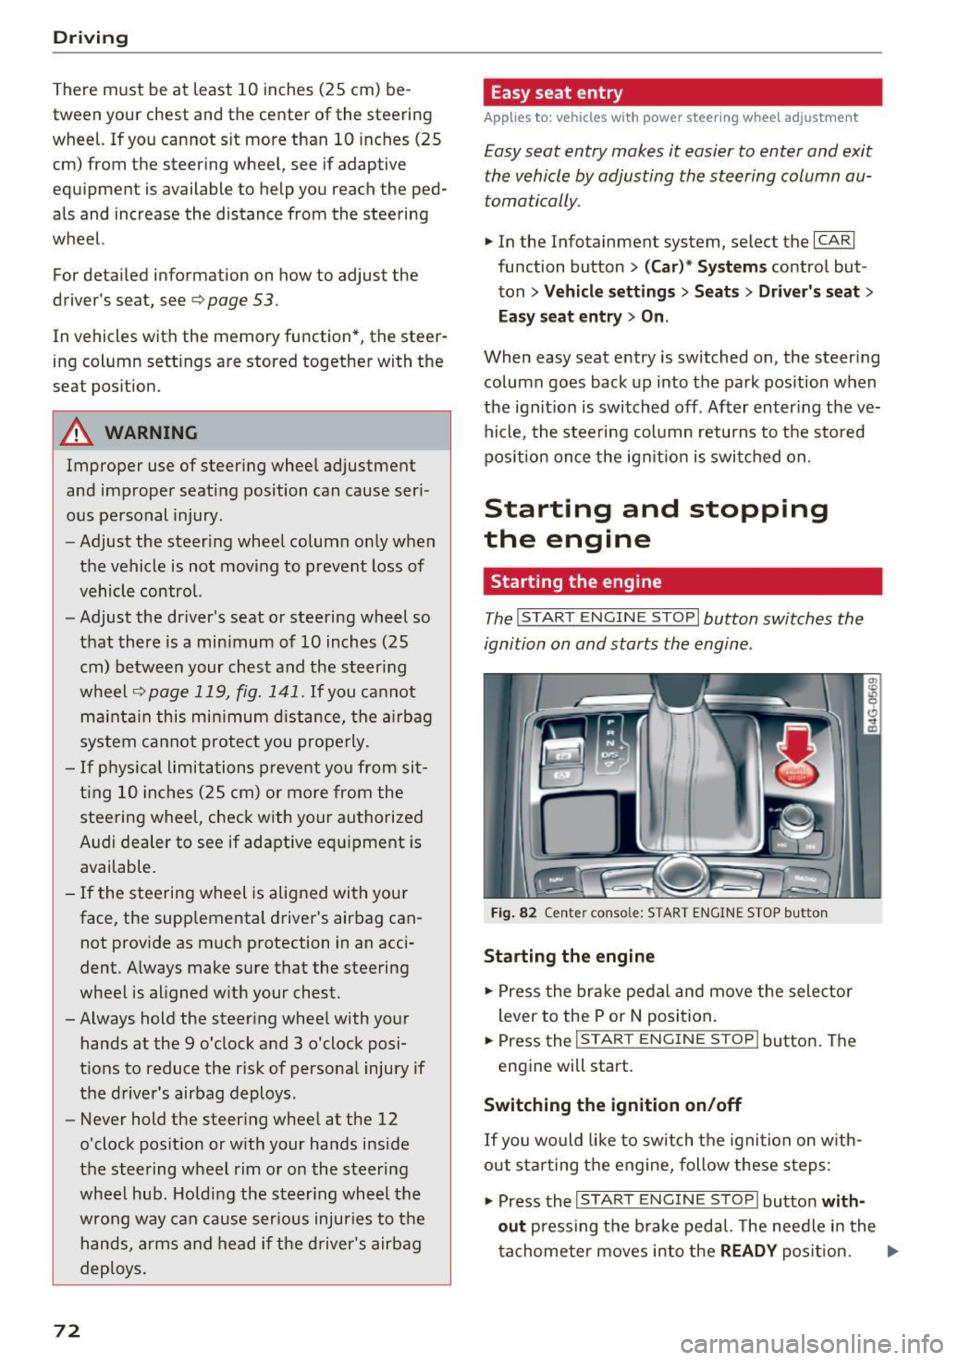
The I START ENGINE STOP I button switches the
ignition on and starts the engine .
Fig. 82 Cente r conso le: S TART ENGINE STOP b utt on
Starting the engine
.,. Press the brake pedal and move the selector
lever to the P or
N position.
... Press the
!STAR T ENGINE ST OP ! button. The
engine will start.
Switching the ignition on/off
If you would like to switch the ignition on w ith
out sta rting the engine, follow these steps:
.,. Press the
I START ENGINE STOP ! button with
out
pressing the brake pedal. The needle in the
tachometer moves into the
READY position. II>-
Page 120 of 282
Driving sa fe ty
Driving safety
Basics
Safe driving habits
Please remember -safety first!
This chapter contains important information,
tips, instruct ions and warn ings that you need to
read and observe for your own safety, the safety
of your passengers and others. We have summar ized here what you need to know about safety
be lts, a irbags, child restra ints as well as child
safety. Your safety is for us
priority number 1 . Al
ways observe the i nfo rmation and wa rn ings in
this section - for your own safety as well as that
of your passengers.
The information i n this section applies to all
model versions of yo ur vehicle . Some of the fea
tures descr ibed in t his sections may be s tanda rd
equipment on some models, or may be optional
equipment on others . If you are not sure, ask
your authorized Audi dealer.
A WARNING
- Always make sure that you follow the in
structions and heed the WARNINGS in th is
Manual.
It is in your interest and in the in
te rest of your passengers.
- Always keep the comp lete Owner's Litera
ture in your A udi when you lend or sell your
vehicle so that this important information
will always be available to the d river and
passenge rs.
- Always keep the Owner 's literature handy so
that you can find it easily if you have ques
t ions.
Safety equipment
The safety features are part of the occupant re
straint system and work together to help reduce
the risk of injury in a wide variety of occident si t
uations.
Your safety and the safety of your passenge rs
should not be left to chance. Advan ces i n tech
nology have made a var iety of features avai lab le
to help reduce t he risk of injury in an accident .
118
The following is a list of just a few of the sa fety
features in your Audi :
- sophis tica ted safety be lts fo r dr ive r and all pas-
senge r seat ing pos itions,
- safety belt p retensioners,
- safety belt force lim ite rs fo r th e front seats,
- safety belt he ight adjustment systems for the
front seats,
- front airbags,
- knee airbags for the front seats*
- side airbags in the front seats and outer rear
seats*,
- side curtain airbags with ejection mitigation
features,
- special LATCH anchorages for child restraints,
- head rest raints fo r ea ch seating position,
- adj ustab le steering col umn.
These ind iv idual safety features, can work to
ge ther as a system to help protect you and your
passengers in a wide range of acc idents. These
features canno t wo rk as a sys tem if they are not
alw ays cor rec tly adj usted and cor rect ly used.
Safety is everybody' s re sponsibility!
Important things to do before driving
Safety is everybody's job! Vehicle and occupant
safety always depends on the informed and care
ful driver .
For your safety and the safety of your passen
gers,
before driving alway s:
.. Make sure that a ll lights and signals are operat
ing correctly.
.. Make sure that the tire pressure is correct.
.,. Make sure that all windows are clean and afford
good visibility to the outs ide .
.. Sec ure all luggage and othe r items carefully
~page 62, ~ page 60.
.. Ma ke sure that noth ing ca n interfere wi th the
peda ls .
.. Adjust front seat, head restraint and mirrors
correctly for yo ur height .
.. Instruct passengers to adjust the head re
straints according to their he ight.
Page 122 of 282
Driving safety
"' Always keep both feet in the footwell so that
you are in control of the vehicle at all times.
For detailed information on how to adjust the
driver's seat, see
c;, page 53.
A WARNING
Drivers who are unbelted, out of position or
too close to the airbag can be seriously in
jured by an airbag as it unfolds . To help re
duce the risk of serious personal injury:
- Always adjust the driver's seat and the
steering wheel so that there are at least
10 inches (25 cm) between your breastbone
and the steering wheel.
- Always adjust the driver's seat and the
steering wheel so that there are at least
4 inches (10 cm) between the knees and the
lower part of the instrument panel.
- Always hold the steering wheel on the out
side of the steering wheel rim with your
hands at the 9 o'clock and 3 o'clock posi
tions to help reduce the risk of personal in
jury if the driver's airbag inflates.
- Never hold the steering wheel at the
12 o'clock position or with your hands at
other positions inside the steering wheel
rim or on the steering wheel hub. Holding
the steering wheel the wrong way can cause
serious injuries to the hands, arms and head if the driver's airbag inflates.
- Pointing the steering wheel toward your
face decreases the ability of the su pplemen
tal driver's airbag to protect you in a colli
sion.
- Always sit in an upright position and never lean against or place any part of your body
too close to the area where the airbags are
located .
- Before driving, always adjust the front seats
properly and make sure that all passengers
are properly restrained .
- For adjustable head restraints: before driv
ing, always also adjust the head restraints
properly .
- Never adjust the seats while the vehicle is
moving. Your seat may move unexpectedly
and you could lose control of the vehicle.
120
-
-Never drive with the backrest reclined or
tilted far back! The farther the backrests are
tilted back, the greater the risk of injury due
to incorrect positioning of the safety belt
and improper seating position .
- Children must always ride in child seats
c:;, page 159 . Special precautions apply
when installing a child seat on the front
passenger seat
c:;, page 135.
Proper seating position for the front
passenger
The proper front passenger seating position is
important for safe, relaxed driving.
For your own safety and to reduce the risk of in
jury in the event of an accident , we recommend
that you adjust the seat for the front passenger
to the following position:
"'Adjust the angle of the seatback so that it is in
an upright position and your back comes in full
contact with it whenever the vehicle is moving.
"'For adjustable head restraints: adjust the head
restraint so the upper edge is as even as possi
ble with the top of your head. If that is not pos
sible, try to adjust the head restraint so that it
is as close to this position as possible
c:;, page 121 . Move the head restraint so that it
is as close to the back of the head as possible.
"' Keep both feet flat on the floor in front of the
front passenger seat .
"' Fasten and wear safety belts correctly
c;,page 130.
For detailed information on how to adjust the
front passenger's seat, see
c:;, page 52 .
A WARNING
Front seat passengers who are unbelted, out
of position or too close to the airbag can be
seriously injured or killed by the airbag as it
unfolds. To help reduce the risk of serious
personal injury:
- Passengers must always sit in an upright po
sition and never lean against or place any part of their body too close to the area
where the airbags are located.
Ill-
Page 123 of 282
-Passengers who are unbelted, out of posi
tion or too close to the airbag can be seri
ously injured by an airbag as it unfolds with
great force in the blink of an eye.
- Always make sure that there are at least
10 inches (25 cm) between the front pas
senger's breastbone and the instrument
panel.
- Always make sure that there are at least
4 inches (10 cm) between the front passen ger's knees and the lower part of the instru
ment panel.
- Each passenger must always sit on a seat of
their own and properly fasten and wear the safety belt belonging to that seat.
- Before driving, always adjust the front pas
senger seat properly.
- For adjustable head restraints: before driv
ing, always also adjust the head restraints
properly.
-Always keep your feet on the floor in front
of the seat. Never rest them on the seat, in
strument panel, out of the window, etc. The
airbag system and safety belt will not be
able to protect you properly and can even in
crease the risk of injury in a crash .
- Never drive with the backrest reclined or
tilted far back! The farther the backrests are
tilted back, the greater the risk of injury due
to incorrect positioning of the safety belt and improper seating position.
- Children must always ride in child seats
c> page 159. Special precautions apply
when installing a child seat on the front
passenger seat
c> page 135.
Proper seating positions for passengers in
rear seats
Rear seat passengers must sit upright with both
feet on the floor consistent with their physical
size and be properly restrained whenever the ve
hicle is in use.
To reduce the risk of injury caused by an incorrect
seating position in the event of a sudden braking
maneuver or an accident, your passengers on the
rear bench seat must always observe the follow
ing:
Driving safety
.,. For adjustable head restraints: adjust the head
restraint so the upper edge is as even as possi
ble with the top of your head. If that is not pos
sible, try to adjust the head restraint so that it
is as close to this position as possible
c>page 121 .
.,. Keep both feet flat in the footwell in front of
the rear seat.
.,. Fasten and wear safety belts properly
c> page 130.
.,. Make sure that children are always properly re
strained in a child restraint that is appropriate
for their size and ager:!;>
page 159.
A WARNING
-
Passengers who are improperly seated on the
rear seat can be seriously injured in a crash.
- Each passenger must always sit on a seat of
their own and properly fasten and wear the
safety belt belonging to that seat.
- Safety belts only offer maximum protection
when the safety belts are properly posi
tioned on the body and securely latched. By not sitting upright, a rear seat passenger in
creases the risk of personal injury from im
properly positioned safety belts!
- For adjustable head restraints: always ad
just the head restraint properly so that it
can give maximum protection.
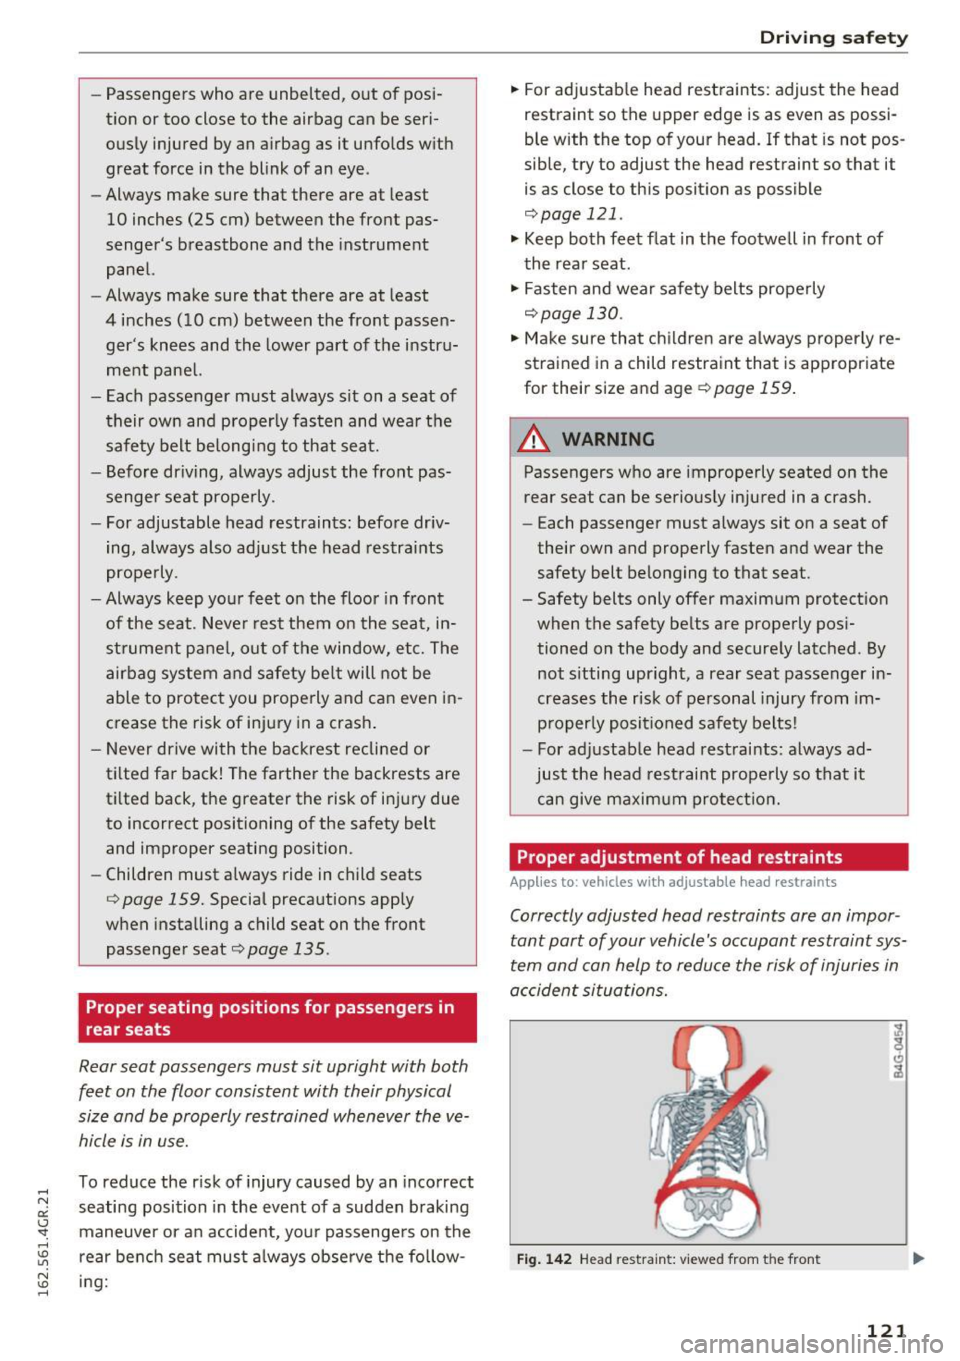
Proper adjustment of head restraints
App lies to: vehicles with adjusta ble head restraints
Correctly adjusted head restraints are an impor
tant part of your vehicle's occupant restraint sys
tem and can help to reduce the risk of injuries in
accident situations.
Fig. 142 Head restraint: viewed from the front
121
Page 124 of 282
Driving sa fe ty
The head restraints must be correc tly adjusted to
achieve the best protection .
.,. Adjust the head restraint so the upper edge is
as even as poss ible with the top of your head.
If
that is not possible, try to adjust the head re
straint so that it is as close to this position as
poss ib le ¢
fig . 142. Move the head restraint so
that it is as close to the back of the head as
poss ible.
Adjusting head restraints ¢
page 55.
A WARNING
All seats are equipped with head restraints.
Dr iv ing without head restraints or with head
restraints that are not properly adjusted in
creases the risk of ser ious or fatal nec k inju ry
dramatically. To help reduce the r isk of injury:
-Always dr ive with the head restraints in
place and properly adj usted .
- Every person in the vehicle must have a
properly adjusted head restra int.
- Always make sure each person in the vehicle
properly adjusts their head restraint. Adjust
the head restra int so the uppe r edge is as
even as possib le w ith the top of you r head.
If that is not possib le, t ry to adjust the head
restra int so that it is as close to th is posi tion
as possib le. Move the head restr aint so that
it is as close to the back of the head as pos
sible.
- Never attempt to adjus t head restraint
whi le driving. If you have dr iven off and
must adjust the driver headrest for any rea
son, first stop the vehicle sa fely before at
tempting to ad just the head restra int.
- Children must always be proper ly restrained
in a chi ld restraint that is appropriate for
their age and size
¢page 159.
Examples of improper seating positions
The occupant restraint system can only reduce
the risk of injury if vehicle occupants are properly
seated.
Imp roper seating positions can cause se rious in
jury or deat h. Safety belts can only work when
122
they a re prope rly positioned on t he body . Im
proper seating positions reduce the effectiveness
of safety belts and will even increase t he risk of
i njury and death by moving the safety belt to cr it
i ca l areas of the body. Improper seating positions
also increase the r isk of serious i nju ry and death
whe n an airbag deploys and str ikes a n occupant
who is not in the proper sea ting posit io n. A dr iver
i s respons ible fo r th e safety of al l veh icle occu
pan ts and espe cially for children . Therefore:
.,. Never allow anyone to assume a n incor rect
seating position when the vehicle is being used
¢ _& .
The following bulletins list only some samp le po
s it ions that will increase the r is k of se rious injury
and death . Our hope is that t hese examples w ill
make yo u mo re awa re of seating posi tions that
are dangerous .
Therefore, whenever the vehicle is moving:
- never stand up in the vehicle
- never stand on the seats
- neve r kneel on the seats
- neve r ride wit h the seatback reclined
- never lie down on the rear seat
- neve r lean up aga inst the ins trumen t pa nel
- neve r sit on the edge of the seat
- never s it sideways
- never lean out the window
- never put your feet out the window
- never p ut your feet on the instr ument panel
- never rest your feet on the seat c ushion or back
of t he seat
- neve r ride in the footwell
- neve r ride in the ca rgo a rea
A WARNING
I mp roper se ating positions inc re ase the risk
of ser ious personal inju ry and dea th whenever
a vehicle is being used.
- Always make sure that all veh icle occupants
s tay in a pro per seating posit ion and a re
properly restrained whenever the vehicle is
be ing used .