window AUDI S3 2010 Owner's Manual
[x] Cancel search | Manufacturer: AUDI, Model Year: 2010, Model line: S3, Model: AUDI S3 2010Pages: 320, PDF Size: 75.34 MB
Page 101 of 320
Please keep in mind that with the air conditioner switched off, the
interior temperature cannot be lower than the outside temperature.
There is no cooling and the air is not dehumidified (danger of the
windows becoming fogged).
[ i ] Tips
if there is a defect in the air conditioner, the air conditioner cannot
be switched on. In this case, the diode in the button does not light
after being switched on. in the event of a system fault, please
contact an Audi or specialist garage. •
Switching the air conditioning on and off @
-Press the [AC] button to switch the air conditioner on or
off.
if there is a defect in the air conditioner, the air conditioner cannot
be switched on. In this case, the diode in the button does not light
after being switched on . in the event of a system fault, please
contact an Audi or specialist garage. •
Automatic mode [ AUTO I
The automatic mode is the standard setting for all
seasons.
Swit ching on AUTO
- Select temperature between 64 °F (+18 °C) and 84 °F
(+28 °C) .
- Press
[AUTO I~ page 98, fig . 103.
AUTO on ly works when you set the inside temperature between
64 °F (18 °C) and 84 °F (28 °C). If you se lect a tempe rature be low
Controls and equip
ment
W arm and cold
64 °F (18 °C), LO will appear in the disp lay. If you se lect a tempera
t ure above 84 °F (28 °C),
HI will appear in the display .
The system automatica lly compensates for changes in outside
temperature and for the intensity of the sun light .
[ i ] Tip s
By keeping the [AU TO l button on the driver's side pressed for
severa l seconds, the temperature of the passenger's side can be set
to the temperature of the driver's side or vice versa. The new
t emperature setting will be shown in the disp lay. •
Setting the temperature 1
Separa te tempera tures can be selected for the driver's
and fr ont passenger's side.
- Turn the rotary sw itch © on the driver's side and the
rotary switc h@ on the passenger's s ide left( -) or right
(+ ) to control the temperature ~ page 98, fig. 103.
There is a time de lay before the selected temperature is reached.
[ i ] Tip s
The temperature setting for the driver's side can be transferred to
the passenger's side~
page 99. •
Defrosting/defogging the windshield[@)
The windshield and side windows are quickly defrosted or
defogged
- Press [®I~ page 98, fig. 103 .
- Press[@] again or press
[AUTO I to switch off the
defros ter .
I • •
Page 102 of 320
• .___w __ a _r _m _ a _n_d_ c_ o _ ld __________________________________________________ _
The temperature is auto mat ica lly contro lled. Maximum airflow is
primarily blown in through out lets G),@ and
0 => page 102 .
Outlets@ can be opened and c losed wi th the controls behind
them . Outlets @ and
0 must be opened so the windows can be
defrosted as quickly as possible.
By pressing
( lliil] and air recircula tion are switched off .•
Manual air recirculation mode ~
T he recirculation mode prevents polluted outside air from
entering the vehicle interior.
Switching on air rec ir c ulation
- Press the button [~ I=> page 98, fig. 103 => &.
Swit ching off air r ecir culation
- Press the b utton [~ I again , or
Press the [AUTO
I button, or
- Press the
l@I button.
In air recirculation mode, air is drawn from the vehicle interior and
recirculated . We recommend that you use the manual a ir reci rcu la
tion mode under th e fol lowing cond itions :
When driving through a tunnel or i n a traffic jam so that exhaust
fumes canno t en ter the vehic le interior.
& WARNING
Do not use this s etting for extended per iod s of t ime . The wind ows
c ould fog up sin ce no fre sh air can enter the vehi cle . If the
window s fog up , pre ss th e air re cir culat ion button again immed i
ately t o switch off th e air re circulation function or sel ect defro st. •
Automatic air recirculation[~ ]
If outside air is pollu te d, an air quality sens or in the
vehicle will automatically switch on the air recirculati on.
Switching on air recir culation
- Press [~ I=> page 98, fig. 103.
Switching off air re cir culation
Press@ again, or
press [AU TO
I, or
press
[ @ I.
The automatic air recirculation mode shou ld no rma lly be left
sw itched on at all times.
T he system is ready to operate approximately 30 seconds after you
t urn on the ignition or start the vehic le . Fresh air enters the vehic le
only during this ini tialization period.
The air qua lity sensor for detecting diese l and gasoline exhaust
fumes switches automatically to air recirculation mode if the outside air is h eavily po lluted . The supply of outside air is closed off.
As soon as the pollut ion leve l drops, fresh air is automatically
supplied to the vehic le interior again .
The air recirculation operates fo r a maximum of 12 minutes . If the
windows star t to fog up whi le the a ir rec irculation is on, press(@]
Under c ertain operating conditions ( for example , if
I@ ] or 1~ 1 are
pressed) the a ir rec ircu lation automatically switches o ff. If the air
cond itioner is switched off, or if the temperature is be low 18 °F ( -
8 °C), the air recircu lation wi ll opera te only for 12 sec onds. •
Page 103 of 320
___________________________________________________ w_ a _r_m _ a_ n_d_ c_ o_ ld __ _
Switching between Fahrenheit and
Centigrade
You can change the temperature display from °F (Fahren
heit) to °C (Centigrade) and vice versa.
-Hold the [ ,;;S;)I button down => page 98, fig. 103.
- Turn the rotary switch (driver's side) @for 3 seconds+. •
Air recirculation (~ ]
The air recirculation prevents exhaust fumes or other
pollution from entering the vehicle.
Switching air recirculation on
- Press [~I=> page 98, fig. 103 => &
Switching air recirculation off
-Press~ again, or
- press
[AUTO J, or
- press[@).
In the air recirculation mode, the air in the passenger compartment
is recirculated to prevent exhaust fumes and other pollution from
entering the vehicle. We recommend that you use the manual air
recirculation under the following conditions:
• when driving through tunnels
• in a traffic jam.
& WARNING
Do not use this setting for extended periods of time . The windows
could fog up since no fresh air can enter the vehicle . If the
Controls and equip
ment
& WARNING (continued)
windows fog up, press the air recirculation button again immedi
ately to switch off the air recirculation function or select defrost. •
Adjusting the fan speed 8 G
The automatically selected fan speed can be increased or
decreased.
- Press the 8 or G buttons in the center of the control
panel=>
page 98, fig. 103 to adjust the fan speed to your
comfort.
The air conditioning system automatically regulates the fan speed
in response to the interior temperature. However, you can also
adjust the fan speed manually. A line of small bars in the center
display above the fan control buttons will retreat or extend to reflect
your adjustments to the fan speed.•
Air distribution
The automatically controlled air distribution can be
changed manually.
You can use the [1!:.), l~l or l~ l buttons separately or together in
combination. To switch back to the automatic air distribution
setting, either switch off the buttons you previously selected, or
press
[ AUTO ).
Each of the three buttons has its own specific function (the refer
ence numbers refer to the air outlets) :::>
page 102, fig. 104.
Air directed to the windows ~
All the air is directed to outlets G),@ and G). Contrary to when [@ 1
is pressed, the amount of air remains the same. .,_
I • •
Page 104 of 320
![AUDI S3 2010 Owners Manual • ..__w_ a_ r_m _ a_ n_d_ c_ o_ ld __________________________________________________ _
Air d ir ected to the dri ver/ front passe nger[~]
All the air is directed to outlets @, G) and � AUDI S3 2010 Owners Manual • ..__w_ a_ r_m _ a_ n_d_ c_ o_ ld __________________________________________________ _
Air d ir ected to the dri ver/ front passe nger[~]
All the air is directed to outlets @, G) and �](/img/6/57545/w960_57545-103.png)
• ..__w_ a_ r_m _ a_ n_d_ c_ o_ ld __________________________________________________ _
Air d ir ected to the dri ver/ front passe nger[~]
All the air is directed to outlets @, G) and © in the instrument
panel. Air also is directed through the center console in the rear.
Air dir ected to th e footw ells ~
All the air is directed to outlets © and to the outlets under the front
seats .•
Air outlets
, _ ,
,~
---- 1
'
Fig . 104 I nstrume nt pan el: a ir out let loca tio ns a nd airfl ow direc tions
T he air out lets G) and 0 on top of t he instrument pane l are
fixed . Outlets 0 and 0 can be adjusted .
Adjusting air outlets 0 and 0
- Turn the vertical thumbwheel beside the outlet to
increase, reduce or shut down t he airflow from that
outle t. - Move t
he smal l tab in the center of the o utlet lo uver side
ways and up or dow n to ad just the level an d direc tion of
airflow.
The supply of air to the outlets is controlled either automatically or manually depending on the operation mode selected . The airflow
from al l outlets can be hea ted, unheated or cooled.
The heater out lets for the rear footwells are located under the front
seats. When you select outlets©, air is also directed to the rear
footwells.
[ i ] Tips
• When defrosting/defogging the windows, air flows from outlets
G), ® and G). To defrost or defog the windows as rapidly as
possible, air out lets
G) should be opened fully with the adjuster
whee ls.
• When the air conditioner is working, cooled air wi ll flow primarily
from outlets ®·
G) and ©-To assure adequate cooling, out lets G)
and © should never be completely closed. •
Using the climate controls economically
Using the climate controls prudently can help save fuel.
When you use the air conditioner, engine power is reduced
and fuel consumption increases. To save fuel, you should
use the a ir conditioner only when necessary . Also please
note the following points:
- If you want to save fuel, sw itch off the air conditioner.
- If you are going to drive w ith the wi ndows open, switc h
off the a ir condit io n er.
~
Page 105 of 320

___________________________________________________ W_ a_ r_m _ a_ n_d_ c_ o_ ld _ __.11111
<£> For the s ake of th e envir onm ent
By reducing the amount of fue l you use, you a lso reduce the amount
of pollutants emitted into the air. •
Key coded settings
When the ignition is switched on, the air conditioner
settings are automatically assigned to the key being used.
The air conditioner settings selected are automatically stored and
assigned to the key being used. When the vehicle is started, the air
conditioner automatical ly selects the settings assigned to that key .
This way every driver will maintain his/her own personal settings and does not have to reset them manually.
[ i ] Tip s
If a different driver uses your key and changes the air conditioner
sett ings, the latest adjustments wil l erase and replace the settings
you hav e stored. •
Rear vvindovv defogger QiP
The rear window defogger clears the rear window of
condensation.
Con tro ls and eq uip
ment
F ig . 105 Sw itch for
rear window defogge r
w ith air-co nditionin g
Press the CiiP switch to switch the rear wind ow defogger
on a nd off.
The defogger works only with the engine runn ing. When the
defogger is switched on, an indicator light in the switch comes on .
The rear window defogger switches off automatically after about 20 minutes.
<£> For the sake of the environment
Turn the defogger off when the rear window is c lear . When you save
electricity, you save fuel. •
Applie s to v ehic le s: wi th di ese l e ngin e
Additional heater
-Switch the Additional h eater to AUTO .
Vehicles with diesel engines are equipped with an additional heater
to warm the interior of the vehicle more quickly. The additional
heater switches itself on and off automatically when the outside
temperature is below 50 °F (10 °C) and the engine is running ,
depending on the coolant temperature, interior temperature and
the selected temperature. •
Vehicle care I I irechnical data
Page 108 of 320
• ..__O_ n_ t_h _ e_ r_ o_ a_ d ____________________________________________________ _
Ignition lock and ignition switch
Ignition lock
The engine can be started or turned off with the ignition
key.
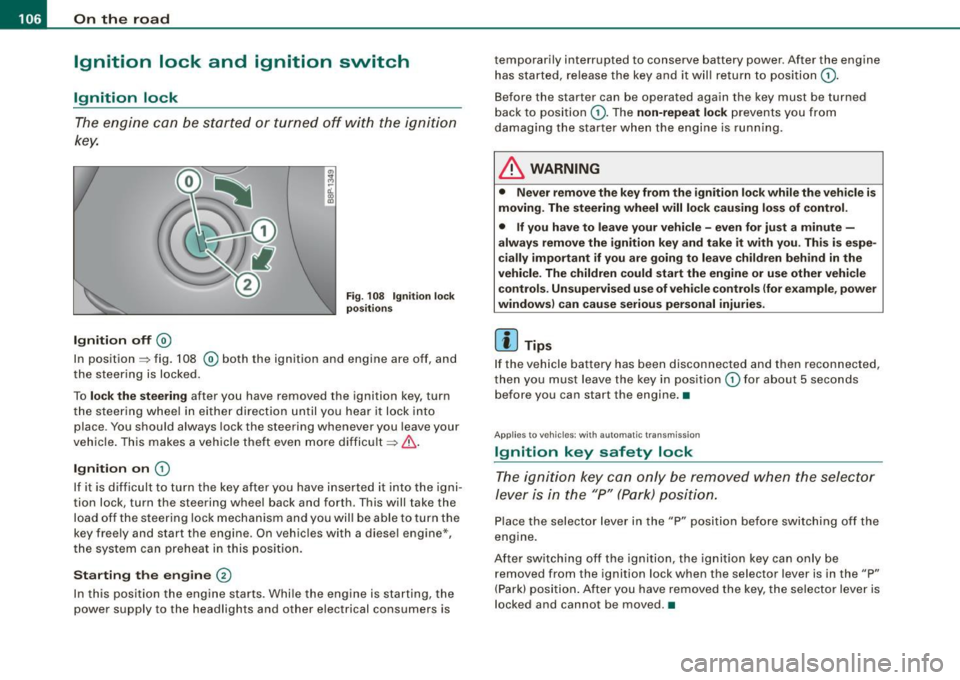
Ignition off ®
Fi g. 108 Ignit ion lock
p os ition s
In position => fig. 108 ® both the ignit ion and engine are off, and
the steering is locked .
To
lo ck the stee ring after you have removed the ignition key, turn
t he steering whee l in either direction until you hear it lock into
place . You should always lock the steering whenever you leave your
vehic le . This makes a vehicle theft even more difficult =>
& -
Ignition on CD
If it is difficult to turn the key after you have inserted i t into the igni
tion lock, turn the steering wheel back and forth . This will take the
load off the steering lock mechanism and you will be able to turn the
key freely and start the engine . On vehicles with a diesel engine*,
t he system can preheat in this pos ition.
St arting the engine
@
In this position the engine starts . Whi le the engine is starting, the
power supply to the headlights and other electrical consumers is temporarily interrupted to conserve battery power
. After the engine
has started, release the key and it will return to position
CD .
Before the starter can be operated again the key must be turned
back to position
CD -The non-repeat lock prevents you from
damaging the star ter when the engine is runn ing.
& WARNING
• Never remo ve the key from the ignition lo ck w hile the veh icle i s
moving. The steering whe el will lo ck caus ing lo ss of control .
• If you hav e to lea ve your vehicle -even fo r ju st a min ute -
alway s remove the ignition key and take it with you. Th is is espe
ci ally important if you are g oing to lea ve children behind in the
vehicle . The childr en co uld start the eng ine or u se other vehi cle
c on trols . Un supe rvis ed u se of veh icle c ont ro ls ( for e xamp le , po wer
windows) c an cause seriou s per sonal injuries .
[ i ] Tips
If the vehicle battery has been disconnected and then reconnected,
then you must leave the key in position
CD for about 5 seconds
before you can start the engine. •
Applies t o vehi cles : w ith autom atic trans mission
Ignition key safety lock
The ignition key can only be removed when the selector
le ver is in the "P" (Park) p osition.
Place the selector lever in the "P" posi tion be fore switching off the
engine .
After switching off the ignition, the ignition key can only be
removed from the ignition lock when the selector lever is in the "P"
(Park) position . After you have re moved the key, the selector lever is
l ocked and cannot be moved .•
Page 127 of 320
Driving Safely -
----------------
Important things to do before driv ing
Safety is everybody's job! Vehicle and occupant safety
always depends on the informed and careful driver.
For your safety and the safety of your passengers, before
driving always:
-Make sure that all lights and signals are operat ing
correctly.
- Make sure that the tire pressure is correct.
- Make sure that all windows are clean and afford good
visibility to the outside.
- Secure all luggage and other items carefully =>
page 92.
-Make sure that noth ing can interfere w ith the pedals.
- Adjust front seat, head restraint and mirrors correctly for your height .
- Instruct passengers to adjust the head restraints
according to their height.
- Make sure to use the right ch ild restraint correctly to
protect children =>
page 167, "Child Safety ".
- Sit properly in your seat and make sure that your passen
gers do the same=>
page 72, "General recommenda
tions".
- Fasten your safety belt and wear it p roperly. Also instruct
your passengers to fasten the ir safety belts properly
=>
page 135. •
Controls and equip
ment Safety first Vehicle operation
What impa
irs driving safety?
Safe driving is directly related to the condition of the
vehicle, the driver as well as the driver's ability to concen
trate on the road without being distracted.
The driver is responsible for the safety of the vehicle and all
of its occupants. If your ability to drive is impaired, safety
risks for everybody in the vehicle increase and you also
become a hazard to everyone else on the road =>& .There
fore:
Do not let yourself be distracted by passengers or by
using a cellular telephone .
NEVER drive when your driving ability is impaired (by
medications, alcohol, drugs, etc.).
- Observe all traffic laws, rules of the road and speed limits
and plain common sense .
- ALWAYS adjust your speed to road, traffic and weather
conditions.
- Take frequent breaks on long trips. Do not drive for more
than two hours at a stretch.
- Do NOT drive when you are tired, under pressure or when
you are stressed .
& WARNING
Impaired driving safety increases the risk of serious personal
injury and death whenever a vehicle is being used. •
Vehicle care Do-it-yourself service Technical data
Page 130 of 320
........ _o_ r_iv _i_ n""' g::;._ S_ a_f _e _ly =---------------------------------------------------
& WARNING (continued)
• Always make sure that there are at least 10 inches (25 cm)
between the front passenger's breastbone and the instrument
panel.
• Each passenger must always sit on a seat of their own and
properly fasten and wear the safety belt belonging to that seat.
• Before driving, always adjust the front passenger seat and
head restraint properly.
• Always keep your feet on the floor in front of the seat . Never
rest them on the seat, instrument panel, out of the window, etc.
The airbag system and safety belt will not be able to protect you
properly and can even increase the risk of injury in a crash.
• Never drive with the backrest reclined or tilted far back! The
farther the backrests are tilted back, the greater the risk of injury due to incorrect positioning of the safety belt and improper
seating position.
• Children must always ride in child safety seats~
page 167.
Special precautions apply when installing a child safety seat on
the front passenger seat~
page 145. •
Proper seating positions for passengers in
rear seats
Rear seat passengers must sit upright with both feet on
the floor consistent with their physical size and be prop
erly restrained whenever the vehicle is in use.
To reduce the risk of injury caused by an incorrect seating
position in the event of a sudden braking maneuver or an
accident, your passengers on the rear bench seat must
always observe the following:
- Make sure that the seatback is securely latched in the
upright position =>
page 81.
-Adjust the head restraint so that the upper edge is as
even with the top of your head as possible but no lower
than eye level=>
page 129.
-Keep both feet flat in the footwell in front of the rear seat .
- Fasten and wear safety belts properly=>
page 139.
-Make sure that children are always properly restrained in
a child restraint that is appropriate for their size and age
=>
page 167.
& WARNING
Passengers who are improperly seated on the rear seat can be
seriously injured in a crash.
• Each passenger must always sit on a seat of their own and
properly fasten and wear the safety belt belonging to that seat.
• Safety belts only offer maximum protection when the seatback
is securely latched in the upright position and the safety belts are
properly positioned on the body. By not sitting upright, a rear seat
passenger increases the risk of personal injury from improperly
positioned safety belts!
• Always adjust the head restraint properly so that it can give
maximum protection. •
Page 132 of 320

-L..___.:D=-:.. r.:....iv .:....i:..:. n..:.: g;a...: S=-= a:..:.f -=e :..:..IY !,__ ________________________________________________ _
examples will make you more aware of seating positions that are
dangerous.
Therefore, whenever the vehicle is moving:
• never stand up in the vehicle
• never stand on the seats
• never kneel on the seats
• never ride with the seatback reclined
• never lie down on the rear seat
• never lean up against the instrument panel
• never sit on the edge of the seat
• never sit sideways
• never lean out the window
• never put your feet out the window
• never put your feet on the instrument panel
• never rest your feet on the seat cushion or back of the seat
• never ride in the footwell
• never ride in the cargo area
& WARNING
Improper seating positions increase the risk of serious personal
injury and death whenever a vehicle is being used.
• Always make sure that all vehicle occupants stay in a proper
seating position and are properly restrained whenever the vehicle
is being used. •
Pedal area
Pedals
The pedals must always be free to move and must never
be interfered with by a floor mat or any other object.
Make sure that all pedals move freely without interference and that
nothing prevents them from returning to their original positions.
Only use floor mats that leave the pedal area free and can be
secured with floor mat fasteners.
If a brake circuit fails, increased brake pedal travel is required to
bring the vehicle to a full stop.
& WARNING
Pedals that cannot move freely can cause loss of vehicle control
and increase the risk of serious injury.
• Never place any objects in the driver's footwell. An object could
get into the pedal area and interfere with pedal function. In case
of sudden braking or an accident, you would not be able to brake
or accelerate!
• Always make sure that nothing can fall or move into the
driver's footwell. •
Floor mats on the dr iver side
Always use floor mats that can be securely attached to
the floor mat fasteners and do not interfere with the free
movement of the pedals.
-Make sure that the floor mats are properly secured and
cannot move and interfere with the pedals~
&- .,
Page 134 of 320

-Driving
Safely ------=-------=----------------
& WARNING
Improperly stored luggage or other items can fly through the
vehicle causing serious personal injury in the event of hard braking or an accident. To help reduce the risk of serious personal injury:
• Always put objects, for example, luggage or other heavy items
in the luggage compartment.
• Always secure objects in the luggage compartment using the
tie-down eyelets and suitable straps.
& WARNING
Heavy loads will influence the way your vehicle handles. To help
reduce the risk of a loss of control leading to serious personal
injury :
• Always keep in mind when transporting heavy objects, that a
change in the center of gravity can also cause changes in vehicle
handling:
-Always distribute the load as evenly as possible.
- Place heavy objects as far forward in the luggage compart-
ment as possible.
• Never exceed the Gross Axle Weight Rating or the Gross
Vehicle Weight Rating specified on the safety compliance sticker on the left door jamb. Exceeding permissible weight standards
can cause the vehicle to slide and handle differently.
• Please observe information on safe driving~
page 124.
& WARNING
To help prevent poisonous exhaust gas from being drawn into the
vehicle, always keep the rear lid closed while driving.
• Never transport objects larger than those fitting completely
into the luggage area because the rear lid cannot be fully closed.
& WARNING (continued)
• If you absolutely must drive with the rear lid open, observe the
following notes to reduce the risk of poisoning :
- Close all windows,
- Close the power roof*,
- Open all air outlets in the instrument panel,
- Switch off the air recirculation,
- Set the fresh air fan to the highest speed.
& WARNING
Always make sure that the doors , all windows, the power roof*
and the read lid are securely closed and locked to reduce the risk
of injury when the vehicle is not being used.
• After closing the rear lid, always make sure that it is properly
closed and locked .
• Never leave your vehicle unattended especially with the rear lid
left open. A child could crawl into the vehicle through the luggage
compartment and close the rear lid becoming trapped and unable
to get out . Being trapped in a vehicle can lead to serious personal
injury.
• Never let children play in or around the vehicle.
• Never let passengers ride in the luggage compartment . Vehicle
occupants must always be properly restrained in one of the
vehicle's seating positions.
[ i] Tips
The tire pressure must correspond to the load -see the tire pressure
sticker on the fuel filler door. •