turn signal AUDI S3 2010 Owners Manual
[x] Cancel search | Manufacturer: AUDI, Model Year: 2010, Model line: S3, Model: AUDI S3 2010Pages: 320, PDF Size: 75.34 MB
Page 10 of 320
Instruments and warning/indicator lights
Instruments and warning/indicator lights
Instruments
Instrument cluster and controls
The ins trum ent cluster is your central source of informa
ti on.
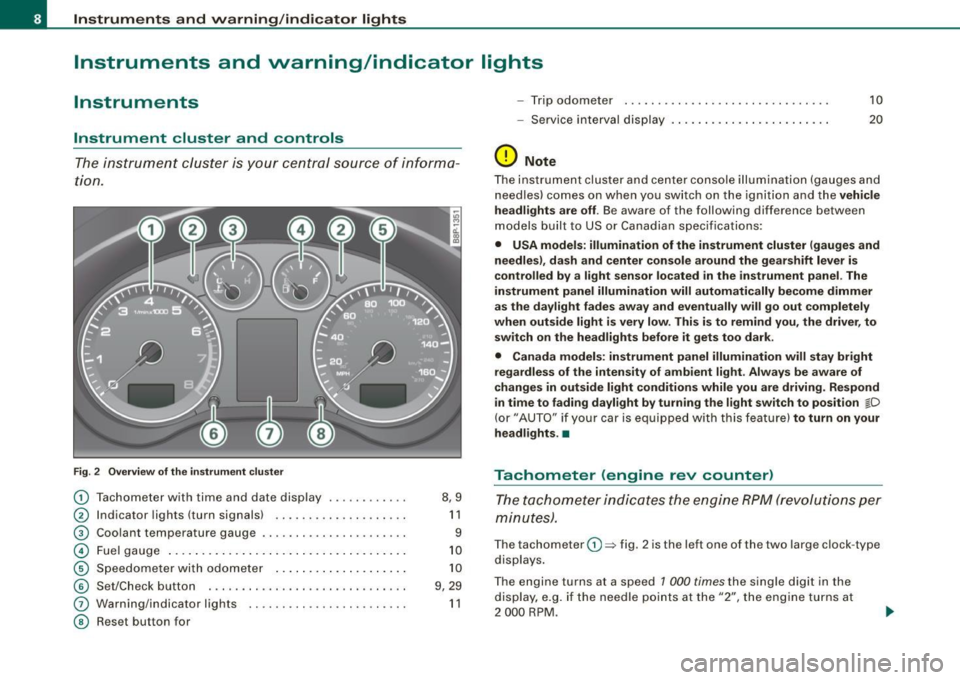
Fig . 2 Overv ie w of th e instrume nt clu ster
0
0
0
©
©
©
G)
©
T achometer with time and date display ......•.....
I ndicator lights (turn signals) ... ....... .... ..... .
Coo lant temperature gaug e .... ... ...... ...... .. .
Fuel gauge .. ... .... .. ...... .... ... ..... ... ... .
S pe edom eter wi th o do met er ..... .... ... .. .. ... .
Se t/Chec k button ..... ... ..... ..... ... ........ .
Warn ing/indicator l ights
Reset but ton for 8,9
1 1
9
1 0
1 0
9 , 29
1 1
- Trip odomete r 10
-Service i nterv al dis play . . . . . . . . . . . . . . . . . . . . . . . . 20
(D Note
The instrument clu ste r and center c onsole i lluminati on (gauge s and
n eedles) comes on w hen you sw itch on the ignit ion and the vehicle
he adl ights are off . Be awa re of the following difference betw een
models built to US or Canad ian specificat io ns:
• USA models : illumination of the instrument cluster (gauges and
needles), dash and center con sole around the gear shift lever is
controlled by a light sensor located in the instrument panel. The
instrument panel illumination will automatically become dimmer
as the daylight fades away and eventually will go out completely
when outside light is very low . This is to remind you, the driver , to
sw itch on the headlights befo re it gets too dark .
• Canada models: instrument panel illumination will stay bright
regardless of the intensit y of ambient light . Always be aware of
changes in outside light conditions while you are driving . Respond
in time to fading dayl ight by turning the light swit ch to position
jD
(or" AUTO" if you r car i s equi ppe d with this feature) to turn on your
headlights . •
Tachometer (engine rev counter)
T h e ta chom eter ind icates the e ngine RPM (revo luti ons pe r
minut es).
The tachom eter 0 => fig . 2 is the left on e of the two large clock -type
dis plays .
The engine turns at a speed 1 000
times the single di git in the
display, e.g . if the needle p oints at the "2", the eng ine t urns at
2 000 RP M.
Page 16 of 320
Inst rum ents and w arnin g/indi cat or li ghts
reconnected again . The light should go out after driving a short
distance if the steering wheel is turned slight ly .
For more information about the ESP:::::,
page 188. •
Malfunction Indicator Lamp (MIL)
(USA models )/ (Canada models)
The Malfunction Indicator Lamp (M IU is part of the On-Board Diag
nostic (OBD Ill system . The symbo l lights up when the ignition is
turned on and wi ll turn off after the engine has started and has
sett led at constant id le speed. This indicates that the MIL is working
proper ly .
The warning light il luminates when there is a malfunction in the
engine electronic system. Contact your authorized Audi dealer and have the malfunction corrected.
For more information :::::,
page 21. •
High beam @:D
The ~Dwarning/ indicato r light illuminates when the h igh beams are
on or when you use the headlight flasher. For more information
about using the h ig h beams , see :::::,
page 57. •
Turn signals ¢ Q
The indicator light flashes when you use ei ther turn
signal.
Whenever you use the left¢ or the right ¢ turn signal, the ind icator
light flashes . When you use the emergency flasher, both indicator
lights flash .
If one of the turn signal light bulbs burn out, the turn signal will
flash twice as fast as no rma l.•
Cruise control
CRUISE (USA models) / 0 (Canada models)
The CRUISE warning/indicator light illuminates when the cruise
control is activated. •
Airbag system !_J·
This warning/indicator light monitors the airbag and the
tensioner systems.
The ! .!r warning light illuminates for a few seconds each time you
switch on the ignition.
If the
! !r warning light does not go out, or if it illuminates whi le you
are driving, or if it starts to flash, then there is a ma lfunction some
where in the system . If the light does not illuminate when you
switch on the ignition, this also means there is a malfunction.
& WARNING
If you ha ve a malfunction in the a irbag sy stem , cont act your autho
rized Audi dealer immedi ately. Otherwi se the airba g or the belt
ten sioner may not wor k properl y in an acci dent. •
Generator 0
This warning/indicator light detects a malfunction in the
generator or in the vehicle's electrical system .
The O warning/indicator light illuminates when you switch on the
ignition and must go out after the engine has started.
If the
O warning/indicator light il luminates while you are driving,
you shou ld co ntact your authori zed Aud i dealer . Since the veh icle
battery is discharging, you should switch off any unnecessary elec
trical consumers ( for example, the air conditioner) .•
Page 17 of 320

Safety belts i
This warning/indicator light reminds you to put on your
safety belt.
Th e ,{f. warning/indicator light illuminat es when the ignition is
switched on to remind the driver and (on USA models only) any front
passenger to put on the safety belt. Additionally, an acoustic
warning (gong) will also sound.
For more Information:::::, page
135, "Safety belt warning light-*-"·•
Brake system
BRAKE (USA models) / (CD) (Canada models)
This warning/indicator light illuminates when the brake
fluid level is too low or when there is a malfunction in the
ABS, or when the parking brake is set.
The light illuminates when the ignition is turned on. It goes out after
the engine has been started and the parking brake is fully released.
This indicates that the brake warning light is functioning properly.
If the brake warning light does not light up when the engine is
cranking or the parking brake is applied, there may be a malfunction
in the electrical system. In this case, contact your Audi dealer. If the brake system warning/indicator light flashes, there is a brake
system malfunction.
If the ABS fails, the ABS warning /indicator light (USA
models)/
.J (Canada models) flashes together with the brake system
warning/indicator light:::::,& .
(USA models): If the warning light
BRAKE and the warning light
illuminate together, immediately contact your authorized Audi
dealer or qualified workshop to have all brake pads inspected
=:> page 33.
When the light comes on, an audible warning signal is also given.
Controls and equip
ment
Instruments and warning/indicator lights
Parking brake set
The BRAKE or CCi)) (Canada) warning/indicator light illuminates when
the parking brake is set:::::,&.
& WARNING
• USA models : If both the BRAKE warning light and the
warning light come on at the same time, the rear wheels could lock up first under hard braking. Lock-up of the rear wheel brakes
can cause loss of vehicle control and an accident. Have your
vehicle repaired immediately by your authorized Audi dealer or a qualified workshop. Drive slowly and avoid sudden, hard brake
application.
• Canada models: If both the brake warning light CCi)) and the ABS
warning light come on at the same time, the rear wheels could
lock up first under hard braking. Lock-up of the rear wheel brakes
can cause loss of vehicle control and an accident. Have your
vehicle repaired immediately by your authorized Audi dealer or a
qualified workshop. Drive slowly and avoid sudden, hard brake
application
• If the brake warning/ indicator light does not go out after a few
seconds and the parking brake released, or lights up while you are
driving, the fluid level in the brake fluid reservoir is too low. If you
believe that it is safe to do so, proceed immediately at low speed
to the nearest authorized Audi dealer or qualified workshop and have the brake system inspected.
• Always keep in mind that after several brake applications, you
will need greater pressure on the brake pedal to stop your vehicle .
Do not rely on strained brakes to respond with maximum stopping
power in critical situations. You must allow for increased braking
distances. The extra distance used up by fading brakes could lead
to an accident. •
I • •
Page 26 of 320
Driver informati on displ ay
Fig. 1 4 Display : Start
menu
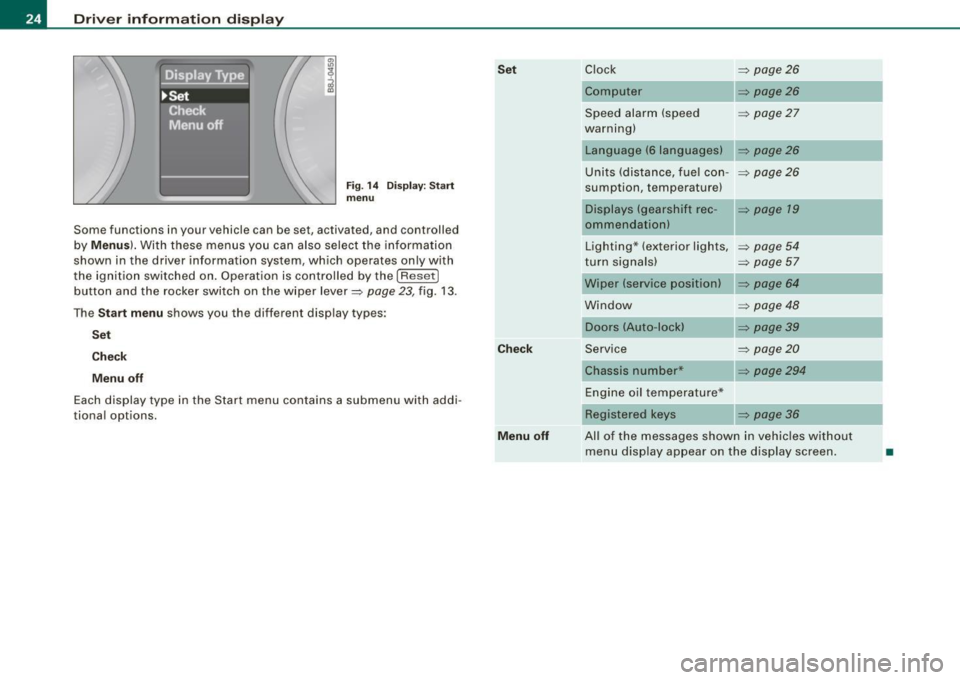
Some func tions in your vehicle can be se t, act iva ted, and cont rolled
by
M enu s). With these menus you can also select the information
shown in the driver information system , which ope rates only with
the ignition switched on. Operation is controlled by the
! R ese t]
button and the rocker switch on the wiper lever=> page 23, fig. 13 .
The
S ta rt m enu shows you the diff erent disp lay types :
Set
C hec k
M enu off
Each display type in the Start menu con tains a submenu with addi
tional options.
Se t
C hec k
M enu off Clock
=> page 26
Computer => page26
Speed alarm (speed => page27
warning)
Language (6 languages)
Units (distance, fuel con- =>
page26
sumption, temperature)
Displays (gearshift rec -
=> page 19
ommendation)
Lighting * (exterior lights,
=>
page 54
turn signals) => page 57
Wiper (service position) => page 64
Window => page 48
Doors (Auto-lock)
Service
=>
page20
Chassis number* => page294
Engine oil temperature*
Registered
keys => page 36
All of the messages shown in vehicles without menu disp lay appear on the display screen.
•
Page 36 of 320

Driver information display
Defective light bulb warning U
The defective light bulb warning tells you when a vehicle
light bulb has become defective.
If a defective bulb has been detected by the system or a light bulb
burns out, the symbol with a message appears in the display to
tell you which bulb is burnt out and where it is located. For example:
Rear left turn signal
After 5 seconds, the message disappears . If you want to recall the
message into the display, press the CHECK button=>
page 8, fig. 2
©-
There are three reasons why the defective bulb message would
appear in the display:
• The light bulb has burnt out=>
page 283.
• The fuse is "blown" => page 278, "Replacing a fuse".
• The wire connection to the light bulb is defective .
Have the bulb replaced or the connection repaired by your autho
rized Audi Service department.
& WARNING
• Light bulbs are pressurized and could explode while they are
being changed causing serious personal injury.
• Work with due care when handling the high-voltage section of
gas discharge (xenon) lamps. Failing to do so could result in death
or serious injury! •
Brake light defective " U'lf" (USA
models) / (Canada models)
In case of a malfunction or component failure, the symbol
(USA models)/ (Canada models) can appear . The following elec- trical components should be checked, repaired or replaced, as
necessary:
• Brake light bulbs
• All wiring connections
• Brake light switch
Contact your authorized Audi dealer for assistance if necessary.
[ i] Tips
The brake light switch is only inspected as part of the functional
check after the engine is started .•
A pplies to vehi cles : w it h a uto mati c he adl ights
Light /rain sensor defective _,
The indicator light indicates a defect in the automatic
headlights/automatic wiper system.
If the symbol illuminates, the light sensor has failed. For safety
reasons, the low beams are turned on permanently with the switch
in
AUTO. However, you can continue to turn the lights on and off
using the light switch . In the case of a defect in the rain sensor, the
windshield wiper lever functions are still available. Have the
light/rain sensor checked as soon as possible at an authorized Audi
dealer. •
Applies t o vehi cles: with Ad aptive Ligh t
Adaptive Light defective ~{)
C: Adaptive light defective
When this symbol J illuminates, it means that Adaptive Light is
defective. Go to a qualified workshop to have the headlights or the
control unit for the Adaptive Light repaired. •
Page 41 of 320
• Remote control feature=> page 37.
• Anti -theft alarm system => page 46.
All the doors and the rear lid are locked by the central locking
sys tem when you lock the veh icle.
Unlo cking th e ve hicle
You can un lock the vehicle from outside either by using the remote
control
o r by inserting and turning the key in the driver's door lock.
When you
unlock your vehicle :
• The anti -theft alarm system is deactivated briefly .
• T he vehicle i nteri or lights illuminate fo r approxi mate ly 30
seconds .
• All tu rn signal lights will flash twice when t he car is unl ocked .
• After un locking the vehicle, you have 30 seconds to open a door
or the rear lid. After 30 seconds, t he vehicle automatically locks and
the anti-theft a larm system activates again.
The rear lid can be locked o r unlocked either by u sing the remote
control
or by inserting and turning the key in the driver's door lock.
Un loc king the vehicle with the remote control
c::::::::5 wi ll only unlock
the rear lid, to open it, the l id handle needs to be pressed.
Lo cking the vehi cle
You can lock the vehic le from outside either by using the remote
control
or by i nserting and tu rning the key in the drive rs's d oor l ock .
When you
lock the vehicle:
• All doors and the rear lid are locked .
• All turn signal lights w ill flash once when the car is locked .
• T he anti -theft alarm sys tem is activated. The horn of the anti
theft alarm system wi ll sound and the anti -theft alarm system readi
ness light, loca ted in the center of the instrument pane l below the
w indshie ld on the right side of the a ir vent, wil l start to b link.
• The ve hicle interior l ights tur n off .
Controls and equip
ment
Opening and clo sing
Automati c locking *
The a utoma tic locking feature l ocks all the vehicle do ors and t he
rear lid when you drive faster than 9 mph (15 km/h).
You can unlock the vehicle from the inside by :
• removi ng the key from the igniti on swi tch (the vehicle wil l a uto
matically un lock itself) or
• pressing the unlock part o f the power lock switch
l!:)) or
• pul ling the inside handle for that door (once -the front doo r is
unlocked and opened at the same time, twice to open the rear doo r).
I f you wish, you can have an authorized Audi dea ler convert your
p ower d oor lock system to auto matic l ocki ng .
& WARNING
• When you lock your vehicle from out side , nobody - especially
c hildren - should remain inside the vehi cle . Re member , when you
lock the vehicle from the out side the window s cannot be opened
from the inside .
• When you leave the vehicle , alway s remove the ignition key and
t a ke it with you . This will prevent passengers (children , for
example ) from accidentally being locked in the vehicle should they
accidentally press the po wer locking swit ch on the center c onsole .
• Do not leave children ins ide the vehicle unsupe rvised. In an
emergen cy it would be imposs ible to open the doors from the
out side without th e key.
[ i ] Tips
• I n the eve nt of a crash with airbag deployment all locked do ors
wi ll be automatically un locked to give access to the vehicle occu
p a nts from the outside.
• I f the power locking system should fail, you can still open the
f u el tank flap in an emergency =>
page 222 . ~
I • •
Page 42 of 320
Opening and closing
• You are well advised not to keep valuables inside an unattended
vehic le , visible or not . Even a properly locked vehicle cannot provide
the security of a safe! •
Unlocking and locking the vehicle with the
remote control
How the remote control works.
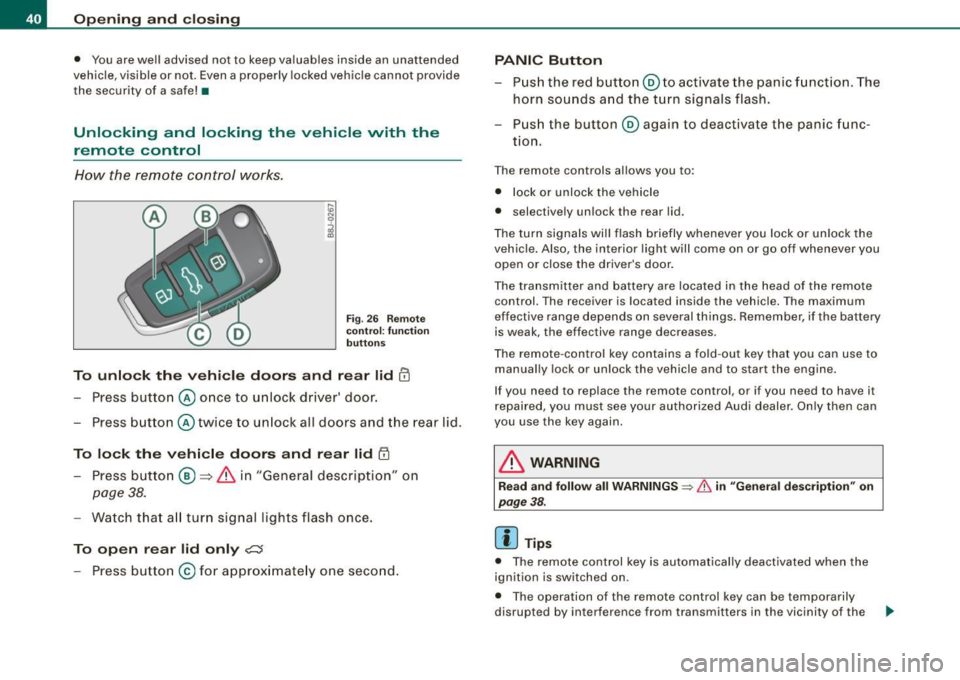
Fig. 2 6 R em ote
c on tro l: func tion
button s
To unlo ck the vehi cle doors and rear lid !TI
Press button @ once to unlock driver' door.
- Press button @ twice to un lock all doors and the rear lid .
To lock the vehi cle doors and rear lid l'.D
- Press butto n ® => & in "General descrip tion" on
page 38.
- Watch tha t all turn signal lights flash once.
To open rear lid only ?::$
- Press button @for approx imate ly one seco nd.
PANIC Button
- Pus h the red butto n@ to activate the panic f unct ion. The
horn sounds a nd the turn signals flash .
- Pus h the button ® aga in to deactivate the panic f unc-
tion.
T he remote controls al lows you to :
• l ock or unlock the vehicle
• se lective ly unlock the rear lid.
T he tu rn signa ls will flash briefly whenever yo u lock or un lock the
vehic le. Also , the interior light will come on or go off whenever you
open or close the driver's door.
The transmitter and battery are located in the head of the remo te
control. The receiver is located inside the vehicle. The maximum
effective ra nge depends on several things. R emember, if the battery
is weak, the effective rang e decreases .
T he rem ote -contr ol key con tains a fo ld -ou t key tha t you can use to
manually lock or unlock the vehicle and to s tart the engine.
I f you need to replace the remote contro l, or if you need to have it
r epaired, you must see your authori zed Audi dealer. On ly then can
you use the key again.
& WARNING
Read and follow all WARNINGS => & in "Genera l description " on
page
38.
[ i ] Tips
• The remote control key is automa tically deactivated when the
ignition is switched on .
• Th e opera tion of the remote control key can be temporarily
disrupted by interference from transmitters in the vicinity of the .,.
Page 46 of 320
Opening and closing
Closing the rear lid
- Pull it down and shut it firmly~&. There is a recess in
the interior trim of the lid to make it easier to pull down.
& WARNING
• After closing the rear lid, always pull up on it to make sure that
it is properly closed. Otherwise it could open suddenly when the
vehicle is moving.
• To help prevent poisonous exhaust gas from being drawn into
the vehicle , always keep the rear lid closed while driving. Never
transport objects larger than those fitting completely into the
luggage area, because then the rear lid cannot be fully closed.
• Never leave your vehicle unattended especially with the rear lid
left open. A child could crawl into the car through the luggage
compartment and pull the lid shut, becoming trapped and unable
to get out. To reduce the risk of personal injury, never let children play in or around your vehicle. Always keep the rear lid, as well as
the vehicle doors, closed when not in use.
[ i ) Tips
• If the rear lid is open or not properly locked when the ignition is
turned on, the door and rear lid warning appears in the instrument
cluster display.
• If the rear lid on a locked vehicle is unlocked with the middle
button
cs on the remote key , the rear lid is automatically locked
again immediately after closing. This is indicated by the turn signals
blinking. •
Emergency release for rear lid
If the rear lid cannot be opened, an emergency release is
provided.
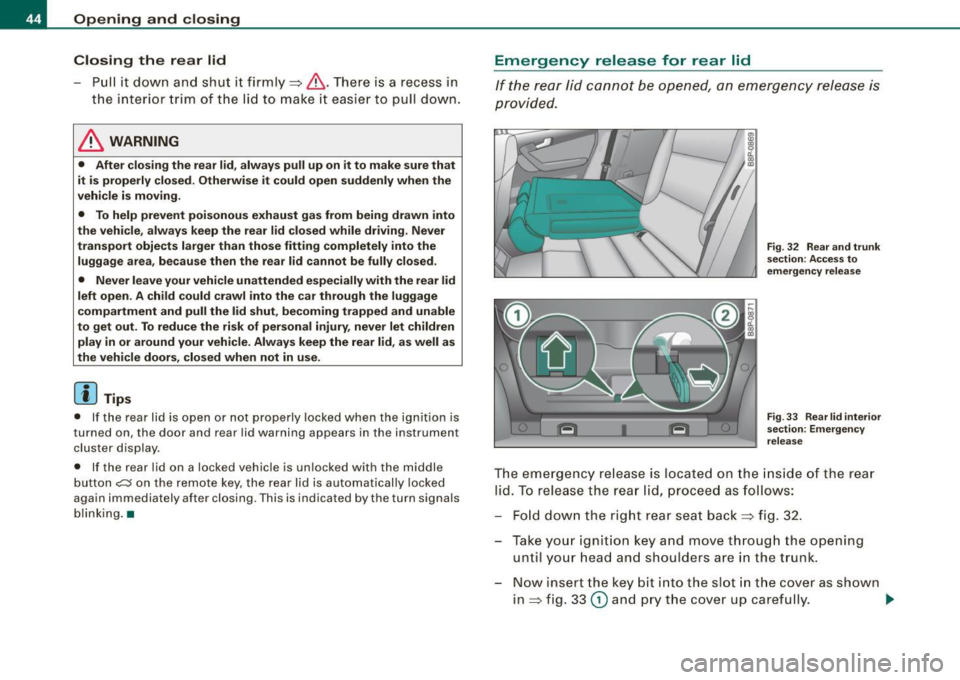
Fig. 32 Rear and trunk
section: Access to
emergency release
Fig. 33 Rear lid interior
section: Emergency
release
The emergency release is located on the inside of the rear
lid. To release the rear lid, proceed as follows:
- Fold down the right rear seat back~ fig. 32.
- Take your ignition key and move through the opening until your head and shoulders are in the trunk.
- Now insert the key bit into the slot in the cover as shown
in ~ fig. 33
(D and pry the cover up carefully. ..,.
Page 57 of 320

on the next time automatic headlights are switched on. To use the
high beams, you first have to pull the high beam lever back and then
push the lever forward again.
• In cool or damp weather, the inside of the headlights, turn
signals and tail lights can fog over due to the temperature differ
ence between the inside and outside. They will clear shortly after
switching them on. This does not affect the service life of the
lighting.
• Frequent use of the coming home/leaving home function for
approaching and departing a vehicle parked in the dark will strain
the battery . This applies particularly if only short distances are
driven between stops. Occasionally drive longer distances to make
sure the battery is recharged sufficiently. •
Applies to vehicles: with Adap tive Light
Adaptive light
When driving around bends, the relevant area of the road
is better illuminated.
Fig. 48 Adaptive light
when driving
The benefit of adaptive light is that the curve and the edge of the
road are better illuminated::::} fig . 48 . The adaptive light is controlled
automatically, depending on vehicle speed and steering wheel
angle.
Con tro ls and eq uip
ment
Clear vision
When driving around bends, the headlights are controlled
according to steering wheel angle. So that there is no black area
ahead of the vehicle, the two main beams pivot at different angles .
[ i] Tips
The system works above a speed of about 6 mph (10 km/hl. •
Front fog lights !O
Use the light switch to turn on the front fog lights.
Fig. 49 Fog light acti
vation: light switch
position on vehicles
WITHOUT sensor light
Switching on the front fog lights !D
Do not turn the light switch ·'ti-·~ fig. 49 toward the fog
light symbol
Turn the light switch to
~oo: or to io.
Pull the light switch to the first stop G).
When the front fog lights are on, the symbol }O next to the light
switch will illuminate.•
Vehicle care I I Technical data
Page 58 of 320
Clear vision
Instrument panel illumination
The ill umination of the instrumen ts, dis plays an d the
center cons ole c an be adjusted .
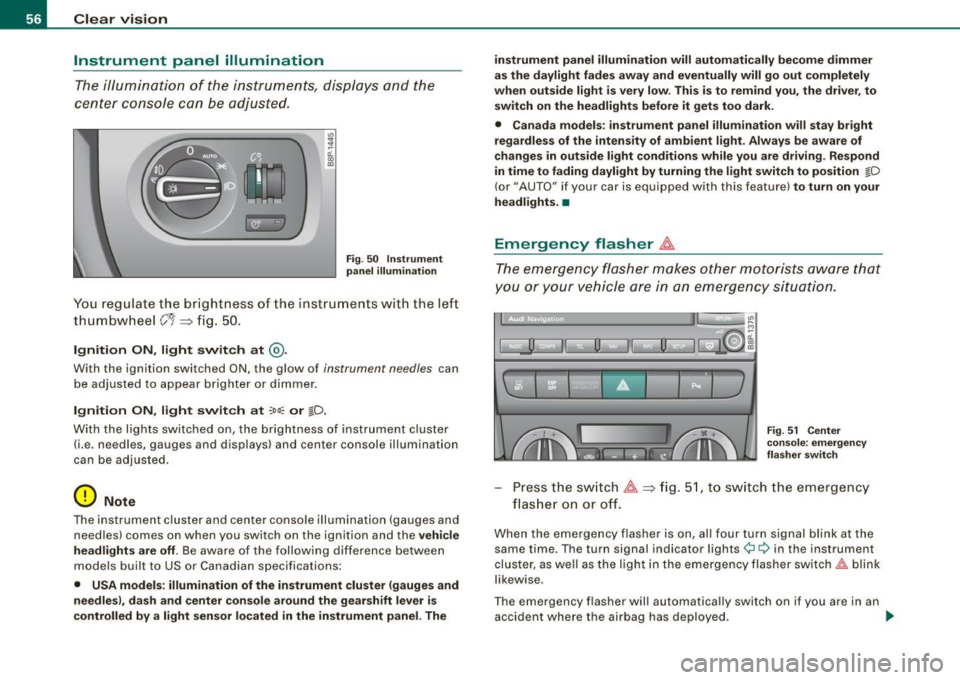
"' ;
a'.. ., m
Fig. 50 In stru men t
pan el illumi nat ion
You re gul ate the br ight ness o f the ins tru ments wit h the lef t
th um bw heel
C'1 => fi g. 50 .
Ignition ON , light switch at @ .
With the ignition switched ON, the g low of instrument needles can
be adjuste d to a ppear brigh ter or dimmer .
Ignition ON , light switch at ~oo : or tD.
With the l ights switched o n, the brightness of instrument c luster
(i.e . ne edles, gauges and displays) and center console il lumination
can be adjusted.
0 Note
The instrument cl uster and cente r console illumination (gauges and
needles) comes on when you switch on the ignition and the
v ehi cle
headlights are off.
Be aware of the f ollowi ng differe nce betwee n
models built to US or Canadian specifications :
• USA model s: illumination of the instrument cluster (gauges and
needles ), dash and center console around the gearshift leve r is
contr olled by a light sensor l ocated in the instrument panel. The i
nstrument panel illumination will autom ati cally be come dimmer
as the daylight fades away and eventually will go out completely
when out side light i s very low . Thi s is to rem ind you , the dri ver , to
sw itch on the headlights before it gets too dark.
• Canada models : in strument panel illumin ation will sta y bri ght
regardle ss of the inten sity of amb ient light . Alway s be aware of
c hange s in outside light conditions while you are d riving . Re spond
in time to fading dayl ight by turning the light switch to position
tD
(or" AUTO" if your car is equipped with this feature) to turn on your
he adl ights. •
Emergency flasher ~
The emergency flasher makes other motorists aware that
you or your vehicle are in an emergency situation.
1 1 0. -II 0 Ii i
11
u
I ] '
' F ig . 51 Center
c o ns ole : em erge ncy
fla sher swit ch
Pr ess th e sw itch ~=>fig. 51, to sw itch the em ergency
flas her on or off.
When the eme rgency flasher is on, al l four turn sig nal blink at the
same time . The turn signal indicator lights
¢i ¢ in the instrument
clu ster, as well as the light in the emergency flasher switch~ blink
likewise .
The emergency flasher will automatically switch on if you are in an accident where the airbag has deployed . _,,.