hood release AUDI S3 2011 Owners Manual
[x] Cancel search | Manufacturer: AUDI, Model Year: 2011, Model line: S3, Model: AUDI S3 2011Pages: 320, PDF Size: 75.79 MB
Page 9 of 320
Instruments and controls
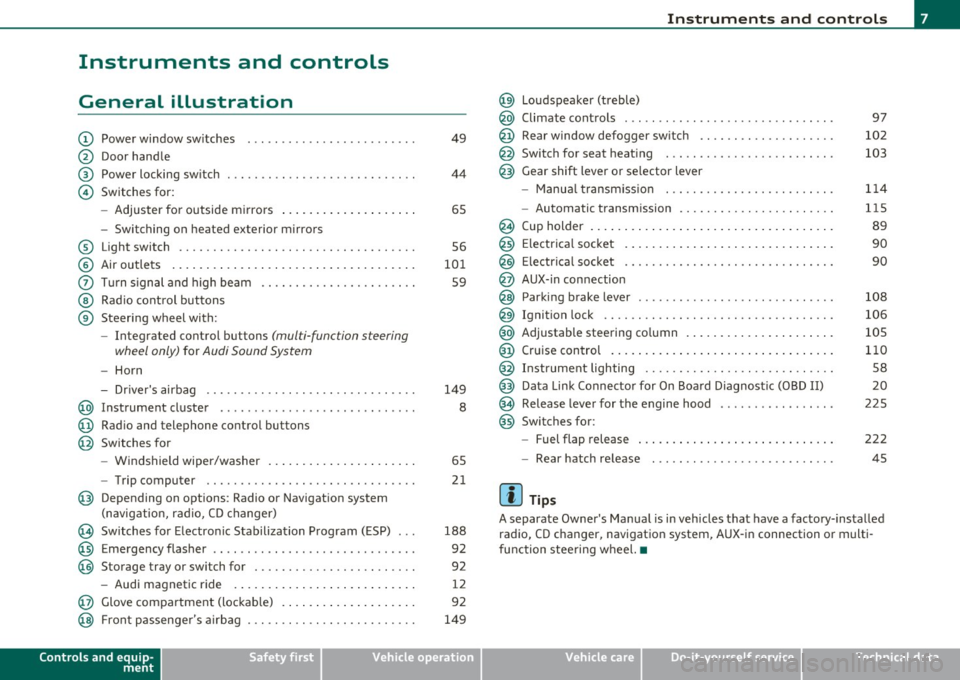
General illustration
CD
@
®
©
Power window switches
Door handle
Power lo cking sw itch ... .. .. ......... .... .. .. .. . .
Switches for:
- Adjuster for outside m irro rs ... .. .. .. .. .. ... . .. .
- Switching on heated exterior m ir rors
© Light switch ........... .. .... .. .... .. ...... ... .
© Air outle ts ... .. ... .. .. .. .... .. .. .. .. .. ...... . .
0 T ur n s ignal and high be am .. ................... . .
@ Rad io cont rol buttons
® Steering wheel with:
- Integra ted control bu ttons
(multi-fun ction s teering
wheel only) for Audi Sound System
- Horn
- Drive r's airbag ............. .. .. .. .. .. .... ... .
@ Instrument cluster .................. .... ... ... .
@ Rad io and telephone control bu ttons
@ Switches for
- Windshield wiper/washer ... ...... .. ..... .... . .
- Trip computer ....... ...... .. .... .. ...... ... .
@ Depending on options : Radio or Navigat ion system
(n avigat ion, r adio, CD changer)
@ Sw itches fo r Electro nic Stabilization P rogram ( ESP)
@ Emergency flasher .. . .......................... .
@ Storage tray or switch for ............ ...... .. .. . . 4
9
44
6 5
56
101 59
1 4 9
8
65
21
188 92
92
- Audi magnetic ride . . . . . . . . . . . . . . . . . . . . . . . . . . . 12
@ Glove compa rtment (lockab le) . . . . . . . . . . . . . . . . . . . . 92
@ Fron t passenge r's airb ag . . . . . . . . . . . . . . . . . . . . . . . . . 149
Controls and equip
ment Safety first
Instruments and controls
@ loudspeaker (treble)
@ Climate controls .
.. ... ... .. ..... ........... ... .
@ Rear window defogger sw itch .. .. .. .. .. .. .. ..... .
@ Sw itch for seat heat ing ... .. ................. .. .
@ Gear shift lever or se lector lever
- Manu al tra nsm iss io n ..... ................. .. .
- Automatic transm ission ................. .... . .
@ Cup holder ... ... .. .. .. .. .. .. .. .. ... ... .... ... .
@) Electrica l socket . ....... .. . .. ... .. ... .. .. ... .. .
@ El ectri cal socket ................. .... .. .. ..... .
@ AUX- in connection
@ Parking brake lever .................. .... ...... .
@ Ignit ion lock ...... .. .... .. ................... .
@ Adjustable steering co lumn . ....... ... ... . .... .. .
@ Cruise control .... .. .. ... . ..... .. .. .. .. .. .. ... .
@ In strume nt lighting .......... ... .. . .. .. .. .. .. . .
@ Data Link Connecto r for On Boa rd Diagnostic (OBD II)
@ Release lever for the engine hood ......... . ... ... .
@ Switches for :
- Fuel flap release .... ... . ... .. .. .. .. .. .. .. ... .
- Rear hatch re lease
(I] Tips
9 7
102
103
1 14
115 89
90
90
108
106
105
1 10
5 8
20
2 25
222 4 5
A separate Owner's Manua l is in vehicles that have a factory-installed
radio, CD c hanger, navigatio n system, AUX -in connection or multi
fu nction stee ring w heel. •
Vehicle care Technical data
Page 22 of 320
Driver information display
• Gear shift recommendation can be deactivated in the dr iver infor
mation system~
page 22. •
On-Board Diagnostic system (OBD)
On-Board Diagnostics
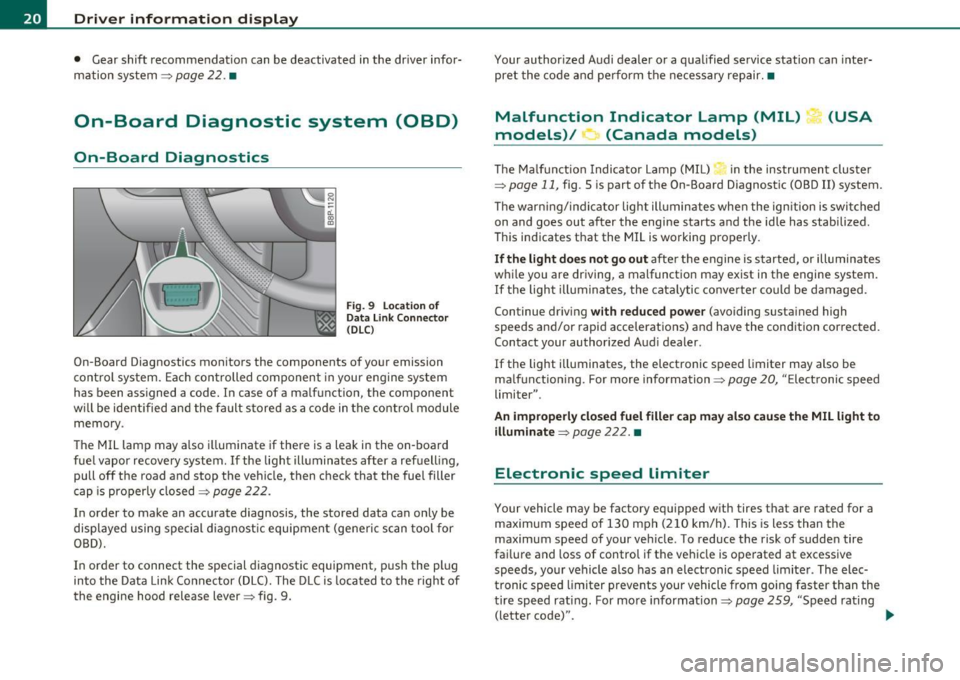
Fig. 9 Location of
Data Link Connector
(DLC)
On-Board Diagnostics monitors the components of your emission
control system. Each controlled component in your eng ine system
has been assigned a code. In case of a malfunction, the component
wi ll be identified and the fault stored as a code in the control module
memory .
The MIL lamp may also illuminate if there is a leak in the on-board
fuel vapor recovery system.
If the Light illuminates after a refuelling,
pull off the road and stop the vehicle, then check that the fuel filler
cap is properly closed~
page 222.
In order to make an accurate diagnosis, the stored data can only be
displayed using special diagnostic equipment (generic scan tool for
OBD).
In order to connect the special diagnostic equipment, push the plug
into the Data Link Connector (DLC). The DLC is located to the right of
the engine hood release lever~ fig. 9. Your authorized
Audi dealer or a qualified service station can inter
pret the code and perform the necessary repair.•
Malfunction Indicator Lamp (MIL) (USA
models) / (Canada models )
The Malfunction Indicator Lamp (MIL) in the instrument cluster
~ page 11, fig. 5 is part of the On-Board Diagnostic (OBD II) system.
T he warn ing/indicator light illum inates when the ignition is switched
on and goes out after the engine starts and the idle has stabilized.
This indicates that the MIL is working properly .
If the light does not go out after the engine is started, or illuminates
while you are driving, a malfunction may exist in the engine system.
If the light illuminates, the catalytic converter could be damaged.
Continue driving
with reduced power (avoiding sustained high
speeds and/or rapid accelerations) and have the condition corrected.
Contact your authorized Audi dealer.
If the light illuminates, the electronic speed limiter may also be
ma lfunction ing. For more information~
page 20, "E lectronic speed
limiter" .
An improperly closed fuel filler cap may also cause the MIL light to
illuminate~
page 222 . •
Electronic speed limiter
Your vehicle may be factory equ ipped with tires that are rated for a
maximum speed of 130 mph (210 km/h). This is less than the
maximum speed of your veh icle . To reduce the risk of sudden tire
fai lure and loss of control if the vehicle is operated at excessive
speeds, your vehicle a lso has an electronic speed limiter . The elec
tronic speed limiter prevents your vehicle from going faster than the
tire speed rating. For more information~
page 259, "Speed rating
(letter code)".
~
Page 34 of 320

Driver information display
Brake system malfunction
BRAKE (USA models)/ {©) (Canada models)
The indicator light flashes if the brake fluid level is too
low , if there is a malfunction in the ABS system or when
the parking brake is engaged.
If the BRAKE /((D) symbol flas hes in the display wit h the
parking brake released, there is a malfunction in the brake
system. In addition to the symbol, o ne of two messages
appears in the display:
Stop vehicle and check brake fluid
ABS fault ! See owner's manual
- Pull off the road and sto p the ve hicle.
- Obtain professio nal assistance .
USA models: if there is a ma lfunct io n in the ABS system, the/.
w ar ning/ind ica tor ligh t illum inates along wi th the BRAKE system
ma lf u nction warning/indicator light~&.
Canada models: if there is a malfu nction in the ABS system, the
wa rning/ind icator ligh t illuminates togethe r with the ((i)) bra ke
system malfunction warn ing/indicator light~& .
Parking brake set
T he parking bra ke warning light Brake/((i)) (Canada mo dels) ill umi
nates when the pa rking brake is set. In addit ion, a warning tone will
so und after yo u have driven for longer than 3 secon ds and faster than
3 mph (5 km/h).
& WARNING
• Always observe the warning s in ~ page 218 , "Engine compart
ment" , before opening the engine hood and checking the brake
fluid.
& WARNING (c on tinued )
• Driving with low brake fluid i s a safety hazard! Stop the car and
get profe ssional assistance .
• If the brake sy stem warning/indicato r light illuminates
together with the ABS warning /indicator light, then th e ABS
system is malfunctioning. The rea r wheels could quickly lock up
when you apply the brakes . Th is could lead to lo ss of control and
your vehicle could slide! Dri ve carefully to the nea rest authorized
Audi dealer and hav e the malfunction corrected. •
Engine cooling system malfunction _L
A malfunction in the engine cooling system must be
rep aired as s oon as possible .
When t he -L symbol in th e d isplay flashes , then either the
engine coolant
temperature is too h igh , or the coolant level
is too low. In add it ion to the symbol , the fo llow ing message
also appears i n the d isplay:
Switch off engine and check coolant level
- Pull off th e road and stop the v ehicle.
- Tur n off the engine .
- Chec k coo lant level~
page 235 .
-Add co olan t if ne cessary ~ page 236.
-Con tinue drivi ng o nly a fter the e ngin e coolant
wa rnin g/ind icato r lig ht go es out .
- Con tact you r au tho rized Audi dealer fo r assis tance if
necessary .
If the eng ine coolant leve l is correct, then the radiator fa n may be the
c ause of the m alfun ction.
~
Page 69 of 320
![AUDI S3 2011 Owners Manual (]] Tips
• The w indshield wipers are switched off when the ign ition is tu rned
off . Activate the windshield wipers after the ignition is switched back
on by mov ing the w i AUDI S3 2011 Owners Manual (]] Tips
• The w indshield wipers are switched off when the ign ition is tu rned
off . Activate the windshield wipers after the ignition is switched back
on by mov ing the w i](/img/6/57544/w960_57544-68.png)
(]] Tips
• The w indshield wipers are switched off when the ign ition is tu rned
off . Activate the windshield wipers after the ignition is switched back
on by mov ing the w indshield wipe r leve r to any pos ition.
• Worn or dirty windshield w iper blades cause smearing, which can
affect the operat io n of the l ight/rain sensor*. Check t he condi tion of
your windshield wiper b lades regularly.
• The rain sensor is part of the inte rval wiping system . Turning off
the ignition will also deactivate the rain sensor. To reactivate the
sensor, switch off the inte rval wiping funct ion, the n switch it back on
again .
• Applies to veh icles with light/ra in sensor: When the w ipers are
switched on manually and in rain conditions, the automatic head
lights* turn on~
page 56, "Switching the headlights on and off ·f!: "
or off during the day when the wipers are no longer operating. The
au tomatic headlights* func tion is available in t his case only when the
light switch is in the "AUTO" position~
page 56, fig. 49.
• Make su re the washe r fl ui d reservoir in the eng ine compartment is
topped off before going on a long trip. Look up::::)
page 243 for
check ing and fill ing t he washer conta iner.
• The wipers only operate with the hood completely closed. •
Contro ls a nd e quip
m en t Vehicle
OP-eration
Clear vision
Rear window wiper cs;J
The wiper lever is also used to operate the rear windo w
w iper and the automatic wiper/ washer function .
Fig . 63 Wi per lev er:
a ct iva ting the rear
w indow wi per an d
w ashe r
The rear window w iper and t he au tomatic wiper/washer func
tions are activated as follows:
Intermittent wiping
- P ush the wipe r lever forward towards the dashboard and
to the
first position ©~ fig. 63 . T he rear window wiper
w ill wipe the win dow approx. every four seco nds.
Automatic wiper/washer function
- Push the wiper lever forward to the second stop, position
0 , and ho ld it there for as long as you want the rear
wiper/washer to operate.
- Release the lever aga in. T he wiper w ill keep run ning for
app rox . four seco nds .
Switching intermittent wiper action off
- Pull the lever a ll the way back to the original posi tion.
Vehicle care Do-it-yourselt service iTechnical data
Page 156 of 320
-Airbag system
•m---=---=----------------
belt is not being used, t he first stage dep loys, followed by the second
stage a fter a mu ch later time in the c rash seq uence .
If the electronic control un it reg isters a crash of medium severity, the
first stage of the airbag deploys fo llowed by the second stage at a
much la ter t ime in the crash sequence -regard less of whethe r th e
safety belt is being used or not. In higher sever ity crashes as regis
t ere d by t he elect ronic con tro l u ni t, both the first and second stages
dep loy almost at the same time.
On the passenger side, regardless of safety be lt use, the a irbag will
be turned off if the we ight on the passenger seat is less than the
amount prog rammed in the electronic contro l unit. The front airbag
on the passenge r side w ill a lso be turned off if one of the ch ild safety
seats that has been certified under Federa l Moto r Vehicle Safety
Standar d 208 has bee n recognized o n th e seat. The
PASSENGER AIR
BAG OFF light comes on and stays on to tell you w hen the front
Advanced Airbag o n the passenger side has been tu rned off
~ page 147, "Ch ild restraints on the front seat -some important
t hings to know" .
& WARNING
To reduce the risk of injury when an airbag inflate s, always wear
safety belts properly .
• If you are unrestrained, leaning forward, sitting sidewa ys or
out of position in any way , your risk of inju ry is much higher.
• You will also receive serious injuries and could even be killed if
you are up against the airbag or too close to it when it inflates· even with an Advanced Airbag~
page 145. •
More important things to know about front
airbags
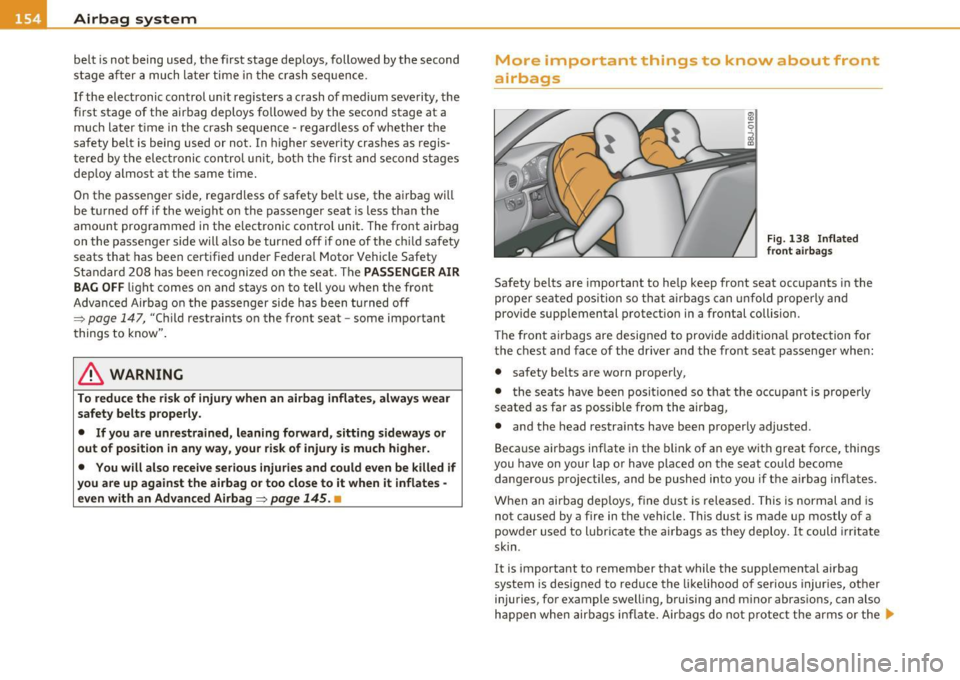
Fi g. 138 I nflated
front a irb ags
Safety belts are important to he lp keep front seat occupants in the
pro per seated pos ition so that a irbags can unfold prope rly and
prov ide supp lemental protect ion in a frontal collision.
Th e front airbags are designed to provide add itio na l protec tion for
the c hest and face of the driver and the front sea t passenge r when:
• safety belts are worn properly,
• the seats have been posit ioned so that the occupant is prope rly
seated as far as possible from the airbag,
• and the head restraints have been properly adjusted .
Because air bags inflate in the b link of a n eye w it h great force, things
you have on your lap o r have place d on the seat cou ld become
dangerous projectiles, and be pushed into you if the a irbag inf lates.
When a n airbag dep loys, fine dust is released. This is normal and is
not caused by a fire in the vehicle. This dust is made up mostly of a
powder used to l ubricate the ai rbags as they deploy.
It could irritate
skin .
It is important to remember that while the supp lemental airbag
system is desig ned to reduce the li ke lihood of serious injur ies, other
injuries, for example swelling, b ruising and m inor abras ions, can also
happen when airbags infl ate. Airbags do not p rotect the arms or the ..,_
Page 227 of 320

Checking and filling -------------- ------=------=:;______,.Jl':fffll
Checking and filling
Engine hood
Releasing the engine hood
The engine hood is released from inside the vehicle.
-Open the driver's door.
Fig. 159 Driver's side
footwell : engine hood
release lever
- Pull the release lever on the left under the instrument
panel ::::;, fig . 159 in direction of the arrow.
The hood pops up slightly und er spring pressure. •
Vehicle OP-eration
Opening the engine hood
Fig. 160 Engine hood
release lever
Before opening the engine hood, make sure that the wind
shield wipers are folded flat against the windshield. Other
wise , they could damage the paint on the hood.
Pull the release lever::::;, fig. 160 in the direction indicated
by the arrow. This release the hook under the hood.
- Open the hood all the way.
& WARNING
Hot engine coolant can burn you!
• To reduce the risk of being burned, never open the hood if you
see or hear steam or coolant escaping from the engine compart
ment . Wait until no steam or coolant can be seen or heard before
carefully opening the hood. •
Vehicle care Do-it-yourselt service iTechnical data
Page 310 of 320
-Alphabetical inde x _...,___ _ ______:_:__:_=.:..:...._ _________________ _
Emergency release for selector lever ... 121 Engine hood
Emergency starting ...... .. .. .. ... .. 286 Closing
............. ... .. ... .... 226
Emergency towing . .. .... .. ..... .... 289 Release lever
.............. .... .. 225
Energy management ........ .. .... .. 194 Releasing and open
ing .. .... .... .. 225
Battery power ................. .. 196 Engine malfunction (diesel engine)
Dr iver not ification .... ..... ....... 196 Warning light ............
.. .. .. .. 13
Engine E
ngine oil ........ ...... .... .. .. ... 228
4-cylinde r diesel (140 hp) ...... ... 228 Add
ing ... ... .. .. .. .. .... .. .. ... 232
4-cylinder gasoline (200 hp) . ..... . 227 Add
itives . ... ... ... .. .... .. .. ... 232
Coolant ................ ...... .. 234 Changing
....... ... .... .. .. .... . 232
Hood . ............. .... .. .... .. 225 Checking the engine oil leve
l ..... .. 231
Preheater .... .. .. .. .... ......... 103 Diesel engine .........
.... .. ..... 233
Starting . .. ... ... .... .. .. ... 106, 107
Starting w ith jumper cables . ....... 286
Stopping .. .. ... ... .. ........ ... 108
Engine compartment .. ....... ... . .. . 227
Safety instructions ............. .. 226
Work ing in the eng ine compartment 226
Engine coo lant system . ....... ... . ... 234
Add ing coolant ....... .. ... .... .. 236
Checking coo lant level ... .. .. .. ... 235
Checking the engine coolant level . .. 235 Indicat
ions and conditions requir ing extra
c heck ing .. .................... 231
O il cons ump tion . .... .. .. ... .. .. . 230
Oil grades .... .. .... ...... .. ... . 228
Recommended oil check intervals . .. 231
Specification and viscosity .. .... .. . 228
Specifications D iese l engine . .. ..... 233
Specifications gaso line engine . .... . 228
Engine oil leve l ... .. .... .. .. ...... .. . 3 4
E ngine oil p ressure (mailf u nctio n) ... .. . . 33
Radiator fan ............ ...... .. 237 Engine oil sensor defective
... .. .. ... .. 35
Engine coo lant tempe ra tur e E
ngine preheater ........ .... .. ..... 103
Ga uge ... .. .. .. .. .. .. ... . .. .. .. .. 9 Connecting ................
.... . 103
E ngine coo ling system Engine speed lim
itation . .... ... .... ... 34
Malf unct io n .. ... ......... .... .... 32 Environment
E ngine data ................ ...... .. 296 Brea
k-in period .. .... .. .. ... .... . 197
Engine fau lt
W arning light ........... ...... ... 13 Catalytic converter . . . . . . . .
. . . . . . . 198
Diesel particulate filter ............ 199
Disposing of your vehicle battery . .. . 242
Dr iv ing at hig h speeds .......... .. 200 Dr
iv in g to mi nimize pollution and noise ..
20 0
Fuel . ... .. .. .. ...... ... .. .. . ... 222
Fue l economy . ... .. .. .. ... .... .. 200
Leaks under yo ur vehicle ... .. .. .. . 226
Letting the vehicle stand and warm up ... 200
Proper disposa l of dra ined br ake fluid 238
Proper disposa l of dra ined engine coo lant
236
Prope r disposal of dra ined engine oil 232
Recycl ing used eng ine o il .......... 232
Unleaded fue l ............. .. .. .. 219
W hat sho uld I do w it h an old batte ry?
242
EPC
See Electronic power control . . . . . . . . 13
ES P
See Elect ronic Stability P rogram .. .. 188
Event Data Recorder ( EDR) .. ......... 188
Exhaust ta il pipes
Cleaning ... .... .... .. .. ...... .. 213
Expans ion tank .. ... ................ 235
F
Fahrenheit
Switching between Fahre nhe it and
Centigrade ..... .. .............. 99
Fan Adjusting the fan s peed .. ......... 1 00
Climate cont rols . ... .. .. ... .. ... . 10 0
Radiator ... .. ... ..... ... ...... .. 237
Page 312 of 320
-Alphabetical inde x __ __,_ ______________________________________________ _
Heated outside mirrors ...... .... .. .. . 65 Improperly worn safety belts .... .. .. . 143 K
Heated washer jets
Wiper and washer system ...... ... . 65
Heavy clothing and safety belts ..... ... 138
High beam ...... ...... .. .. .. .. .. 56, 59
Warning/indicator lights . .. .. ... ... 14
High voltage warning labe l ........ ... 294
Hill Descent Assist . . . . . . . . . . . . . . . . . . 118
Hill hold assist Starting on hills
hood 110
See Engine hood ...
.............. 225
Hood release ......... .............. 225
Horn ........... ...... .. .. .. .. .. .. .. 7
How are child restraint system anchors related
to child safety . .. .. .. .. ......... 180
How many a irbags does my vehicle have? .. ..
152
How often should I check my tire pressures? .
253
How safety belt pretensioners work .. .. 143
Hydroplaning ... .... ............... 257
I
Ignition key ... .. .... ......... .... .. 106 Indicator light
Airbag system ....... ..... ... 156, 157
Audi magnetic ride ... ... ... ..... .. 12
PASSENGER AIR BAG OFF ... ...... . 157
Indicator lights . .. ........... ...... 8 , 11
Red symbols in the center display .. .. 30
Yellow symbols in the center display . . 30
Infant seats .... .... .. .. .. .. .. .. ... 172
Inside rear view mirror ........ .. .. . 63, 64
Installing child safety seats Safety belts . . . . . . . . . . . . . . . . . . . . . 177
Installing the upper tether strap on the anchorage ... ................. . 185
Instrument panel Illum ination ......... .... .. .... .. 58
Instrument panel and controls . .. .. .. .. .
8
Instruments and controls
General illustration . . . . . . . . . . . . . . . . . 7
Interior light Rear ... ................. .. .... .. 62
Interior lights .. .. ................ 60, 61
Ambient lighting ... ............... 62
Luggage compartment ............. 63
Interlock switch ............. .. .. .. .. 33
Ignition lock ....... ... ............. 106
J
Ignition lock positions .. .. .. ......... 106
Immobilizer .. .. ..... ... .. .......... 10 Jack and too ls . ... ................. . 270
Important information for vehicles with Diesel engine when adding or chang ing engine
oil .. ....................... .. 233
Important things to do before driving .. 125 Jump starting
.. .. .. ......... ...... . 288
Jumper cables .. .. .................. 288
Jump -starting ............... .. .... . 286 Key
............. ... ... ... .. .. ..... 38
Battery replacement . . . . . . . . . . . . . . . 40
Coded sett ings ............ .. .. .. 102
Convenience opening and closing of
windows . .. .. .... .............. SO
Key replacement .... .............. 38
Master key . .. .. .. .. .. .. ... ..... .. 38
Valet key .... .... .. ... ... ... .. .. . 38
Key-coded settings Climate controls .. .. ............. 102
Kick-down Automatic transmission ........... 120
L
LATCH 180
Description . ... ................. 182
Installing a child restraint .. ... .. .. 183
Location ............ ...... .... .. 181
Mounting and re leasing the anchorage
hook .. ........... .. .... .. .. .. 183
Launch Control Program ............. 120
Leather .................... ... .. .. 215
Cleaning ........... .. ... ..... .. 216
leaving home ... ............. .... .. . 57
Lifting jack ............ .... .... .. .. 276
Lifting points ................ ...... 292
Lifting/ra ising the vehicle ........... . 292
Light coming/leaving home ............ .. 57
Exterior lighting .. .. .... .......... 57
Page 314 of 320
-Alphabetical inde
x ---=-----------------
Paint no .............. ...... .. .. ... 294
panoramic sliding s unroof ..... .. .. ... . 51
Comfort closing . ... .. .. ... ... .... 52
Emergency operation . ... ...... . 53, 54
to close ............ ...... .... .. . 51
to open .............. .. .. .... .. . 51
Par king .. .. .... .. .. ...... ......... 109
Au tomatic t ransm ission . ....... ... 11 7
Par king brake ..... .. .. .. .. .. .. .. ... 108
Sett ing and releasing .. .. .. .. ..... 108
Park ing b rake warning ............. ... 32
Par king on a decl ine (downhi ll) . .. ..... 109
Park ing on an incline ( uphill) ....... ... 109
Particle filter
See Diese l particu late fi lter ... ... ... 34
Parts rep lacement . .... .. .. .. .. ..... 301
PASSENGER AIR BAG OFF light ..... ... 157
Passive sa fety system .. ....... ... . .. . 1 24
Peda ls ... ... ... ... ......... ....... 130
Physical principles of a frontal col lision . 136
Polishing . ....................... .. 209
Power locking switch ................. 44
Rear center console ....... .... .... 45
Power locking system . ....... ... . ... . 40
Convenience close/open feature .. .. . 50
Locking and unlock ing the vehicle from
inside ............ .. .. .. ... .... 44
O pe ning and closing the windows . .. . SO
O pera ting locks from wi th key ....... 43
Rear lid ... .. ...... .. .. .. .. .. ... . 45
Remote control ..... .. .. .. .. ... 39, 42
Unlocking a nd locking vehicle .... ... 42 Power seat
Adjusting the seatback .. ...... ... .. 76
Adjustme nt ............... ... .. .. 75
Power steering
See Electro-mechanical power assist . 17,
1 93
Power sunroof
See panoramic sliding sunroof ....... 51
Powe r window switches .. ... . ... .. .. .. 49
In the driver's door .... ... ... .... .. 49
Reactivating the system ..... ..... .. 51
Pregnan t wome n
Spe cial considerat ions when wear ing a
safety belt .............. .. .. .. . 141
Prope r occupant seating posit ions . ... . 126
Prope r safe ty belt position . . . . . . . . . . . 140
Proper seat ing position
Front passenger .......... .... .. . 127
Occupants .... ........... .. .... . 126
Rear passengers 128
Q
Quartz clock ..................... ... . 9
quattro ®
See All Whee l Drive ........ .. .... . 194
Ques tion
W hat happens to u nbelte d oc cupan ts? ...
137
Why safety belts? ............. .. . 135
R
Powe r out lets . .... .. .. .... ......... . 90 Radiator fan ........ .... .. .. .. .... . 237 Rad
io
Replacing .. ... ........... ... .. .. 302
Rain sensor defective ... .. .. .. .. .. .. .. 36
Readi ng light
Rear .. .. .... ............... .... . 62
Reading lights Front . ....................... 60, 61
Rear .. ... .................... 60, 61
Rear armrest ... .. ... ... .... .. .. ... . 80
Rear lid Emergency release .. .... .......... 46
Locking/un lo ck ing ................ 45
Rear lig ht defective .. ..... ... ..... .. . 36
Rear power locking switch ....... .. .. .. 45
Rea r seat bottom .. ... ... .... ... . ... . 81
Rear view mirror Ins ide rear view mirror . .. .. .. ... 63, 64
Rear window defogger with air -cond ition ing ...... ... .. .. 102
Ref uelling .. .... .. .... .... ... .. ... . 222
Release lever for engine hood ..... .. .. 225
Remote cont rol . .. .... .............. 39
Rese tting remote con trol ... ...... .. 43
Unloc king and locking ... .. .. .. .. .. 42
Remote master key Batte ry rep lacement . ..... .. ... ... . 39
Check ligh t ..................... . 39
Repa ir manua ls . ..... ......... ..... 299
Repai rs
Airbag system 159
Rep lacing
W heel r ims .. .. .. .. ........... .. 257