key AUDI S3 2012 User Guide
[x] Cancel search | Manufacturer: AUDI, Model Year: 2012, Model line: S3, Model: AUDI S3 2012Pages: 280, PDF Size: 70.11 MB
Page 43 of 280
Emergency release for rear lid
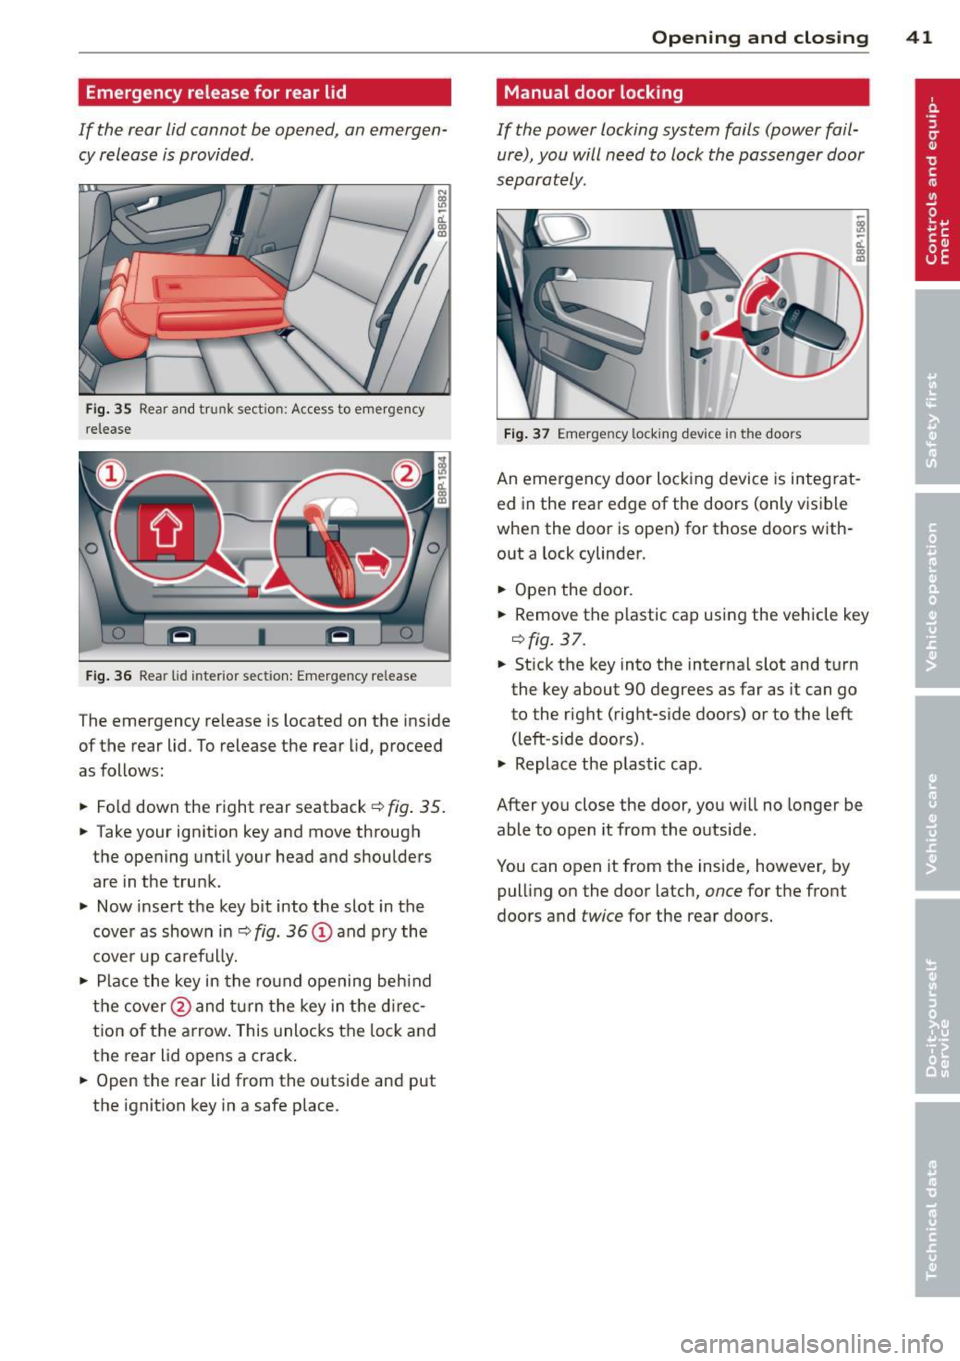
If the rear lid cannot be opened, an emergency release is provided .
Fig. 35 Rear and trunk section: Access to emergency
release
F ig . 36 Rear lid interior sectio n: Emergency re lease
The emergency release is located on the inside
of the rear lid . To release the rear lid, proceed
as follows:
.. Fold down the right rear seatback
r::!;) fig . 35.
.. Take your ignition key and move through
the opening until your head and shoulders are in the trunk.
.. Now insert the key bit into the slot in the
cover as shown in
r::!;) fig. 36 (D and pry the
cover up carefully .
.,. Place the key in the round opening beh ind
the cover @and turn the key in the direc
tion of the arrow . This unlocks the lock and
the rear lid opens a crack .
.. Open the rear lid from the outside and put
the ignition key in a safe place .
Opening and closing 41
Manual door locking
If the power locking system fails (power fail
ure), you will need to lock the passenger door
separately.
Fig. 37 Eme rgency lo cking device in the doors
An emergency door lock ing device is integ rat
ed in the rear edge of the doors (only visible
when the door is open) for those doors with
out a lock cylinder .
.. Open the door .
.. Remove the plastic cap using the vehicle key
r::!;,fig. 37 .
.. Stick the key into the internal slot and turn
the key about 90 degrees as far as it can go
to the right (right-side doors) or to the left
(left -side doors) .
.. Replace the plastic cap.
After you close the door, you will no longer be
able to open it from the outside .
You can open it from the inside, however, by
pulling on the door latch,
once for the front
doors and twice for the rear doors.
Page 44 of 280

42 Opening and clo sing
Child safety lock
The child saf ety lock t prev ents th e re ar
doors from being opened from the inside .
Fig. 38 Rear doors : child safety lock
The rear doors are equipped wi th a ch ild safe
ty lock.
It is operated w ith the vehicle key. The
child safety lock is only visible when the door
is open.
• To
switch on the child safe ty lo ck , tu rn the
i gnition key in the direct ion of the arrow .
• To
switch off the child safety loc k, t urn the
ignition key in the opposite direction of the
arrow.
The c hild safety lock prevents the doors from
being opened from the inside when you have
small children sitt ing in the rear.
Anti-theft alarm system
The anti -theft alarm triggers an alarm if any
one attempts to break into the vehicle .
Fig. 39 Diode pos it ion in th e in st ru men t pane l
The anti-theft a larm system triggers an audi
ble alarm and tu rns o n the emergency flasher
if a n unauthori zed interference w ith the vehi
cle is sensed by the system.
How is the anti -theft alarm system
switched on?
T he anti -theft alarm system is switched on
when you lock the driver's door manua lly us
ing t he fo ld-out key, or when you use the re
mote control. The system is activated approx i
mately 30 seconds after the vehicle is locked .
The ind icator light¢
fig. 39 starts flash ing
rapid ly for 30 s econds and then blinks slowly.
How is the anti-theft alarm sy stem
switched off?
T he anti-theft alarm system is switched off
when you use the remote cont ro l to unlock
yo ur vehicle.
If you do not open a doo r wi thin
30 se co nds after yo u have u nlocked wi th the
remote control, t he vehicle will loc k it se lf
again automatically .
If you lock just t he d river's door using your
k ey, the fron t passenger's door and the re ar
li d remai n locked.
When will the anti th eft alarm system be
triggered?
When the vehicle is lo cked, t he alar m sys tem
monitors and pro te cts the fo llowi ng parts of
the ve hicle :
- eng ine compartmen t
- luggage compartmen t
- doors
- ignition
When the system is activated, the alarm will be triggered if one of t he doors, t he engine
hood or the rear lid are opened, or if the igni
t ion is turned on or the rad io removed .
The anti-theft alarm system wi ll also go off
whe n the battery is disconnected.
You can also trigge r the alarm by pressing the
P ANIC button on you r remo te-control key .
T his wi ll ale rt ot her people in case of emer
gency . Press the
PANIC button again to turn
off the alarm.
Page 45 of 280
How is the anti-theft alarm switched off
when triggered?
The alarm system is switched off when you
un lock the vehicle using the remote-control
key or when the ignition is switched on. The
alarm will also switch itself off when it comes
to the end of its cycle .
Emergency flasher
The emergency flasher will blink briefly when
the doors, engine hood and rear lid are prop
erly closed .
If the emergency flashers do not blink, check
the doors, engine hood and rear lid to make
sure they are properly closed. If you close a
door, the hood or the rear lid with the anti
theft alarm switched on, the emergency flash
ers will blink only after you have closed the
door or lid .
(D Tips
For the anti-theft alarm system to func
tion properly, make sure all vehicle doors
and windows are closed before leaving the
veh icle.
Power windows
Controls
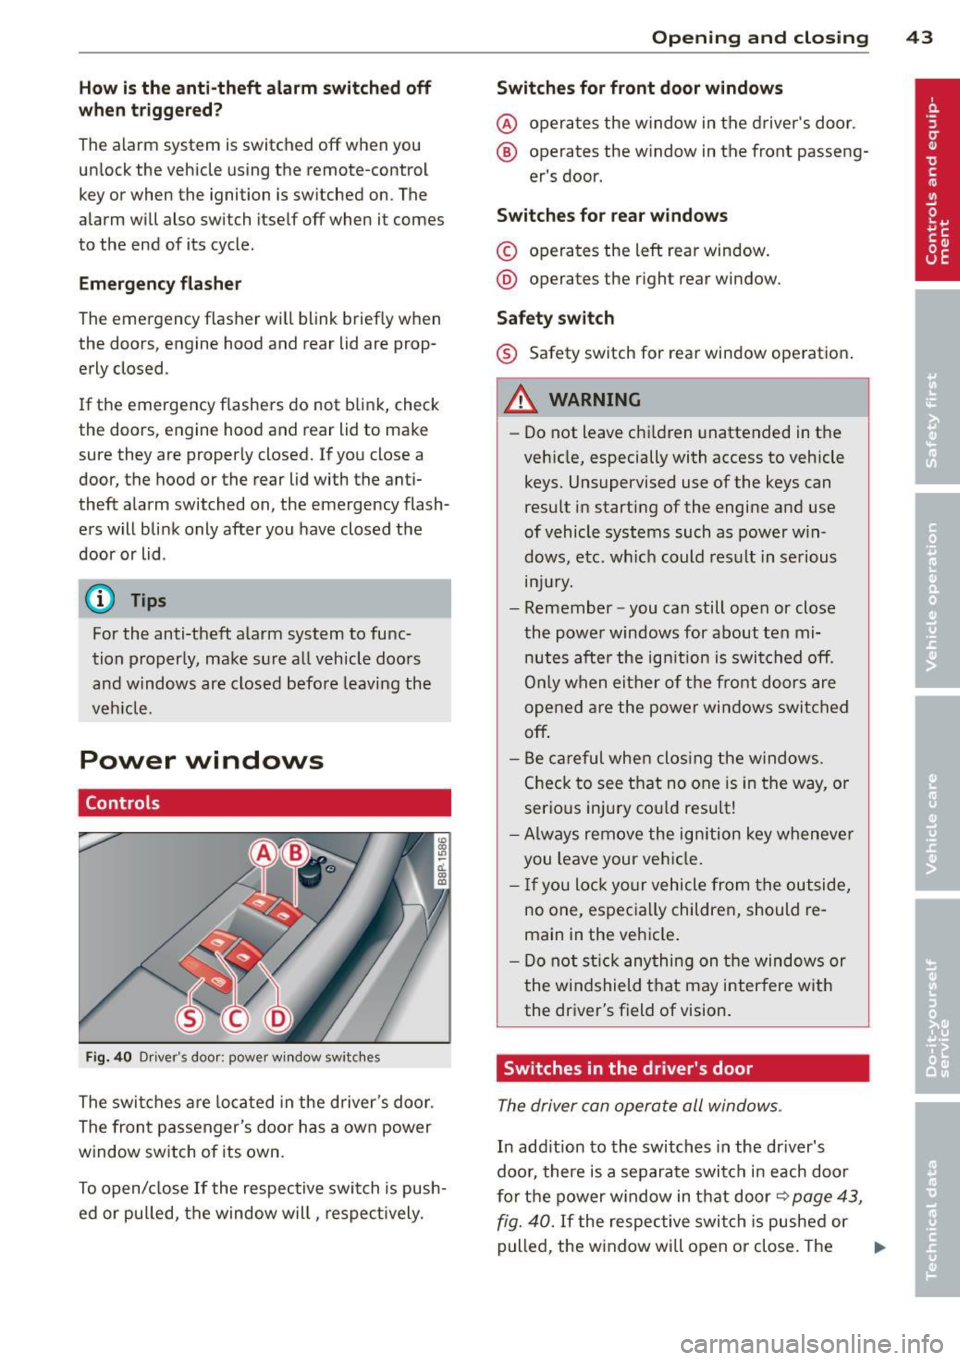
Fig. 40 Dr iver 's door: powe r w ind ow sw itches
The switches are located in the driver's door.
The front passenger's door has a own power
window switch of its own.
To open/close If the respective switch is push
ed or pulled, the window will, respectively.
Opening and closing 43
Switches for front door windows
@ operates the window in the driver's door.
® operates the window in the front passeng -
er 's door.
Switches for rear windows
© operates the left rear window.
@ operates the right rear window.
Safety switch
® Safety switch for rear window operation .
A WARNING
-Do not leave chi ldren unattended in the
veh icle, especially with access to vehicle
keys. Unsupervised use of the keys can
result in starting of the engine and use
of vehicle systems such as power win
dows, etc. wh ich could result in serious
mJury.
- Remember -you can still open or close
the power windows for about ten mi nutes after the ign ition is switched off.
On ly when either of the front doors are
opened are the power windows switched
off .
- Be careful when clos ing the windows .
Check to see that no one is in the way, or
serious injury could result!
-Always remove the ignition key whenever
you leave your vehicle .
- If you lock your vehicle from the outside,
no one, especially children, should re
main in the vehicle.
- Do not stick anything on the windows or
the windshield that may interfere with
the driver's field of vision.
Switches in the driver's door
The driver can operate all windows .
In addition to the switches in the driver's
door, there is a separate switch in each door
for the power window in that door~
page 43,
fig. 40.
If the respective switch is pushed or
pulled, the window will open or close. The
Ill>
Page 46 of 280
44 Opening and closing
power window switches have a two-position
function:
Opening the windows
.. Push the switch to the first stop and hold it
t h ere until the window has lowered to the
desired position .
.. Push the switch briefly to the
second stop:
the window will automatically open all the
way.
.. By briefly pressing/pulling the switch again,
the downward travel of the window can be
stopped in any position
c:> .&. in Controls on
page 43.
Closing the windows
.. Pu ll the switch up to the first stop and ho ld
it there until the window has risen to the de
sired posit ion .
.. Pull the switch qu ickly to the
second posi
tion :
the w indow w ill automatically close all
the way
c:> ,&. in Controls on page 43.
.. By briefly pressing/pulling the switch again,
the upward travel of the window can be
stopped in any position
c:> .&. in Controls on
page 43 .
Activating/deactivating rear windows
.. Push the sw itch to the depressed position
to
activate the rear windows - the light in
the switch w ill go out.
.. Briefly press the switch to
deactivate the
rear windows -the switch will return to the
safety position and the light
LJ will illumi
nate.
The safety switch ®
c:> page 43, fig. 40 in the
armrest on the driver's door turns off the rear
power windows. Only when the safety switch
is depressed can the rear windows be opened
or closed. The symbol in the safety sw itch illu
minates when the power windows in the rear
doors are switched off (button NOT de
p ressed). This feature has been provided for
the safety of small children riding in the rear
of the vehicle.
(D Tips
The windows can still be opened and
closed for about ten minutes after the ig
nition has been turned off. The power w in
dows are not shut off unt il one of the front
doors is opened.
' Convenience close/open feature
You can close or open the windows from out
side when you lock or unlock your car with the
key.
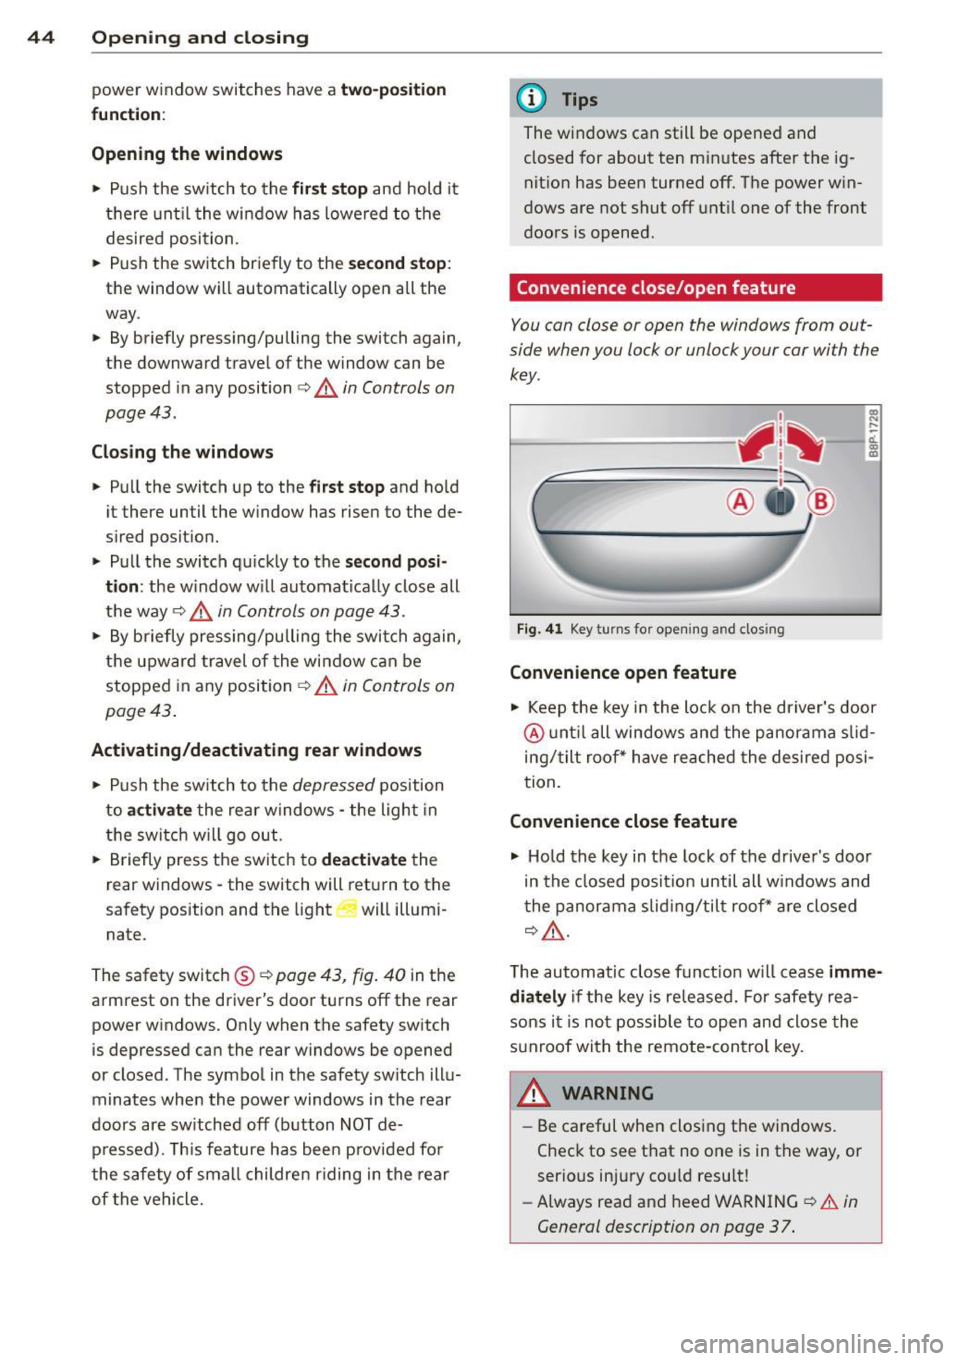
Fig. 41 Key turns for opening and closing
Convenience open feature
co ... ....
11. a:, a,
"' Keep the key in the lock on the driver's door
@ until all windows and the panorama s lid
ing/tilt roof * have reached the desired posi
tion .
Convenience close feature
"' Hold the key in the lock of the driver's door
in the closed position until all w indows and
the panorama slid ing/tilt roof * are closed
c:> ,&..
The automatic close f unct ion w ill cease imme
diately
if the key is released. For safety rea
sons it is not possible to open and close the
sunroof with the remote-control key.
A WARNING
= -
- Be careful when closing the windows.
Check to see that no one is in the way, or
serious injury cou ld resu lt!
- Always read and heed WARNING
c:> A in
General description on page 37 .
Page 48 of 280
46 Openin g and clo sing
,8. WARNING
Never close the panoramic sliding sunroof
carelessly or without watching - there is a
r isk of personal injury. For th is reason, al
ways remove the ignition key when leav ing
t he vehicle.
(j) Tips
- When you park your vehicle, we general
l y recommend closing the panoramic
s lid ing sunroof and the sun blind.
- When the vehicle is parked, a wet roof shou ld be dried lightly with a soft cloth
befor e it is opened so that water does
not dr ip into the inte rior.
Comfort closing
Applies to vehicles: with panoramic sliding sunroof
The open roof can also be closed from the
outside.
~ Hold the key in the driver's door lock in the
lock pos ition until the roof is closed
~ ,&. .
,8. WARNING
Never close the panoramic sliding sun roof
c arelessly or wit hout w atching - there is a
r is k of personal injury.
Page 66 of 280
64 Seats and storage
-Beca use the driver seat can be electrical
ly ad justed with the ign ition key re
moved, never leave children unattended
in the vehicle . Unsupervised use of the
electric seat adjustments may cause seri o us in jury.
Adjusting the seatback
App lies to vehicles: with power driver seat
u-
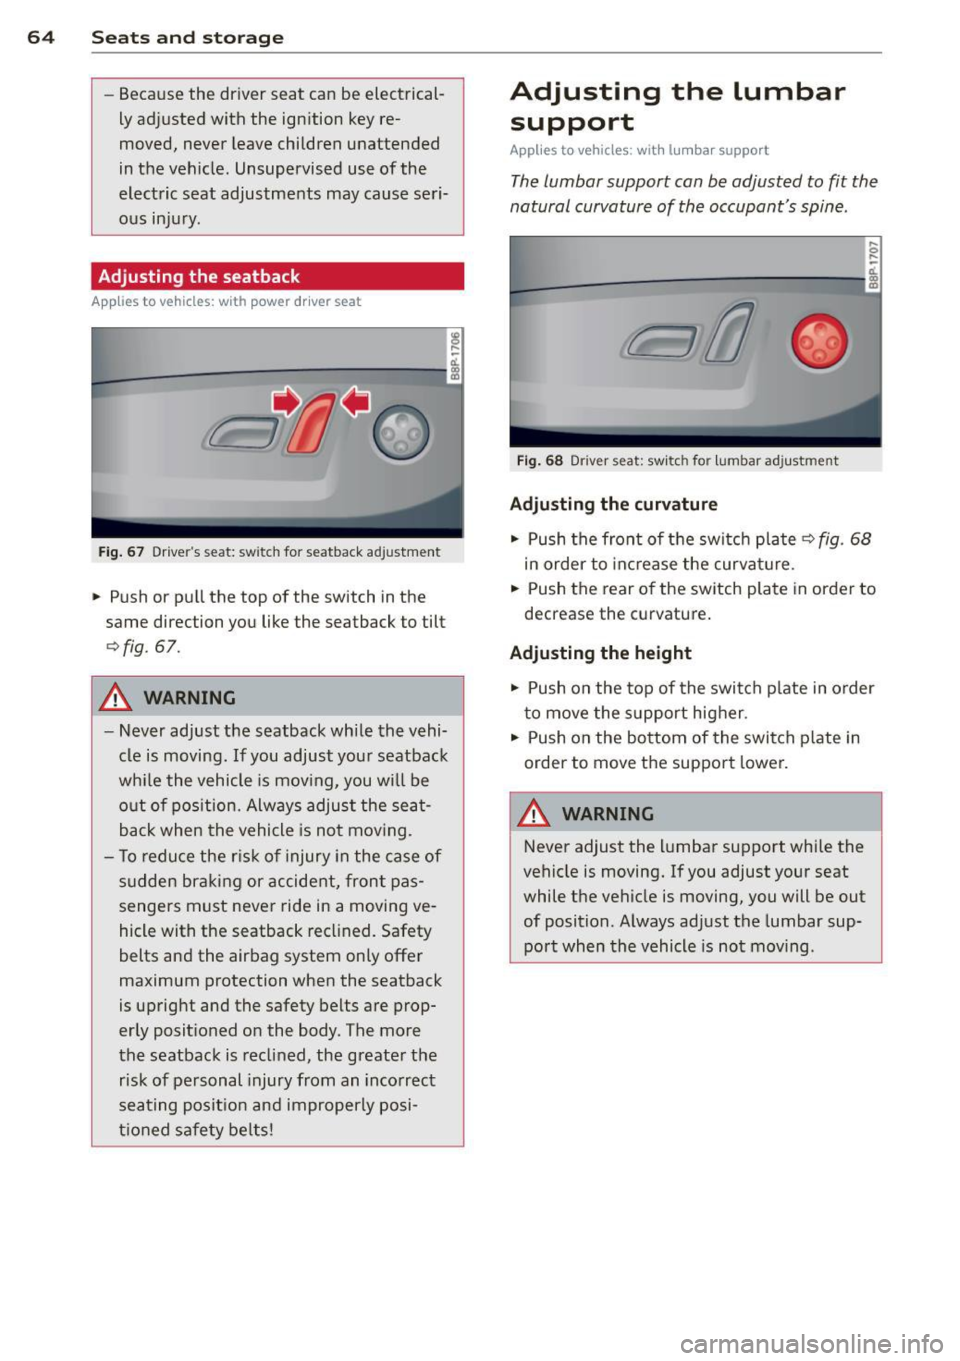
Fig . 67 Drive r's seat: switc h for seatback adjustment
• Push or pull the top of the switch in the
same direction you like the seatback to tilt
¢fig. 67.
A WARNING
- Never adjust the seatback whi le the vehi
cle is moving. If you adjust your seatback
w hil e the vehicle is mov ing, you wi ll be
o ut of pos ition. Always adjust the seat
back when the vehicle is no t mov ing.
- T o redu ce the r is k of injury in the case of
sudden bra king or accident, front pas
sengers must never ride in a moving ve
hicle with the seatback reclined. Safety
belts and the airbag system only offe r
maximum protection when the seatback
is upright and the safety belts are prop
er ly posit ioned on the body . The more
the seatback is reclined, the greate r the
risk of personal injury from an incorrect
seating posit ion and improperly posi
tioned safety be lts!
Adjusting the lumbar
support
Applies to vehicles: with lumba r support
The lumbar support can be adjusted to fit the
natural curvature of the occupant's spine.
F ig . 68 Driver seat: switc h for lumbar ad justment
Ad justing the curv atur e
.,. Push the front of t he sw itch plate c:> fig . 68
in order to in cr ease the curva ture.
• Push the rear o f the switch plate in order to
decrease the curvature.
A dj usting the height
• Push on the top of the switch p late in order
t o move the s upport higher .
• Push on the bottom of the switch p late in
order to move t he support lower.
A WARNING
-
Never adjust the lumbar support while the
vehicle is moving. If you adjust your seat
while the vehicle is moving, you will be out
of position. Always adjust the lumbar sup
port when the vehicle is not mov ing .
Page 77 of 280
CD Note
Only drink containers with lids should be
carried in the cupho lder. Liqu id could spill
out and damage your veh icle's e lectronic
equ ipment or sta in the upholstery etc.
Socket
Outlets
The outlet in the front center console and in
the luggage compartment may be used for
12-volt appliances.
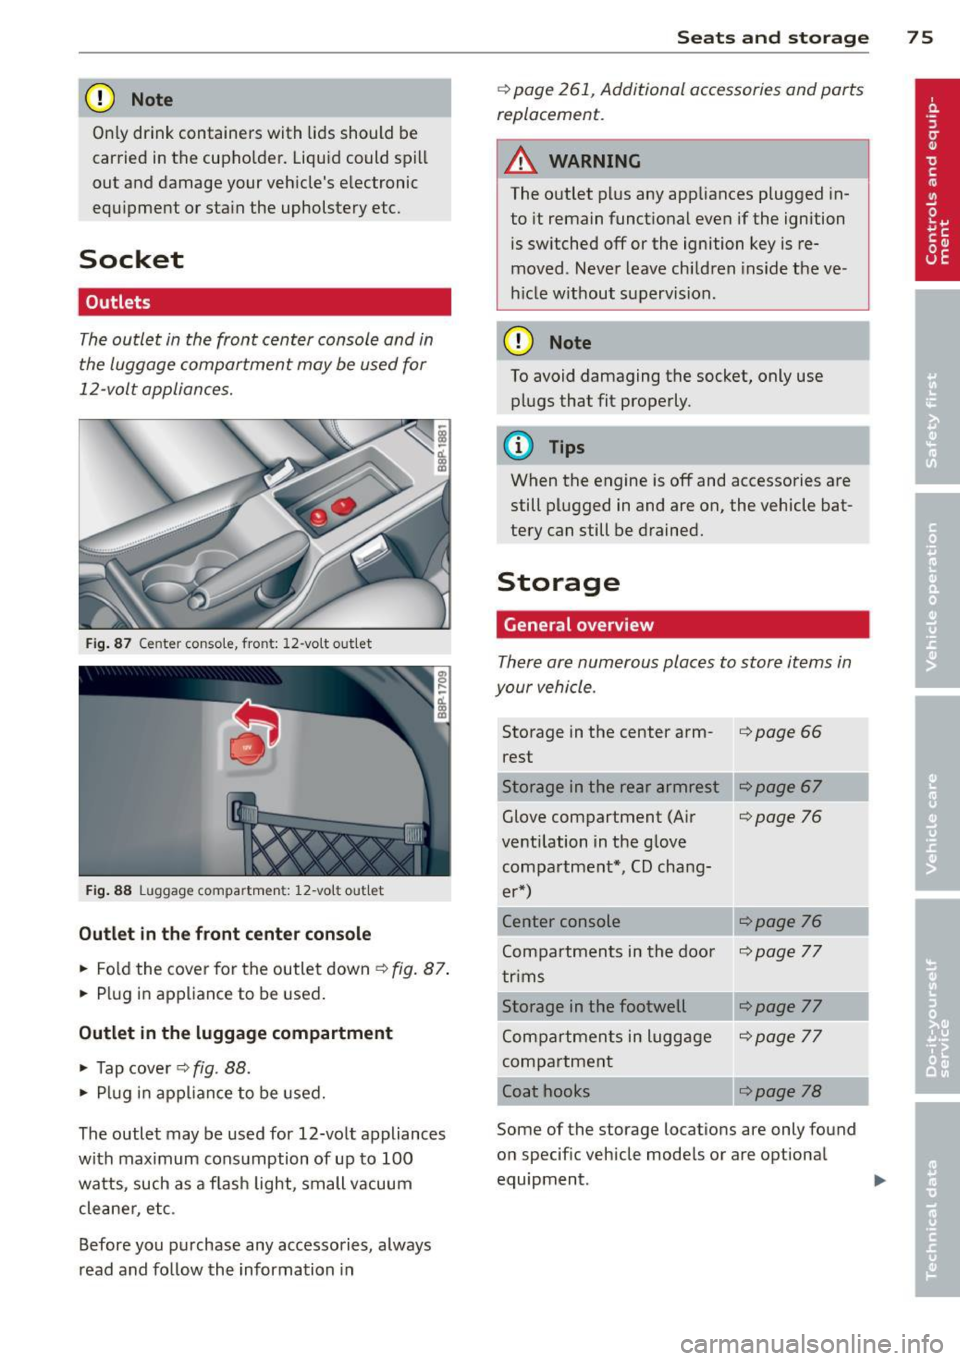
Fig. 87 Ce nter conso le, front: 12-vo lt out let
Fig. 88 L uggage compartmen t: 12-vo lt out let
Outlet in the front center console
.. Fold the cover for the outlet down ¢ fig. 87.
.. Plug in appliance to be used.
Outlet in the luggage compartment
.. Tap cover ¢ fig. 88.
.. Plug in appliance to be used.
The outlet may be used for 12-volt appliances
with maximum consumption of up to 100
watts, such as a f lash light, small vacuum
cleane r, etc.
Before you purchase any accessories, always
read and follow the information in
Seats and storage 75
¢ page 261, Additional accessories and parts
replacement.
A WARNING
The outlet plus any appliances plugged in
to it remain functional even if the ignition
is switched off or the ignition key is re
moved. Never leave children inside the ve
h icle w ithout supervision.
CD Note
To avoid damaging the socket, only use
plugs that fit properly.
(y Tips
When the engine is off and accessories are
still plugged in and are on, the vehicle bat
tery can still be drained.
Storage
General overview
There are numerous places to store items in
your vehicle .
Storage in the center arm-i=>page 66
rest
Storage in the rear armrest
Glove compartment (Air
¢page 76
ventilation in the glove compartment*, CD chang-
er*)
Center console
¢page 76
Compartments in the doo r ¢page 77
trims
Storage in the footwell
¢page 77
Compartments in luggage ¢page 77
compartment
Coat hooks
¢page 78
Some of the storage locations are only found
on specif ic vehicle models or are optional
equipment .
Page 86 of 280
84 Warm and cold
Air outlets
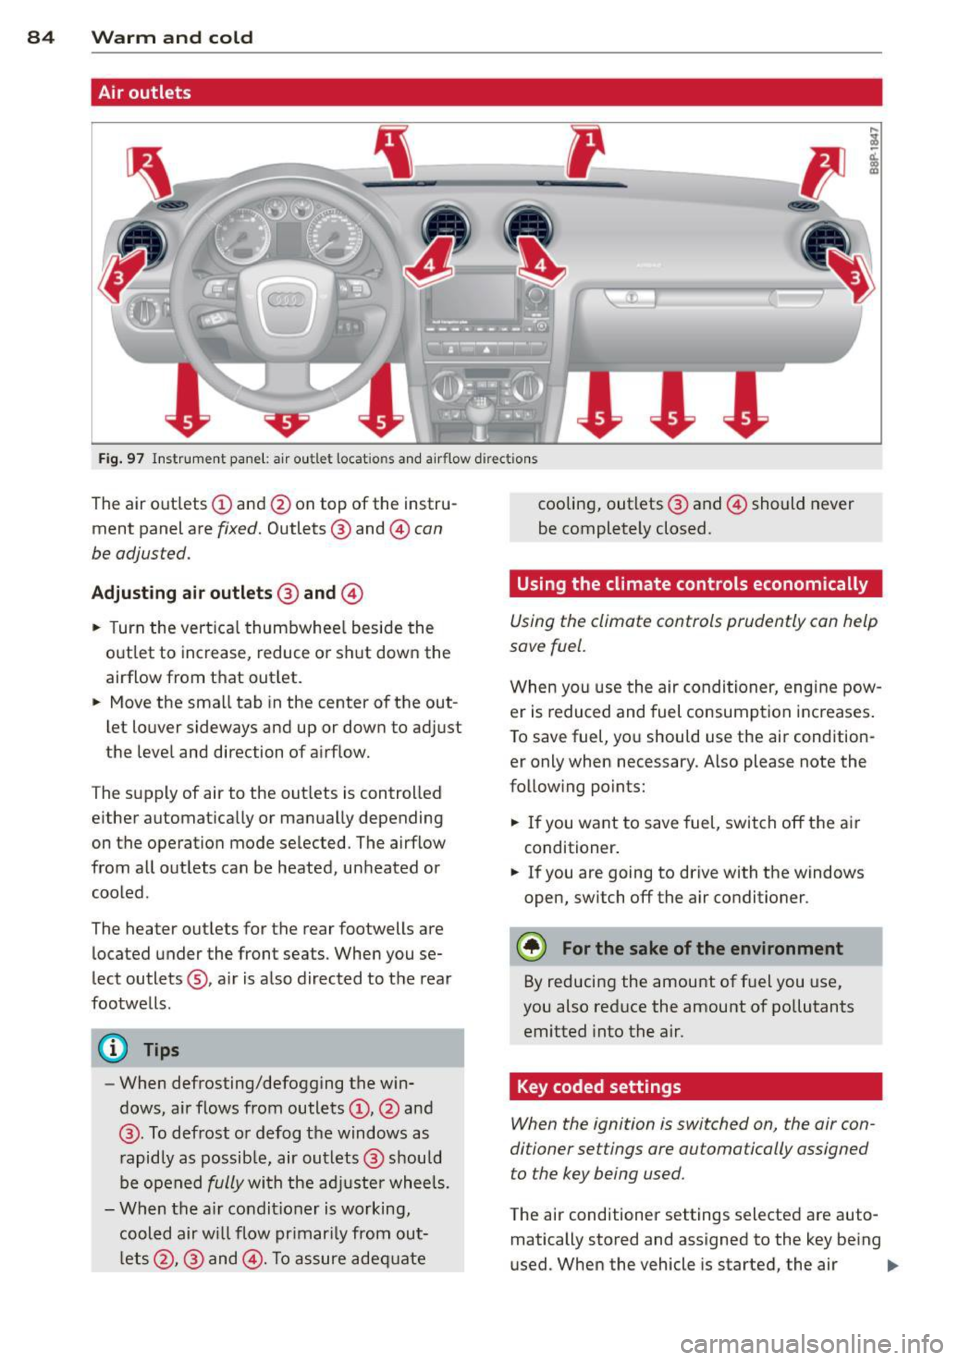
Fi g. 97 Instr ument pane l: a ir ou tlet locat io ns an d airflow d irec tions
The air out lets (D and @on top of the instru
ment panel are
fixed. Outlets @ and @can
be adjusted.
Adjusting a ir outl ets ® and @
.. Turn the vertica l thumbwhee l beside the
outlet to increase, reduce or s hut down the
airflow from that out let.
.. Move the small tab in the center of the out
let louver sideways and up or down to ad just
the leve l and direction of airflow.
T he supply of air to the out lets is controlled
e ither automat ica lly or manually depending
on the operation mode se lected . The airflow
from all outlets can be heated, unheated or
cooled.
The heater out lets for the rear footwells are
located under the front seats . When you se
lect outlets @, a ir is a lso directed to t he rear
footwells .
@ Tips
-When defrosting/defogging the win
dows, air flows from outlets
(D , @ and
@ . To defrost or defog the windows as
r apidly as possib le, air outlets @ should
be ope ned
fully wi th the ad juster wheels.
- When the a ir condit ioner is working,
cooled air w ill flow pr imar ily from out
l e ts @ ,@ and @. To assure adeq uate cooling, outlets
@ and @) should never
be completely closed.
Using the climate controls economically
Using the climate controls prudently can help
save fuel .
When you use the air conditioner, eng ine pow
er is reduced and fuel consumption increases .
T o save fuel, yo u should use the air condition
er only when necessary . Also please note the
follow ing points:
.. If you wa nt to save fuel, switch off the ai r
conditioner .
.. If you are going to drive with the windows
open, switch off the air conditioner .
@ For the sake of the environment
By reducing the amount of fuel you use,
you also reduce the amount of po llutants
emitted into the air.
· Key coded settings
When the ignition is switched on, the air con
di tioner settings are automatically assigned
to the key being used .
The air conditioner settings selected are auto
matically stored and assigned to the key be ing
u sed . When the vehicle is started, the air ..,.
Page 87 of 280
conditioner automatically se lects the settings
assigned to that key. This way every driver will maintain his/her own persona l settings and
does not have to reset them manually.
(D Tips
If a d ifferent driver uses your key and
changes the air conditioner settings, the
latest adjustments w ill erase and rep lace
the settings you have stored.
mP Rear window defogger
T he rear window defogger clears the rear win
dow of conden sation .
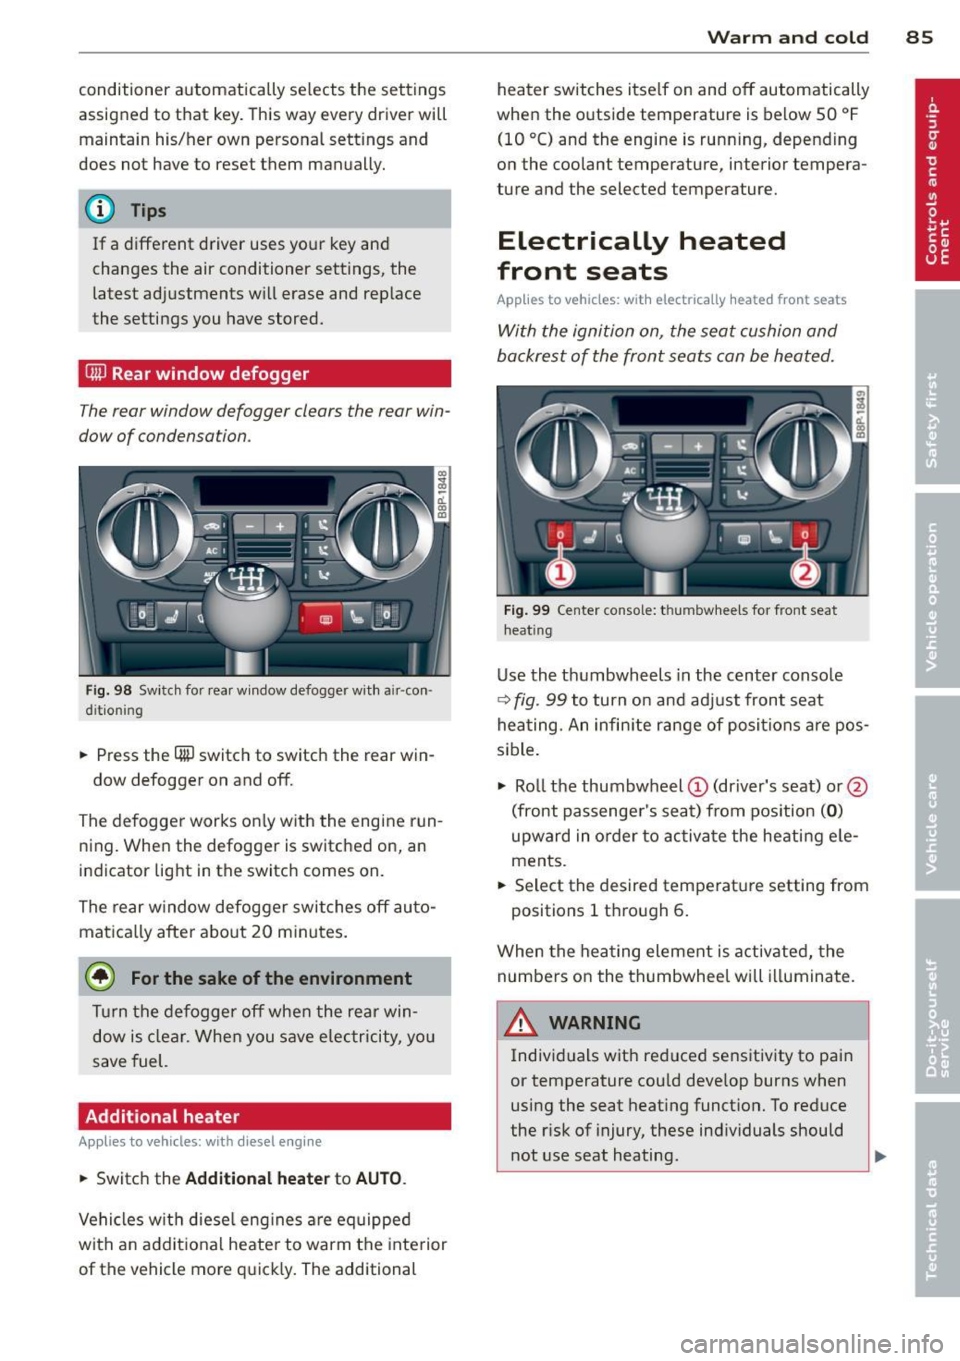
Fig. 98 Swi tch for rea r wi ndow defogger w ith a ir -con ·
d it io nin g
.. Press the QiP switc h to switch the rear win-
dow defogger on and off.
The defogger works on ly with the engine run
n ing. When the defogger is switched on, an
indicator light in the switc h comes on.
The rear w indow defogger switches
off au to
matica lly afte r abo ut 20 m inutes.
@ For the sake of the environment
T ur n the defogger off when the rea r win
dow is clear. When you save elec tricity, you
save fuel.
Additional heater
Applies to vehicles: with diesel engine
.. Switc h the Additional heate r to AUTO .
Vehicles w it h diese l eng ine s are equipped
with an add it ional heate r to warm the interior
of the vehicle mo re q uick ly. The additional
W arm and cold 85
heater switches itse lf on and off automatically
when the o utside temperature is below 50 °F
(10 °C) and the engine is running, depending
o n the coolant temperature , interior tempera
ture and the selected temperature.
Electrically heated
front seats
Applies to vehicles: with electrically heated front seats
With the ignition on , the seat cushion and
backrest of the front seats can be heated.
F ig . 99 Ce nter co nsole: t hu m bwhee ls for front seat
h eat ing
Use the t humbwheels in the center conso le
c;:> fig . 99 to turn on and adjust front seat
heating. An infin ite range of positions are pos
sible .
.. Ro ll t he thumbw heel
(D (dr iver's seat) or@
(front passenger's seat) from pos ition
( 0 )
upward in order to activa te the heati ng e le
ments .
.. Select the desired temperat ure setting from
positions 1 t hrough 6.
When the hea ting element is activated, the
numbers on the thumbwheel will illuminate .
& WARNING
Individuals wit h reduced sensitiv ity to pai n
or temperature cou ld deve lop burns when
using the seat heating funct ion. To reduce
the r isk of injury, these ind ividuals should
not use seat heating .
Page 91 of 280

Ignition lock and ignition switch
Ignition lock
The engine can be started or turned off with
the ignition key.
Fig. 102 I gni tion lock positio ns
Ignition off@
In position ¢ fig. 102@both the ignition and
engine are off, and the steering is locked.
To
lock the steering after you have removed
the ignition key, turn the steering wheel in ei
ther direction until you hear it lock into place.
You shou ld always lock the steering whenever
you leave your vehicle. This makes a vehicle
theft even more difficul t
q ,&.
Ignition on CD
If it is difficult to turn the key after you have
inserted it into the ignition lock, turn the
steering wheel back and forth. This will take
the load off the steering lock mechan ism and
you will be able to turn the key freely and
start the engine. On vehicles with a diesel en
g ine*, the system can preheat in this pos ition .
Starting the engine @
In this position the engine starts. While the
engine is starting, the power supply to the
headlights and other electrical consumers is
temporarily interrupted to conserve battery power. After the engine has started, release
the key and it will return to position @.
Before the starter can be operated again the
key must be turned back to position @. The
non-repeat lock prevents you from damag ing
the starter when the engine is running.
On the road 89
A WARNING
-Never remove the key from the ignition
lock wh ile the vehicle is moving. The
steering wheel will lock caus ing loss of
control.
- If you have to leave your vehicle - even
for just a minute -always remove the ig
nition key and take it with you. This is es
pecia lly important if you are going to
leave children behind in the vehicle. The
children could start the engine or use
other vehicle controls. Unsupervised use
of vehicle controls (for example, power
windows) can cause serious personal in
juries.
(D Tips
If the vehicle battery has been disconnect
ed and then reconnected, then you must leave the key in position @for about 5
seconds before you can start the engine.
Ignition key safety lock
Applies to vehicles: wit h automatic transmission
The ignition key can only be removed when
the selector lever is in the "P" (Park) position.
Place the selector lever in the "P" position be
fore switching off the engine .
After switching off the ign ition, the ignition
key can on ly be removed from the ignition
lock when the selector lever is in the "P"
(Park) position. After you have removed the
key, the se lector lever is locked and cannot be
moved.