key AUDI S3 2012 Owner's Manual
[x] Cancel search | Manufacturer: AUDI, Model Year: 2012, Model line: S3, Model: AUDI S3 2012Pages: 280, PDF Size: 70.11 MB
Page 92 of 280
90 On the road
Starting and stopping
the engine
Starting the engine
The engine can only be started with your orig
inal Audi key.
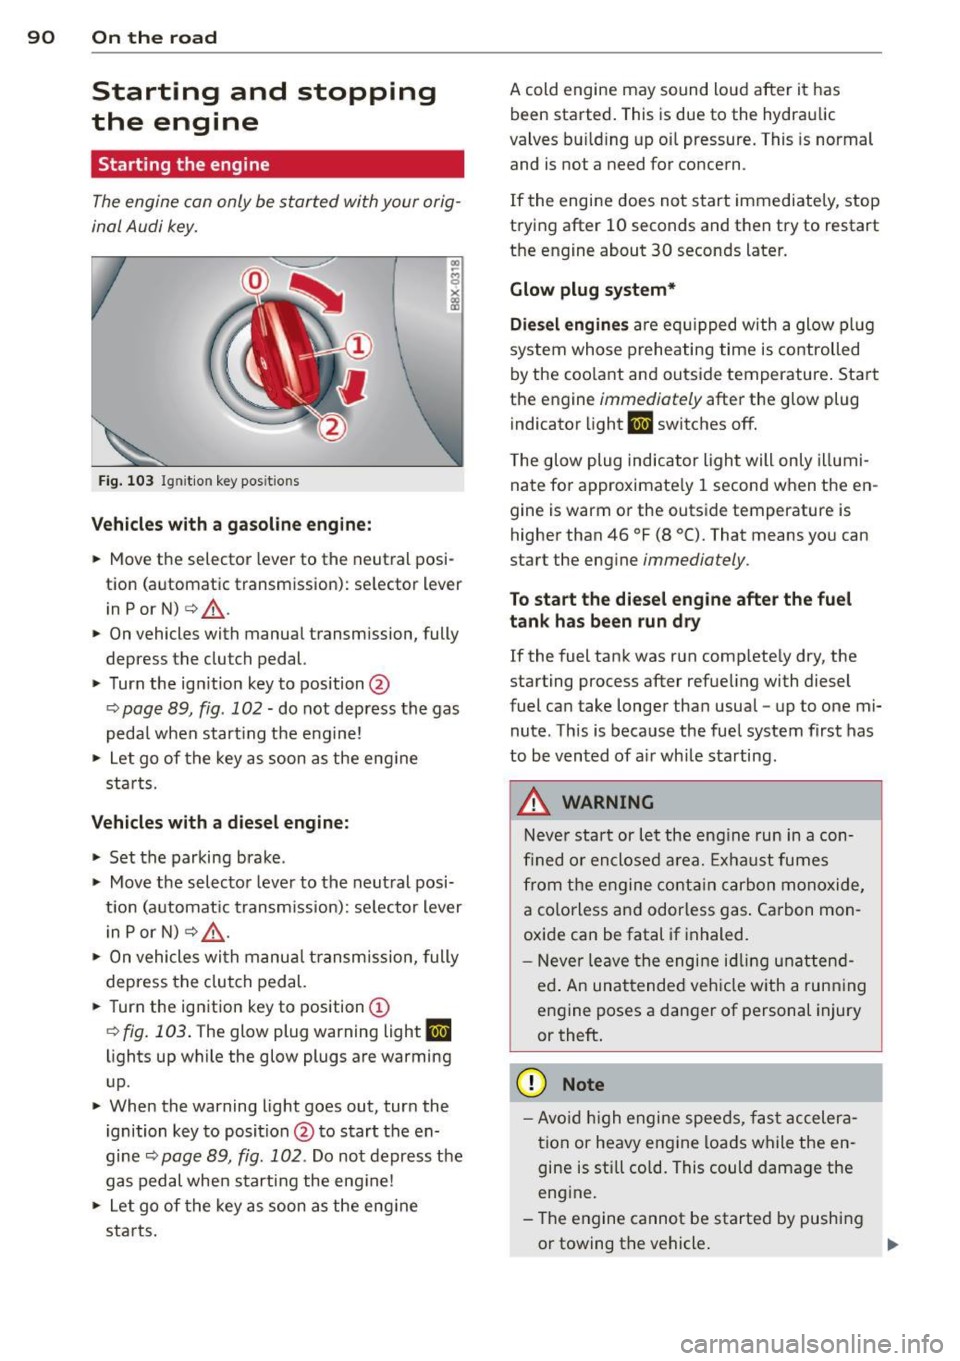
Fig. 10 3 Igni tio n key pos itio ns
Vehicles with a gasoline eng ine:
.. Move the selector lever to the neut ral posi
t ion (a utomatic transmission): se lector lever
in Por
N) c> .&_ .
.. On vehicles with manual transmission, fully
depress t he clu tch pedal.
.,. Turn the ig nition key to position @
¢ page 89, fig. 102 -do not d epress th e gas
peda l when start ing the e ngine!
.. Let go of the key as soon as the eng ine
s tar ts.
Vehicles with a diesel engine:
.. Set the parking bra ke .
.. Move t he sele cto r lever to the neut ral posi
t ion (a utomat ic tr ansm iss ion): se lecto r lever
i n
P or N) c> .&_ .
.. On vehicles wi th m anu al transm is s ion, fully
depress the clutch pedal.
.. Turn the ignition key to position
(D
¢ fig . 103 . The glow plug warning light II
lights up while the glow plugs are warming
up .
.. When the warning light goes out, tur n the
i gnition key to posi tion @to s tart the en
gine
c> page 89, fig . 102 . Do no t depress t he
gas pedal when s tart ing the engine!
.. Let go of the key as soon as t he eng ine
sta rts . A cold engine may sound lo
ud after it has
been started . This is due to the hydraulic
valves b uilding up o il pressure. This is normal
and is not a need for co ncern .
If the engine does not start immediate ly, stop
t rying after 10 seconds and then try to restart
t h e engine about
30 seconds later.
Glow plug system*
Diesel engines are e quipped w ith a glow pl ug
system whose prehe ating time is co ntrolled
by the coo la nt an d ou tside temperature . Sta rt
the engine
immediately after the g low plug
i ndicator light
II switches off.
T he glow plug indica to r ligh t will only illumi
nate fo r approximate ly 1 second w hen t he en
gine is warm or the outside temperature is
higher than
46 °F (8 °(). That means yo u can
start the eng ine
immedia tely .
To start the diesel eng ine after the fuel
tank has been run dry
If the fuel tank was r un comp lete ly dry, the
starting process after refue ling with diesel
fuel can take longer than usua l - up to one mi
nute . This is because the fue l system first has
to be vented of a ir wh ile s tarting .
A WARNING
-Neve r sta rt or l et the eng in e r un in a con-
fi ned o r encl ose d area. Exhaus t fumes
fr om the e ngine co ntain ca rbo n m onoxide ,
a colorless and odorless g as. Ca rbon mo n
oxi de can be fatal if inhaled .
- N ever le ave the engi ne id ling una tten d
ed . An unat tende d veh icle w ith a run ning
e ng ine poses a dan ger of personal injury
or theft .
(D Note
-Av oid high engine spee ds, fast a cceler a
t ion or heavy engine loa ds w hile the en
gine is st ill co ld. This could damage the
eng ine .
- The e ngine cannot be starte d by pushing
or towing t he vehicle . .,.
Page 93 of 280
@ For the sake of the environment
To avoid unnecessary engine wear and to reduce exhaust emissions, do not let your
vehicle stand and warm up. Be ready to
drive off immediately after start ing your
veh icle. Mainta in moderate speed until the
engine is completely warm . Remember,
the engine performs best at operating
temperature .
Stopping the engine
.. Turn the ignition key to position@
¢page 89, fig. 102.
_& WARNING
-Never turn off the engine unti l the vehi
cle has come to a complete stop.
- The brake booster and servotronic on ly
work when the engine is running . With
the ignition turned off, you have to apply
more force when steering or braking.
Since you cannot steer and stop normal ly, this can lead to accidents and serious
injuries.
- The rad iator fan can continue to run for
up to 10 minutes even after you have
tu rned off the eng ine and removed the
ignition key. The radiator fan can also
turn on again if the engine coolant heats
up because of intense sunlight or heat
build-up in the engine compartment.
(D Note
Do not stop the engine immediate ly after
hard or extended dr iving. Keep the engine
running for approximately two minutes to
prevent excessive heat build-up .
On the road 91
Parking brake
Parking brake
When the parking brake is set, it prevents the
vehicle from rolling away unintentionally .
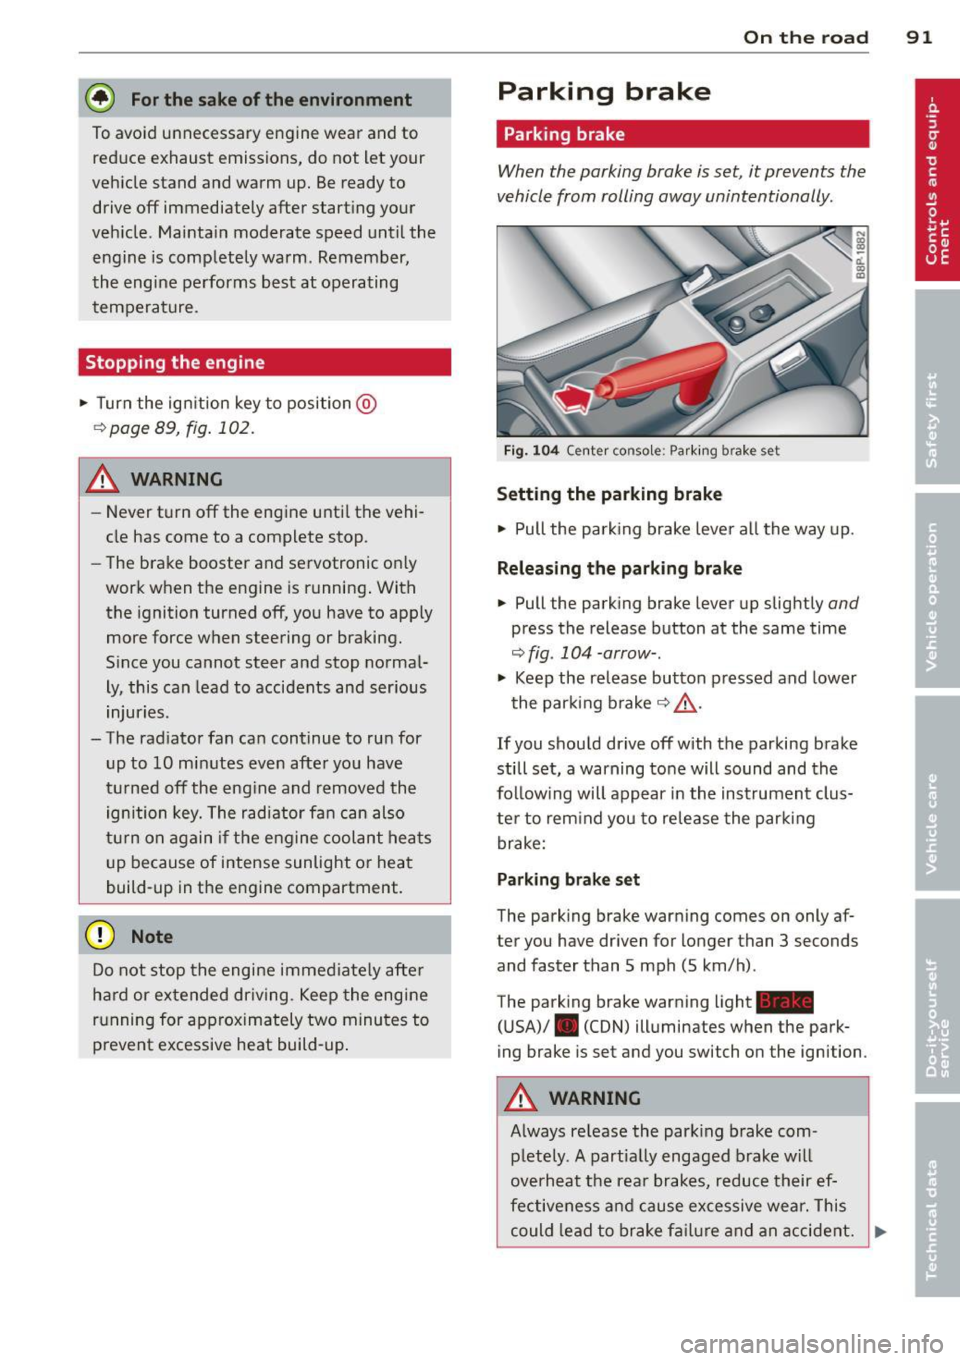
Fig. 104 Cente r co nso le: Park ing b rake set
Setting the parking brake
.. Pull the park ing brake lever all the way up.
Releasing the parking brake
.. Pull the parking brake lever up slightly and
press the release button at the same time
¢fig. 104-arrow-.
.,. Keep the release button pressed and lower
the parking brake¢&_ .
If you should drive off with the parking brake
still set, a warning tone will sound and the
follow ing will appear in the instrument clus
ter to remind you to release the parking
brake:
Parking brake set
The parking brake warning comes on only af
ter you have driven for longer than 3 seconds
and faster than 5 mph (5 km/h) .
The parking brake warning light_
(USA)/ . (CON) illuminates when the park
ing brake is set and you switch on the ignition .
A WARNING
Always release the parking brake com -
pletely. A partially engaged brake will
overheat the rear brakes, reduce their ef
fectiveness and cause excessive wear. This
could lead to brake failure and an accident. .,.
Page 94 of 280
92 On the road
On ly afte r th e ve hic le has come to com
plete stop, shou ld you f irm ly set t he park
ing b rake and either move the gea rshift
lever into 1st. gear (manual transm iss ion)
or move the selector lever into "P" (Auto
mat ic transm ission).
Parking
To prevent a parked vehicle from rolling
away, there are a few things you should do.
When you park your ve hicle, do the following:
• Stop the vehicle using the brake pedal.
• Set the parking brake firmly.
• Move the selector lever into the
P position
( automatic transmi ssion ) or move the gear
shift lever into 1st. gear
( manual t ransmi s
s ion )<=:> .&,. .
• Switch off the eng ine and remove the igni-
t ion key from the ignit ion lock.
What else you shou ld do when p ark ing
your vehicl e on an incline or decline
Turn the stee ring wheel so that if the vehicle
should start to ro ll, it will roll into the curb.
If you are parking on a
decl ine (the front of
your ve hicle facing downhill), turn the front
wheels to the right so that they point
toward
the curb .
If you are parking on an incline (the font of
your ve hicle facing up hill), turn the front
wheels to the left so that they po int
away
from the curb.
Move the selector lever into the P pos ition
( automatic transmiss ion ) or move the gear
sh ift lever into 1st . gear
(manua l tran smis
sion) .
A WARNING
This is how yo u can red uce the risk of i n
jury whe n leaving your veh icle.
- N ever park the v ehicle whe re it can come
in co ntac t wi th dry grass, sp illed f uel or
any ot her flammable m ater ials.
-
- Never a llow anyone -espec ially sma ll
children -to remain in the veh icle when
it is locked. Locked doors make it more
difficult for rescue rs to access t he pas
senger compartment in t he event of an
emergency . Danger to life!
- Never leave children unsuperv ised in the
veh icle. Children could release t he pa rk
i n g b rake or move the gearsh ift leve r out
of gear. The vehicle cou ld start to ro ll
a way an d ca use an acc ident.
- No matte r what the season is, the tem
pe rat ure in a par ked veh icle can reach
d angerous leve ls .
Starting on hills
App lies to vehicles : wi th hill ho ld assist
Hill hold assist makes it easier to start on
hills .
Requirement: The dr iver's door m ust be
cl osed, the seat bel t m ust be buckled and the
engine m ust be running.
The system is activated w hen the brake peda l
is dep ressed
for a few se cond s.
After releasing the brake pedal, the brake
power is held for a
brief moment to p revent
the ve hicl e from rolling back when starting. At
t hi s time, you ca n easi ly beg in to move your
vehicle.
A WARNING
= -
- If you di d no t begin moving immed iate ly
after releasing the brake pedal , under
certain ci rcumstances, the vehicle would
begin to ro ll backward. Depress the
brake peda l immediately or engage the
hand brake.
- Sh ould the engine sta ll, depress the
brake peda l immediately or engage the
hand brake .
- In order to prevent the vehicle from roll
i n g back unintentionally when starting in
stop-and-go traffic, keep the brake pedal
depressed fo r a few seconds before driv-
ing off.
Ii),
Page 100 of 280
98 Transmission
The selector lever lock is released as fo llows:
,. Switch the ign ition on.
,. Step on the brake peda l
and simult aneously
ho ld down the re le ase but ton .
(~ Automatic selector lev er lock
The selector lever is locked in the P and N po
sitions when the ignition is on . To move the
l eve r from these positions the d river must de
p ress the brake pedal. As a reminde r to the
d river, the fo llow ing warning appea rs in t he
instr ument cluster d isp lay when the selecto r
is in P and N :
APPLY BRAKE WHEN ENGAGING GEAR WITH
VEHICLE STATIONARY
I n addition, the symbo l
<
gate.
The selector lever lock is effective only whe n
the vehicl e is stationary and at speeds be low
S km/ h. At higher speeds, the lock i n the N
position is automatic ally swi tched off .
The selector lever is no t locked when rapid
shifts a re made thro ugh the N pos ition (e .g .
from R to D). Thi s allows yo u to "rock " the ve
h icle if i t becomes s tuc k.
If the lever is in the
N pos it ion for mo re tha n 1 second w ith the
b rake peda l not depressed, the se lector lock
e ngages automatica lly.
Release button
The release button in the se lector lever ha n
d le preven ts accident al sh ifts in to cer tain se
lector lever posit ions. When you press the re
lease butto n, the selector lever lock is cancel
led . In the illustration, the pos itions in which
the release button has to be pressed are high
lighted in
color c:>fig.110.
Ignition key removal lock
The ignition key can on ly be remove after the
ignitio n is switched off if the selector lever is
in P. As long as the ignit ion key is removed,
the selecto r lever is locked in P.
(D Tips
If the se lector lever does not engage,
the re is a ma lfunction . The engine is disa-
b led to prevent the vehicle from driving off
u nintentionally. To allow t he se lector lever
to engage aga in, p roceed as follows: P ress
and release the b rake pedal.
Driving Notes
Applies to vehicles: wit h S tronic®
The forward gears are shifted up or down au
tomatically .
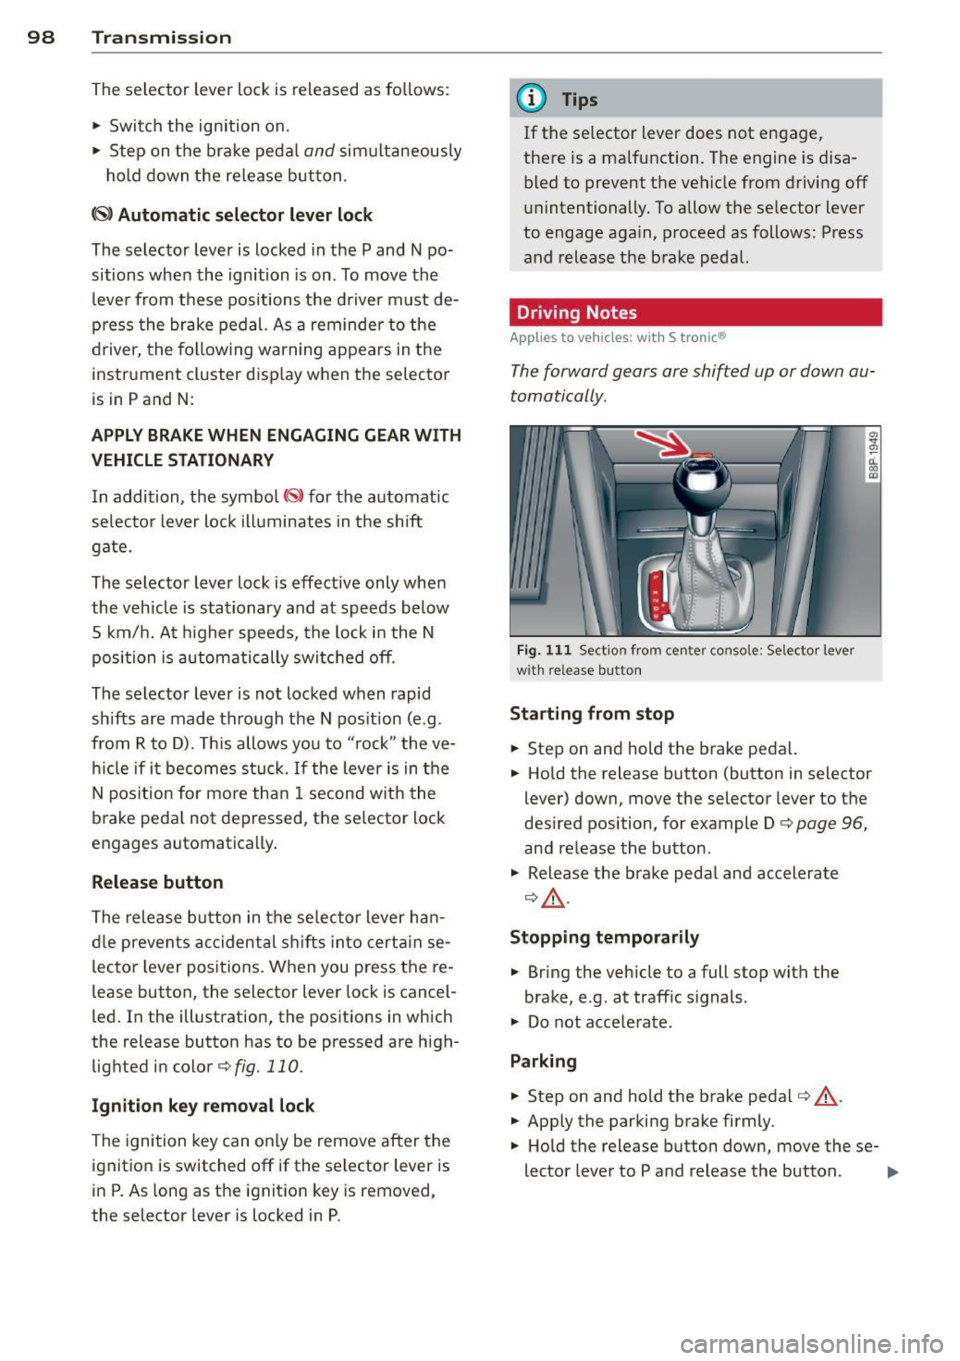
Fig. 11 1 Sect io n from center co nso le: Se lecto r lever
w it h re lease butto n
Starting from stop
.. Step on and hold the brake peda l.
,. Hold the release button (button in selector
lever) down, move the selector lever to the
desired position , for example D
c:> page 96,
and release the button .
,. Release the brake p eda l and accelera te
c:> &_ .
Stopping temporarily
.,. Bring the veh icle to a full stop with the
brake, e .g. at traff ic signals .
,. Do not acce le rate.
Parking
,. Step on and hold the brake peda l c:> &_.
,. App ly the par king brake firmly .
,. Hold the release button down , move these-
lector leve r to P and release the button . .,.
Page 118 of 280
116 Safety belts
Important safety instructions about
safety belts
Safety belts must always be correctly posi
tioned across the strongest bones of your
body.
,.. Always wear safety belts as illustrated and
described in this chapter.
,.. Make sure that your safety belts are always
ready for use and are not damaged.
A WARNING
Not wearing safety belts or wearing them
improperly increases the risk of serious
personal injury and death. Safety belts can
work only when used correctly .
- Always fasten your safety belts correctly
before driving off and make sure all pas
sengers are correctly restrained.
- For maximum protection, safety belts must always be positioned properly on
the body .
- Never strap more than one person , in
cluding small children, into any belt.
- Never place a safety belt over a child sit ting on your lap.
- Always keep feet in the footwell in front
of the seat while the vehicle is being driv
en .
- Never let any person ride with their feet on the instrument panel or sticking out
the window or on the seat.
- Never remove a safety belt while the ve
hicle is moving. Doing so will increase
your risk of be ing injured or killed.
- Never wear belts twisted.
- Never wear belts over rigid or breakable
objects in or on your clothing, such as
eye glasses, pens, keys, etc., as these
may cause injury.
- Never allow safety belts to become dam
aged by being caught in door or seat
hardware .
- Do not wear the shoulder pa rt of the belt
under your arm or otherwise out of pos i
tion . -
Several layers of heavy clothing may in
terfere with correct positioning of belts
and reduce the overall effectiveness of
the system .
- Always keep belt buckles free of anything
that may prevent the buckle from latch
ing securely .
- Never use comfort clips or devices that
create slack in the shoulder belt . Howev
er, special clips may be required for the
proper use of some child restraint sys
tems .
- Torn or frayed safety belts can tear, and
damaged belt hardware can break in an
accident. Inspect belts regularly .
If web
bing, bindings, buck les, or retractors are
damaged, have belts replaced by an au
thorized Audi dealer or qualified work
shop.
- Safety belts that have been worn and
loaded in an accident must be replaced
with the correct replacement safety belt
by an authorized Audi dealer . Replace
ment may be necessary even if damage
cannot be clearly seen . Anchorages that
were loaded must also be inspected.
- Never remove, modify, disassemble, or
try to repair the safety belts yourself.
- Always keep the belts clean. Dirty belts
may not work properly and can impair
the function of the inert ia reel
c:> page 187, Safety belts .
Safety belts
Fastening safety belts
Seat first -everybody buckle up!
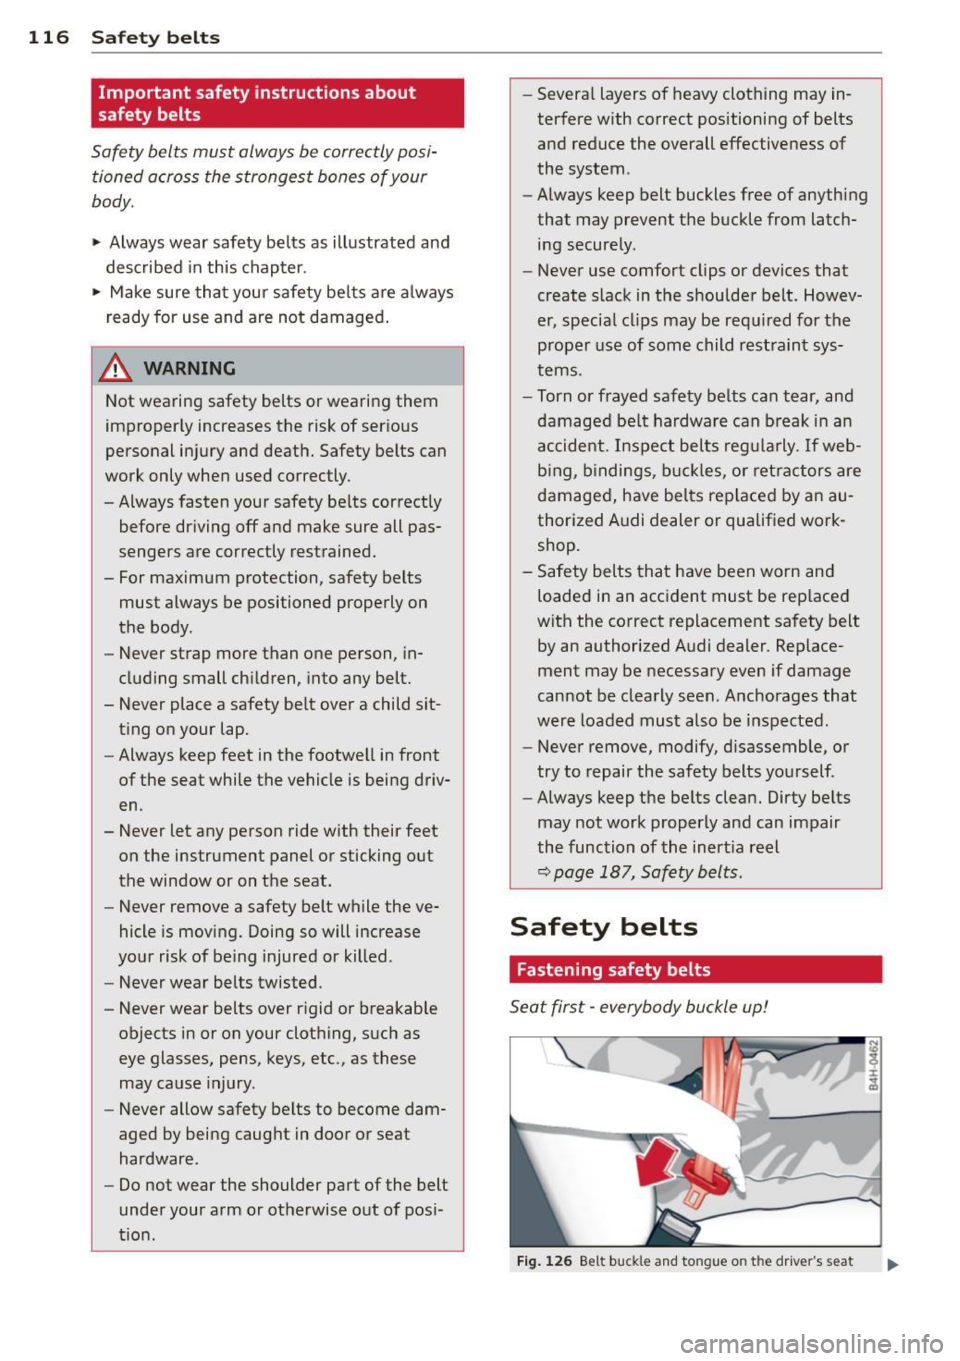
Fig. 126 B elt buck le and to ngue o n th e drive r's sea t
Page 119 of 280
To provide maximum protection, safety belts
must always be positioned correctly on the
wearer's body .
... Adjust the front seat and head restra int
properly
c::> page 61, General recommenda
tions .
... Make sure the seatback of the rear seat
bench is in an upright position and securely
latched in place before using the belt
c::> ,&. .
... Hold the be lt by the tongue and pull it
evenly across the chest and pelvis
c::> ,&..
... Insert the tongue into the correct buckle of
your seat until you hea r it latch securely
c::> fig. 126.
... Pull on t he be lt to make sure that it is se-
curely latched in the buckle.
Automatic safety belt retractors
Every safety belt is equipped w ith an automat
i c belt retractor on the shoulder be lt. This fea
ture locks the be lt when the belt is pulled out
fast, dur ing hard braking and in an accident.
The belt may also lock when you drive up or
down a steep hill or through a sharp curve.
During normal driving the belt lets you move
freely.
Safety belt pretensioners
The safety belts are equipped with a belt pre
tensioner that helps to tighten the safety belt
and remove slack when the pretensioner is ac
tivated. The funct ion of the pretensioner is
monitored by a warning light
c::> page 16.
Sw itchable locking feature
E very safety belt except the one on the driver
seat is equipped with a switchable locking fea
ture that
must be used when the safety belt is
used to attach a child safety seat. Be sure to read the important information about this
feature
c::> page 152.
A WARNING
Imprope rly positioned safety belts can
cause serious injury in an accident
o::> page 117, Safety belt position.
-Safety belts offer optimum protect ion
only when the seatback is upright and
Safety belts 11 7
belts are properly positioned on the
body.
- Always make sure that the rear seat
backrest to which the center rear safety
be lt is attached is securely latched when
ever the rear center safety belt is being
used. If the backrest is not securely latched, the passenger w ill move for
ward with the backrest during sudden
braking, in a sudden maneuver and espe
cially in a crash .
- Never attach th e safety belt to the buck
le for another seat . Atta ching the belt to
the wrong buckle will reduce safety be lt
effectiveness and can cause ser ious per
sonal injury.
- A passenger who is not proper ly restrain
ed can be seriously injured by the safety
be lt itself when it moves from the stron
ger parts of the body into critical areas
like the abdomen.
- Always lock the convertible locking re
tractor when you are securing a child safety seat in the vehicle
c::> page 154.
Safety belt position
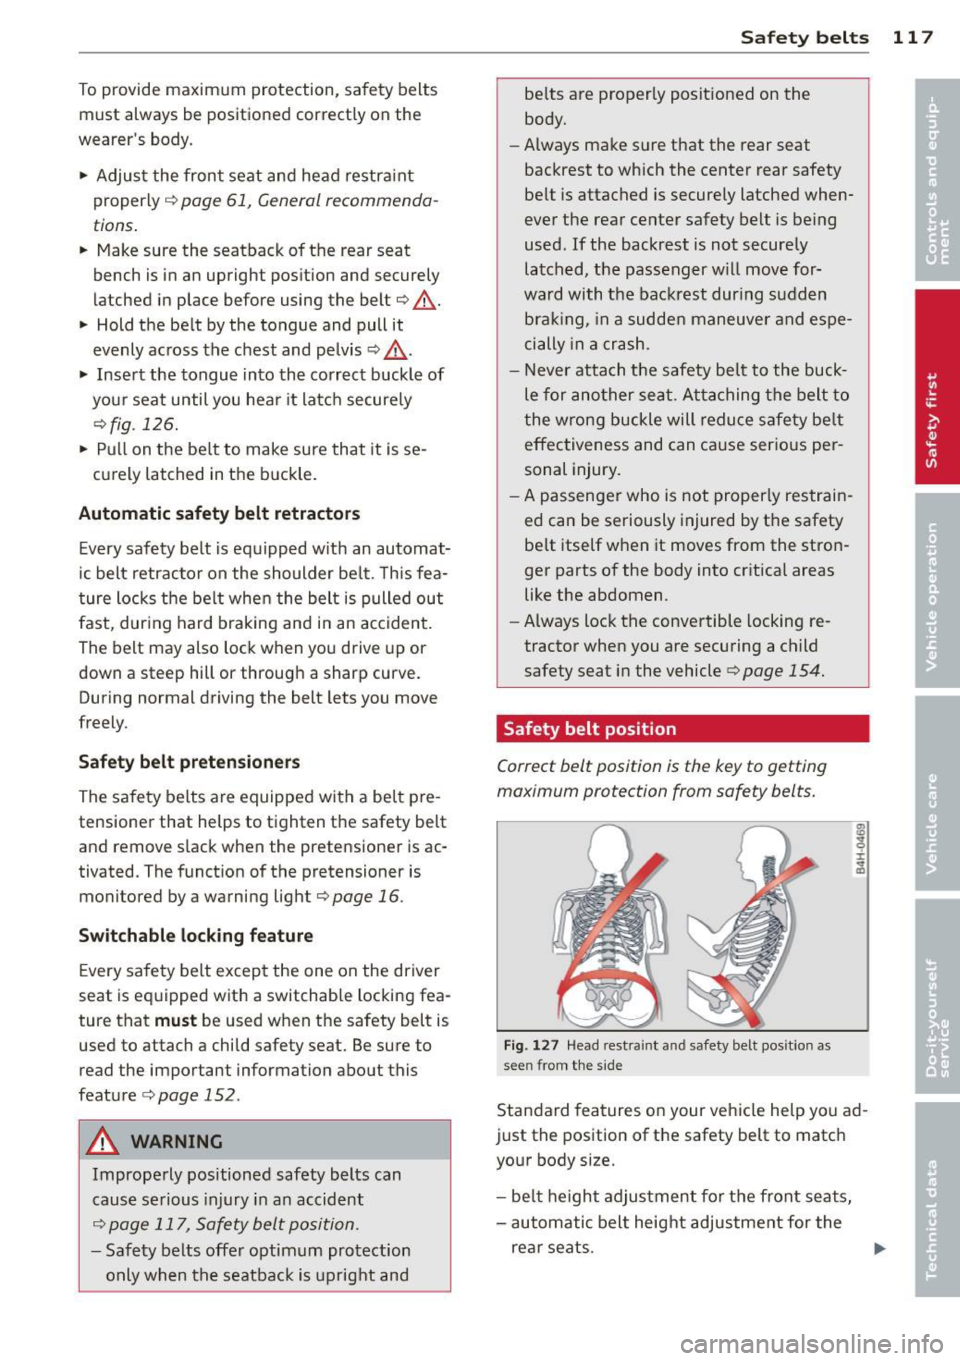
Correct belt position is the key to getting
maximum protection from safety belts.
Fig . 1 27 Head restra int and safety belt pos it ion as
see n from the s ide
ill
q :r ... CD
Standard features on your vehicle he lp you ad
just the position of the safety belt to match
your body size.
- be lt h eight adjustment for the front seats,
- automatic belt height adjustment for the
rear seats .
Page 169 of 280

Energy management
Starting ability is optimized
Energy management controls the distribution
of electrical energy and thus optimizes the
availability of electrical energy for starting the engine .
If a vehicle with a conventional energy system
is not driven for a long period of time , the bat
tery is discharged by idling current consumers
(e.g. immobilizer). In ce rtain c ircumstances it
can result in there being insuff icient ene rgy
avai lab le to start the engine .
Intell igent energy management in your vehi
cle hand les the d istribution of electrical ener
gy. Starting ab il ity is markedly improved and
the life of the battery is extended.
Basically, energy management consists of
batt ery di agno sis, idlin g current man ag e
m ent
and dyn ami c en ergy m anage ment .
Batter y diagnosis
Battery diagnosis continuously determines
the state of the battery . Sensors determ ine
battery vo ltage, battery current and battery
temperature. This dete rm ines the current
state of charge and the powe r of the battery.
Idling curr ent man agement
Idling current management reduces ene rgy
consumption while the vehicle is stand ing .
W ith the ignition switched off, it cont ro ls the
energy supply to the va rious electr ical compo
nents . Data from battery diagnosis is consid
ered.
Depending on the battery's state of charge,
i nd ividua l consumers are gradual ly t urned off
to prevent excess ive d ischarge of the bat tery
and thus maintain starting capability .
Dynamic en ergy management
While the vehicle is being driven, dynamic en
e rgy management dist ributes the energy gen
e rated according to the needs of the individu
a l components.
It reg ulates cons umption, so
that more electrical energy is not being used
Int ellig ent technolog y 167
than is being generated and ensures an opti
mal state of charge for the battery.
(0 Tips
- But even energy management canno t
negate the limits of physics . Consider
that the power and life of a battery are
limited .
- If starting ability is threatened, you are
informed by a warning
r:!) page 168,
Driver notification in the instrument
cluster display.
What you should know
The highest priority is given to maintaining
starting capability.
The battery is severe ly taxed in short -distance
driving, in city traffic and during the cold time
of year. Abundant electrical energy is re quired, but only a little is generated .
It is also
critical if the engine is not running and electri
cal components are turned on . In this in
stance energy is be ing consumed but none is
being generated.
It is in precisely these situations that you will
notice energy management actively regulat
ing the d istribution of energy .
Vehicle stands for an e xtended peri od
If you do not drive your vehicle over a period
of several days or weeks, e lectr ical compo
nents are gradually cut back or switched off.
This reduces energy consumption and ma in
ta ins start ing capability over a longer period .
Take into considerat ion that when you unlock
your vehicle, some convenience functions, such as the remote key or power seat adjust
ment, may not be available . The conven ience
funct ions w ill be available again when you
tu rn on the ignition and start the engine .
With the engine turned off
If you listen to the radio, for example, w ith
the engine turned off, the battery is being d is-
charged.
~
•
•
Page 189 of 280
(D Note
- Never use chemical solvents (e.g . lighter
flu id, turpentine), waxes, shoe polish or
s imilar products on Alcantara ® surfaces.
- To avoid damage, have stubborn stains
removed by a commercia l cleaning spe
cialist.
- Do not use brushes, stiff sponges or sim
ilarly abrasive cleaning aids.
Safety belts
Only well-maintained safety belts work relia
bly when needed.
.. Keep belts clean .
.. For cleaning, use a mi ld soap and water sol
ution . Let be lts dry thoroughly and away
from direct sunlight.
.,. Do not allow inertia reel safety belts to re
tract before they are completely dry.
.,. Check the condition of your safety belts
reg
ularly .
Heavily soiled safety belts may not retract
properly .
A WARNING
Damaged safety belts can break in a crash.
- Anything that might damage your safety
belts could mean that you and your pas
sengers wou ld not be adequately pro
tected in an acc ident.
- Safety belt performance depends on cor
rect installation. Never remove belts
from the vehicle to clean them.
- Do not use chemical cleaning agents,
bleach o r dyes. They have corros ive prop
erties whi ch weaken the webbing.
- When cleaning your safety belts, inspect
them for damage.
If you discover dam
age, see your a uthorized Audi dea ler.
- Always read and heed all WARN INGS and
other information
Q page 178.
l ) Use o nly the correct cleaning sol utions. Neve r use gas
oline or d iese l fuel.
Cleaning and protec tion
Engine compartment
Be especially careful when cleaning the en
gine compartment.
A lw ays switch o ff the ign it ion before cle an
i ng the eng ine
c> ,& .
Plenum pan el
Remove leaves from the plenum panel in front
of the windshield under the engine hood. This
prevents the water drain holes from becoming
blocked, and it prevents debris from enter ing
the vehicle interior through the heating and
vent ilat ion ducts.
Co rro sio n protect ion
The engine compartment and transmission
have been corrosion-protected at the factory.
Good anti -corrosion treatment is very impor
tant, partic ularly in the winter.
If the vehicle
is frequently driven on salt treated roads, the
entire engine compartment and p lenum panel
should be thoroughly cleaned at the end of
winter and retreated to prevent salt damage.
At the same time, the underside of the vehicle
shou ld be washed as well.
If the engine compartment is cleaned at any
time with grease remov ing solutions
1> , or if
you have the engine washed, the anti-corro
s ion treatment is almost always removed as
well.
It i s therefo re essentia l to have a long
lasti ng cor rosion pro tect ion reapplied to all
surfaces, seams, joints and components in the
engine compartment .
A WARNING
Be aware: The engine compartment of any
motor vehicle is a potentially hazardous
area.
- Before work ing in the engine compart
ment, be sure to read the information
c>page 194.
- Before reaching into the front plenum
panel, a lways remove the ignit ion key.
187
•
•
Page 196 of 280
194 Checking and filling
Checking and filling
Engine hood
Releasing the engine hood
The engine hood is released from inside the
vehicle .
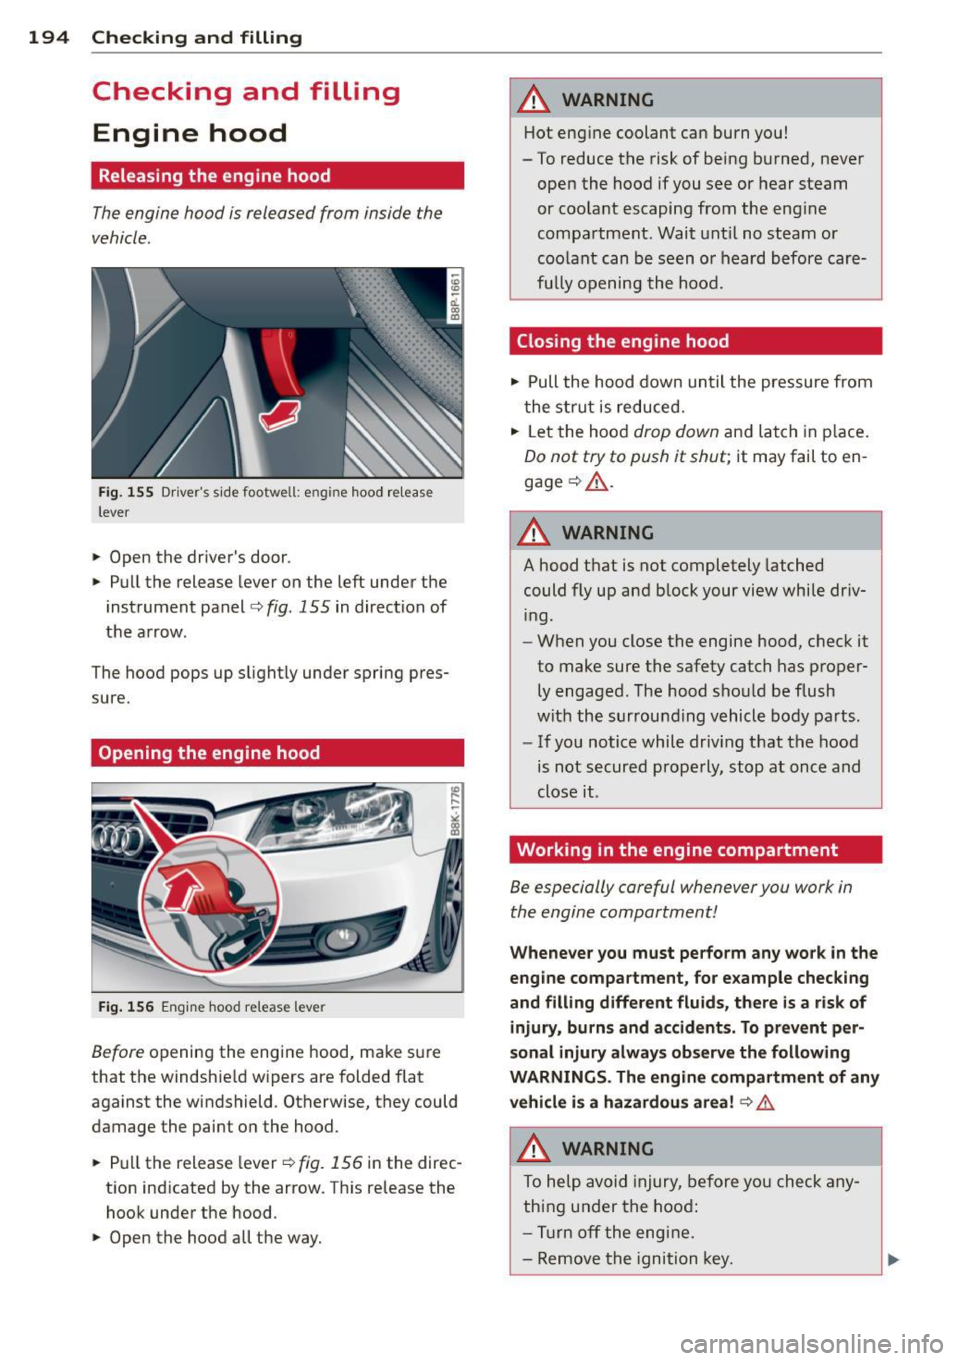
Fig. 155 Driver' s side footwe ll: e ngin e hood release
lever
.. Open the driver's door.
.. Pull the release lever on the left under the
instrument panel
c> fig . 155 in direction of
the a rrow .
The hood pops up slight ly under spring pres
sure.
Opening the engine hood
Fig . 156 Engine hood releas e le ve r
Before opening the eng ine hood, make sure
that the windshie ld wipers are folded flat
against the windshield . Otherwise, they could
damage the paint on the hood.
.. Pull the release lever
r=;,fig . 156 in the direc
tion indicated by the arrow . This release the
hook under the hood .
.. Open the hood all the way.
A WARNING
-Hot engine coolant can burn you!
- To reduce the risk of being burned, never
open the hood if you see or hear steam
or coo lant escaping from the eng ine
compartment . Wait unt il no steam or
coolant can be seen or heard before care
fu lly opening the hood.
Closing the engine hood
.. Pull the hood down until the pressure from
the strut is reduced .
.. Let the hood
drop down and latch in p lace.
Do not try to push it shut; it may fail to en
gage
c> .&, .
A WARNING
--
A hood that is not completely latched
could fly up and b lock your view while dr iv
i ng.
- When you close the engine hood, check it
to make sure the safety catch has properly engaged . The hood shou ld be flush
with the surrounding vehicle body parts.
- If you notice while dr iv ing that the hood
is not secured properly, stop at once and
close it .
Working in the engine compartment
Be especially careful whenever you work in
the engine compartment!
Whene ve r you must pe rform any wo rk in the
eng ine compartment, for e xample chec king
and filling differ ent fluid s, the re i s a risk of
injury , burns and accident s. T o pr event p er
s onal injury alwa ys observe the foll owing
WARNING S. Th e engin e c ompartm ent of an y
v e hicl e is a hazardou s area!
r=;, .&.
A WARNING
To help avoid injury, before yo u check any
thing under the hood:
- Turn off the engine .
- Remove the ignition key.
Page 209 of 280
@ For the sake of the environment
Because of the problem of proper disposal
of brake fluid as we ll as the special tools
req uired and the necessary expert ise, we
recommend that you have the brake fluid
changed by your author ized Audi dealer.
Battery
General information
All work on the battery requires technical
knowledge!
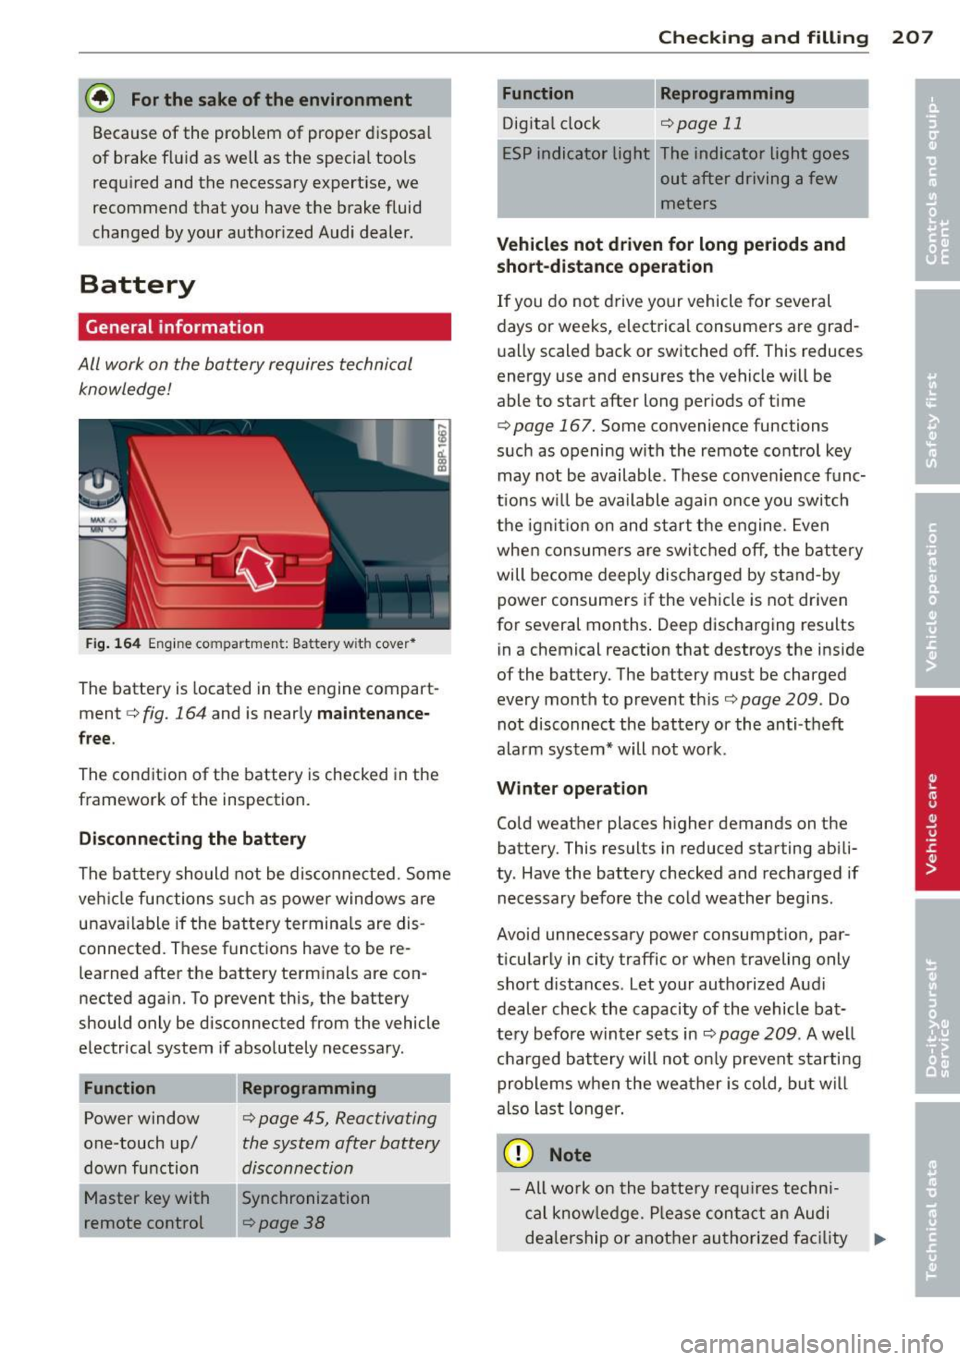
F ig . 1 64 Eng ine co mpa rtment: Batte ry w it h cover*
The battery is located in the engine compart
ment
c::> fig. 164 and is near ly m ain te nance
fre e.
The condition of the battery is checked in the
framework of the inspection.
Disconnecting the battery
The batte ry should not be disconnected. Some
ve hicl e functions such as power windows are
unavailable if the battery termina ls are dis
connected. These funct ions have to be re
l earned after the battery term inals are con
nected aga in. To prevent this, the battery
should only be disconnected from the vehicle
electrical system if absolutely necessary .
Function
Power window
one-touch up/
down function
Master key with
remote control
Reprogramming
c::, page 45, Reactivating
the system after battery
disconnection
Synchronization
~page 38
Checkin g and fillin g 207
Reprogramming
Digita l clock c::, page 11
ESP indicator light The indicator ligh t goes
out after driving a few
meters
Vehicl es not driven for long periods and
sho rt -d is tance op eration
If you do no t drive your vehicle for several
days or weeks, electrical consumers are grad
u ally scaled back or switched off . This reduces
energy use and ensures the vehicle will be
able to start after long periods of time
c::, page 167. Some convenience functions
such as opening w it h the remote control key
may not be available. These conve nience func
tions wi ll be available again once you switch
the ignit io n on and sta rt the engine. Even
whe n consume rs a re switched off, the battery
will become deeply discharged by stand -by
power consumers if the vehicle is not driven
for several months . Deep discharging results
in a chemical reaction that destroys the inside
of the battery. The battery must be charged
every month to prevent th is
c::, page 209. Do
not disconnect the battery or the anti-t heft
alarm system* will not work .
Winter operation
Cold weather places higher demands on the
battery. This results in reduced starting abili
ty. Have the battery checked and recharged if
necessary befo re the cold weather begins.
Avoid unnecessary power consumpt ion, par
ticularly in city traffic or when traveling only
short distances . Let your authorized Audi
dealer check the capacity of the vehicle bat
tery before winter sets in
c::, page 209 . A well
c harged bat tery will not o nly prevent s tarti ng
problems when the weather is cold, but will
also last longer .
(D Note
-All wo rk on the batte ry requ ires techn i
cal know le d ge. P lease con ta ct an Audi
dealership or another authorized fa cility
lill>