display AUDI S3 2012 Owner's Manual
[x] Cancel search | Manufacturer: AUDI, Model Year: 2012, Model line: S3, Model: AUDI S3 2012Pages: 280, PDF Size: 70.11 MB
Page 42 of 280
40 Opening and closing
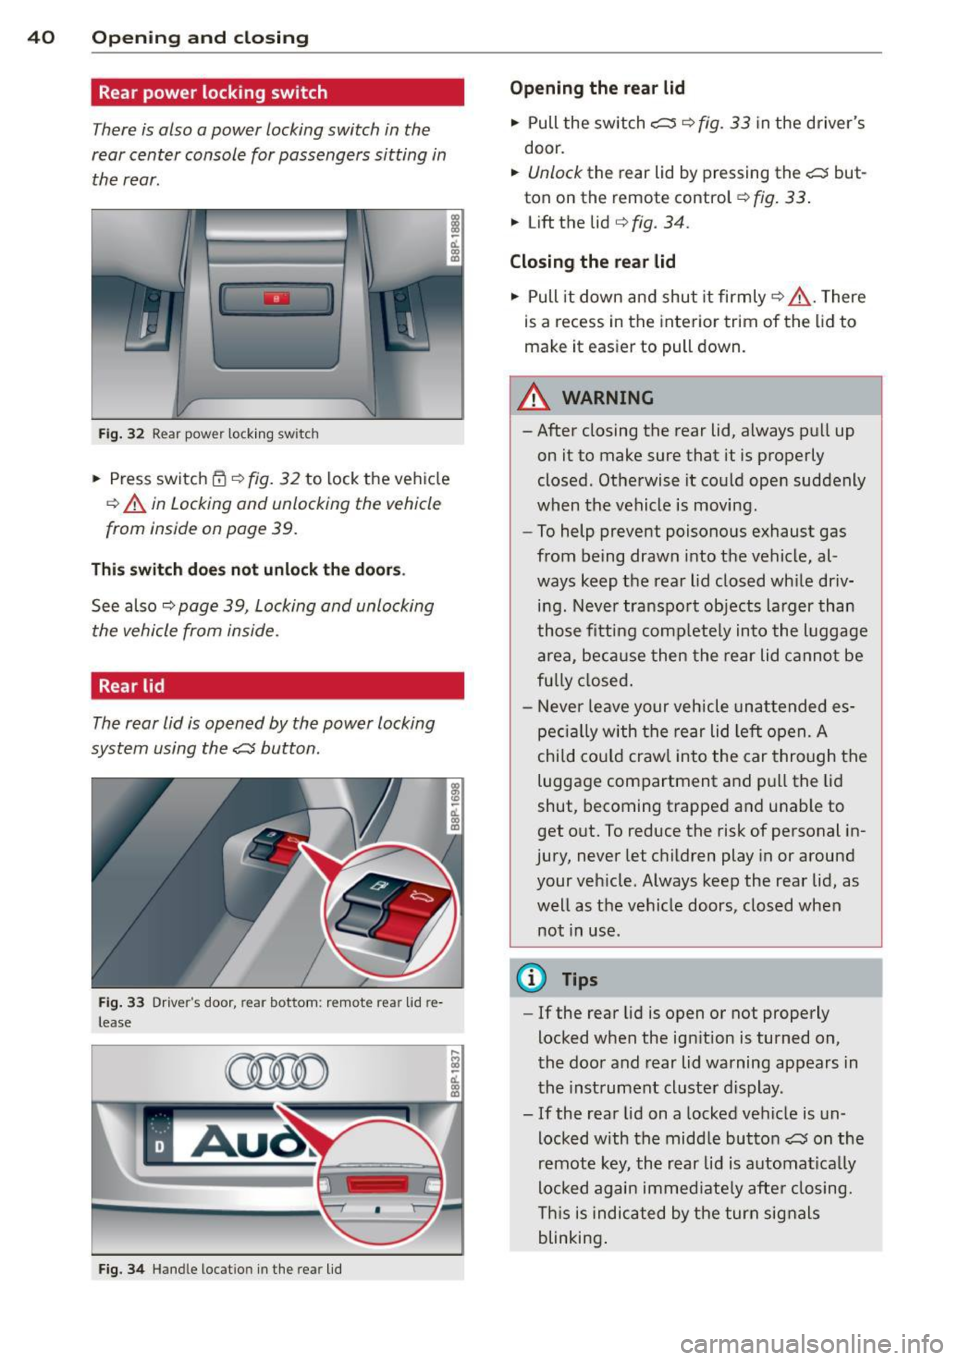
Rear power locking switch
There is also a power locking switch in the
rear center console for passengers sitting in
the rear.
Fig. 32 Rear power locking switch
.. Press switch~¢ fig. 32 to lock the vehicle
¢ A in Locking and unlocking the vehicle
from inside on page 39.
This switch does not unlock the doors.
See also ¢ page 39, Locking and unlocking
the vehicle from inside.
Rear lid
The rear lid is opened by the power locking
system using the
c:J button.
Fig. 33 Driver 's door, rear bottom: remote rear lid re
lease
Fig. 34 Hand le locat ion in the rear lid
,...
!:I -ct. co
.. Pull the switch i;:;:::::::5 ¢ fig. 33 in the driver's
door.
.. Unlock the rear lid by pressing the c:J but-
ton on the remote control
Q fig. 33 .
.. Lift the lid ¢ fig. 34.
Closing the rear lid
.. Pull it down and shut it firmly¢ A . There
is a recess in the interior trim of the lid to
make it easier to pull down.
A WARNING
-
-After closing the rear lid, always pull up
on it to make sure that it is properly
closed. Otherwise it could open suddenly
when the vehicle is moving.
- To help prevent poisonous exhaust gas
from being drawn into the vehicle, al
ways keep the rear lid closed while driv
ing. Never transport objects larger than
those fitting completely into the luggage
area , because then the rear lid cannot be
fully closed.
- Never leave your vehicle unattended es
pecially with the rear lid left open. A
child could crawl into the car through the
luggage compartment and pull the Lid
shut, becoming trapped and unable to
get out. To reduce the risk of personal in
jury, never let children play in or around
your vehicle. Always keep the rear lid, as
well as the vehicle doors, closed when not in use.
(D Tips
-If the rear lid is open or not properly
locked when the ignition is turned on,
the door and rear lid warning appears in
the instrument cluster display.
- If the rear lid on a locked vehicle is un
locked with the middle button
c:J on the
remote key, the rear lid is automatically
locked again immediately after closing.
This is indicated by the turn signals
blinking.
Page 50 of 280

48 Clear vis ion
light sensor checked as soon as possible at a
dea lership.
Com ing home /leaving home function *
The function is switched on when the switch is
i n the AU TO* position and the function is
shown as active in the driver info rmation sys
tem .
The
co ming h om e function illuminates the
a rea around the veh icle when the ign it ion is
switched off and the driver 's door is opened.
The length of time the lights remain on can be set in the menu display
( Illumination > Exte
r io r light s> coming hom e).
The leav ing home function illuminates the
area around the vehicle when unlock ing it.
A WARNING
- Never use dayt ime running lights to see
where you are going. They are not bright
enough and w ill not let you see far
enough ahead for safety, especially at
dusk or when it is dark. Always switch on
the low beams at dusk or when it is dark.
- Automatic headlights are only intended
to assist the dr iver . They do not relieve
the driver of his responsibility to check
the headlights and to tu rn them on man
ually according to the current light and
visibili ty cond itions. Fo r example, fog
and rain cannot be detected by the light
sensors . So a lways switch on the head
lights under these weather cond itions
and when driving in the dark
io.
- Crashes can happen when yo u cannot see
the road ahead and when you cannot be seen by other motorists .
- Always turn on the headlights so that
you can see ahead and so tha t others
can see yo ur car from the bac k.
- With the switch in
AUTO front fog lights
ca nnot be t urned on in addition .
- The light sensor fo r headlight contro l is
l ocated in the rear view m irror mount .
Do no t apply any stickers to the w ind- shield in this area to prevent malfunc
tions or fa ilures.
- Some exter io r light ing funct ions can be
adjusted in the driver informat ion sys
tem
~ page 2 7.
- If you remove the ignition from the igni
tion lock while the headlights are still
on, a buzzer will so und as long as the
dr iver's door is open to rem ind you to
turn off the lights.
- Always observe the specif ic loca l regula
tions for your area as to when to use your
lights.
- With automatic headlights, the high
beam funct ion is also available, but wit h
one restrict ion: If you have not switched
the high beams back to low beams dur
ing automatic headlight operation (fo r
example, after d riving through a tunnel) ,
only the low beams come on the nex t
t ime au tomati c headlights are swi tc h ed
on. To use the high beams, you first have
to pull the high beam lever back and
then push the lever fo rward again.
- In cool or damp weather , the inside of
the headlights, turn signals and tail lights can fog over due to the tempera
ture difference between the inside and
outside. They w ill clear shortly after
switching them on. This does not affect
the se rv ice life of the lighting .
- Frequent use of the coming home/leav
ing home function for app roach ing and
depa rting a vehicle parked in the da rk
w ill strain the battery . Thi s ap plies pa r
tic ular ly if only short distances a re d riven
between stops . Occasionally drive longer
dis tances to make sure the battery is re
charged sufficiently.
Page 51 of 280
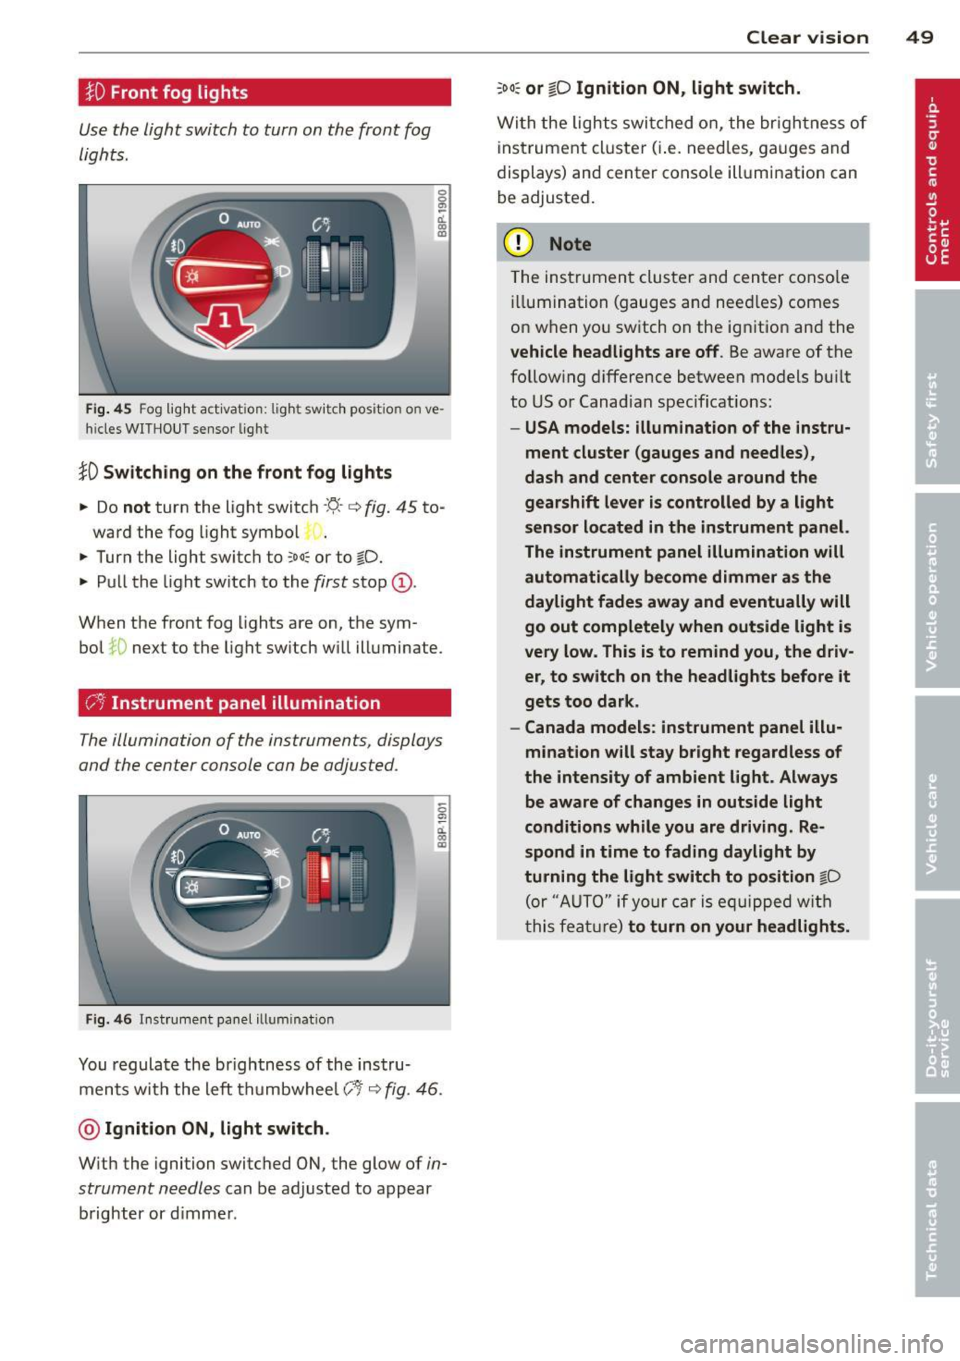
:l:D Front fog lights
Use the light switch to turn on the front fog
lights.
Fig. 45 Fog light act ivat ion: light sw itc h pos it ion o n ve
h icles WITHO UT sensor light
}D Switching on the front fog lights
.. Do not turn the light switch -"t;.. -<=> fig. 45 to-
ward the fog light symbol
.. Turn the light switch to
coo: or to @:D.
.. Pull the light switch to the first stop (D.
When the front fog lights are on, the sym
bol
:iO next to the light switch will illuminate.
C:t:t Instrument panel illumination
The illumination of the instruments, displays
and the center console can be adjusted .
Fig. 46 In st rum ent pa nel illum inat ion
0
"' d. .. m
You regulate the brightness of the instru
ments with the left thumbwhee l
Co/<=> fig. 46 .
@ Ignition ON, light switch.
With the ignition switched ON, the glow of in
strument needles
can be adjusted to appear
brighter or d immer.
Clear vision 49
:oo: or io Ignition ON, light switch.
With the lights swit ched on, the brightness of
instrument cluste r (i.e. needles, gauges and
displays) and center console illumination can
be adjusted.
(D Note
The instrument cluster and center console
ill umination (gauges and need les) comes
on when you switch on the ignition and the
vehicle headlights are off . Be aware of the
follow ing difference between models built
to US or Canadian specifications:
-USA models: illumination of the instru
ment cluster (gauges and needles),
dash and center console around the
gearshift lever is controlled by a light
sensor located in the instrument panel.
The instrument panel illumination will
automatically become dimmer as the
daylight fades away and eventually will
go out completely when outside light is
very low. This is to remind you, the driv
er, to switch on the headlights before it
gets too dark.
- Canada models: instrument panel illu·
mination will stay bright regardless of
the intensity of ambient light. Always be aware of changes in outside light
conditions while you are driving. Re
spond in time to fading daylight by
turning the light switch to position
gD
(or "AUTO " if your car is equipp ed with
th is feature)
to turn on your headlights.
Page 61 of 280
-You cannot activate the service position
when the hood is open.
- The front wiper blades a re different
l engths; the blade on the driver's side is
l onger.
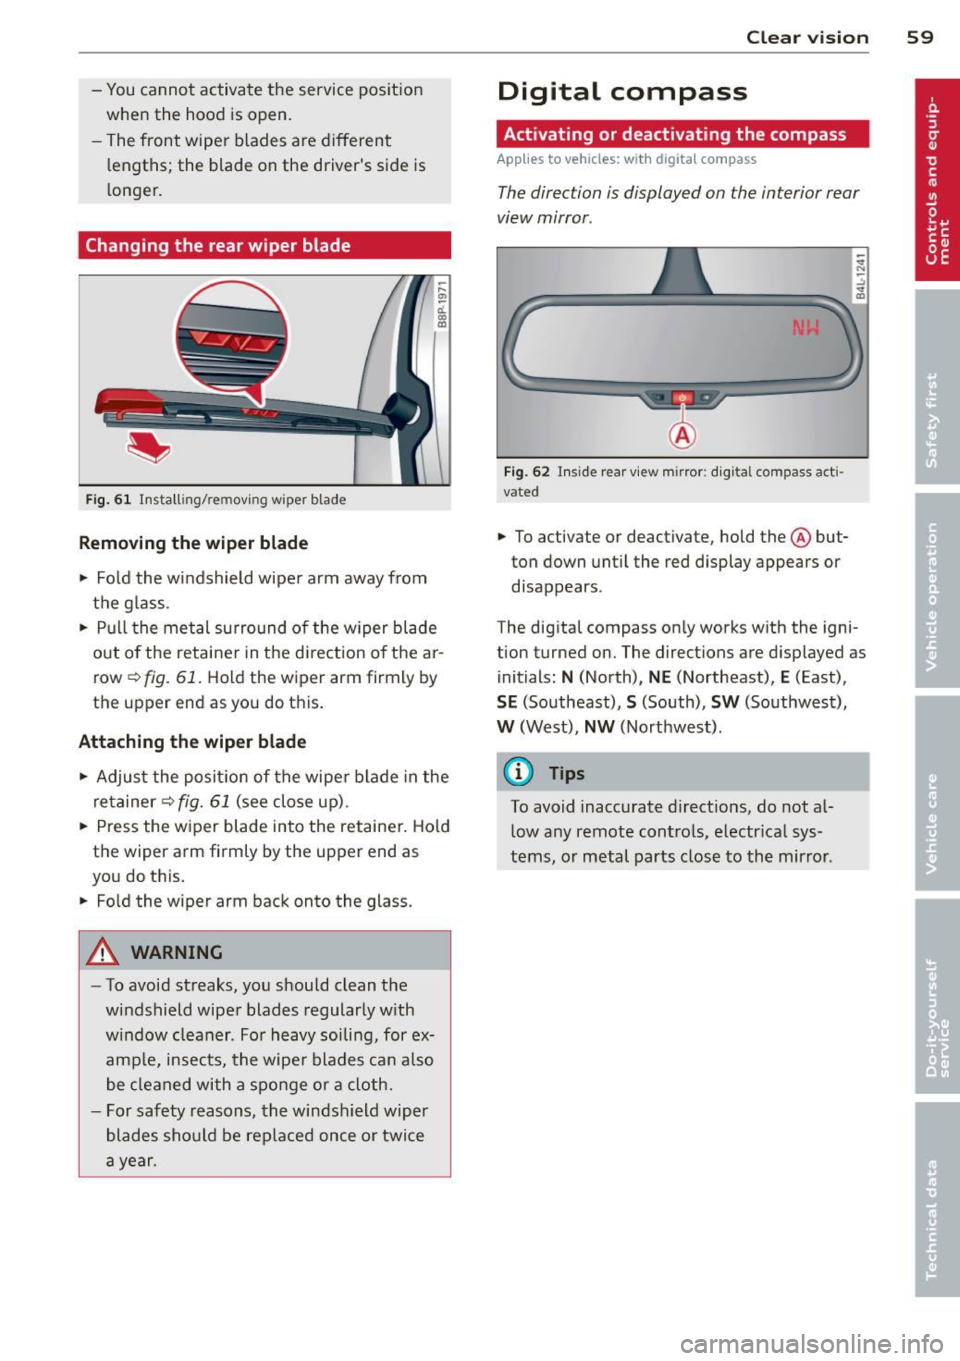
Changing the rear wiper blade
F ig . 6 1 Insta lling/re moving wiper blade
Removing the wiper b lade
.. Fo ld the windshield wipe r arm away from
the g lass .
.. Pull the met al surround of the w iper blade
out o f the retaine r in the d irection o f the ar
row
r=> fig. 61. Hold the wiper arm firmly by
the upper end as you do this.
Attaching the wiper blade
.. Adjus t the posi tion of the wipe r blade in the
retainer
r=> fig. 61 (see close up).
.. Press the w iper blade into the retainer. Hold
t h e wiper arm firmly by the upper end as
you do this .
.. Fo ld the wiper arm back onto the glass.
A WARNING
- To avoid streaks, you should clean the
windshield wiper blades regular ly w ith
w indow cleaner. Fo r heavy soiling, for ex
ample, insects, the wipe r blades can also
be cleaned with a sponge or a cloth.
- For safety reasons, the windsh ield wiper
blades sho uld be replaced once or twice
a year .
Clear vision 59
Digital compass
Activating or deactivating the compass
App lies to vehicles: wi th digi tal co mpass
The direction is displayed on the interior rear
view mirror .
Fig. 62 Inside rear v iew mirror : d ig ita l compass act i
vated
.. To activate or deactivate, hold the@ but
ton down unt il the red display appears or
disappears .
The dig ital compass only works w ith the igni
tion turned on. The directions are displayed as
initials :
N (North), NE (Northeast), E (East),
SE (So utheast), S (South), SW (Southwest),
W (West), NW (Northwest) .
(0 Tips
To avoid inaccurate d irect io ns, do not al
l ow any remote contro ls, electr ica l sys
tems, o r metal parts close to the mir ror.
Page 62 of 280
60 Clear vis ion
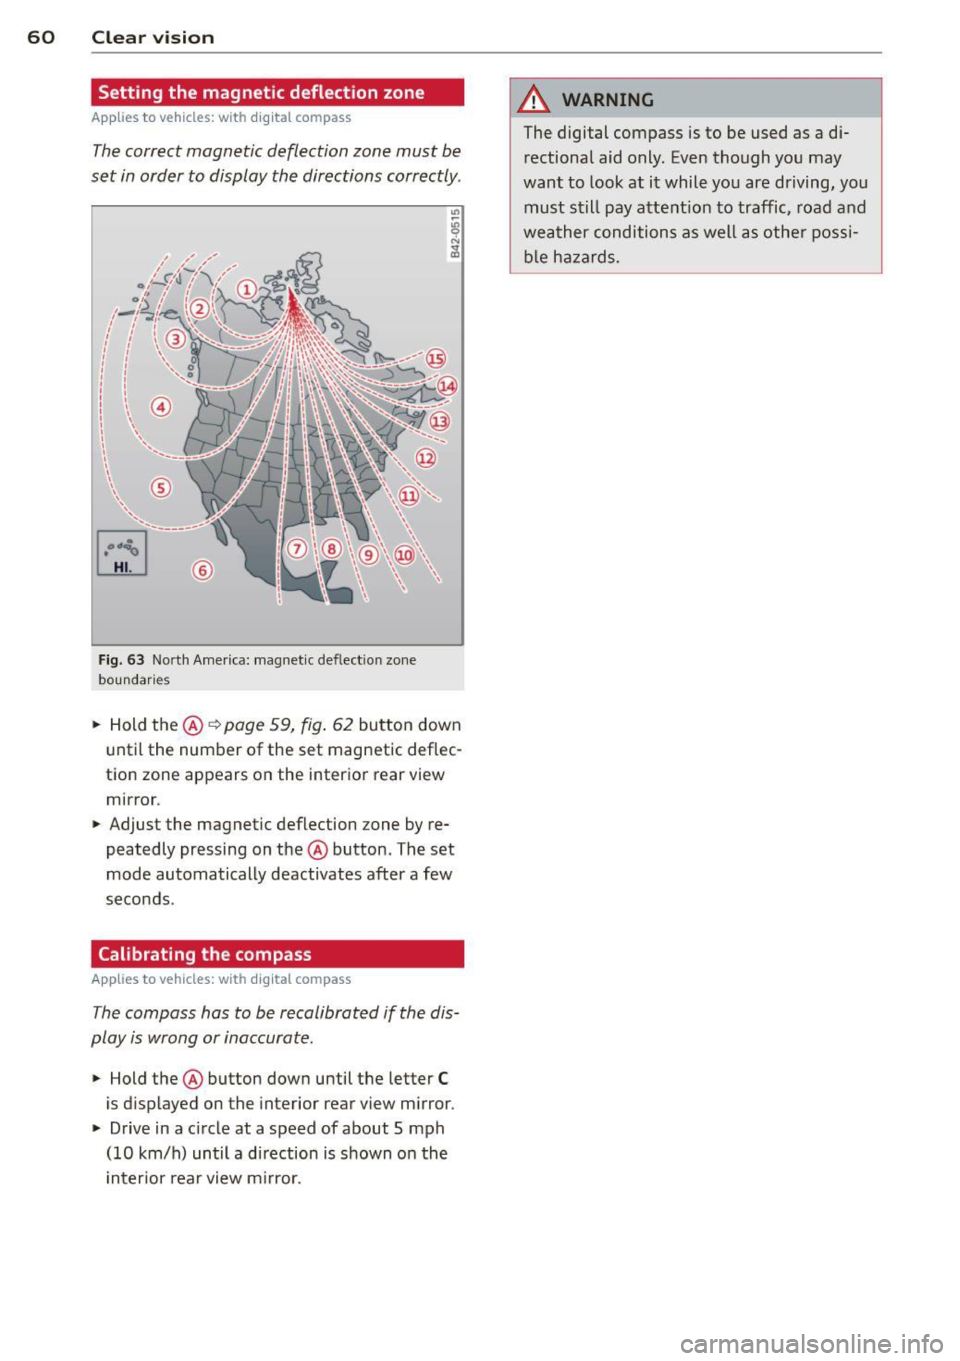
Setting the magnetic deflection zone
A ppl ies to vehicles: with digital compass
The correct magnetic deflection zone must be
set in order to display the directions correctly.
©
Fig. 63 North America: magnet ic def lect ion zone
boundaries
• Hold the@~ page 59, fig. 62 button down
u ntil the number of the set magnetic deflec
tion zone appears on the interior rear view
mirror .
• Adjust the magnetic deflection zone by re
peatedly pressing on the @button. The set
mode automatically deactivates after a few
seconds .
Calibrating the compass
Applies to vehicles: with digital compass
The compass has to be recalibrated if the dis
play is wrong or inaccurate.
• Hold the@ button down until the letter C
is displayed on the interior rear view m irror .
• Drive in a circle at a speed of about 5 mph
(10 km/h) until a d irection is shown on the
i nterior rear view m irror.
A WARNING
-
The digital compass is to be used as a di-
rectional aid only. Even though you may
want to look at it while you are driving, you
must still pay attent ion to traffic, road and
weather conditions as well as othe r possi
b le ha zards.
Page 82 of 280
80 Warm and cold
-Never use the windshield wiper/washer
system in freezing weather until you
have warmed the windshield first, using
the heating and ventilation system. The
washer solution may freeze on the wind
shield and reduce visibility .
(D Note
-If you suspect that the air conditioner
has been damaged, switch off the air
conditioner and contact an authorized
Audi dealer to have the system inspect
ed .
- Repairs to the Audi air conditioner re
quire special technical knowledge and
special tools. Contact an authorized Audi
dealer for assistance.
@ Tips
-Keep the air intake slots (in front of the
windshield) free from ice, snow and de-
Controls
bris in order to maintain the proper func
tion of the climate control system.
- Air escapes through vents under the rear
window. When placing items of clothing on the luggage compartment cover, en
sure that the openings are not covered.
- If the inside temperature is very high
(for example, if the vehicle has been
parked in sun), open the windows and al
low the hot air to escape before turning
on the air conditioner .
- A sensor in the grill provides the air-con
ditioning system continuously with read
ings of current outside temperature . So
that the air-conditioning can operate at maximum efficiency, the area below the
front license plate holder must not be
covered .
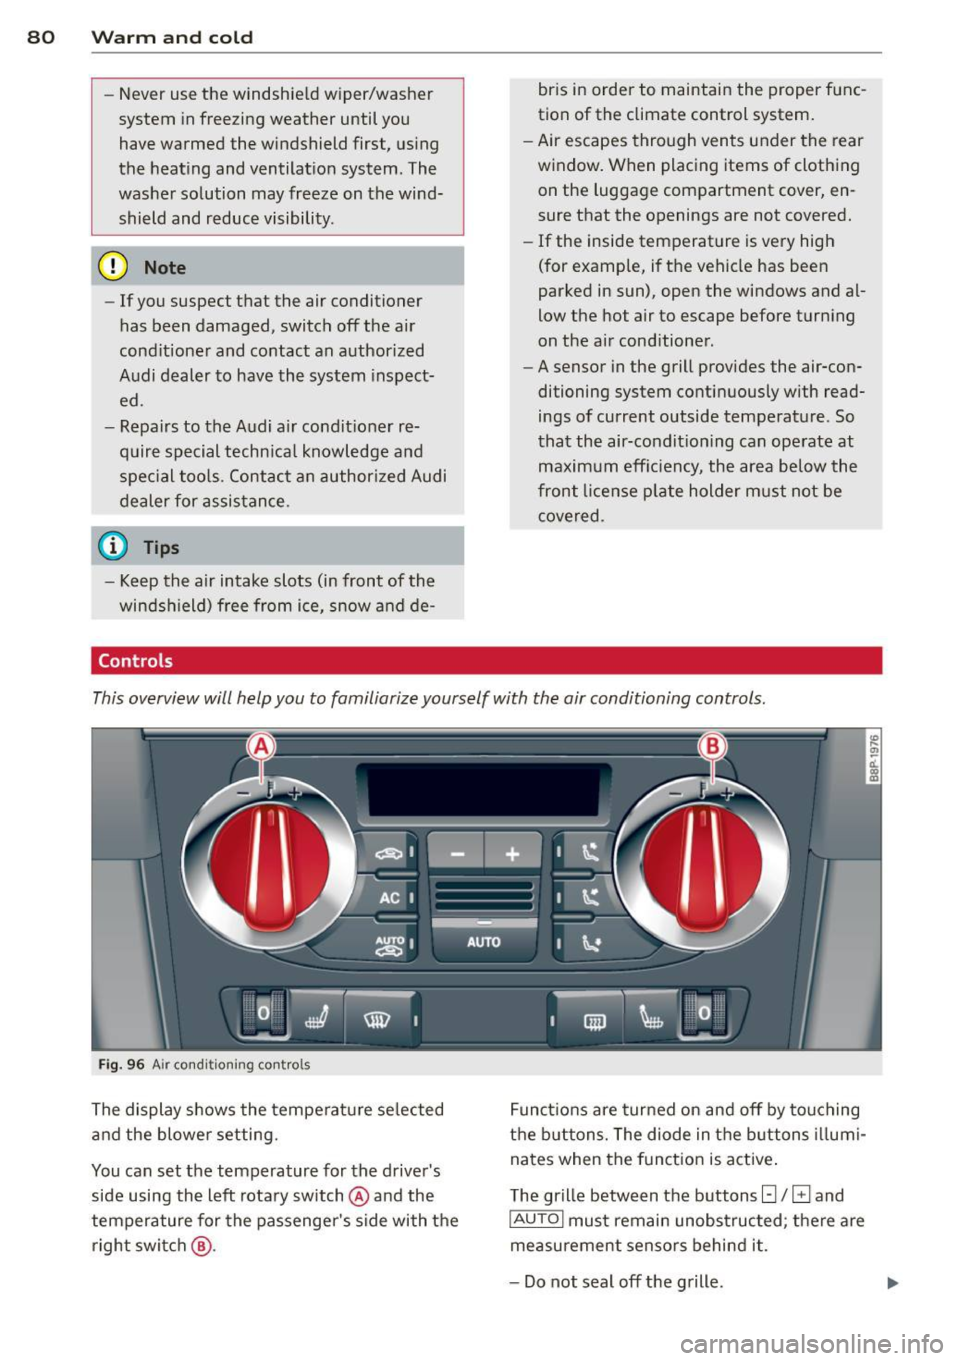
This overview will help you to familiarize yourself with the air conditioning controls.
Fig. 96 Air condi tion ing con tro ls
The display shows the temperature selected
and the blower setting.
You can set the temperature for the driver's
side using the left rotary switch @and the
temperature for the passenger's side with the
right switch @. Functions are
turned on and off by touching
the buttons. The diode in the buttons illumi
nates when the function is active.
The grille between the buttons[:]/
G and
IAUTOI must remain unobstructed; there are
measurement sensors behind it.
- Do not seal off the grille.
Page 83 of 280
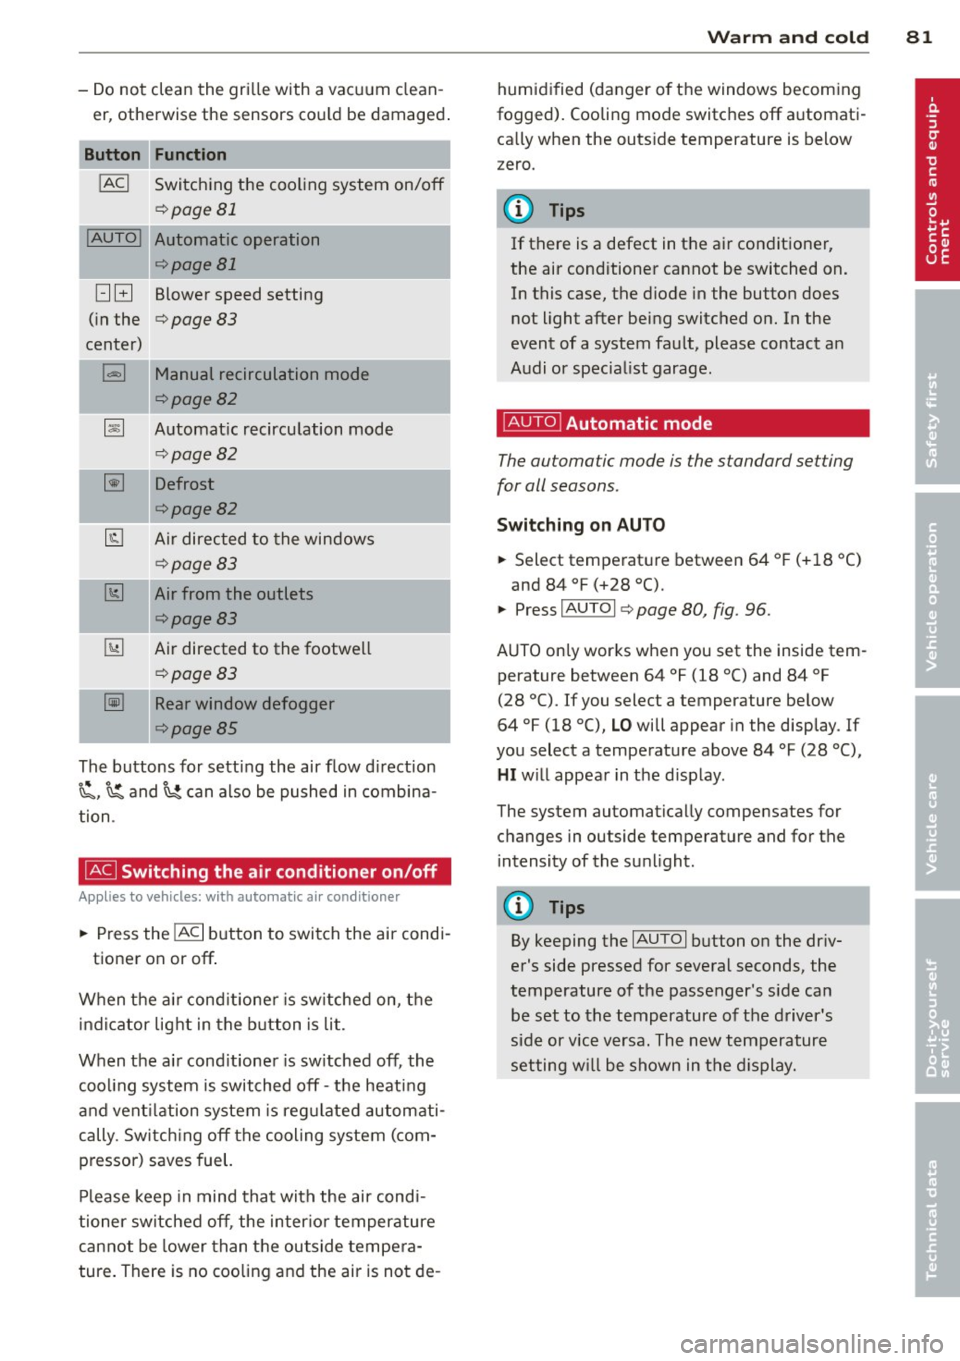
-Do not clean the gri lle with a vacuum clean
er, otherwise the sensors cou ld be damaged .
Function
!ACI Switching the cooling system on/off
q page 81
!AUTO I Automatic operation
qpage 81
[:] B Blower speed setting
( in the
q page 83
center)
l=I Manual recirculation mode
qpage82
~ Automat ic recircu lation mode
q page 82
~ Defrost
qpage82
@J Air directed to the windows
¢page83
[1;] Air from the outlets
qpage83
~ Air directed to the footwe ll
~page83
-= -·--~ Rear window defogger
¢page85
The buttons for sett ing the air flow d irection
~. ~and~ can also be pushed in combina
tion .
~ Switching the air conditioner on/off
Applies to vehicles: with a utomat ic a ir conditioner
... Press the !AC I button to switch the air cond i
tioner on or off .
When the a ir cond it ione r is sw itched on, t he
i ndicator light in the b utton is lit.
When the a ir cond it ioner is sw itched off, the
cooling system is switched off -th e heat ing
an d vent ilation system is reg ulated automati
cally. Sw itch ing off the cooling system ( com
pressor) saves fuel.
Pl ease keep in mind that with the air cond i
tioner switched off , the inter io r temperature
cannot be lower than the outside tempe ra
ture. There is no coo ling and the air is not de -
Warm and cold 81
humid ified (danger o f the windows becom ing
fogged). Cooling mode switches off a utomati
ca lly when the outs ide temperature is below
zero.
(D Tips
If there is a defect in the a ir conditioner,
the air conditioner cannot be switched on. In this case, the d iode in the button does
not light after being switched on. In the
event of a system fault, please contact an
A udi or specia list garage.
~ Automatic mode
The automatic mode is the standard setting
for all seasons .
Switching on AUTO
... Select tempe rat ure between 64 ° F (+ 18 °()
and 84 °F (+28 °C).
... Press
IAUTOI q page 80, fig. 96 .
AUTO on ly works when you set the inside tem
perature between 64 °f (18 °C) and 84 °f
(28 °C). If you select a temperature be low
64 °F (18 °(),
LO will appear in the display . If
you select a temperat ure above 84 °F (28 °C),
HI w ill appea r in t he d isp lay.
The system automatically compensates for changes in outside temperature and for the
i ntensity of the su nlight.
(D Tips
By keeping the IAUTOI button on the dr iv
er's side pressed for several seconds, the
temperature of the passenger's s ide ca n
be set to the temperature o f th e d river's
side or vice v ersa. The new temperature
setting w ill be shown in the d isplay.
Page 85 of 280
The air recirculation opera tes for a maximum
of 12 minutes. If the windows start to fog up
while the air rec irculat ion is on, press~
Unde r certain operating condi tions (fo r exam
p le, if~ or
1-1 are pressed) the air recircu la
tion automatica lly switches off.
If the air con
d itioner is sw itched off, or if the temperature
is below 18 °F (-8 °C), the air recircu lation wi ll
operate only for 12 seconds.
Switching between Fahrenheit and
Centigrade
You can change the temperature display from
°F (Fahrenheit) to °C (Centigrade) and vice
versa.
.,. Hold the l.,s,! button down c:> page 80,
fig.
96.
.,. Turn the rotary switch (d river 's s ide) @ for
3 seconds +.
G;J Air recirculation
The air recirculation prevents exhaust fumes
or oth er pollution from entering the vehicle .
Switching air recirculation on
.,. Press ~ c:> page 80, fig. 96 c:> A
Switching air recirculat ion off
.,. Press~ again, or
.,. press
IAUTOI, or
.,. press~-
I n the ai r recircula tion mode, the air in the
passenger compa rtment is recirculated to
p revent exhaust fumes and ot her pollution
from entering the vehicle. We recommend
that you use the manual air recircu lation un
der the following conditions:
- when d riving through t unnels
- in a traffic jam.
,8. WARNING
Do not use this setting for extended pe ri
ods of time . The windows could fog up
since no fresh a ir can ente r the vehicle . If
Warm and c old 83
the windows fog u p, press the ai r rec ircula
tion button aga in immed iately to sw itch
off the air rec irculation function or select
defrost.
G IB Adjusting the fan speed
The automatically selected fan speed can be
increased or decreased.
.,. Press the[:] or El buttons in the center of
the control panel
c:> page 80, fig. 96 to ad
just the fan speed to your comfort.
T he air conditioning system automatically
r egulates the fa n speed i n respo nse to the in
terior tempe rat ure. However, you can a lso ad
j ust the fan speed ma nually. A line of small
bars in the center display above the fan con
trol buttons w ill re treat or extend to reflect
you r adjustments to the fan speed .
Air distribution
The automatically controlled air distribution
can be changed manually.
You can use the @J , [fil or~ buttons separate
ly or together in combination. To switch back
to the automatic air d istr ibu tion sett ing, ei
the r switch off the b uttons you prev iously se
lected , or press
IAUTOI.
Each of the three buttons has its own spec ific
funct io n (t he reference numbers refer to the
a ir out lets)
c:> page 84, fig. 97.
~ Air directed to the windows
A ll the air is directed to outlets
a ir remains the same .
~ Air directed to the driver /front
passenger
All the a ir is directed to outlets@,@ and ©
in the instrument panel. Air also is directed
th ro ugh the center console in the rear.
~ Air d irected to the footwells
A ll the air is directed to outlets ® and to the
outlets under the front seats.
Page 96 of 280
94 On the road
Cruise control
Switching the system on
The cruise control system makes it possible to
drive at a constant speed starting at 20 mph (30 km/h) .
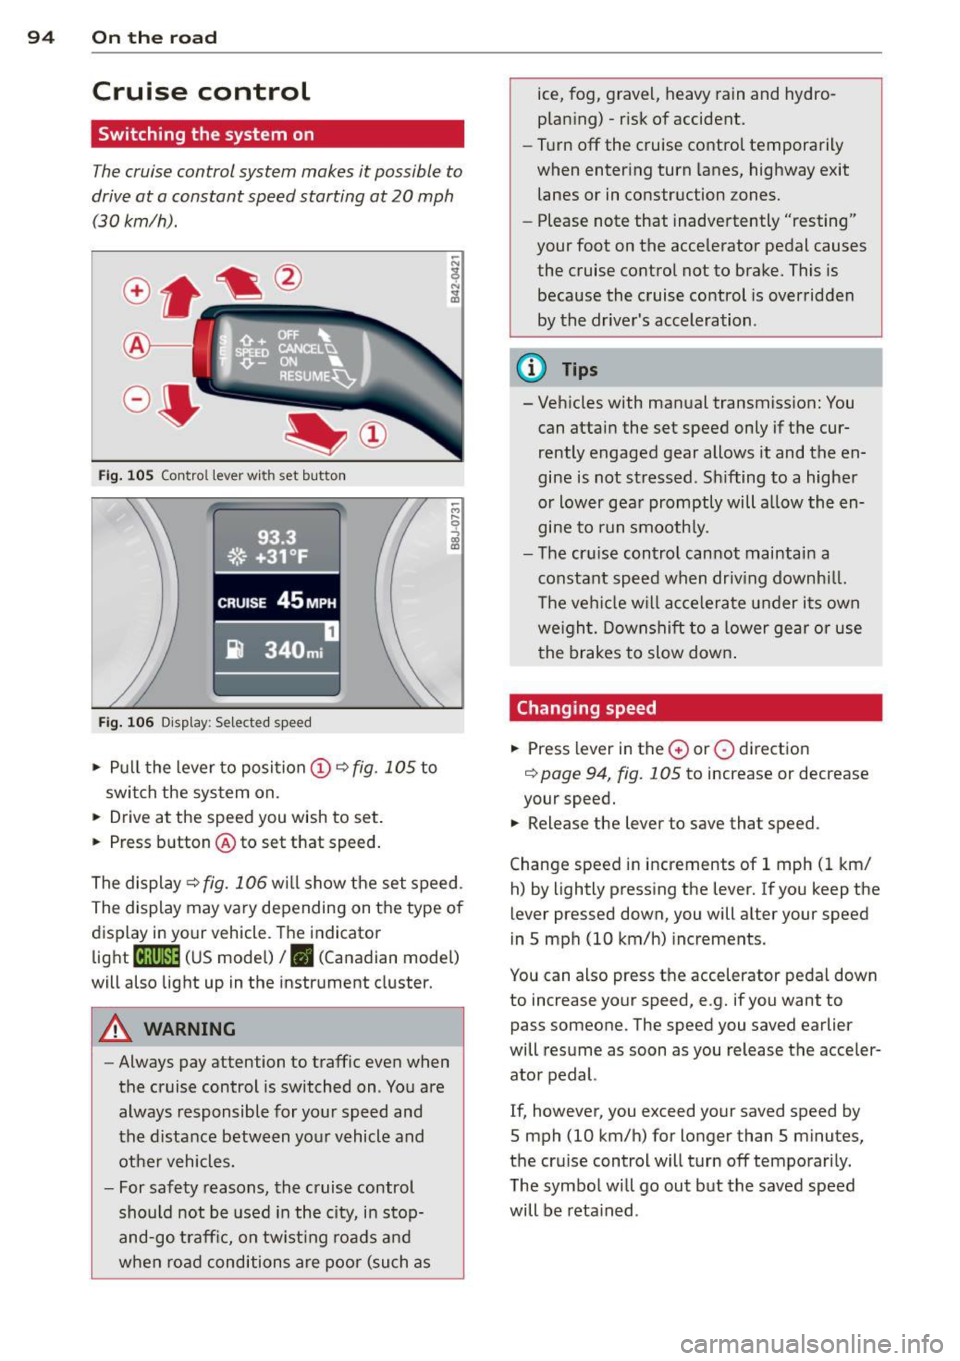
Fig. 105 Control lever wi th set button
Fi g. 106 Disp lay: Se lected speed
• Pull t he lever to posi tion (D ¢ fig . 105 to
switch the sys tem on.
• Drive at the speed you wish to set .
• Press b utton @ to set that speed .
The display
¢fig. 106 will show the set s peed .
The display may v ary depending on t he type o f
display in yo ur vehicle. The indicator
light
[ifj11 )~1~ (US mode l) I. (Canadian mode l)
will also light up in the instrument cluster.
A WARNING
- Always pay attention to traffic even when
the cruise control is switched on . You are
always responsible for your speed and
the distance between yo ur vehicle and
othe r vehicles .
- For safety reasons, the c ruise control
sho uld not be used in the city, in stop
and -go traff ic, on twist ing roads an d
when ro ad conditions are poo r (such as ice,
fog, gravel, heavy rain and hydro
plan ing) -risk of accident.
- Turn off the cruise contro l temporarily
when enter ing turn lanes, highway exit
lanes or in construction zones.
- Please note that inadvertently "resting"
your foot on the accelerator pedal causes
the cruise co ntrol not to brake. This is
because the cruise control is over ridden
by the dr ive r's acceleration.
(D Tips
- Veh icles with man ual transmiss ion: You
can attai n the set speed only if the cur
rently engaged gear allows it and the en
gine is not stressed . Sh ifting to a highe r
o r low er gea r promptly will a llow the en
gine to r un smooth ly.
- The cr uise control can not mainta in a
constant speed when driv ing downhi ll.
T he vehi cle w il l accele rate under i ts own
we ight. Dow nshift to a lower ge ar or use
the brakes to slow down .
Changing speed
• Press lever in the 0 or 0 direct io n
¢ page 94, fig. 105 to increase or decrease
your speed.
• Release the lever to save that speed .
Change speed in increments of 1 mph (1 km/
h) by lightly pressing the lever. I f you keep the
lever pressed down, you will alter your speed
in S mph (10 km/h) increments.
You can also press t he accelerator pedal down
to increase your speed, e.g. if you want to
pass someone. The speed you saved earlier
will resume as soon as you release the acceler
ator pedal.
If, however , you exceed yo ur saved speed by
5 mph (10 km/h) for longer than 5 minutes,
the cru ise control will turn off temporari ly.
T he symbo l will go out but the saved speed
will be reta ined .
Page 98 of 280
96 Transmis sion
Transmission
Manual transmission
Gearshift lever
Applies to vehicles: with manual transmission
The clutch pedal must be depressed all the
way before you can start the engine .
The manual transmission in your Audi is
equipped with an
interlock-feature.
• Depress the clutch pedal all the way.
• Start the engine with the gearshift lever in
Neutral and the clutch pedal depressed.
(D Note
Always depress the clutch pedal fully when
changing gears. Do not hold the vehicle on
a hill with the clutch pedal partially de
pressed. This may cause premature clutch
wear or damage .
@ Tips
-Resting your hand on the gearshift lever
knob while driving will cause premature
wear in the transmission.
- The back-up lights go on when you shift
i nto Reverse with the ignition on.
Gearshift pattern (6-speed manual
transmission)
Applies to vehicles: with 6-speed manual transmission
Fig. 108 Gearshift pattern: 6 -speed manual t ransmis
sion
Drive in 6th gear for optimum fuel economy
when cruising . However, if more acceleration
is required (when passing, for example), shift
down.
Engaging reverse gear (R)
• Move the shift lever all the way to the left,
press it down, then push it forward.
Especially after driving forward, stop the vehi
cle completely, shift into
Neutral and rest the
shift lever briefly in Neutral before shift ing in
to
Reverse.
S tronic transmission
· Introduction
Applies to vehicles: with S tronic®
Your vehicle is equipped with a S tronic trans
mission, also called a double-clutch system/
transmission .
Power is transferred between the engine and
the transmission by means of two independ ent clutches. They replace the torque convert
er of conventiona l automatic transmissions
and allow the vehicle to accelerate without a
not iceable break in the power flow.
With the aid of
tiptronic, the gears can op
t ionally be shifted
manually ~ page 100.
Selector lever positions
Applies to vehicles: with S tronic®
All the selector lever positions are explained
in this section.
~-. -·~•-~ _ .. _....,-l
•+55 °F '
i} 340 mi
D
Fig. 109 Disp lay: Se lector lever posi tions
The instrument cluster display shows these
lector lever position.
P -Park lock
In this position the gears are mechanically
locked.