roof AUDI S3 2015 Owners Manual
[x] Cancel search | Manufacturer: AUDI, Model Year: 2015, Model line: S3, Model: AUDI S3 2015Pages: 310, PDF Size: 76.15 MB
Page 4 of 310
2 Table of contents Vehicle literature .. .. .. .. .. ... .
About this Owner's Manual ...
Operation .............. .... ... .
Cockpit ... ............. .... .. . .
Ove rv iew ... ... .. ..... ... .. .. ... .
Instruments and indicator
lamps ..... ............. .. .. .. . .
Ins truments . .. .. ..... ... .. .. ... .
Indicator lights ....... ... .. .. ... .
Driver information system .. .
Overview ... ... .. ..... ... .. .. ... .
Operation . .... .. ..... ... .. .. ... .
Boost indicator ........... .... ... .
Efficiency program ........ .. .. .. . .
On-Board Diagnostic system (OBD) . . .
Lap timer and engine oil temperature
indicator ............. ........ .. .
Opening and closing .. .. .. .. . .
Ce ntra l locking ................ .. .
L uggage compartmen t lid ... ... .. . .
C hil d safety lo ck ........ .. .. .. .. . .
P owe r wi ndows .......... .. .. .. . .
5
6
8
8
8
10
1 0
1 4
27
2 7
28
29
29
30
32
35
35
4 2
42
43
P anorama s unroof . . . . . . . . . . . . . . . . 4 4
Lights and Vision ............. .
Exte rior ligh ting ....... ... .. .. ... .
I nter ior light ing .. ..... ... .. .. ... .
V1s 1on ..... ... .. ..... ... .. .. ... .
W indshie ld wipers ........ .. .. ... .
O utside mirror ............... ... .
Dig ita l compass .......... .... ... .
Seats and storage ....... .. ... .
General i nformat ion ............. .
F ront seats ........... .... .... .. .
H eadrests .. ................ ... . .
Socket ... .. ... .... ...... .. .. .. . .
S to rage .... ... .......... .. .. .. . .
Ro of r ack .. ............. ....... .
L uggage compartmen t .. .. .. .. .. . .
46
46
4 9
so
so
52
54
56
56
57
59
60
6 1
6 2
6 4
Warm and cold . . . . . . . . . . . . . . . . 68
C lima te control sys tem . . . . . . . . . . . .
6 8
Driving ... .... .. ... .. ..... .... . .
Stee ring .. .... .. .. ... ..... ... .. .
Starting and stopp ing t he engine
(ve hicles with an ign ition lock) ... .. .
Starting and stopp ing th e engine
(ve hicles w ith a convenience key) ... .
Drive r m essages .. ... .. ....... ... .
El ectromechanical pa rking brak e ... .
Hill ho ld .. .. .. . .............. .. .
S peed w arning system .......... .. .
C ruise con tro l system .. ..... ... .. . 74
74
74
77
79
80
82
83
8 3
Audi adaptive cruise control .. 86
In troduc tion ..... ............... .
Genera l Info rmation . .. ..... ... .. .
Adaptive cruise contro l ...... .... . .
Drive r messages . .... .. ..... ... .. .
Audi pre sense .. .... .... ... .. .
Introduction ..... ... .. ..... .... . .
Genera l information ........... .. .
Audi pre sense basic .............. .
Audi pre sense front .............. .
Driver messages ................. .
Audi active lane ass ist ..... .. .
Lane assist .. .. ............ ..... . 86
8
6
87
92
94
94
94
94
94
96
98
98
Audi side assist . . . . . . . . . . . . . . . 102
Side assist ...... ............... .
Audi drive select ............. .
Driving settings ................. .
Automatic transmission ..... .
S tronic-transmiss ion ........... .. .
Parking systems
General information ........... .. .
Rea r parki ng system ............. .
Pa rking sys tem plus .............. .
Rea rv iew camera .... .. ....... ... .
Adju sting t he d isplay a nd the wa rning
tones . .... .... ................. .
Er ror messages . ... ... ..... ... .. .
102
106
106
109
109
118
118
119
119
120
124
124
Page 45 of 310
....,
N
0 > co
rl I.O
"' ....,
"' rl
.. To turn off, turn the ignition key opposite
the direction of the arrow .
When the child safety locks are activated, the
inside door handles do not work and the doors
can only be opened from the outside.
The ch ild safety lock only f unctions on the
door in whi ch it was act ivated.
Power windows
Controls
T he driver can control oil power windows .
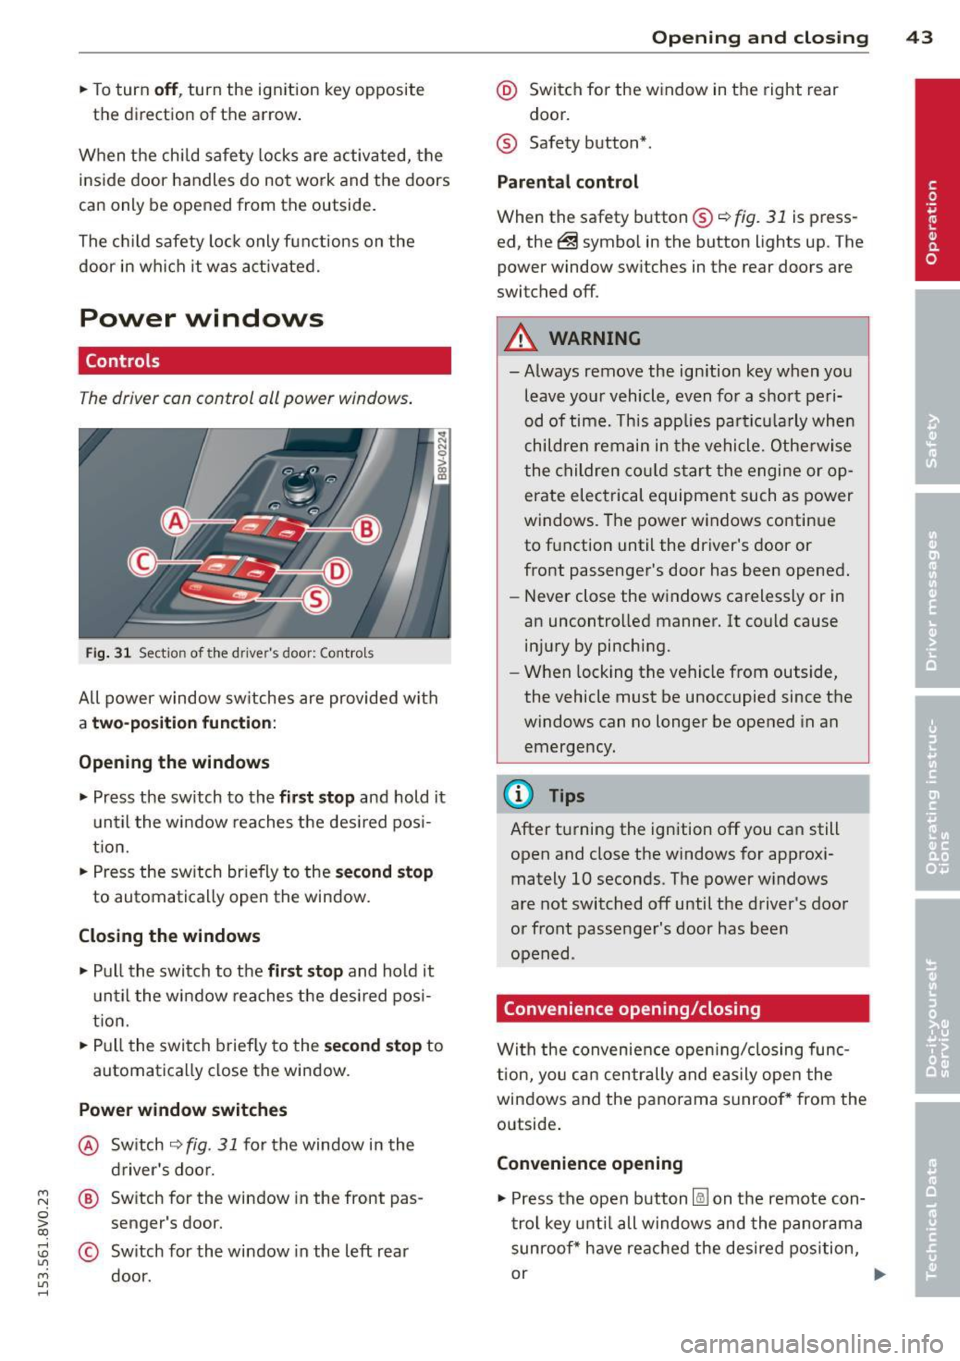
Fig. 31 Sectio n of the drive r's d oor: Control s
All power window sw itches are provided with
a two-position function :
Opening the windows
.. Press the sw itch to the fir st stop and hold it
until the window reaches the desired pos i
tion.
.. Press the sw itch br iefly to the
second stop
to automatically open the window.
Closing the windows
.. Pull the switch to the first stop and hold it
until the window reaches the des ired posi
t ion .
.. Pull the switch briefly to the
second stop to
automatically close the window.
Power window switches
@ Switch ~ fig. 31 for the window in the
driver's door.
@ Switch for the window in the front pas
senger 's door.
© Sw itch for the window in the left rear
door.
Opening and closing 43
@ Switch for the window in the right rear
door.
® Safety button* .
Parental control
When the safety button®~ fig. 31 is press
ed, the@symbol in the button lights up. The
power window sw itches in the rear doors are
switched off.
A WARNING
-Always remove the ign ition key when you
leave your vehicle, even for a short peri
od of time. This applies particula rly when
children remain in the vehicle. Otherwise
the children could sta rt the engine or op
erate electrical equipment such as power
windows. The power windows continue
to function until the driver's door or
front passenger's door has been opened.
- Never close the windows carelessly or in
an uncontrolled manner. It could cause injury by pinching.
- When locking the vehicle from outside,
the vehicle must be unoccupied since the
windows can no longer be opened in an
emergency.
(D Tips
After turning the ignition off you can still
open and close the windows for approxi
mately 10 seconds. The power windows
are not switched off until the driver's door
or front passenger's door has been
opened .
Convenience opening/closing
With the convenience opening/closing func
t ion, you can centrally and easily open the
windows and the panorama sunroof* from the
outside.
Convenience opening
.. Press the open button l@J on the remote con
trol key until all windows and the panorama
sunroof* have reached the desired position,
or .,,.
Page 46 of 310
44 Opening and clo sing
• Hold the key in the driver's door lock until all
windows and the panorama sunroof* have
reached the desired position .
Conveni ence closing
• Hold the key in the d river's door lock i n the
lock pos ition until a ll wi ndows and the pan
o rama sunroo f* are closed .
Convenience closing with the convenience
key*
• To uch the sensor* on one of the front door
h and les and cont in u e touching it unt il all of
the windows and the panorama s unroof* are
closed . Do not place your hand in the door
hand le when doing th is.
Adjusting the convenience opening in the
MMI
• Se lect : the I MENU ! button> Car> Systems *
control button > Vehicle sett ings > Central
locking > Long -press to open windows
To enab le convenience opening of the win -
dows and the roo f*, the
Front windows , Rear
w indows *
and Roof* functions must be
sw itched
On .
A WARNING
-Never close the windows or pano rama
sunroof* carel essly or in an uncontro lled
m ann er, be cause th is increases the risk
o f i njury.
- Fo r se curity reasons, the windows can
only be opened with the remote c ontro l
k ey at a maxim um dis tance of ap proxi
ma tely 6 feet ( 2 meters) from the ve hi
cle .
- Pa y att ention when using the lock cyli n
der to close the windows and t he panora
ma sunroof* so that no one is pinche d.
Clos ing stops whe n the key is moved into
the start ing pos ition.
Correcting power window malfunctions
After disconnecting the vehicle battery , the
one-touch up and down feature must be acti vated again .
• Pull the power window switch u ntil the win
dow is completely ra ised .
• Release the sw itch and pull it agai n for at
l e ast one s econd .
Panorama sunroof
Description
Applies to vehicles: with panoramic sunroof
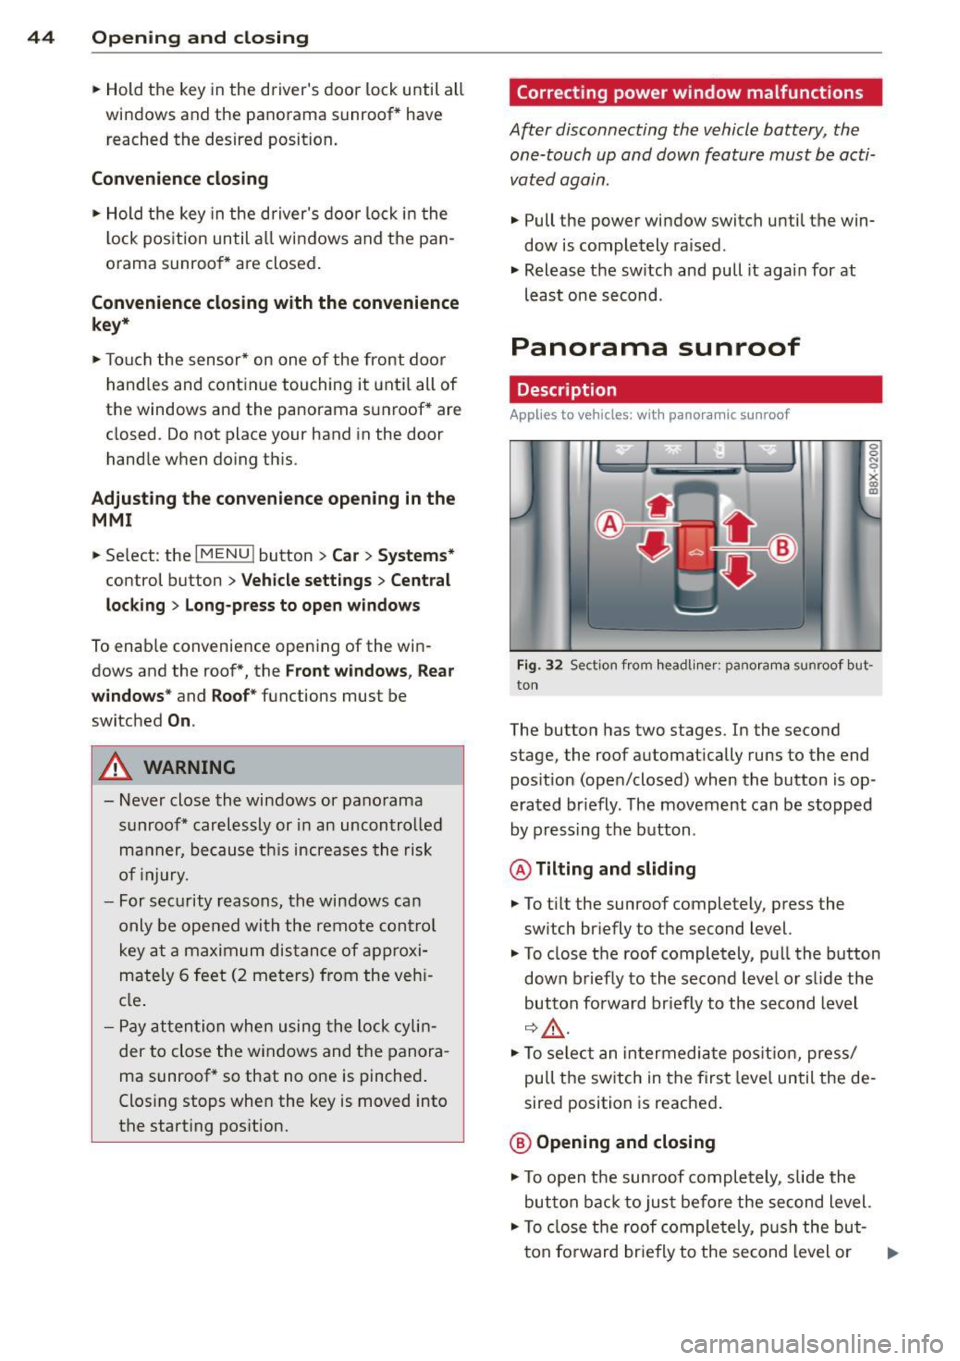
Fig. 32 Sect io n fr om headli ner: pano ra m a s unroof but
to n
The butto n has two stages . In the second
stage, the roof automat ically runs to the end
pos ition (open/closed) when the button is op
era ted br iefly . T he movement ca n be s topped
by pressing the b utton .
@Tilting and sliding
• To t ilt the sunroof completely , press the
sw itch br iefly to the second level.
• To close t he roof completely, pu ll the button
down b riefly to the seco nd leve l or s lide the
button forward br iefly to the s econd level
~~-
.. To se le ct an in termedia te pos it ion , press/
pull t he sw itch in the firs t leve l until the de
sired position is reached .
@ Opening and closing
• To open t he su nroof completely, sli de the
button bac k to ju st befo re the second level.
• To close t he roof comple tely, p ush the but-
t on fo rward br ie fly to the se cond level or .,..
Page 47 of 310
M N
0 > co ,...., \!) 1.1'1
M 1.1'1 ,....,
pull the button down briefly to the second
level ~
A_.
~ To se lect an intermediate position, press/
pull the switch forward/back in the first lev
el until the des ired pos it ion is reached.
A wind deflector integrated in the panorama
sunroof adapts automatica lly to the sunroof
position . Th is reduces w ind noise to a mini
mum in all panorama sunroof positions .
You can still operate the panorama sunroof
for about 10 minutes after the ignition is
switched off. The sw itch is deact ivated once
the dr iver 's or front passenger 's door is
opened .
Sun blind
The sun shade can be opened and closed man
ually, depending on the position of the panor
ama sunroof. The sun shade can be opened partially .
A WARNING
Be careful when closing the panoramic
sunroof -otherwise serious injury could re
sult! Always take the ignition key with you
w hen leav ing the veh icle.
0 Note
Always close your panoramic sun roof when
leaving your veh icle . Sudden rain can cause
damage to the in terior equ ipment of you r
veh icle, part icu larly the electronic equ ip
ment .
(D Tips
-Fo r information about convenience
opening/closi ng, refer to~
page 43.
- The panorama sunroof can only be
opened when the temperature is warmer
than -4°F
(-20 °().
Panorama sunroof emergency closing
Appl ies to vehicles: wit h pa noram ic sunroof
If the panorama sunroof detects resistance or
a n object in its path while closing, the sunroof
will open aga in automatically. If the sunroof
Opening and clo sin g 45
fails to close after removing the object and af
ter trying to close a second time, you can per
form an emergency closing .
~ Within five seconds after the sunroo f opens
automatically, pu ll the switch until the roof
closes .
If you let go of the switch early, the pano rama
s u nroof will open aga in.
•
Page 64 of 310
62 Seats and storage
The glove compartment can be locked using
the vehicle key.
.&_ WARNING
Always leave the lid on the glove compart ment cover closed while driving to reduce
the risk of injury.
Additional storage compartments
There are additional storage compartments,
compartments and holders at other locations
in the vehicle :
- In the upper part of the glove compart
ment .
- In the center console under the center arm
rest* .
- On the back of the right front seat. The com
partment* can hold a maximum weight of
2 lbs (1 kg).
- Garment hooks on the 8-pillar
c:> &, .
.&_ WARNING
-Do not place any objects on the instru
ment panel. Objects that are not stored
securely can slide around in the vehicle
while driving, when accelerating or brak ing or when turning.
- Make sure that objects cannot fall out of
the center console storage compartment
or other compartments and into the
footwell while driving. These objects
could prevent you from braking or accel
erating during sudden braking maneu
vers.
- Garments hung on the hooks must not obstruct the driver's view. The garment
hooks are only designed for light objects.
Do not hang any garments with hard,
sharp or heavy objects in the pockets on
the garment hooks. These objects could
injure vehicle occupants during sudden
braking or in a collision - especially if the
airbags deploy.
-Always keep the glove compartment
closed while driving to reduce the risk of
injury during a collision or heavy braking. -
Read and following the WARNINGS in
c:> page 165, Important safety instruc
tions on the side airbag system .
- Hang garments so that they do not ob
struct the driver's view.
- The garment hooks should only be used
for light articles of clothing. Do not leave
any heavy or sharp-edged objects in the
pockets that could interfere with the side
airbags unfolding and cause injuries in
the event of a collision.
- Do not use coat hangers to hang gar ments, because this could reduce the ef
fectiveness of the side curtain airbags .
- Do not hang any heavy objects on the garment hooks, because they could
cause injury during heavy braking.
- Because of their load capacity, the hooks
should only be used to secure objects
that weigh a maximum of 10 lb (5 kg).
Heavy objects will not be secured suffi
ciently, and this increases the risk of in
jury.
Roof rack
Description and mounting locations
Additional cargo can be carried with a roof
luggage rack.
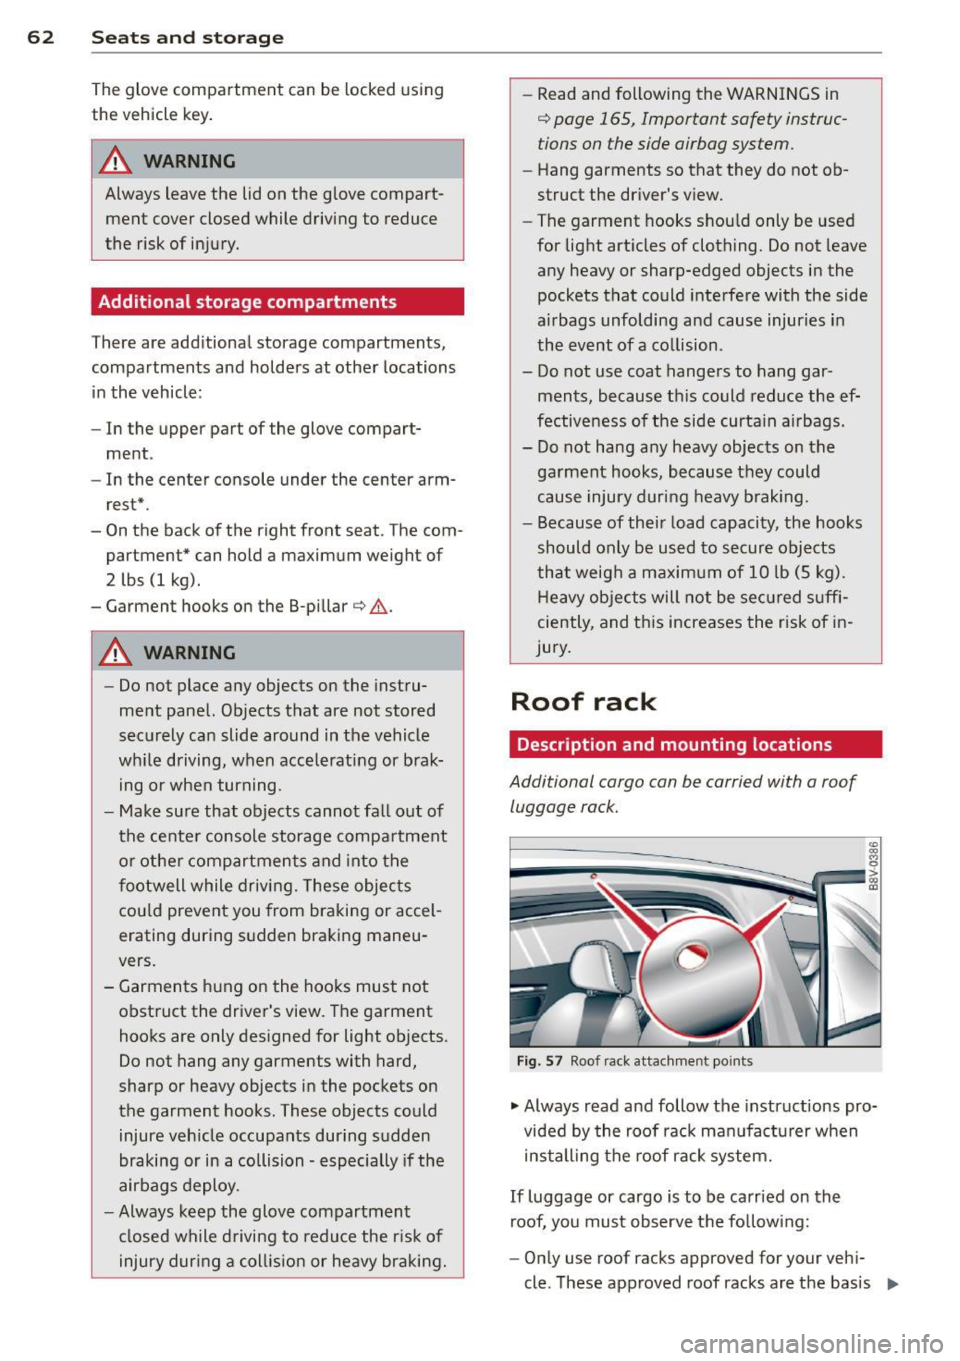
Fig. 57 Roof rack attachment po ints
• Always read and follow the instructions pro
vided by the roof rack manufacturer when
installing the roof rack system.
If luggage or cargo is to be carried on the
roof, you must observe the following:
- Only use roof racks approved for your vehi-
cle. These approved roof racks are the basis ..,
Page 65 of 310
M N
0 > co ,...., \!) 1.1'1
M 1.1'1 ,....,
for a complete roof rack system. Additiona l
attachments or carrier systems are needed
to transport luggage and sports equipment.
We recommend using roof racks from the
Audi original accessories program.
- When installing the roof rack, make sure it
is only mounted on the designated locations
on the roof¢
fig. 57.
-We recommend that you keep the installa
tion instructions for your roof rack system
together with your Owner's literature in the
vehicle .
When should the roof rack be remo ved ?
-Before going through an automatic car wash
(it is best to ask the car wash operator for
advice).
- When not in use, to reduce fuel consump
t ion, w ind no ise and to guard against theft .
A WARNING
-Use of an unapproved roof rack or incor
rect mount ing of an approved roof rack
can cause the roof rack or the items at
tached to it to fa ll off the roof onto the
road.
- Objects fall ing from the roof of a veh icle
can cause a c rash and persona l injury.
- Only mount the roof rack on the desig
nated locations on the roof¢
fig. 57.
-The roof rack system must be installed
exactly according to the instructions pro
vided.
- When driving w ith a roof rack system,
changes to the center of g ravity and wind
resistance can change the veh icle han
dling and lead to a collision. A lways
adapt your driving and your speed to the
c u rrent conditions.
(D Note
- Your veh icle warranty does not cover any
damages to the veh icle caused by using
r oof racks or mo unting structures not
approved by Audi for your vehicle. The
same applies to damage resulting from i ncorrect roof rack installation.
S eat s an d sto rage 63
- Always check the roof rack mountings
and hardware before each trip and dur
ing a trip to make s ure everyth ing is se
curely tightened. If necessary, ret ighten
the mountings and check the entire sys
tem from time to time.
- After mount ing a roof rack system, or
when you transport objects on the roof
of your vehicle, the height of the veh icle
is naturally increased . Be careful when
dr iving unde r low bridges or in parki ng
garages for example. This cou ld cause
damage to the load and even the vehicle
itself .
- Make sure the open rear lid and the sun
roo f* do not come in to contact with the
roo f rac k.
Loading the roof rack
Always distribute loads evenly. Make sure
anything on the roof rack is securely tied
down .
.,. Always dis tribute the loads on the roof rack
even ly .
.,. Always attach items to the roof rack securely
before you drive off .
T he maxim um permissible roof we ight is
1 6 5 lb (75 kg ). The roof weight is the total of
the weight of the roof rack, the attachments
and the cargo you are carrying. You must a lso
not exceed the maximum load weight for the
roof rack you are using.
When using a roof rack system which has a
lower load carrying capacity, you must not use
up the tota l maximum permissible load carry
ing capacity specified above. Instead, you
should load the roof rack system only to the
max imum capacity specified by the manufac
ture r of the roof rack system .
A WARNING
Weak, damaged or imprope r straps used
to secure items to the roof rack can fail
during ha rd braking o r in a coll is ion and
cause ser ious persona l injury .
.
•
Page 66 of 310
64 Seats and storage
-Make sure the roof rack is installed exact
ly as specified above
r::;, page 62.
- Always use suitable mounting straps for
securing items to the roof rack to help
prevent items from shifting or flying for
ward.
- Items on the roof rack must always be
securely mounted.
- The use of a roof rack can negatively af
fect the way a vehicle handles. Cargo
that is large, heavy, bulky, long or flat
will have a greater negative influence on
the vehicle's aerodynamics, center of gravity and overall handling. Always
drive slowly, avoid sudden braking and
maneuvers when transporting cargo on
the roof of your vehicle.
- Never exceed the maximum permissible
load carrying capacity of the roof of your
vehicle, the permissible axle weights and
the permissible total weight of your veh i
cle
r::;, page 286, Weights.
@ For the sake of the environment
As a result of the increased wind resist
ance created by a roof rack, your vehicle is
using fuel unnecessarily. So remove the
roof rack after using it .
Luggage compartment
Loading luggage compartment
Luggage items must be stowed securely .
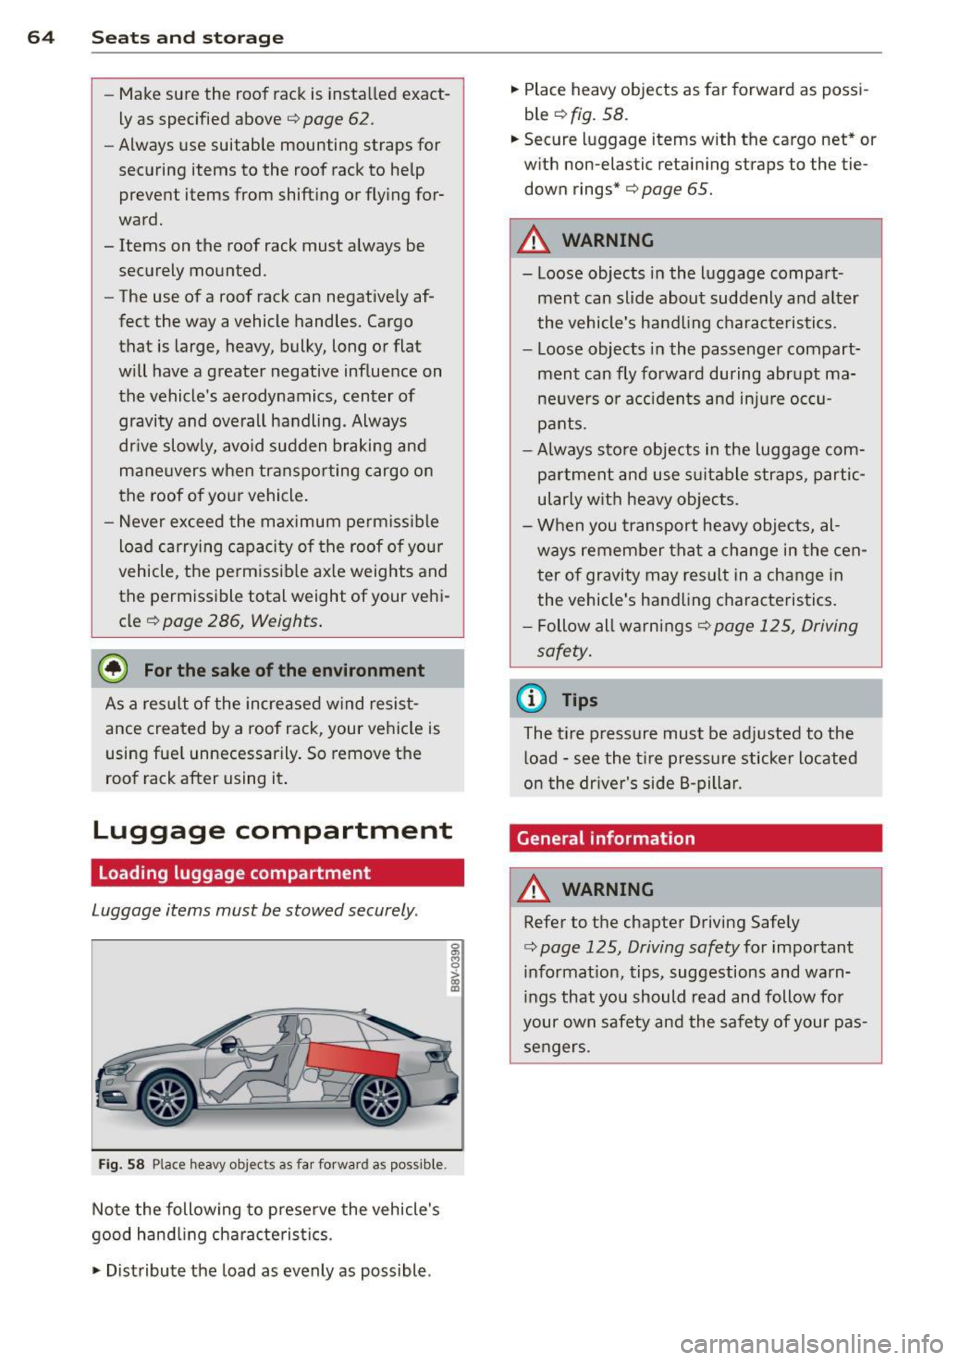
Fig. 58 Place heavy objects as far forward as possible.
Note the following to preserve the vehicle's
good handling characteristics .
.,. Distribute the load as evenly as possible .
0
s
> "' m
.,. Place heavy objects as far forward as possi
ble
r::;, fig. 58.
.,. Secure luggage items with the cargo net* or
with non-elastic retaining straps to the tie
down rings*
r::;, page 65.
A WARNING
- Loose objects in the luggage compart
ment can slide about suddenly and alter
the vehicle's handling characteristics.
- Loose objects in the passenger compart
ment can fly forward during abrupt ma
neuvers or accidents and injure occu
pants.
- Always store objects in the luggage com
partment and use suitable straps, partic
ularly w ith heavy objects.
- When you transport heavy objects, al
ways remember that a change in the cen
ter of gravity may result in a change in
the vehicle's handling characteristics.
- Follow all warnings
¢page 125, Driving
safety.
'
(D Tips
The tire pressure must be adjusted to the
load -see the tire pressure sticker located
on the driver's side B-pillar.
General information
A WARNING ,-
Refer to the chapter Driving Safely
r::;, page 125, Driving safety for important
information , tips, suggestions and warn
ings that you should read and follow for
your own safety and the safety of your pas
sengers .
Page 70 of 310
68 Warm and cold
Warm and cold Climate control system
Description
Different systems cou ld be installed.
- manual climate control system* or
- automatic climate control system*
The
climate control system* cools and re
moves humidity from the air in the vehicle in
terior. It is the most effective when the win
dows and panorama sunroof* are closed. If
there is a build-up of heat inside the vehicle,
ventilation can help to speed up the cooling
process . For this reason, the windows and
panorama sunroof can be opened from the
outside .
9 page 43, Convenience opening/
closing
Pollutant filter
T he pollutant filter removes pollutants such
as dust and pollen from the air .
Key recognition
You can store various settings for the manua l
and automatic
climate control system* and
assign them to the key being used .
A WARNING
Poor visibility can lead to accidents.
- For safer driving, keep all windows free
of ice, snow and fog .
- Become familiar as quickly as possible
with the correct use and function of the cl imate control system, especially with
the defrosting and defogg ing funct ion .
- When the temperature is below freezing,
only use the windsh ield washer system
after the w indshield has been warmed by the cl
imate control system . The washer
fluid could freeze on the windshield and
impair visibility.
(D Note
- If you suspect that the climate control
system is damaged, switch the system
off to prevent further damage and have
it checked by an authorized Audi dealer
or authorized Audi Service Facility.
- Repairs to the Audi climate control sys
tem require special technical knowledge
and special tools. See an authorized Audi
dealer or authorized Audi Serv ice Facility .
® For the sake of the environment
Reducing the amount of fuel used also re
duces the amount of pollutants that enter
the air.
(D Tips
- To prevent interference with the heating
and cooling output and to prevent the
w indows from fogging over, the air in
take in front of the windshield must be
free of ice, snow or leaves.
- Condensation from the cooling system*
can dr ip and form a puddle of water un
der the vehicle. This is normal and does
not mean there is a leak.
- T he energy management system may
switch the seat heating* or rear window
defroster off temporari Ly . These systems
are available again as soon as the energy
balance has been restored.
- The flows through the vents under the
rear window. Make sure the openings are
not covered when placing clothing on the
luggage compartment cover.
Page 96 of 310
94 Audi pre sen se
Audi pre sense
Introduction
Applies to vehicles: with Audi pre sense basic or Audi pre
sense front
Within the limits of the system, pre sense ba
sic and pre sense front can initiate steps to
protect vehicle occupants in certain danger
ous situations.
Critical driving situations can be recognized by
the pre sense front v ia a network of differe nt
vehicle systems and can take steps to prepare
the vehicle occupants for a potentia l collision.
The pre sense front works with a radar sensor
and a video came ra* .
It also functions within
the limits of the system when adapt ive cruise
control * is switched off.
General information
General information
App lies to vehicles: with Audi pre sense front or Audi
adaptive cruise control
A WARNING
Also follow the general information found
on
~ page 86, General information.
Audi pre sense basic
Descript ion
Applies to vehicles: with Audi pre sense basic
The function of the pre sense basic is activat
ed at a speed of 20 mph (30 km/h) or higher.
The following functions can be triggered un
der certain conditions within the limits of the
system:
- T ensioning of the safety be lts (for example,
during heavy braking) : The front safety belts
have reversib le be lt pretensioners. If a colli
sion does not occur, the safety belts loosen
s light ly and are ready to trigger again .
- Closing the windows and the sunroof* (for
example, when over- or understeering): The
windows and the sunroof" close until there is only a small gap open. Audi drive select:
The dep loyment time is
adapted in dynamic mode.
A WARNING
-The pre sense basic cannot overcome natu- ral phys ica l laws.
It is a system designed to
assist and it cannot prevent a coll is ion. Do
not let the increased safety provided
tempt you into taking risks. This could in
crease your r isk of a collis ion.
- The system can deploy incorrectly due to system-specific limits .
(D Tips
-Certa in pre sense bas ic functions switch
off when ESC is switched off (sport
mode) or when dr iving in reverse .
- The pre sense bas ic functions may not be
available if there is a ma lfunction in the
ESC system or the a irbag control mod
ule .
- Note that with pre sense bas ic, the rever
sible safety belt pretensioner on the
front passenger 's side deactivates when
the front passenger's a irbag is deactivat
ed.
Audi pre sense front
Description
Applies to vehicles: with Audi pre sense front or Audi
adapt ive cru ise control
Pre sense front informs yo u if the distance to
the vehicle ahead falls below the safe distance
for an extended period of time. It can warn of a possible collision and initiate braking ma
neuvers, within the limits of the system .
When detected in time, the system can assess
dangerous situat ions where an object ahead
brakes suddenly or if your own veh icle is trav
eling at a high speed and approaching an ob
ject that is moving more slow ly . If detection is
not possible, then p re sense fro nt does not re
act.
Page 134 of 310
132 Driving saf ety
A WARNING
Heavy loads will influence the way your ve
hicle handles. To help reduce the risk of a
loss of control leading to ser ious personal
injury:
-Always keep in m ind when transporting
heavy objects, that a change in the cen
ter of gravity can also cause changes in
vehicle handling:
- Always distribute the load as evenly as
possible.
- Place heavy objects as far forward in
the luggage compartment as possible.
- Never exceed the Gross Ax le Weight Rat
ing or the Gross Vehicle Weight Rating
specified on the safety compliance stick
er on the left door jamb. Exceeding per
missible we ight standards can cause the
vehicle to slide and handle differently.
- Please observe information on safe driv
ing
opoge 125.
A WARNING
To help prevent poisonous exhaust gas
from be ing drawn into the veh icle, always
keep the rea r lid closed while dr iving.
- Never transport objects larger than those fitting completely into the luggage
area because the rear lid cannot be fully
cl osed.
- If you absolutely must drive w ith the rear
lid open, observe the follow ing notes to
reduce the risk of poisoning:
- Close all w indows,
- Close the power roof *,
- Open all air outlets in the instrument
panel,
- Sw itch off the air recircu lation,
- Set the fresh a ir fan to the highes t
speed.
A WARNING
Always ma ke s ure th at the doors, all win
dows, the power roo f* and the rear lid are
securely closed and locked to reduce the risk of injury when the vehicle is not being
used.
- After closing the rear lid, always make
sure that it is properly closed and locked.
- Never leave your vehicle unattended es
pecially with the rear lid left open. A
child cou ld craw l into the vehicle thro ugh
the luggage compartment and close the rea r lid becoming trapped and unable to
get out. Being t rapped in a vehicle can
lead to serious pe rsonal in jury.
- Never let children play in or around the veh icle.
- Never let passengers ride in the luggage
compa rtment. Vehicle occupants must
always be prope rly restra ined in one of
the vehicle's seating posit ions.
(D Tips
- Air circulation helps to reduce window
fogging. Stale a ir escapes to the outside
through vents in the t rim panel. Be sure
to keep these slots free and open.
- The tire pressure m ust correspond to the
load. The tire pressure is shown on the
t ire pressure label. The tire pressure la
bel is located on the drive r's side B-pilla r.
The tire pressure label lists the recom
mended co ld tire inflation pressures for
the vehicle at its maxim um capacity
we ight and the tires that we re on your
vehicle at the t ime it was manufactured.
For recommended tire pressures for nor
ma l load cond itions, please see chapter
opoge240.
Tie -downs
The luggage comportment is equipped with
four tie-downs to secure luggage and other
items.
Use the t ie-downs to secure your cargo prop
erly
o page 131, Loading the luggage com
portment .
In a collision, the laws of physics mean that
even smaller items that are loose in the vehi-
cle w ill become heavy missiles t hat can cause .,..