engine AUDI S3 2016 Owners Manual
[x] Cancel search | Manufacturer: AUDI, Model Year: 2016, Model line: S3, Model: AUDI S3 2016Pages: 328, PDF Size: 81.78 MB
Page 252 of 328
Check ing and F illing
Al ways read and heed all WARNING S below
¢
A and ¢ A in Working on the battery on
page 248.
... Swi tch off the ignition and all electrical con
sumers .
... Make sure the area is well ventilated when you
charge the battery.
... Open the engine hood ¢
page 23 7.
... Open the red cover on the positive pole
¢fig . 200.
... Clamp the cha rge r terminal clamps as instruct
ed on the
batt ery terminal (+ ) and only on the
bo dy ground poin t(·).
... Only now pl ug the mains lead for the charging
equipment into the wall outlet and turn it on
¢£ .
... Make su re the ch arg ing rate is not o ver
3 0 a mp s/ 1 4.8 Volt.
... When the battery is fully charged: Turn the
charg ing equipment off and remove the mains
lead from the wall outlet.
... Now remove the clamps fo r the charging equ ip-
ment .
... Close the red cover on the positive pole.
... Close the hood ¢
page 238.
A discharged battery can freeze at temperatures
of only 32 F
0 (0 °C). A llow a frozen battery to
thaw comp letely before attempt ing to c harge it
¢
.&. . However, we recommend not us ing a
thawed batte ry again because the battery casing
can be cracked due to ice formation and can leak
battery acid.
Battery charging (Ma ximum charging rate of
30 amp s/ 14.8 Volt )
When charging at low voltages (e.g. with a trick
le charger ),
the battery cables do not have to be
d isconnected first. The battery caps should
not
be opened when charging a battery.
It is not necessary to remove the battery from
the lu ggage compartment, and it is also not nec
essary to disconnect the cables.
250
Fast charging the battery (charg ing rat e
abov e 14.8 Volts )
For technical reasons do not use a battery charg
er that uses voltage greater than 14.8 Volts to
charge your veh icle's battery.
A WARNING
Charg ing a battery can be dangerous .
-Always follow the operating instructions
provided by the battery charger manufactur
er when charging your battery .
- Never charge a frozen battery.
It may ex
plode because of gas trapped in the ice. Al
low a frozen battery to thaw out first.
- Do not reuse batteries which were frozen.
The battery hous ing may have cracked and
weakened when the battery froze.
- Charge the battery in a well ventilated area .
Keep away from open flame or electrical
spark. Do not smoke . Hydrogen gas generat
ed by the batte ry is explosive .
- To reduce the danger of explosion, never
connect or d isconnect charger cables while
the charger is ope rating .
- Fast charg ing a battery is dangerous and
should only be attempted by a competent
technician w ith the prope r equipment.
- Batte ry acid that may spill during charging
should be washed off w ith a so lution of
warm water and baking soda to neutra lize
the ac id.
{[) Note
Never use a fast cha rge r as a booster to start
the eng ine. This will se riously damage sensi
tive elec tronic components, such as control
u nits, re lays, ra dio, e tc., as well as the ba ttery
charger.
Battery replacement
The new battery must hove the some specifica
tions and dimensions as the original equipment
battery .
Intelligent energy man agement in yo ur vehicle is
r esponsib le for d istr ib uting the elec trica l energy ..,.
Page 253 of 328
,....,
N
0 > co ,....,
gent energy management system wi ll keep the
engine battery charged better than veh icles w ith
out this system . To make sure the additional
e lectrical energy is avai lab le once again after you
have changed the battery, we recommend that
you install batteries of the same type and manu
facture on ly (the same as those installed at the
time your veh icle was de livered). Specifications
are listed on the battery housing. Your author
ized dealer must code the battery in the energy
management system to enable you to use the en
ergy management functions correctly after re p lacing the battery.
The new battery must have the same capacity,
voltage (12 -volts), amperage, construction and
p lug sealing .
When insta lling the battery, ma ke sure the igni
tion and all e lectrical consumers are switched
off .
(D Note
Ma ke sure the ventilation hose on the side of
the battery is connected, otherw ise fumes o r
battery acid can leak out .
@ For the sake of the environment
Because of the prob lem of proper disposal of
a ba ttery, we recommend your author ized
Audi dea ler change the battery for you . Bat
teries contain su lf u ric acid and lead and must
always be disposed of properly in compliance
w ith all environmental regulations. D isposing
of vehicle batteries improperly is very danger
ous to the env ironment.
Ch eck ing and Filling
Windshield washer
system
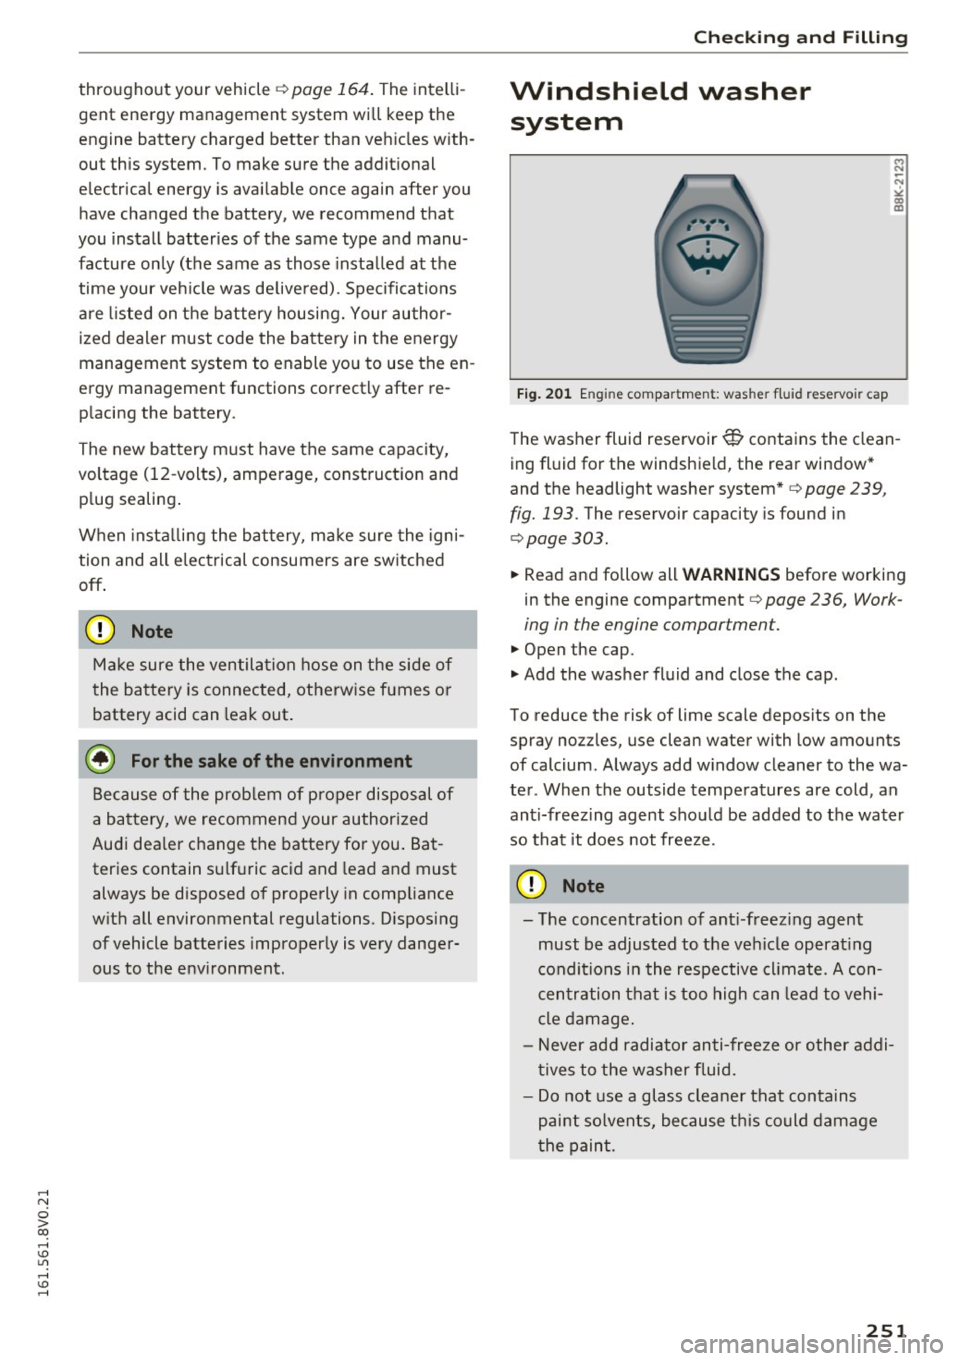
F ig . 201 E ngin e compar tmen t: was her flui d reservo ir cap
M N
-N ~
"' m
The washer fluid reservoir W contains the clean
ing fluid for the windshield, the rear window *
and the headlight washer system*¢
page 239,
fig. 193 .
The reservoir capacity is found in
¢ page 303.
.,. Read and follow all WARNING S before working
in the engine compartment <=>
page 236, Work
ing in the engine compartment .
.,. Open the cap.
.,. Add the washer fluid and close the cap .
To reduce the risk of lime scale deposits on the
spray nozzles, use clean water with low amounts
of calcium. Always add w indow cleaner to the wa
ter . When the outside temperatures are cold, an
anti-freez ing agent should be added to the water
so that it does not free ze.
(D Note
- The concentration of ant i-freez ing agent
must be adjusted to the vehicle operat ing
conditions in the respective cl imate. A con
c entration that is too high can lead to vehi
cle damage.
- Never add radiator an ti-free ze or other addi
tives to the washer fluid.
- Do not use a glass cleane r that contains
pai nt solvents, because t his could damage
t he paint.
251
Page 254 of 328
Checking and Filling
Service interval display
The service interval display detects when your ve
hicle is due for service.
The service interval display works in two stages:
-Inspection or oil change reminder: after a cer-
tain distance driven, a message appears in the
instrument cluster display each time the igni
tion is switched on or off . The remaining dis
tance or time is displayed briefly.
- Inspection or oil change due: if yo ur vehicle
has reached an inspection or oi l change interval
or both intervals at the same time, the mes
sage
Inspection due! or Oil change due! or Oil
change and inspection due!
appears briefly af
ter switching the ignition on/off .
Checking service intervals
You can check the remaining distance or time un
til the next oil change or next inspection in the
MMI. Select the
I MENU I button> Car> Systems *
control button > Service & control > Service in
tervals .
Resetting the indicator
Your authorized Audi dealer or authorized Audi
Serv ice Facility will reset the serv ice interval dis
p lay after performing service.
If you perform an oil change yourself to the Audi
specifications, you must reset the service interval
d isp lay.
To reset the display, select the
I MENU ! button >
Car > Systems * control button > Service & con
trol
> Service intervals > Reset oil change inter
val.
([) Note
-Only reset the oil change indicator if the oil
was changed.
- Following the service intervals is critical to
maintain ing the service life and va lue of
your vehicle, especially the engine. Even if
the m ileage on the vehicle is low, do not ex
ceed the time for the next service.
- Calculating the time to the next oil change
i s interrupted when the ve hicle battery is
disconnected. If the vehicle is not driven for
252
a long period of time, check the mainte
nance schedule so that you can fo llow the
maintenance intervals.
Page 267 of 328
,....,
N
0 > co ,....,
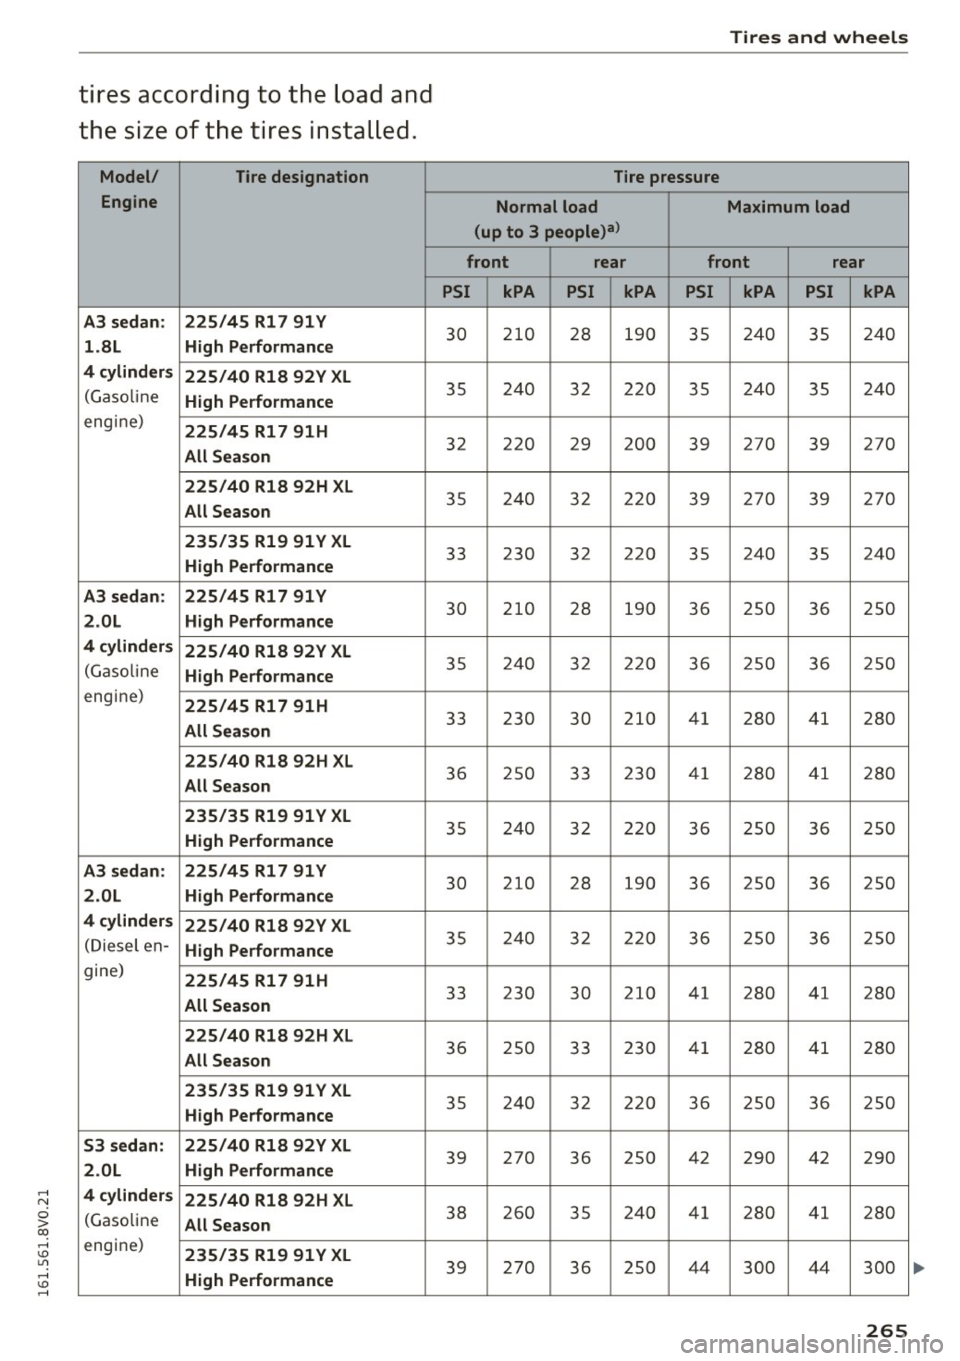
th e s ize of the tire s installed .
Model/ Tire designation
Engine
A3 sedan : 225/45 Rl 7 91 Y
l .8L High Performance
4 cyl inders
225/40 Rl8 92Y XL
(G aso line High Performance
eng ine) 225 /45 Rl 7 91H
All Season
225 /40 Rl8 92H XL
All Season
235/35 Rl9 91 Y XL
High Performance
A3 sedan: 225 /45 Rl 7 91 Y
2 .0L High Performance
4 cylinders 225/40 Rl8 92Y XL
(G aso line High Performance
eng ine) 225 /45 Rl7 91H
All Season
225 /40 Rl8 92H XL
All Sea son
235/35 Rl9 91 Y XL
High Performance
A3 sedan: 225 /45 Rl 7 91 Y
2 .0L High Performance
4 cylinder s
225/40 Rl8 92Y XL
(D iesel en-High Performance
gine) 225/45 Rl 7 91H
All Season
225 /40 Rl8 92H XL
All Sea son
235/35 Rl9 91 Y XL
High Performance
53 sedan: 225 /40 Rl8 92Y XL
2.0L High Performance
4 cylinder s
225 /40 Rl8 92H XL
(Gaso line All Season
engine) 235/35 Rl9 91 Y XL
High Performance
Tires and wheels
Tire pressure
Normal load Maximum load
(up to 3 people)
3>
front rear front rear
PSI kPA PSI kPA PSI kPA PSI kPA
30 210 28 190 3 5 240 35 24 0
35 240 32 220 35 240 35 240
32 220 29 200 39 270
39 270
3 5 2 40 32 22 0 39 270 39 270
33 230 32 220
35 240
35 240
30 210 28 190 36 250 36 250
35 240 32 220 36 250 36 250
33 230 30 210 41
280 41
280
3 6 2 50 33 230 41 280 4 1 280
35 240 32 220
36 250
36 250
30 210 28 190 36 250 36 250
3 5 240 32 22 0 36 2 50 36 250
33 230
30 210 41 280 41 280
36 250 33 230 4 1 28 0 41 280
35 240 32 220 36 250 36 250
39 270
36 250 42
290 42
290
3 8 260 35 240 41 280 4 1 280
39 270
36 250 44 300 44
300
265
Page 268 of 328
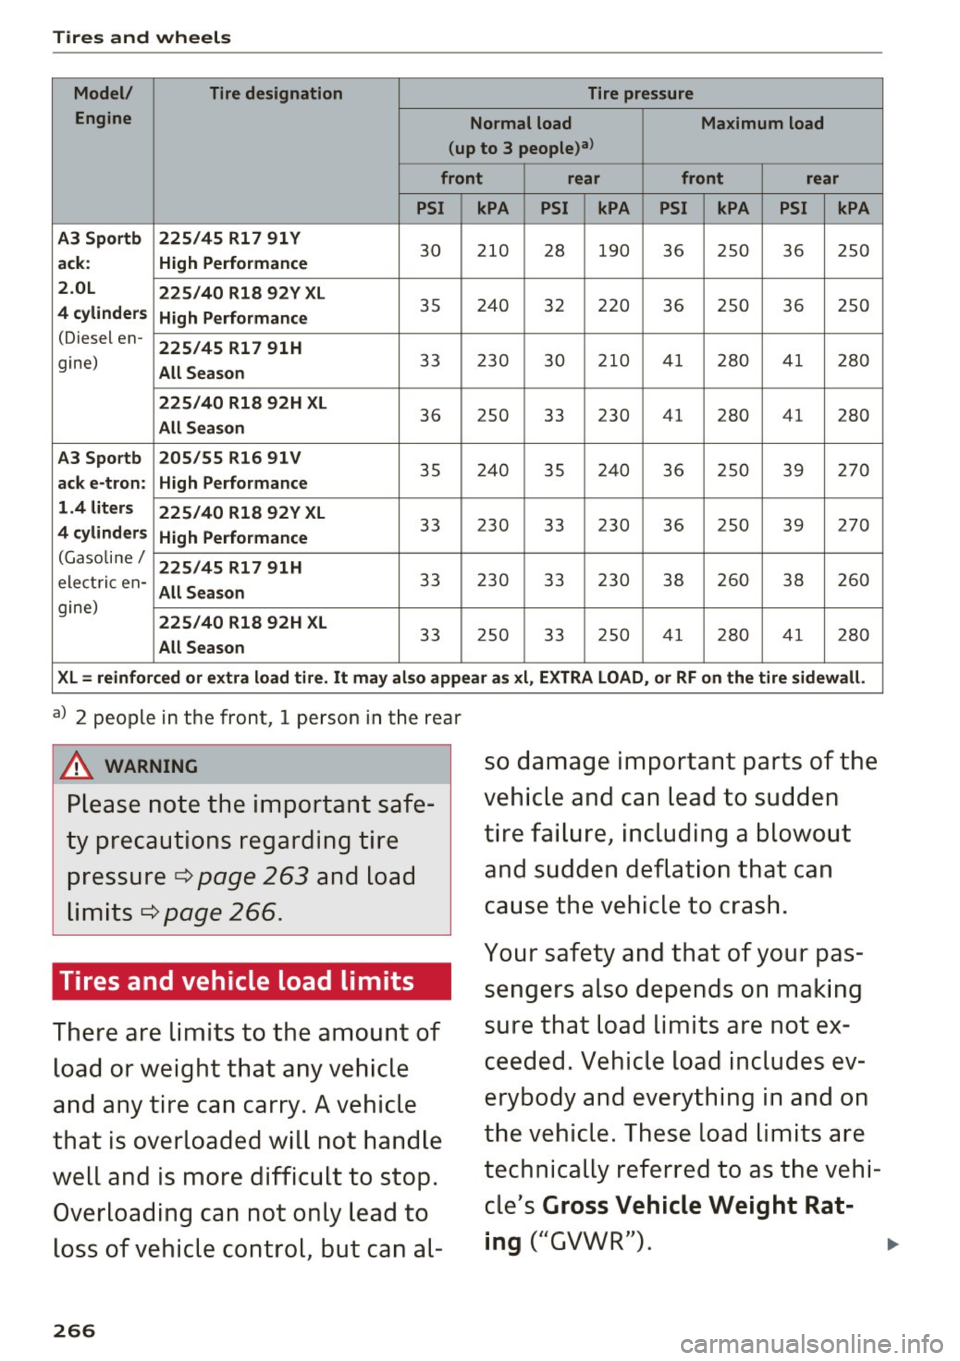
Tires and wheels Model/ Tire designation
Tire pressure
Engine Normal load
Maximum load
(up to 3 people)a>
front rear front rear
PSI kPA PSI kPA PSI kPA PSI kPA
A3 Sportb 225/45 Rl 7 91 Y ack: High Performance
30 210 28 190 36 250 36 250
2.0L
225/40 Rl8 92Y XL
4 cylinders High Performance
35 240 32 220 36 250 36 250
(Diesel en-
225/45 Rl7 91H
gine) All Season
33 230 30
210 41 280 41 280
225/40 Rl8 92H XL
All Season
36 250 33 230 41
280 41
280
A3 Sportb 205/55 Rl6 91 V
ack e-tron: High Performance
35 240 35 240 36 250 39 270
1.4 liters
225/40 Rl8 92Y XL
4 cylinders High Performance
33 230
33 230
36 250 39 270
(Gasoline/
225/45 Rl 7 91H
electric en- All Season
33 230 33 230 38 260 38 260
gine)
225/40 Rl8 92H XL
All Season
33 250 33 250 41 280 41 280
XL= reinforced or extra load tire. It may also appear as xi, EXTRA LOAD, or RF on the tire sidewall.
a) 2 people in the front, 1 person in the rear
A WARNING
Please note the important safe
ty precautions regarding tire pressure ¢
page 263 and load
limits ¢
page 266.
Tires and vehicle load limits
There are limits to the amount of
load or weight that any vehicle
and any tire can carry. A vehicle
that is overloaded will not handle
well and is more difficult to stop. Overloading can not only lead to
loss of vehicle control, but can al-
266
so damage important parts of the
vehicle and can lead to sudden
tire failure, including a blowout
and sudden deflation that can
cause the vehicle to crash.
Your safety and that of your pas sengers also depends on making
sure that load limits are not ex
ceeded. Vehicle load includes ev
erybody and everything in and on
the vehicle. These load limits are
technically referred to as the vehi cle's
Gross Vehicle Weight Rat-
ing
("GVWR"). ..,
Page 283 of 328
.... N
0 > CX)
.... I.Cl U"I
.... I.Cl ....
both tabs on the side panels ¢ fig. 209 (top im
age).
.. A3 Sedan: clip the plastic hook@ into the lug
gage compartment seal¢
fig. 209 (bottom im
age) .
Side panel
.. Open the twist lock and remove the cover @* I
@ ¢fig. 208 .
.&_ WARNING
Improper use of the vehicle jack can cause se
rious personal injuries.
- Never use the screw driver hex head to
tighten wheel bolts, since the bolts cannot
atta in the necessary tightening torque if you
use the hex head, potentially caus ing an ac
c ident.
- The factory-supplied jack is intended only
for your vehicle model. Under no circum
stances should it be used to
lift heavy
vehicles o r other loads; you r is k inju ring
yo urself.
- Never start the engine when the vehicle is
ra ised, whi ch could cause an accide nt.
- Support the veh icle secure ly with app ropr i
ate stands if wor k is to be perfo rmed under
neath t he vehicle; otherwise, the re is a po
tent ial risk for in jury.
- Never use the jack s upplied with your Audi
on another vehicle, par tic ularly on a heav ier
one. The jack is only suitab le for use on the
vehicle it came with .
(D Tips
The vehicle jack* in your vehicle is mainte
na nee-free.
Tire mobility kit
Preparation
A ppl ies to vehicles: W ith t ire re pair set
.. Read and fo llow th e import ant saf ety pr ecau
tion s¢
page 280, General information .
.. Check if a repair w ith the t ire mobility k it is pos
s ible
¢ page 281.
Emergen cy a ssis tanc e
Using the tire mobility kit
App lies to vehic les : With tire r epair set
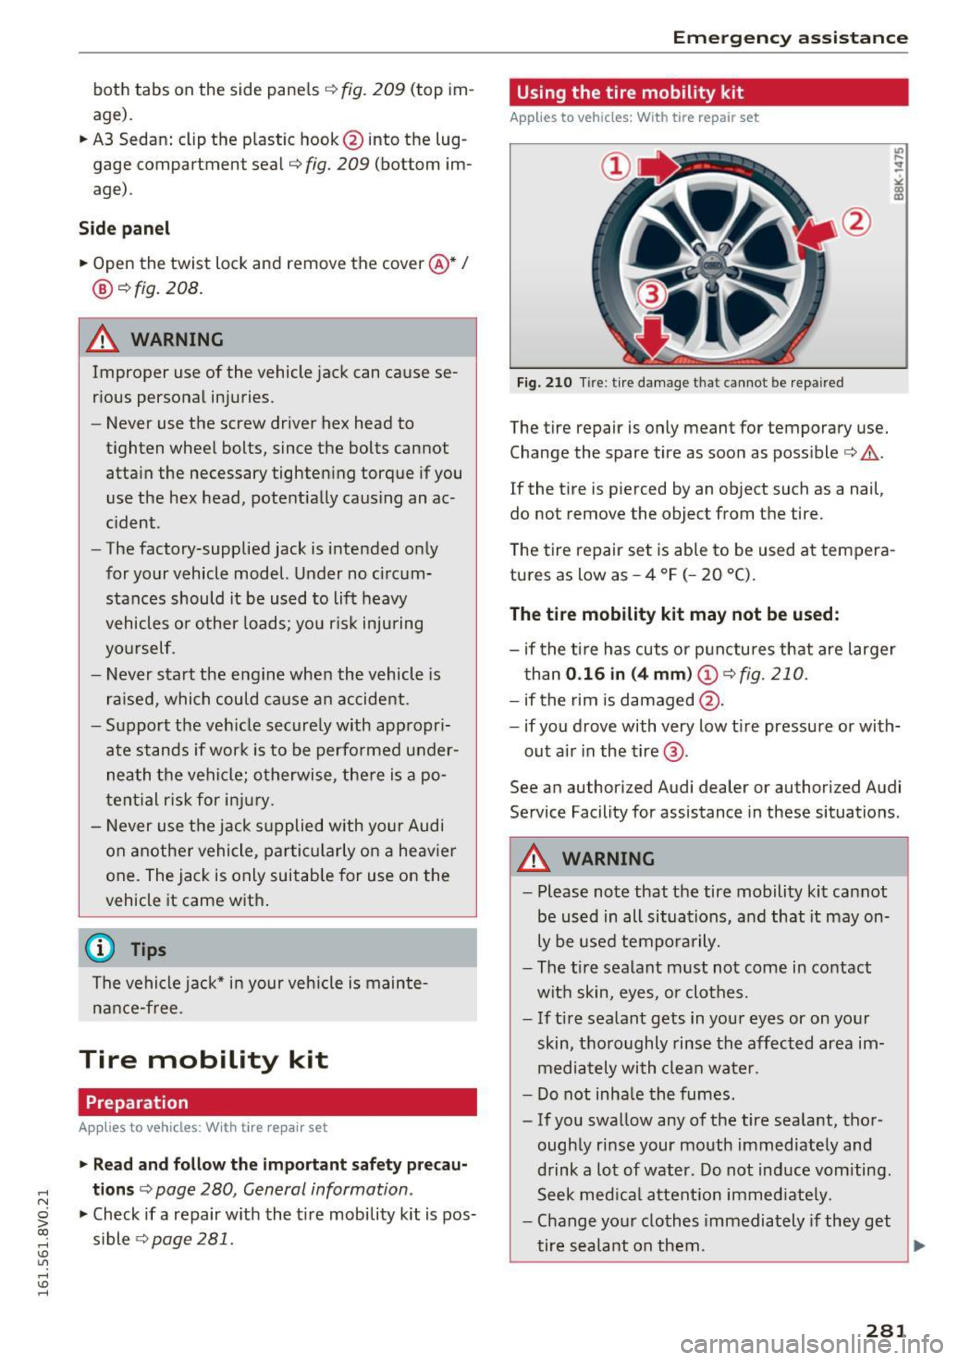
F ig. 210 T ire: t ire damage t hat cannot be repaired
The tire repair is only meant for temporary use.
Change the spare tire as soon as possible <=>,&. .
If the t ire is p ierced by an object such as a nail,
do not remove the object from the tire.
The tire repair set is ab le to be used at tempera
tures as low as - 4 °F (- 20 °C).
The t ire mobility kit may not be us ed:
- if the ti re has cuts or punctures that are larger
than
0 .1 6 in (4 mm)@ ¢ fig. 210.
-if the rim is damaged @.
- if you drove with very low t ire pressure or with-
out air in the tire @.
See an authorized Audi dealer or authorized Audi
Service Facility for assistance in these situations .
.&_ WARNING
>=
-Please note that the tire mobility kit cannot
be used in all situations, and that it may on
ly be used temporarily.
- The tire sealant must not come in contact
wit h skin, eyes, o r clothes.
- If ti re sealant gets in you r eyes or on yo ur
skin, tho ro ughly rinse the affected area im
mediately wi th clea n wate r.
- Do not inha le the fumes.
- If you swallow any of the tire sealant, thor-
ough ly rinse your mouth immediately and
drink a lot of water . Do not ind uce vomiting.
Seek med ica l attent io n immed iate ly .
- Change yo ur clothes immediately if they get
tire seala nt on them.
~
281
Page 293 of 328
.... N
Fuses and bulbs
Electrical fuses
Replacing fuses
A fuse that has blown will have metal strips tha t
have burned through .
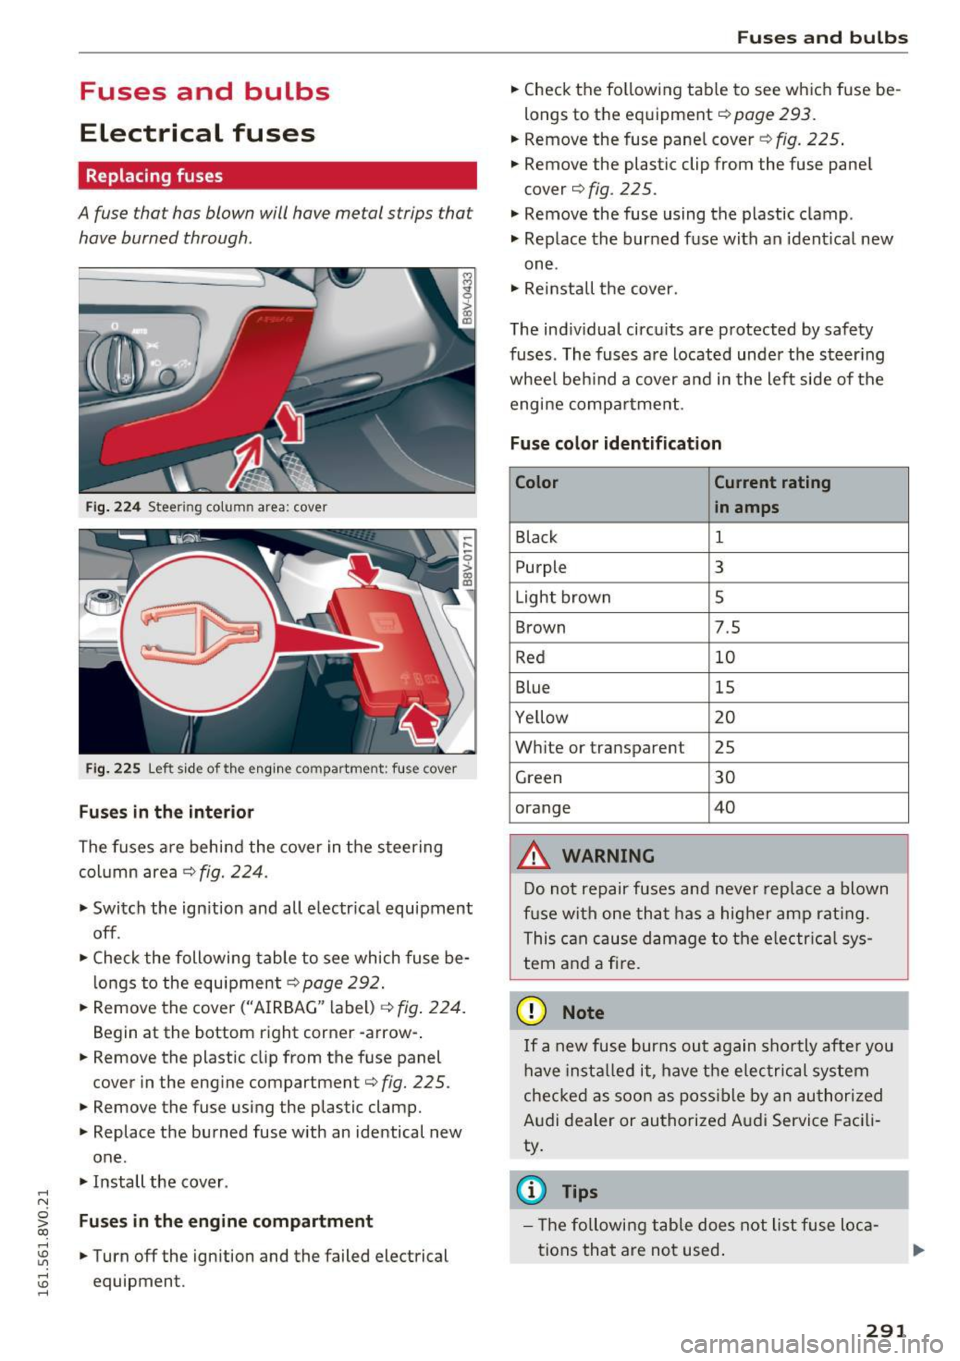
Fig. 224 Steer ing colu mn area : cove r
Fig. 225 Left side of the engin e com partment : fus e cover
Fuses in the interior
The fuses are behind the cover in the steering
column area
¢fig. 224.
• Switch the ign ition and all electr ical equipment
off .
• Check the following table to see which fuse be
longs to the equipment
r::!.> page 292.
• Remove the cover ("AIRBAG" label)
¢ fig. 224.
Begin at the bottom right corner -arrow- .
• Remove the plastic clip from the fuse panel
cover in the engine compartment ¢
fig. 225.
• Remove the fuse using the plastic clamp.
• Replace the burned fuse with an identical new
one .
• Install the cover .
~ Fuses in the engine compartment CX)
rl
~ •Turnoff the ignition and the failed electrical
~ equipment . ....
Fuses and bulbs
• Check the following table to see which fuse be
longs to the equipment¢
page 293.
• Remove the fuse panel cover r::!.> fig. 225.
• Remove the plastic clip from the fuse panel
cover¢
fig . 225 .
• Remove the fuse using the plastic clamp .
• Replace the burned fuse with an identical new
one .
• Reinstall the cover.
The individual circu its are protected by safety
fuses . The fuses are located under the steering
wheel beh ind a cover and in the left side of the
engine compartment .
Fuse color identification
Color Current rating
in amps
Black 1
Purple 3
Light brown 5
Brown 7.5
Red 10
Blue 15
Yellow 20
White or transparent 25
Green 30
orange 40
A WARNING
Do not repair fuses and never replace a blown
fuse with one that has a higher amp rating .
This can cause damage to the electr ical sys
tem and a fire.
(D Note
If a new fuse burns out again shortly after you
have installed it, have the electrical system
checked as soon as possible by an authorized
Audi dealer or authorized Audi Service Facili
ty.
(0 Tips
- Th e following table does not list fuse loca
tions that are not used.
291
Page 294 of 328
Fuses and bulbs
-Some of the equipment listed in the follow
ing tables applies only to certain mode l ver
sions or certain optional equ ipment.
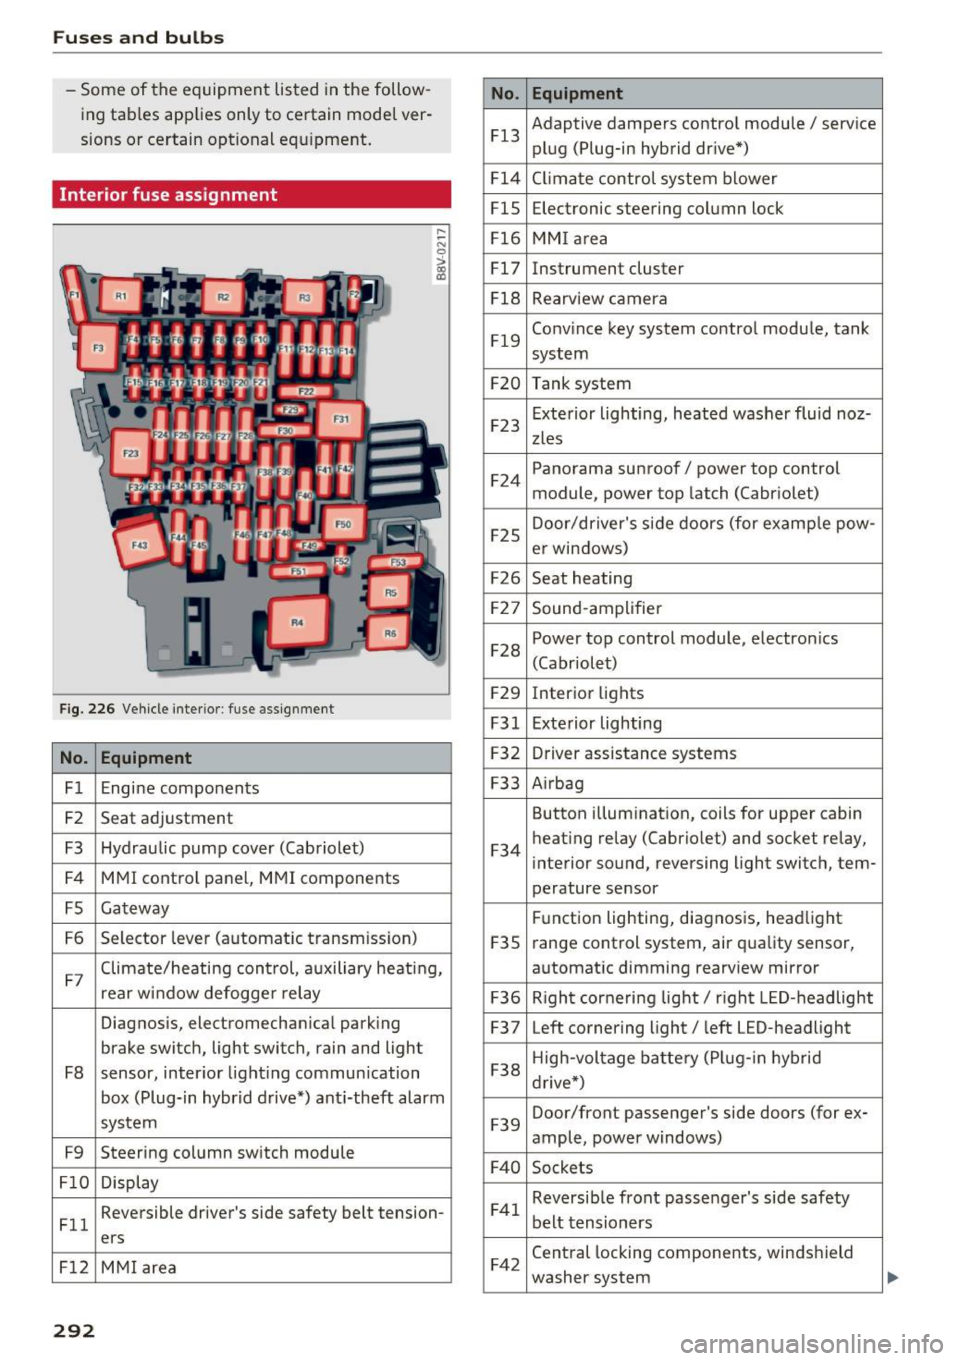
Interior fuse assignment
F ig. 226 Vehicle interior: fuse assignment
No. Equipment
Fl Engine components
F2 Seat adjustment
F3 Hydraulic pump
cover (Cabriolet)
F4 MMI control panel, MMI components
FS Gateway
F6 Selector lever (automatic transmiss
ion)
.... ~ N 0
> a) cc
F7 Climate/heating cont
rol, auxiliary heating,
rear window defogger relay
Diagnosis, electromechanical parking
brake switch, light switch , rain and light
F8 sensor, interior lighting commun ication
box (Plug-in hybrid drive*) ant i-theft alarm
system
F9 Steering column switch module
FlO Display
Fll Reversible driver's side safety belt tension-
ers
Fl2 MMI area
292
No.
Fl3
Fl4
FlS
Fl6
Fl7
Fl8
Fl9
F20
F23
F24
F25
F26
F27
F28
F29 F31
F32
F33
F34
F35
F36
F37
F38
F39
F40
F41
F42
Equipment
Adaptive dampers control module/ service plug (Plug-in hybrid dr ive")
Climate control system blower Electronic steering column lock
MMI area
Instrument cluster
Rearview camera
Convince key system control module, tank
system
Tank system Exterior lighting, heated washer fluid noz-
zles
Panorama sunroof/ power top control
module, power top latch (Cabriolet)
Door/dr iver's side doors (for example pow-
er windows)
Seat heating
Sound-amplifier
Power top control module, electro nics
(Cabriolet)
Interior lights
Exterior lighting
Driver assistance systems
A irbag
Button illumination, coils for upper cabin
heating relay (Cabriolet) and socket relay,
interior sound, reversing light switch, tern-
perature sensor
Function lighting, diagnosis, headlight
range control system, air quality sensor,
automat ic dimming rearv iew mirror
Right corneri ng light/ r ight LED-headlight
Left cornering light/ left LED-headlight
High-voltage battery (Plug- in hybrid
drive*)
Door/front passenger's side doors (for ex-
ample, power windows)
Sockets
Reversib le front passenger's side safety
belt tensioners
Central locking components, windshield
washer system
Page 295 of 328
.... N
0 > CX)
rl I.Cl U"I
rl I.Cl ....
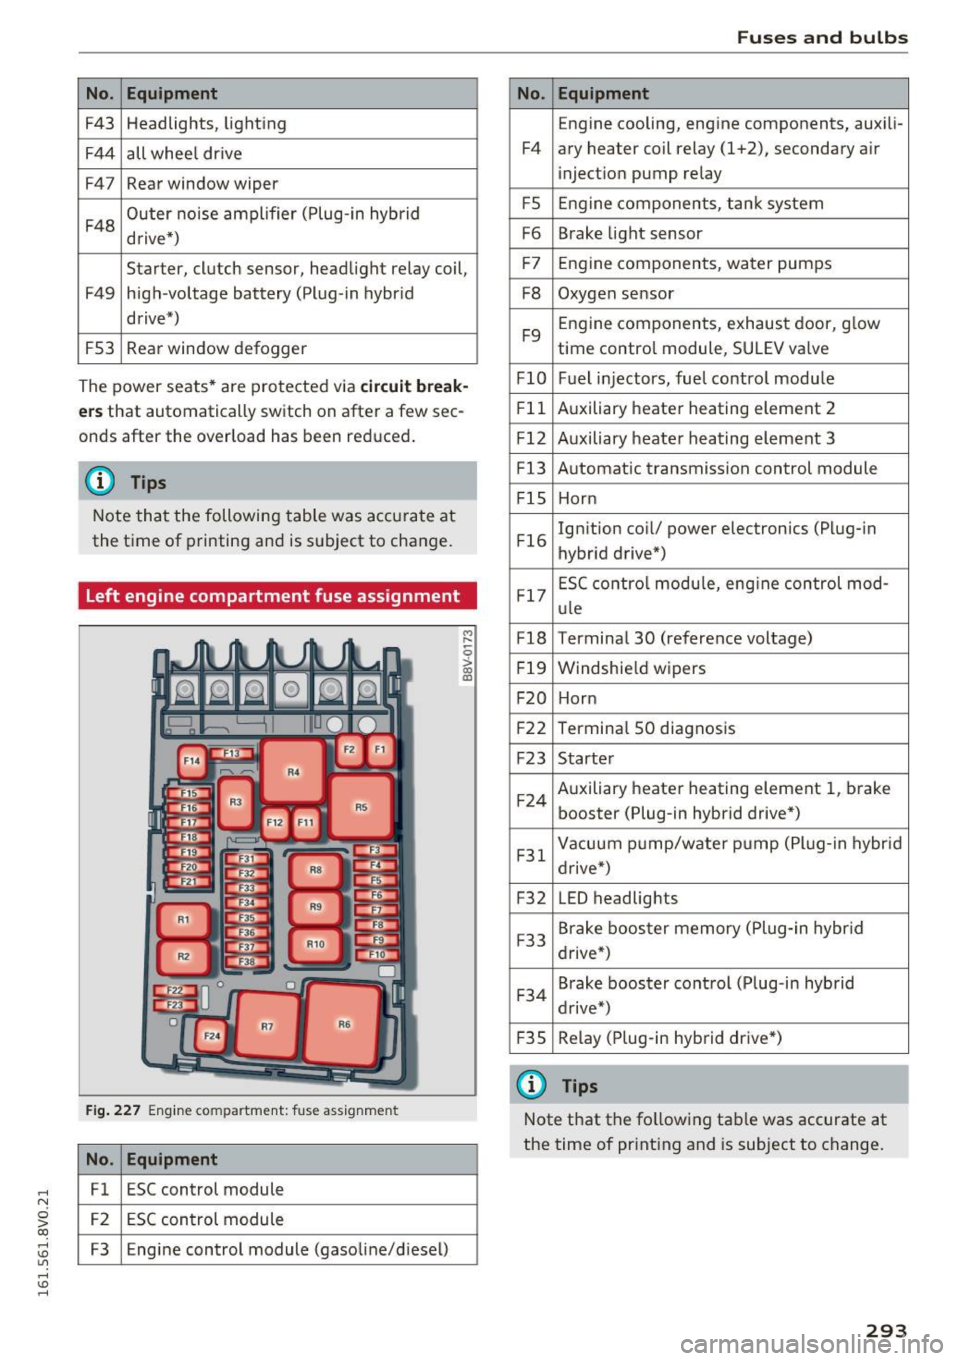
No. Equipment
F43 Headlights, lighting
F44 all whee l drive
F47 Rear window wiper
F48 Outer noise amplifier
(Plug-in hybrid
drive*)
Starter, clutch sensor, headlight relay coil,
F49 high-voltage battery (Plug-in hybr id
drive*)
F53 Rear window
defogger
The power seats* are protected via
circuit break
ers
that automatically switch on after a few sec
onds after the overload has been reduced.
(D Tips
Note that the following table was accurate at
the time of printing and is subject to change.
Left engine compartment fuse assignment
Fig. 227 Engine compartment: fuse assignment
No. Equipment
Fl ESC control module
F2 ESC control module
F3 Engine control module (gasoline/d iesel)
M ,-..
0
> co ID
Fuses and bulbs
No. Equipment
Engine cooling, engine components, auxili-
F4 ary heater coil relay (1+2), secondary a ir
injection pump relay
FS Engine components, tank system
F6 Brake light sensor
F7 Engine components,
water pumps
F8 Oxygen sensor
F9 Engine
components, exhaust door, glow
time control module, SULEV va lve
FlO Fuel injectors, fuel control modu le
Fll Auxiliary heater heating element 2
F l2 Auxiliary heater heating element 3
Fl3 Automatic transmission control module
FlS Horn
Fl6 Ignition coil/
power electronics (Plug-in
hybrid drive*)
Fl7 ESC control
module, eng ine control mod -
ule
Fl8 Terminal 30 (reference voltage)
F l9 Windshield wipers
F20 Horn
F22 Termina l 50 diagnosis
F23 Starter
F 24 Auxiliary heater heating element 1,
brake
booster (Plug-in hybrid drive*)
F31 Vacuum
pump/water pump (Plug-in hybrid
drive*)
F32 LED
headlights
F33 Brake booster
memory (Plug-in hybrid
drive*)
F 34 Brake
booster control (Plug -in hybrid
drive*)
F 35 Relay (Plug-in hybrid drive*)
@ Tips
Note
that the fo llowing tab le was accurate at
the time of printing and is subject to change.
293
Page 296 of 328
Fuses a nd bul bs
Bulbs
Replacing light bulbs
For your safety, we recommend that you have
your authorized Audi dealer replace burned out
bulbs for you.
It is becoming increasingly more and more diffi
cult to replace vehicle light bulbs since in many
cases, other parts of the car must first be re
moved before you are able to get to the bu lb .
This applies espec ially to the light bulbs in the
front of your car wh ich you can only reach
through the engine compartment .
Sheet metal and bulb holders can have sharp
edges that can cause ser ious cuts, and parts
m ust be correctly taken apa rt and then p roperly
put back together to help prevent breakage of
parts and long term damage from water that can
enter housings that have not been properly re
sealed.
For your safety, we recommend that you have
your authorized Audi dealer replace any bu lbs for
you, since your dealer has the proper tools, the correct bulbs and the expertise.
G as di sc harg e l am ps (Xe non li ghts):
Due to the high electrical voltage, have the bulbs
replaced by a qua lified technic ian . Headlights
with Xenon light can be identified by the high
voltage sticker.
LED headlights* require no maintenance. Please
contact your authorized Aud i dealer if a bulb
needs to be replaced.
A WARNING
Contact w ith high-voltage components of the
electrical system and improper rep lacement
of gas discharge (Xenon) headlight bulbs can
cause serious personal injury and death.
- Xenon bulbs are pressurized and can ex
plode when being changed.
- Changing Xenon lamps requires the special training, instructions and equipment.
- Only an a uthorized Audi dea ler or other
qualified workshop should change the bulbs
in gas discharge lamps .
294
A WARNING
-
There are parts with sharp edges on the open-
ings and on the bulb holders that can cause
serious cuts.
- If you are uncertain about what to do, have
the work performed by an authorized Audi
dealer or other qualified workshop. Ser ious
pe rsonal injury may resu lt from improperly
pe rformed wor k.
@ Tips
- If you still prefer to replace the light bulbs
yourself, be aware that the engine compart ment is a hazardous area to work in
9 page 2369 .&.
-It is best to ask your authorized Audi dealer
whenever you need to change a bulb.