automatic transmission AUDI S3 SEDAN 2015 Owners Manual
[x] Cancel search | Manufacturer: AUDI, Model Year: 2015, Model line: S3 SEDAN, Model: AUDI S3 SEDAN 2015Pages: 282, PDF Size: 71.14 MB
Page 11 of 282
M N
0 > co ...... \!) ..,.,
..,.,
..,., ......
CD
@
®
©
®
®
(J)
®
Power windows
Door hand le
Aud i side assist
........ .... .. .
Centra l locking switch ... .. .. .. .
Powe r exter ior mir ro r adjustment
H ead light cont rol swit ch .. .. .. .
Vents
L ever fo r:
- Turn si gnals and high beams . . .
- Audi act ive lane assis t ... .. .. .
® Steer ing whee l w ith horn and
@
©
@
- Driver's airbag ....... .. .. .. .
- On-board computer controls .. .
- MMI, telephone , nav igat ion and
vo ice recogn ition system controls
- tiptron ic shift paddles (automatic
transmission)
I ns trumen t clus te r ..... .. .. .. .
W indshield washer system lever .
Steer ing column with:
- Ignit ion emergency operation (in
vehicles with conve nience key) .
- Ignit ion loc k (in vehicles wi th me-
chanical key) . ..... ... .. .. .. .
@ Adjustable steer ing column
(B) D epending on equipment: 4
0
109
37
47
4 3
64
45
106
152 28
87
1 0
49
7 7
73
72
- Cruise contro l lever . . . . . . . . . . 94
- adaptive cruise cont ro l . .. .. .. .
Driver's knee a irbag .... .. .. .. .
I ns trumen t illum ination . .. .. .. .
Hood re lease
. .. .... ... .. .. .. .
Luggage compartment release ..
C hild safety loc k bu tton . .. .. .. .
MMI disp lay (navigation, radio, TV/
video)
Glove compartment ( lockable) .. .
F ront passenger's airbag . ... .. .
Treble speakers Fr ont passenger's knee airbag .. .
Depending on equipment, b uttons
f or:
- Audi dr ive select ...... .. .. .. .
- Pa rking aid plus (o r with rearview
camera) 9
6
164
4 7
199
39
40
58
152
164
1 12
1 16
Co ckpit over view
-Eme rgency flashers ..... ... . .
- Elect ron ic St abiliza tion Control
( E SC) ..... .. .. .... .... ... . .
- MMI Displ ay
- Airbag Off indicato r ..... .... .
@ Depending on eq uipment:
- Manual climate contro l system .
- Automatic climate control
system ... .. ............. . .
@ Socket . .... .. .. ........... . .
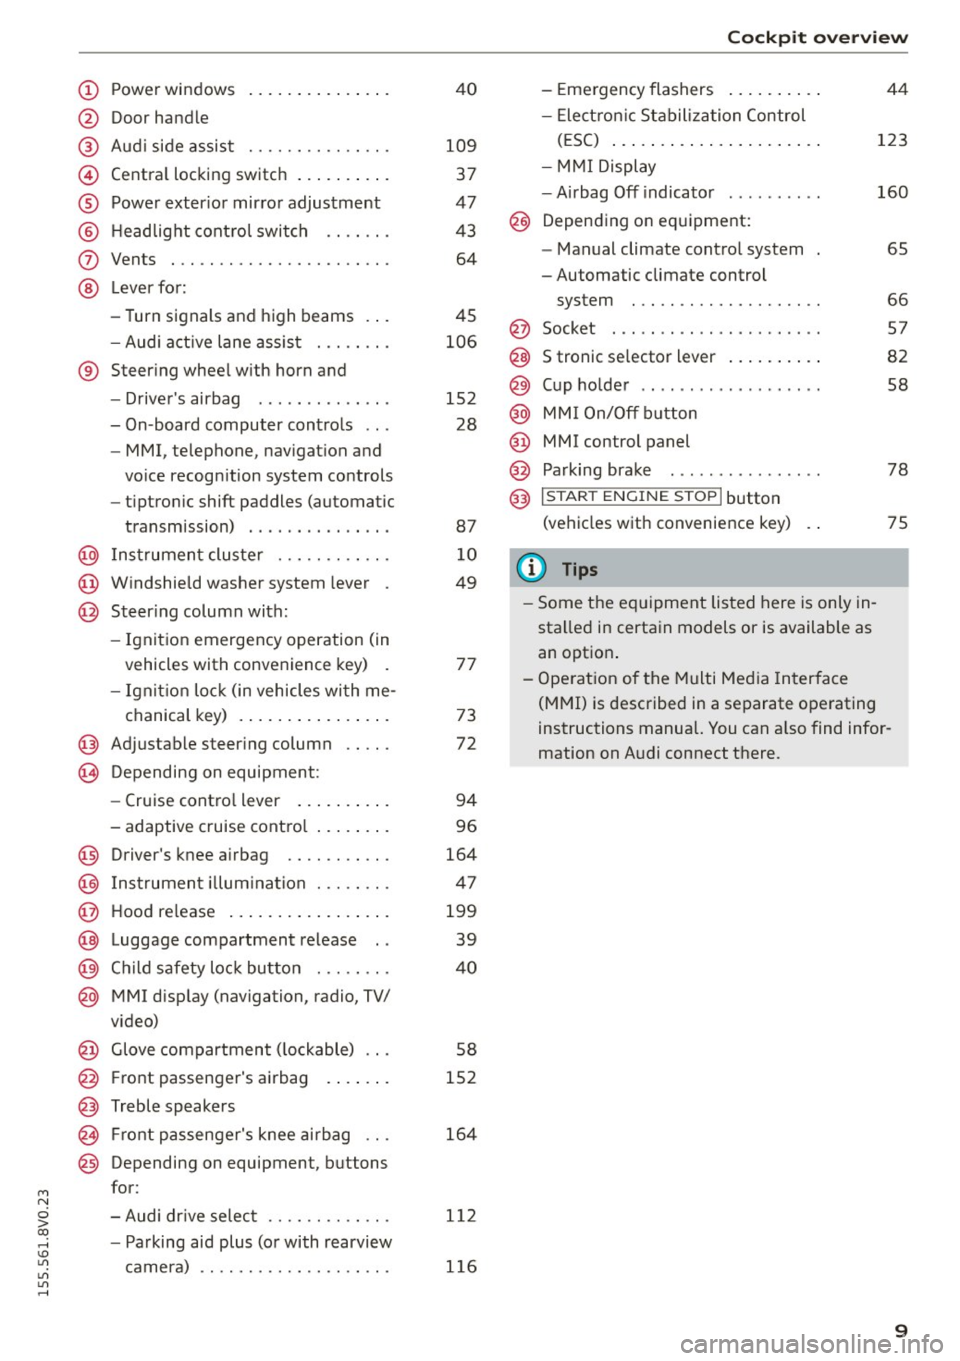
S tronic se lector lever
. .... ... ..
Cup ho lde r .. .. .......... .... .
MM I On/ Off button
MMI control panel
Parking bra ke
@) I S TAR T ENGI NE STOPI button
(vehicles with convenie nce key)
(J} Tips
- Some the eq uipment listed here is only in
sta lled in certa in models or is available as
an option . 44
123
160
6S
66
5 7
82
58
78
75
- Ope rat ion of the Multi Med ia In terface
(MMI) is described in a separate o perating
instructions manual. You can a lso find infor
mation on A udi connect there.
9
Page 84 of 282
Automatic transmi ssion
Automatic transmission
S tronic
Introduction
Applies to veh icles: w ith S tro nic transmiss ion
Your vehicle is equ ipped w ith an electronically
contro lled DSG transmission ca lled S tronic. Two
independent clutches transfer the power be
tween the eng ine and t ransmission. It a llows the
vehicle to accelerate without a noticeable inter
ruption in tract ion .
The transmission upshifts or downsh ifts auto
matica lly. The driv ing style contin uously influen
ces the se lection of the driving program .
When a
mod era te driving style is used, the
transmiss ion se lects the mos t econom ica l driving
mode. The transmission upsh ifts at a lower RPM
and downshifts at a higher RPM to improve fuel
efficiency .
The transmission swit ches to a sporty mode after
a kick-down or when the driver uses a
s po rty driv
ing sty le
characterized by quick accelerator pedal
movements, heavy acceleration, frequent
changes in speed and t raveling at the maximum
speed.
If desired, the drive r can a lso se lect the gears
manually ( tiptronic mode) ¢ page 87, Shift ing
manually (tiptronic mode) .
Selector lever positions
Applies to vehicles: w ith S tro nic transmiss ion
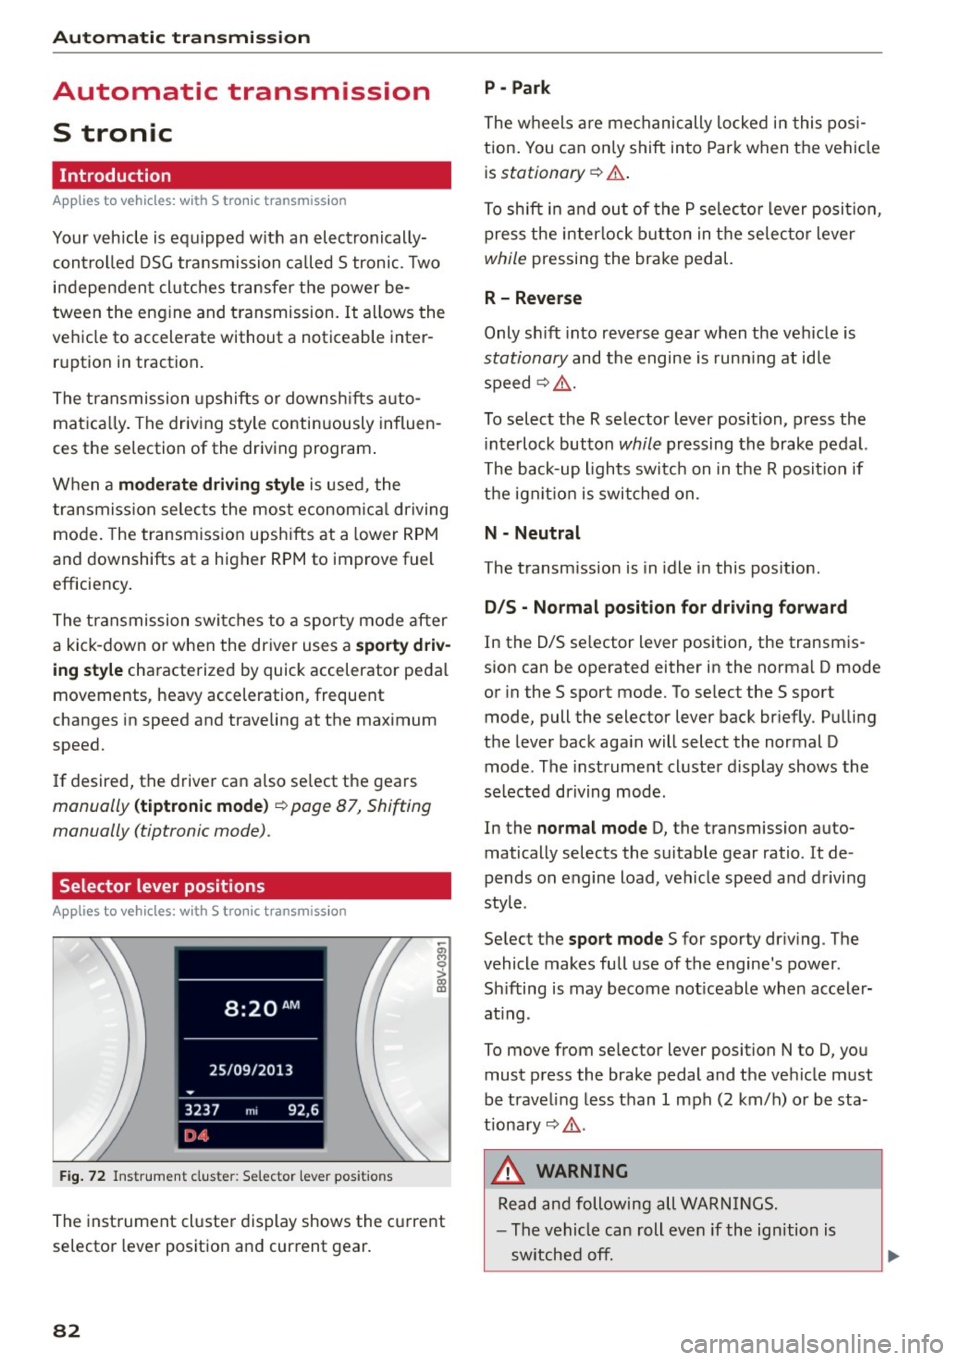
F ig. 72 In strum ent clus te r: S electo r lev er pos it io ns
-~ 0 > a, ID
The inst rument cl uste r display shows the c urrent
selector lever position and current gear.
82
P - Park
The wheels a re mechanically locked i n this pos i
tion . You can on ly shift into Par k when the vehi cle
i s
stationary ¢.&. .
To shift i n and ou t of the P se lec to r lever posit io n,
press the interlock button in the selec tor lever
while pressing the brake pedal.
R - Reverse
Only sh ift into reve rse gear when the vehicle is
stationary and the engine is run ning at id le
speed¢ .&..
To select the R selector lever position, p ress the
i nterlock button
while pressing the brake pedal.
The back-up lights switc h on in the R posit ion if
the ign it io n is switched on.
N - Neutral
The transm ission is in idle in this pos ition .
D/S - Normal po sit ion fo r dri ving f orward
In the D/S se lector lever position , the transm is
s ion can be operated either in the norma l D mode
or in the S sport mode. To se lect the S sport
mode, pull the selector lever back br iefly . Pu lling
the lever back aga in will select the normal D
mode . The instrument cluster display shows the
selected driving mode .
In the
normal mode D, the transmission auto
matically selects the suitable gear ratio. It de
pends on engine load, vehicle speed and d rivi ng
style .
Se lect the
sport mode S for sporty dr iv ing . The
vehicle makes fu ll use of the engine 's power.
Sh ifting is may become not iceable when accele r
at ing .
To move from se lec tor lever position N to D, you
must p ress the brake pedal and the ve hicle must
be traveling less than 1 mph (2 km/h) o r be sta
tiona ry¢ .&..
&, WARNING
Read and following all WA RN IN GS.
- The vehicle can roll even if the ignition is
sw itched off.
Page 86 of 282
Automatic transmission
than approximately 2 seconds when the brake
pedal is not pressed.
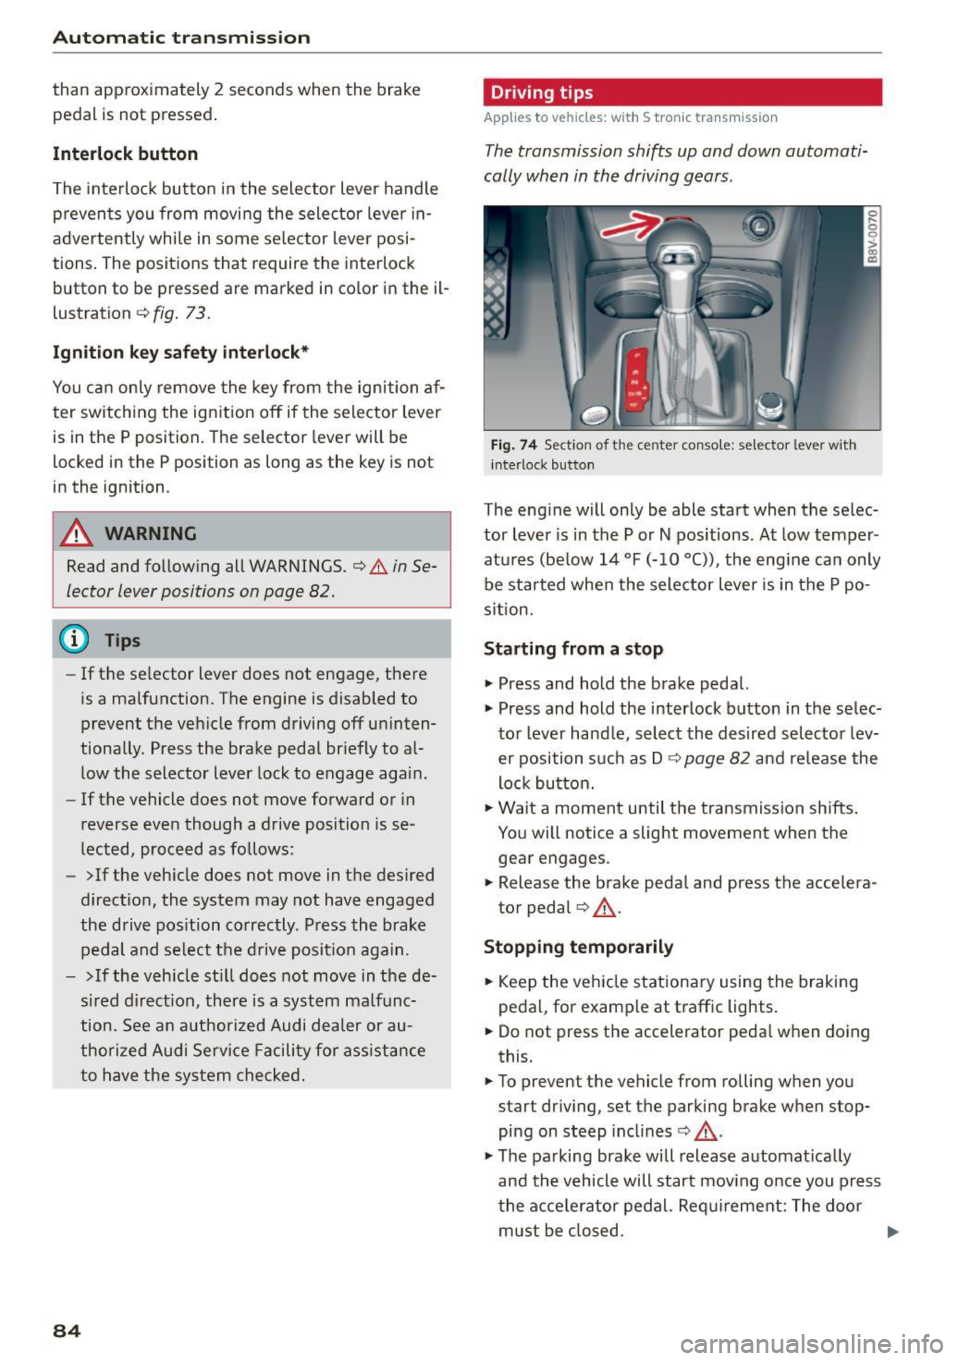
Interlock button
The interlock butto n in the selector lever handle
p revents you from moving the selector lever in
advertently while in some selector lever posi
t ions . The positions that require the interlock
button to be pressed are marked in co lor in the il
lustration
c::> fig. 73.
Ignition key safety interlock*
You can only remove the key from the ignition af
ter sw itching the ign ition off if the selector lever
is in the P position. The selector lever will be
locked in the P posit ion as long as the key is not
in the ignition .
A WARNING
Read and following all WARNINGS. c::> & in Se
lector lever positions on page 82.
@ Tips
- If the selector lever does not engage, there
is a malfunction. The engine is disabled to
prevent the vehicle from driving off uninten
tionally. Press the brake pedal br iefly to al
low the selector lever lock to engage again.
- If the vehicle does not move forward or in
reverse even though a drive position is se
lected, proceed as follows:
- >If the vehicle does not move in the desired
direct ion, the system may not have engaged
the drive pos ition correctly. Press the brake
pedal and select the drive position again.
- >If the veh icle still does not move in the de
sired direct ion, there is a system malfunc
tion. See an authorized Audi dealer or au
thorized Audi Service Facility for ass istance
to have the system checked.
84
Driving tips
Applies to vehicles: with S tronic transmissio n
The transmission shifts up and down automati
cally when in the driving gears .
Fig. 74 Sec tion of t he ce nter conso le: se le ct or lever with
interloc k button
The engine will only be able start when the selec
tor lever is in the P or N positions . At low temper
atures (be low 14 °F (-10 °C)), the engine can only
be started when the selector lever is in the P po
sition.
Starting from a stop
"' Press and hold the brake pedal.
"' Press and hold the interlock button in the selec
tor lever hand le, select the desired selector lev
er position such as D
c::> page 82 and release the
lock button.
"' Wait a moment until the transmission shifts .
You will notice a slight movement when the
gear engages .
"' Release the brake peda l and press the accelera
tor pedal
c::> ,&. .
Stopping temporarily
"'Keep the veh icle stationary using the braking
pedal, for example at traff ic lights .
"' Do not press the accelerator peda l when doing
this.
"' To prevent the vehicle from rolling when you
start driving, set the parking brake when stop
ping on steep incl ines
c::> ,&. .
"'The parking brake will release automat ically
and the vehicle will start moving once you press
the acce lerator pedal. Requirement: The door
must be closed.
Page 88 of 282
Automatic transmission
-If the engine must run while you are work
ing in the engine compartment with the
hood open, make sure a gear is not engag
ed . The selector lever must be firmly in the
P position and locked in place and the park
ing brake must be set ¢
page 198. Other
wise, the vehicle could begin moving when
the engine speed is high, even with the
parking brake set.
0 Note
- When stopping on an incline, do not try to
hold the vehicle in place by pressing the ac
celerator pedal while a driving gear is se
lected. This can cause the automatic trans
mission to overheat and can damage it. Ac
tivate the parking brake or press the brake
pedal to prevent the vehicle from rolling.
- Allowing the vehicle to roll when the engine
is stopped and the selector lever is in the N
position will damage the automatic trans
mission because it is not lubricated under
those circumstances.
- The transmission can overheat and be dam
aged under certain driving and traffic condi
tions such as frequent starts, creeping for a
long time, or stop-and-go traffic . When the
5] or. indicator light turns on, stop the
vehicle at the next opportunity and let the
transmission cool¢
page 88.
-Allowing the vehicle to roll when the engine
is stopped will damage the S tronic trans
mission because it is not lubricated
¢ page 2 54, Towing with a tow truck.
(D Tips
For safety reasons, the parking brake only re
leases automatically when the driver's door is
closed.
Hill descent control
Applies to veh icles: w ith S tron ic transm ission
The hill descent control system assists the driv
ing when driving down declines.
Hill descent control is activated when the selec
tor lever is in the Dor S position and you press
86
the brake pedal. The transmission automatically
selects a gear that is suitable for the incline. Hill
descent control tries to maintain the speed ach
ieved at the time of braking, within physical and
technical limitations. If may still be necessary to
adjust the speed with the brakes. Because hill de
scent control cannot shift down farther than 3rd
gear, it may be necessary to shift into tiptronic
mode in very steep areas . In this case, shift into
1st or 2nd gear in tiptronic mode to use the en
gine's braking force to relieve the brakes.
Hill descent control switches off once the decline
levels out or you press the accelerator pedal.
On vehicles with a cruise control system*
¢
page 94, hill descent control is also activated
when the speed is set .
&_ WARNING
Hill descent control cannot overcome physical
limitations, so it may not be able to maintain
a constant speed under all conditions. Always
be ready to apply the brakes.
Page 89 of 282
....,
N
0 > co
rl I.O
"'
"'
"'
rl
Shifting manually (tiptronic mode)
Applies to vehicles: with 5 tronic transmiss ion/ shi ft padd les
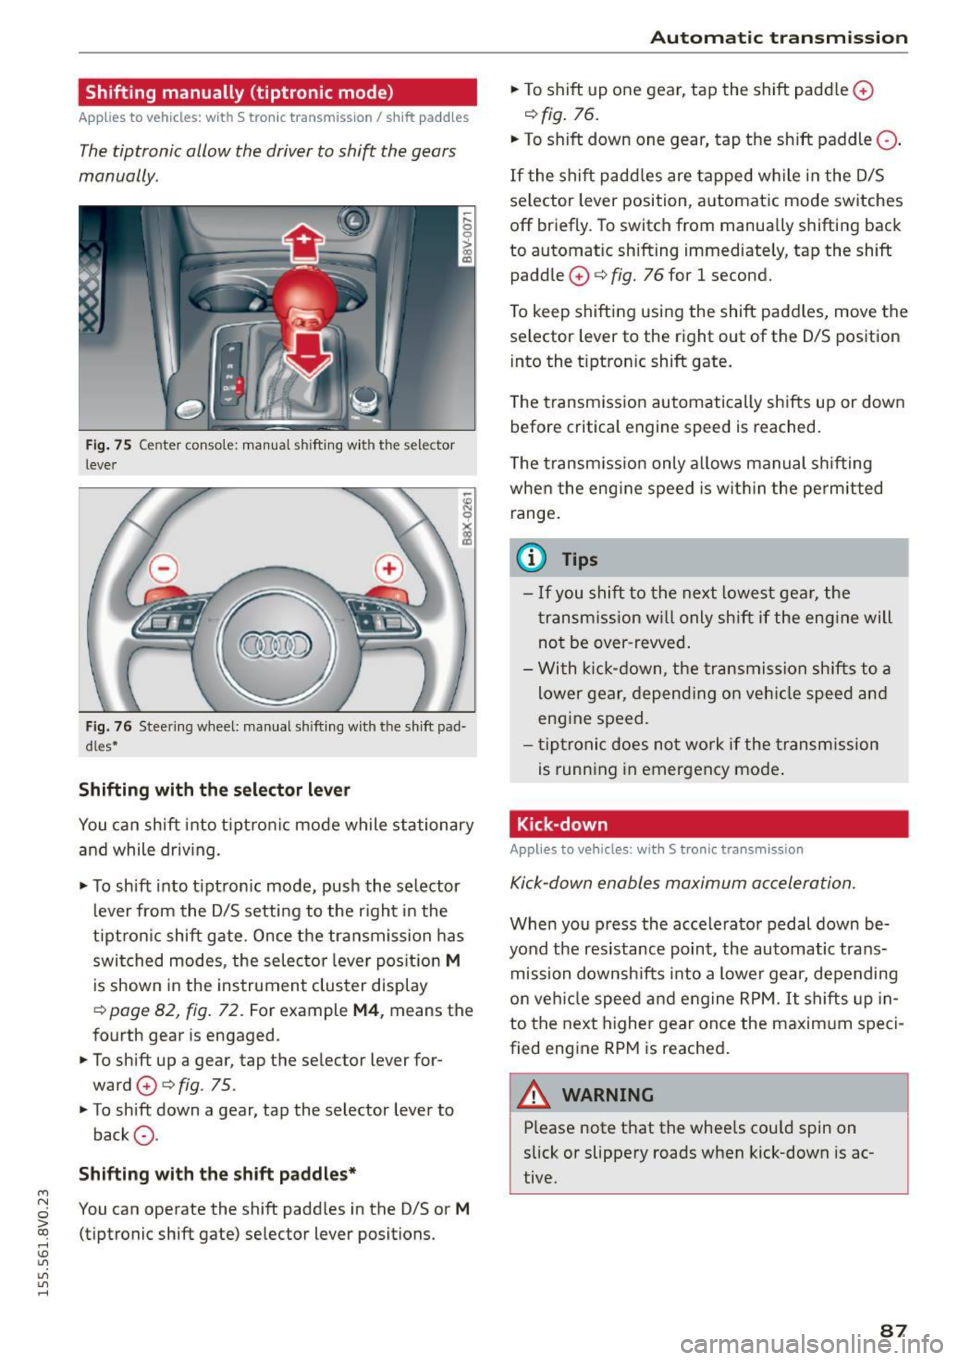
The tiptronic allow the driver to shift the gears
manually.
Fig. 75 Center c_onso le: manual shi fting wi th the selec tor
lever
Fig. 76 Steering wheel: manual shi fting with t he shift pad
d les*
Shifting with the selector lever
You can shift into tiptronic mode while stationary
and while driv ing.
• To shift into tip tron ic mode, push the selector
lever from the D/S setting to the right in the
tiptron ic shift gate. Once the transmission has
switched modes, the selecto r lever position
M
is shown in the instrument cluster display
r:::> page 82, fig. 72 . For example M4, means the
fourth gear is engaged.
• To shift up a gear, tap the selector lever for
ward
0 r:::> fig . 75.
• To shift down a gear, tap the selector lever to
back
0 -
Shifting with the shift paddles*
You can operate the shift paddles in the D/S or M
(tiptronic shift gate) selector lever positions.
Automatic transmission
• To shift up one gear, tap the shift padd le 0
r:::> fig. 76.
• To shift down one gear, tap the shift paddle 0 -
If the shift paddles are tapped while in the D/S
selector lever position, automatic mode switches
off briefly. To switch from manually shifting back
to automatic shifting immediately, tap the shift paddle
0 ¢ fig. 76 for 1 second.
To keep shifting using the shift paddles, move the
selector lever to the right out of the D/S position
into the t iptron ic shift gate.
T he transmission automatically shifts up or down
before critical engine speed is reached.
The transmission only allows manual shifting
whe n the engine speed is within the permitted
range.
(0 Tips
- If you shift to the next lowest gear, the
transmission will only shift if the engine will
not be over-revved.
- With kick-down, the transmission shifts to a
lower gear, depending on vehicle speed and
engine speed.
- tiptronic does not work if the transmission
is running in emergency mode .
Kick-down
Applies to vehicles: wit h S tronic transm issio n
Kick-down enables maximum acceleration.
When you press the accelerator pedal down be
yond the resistance point , the automatic trans
mission downsh ifts into a lower gear, depending
on veh icle speed and engine RPM.
It shifts up in
to the next higher gear once the maxim um speci
fied eng ine RPM is reached.
A WARNING ~
Please note that the whee ls cou ld spin on
slick or slippery roads when kick-down is ac
tive .
-
87
Page 90 of 282
Automatic transmission
Launch Control-Program
Applie s to v ehi cles: w ith launch control
The Launch Control Program enables maximum
acceleration .
Requirement: The engine must be at operating
temperature and t he steering wheel must not be
turned.
.,. With the engine running, press the
!~OFFI but
ton briefly one time
l) .
.,. Pull the selector lever back out of the O/S posi
tion briefly to select the S position, or press it
toward the right into the tiptronic position or
select the
Dynamic driving mode in drive se
lect*
~page 112.
.,. Press the brake pedal firmly with your left foot
and hold it all the way down for at least 1 sec
ond.
.,. At the same time, press the gas pedal all the
way down with your right foot until the engine
reaches and stays at a high RPM level.
.,. Remove your left foot from the brake.
_.&. WARNING
- Always adapt your driving to the traffic flow.
- Only use Launch Control when road and traf-
fic conditions allow it and other drivers will
not be endangered or impacted by your driv
ing and the vehicle's acceleration.
- Please note that the drive wheels can spin
and the vehicle can break away when sport
mode is switched on, especially when the
road is slippery.
- Once the vehicle has started moving, press
the
l .1'3 OFF ! button briefly to turn the sport
mode off.
(D Tips
- The transmission temperature may increase
significantly after using the launch control program. If that happens, the program may
1l In vehicles w ith a d rive r infor matio n syste m, a n ESC light
in t he instrument clus ter s tays o n co ntinuo usly and t he
message
Stabilization control (ESC): sport. Warning! Re·
stricted stability
appears temporarily.
88
not be available for a few minutes. It will be
available again after a cool-down period.
- When accelerating using the launch control
program, all vehicle parts are subject to
heavy loads. This can lead to increased wear.
Emergency mode
App lies to vehicles : wi th S t ro ni c t ra nsmi ssio n
In the event of a system malfunction, there is an
emergency program .
If all of the selector lever positions are highlight
ed with a light background in the instrument
cluster display, there is a system malfunction and
the S tronic transmission is running in the emer
gency program. The vehicle can still be driven in
emergency mode, but only with reduced speed
and not in all gears. In some cases, the vehicle
cannot drive in reverse .
(D Note
If the transmission runs in emergency mode,
drive to an authorized Audi dealer or author
ized Audi Service Facility immediately to have
the malfunction corrected.
Transmission malfunction
• Transmission malfunction! Please stop the
vehicle and select P
There is a malfunction in the transmission. Park
the vehicle securely and do not continue driving.
See an authorized Audi dealer or authorized Audi
Service Facility for assistance.
• Transmission overheating! Please stop the
vehicle!
The transmission is too hot and can become dam
aged. Stop and let the transmission cool with the
engine running (at idle) in the P selector lever po
sition. Then the indicator light and the message
turn off, drive to an authorized Audi dealer or au
thorized Audi Service Facility immediately to have.,.
Page 91 of 282
....,
N
0 > co
rl I.O
the malfunction corrected. If the indicator light
and the driver message do not turn off, do not
continue dr iv ing. See an authorized Audi dealer
or authorized Audi Service Facility for assistance .
rm Transmission malfunction: you can continue
driving
Drive to an authorized Aud i dealer or authorized
Aud i Service Facility immediately to have the
malfunction corrected.
rm Transmission malfunction: no reverse gear
(you can continue driving)
Drive to an authorized Aud i dealer or authorized
Audi Service Fac ility immediately to have the
malfunction corrected.
rm Transmission malfunction: You can continue
driving in D until engine off
Drive the vehicle away from moving traffic and
park. See an authorized Audi dealer or authorized
Audi Service Fac ility for assistance.
rm Transmission overheating! Please adapt
driving style
Continue driving moderate ly. When the indicator
light turns off, you can continue driving normally.
rm Transmission: Please press brake pedal and
select gear again
If the transmission malfunctions because the
temperature is too high, a message appears
when the transmission is coo led.
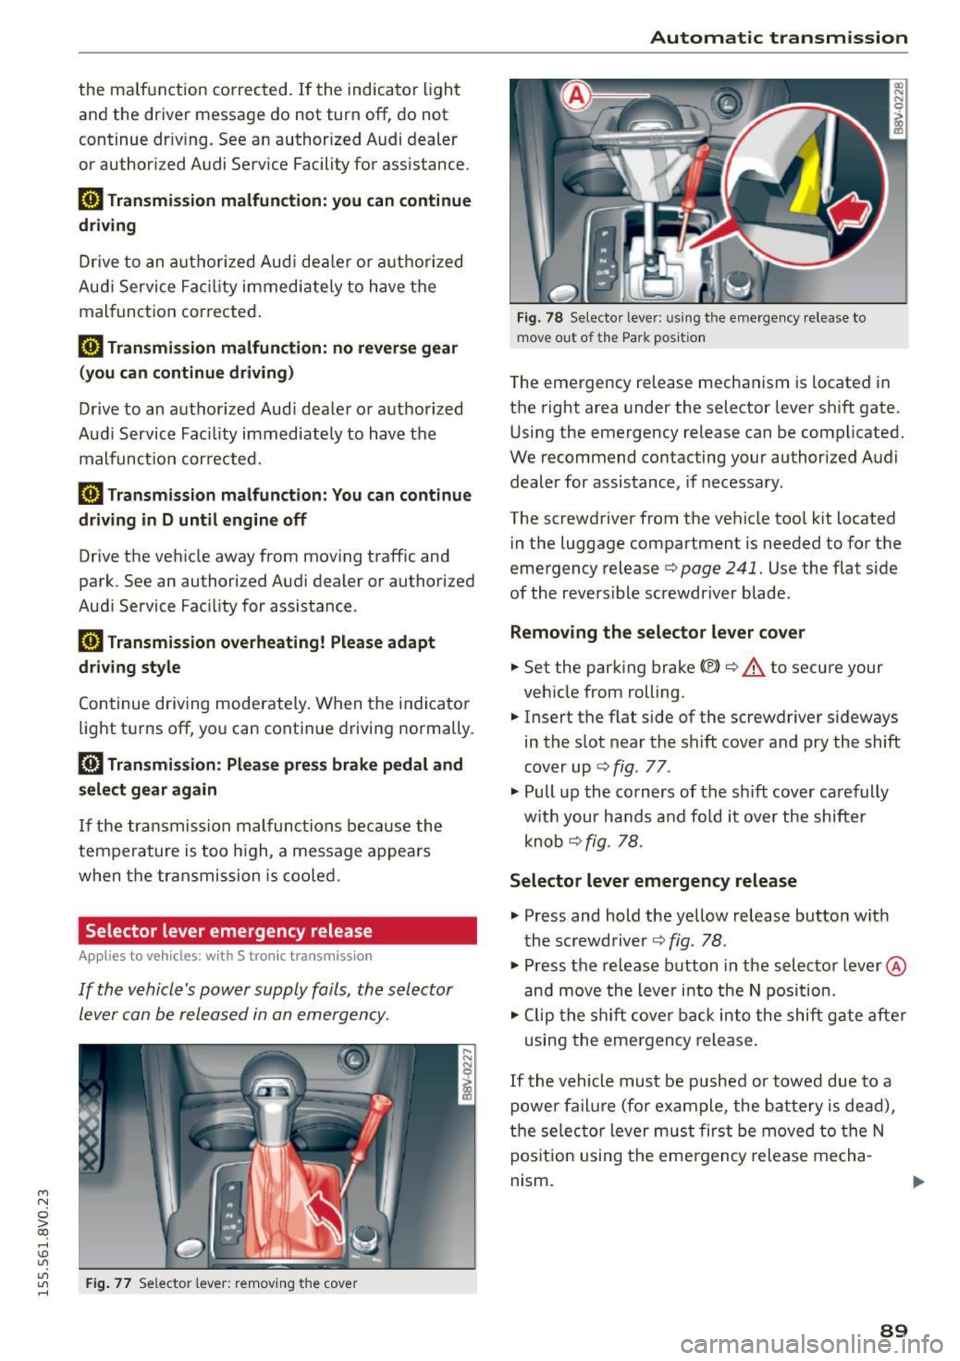
Selector lever emergency re lease
Appl ies to vehicles: with S tronic transm ission
If the vehicle's power supply foils, the selector
lever can be released in an emergency.
"'
"'
"' Fig. 77 Selector lever: removing the cove r rl
Automatic transmission
Fig. 78 Selector lever: u sing the emergency release to
move out of the Park position
The emergency release mechanism is located in
the right area under the selector lever shift gate.
Using the emergency release can be complicated.
We recommend contacting your authorized Audi dealer for assistance, if necessary.
The screwdriver from the vehicle too l kit located
in the luggage compartment is needed to for the
emergency release
c> page 241. Use the flat side
of the reversible screwdriver blade .
Removing the selector lever cover
.. Set the parking brake «Ell c> A to secure your
vehicle from rolling.
.. Insert the flat side of the screwdriver s ideways
in the slot near the shift cover and pry the shift
cover up ¢
fig. 77 .
.. Pull up the co rners of the sh ift cover carefully
with your hands and fo ld it over the shifter
knob ¢
fig. 78.
Selector lever emergency release
.. Press and hold the yellow release button with
the screwdriver ¢
fig. 78.
.. Press the release button in the selector lever ®
and
move the lever into the N position.
.. Clip the shift cover back into the shift gate after
using the emergency release.
If the vehicle must be pushed or towed due to a
power failure (for example, the battery is dead),
the selector lever must first be
moved to the N
position using the emergency release mecha
nism .
89
Page 114 of 282
Assist Driver messages
Appl ies to vehicles: with Audi side assist
If the side assist switches off automatically, a
message appears in the instrument cluster dis
p la y.
@j Audi side assist: currently unavailable.
No sensor vision
The radar sensors' vision is affected. Do not cover
the area in front of the sensors with bike wheels,
stickers, dirt or other objects. Clean the area in
front of the sensors, if necessary
r:!> page 110,
fig. 98.
@j Audi side assist: currently unavailable
Side assist cannot be switched on temporarily be
cause there is a ma lfunction (for examp le, the
battery charge level may be too low).
@j Audi side assist: System fault!
The system cannot guarantee that it will detect
veh icles correctly and it is switched off. The sen
sors have been displaced or are faulty. Have the
system checked by an authorized Audi dealer or
authorized Audi Service Facility soon.
Audi drive select (drive
settings)
Introduction
Applies to vehicles: with Audi drive select
Audi drive select makes it possible to experience
different types of vehicle settings in one vehicle.
The driver can select from three
Comfort, Auto
and Dynamic modes using the ~.7l.'i button in the
center console or the MMI to switch between a
sporty and a comfortable driving mode, for ex
ample . In the
individual* mode, the settings can
be adjusted to your personal preferences . This
makes it possib le to combine settings such as a
sporty engine tun ing with light steering .
.,&. WARNING
Using Audi drive select incorrect ly can lead to
collisions, other accidents and serious inju
ries.
112
· Description
Applies to vehicles: with Audi drive se lect
The vehicle setup in each mode depends on the
vehicle's features. However , the eng ine and steer
ing are always affected.
Engine and automatic transmission
Depending on the mode, the engine and auto
matic transmission* respond more qu ickly or in a
more balanced manner to accelerator peda l
movements .
Adaptive dampers (Audi magnetic ride)*
The adaptive dampers use sensors to record in
format ion regarding steer ing movements, brak
ing and acce lerat ion operations by the driver,
road surface, dr iv ing speed, and load. With Audi
drive select you can adjust the adaptive dampers
sporty (dynamic), comfortable (comfort) or bal
anced (auto).
Steering
T he steer ing adapts in terms of steer ing ass is
tance. There a re diffe rent modes
Q page 113.
Indirect steering that moves easily as in comfort
mode is especia lly suited to long drives on a high
way. The dynamic mode provides sporty, direct
steering .
For vehicles with progressive steering* the steer
ing performance is more agi le .
Cornering light*
The cornering light adjusts when driv ing on
curves at speeds between 6 mph (10 km/h) and
68 mph (110 km/h). The pivoting action and the
lig hting are also adapted to the mode.
Adaptive cruise control*
The behavior when accelerating can be adjusted
from comfortable to sporty, depending on the
Audi drive select mode. Adaptive cruise control
also responds to the driving behavior of the vehi
cle ahead in a more conservative or sporty man
ner.
Page 252 of 282
Fuses and bulbs
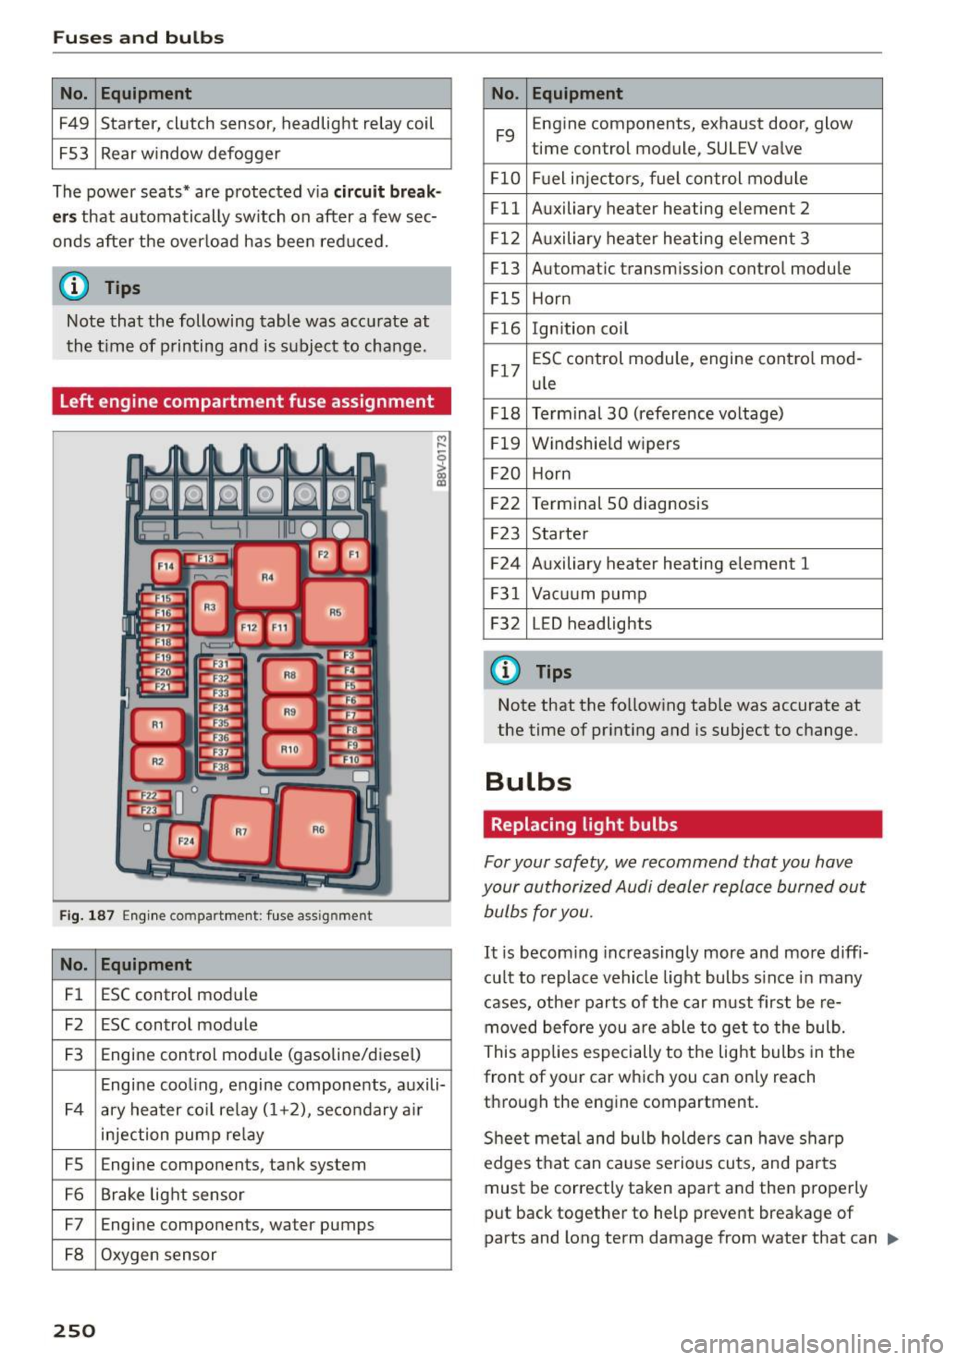
No. Equipment
F49 Starter, clutch sensor,
headlight relay coil
F53 Rear window defogger
The power seats* are protected via
circuit break
ers
that automatically switch on after a few sec
onds after the overload has been reduced.
(0 Tips
Note that the following table was accurate at
the time of printing and is subject to change.
Left engine compartment fuse assignment
Fig. 187 Engine compartmen t: fuse assig nme nt
No. Equipment
Fl ESC control module
F2 ESC control module
F3 Engine control module (gasoline/diesel)
Engine cooling, engine components, auxili-
F4 ary heater coil relay (1+2), secondary a ir
injection pump relay
FS Engine components, tank system
F6 Brake light sensor
F7 Engine components, water pumps
F8 Oxygen sensor
250
No. Equipment
F9 E
ngine components, exhaust door, glow
time control module, SULEV valve
Fl0 Fuel injectors, fuel control module
Fll Auxiliary heater heating element 2
F12 Auxiliary heater heating element 3
F13 Automatic transmission control module
FlS Horn
F16 Ign ition coil
F17 ESC
control module, engine contro l mod-
ule
F18 Terminal 30 (reference voltage)
F19 Windshie
ld wipers
F20 Horn
F22 Terminal 50 diagnosis
F23 Starter
F24 Auxiliary heater heating element 1
F31 Vacuum pump
F32 L
ED headlights
(!') Tips
Note that the following tab le was accurate at
the time of printing and is subject to change.
Bulbs
Replacing light bulbs
For your safety , we recommend that you have
your authorized Audi dealer replace burned out
bulbs for you.
It i s becoming increasingly more and more diffi
cu lt to replace vehicle light bulbs s ince in many
cases, other parts of the car must first be re
moved before you are able to get to the bulb.
This applies especially to the light bulbs in the
front of your car which you can only reach
through the engine compartment.
Sheet meta l and bulb holders can have sharp
edges that can cause serious cuts, and pa rts
must be correctly taken apart and then properly
put back together to help prevent breakage of
parts and long term damage from water that can .,,_
Page 254 of 282
Emerg enc y s it uat ion s
Emergency situations
General
T his c hapt er is inte nded fo r tra ined e merg ency
c rews a nd worki ng p ers onn el w ho h ave the nec
e ssa ry tool s and equipm ent t o perf orm the se
op era tion s.
Starting by pushing or
towing
CD Note
Veh icles w ith an automatic transmission can
not be started by push ing or tow ing.
Starting with jumper
cables
If necessary, the engine con be started by con
necting it to the battery of another vehicle .
If the engine should fail to start because of a d is
charged or weak battery, the battery can be con
nected to the battery of
another vehicle, using a
p air o f jump er ca bles to start the engine.
Jump er c able s
Use only jumper cables of sufficiently large cr oss
se ction
to carry the starter current safely. Refer
to the manufacturer's specifications.
Use on ly jumper cables with
insulated term inal
clamps which are d istinctly mar ked:
pl us( +) cabl e in most cases co lored re d
minu s(-) cable
in most cases colored black .
A WARNING
Batteries contain electricity, ac id, and gas.
Any of these can cause very ser ious or fatal in
jury . Follow the inst ruct ions be low for safe
hand ling of your veh icle's battery.
- Always shield your eyes and avoid leaning
over the battery w henever possible.
- A discharged battery can freeze at tempera
tures just below 32
°F (0 °C). Before con
nect ing a jumper cab le, you must thaw the
25 2
frozen battery completely, otherwise it
could explode.
- Do not allow battery acid to contact eyes or
skin. Flush any contacted area with water immediately.
- Improper use of a booster battery to start a
veh icle may cause an explosion.
- Vehicle batteries generate explosive gases .
Keep sparks, flame and lighted cigarettes
away from batteries.
- Do not try to jump start any vehicle with a
low acid level in the battery.
- The voltage of the booster battery must al
so have a 12-volt rating. The capacity (Ah) of
the booster battery should not be lower
than that of the discharged battery. Use of
batter ies of different voltage or substantial
ly different "Ah" rating may cause an explo
sion and personal injury.
- Never charge a frozen battery. Gas trapped in the ice may cause an explosion .
- Never charge or use a battery that has been
frozen. The battery case may have be weak
ened .
- Use of batter ies of different voltage or sub
stantially d ifferent capacity (Ah) rating may
cause an explosion and injury. The capacity
(Ah) of the booster battery should not be
lowe r than that of the discharged battery.
- Before you check anything in the engine
compartment, always read and heed a ll
WARNINGS
qpoge 198.
CD Note
-App lying a higher voltage booster battery
wi ll cause expensive damage to sensitive
elec tronic components, such as control
units, re lays, radio, etc.
- T here must be no electrical contact between
the vehicles as otherwise cu rrent cou ld al
ready start to flow as soon as the positive
(+) termina ls are connected.
@ Tips
The discharged battery must be properly con-
nected to the vehicle's electrical system. .,.