rims AUDI S3 SEDAN 2015 Owners Manual
[x] Cancel search | Manufacturer: AUDI, Model Year: 2015, Model line: S3 SEDAN, Model: AUDI S3 SEDAN 2015Pages: 282, PDF Size: 71.14 MB
Page 122 of 282
Parking systems
Parallel parking
Applies to veh icles: w ith pa rk in g system p lus w it h rearv iew
camera
This view may be used when parallel parking
along the side of a street .
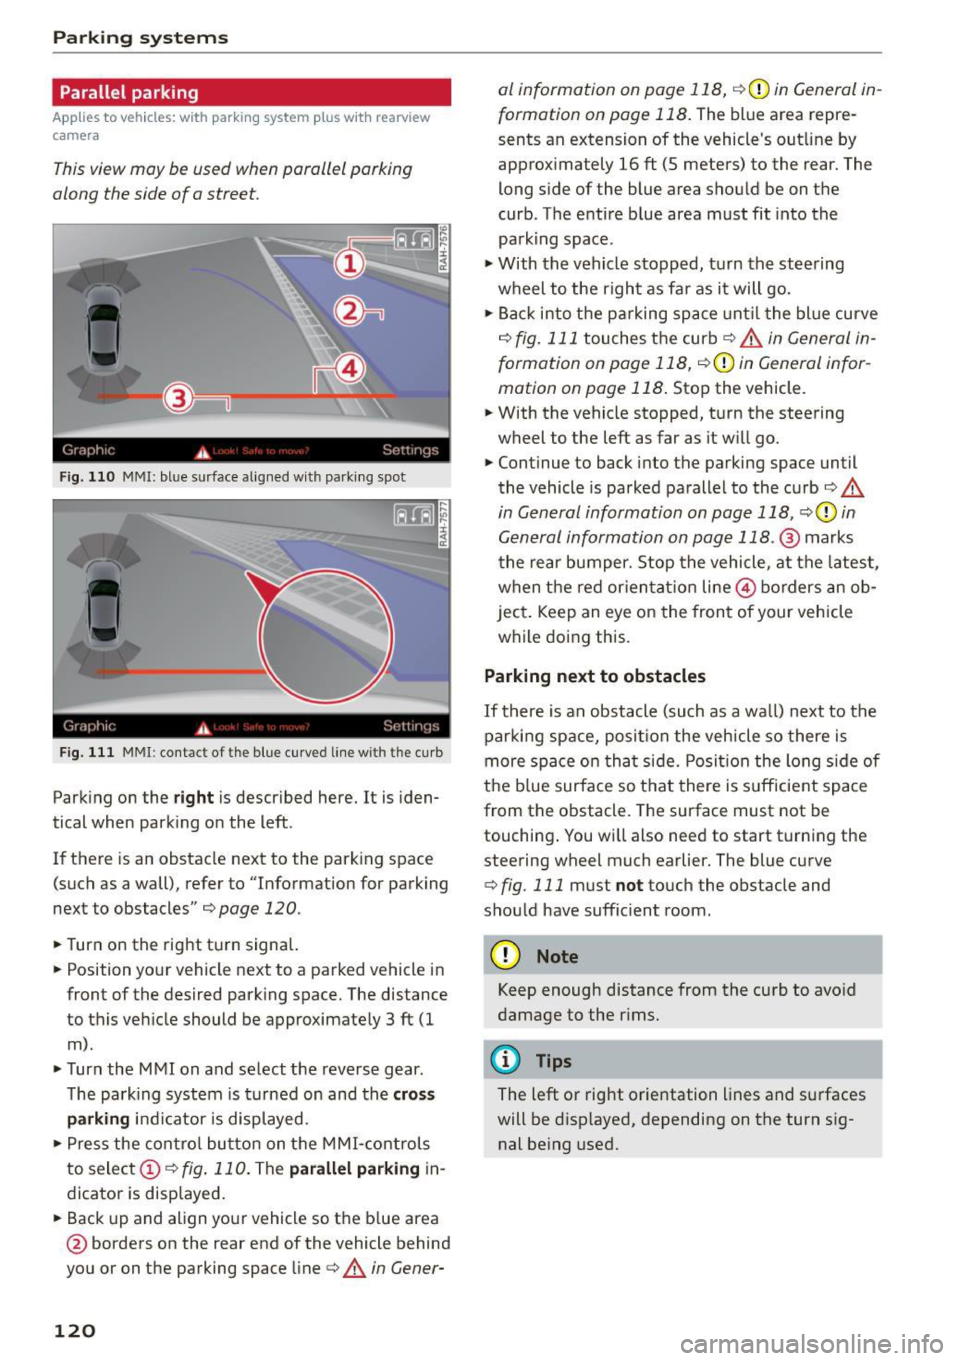
Fig. 110 MMI: blue surface aligned wit h parking spot
Fig. 111 MMI: contact of the blue curved line with the curb
Park ing on the right is described here. It is iden
tical when parking on the left .
If there is an obstacle next to the park ing space
(such as a wall), refer to "Information for parking
next to obstacles" ¢
page 120 .
.,. Turn on the right turn signal.
.,. Position your vehicle next to a parked vehicle in
front of the desired parking space. The distance
to this veh icle should be approximately 3 ft (1
m) .
.,. Turn the MMI on and select the reverse gear .
The park ing system is turned on and the
cross
parking indicator is displayed.
.,. Press the control button on the MMI-controls
to select
(D ¢ fig. 110. The parallel parking in
dicator is displayed .
.,. Back up and al ign your vehicle so the blue area
@ borders on the rear end of the vehicle behind
you or on the parking space line¢.&.
in Gener-
120
al information on page 118, ¢(Din General in
formation on page 118 .
The blue area repre
sents an extension of the vehicle's outline by
approximately 16
ft (5 meters) to the rear. The
long side of the blue area should be on the
curb . The entire b lue area must fit into the
parking space .
.,. With the vehicle stopped, turn the steering
wheel to the right as far as it will go .
.,. Back into the parking space until the blue curve
¢
fig. 111 touches the curb¢.&. in General in
formation on page 118, ¢(Din General infor
mation on page 118.
Stop the vehicle .
.,. With the vehicle stopped, turn the steering
wheel to the left as far as it will go .
.,. Continue to back into the parking space until
the vehicle is parked parallel to the curb¢.&.
in General information on page 118, ¢CI) in
General information on page 118 .@
marks
the rear bumper. Stop the vehicle, at the latest,
when the red orientat ion line @ borders an ob
ject. Keep an eye on the front of your vehicle
while doing this.
Parking next to obstacles
If there is an obstacle (such as a wall) next to the
parking space, position the veh icle so there is
more space on that side. Position the long side of
the blue surface so that there is suff icient space
from the obstacle. The surface must not be
touching . You will also need to start turning the
steering wheel much earlier. The blue curve
¢ fig. 111 must not touch the obstacle and
should have sufficient room .
(D Note
Keep enough distance from the curb to avo id
damage to the rims.
¢j) Tips
The left or right orientation lines and surfaces
will be disp layed, depending on the turn sig
nal being used.
Page 216 of 282
Tires and wheels
Tires and wheels
Wheels
General information
~check your tires regularly for
damage (punctures, cuts, crac ks
and bulges). Remove foreign ob
jects from the tire tread.
~ If driving over curbs or similar
obstacles, drive slowly and ap
proach the curb at an angle.
~ Have faulty tires or rims re
placed immediately.
~ Protect your tires from oil,
grease and fuel.
~ Mark tires before removing
them so that the same running direction can be maintained if
they are reinstalled.
~Lay tires flat when storing and
store them in a cool, dry location
with as little exposure to light as possible.
(D Note
-Please note that summer and winter tires are designed for
the conditions that are typical i n those seasons. Audi recom
mends using winter tires dur
i ng the winter months. Low
temperatures significantly de crease the elasticity of summ
er tires, which affects traction
214
and braking ability. If summer
tires are used in very cold tem peratures, cracks can form on
the tread bars, resulting in
permanent tire damage that
can cause loud driving noise
and unbalanced tires.
-Burnished, polished or chromed rims must not be used in winter driving condi
tions. The surface of the rims does not have sufficient corro
sion protection for this and
could be permanently dam
aged by road salt or similar
substances.
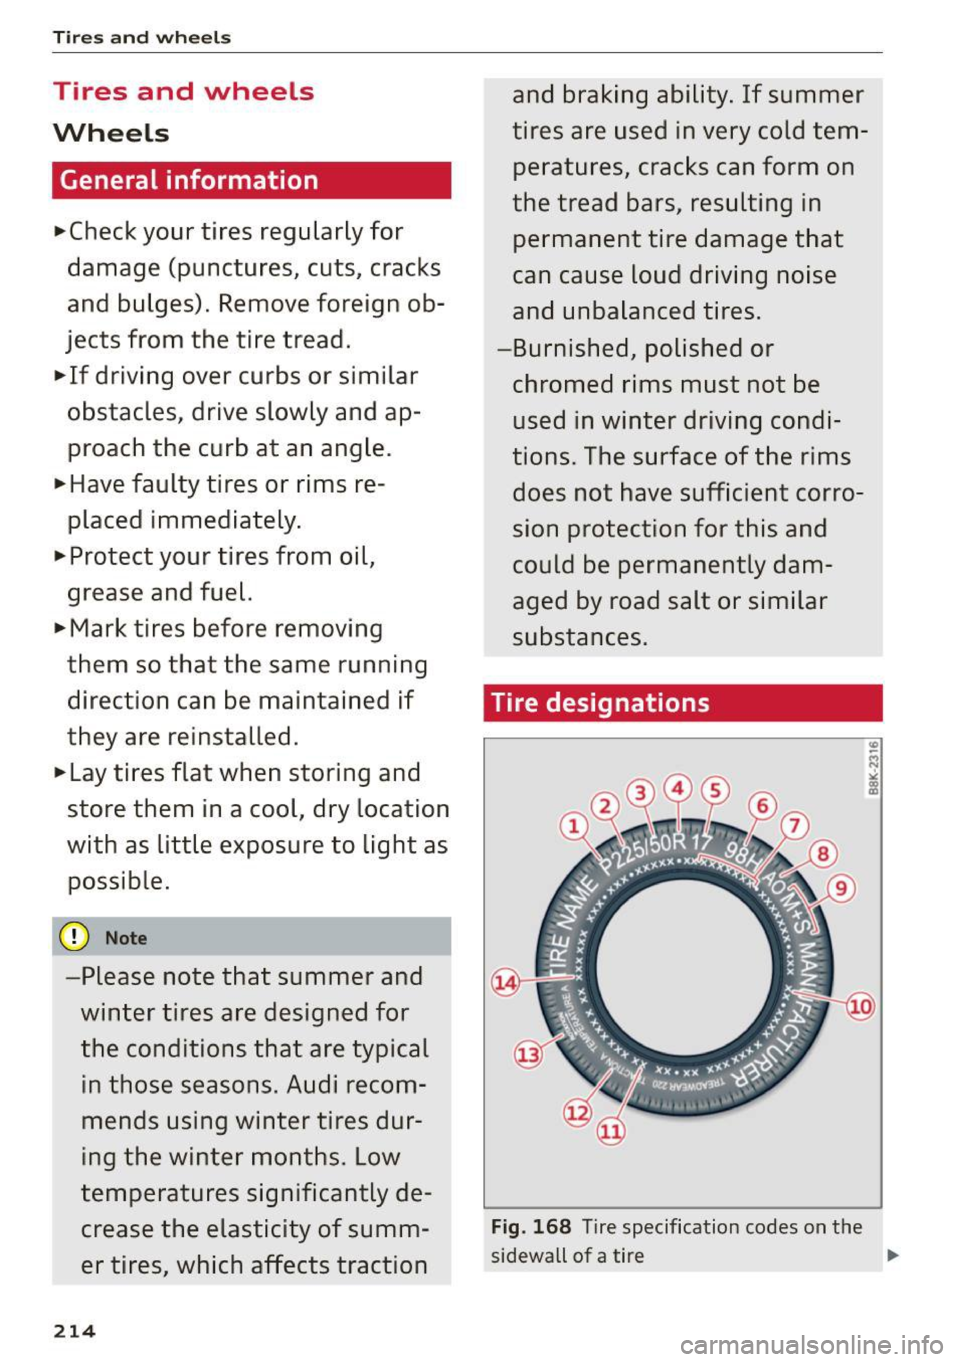
Tire designations
Fig. 168 Tire specification codes on the
sidewall of a tire .,_
Page 225 of 282
"' N
~
-Have an authorized Audi dealer or authorized Audi Service Facili
ty check the wheel alignment if
there is unusual wear.
-Have the wheels rebalanced if an imbalance is causing noticeable
vibration in the steering wheel.
If you do not, the tires and other
vehicle components could wear
more quickly .
Treadwe ar indic ato r
Original equipment tires contain
treadwear indicators in the tread pattern, which are bars that are
1/16 inch (1.6 mm) high and are
spaced even ly around the tire per
pend icular to the running direc
tion
¢ fig. 169. The letters "TW I"
or triangles on the tire sidewall indicate the location of the tread
wear indicators.
The tires have reached the mini mum tread depth
l) when they
have worn down to the treadwear
indicators. Replace the tires with
new ones¢ &.
Whe el rot ation
Rotating the wheels regularly is
recommended to ensure the tires
;;; l) Obey any applicable regu lation s in your ~
~ country . ....
Tires and wheels
wear evenly. To rotate wheels, in
stall the wheels from the rear
axle on the front axle and vice ver
sa. This will allow the tires to
have approximately the same
length of service life.
F or unidirectional tires, make sure
the tires are installed according to
the running direction indicated on
the tire sidewall¢
page 245.
Hidden damage
Damage to tires and rims can of
ten occur in locations that are hid
den. Unusual vibrations in the ve
hicle or pulling to one side may
indicate that there is tire damage .
Reduce your speed immed iately .
Check the tires for damage. If no
damage is visible from the out
side, drive slowly and carefully to
the nearest authorized Audi deal
er or authorized Audi Service Fa
cility to have the vehicle inspect
ed.
A WA RNING
-
Tread that has worn too low or
different tread depths on the
tires can reduce driving safety.
This can especially have a
223
Page 231 of 282
M N
0 > co ,...., \!) 1.1'1
1.1'1
1.1'1
,....,
be five 150 lbs. passengers in
your vehicle, the amount of
available cargo and luggage load capacity is 650 lbs.
(1400-750 (5
X 150) = 650
lbs.)
5. Determine the combined weight of luggage and cargo
being loaded on the vehicle.
That weight may not safely
ex
ceed the available cargo and
luggage load capacity calculat
ed in Step 4.
6. If your vehicle will be towing a trailer, load from your trailer
will be transferred to your vehi
cle. Consult this manual to de
termine how this reduces the available cargo and luggage
load capacity of your vehicle.
.,.Check the tire sidewall
(c> page 214, fig. 168) to deter
mine the designated load rating
for a specific tire.
Wheel bolts and rims
Wheel bolts
Wheel bolts must be clean and loosen/tighten
easily.
Rims
Rims with a bolted rim ring* or with bolted wheel
covers* consis t of mul tiple pieces. These compo
nents were bolted together using special bolts
and a special procedure . You must not repair or
disassemble them
Q ,& .
Tires and wheels
A WARNING
Wheel bolts that are tightened or repaired in
correctly can become loose and result in loss
of vehicle control, which increases the risk of
an accident . For the correct tightening specifi
cation, refer to~
page 242, A~er changing a
wheel.
- Always keep the wheel bolts and the threads
in the wheel hub clean and free of grease.
- Only use wheel bolts that fit the rim.
-Always have damaged rims repaired by an
authorized Audi dealer or authorized Audi
Service Facility. Never repair or disassemble
rims yourself, because this increases the risk
of an accident.
Winter tires
Winter tires significantly improve the vehicle's
handling when driving in winter conditions. Be
cause of their construction (width, compound,
tread pattern), summer tires provide less traction on ice and snow.
.. Use winter tires on all four wheels.
.. Only use winter tires that are approved for your
vehicle .
.. Please note that the maximum permitted
speed may be lower with winter tires
Q _& . An
authorized Audi dealer or authorized Audi Serv
ice Facility can inform you about the maximum
permitted speed for your tires.
.. Check the tire pressure after installing wheels
Qpage 224.
The effectiveness of winter tires is reduced great
ly when the tread is worn down to a depth of
0.157 inch (4 mm). The characteristics of winter
tires also decrease greatly as the tire ages, re
gardless of the remaining tread.
A WARNING
-Never drive faster than the maximum per
mitted speed for your tires. This could cause
the tires to heat up too much. This increases
the risk of an accident because it can cause
the tire to burst.
229
Page 232 of 282
Tires and wheel s
-Always adapt your driving to the road and
traff ic conditions. Dr ive carefully and red uce
yo ur speed on icy or slippery roads. Even
winter tires can lose tract io n on black ice .
@ For the sake of the environment
Reinstall summer tires at the appropriate
time, because they provide better handling
when roads are free of snow a nd ice. Summer
tires cause less road noise, tire wear and fuel
consumptio n.
(D Tips
You can also use all season tires instead of
w inte r tires. Please note that in some coun
t ries w here winter tires are requ ired, on ly win
t er tire s wi th the .& symbol may be pe rm it
t ed.
Snow chains
Snow chains improve traction in the snow .
.,. Only install snow chains on the front wheels.
Th is applies also to veh icles with all wheel
drive* .
.,. Ch eck and correct the seating of th e snow
c h ains if necessa ry afte r dri ving a few feet. Fo l
l ow the ins tructions from the manuf acturer.
.,. Note t he max imum permit ted speed w hen driv
ing with snow chains . Do not exceed 30 mph
(SO km/h).
Snow chains not only improve the
driving in win
ter road conditions, but a lso t he
braking .
Use of s now chai ns is o nly pe rm itted with certa in
r im/t ire comb ina tion s due to techn ica l reason s.
Chec k w ith an au thori zed A udi d ealer or au tho r
ized A udi Service Facility to see if yo u may use
snow cha ins.
Use
fine -mesh snow chain s. They mus t not add
mo re th an 0 .5 3 inch ( 13.S mm) in height, in clu d
ing the chain lock.
You must remove the chai ns when dr iv ing on
roads tha t are
free of snow. W hen r oads are free
of snow, snow chains can imp air handling an d
230
'
damage the tires, and the chains wi ll quick ly be
dest royed.
A WARNING
Using incorrect snow chains o r insta lling snow
cha ins incor rectly can res ult in loss of veh icle
c o ntrol, which increases the risk of an acc i
dent.
(D Note
- Snow chains can damage the rims/wheel
cove rs* if the c hains come into direct c on
tact with them. Remove the wheel covers*
first . Use coa ted snow cha ins.
Low aspect ratio tires
Your A udi is fac to ry-eq uipped w ith low aspect ra
t io t ires. These t ires have been thoroug hly tes ted
a nd been sele cted specifi ca lly f or your mode l for
the ir su perb pe rformance, r oad fee l and h andlin g
u nder a var iety of dr iv ing con ditions. As k your au
t h orized Aud i dea le r fo r more details .
The low aspe ct ratio of these tires is ind icated by
a n umer al of
55 or less in the t ire's s ize design a
tion . The nume ral represents the ratio of the
ti re's si dewall height in relatio n to its tread width
expressed i n pe rcentage. Conventional tires have
a height/width rat io o f 60 o r more .
The performance of low-aspect-ratio tire s is par
ticularly sensitive to imprope r inflation pres
sure. It is therefore important that low aspect ratio tires are inflated to the specified pressure
and that the inflation pressure is regularly
checked and maintained. Tire pressures should be checked at least once a month and always
b efor e a long trip
Q page 224 .
What you can do to avoid tire and rim
damage
Low aspect rat io tires can be damaged mo re eas i
l y by impact w ith potho les, c urbs , g ull ies o r
r idges on t he road, pa rti cularly if th e tire is un
der i nflated.
Page 240 of 282
Care and cleaning
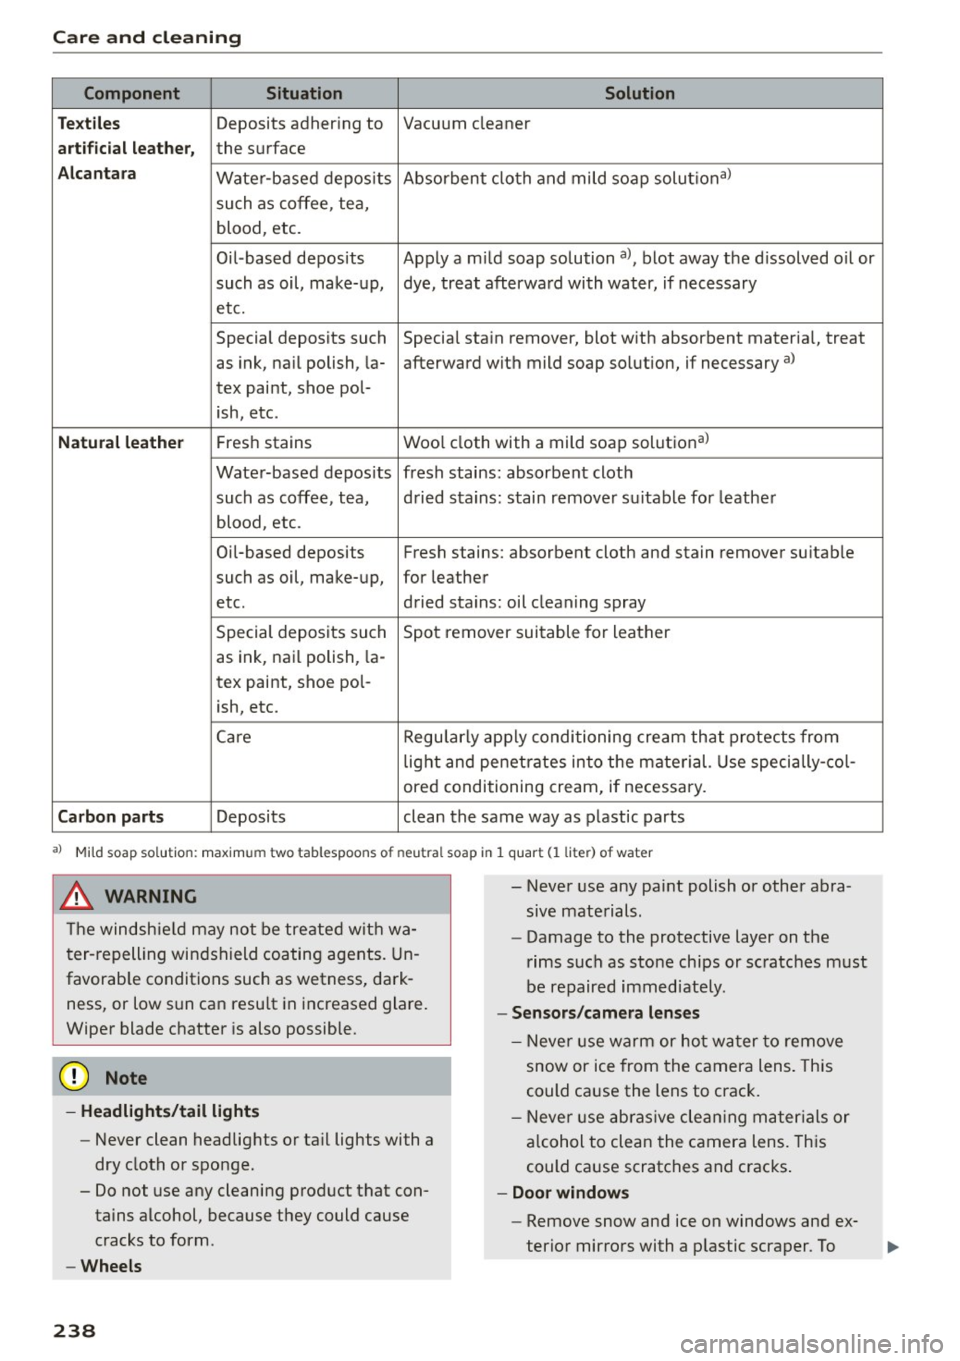
Component S ituation Solution
Te xtiles
Deposits adhering to Vacuum cleaner
arti ficial leath er, the surface
Alca ntara Wate r-based depos its Absorben
t cloth and mild soap solutional
such as coffee, tea,
blood, etc.
Oil-based deposits Apply a m ild soap solution al, blot away the d issolved oil or
such as oil, make-up, dye, treat afterwa rd with water, if necessary
etc.
Special deposits such Special stain remover, blot w ith absorbent materia l, treat
as ink, na il polish, la- afterward with mild soap so lution, if necessary a)
tex paint, shoe pol-
ish, etc.
Natural leather Fres h stains Wool cloth with a mild soap solutional
Wate r-based depos its fresh stains: absorbent clot h
such as coffee, tea, d ried stains: stain remover suitable for leathe r
blood, etc.
Oil-based deposits Fresh stains: absorbent cloth and stain remover suitab le
such as oil, make- up, for leather
etc. dried stains: oil cleaning spray
Special deposits such Spot remover sui table for leather
as ink, nai l polish, la -
tex paint, shoe pol-
ish, etc.
Care Regularly app ly condi tioning cream that protects from
lig ht and penet rates in to the mate rial. Use specially -col -
ored conditioning cream, if necessary.
Carbon part s Deposits clean the same way as plastic parts
al Mild soap sol ution: maxim um two tablespoons of neutral soap in 1 quar t (1 liter ) of water
_& WARNING
The windshie ld may not be tre ate d wit h wa
t er- repelling win dsh ield co ating agents. Un
favorab le conditions such as wetness, dark
ness, or low s un can resu lt in increased glare.
Wiper blade chatter is also possible.
(D Note
- Headlights/tail light s
-Never clean headlights or ta il lights with a
dry cloth or sponge.
- Do not use any cleaning prod uct that con
tains alcohol, because they could cause cracks to form.
- Wheels
238
-
- Never use any paint polish or other abra
sive mate rials.
- Damage to the protective layer on the
rims such as sto ne chips or sc ratches must
be repaired immediately.
- Sensors /camera lenses
- N eve r use warm or ho t w at er to remove
snow or ice from the camera lens . This
could ca use the lens to crack.
- N eve r use abras ive cle an ing m ateria ls or
a lcohol to clea n the camera lens. This
could ca use scratches and cracks .
-Doo r windows
- Remove snow and ice on windows and ex-
terio r mirro rs with a p lastic scraper. To
Page 248 of 282
Emergency assistance
-Have the wheel bolt tightening torque
checked with a torque wrench as soon as pos
sible by your authorized Audi dealer or a
qualified service station .
- With steel and alloy wheel rims , the wheel
bolts are correctly tightened at a torque of
90
ft lb (120 Nm).
- If you notice that the wheel bolts are corroded
and difficult to turn while changing a tire ,
they should be replaced before you check the
tightening torque.
- Replace the flat tire w ith a new one and have
it installed on your vehicle as soon as possi
ble . Remount the wheel cover.
Until then, dri ve with extra care and at reduced
speeds .
A WARNING
-If y ou ar e go ing to equip y our vehicle with
t ir es or rims wh ic h differ from t hose w hich
were factory install ed , th en be s ure to read
t h e info rmat io n
~ pag e 22 1.
- Always make su re the damaged w heel or
ev en a flat tir e and t he ja ck and too l kit are
p ro perly secured i n the luggage compar t
m ent an d are no t lo ose in the p assenge r
comp artment.
- In an accide nt o r su dden mane uver they
c ou ld fly forw ard, injuring anyo ne in t he ve
hicle .
- Always store d amaged w heel, ja ck and tool s
se cur ely in the L uggage comp artment. Oth
erwise , in an acciden t or sudden maneuve r
t h ey could fly forward, ca using injury to pas
sengers in the vehicle.
246
-
Spare tire
General information
Applies to vehicles: with space -saving spare tire {compac t
spare tire)
Fig. 1 82 Lu ggage compartme nt: cargo floor cove r fo lded
upward
Fi g. 183 Compact spare t ire
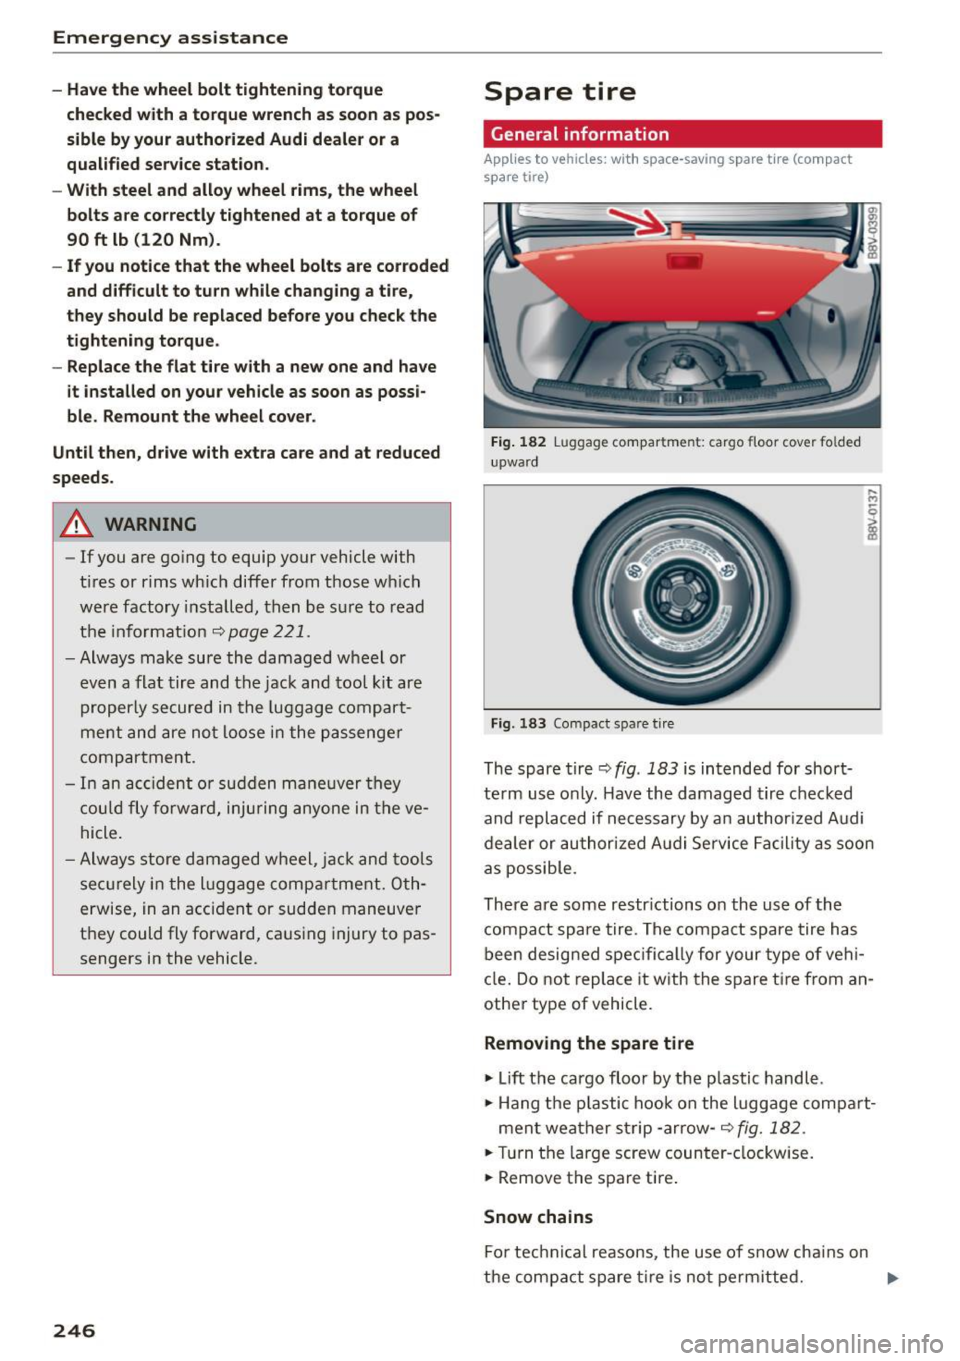
The spare t ire ~ fig . 183 is intended for short
te rm us e onl y. H ave the damaged tire c hec ked
and replaced if ne cessary by an authori zed Audi
de aler or au thori zed A udi Se rvice Facility as soon
as possible.
There are some restr ictions o n the use of the
compa ct spare tire . T he compa ct spare tire has
been desig ned spec ifi cal ly for your type o f ve hi
cl e. Do no t r eplace it w ith the s pare t ire from an
other type of vehicle.
Removing the spare tire
... lift th e cargo flo or by the p lastic handl e .
... Hang the p lastic hook on the luggage compart-
ment weather strip -arrow-~
fig. 182 .
... Tur n the lar ge screw coun ter -cl ockwise .
... Remove the spa re t ire .
Snow chains
Fo r tec hnical reasons, the use of s now cha ins on
the compact spare t ire is no t permitte d. .,.
Page 277 of 282
M N
0 > co ,...., \!) 1.1'1
1.1'1
1.1'1
,....,
R
Radiator fan
Radio clock 206
refer to Clock
. . . . . . . . . . . . . . . . . . . . . . . . 10
Rain/light sensor
Headlights . . . . . . . . . . . . . . . . . . . . . . . . . . 43
Indicator light . . . . . . . . . . . . . . . . . . . . . . . 24
Intermittent (windshield wipers) . . . . . . . . 49
Sw itching on/off . . . . . . . . . . . . . . . . . . . . . 49
Raising the vehicle . . . . . . . . . . . . . . . . . . . . 256
Range (tank contents) . . . . . . . . . . . . . . . . . . 28
Rear armrest . . . . . . . . . . . . . . . . . . . . . . . . . . 56
Rear lid
refer to luggage compartment lid . . . . . . . 39
Rear light
Indicator light . . . . . . . . . . . . . . . . . . . . . . . 24
Rearview camera
refer to Parking systems 116,117
Rearview mirror
refer to Mirror . . . . . . . . . . . . . . . . . . . . . . . 48
Rearview mirror dimming . . . . . . . . . . . . . . . 48
Rear window defogger . . . . . . . . . . . . . . . . . . 68
Recirculation mode
automatic control system . . . . . . . . . . . . . . 67
manual climate control system . . . . . . . . . . 65
Reducing fue l consumption
Efficiency program . . . . . . . . . . . . . . . . . . . . 29
Remote control
refer to Remote control key . . . . . . . . . . . . 33
Remote control key . . . . . . . . . . . . . . . . . . . . . 33
LED . . . . . . . . . . . . . . . . . . . . . . . . . . . . . 33, 34
Replacing the battery . . . . . . . . . . . . . . . . . 34
Synch ron izat ion . . . . . . . . . . . . . . . . . . . . . . 35
u nl ocking/locking . . . . . . . . . . . . . . . . . . . . 35
Repair manuals . . . . . . . . . . . . . . . . . . . . . . . 262
Repairs Airbag system . . . . . . . . . . . . . . . . . . . . . . 163
Replacement key . . . . . . . . . . . . . . . . . . . . . . 33
Replacing Light bulbs . . . . . . . . . . . . . . . . . . . . . . . . . 250
Replacing windshield wiper blades . . . . . . . . 50
Report ing Safety Defects . . . . . . . . . . . . . . . 138
Reset button (tr ip odometer) . . . . . . . . . . . . 11
Resetting the tr ip odometer . . . . . . . . . . . . . 11
Retract New brake pads . . . . . . . . . . . . . . . . . . . . . 125
Ind ex
Retractor . . . . . . . . . . . . . . . . . . . . . . . . . . . . 143
Reve rse (automatic transmission) . . . . . . . . . 82
Reversible mat . . . . . . . . . . . . . . . . . . . . . . . . 61
Right hand dr ive . . . . . . . . . . . . . . . . . . . . . . . 46
Rims ......... ... .. ................. 229
Roof rack . . . . . . . . . . . . . . . . . . . . . . . . . . . . . 62
Load ing . . . . . . . . . . . . . . . . . . . . . . . . . . . . . 63
Roof weight . . . . . . . . . . . . . . . . . . . . . . . . . 63
s
Saddlebag . . . . . . . . . . . . . . . . . . . . . . . . . . . . 61
Safe drivi ng habits . . . . . . . . . . . . . . . . . . . . 130
Safety Airbag system . . . . . . . . . . . . . . . . . . . . . . 148
Belts . . . . . . . . . . . . . . . . . . . . . . . . . . . . . . 140
Cargo . . . . . . . . . . . . . . . . . . . . . . . . . . . . . 136
Co rrect seating position . . . . . . . . . . . . . . 131
Pedal a rea . . . . . . . . . . . . . . . . . . . . . . . . . . 135
Safety be lt pos ition . . . . . . . . . . . . . . . . . . . 144
Safety belt height adjustment . . . . . . . . . 146
Safety be lts worn by pregnant women 145
Safety be lt pretensioner
Serv ice and disposal . . . . . . . . . . . . . . . . . 147
Safety be lts . . . . . . . . . . . . . . . . . . . . . . 1 40, 143
Adjusting . . . . . . . . . . . . . . . . . . . . . . . . . . 145
Cleaning . . . . . . . . . . . . . . . . . . . . . . . . . . . 23
7
Danger to passengers who do not wear a
safety belt . . . . . . . . . . . . . . . . . . . . . . . . . 141
Fastening . . . . . . . . . . . . . . . . . . . . . . . . . . 143
Height ad justment . . . . . . . . . . . . . . . . . . . 146
Improperly wo rn . . . . . . . . . . . . . . . . . . . . 146
Indicator lig ht . . . . . . . . . . . . . . . . . . . . . . . 20
Not worn . . . . . . . . . . . . . . . . . . . . . . . . . . 141
Sa fe ty be lt pos ition . . . . . . . . . . . . . . . . . . 144
Safety instr uctions . . . . . . . . . . . . . . . . . . . 142
Securing child safety seats . . . . . . . . . . . . 182
Special considerations for pregnant wom-
en . . . . . . . . . . . . . . . . . . . . . . . . . . . . . . . . 145
Unfastening . . . . . . . . . . . . . . . . . . . . . . . . 145
Warning/ind icator light . . . . . . . . . . . . . . . 140
Worn properly . . . . . . . . . . . . . . . . . . . . . . 142
Safety be lt warning light . . . . . . . . . . . . . . . 140
Safety centra l locking . . . . . . . . . . . . . . . . . . . 38
Safety compliance sticker . . . . . . . . . . . . . . 258
Safety eq uipment . . . . . . . . . . . . . . . . . . . . . 130
275