horn AUDI S3 SEDAN 2015 Owners Manual
[x] Cancel search | Manufacturer: AUDI, Model Year: 2015, Model line: S3 SEDAN, Model: AUDI S3 SEDAN 2015Pages: 282, PDF Size: 71.14 MB
Page 11 of 282
M N
0 > co ...... \!) ..,.,
..,.,
..,., ......
CD
@
®
©
®
®
(J)
®
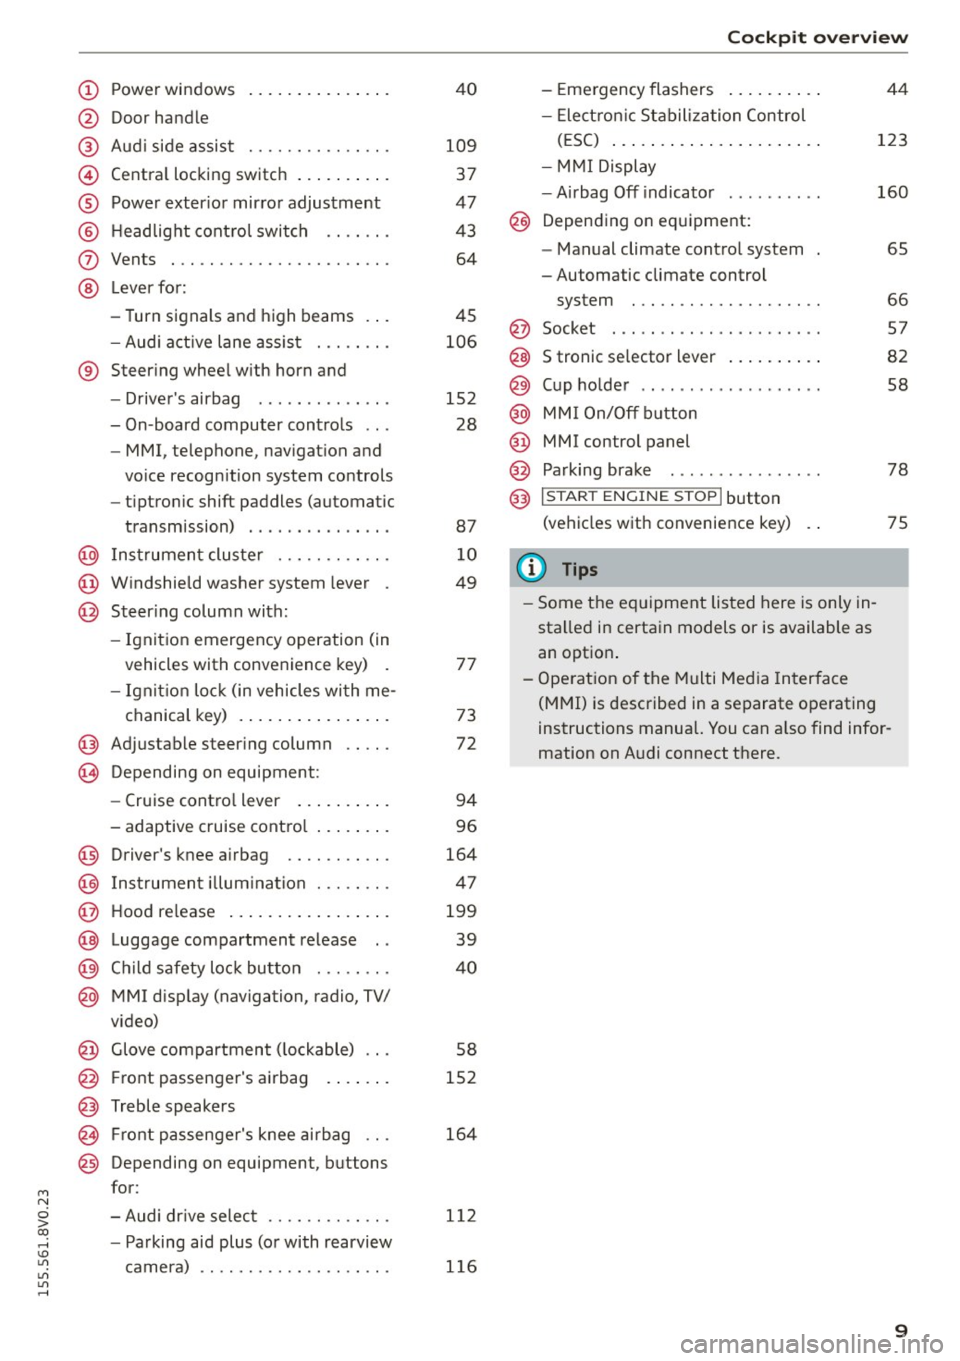
Power windows
Door hand le
Aud i side assist
........ .... .. .
Centra l locking switch ... .. .. .. .
Powe r exter ior mir ro r adjustment
H ead light cont rol swit ch .. .. .. .
Vents
L ever fo r:
- Turn si gnals and high beams . . .
- Audi act ive lane assis t ... .. .. .
® Steer ing whee l w ith horn and
@
©
@
- Driver's airbag ....... .. .. .. .
- On-board computer controls .. .
- MMI, telephone , nav igat ion and
vo ice recogn ition system controls
- tiptron ic shift paddles (automatic
transmission)
I ns trumen t clus te r ..... .. .. .. .
W indshield washer system lever .
Steer ing column with:
- Ignit ion emergency operation (in
vehicles with conve nience key) .
- Ignit ion loc k (in vehicles wi th me-
chanical key) . ..... ... .. .. .. .
@ Adjustable steer ing column
(B) D epending on equipment: 4
0
109
37
47
4 3
64
45
106
152 28
87
1 0
49
7 7
73
72
- Cruise contro l lever . . . . . . . . . . 94
- adaptive cruise cont ro l . .. .. .. .
Driver's knee a irbag .... .. .. .. .
I ns trumen t illum ination . .. .. .. .
Hood re lease
. .. .... ... .. .. .. .
Luggage compartment release ..
C hild safety loc k bu tton . .. .. .. .
MMI disp lay (navigation, radio, TV/
video)
Glove compartment ( lockable) .. .
F ront passenger's airbag . ... .. .
Treble speakers Fr ont passenger's knee airbag .. .
Depending on equipment, b uttons
f or:
- Audi dr ive select ...... .. .. .. .
- Pa rking aid plus (o r with rearview
camera) 9
6
164
4 7
199
39
40
58
152
164
1 12
1 16
Co ckpit over view
-Eme rgency flashers ..... ... . .
- Elect ron ic St abiliza tion Control
( E SC) ..... .. .. .... .... ... . .
- MMI Displ ay
- Airbag Off indicato r ..... .... .
@ Depending on eq uipment:
- Manual climate contro l system .
- Automatic climate control
system ... .. ............. . .
@ Socket . .... .. .. ........... . .
S tronic se lector lever
. .... ... ..
Cup ho lde r .. .. .......... .... .
MM I On/ Off button
MMI control panel
Parking bra ke
@) I S TAR T ENGI NE STOPI button
(vehicles with convenie nce key)
(J} Tips
- Some the eq uipment listed here is only in
sta lled in certa in models or is available as
an option . 44
123
160
6S
66
5 7
82
58
78
75
- Ope rat ion of the Multi Med ia In terface
(MMI) is described in a separate o perating
instructions manual. You can a lso find infor
mation on A udi connect there.
9
Page 37 of 282
....,
N
0 > co
rl I.O
"'
"'
"'
rl
• If you press a button quickly, the LED blinks
once .
• If you press a button longer (convenience open
ing*), the LED blinks several times.
• If the LED does not blink, the remote control
key battery is dead. The message=
Please
ch ange ke y batt ery
can also appear in the in
strument cluster d isplay . Replace the battery .
Replacing the remote cont rol ke y batte ry
"Pry off the cover with a co in c;, fig. 20.
• Insert the new battery w ith the" +" facing up .
• Press the cover back onto the key until it clicks
into place .
We recommend having the battery replaced by
an authorized Audi dealer or authorized Audi
Service Fac ility .
@.) For the sake of the environment
Dead batteries must be disposed of using
methods that will not harm the env ironment.
Do not dispose of them i n household trash .
{!) Tips
The replacement battery must meet the same
specifications as the original battery .
Remote control key synchronization
The remote control key must be synch ron ized if
the vehicle does not lock and unlock with the re
mote cont ro l.
• Press the remote control key button
l@J .
• Insert the key in the dr iver door lock within 30
seconds.
• Press the
[m] button o r Im button.
Opening and clo sing
Unlocking/locking by remote control
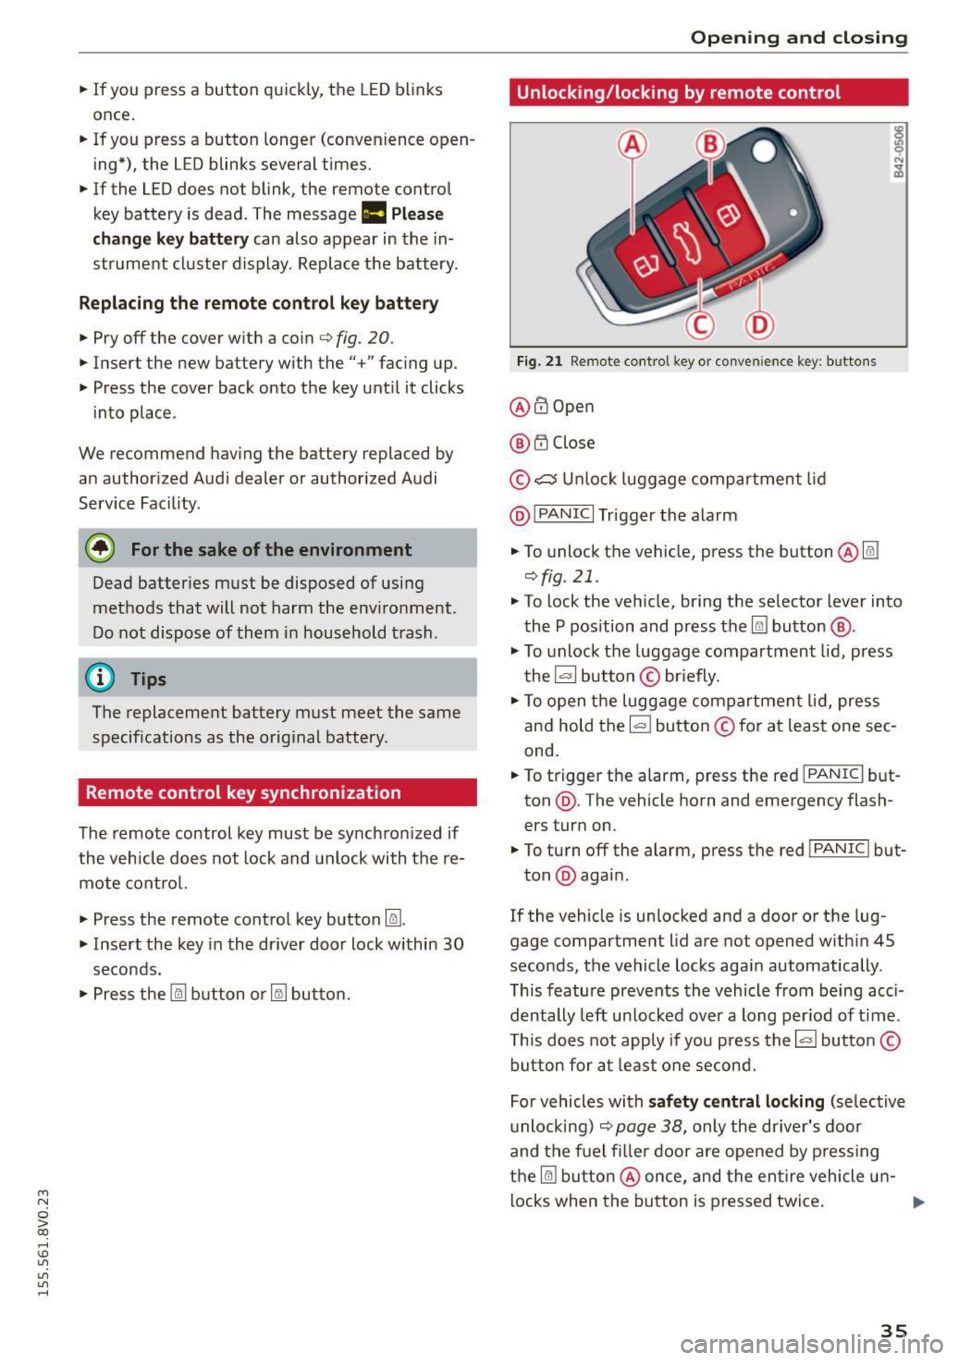
Fig. 2 1 Remote cont rol key o r conven ience key: b uttons
@ @Open
@ t'.D Close
© ,;:::::::, U nlock luggage compartment lid
@ I
PANIC I Trigger the alarm
• To unlock the vehicle, press the button @@:!
¢fig.21 .
• To lock the ve hicle, br ing the selector lever into
the P position and press the
Im button @ .
• To unlock the luggage compartment lid, press
the~ button © briefly .
• To open the luggage compartmen t lid, press
and hold the I= ! button © for at least one sec
ond.
• To trigger the alarm, press the red I
PANIC I but
ton @. The vehicle horn and emergency flash
ers turn on.
• To turn off the alarm, press the red I
PANIC ! but-
ton @again .
If the vehicle is unlocked and a door or the lug
gage compartment lid are not opened w ith in 45
seconds, the vehicle locks aga in automatically .
This feature prevents the vehicle from being acci
dentally left un locked over a long per iod of t ime .
T his does not app ly if you press the~ button©
button for at least one second.
For vehicles with
s af ety ce ntral locking (se lective
u nlocking)
c;, page 38, only the dr iver's door
and the fuel filler door are opened by press ing
the
@I button @once, and the en tire vehicle u n-
locks when the button is pressed twice. ..,.
35
Page 165 of 282
M N
0 > co ,...., \!) ..,.,
..,.,
..,., ,....,
seat into its rearmost position in the seat's
fore and aft adjustment range, as far away
from the airbag as possible . The backrest
must be adjusted to an upright position .
Make sure that the
PASSENGER AIR BAG
OFF
light comes on and stays on all the time
whenever the ignition is switched on.
A WARNING
- If the PASSENGER AIR BAG OFF light does
not go out when an adult is sitting on the
front passenger seat after taking the steps
described above, make sure the adult is
properly seated and restrained at one of the
rear seating positions.
- Have the airbag system inspected by your
Audi dealer before transporting anyone on
the front passenger seat.
(D Tips
If the capacitive passenger detection system
determines that the front passenger seat is
empty, the frontal airbag on the passenger
side will be turned off, and the
PASSENGER
AIR BAG OFF light will stay on .
Repair, care and disposal of the airbags
Parts of the airbag system are installed at many
different places on your Audi . Installing, remov
ing , servicing or repairing a part in an area of the
vehicle can damage a part of an airbag system
and prevent that system from working properly
in a collision.
There are some important things you have to know to make sure that the effectiveness of the
system will not be impaired and that discarded
components do not cause injury or pollute the
environment.
A WARNING
-
Improper care, servicing and repair proce
dures can increase the risk of personal injury
and death by preventing an airbag from de
ploying when needed or deploying an airbag
unexpectedly:
Airbag system
-Never cover, obstruct, or change the steer
ing wheel horn pad or airbag cover or the in
strument panel or modify them in any way.
- Never attach any objects such as cup holders
or telephone mountings to the surfaces cov
ering the airbag units.
- For cleaning the horn pad or instrument
panel, use only a soft, dry cloth or one mois
tened with plain water . Solvents or cleaners
could damage the airbag cover or change
the stiffness or strength of the material so
that the airbag cannot deploy and protect
properly.
- Never repair, adjust, or change any parts of
the airbag system.
-All work on the steering wheel, instrument
panel, front seats or electrical system (in
cluding the installation of audio equipment,
cellular telephones and CB radios, etc.)
must be performed by a qualified technician
who has the training and special equipment
necessary.
- For any work on the airbag system, we strongly recommend that you see your au
thorized Audi dealer or qualified workshop.
- Never modify the front bumper or parts of
the vehicle body.
- Always make sure that the side airbag can inflate without interference:
- Never install seat covers or replacement upholstery over the front seatbacks that
have not been specifically approved by
Audi .
- Never use additional seat cushions that
cover the areas where the side airbags in
flate.
- Damage to the original seat covers or to
the seam in the area of the side airbag
module must always be repaired immedi
ately by an authorized Audi dealer.
- The airbag system can deploy only once. Af
ter an airbag has been deployed, it must be
replaced with new replacement parts de
signed and approved especially for your Audi model version. Replacement of complete
airbag systems or airbag components must be performed by qualified workshops only.
Make sure that any airbag service action is
163
Page 252 of 282
Fuses and bulbs
No. Equipment
F49 Starter, clutch sensor,
headlight relay coil
F53 Rear window defogger
The power seats* are protected via
circuit break
ers
that automatically switch on after a few sec
onds after the overload has been reduced.
(0 Tips
Note that the following table was accurate at
the time of printing and is subject to change.
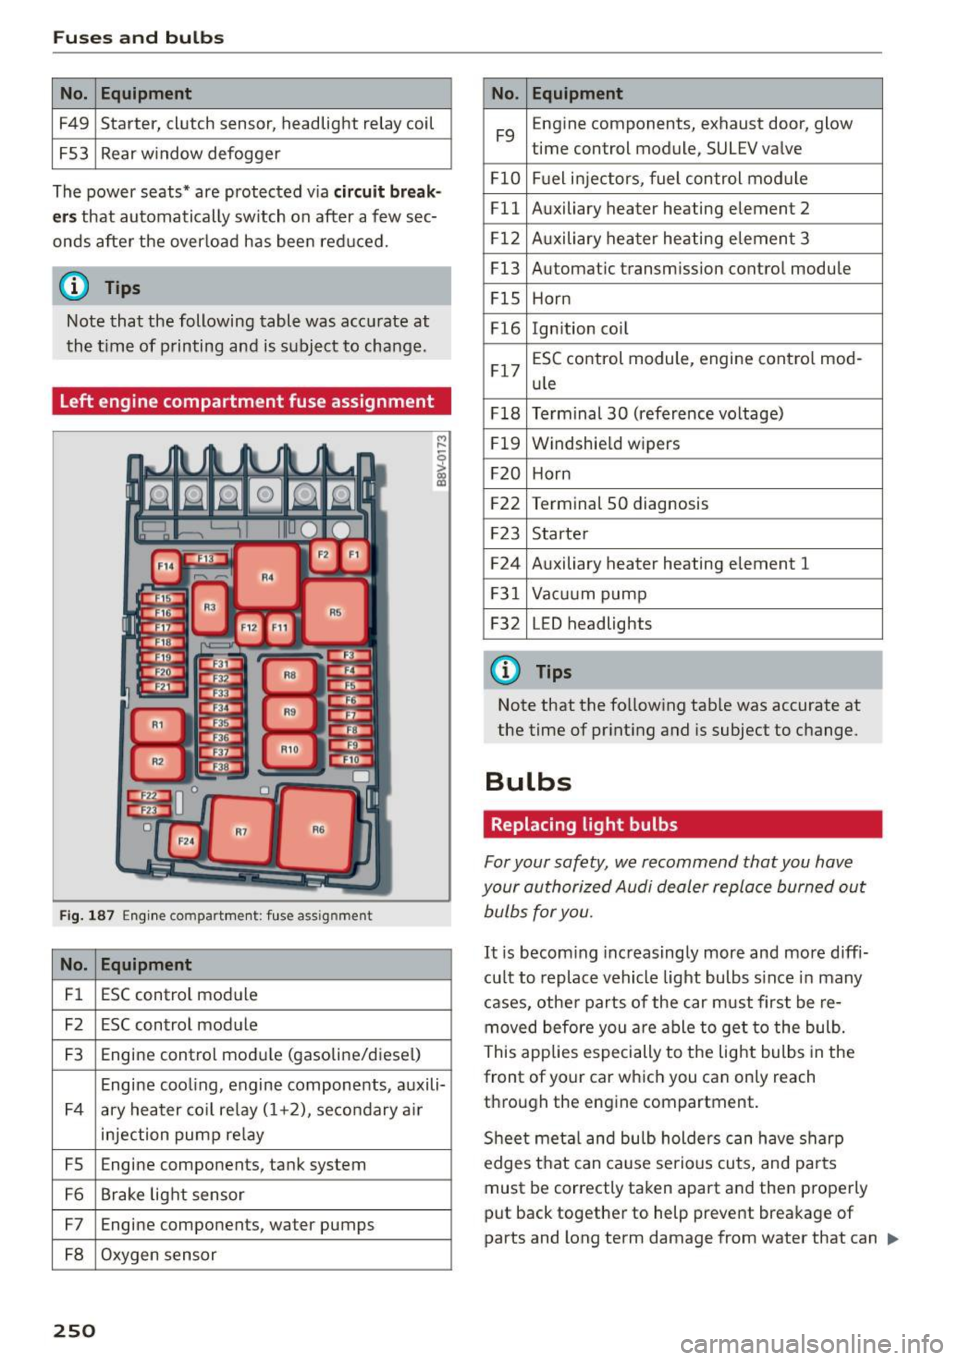
Left engine compartment fuse assignment
Fig. 187 Engine compartmen t: fuse assig nme nt
No. Equipment
Fl ESC control module
F2 ESC control module
F3 Engine control module (gasoline/diesel)
Engine cooling, engine components, auxili-
F4 ary heater coil relay (1+2), secondary a ir
injection pump relay
FS Engine components, tank system
F6 Brake light sensor
F7 Engine components, water pumps
F8 Oxygen sensor
250
No. Equipment
F9 E
ngine components, exhaust door, glow
time control module, SULEV valve
Fl0 Fuel injectors, fuel control module
Fll Auxiliary heater heating element 2
F12 Auxiliary heater heating element 3
F13 Automatic transmission control module
FlS Horn
F16 Ign ition coil
F17 ESC
control module, engine contro l mod-
ule
F18 Terminal 30 (reference voltage)
F19 Windshie
ld wipers
F20 Horn
F22 Terminal 50 diagnosis
F23 Starter
F24 Auxiliary heater heating element 1
F31 Vacuum pump
F32 L
ED headlights
(!') Tips
Note that the following tab le was accurate at
the time of printing and is subject to change.
Bulbs
Replacing light bulbs
For your safety , we recommend that you have
your authorized Audi dealer replace burned out
bulbs for you.
It i s becoming increasingly more and more diffi
cu lt to replace vehicle light bulbs s ince in many
cases, other parts of the car must first be re
moved before you are able to get to the bulb.
This applies especially to the light bulbs in the
front of your car which you can only reach
through the engine compartment.
Sheet meta l and bulb holders can have sharp
edges that can cause serious cuts, and pa rts
must be correctly taken apart and then properly
put back together to help prevent breakage of
parts and long term damage from water that can .,,_
Page 274 of 282
Index
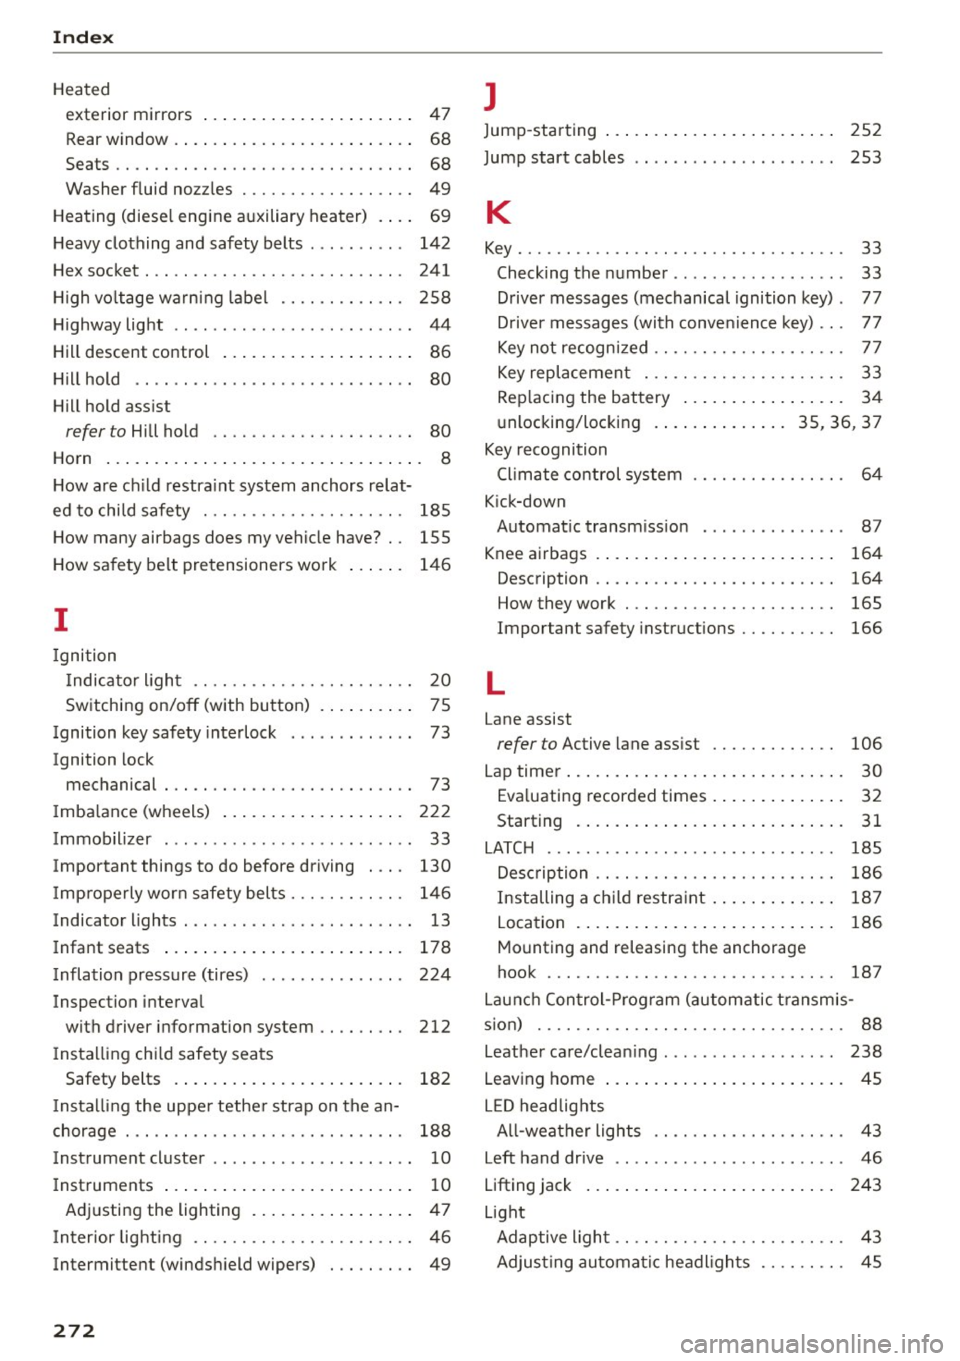
Heated exterior mirrors . . . . . . . . . . . . . . . . . . . . . . 47
Rear window . . . . . . . . . . . . . . . . . . . . . . . . . 68
Seats . . . . . . . . . . . . . . . . . . . . . . . . . . . . . . . 68
Washer fluid nozzles . . . . . . . . . . . . . . . . . . 49
Heating (diesel engine auxiliary heater) . . . . 69
Heavy clothing and safety belts . . . . . . . . . . 142
Hex socket . . . . . . . . . . . . . . . . . . . . . . . . . . . 241
High voltage warning label . . . . . . . . . . . . . 258
Highway light . . . . . . . . . . . . . . . . . . . . . . . . .
44
Hill descent control . . . . . . . . . . . . . . . . . . . . 86
Hill hold . . . . . . . . . . . . . . . . . . . . . . . . . . . . . 80
Hill hold assist
refer to Hill hold . . . . . . . . . . . . . . . . . . . . . 80
Horn . . . . . . . . . . . . . . . . . . . . . . . . . . . . . . . . .
8
How are child restraint system anchors relat-
ed to child safety . . . . . . . . . . . . . . . . . . . . . 185
How many airbags does my vehicle have? . . 155
How safety belt pretensioners work 146
I
Ignition
I ndicator light . . . . . . . . . . . . . . . . . . . . . . . 20
Switching on/off (with button) . . . . . . . . . . 75
Ignition key safety interlock . . . . . . . . . . . . . 73
Ignition lock
mechanical . . . . . . . . . . . . . . . . . . . . . . . . . . 73
I mbalance (wheels) . . . . . . . . . . . . . . . . . . . 222
Immobilizer . . . . . . . . . . . . . . . . . . . . . . . . . . 33
Important things to do before driving . . . . 130
I mp roperly worn safety belts . . . . . . . . . . . . 146
Indicator lights . . . . . . . . . . . . . . . . . . . . . . . . 13
I nfant seats . . . . . . . . . . . . . . . . . . . . . . . . . 178
Inflation pressure (tires) . . . . . . . . . . . . . . . 224
Inspection interval with driver information system . . . . . . . . . 212
I nstalling chi ld safety seats
Safety belts . . . . . . . . . . . . . . . . . . . . . . . . 182
I nstalling the upper tether strap on the an
chorage . . . . . . . . . . . . . . . . . . . . . . . . . . . . . 188
Instrument cluster . . . . . . . . . . . . . . . . . . . . . 10
Instruments . . . . . . . . . . . . . . . . . . . . . . . . . . 10
Adjusting the lighting . . . . . . . . . . . . . . . . . 47
I nterior lighting . . . . . . . . . . . . . . . . . . . . . . . 46
Intermittent (windshield wipers) . . . . . . . . . 49
272
J
Jump-starting
Jump start cables 252
253
K
Key........
.. .. .. .. .. ............. .. . 33
Checking the number. . . . . . . . . . . . . . . . . . 33
Driver messages (mechanical ignition key) . 77
Driver messages (with convenience key) . . . 77
Key not recognized . . . . . . . . . . . . . . . . . . . . 77
Key replacement . . . . . . . . . . . . . . . . . . . . . 33
Rep lacing the battery . . . . . . . . . . . . . . . . . 34
unlocking/locking .. ............ 35, 36 , 37
Key recognition Cl imate control system . . . . . . . . . . . . . . . . 64
Kick-down Automatic transmission . . . . . . . . . . . . . . . 87
Knee airbags . . . . . . . . . . . . . . . . . . . . . . . . . 164
Description . . . . . . . . . . . . . . . . . . . . . . . . . 164
How they work . . . . . . . . . . . . . . . . . . . . . . 165
Important safety instructions . . . . . . . . . . 166
L
Lane assist
refer to Active lane assist . . . . . . . . . . . . . 106
Lap timer. . . . . . . . . . . . . . . . . . . . . . . . . . . . . 30
Evaluating recorded times . . . . . . . . . . . . . . 32
Starting . . . . . . . . . . . . . . . . . . . . . . . . . . . . 31
LATC H . . . . . . . . . . . . . . . . . . . . . . . . . . . . . . 185
Description . . . . . . . . . . . . . . . . . . . . . . . . . 186
Installing a child restraint . . . . . . . . . . . . . 187
Location . . . . . . . . . . . . . . . . . . . . . . . . . . . 186
Mounting and releasing the anchorage
hook . . . . . . . . . . . . . . . . . . . . . . . . . . . . . . 187
Launch Control-Program (automatic transmis-
s ion) . . . . . . . . . . . . . . . . . . . . . . . . . . . . . . . . 88
Leather care/cleaning . . . . . . . . . . . . . . . . . . 238
Leaving home . . . . . . . . . . . . . . . . . . . . . . . . . 45
LED headlights All-weather lights . . . . . . . . . . . . . . . . . . . . 43
Left hand drive . . . . . . . . . . . . . . . . . . . . . . . . 46
Lifting jack . . . . . . . . . . . . . . . . . . . . . . . . . . 243
Light Adaptive light . . . . . . . . . . . . . . . . . . . . . . . . 43
Adjusting automatic headlights . . . . . . . . . 45