mirror controls AUDI S3 SEDAN 2015 Owners Manual
[x] Cancel search | Manufacturer: AUDI, Model Year: 2015, Model line: S3 SEDAN, Model: AUDI S3 SEDAN 2015Pages: 282, PDF Size: 71.14 MB
Page 50 of 282

Lig ht a nd Vis ion
outside forces (such as an impact when ma
neuvering), you must use the power folding
funct ion to fold the mir ror all the way out.
You will hear a loud noise when the mirrors
are latched back in place. The mirror hous
i ng must not be moved back into place by
hand because th is would impair the func
tion of the mirror mechanism.
-Applies to vehicles without power fold ing
exterior mirrors: if the mirror housing was moved by outside forces (such as in impact
during maneuve ring), you must move the
mirror ho us ing ba ck into p lace by hand.
- If you wash the veh icle in an automatic car
wash, you m ust fold the exterior m irrors in
to reduce the risk of damage to the mirrors .
Never fold power folding exterior mirrors*
by hand. Only fo ld them in and out using
the power controls.
@ Tips
If the power adjustment fails, both mirrors
can be adjusted by hand by pressing on the
edge of the mirror surface.
Dimming the mirrors
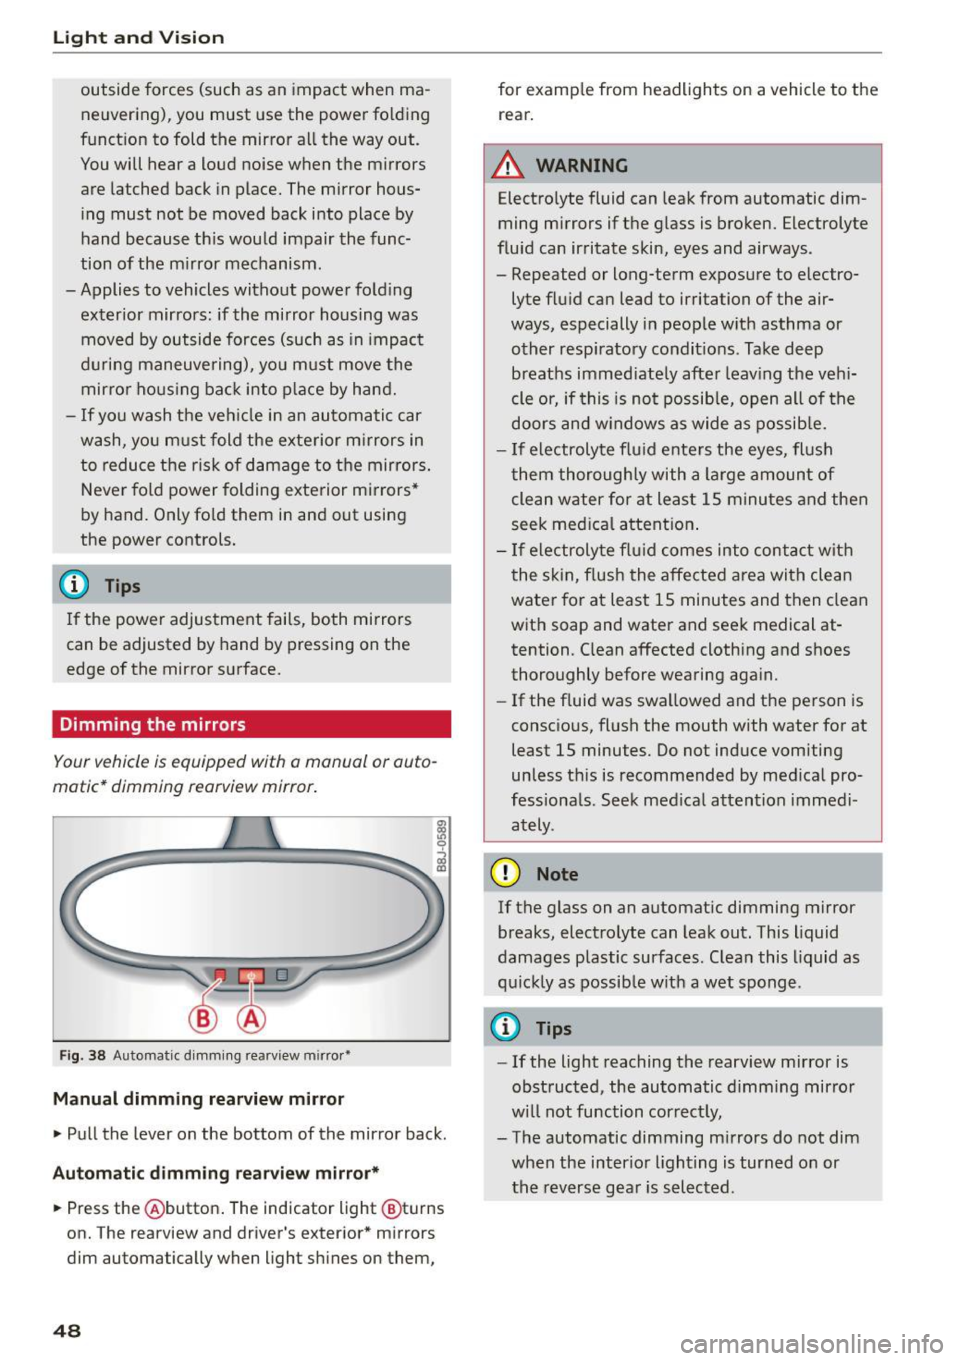
Your vehicle is equipped with a manual or auto
matic* dimming rearview mirror .
Fig. 38 Automatic d imm ing rearv iew mirro r•
M anual dimming rea rvi ew mirror
• Pull the lever on the bottom of the mirror back.
Autom atic dimm ing r ear view mirr or*
• Press the @button . The indicator light @turns
on. The rearview and driver's exterior * mirrors
dim automatically when light sh ines on them,
48
for examp le from headlights on a vehicle to the
rear.
A WARNING
Electrolyte fluid can leak from automatic dim
ming mirrors if the g lass is broken. Electrolyte
flu id can irritate skin, eyes and airways .
- Repeated or long-term exposure to electro
lyte fluid can lead to irritation of the air
ways, especially in people w ith asthma or
other resp iratory condit ions . Take deep
breaths immed iate ly after leav ing the veh i
cle or, if this is not possib le, open all of the
doors and w indows as wide as possib le.
- If electrolyte flu id ente rs the eyes, flush
them thoroughly with a large amount of
clean water for at least 15 m inutes and then
seek med ica l attention .
- If electroly te f lu id comes into contac t with
the skin, flush the affected area with clean
water for at least 15 minutes and then clean
with soap and water and seek medical at
tention. C lean affected clothing and shoes
thoroughly before wearing aga in.
- If the f luid was swa llowed and the person is
consc io us, fl ush the mouth with water for at
least 15 minutes. Do not induce vomiting
unless th is is recommended by med ica l pro
fessiona ls . Seek med ical attention immedi
ately .
(D Note
If the glass on an automat ic dimming m irror
breaks, electro lyte can leak out. This liquid
damages plastic surfaces. C lean this liquid as
q uick ly as possib le w ith a wet sponge .
{D Tips
- If the light reaching the rearview mirror is
obstructed, the automatic d imm ing mirror
w ill not function correct ly,
- The automatic dimming m irrors do not dim
when the interior lighting is turned on or
the reverse gea r is selected .
Page 53 of 282

....,
N
0 > co
rl I.O
"'
"'
"'
rl
-You should not drive your vehicle or press
the windshie ld wiper lever when the wiper
arms are folded away from the w indshield.
The windshield wipers would move back in
to their original position and could damage
the hood and windshield .
- To prevent damage to the windshield wash
er system, a lways loosen wiper blades that
have frozen to the windsh ield before turn
i ng the wipers on .
- To prevent damage to the wiper blades, do
not apply gasoline, petro leum, th inning
agents or other solvents on the wiper b lades or near them.
- To prevent damage to the wiper arms or
othe r components, do not try to move the
windsh ield wipers by hand.
@ Tips
- Commerc ial hot wax such as the types used
by car washe s make it more difficult t o clean
the w indshie ld.
- You can also use the service pos ition, for ex
ample, if you want to p rotect the w indshie ld
from i cing by us ing a cover.
- You cannot activate the service pos it ion
whe n the hood is open.
Digital compass
Switching the compass on and off
Ap plies to vehicles: w ith digi tal compass
Fig. 4 2 Rearview mirro r: Dig ital compass act ivated
... To turn the compass on or off, press the button
@ until the compass in the mirror appears or
disappears.
Light and Visio n
The dig ita l compass on ly works when the ignit ion
is turned on . The directions a re indicated with ab
breviations:
N (nort h), NE (northeast), E (east),
SE (southeast), S (south), SW (southwest), W
(west), NW (northwest).
You must recalibrate t he compass if it does not
display the correct direct ion
¢ page 52, Cali
brating the compass.
(D Tips
To prevent inaccurate compass readings, do not br ing any remote controls, electrical devi
ces or metallic objects near the mirror.
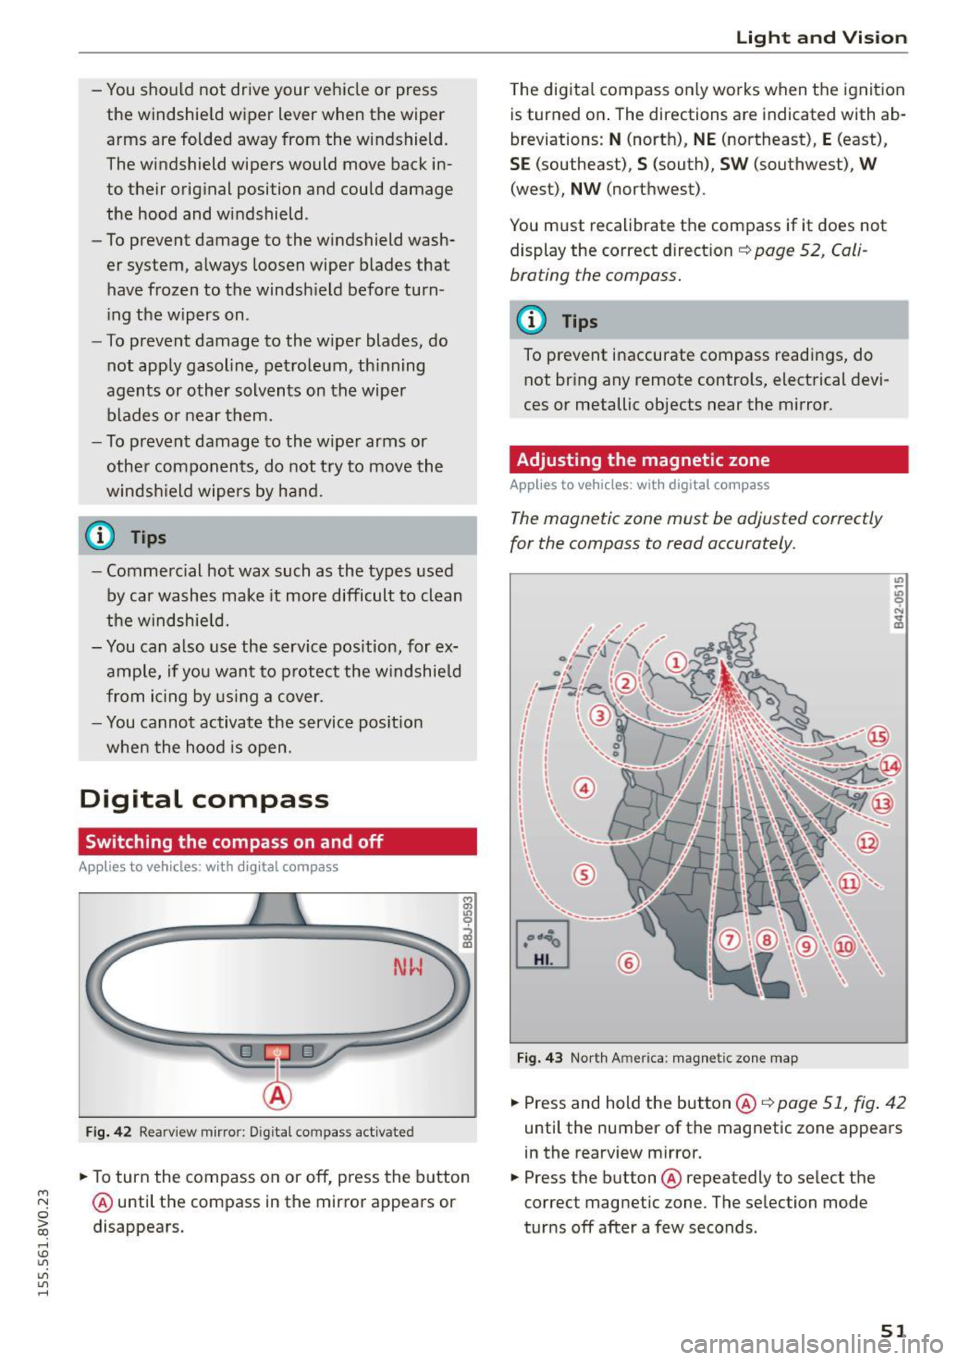
Adjusting the magnetic zone
Appl ies to vehicles: wit h digita l co mp ass
The magnetic zone must be adjusted correctly
for the compass to read accurately.
®
Fig. 4 3 Nor th Ameri ca: magnet ic zone map
... Press and hold the button @ ¢page 51, fig . 42
until the number of the mag netic zone appears
in the rearview mirror .
... Press the butt on @ repeatedly to select the
correct magnetic zone. The se lection mode
tur ns off after a few seconds .
51
Page 241 of 282

M N
0 > co ,...., \!) 1.1'1
1.1'1
1.1'1
,....,
avoid scratches, move the scraper only in
one direction and not back and forth.
- Never remove snow or ice from door win
dows and mirrors using warm or hot water
because this could cause cracks to form.
- To avoid damage to the rear window de
fogger, do not apply any stickers on the
heating wires on the inside of the window.
- Decorative parts/trim
- Never use chrome care or cleaning prod-
ucts .
- Paint
- To reduce the risk of scratches, the vehicle
must be free of dirt and dust before pol
ishing or waxing.
- To prevent paint damage, do not polish or
wax the vehicle in direct sunlight.
- To reduce the risk of paint damage, do not
polish away rust spots.
- Remove cosmetics and sunscreen immedi
ately -these could damage the paint.
- Displays
- To avoid scratches, do not use dry cleaning
methods on displays.
- Controls
- Make sure that no fluids enter the con-
trols, because this could cause damage.
- Safety belts
- Do not remove the safety belts to clean
them.
- Never clean safety belts or their compo
nents chemically or with corrosive fluids
or solvents and never allow sharp objects
to come into contact with the safety belts.
This could cause damage to the belt web
bing.
- If there is damage to the webbing, the
connections, the retractors or the buckles,
have them replaced by an authorized Audi
dealer or authorized Audi Service Facility.
- Textiles/artificial leather/Alcantara
- Never treat artificial leather/Alcantara
with leather care products, solvents, floor polish, shoe polish, spot remove or similar
products.
- Have a specialist remove stubborn stains
to prevent damage.
Care and cleaning
- Never use steam cleaners, brushes, hard
sponges, etc. when cleaning.
- Do not turn on the seat heating* to dry
the seat.
- Objects with sharp edges such as zippers,
rivets on clothing or belts can cause dam
age to the surface.
- Open hook and loop fasteners, for exam
ple on clothing, can damage seat covers.
Make sure hook and loop fasteners are
closed .
- Natural leather
- Never treat leather with solvents, floor
polish, shoe polish, spot remover or simi
lar products .
- Objects with sharp edges such as zippers, rivets on clothing or belts can cause dam
age to the surface .
- Never use steam cleaners, brushes, hard
sponges, etc. when cleaning .
- Do not turn on the seat heating* to dry the seat.
- To help prevent the leather from fading,
do not leave the vehicle in direct sunlight
for long periods of time . If leaving the ve
hicle parked for long periods of time, you
should cover the leather to protect it from
direct sunlight.
(D Tips
- Insects are easier to remove from paint that
has been freshly waxed .
- Regular waxing can prevent rust spots from
forming.
239
Page 270 of 282

Index
Cargo net. . . . . . . . . . . . . . . . . . . . . . . . . . . . . 6 1
Catalytic converter . . . . . . . . . . . . . . . . . . . . 194
CD -ROM playe r (navigation) . . . . . . . . . . . . . . 58
C D change r . . . . . . . . . . . . . . . . . . . . . . . . . . . 58
Ce ntra l ind icator light . . . . . . . . . . . . . . . . . . 13
Centra l locking . . . . . . . . . . . . . . . . . . . . . . . . 33
Centra l locking sw itch . . . . . . . . . . . . . . . . . 37
Conven ience key . . . . . . . . . . . . . . . . . . . . . . 36
Emergency locking . . . . . . . . . . . . . . . . . . . . 39
Folding the exterior mirrors . . . . . . . . . . . . 3 7
L uggage compa rtment lid . . . . . . . . . . . . . . 39
P anorama sun roof . . . . . . . . . . . . . . . . . . . .
4 1
p ' d owe r win ows . . . . . . . . . . . . . . . . . . . . . . 41
Remote control key . . . . . . . . . . . . . . . . . . . 35
Safety cen tral lock ing . . . . . . . . . . . . . . . . . 3 8
Setting . . . . . . . . . . . . . . . . . . . . . . . . . . . . . 3 7
Cert ification . . . . . . . . . . . . . . . . . . . . . . . . .
265
Changing engine o il . . . . . . . . . . . . . . . . . . . 204
Ch ild restr aints
D anger o f using c hild restra ints in the front
seat ... .. .... .. ... .. ..... ... .. .. ...
149
Where can I get additiona l information
about child restra ints and their use? . . . .
189
Ch ild restra int sys tem an chors . . . . . . . . . . 185
Ch ild safety . . . . . . . . . . . . . . . . . . . . . . . . . . 172
Important safety instructions fo r using ch ild
safety seats . . . . . . . . . . . . . . . . . . . . . . . .
17 5
Tet he r an chors
188
Tethe r str aps . .... ......... .. .. .. .. . 188
Ch ild safety lock
Powe r windows . . . . . . . . . . . . . . . . . . . . . . 4 0
Rear doors . . . . . . . . . . . . . . . . . . . . . . . . . . 40
Ch ild safety seats
Booster seats . . . . . . . . . . . . . . . . . . . . . . .
181
Convertible ch ild seats . . . . . . . . . . . . . . . 179
H ow do I p roperly install a ch ild safety seat
. h' l ? m myve 1c e . ................. ... .. . 175
Infant seats . . . . . . . . . . . . . . . . . . . . . . . . 178
Insta lling a child res traint using the LA T CH
system . . . . . . . . . . . . . . . . . . . . . . . . . . . .
18 7
LA T CH system . . . . . . . . . . . . . . . . . . . . . . . 187
Lower anchorages . . . . . . . . . . . . . . . . . . . 186
Mounting and re leasing the anchorage
hook . . . . . . . . . . . . . . . . . . . . . . . . . . . . . .
187
Safety instructions.............. .. ... 175
Unused safety belts on the rear seat . . . . 177
268
Child seats
Securing 178
182
Cleaning . . . . . . . . . . . . . . . . . . . . . . . . . . . . 2 35
Cleaning/removing ice from windows . . . . . 237
Cleaning Alcan tara . . . . . . . . . . . . . . . . . . . . 238
Cleaning art ificial leathe r . . . . . . . . . . . . . . . 238
C leaning carbon parts . ... . ..... ... 237, 238
Cleaning con trols . . . . . . . . . . . . . . . . . . . . . 2 3 7
Cleaning decorative parts and trim . ..
236, 237
Cleaning disp lays . . . . . . . . . . . . . . . . . . . . . 2 3 7
Cleaning exhaust tail pipes . . . . . . . . . . . . .
236
Cleaning plastic parts . . . . . . . . . . . . . . . . . . 237
Cl eaning r ims . . . . . . . . . . . . . . . . . . . . . . . . 2 36
Cleaning seat covers . . . . . . . . . . . . . . . . . . . 238
Cleaning tail lights . . . . . . . . . . . . . . . . . . . . 236
Cleaning textiles . . . . . . . . . . . . . . . . . . . . . . 2 38
Cli mate control system
Key recognition . . . . . . . . . . . . . . . . . . . . . . 64
Climate co ntrol system (automatic)
Adjusting air vents . . . . . . . . . . . . . . . . .
67, 68
Air distrib ution, air vents . . . . . . . . . . . . . . . 67
A UTO (climate control system) . . . . . . . . . . 66
Blower . . . . . . . . . . . . . . . . . . . . . . . . . . . . . 67
Controls . . . . . . . . . . . . . . . . . . . . . . . . . . . . 66
Defrost ing t he w indshie ld . . . . . . . . . . . . . . 67
D rive select . . . . . . . . . . . . . . . . . . . . . . . . . 112
Re ar window defogger . . . . . . . . . . . . . . . . . 68
Recirc ulation mode . . . . . . . . . . . . . . . . . . . 67
Setting the temperature . . . . . . . . . . . . . . . 67
synch ronizing . . . . . . . . . . . . . . . . . . . . . . . . 67
Cli mate co ntrol system (ma nual)
Adjus ting air vents . . . . . . . . . . . . . . . . .
65 , 68
Adjus tin g the tempera ture . . . . . . . . . . . . . 65
Air distrib ution, air vents . . . . . . . . . . . . . . . 65
B lower . . . . . . . . . . . . . . . . . . . . . . . . . . . . . 65
Defrost ing windows . . . . . . . . . . . . . . . . . . . 65
Operation . . . . . . . . . . . . . . . . . . . . . . . . . . . 65
Rear window defogger . . . . . . . . . . . . . . . . . 68
Recircu lation mode . . . . . . . . . . . . . . . . . . . 65
Clock . . . . . . . . . . . . . . . . . . . . . . . . . . . . . . . . 10
Closi ng
Hood ..... .. .... .. .. ... .......... .. 200
P a no rama sunroo f . . . . . . . . . . . . . . . . . . . . 42
Windows ... .... .. .. ... . .. .... ... .. . 40
Closi ng/ope ning
by remote control . . . . . . . . . . . . . . . . . . . .
35
wi th the centra l locking sw itch . . . . . . . . . . 3 7