spare tire AUDI S3 SEDAN 2015 Owners Manual
[x] Cancel search | Manufacturer: AUDI, Model Year: 2015, Model line: S3 SEDAN, Model: AUDI S3 SEDAN 2015Pages: 282, PDF Size: 71.14 MB
Page 5 of 282
M N
0 > co ,...., \!) ..,.,
..,.,
..,., ,....,
Adjusting the disp lay and the warning
tones .... .. .. .. .... .... ... .. .. .... . 121
Error messages . . . . . . . . . . . . . . . . . . . . . 121
Intelligent Technology . . . . . . . . . . 122
Notice about data recorded by the Event
Data Recorder and vehicle cont rol
modules . . . . . . . . . . . . . . . . . . . . . . . . . . . 122
Electronic stabilization control (ESC) . . . . 123
Brakes . . . . . . . . . . . . . . . . . . . . . . . . . . . . . 125
Electromechanical steering . . . . . . . . . . . . 126
All wheel drive (quatt ro) . . . . . . . . . . . . . . 127
En ergy management 128
Safety . . . . . . . . . . . . . . . . . . . . . . . . . . . . 130
Driving safety . . . . . . . . . . . . . . . . . . . . 130
Basics . . . . . . . . . . . . . . . . . . . . . . . . . . . . . 130
Correct passenger seating positions..... 131
Driver's and front passenger's footwe ll . . 13 5
Pedal area . . . . . . . . . . . . . . . . . . . . . . . . . . 135
Storing cargo correct ly . . . . . . . . . . . . . . . 136
Reporting Safety Defects . . . . . . . . . . . . . . 138
Safety belt s . . . . . . . . . . . . . . . . . . . . . . 140
General notes . . . . . . . . . . . . . . . . . . . . . . . 140
Why use safety belts? . . . . . . . . . . . . . . . . 141
Safety belts . . . . . . . . . . . . . . . . . . . . . . . . 143
Belt tensioners . . . . . . . . . . . . . . . . . . . . . . 146
Airb ag sy stem . . . . . . . . . . . . . . . . . . . . 148
Important information . . . . . . . . . . . . . . . 148
Front airbags . . . . . . . . . . . . . . . . . . . . . . . 152
Monito ring the Advanced Airbag System . 160
Knee airbags . . . . . . . . . . . . . . . . . . . . . . . . 164
Side airbags . . . . . . . . . . . . . . . . . . . . . . . . 166
Side curtain airbags . . . . . . . . . . . . . . . . . . 169
Child safety . . . . . . . . . . . . . . . . . . . . . . 172
I mportant information . . . . . . . . . . . . . . . 172
Child seats . . . . . . . . . . . . . . . . . . . . . . . . . 178
Securing child seats . . . . . . . . . . . . . . . . . . 182
LATCH system (Lower anchorages and
tethers for children) . . . . . . . . . . . . . . . . . . 185
Additional information . . . . . . . . . . . . . . . 189
Table of contents
Maintenance and Care . . . . . . . . . . .
190
Checking and Filling . . . . . . . . . . . . . 190
Gasoline . . . . . . . . . . . . . . . . . . . . . . . . . . . 190
Diesel f uel . . . . . . . . . . . . . . . . . . . . . . . . . 191
Refueling . . . . . . . . . . . . . . . . . . . . . . . . . . 192
Catalytic co nverter . . . . . . . . . . . . . . . . . . . 194
D ie sel particulate filter . . . . . . . . . . . . . . . 195
Selective catalytic reduction . . . . . . . . . . . 195
En gine compartm ent . . . . . . . . . . . . . . . . . 198
Eng ine oil . . . . . . . . . . . . . . . . . . . . . . . . . . 20 1
Cooling system . . . . . . . . . . . . . . . . . . . . . . 205
Brake fluid . . . . . . . . . . . . . . . . . . . . . . . . . 207
Battery . . . . . . . . . . . . . . . . . . . . . . . . . . . . 208
Windshield washer system . . . . . . . . . . . . 212
Serv ice interval display
212
Tires and wheels . . . . . . . . . . . . . . . . . 214
Wheels . . . . . . . . . . . . . . . . . . . . . . . . . . . . 214
Tire pressure monitoring system . . . . . . . 232
Care and cleaning . . . . . . . . . . . . . . . . 235
General information . . . . . . . . . . . . . . . . . 23S
Car washes . . . . . . . . . . . . . . . . . . . . . . . . . 23S
Cleaning and care information 236
Troubleshooting . . . . . . . . . . . . . . . . . 240
Emergency assistance . . . . . . . . . . . 240
Luggage compartment lid emergency
re lease . . . . . . . . . . . . . . . . . . . . . . . . . . . . 240
General informat ion . . . . . . . . . . . . . . . . . 240
Equipm ent . . . . . . . . . . . . . . . . . . . . . . . . . 241
Replacing wheels . . . . . . . . . . . . . . . . . . . . 241
Spare tire . . . . . . . . . . . . . . . . . . . . . . . . . . 246
Fu se s and bulbs . . . . . . . . . . . . . . . . . . 248
El ectrica l fuses . . . . . . . . . . . . . . . . . . . . . . 24 8
Bulbs. . . . . . . . . . . . . . . . . . . . . . . . . . . . . . 250
Emergency situation s . . . . . . . . . . . . 252
General . . . . . . . . . . . . . . . . . . . . . . . . . . . . 252
Starting by pushing or towing . . . . . . . . . . 252
Starting with jumper cables . . . . . . . . . . . 252
Using jump start cables . . . . . . . . . . . . . . . 253
Towing with a tow truck . . . . . . . . . . . . . . . 254
Raising the vehicle . . . . . . . . . . . . . . . . . . . 256
3
Page 223 of 282
Occupant loading and distri
bution for vehicle normal load
for various designated seating
capacities
Refer to the tire inflation pressure
labe l
c:::> page 224, fig. 171 for
the number of seating positions .
Refer to the table
c:::> table on
page 226
for the number of peo
ple that correspond to the vehicle
normal load.
New tires or wheels
Audi recommends having all work on tires or wheels performed by
an authorized Audi dea ler or au
thorized Audi Service Facility.
These facilities have the proper knowledge and are equ ipped with
the required tools and replace
ment parts .
.,,. New tires do not yet have the
opt imum adhesion properties .
Drive carefully and at moderate
speeds for the first 350 m iles
(500 km) with new tires .
.,,. Use tires of the same construc
tion, size (rolling circumference)
and as close to the same tread pattern as possible on all four
wheels .
Tires a nd whe els
.,,. Do not replace tires individually.
At least replace both tires on the same axle at the same time .
.,,. Audi recommends that you use
Audi Original equipment tires. If
you would like to use different
tires, please note that the tires
may perform different ly even if
they are the same size
c:::> ,& .
.,,. If you would like to equip your
vehicle with a tire/rim combina
tion that is different from what
was installed at the factory, con sult with an authorized Audi
dealer or authorized Audi Service
Facility before making a pur
chase
c:::> ..1,. .
The spare tire* is different from
the regular tires installed on the
vehicle -for example, if winter
tires or wide tires are installed -
then only use the spare tire* tem
porarily in case of emergency and
drive carefully while it is in use. It
should be replaced with a regular
tire as soon as possible.
On
all wheel d riv e vehicles, all
four wheels must be equipped
with tires that are the same brand
and have the same construction
and tread pattern so that the drive system is not damaged by
22 1
Page 224 of 282
Tires and wheels
different tire speeds. For this rea
son, in case of emergency, only
use a spare tire* that is the same
circumference as the regular tires.
.&,. WARNING -
-Only use tire/rim combina
tions and suitable wheel bolts
that have been approved by
Audi. Otherwise, damage to
the vehicle and an accident could result.
-For technical reasons, it is not
possible to use tires from oth
er vehicles - in some cases,
you cannot even use tires from
the same vehicle model.
-Make sure that the tires you select have enough clearance
to the vehicle. Replacement
tires should not be chosen
simply based on the nominal size, because tires with a dif
ferent construction can differ greatly even if they are the
same size . If there is not
enough clearance, the tires or
the vehicle can be damaged
and this can reduce driving
safety and increase the risk of
an accident.
-Only use tires that are more
than 6 years old when abso-
222
lutely necessary and drive
carefully when doing so.
-Do not use run-flat tires on
your vehicle. Using them when not permitted can lead to ve
hicle damage or accidents.
-If you install wheel covers on
the vehicle, make sure they al
low enough air circulation to
cool the brake system. If they
do not, this could increase the
risk of an accident.
Tire wear/damage
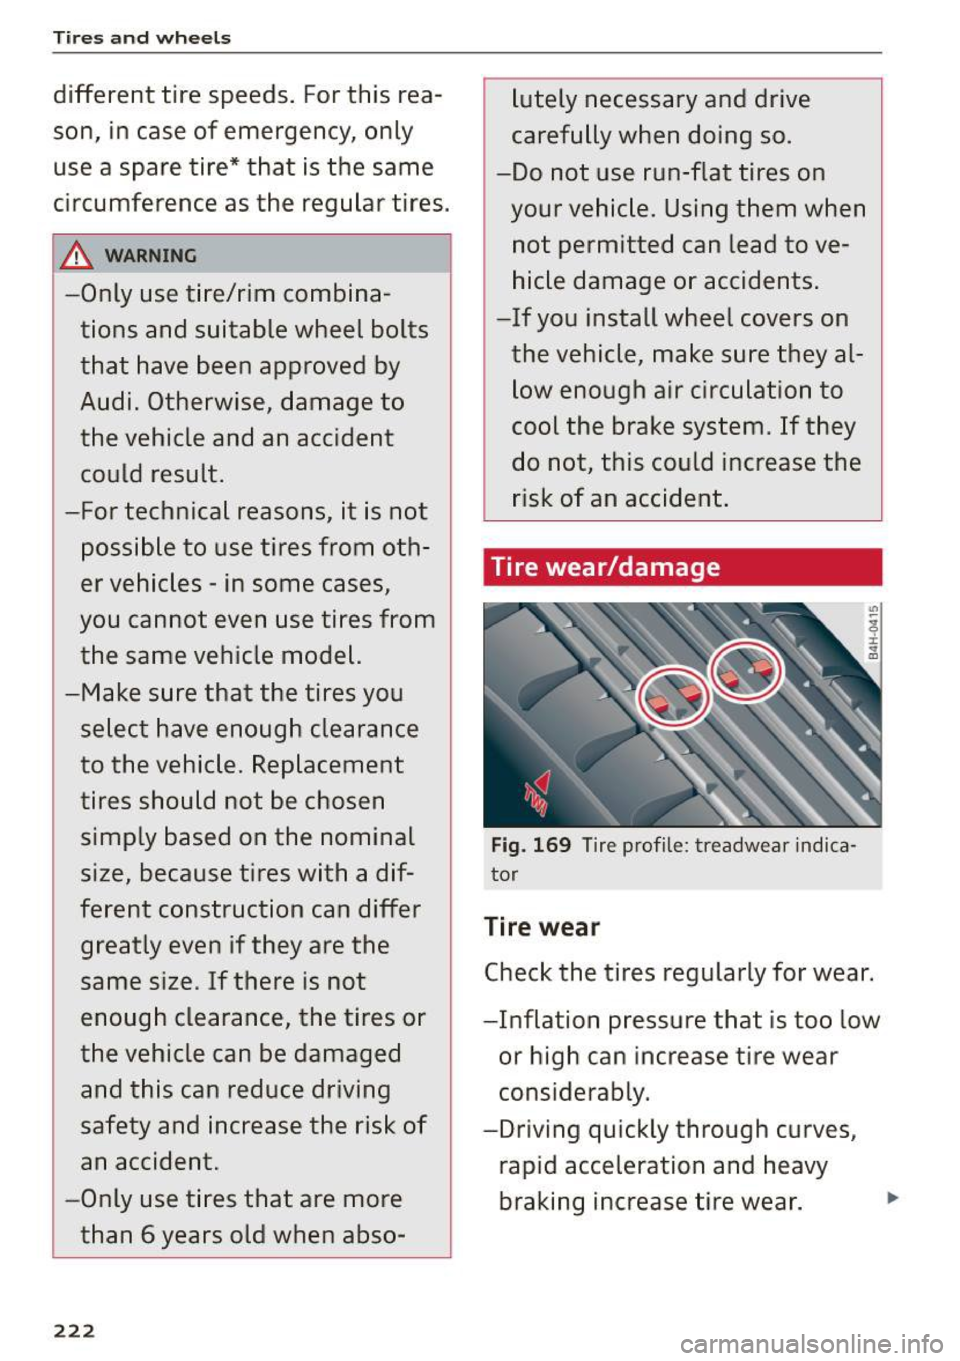
Fig. 169 Tire profil e: treadwear indica
tor
Tire wear
Check the tires regularly for wear.
-Inflation pressure that is too low
or high can increase tire wear
considerably.
-Driving quickly through curves, rapid acceleration and heavy
braking increase tire wear.
..
Page 226 of 282
Tires and wheels
negative effect on handling, on
the risk aquaplaning when driv ing through water, when driv
ing through curves and when
braking, which increases the
risk of an accident.
Tire pressure
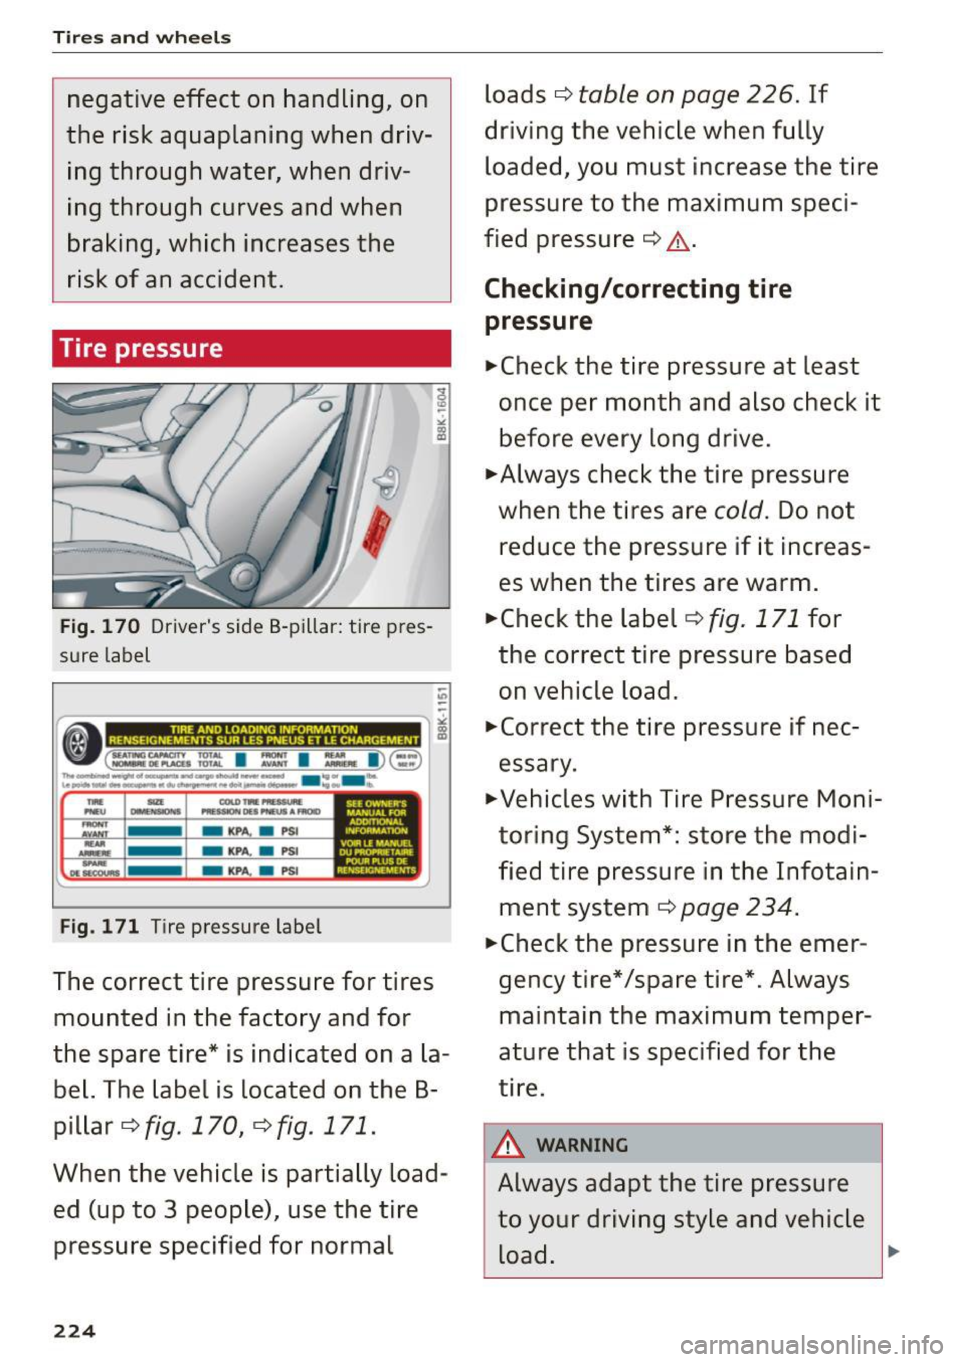
Fig. 170 Driver's side B-pillar: tire pres
sure label
"' -
( fa (_,__,., TOl... I """" I ~- I)~-~ l ~ • .......-OIJI\ACl'..I TOTAL ltNAHt --.,-. . ~
-KPA. a PSl
Fig. 171 Tire pressure label
The correct tire pressure for tires
mounted in the factory and for
the spare tire* is indicated on a la bel. The label is located on the B
pillar
¢fig. 170, r=:>fig. 171.
When the vehicle is partially loaded (up to 3 people), use the tire pressure specified for normal
224
loads c:> table on page 226. If
driving the vehicle when fully loaded, you must increase the tire
pressure to the maximum speci
fied pressure ¢&, .
Checking/correcting tire
pressure
•Check the tire pressure at least
once per month and also check it before every long drive.
•Always check the tire pressure
when the tires are
cold. Do not
reduce the pressure if it increas
es when the tires are warm.
•Check the label ¢
fig. 171 for
the correct tire pressure based
on vehicle load.
•Correct the tire pressure if nec
essary .
•Vehicles with Tire Pressure Moni
toring System*: store the modi
fied tire pressure in the Infotain
ment system ¢
page 234.
•Check the pressure in the emer
gency tire*/spare tire*. Always
maintain the maximum temper
ature that is specified for the
tire.
A WARNING
Always adapt the tire pressure
to your driving style and vehicle load. .,.
Page 234 of 282
Tires and wheels
The grade C corresponds to a level of perform
ance which all passenger car tires must meet un
der the Federal Motor Vehicle Safety Standard No.
109 . Grades Band A represent higher levels
of pe rformance on the laboratory test wheel than
the minimum required by law .
A WARNING
The traction grade assigned to this tire is
based on straight-ahead braking traction
tests, and does not include acceleration, cor
nering, hydroplaning or peak traction charac
teristics.
A WARNING
The temperature grade for this tire is estab
lished for a tire that is properly inflated and
not overloaded. Excessive speed, underinfla
tion, or excessive loading, either separate ly or
in combination, can cause heat buildup and
possible tire failure.
A WARNING
Temperature grades apply to tires that are properly inflated and not over or underinflat
ed .
Tire pressure monitoring
system
CD General notes
Applies to veh icles: w ith tire pressure monitoring system
Each tire, including the spare (if provided),
should be checked monthly when cold and inflat
ed to the inflation pressure recommended by the
vehicle manufacturer on the vehicle placard or
tire inflation pressure label.
(If your vehicle has
tires of a different size than the size indicated on
the vehicle placard or tire inflation pressure la
bel, you should determine the proper tire infla
tion pressure for those tires).
As an added safety feature, your vehicle has been
equipped with a tire pressure monitoring system
(TPMS) that illuminates a low tire pressure tell
tale when one or more of your tires is significant
ly under-inflated. Accordingly, when the low tire
pressure telltale illuminates, you should stop and
232
check your tires as soon as possible, and inflate
them to the proper pressure . Driving on a signifi
cantly under-inflated tire causes the tire to over
heat and can lead to tire failure. Under-inflation
also reduces fuel efficiency and tire tread life,
and may affect the vehicle's handling and stop
ping ability .
Please note that the TPMS is not a substitute for
proper tire maintenance, and it is the driver's re
sponsibility to maintain correct tire pressure, even if under-inflation has not reached the level
to trigger illumination of the TPMS low tire pres
sure telltale.
Your vehicle has also been equipped with a TPMS malfunction indicator to indicate when the sys
tem is not operating properly. The TPMS mal
function indicator is combined with the low t ire
pressure tel ltale. When the system detects a
malfunction, the telltale will flash for approxi
mately one minute and then remain continuously
illuminated. This sequence will continue upon
subsequent vehicle start -ups as long as the ma l
function exists .
When the malfunction indicator is illuminated,
the system may not be able to detect or signal low tire pressure as intended. TPMS malfunctions
may occur for a variety of reasons, including the
installation of replacement or alternate tires or
wheels on the vehicle that prevent the TPMS
from functioning properly. Always check the
TPMS malfunction telltale after replacing one or
more t ires or wheels on your vehicle to ensure
that the replacement or alternate tires and
wheels allow the TPMS to continue to function
properly .
Page 235 of 282
....,
N
0 > co
rl I.O
"'
"'
"'
rl
If the Tire Pressure Monitoring System
indicator appears
Applies to vehicles: with t ire p ressure monitoring syste m
The tire pressure indicator in the instrument
cluster informs you if the tire pressure is too low
or if there is a system malfunction.
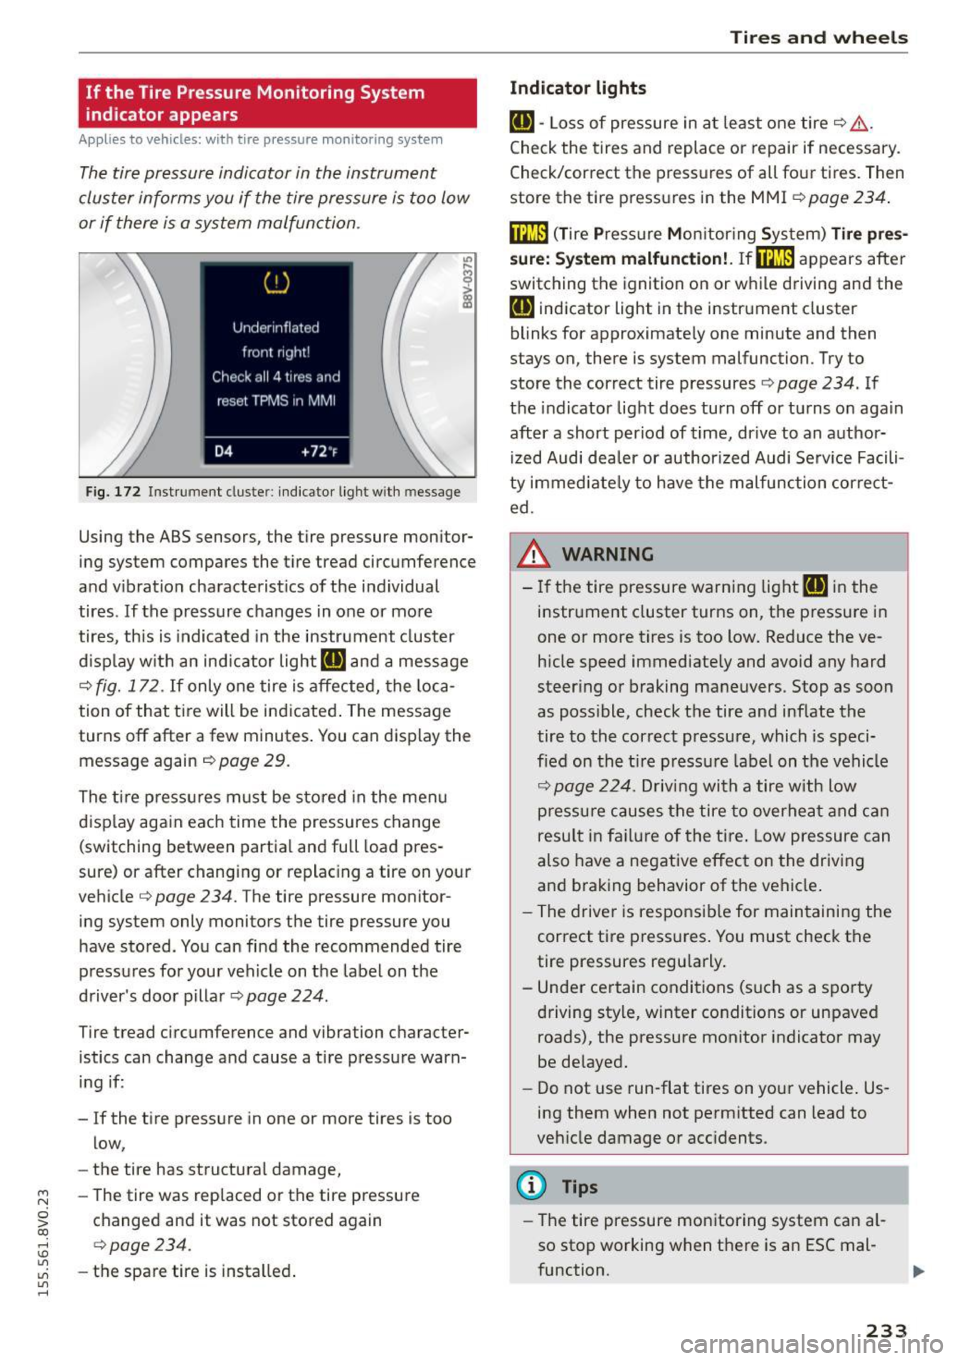
F ig. 172 Instrument cluster: in dicator light w ith message
Using the ABS sensors, the tire pressure monitor
ing system compares the tire tread circumference
and v ibration characterist ics of the ind ividual
tires.
If the pressure changes in one or mo re
tires, th is is indicated in the instrument cluster
d isp lay w ith an ind icator light
RE and a message
¢
fig. 172. If only o ne tire is affected, the loca
tion of that ti re will be indicated . The message
turns off after a few minutes . You can display the
message again
r::;,page 29.
The tire p ressu res m ust be stored in the menu
disp lay aga in each time the pressures change
(switching between partia l and full load pres
sure) or after changing or replac ing a tire on your
ve hicle¢
page 234. The tire pressure monitor
ing system only monitors the tire pressure you
have stored. You can find the recommended tire
pressures for your vehicle on the label on the
driver's door pillar¢
page 224.
Tire tread circumference and vibration character
istics can change and cause a tire pressure warn
in g if:
- If the tire pressure in one or more tires is too
low,
- the tire has structural damage,
- The tire was replaced or the tire pressure
changed and it was not stored again
¢ page 234.
-the spare tire is insta lled .
Tires and wheels
Indicator lights
RE -Loss of pressure in a t least one tire ¢ ,&.
Check the tires and replace or repair if necessary.
Check/correct the pressures of all four t ires. Then
store the tire p ressu res in the MMI ¢
page 234.
film (T ire Pressure Mon itor ing Sys tem) Tire pres
s ure: Sy stem malfunction!. If@m
appears after
switching the ignition on or while driving and the
RE ind icator light in the instr ument cluster
blinks for approximate ly one minute and then
stays on, there is system malfunction. Try to
store the correct tire pressures ¢
page 234. If
the indicator light does turn off or turns on aga in
after a short period of time, dr ive to an author
i zed Audi dea ler or author ized Audi Serv ice Facili
ty immed iate ly to have the malfunction corre ct
ed.
,&. WARNING
- If the tire pressure warning light RE in the
i n str ument cluster turns on, the pressure in
one or more tires is too low . Reduce the ve
h icle speed immediate ly and avoid any hard
steer ing or braking maneuvers. Stop as soon
as poss ible, check the tire and inf late the
tire to the correct pressure, which is speci
fied on the t ire p ress ure label on the vehicle
r::;, page 224. Driv ing with a tire with Low
p ressu re causes the tire to overhea t and c an
resul t in fa il ur e of the tire . Low pressure can
a lso have a negative effect on the driving
and b rak ing behavior of t he vehicle .
- T he drive r is respons ib le for main taining the
correct ti re press ures . You must check the
tire pressures regu larly .
- Under certain conditions (such as a sporty
driving style, winter conditions or unpaved
roads), the pressure monitor indicator may
be de layed.
- Do not use run-flat tires on yo ur vehicle . Us
ing them when not permitted can lead to
veh icle damage or acc idents.
(D Tips
- The tire pressure monitoring system can al
so stop working when t here is an ESC mal-
function. ..,.
233
Page 236 of 282
Tires and wheel s
-Using snow chains may result in a system
malfunction.
- The t ires wi th the ident ificat ion "AO" or
"RO"¢
page 221 have been matche d with
your A udi tire pressure monitoring system.
We recommend that you use these t ires.
- The tire pressure monitoring system can on
l y mon itor the ti re p ress ure of the dr iv ing
tires. Check the tire pressure of the spare
whee l in the luggage compartment so that
i f necessary it is ready for use.
Storing tire pressures
Applies to vehicles: w ith tire pressure monitoring system
A change in tire pressure or a change in tires
must be stored in the system .
The tire p ressu re is stored in the MMI.
.., Make sure befo re stori ng th at t he tire pressures
of all fo ur t ires meet the specified va lues and
are adapted to the load . Otherwise the system
cou ld ma lf u nction
¢ page 224 .
.., Switc h on the ignition .
.,. Se lect : the IMENU! button> Car> Systems *
control button > Service & control > Tire pres
sure monitor > Stor e tire pressure > Yes, store
now .
(]} Tips
Do not store the t ire press ures if snow cha ins
are i nstalled . Otherwise the system could
malf unct io n.
234
Page 244 of 282
Emergency assistance
_& WARNING
Always read and follow all WARNINGS and in
formation
c:> & in Raising the vehicle on
page 244
and c:> page 245.
After changing a wheel
A wheel change is not complete without the do
ing the following .
.. Always store the vehicle tool kit, the jack* and
the replaced tire in the luggage compartment
c:> page 136 .
.. Check the tire pressure on the spare wheel im
med iate ly after mounting it .
.. As soon as possible, have the
tightening tor
ques
on all wheel bolts checked with a torque
wrench. The correct tightening torque is 90 ft
lb
(120 Nm) .
.. Have the flat tire
replaced as soon as possible.
@ Tips
-If you notice that the wheel bolts are cor
roded and difficult to turn while changing a
tire, they should be replaced before you
check the tightening torque.
- Drive at reduced speed until you have the
tightening torques checked.
- After changing a wheel, the tire pressure in
all four tires must be checked/corrected and
the tire pressure mon itoring indicator must
be stored in the MMI
c:> page 234.
Decorative wheel covers
Applies to vehicles: with decorative wheel covers
The decorative wheel covers must be removed
first to access the wheel bolts .
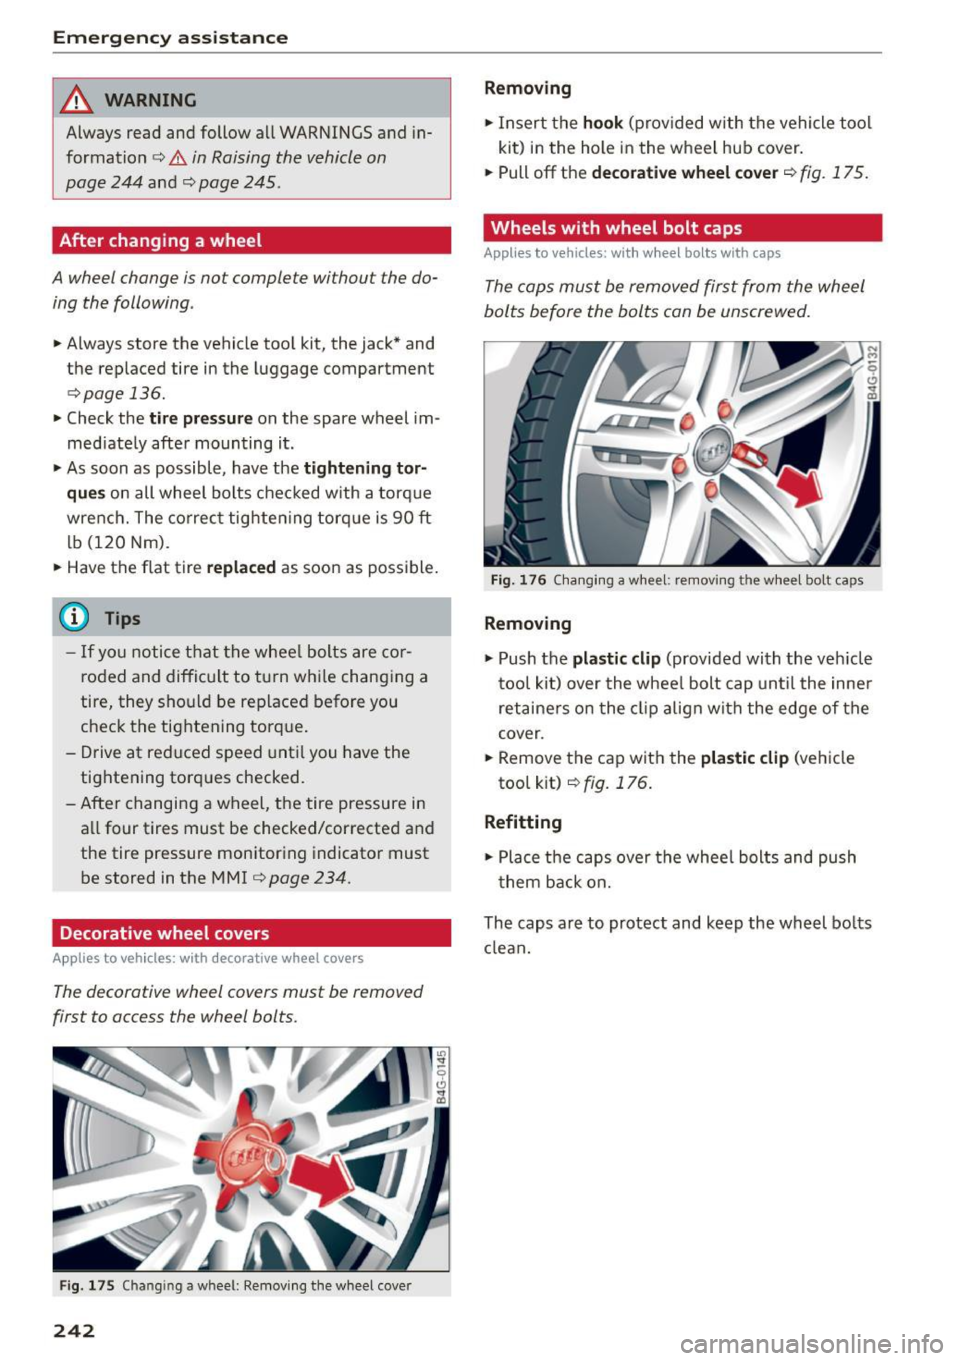
Fig. 175 Chan gin g a w hee l: Removing the wheel cover
242
Removing
.. Insert the hook (provided with the vehicle tool
kit) in the hole in the wheel hub cover.
.. Pull off the
decorative wheel cover c:> fig. 175.
Wheels with wheel bolt caps
Applies to vehicles: with wheel bolts with caps
The cops must be removed first from the wheel
bolts before the bolts con be unscrewed .
Fig. 176 Changing a wheel: removing th e whee l b olt caps
Removing
.. Push the plastic clip (provided with the veh icle
tool kit) over the wheel bolt cap until the inner
retaine rs on the clip align with the edge of the
cover .
.. Remove the cap with the
plastic clip (vehicle
tool k it)
c:> fig. 176.
Refitting
.. Place the caps over the wheel bolts and push
them back on.
The caps are to protect and keep the wheel bolts
clean.
Page 246 of 282
Eme rge ncy ass ista nce
ground. The base @ must be vertical under the
lifting point @.
.. Wind the jack up further until the flat tire
comes off the ground
c> .&_.
Position the vehicle jack onl y under the designat
ed lifting points on the sill
c> fig. 178. There is ex
actly
one location for each wheel. The jack must
not be positioned at any other location
c> &c>Q) .
An uns table s urfac e under the jack can cause the
vehicle to slip off the jack. Always provide a firm
base for the jack on the ground . If necessary
place a sturdy board or similar support under the
jack. On
har d, sli ppery su rfaces (such as tiles)
use a rubber mat or similar to prevent the jack
from slipping
c> & .
A WARNING
-
-You or your passengers could be injured
wh ile chang ing a wheel if you do not follow
these safety precautions:
- Position the vehicle jack only at the desig
nated lifting points and align the jack.
Otherwise, the vehicle jack could slip and
cause an injury if it does not have suff i
cient hold on the vehicle.
-A soft or unstable surface under the jack may cause the vehicle to slip off the jack.
Always provide a firm base for the jack on
the ground. If necessa ry, use a sturdy
board under the jack.
- On ha rd, slippery surface (such as tiles)
use a rubber mat o r similar to prevent the
jack from slipping .
- On ly raise your vehicle with the vehicle
jack provided by the factory . If you use a
vehicle jack for another vehicle, your vehi
cle can slide and cause injury.
- Changes in temperature or load can affec t
the height o f the vehicle .
- Never start the engine when the vehicle is
raised, which could cause an accident.
- Support the vehicle securely with appro
priate stands if work is to be performed
underneath the vehicle; otherwise, there
is a potentia l risk for injury .
244
-To help prevent injury to yourself and your
passengers :
- Do not ra ise the vehicle until you are su re
the jack is securely engaged.
- Passengers must not remain in the veh icle
when it is jacked up.
- Make sure that passengers wait in a safe place away from the veh icle and we ll away
from the road and traffic.
- Make sure jack position is correct, adjust
as necessary and then continue to raise
the jack.
- Changes in temperature or load can affect
the height of the vehicle.
(D Note
Do not lift the vehicle by the sill. Position the
vehicle jack only at the des ignated lifting
po ints on the sill. Otherwise, your vehicle will
be damaged.
Taking the wheel off /installing the spare
Follow these instructions step-by-step for chang
ing the wheel.
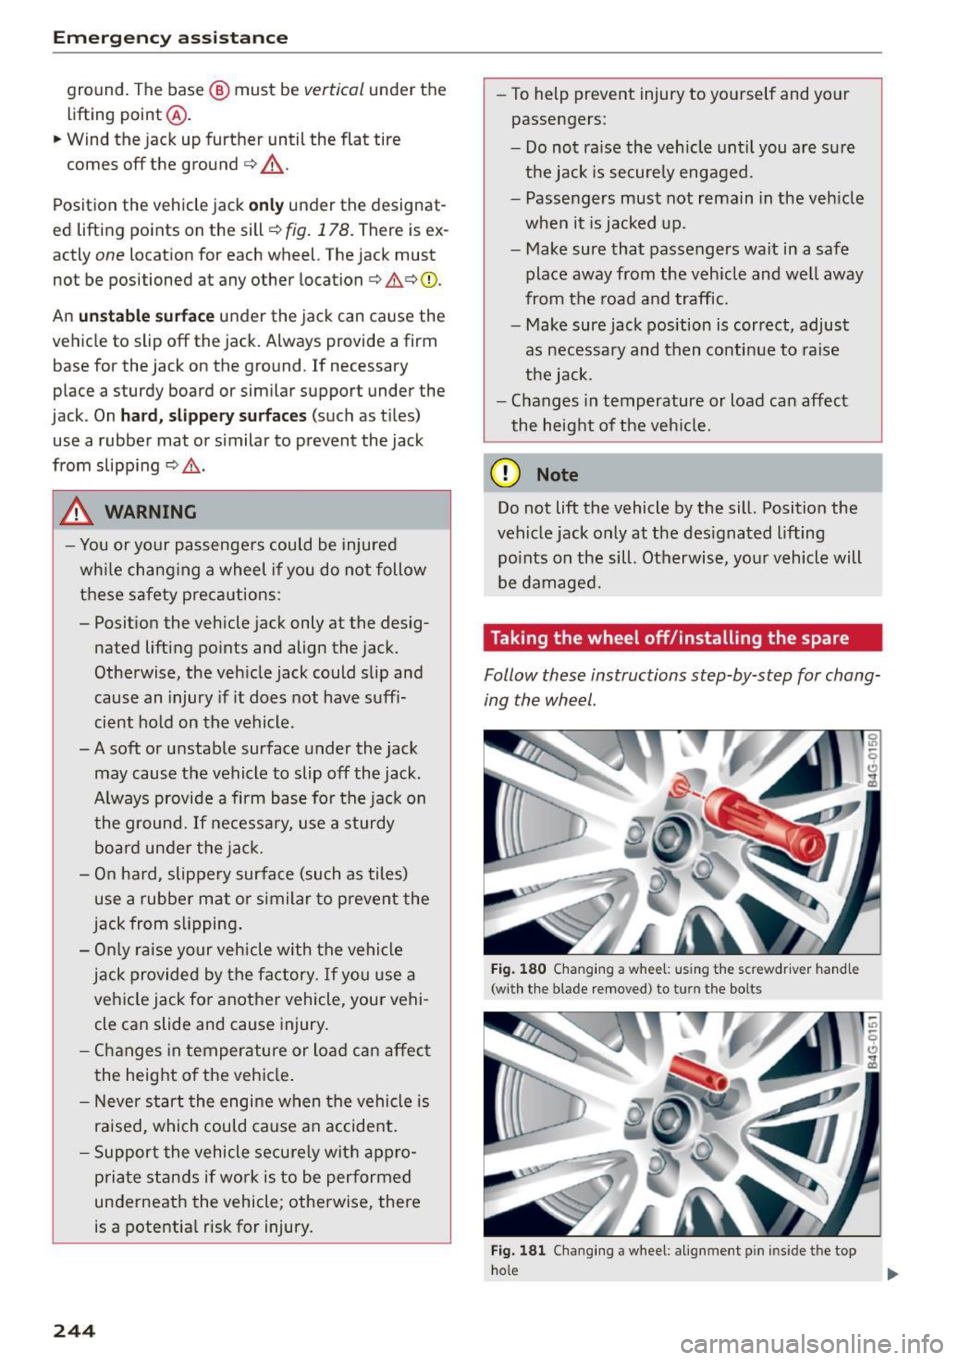
Fig. 180 Chang ing a whee l: us ing the screwdriver hand le
(w ith the blade removed) to turn the bolts
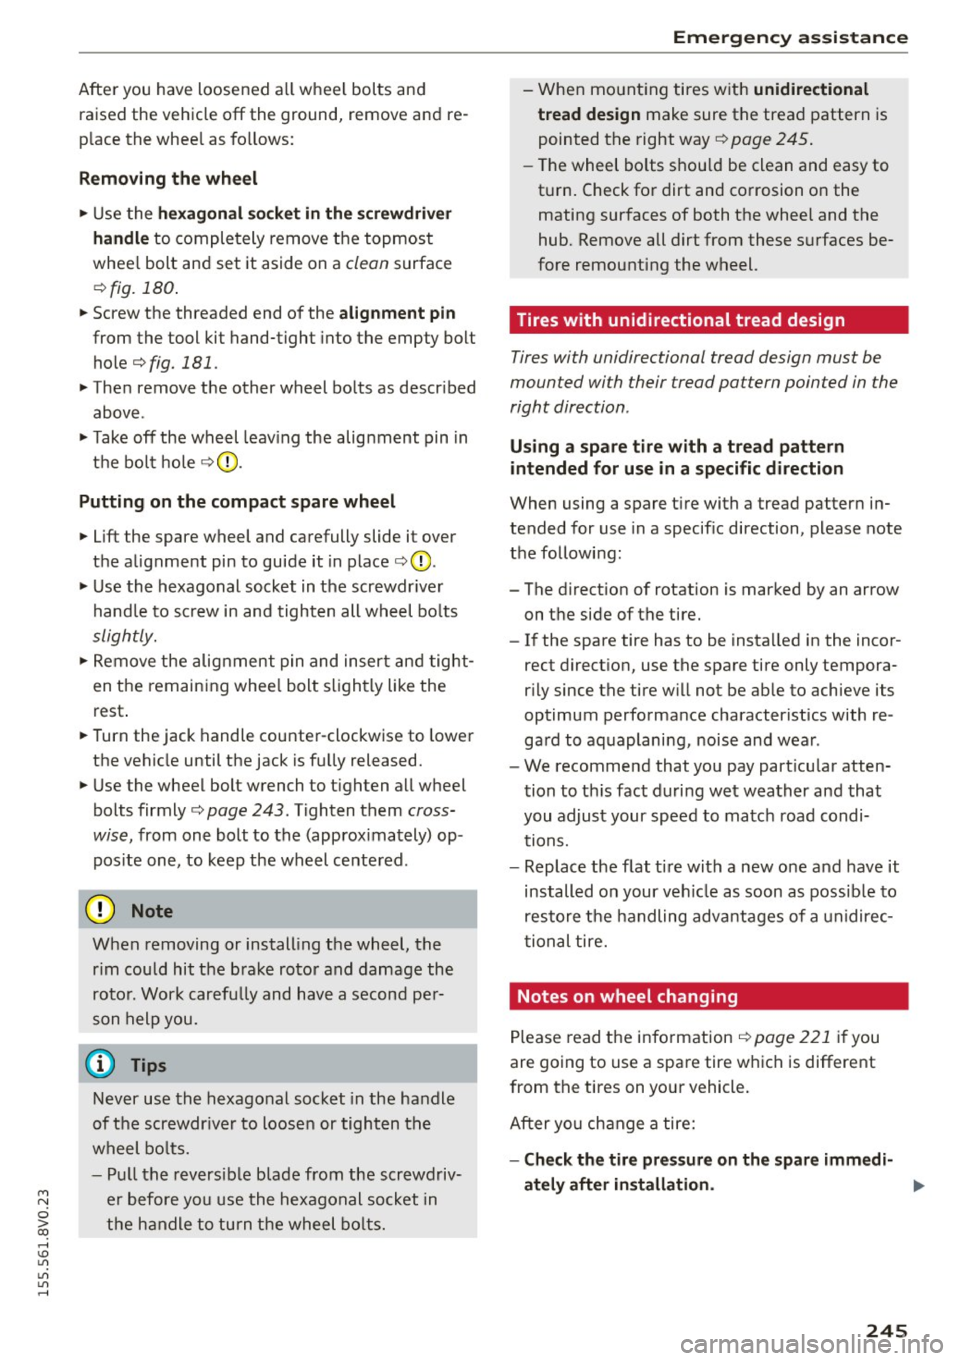
Fig. 181 Changing a w heel: alignment pin inside the top
hole
Page 247 of 282
M N
0 > co ,...., \!) 1.1'1
1.1'1
1.1'1
,....,
After you have loosened all wheel bolts and
raised the vehicle
off the ground, remove and re
place the whee l as fo llows:
Removing the wheel
.,. Use the hexagonal socket in the screwdriver
handle
to completely remove the topmost
whee l bolt and set it aside on a
clean surface
¢ fig. 180 .
.,. Screw the threaded end of the alignment pin
from the tool kit hand-tight into the empty bolt
hole¢
fig. 181.
.,. Then remove the other wheel bolts as descr ibed
above .
.,. Take
off the wheel leav ing the alignment pin in
the bolt hole ¢Q).
Putting on the compact spare wheel
.,. Lift the spare wheel and carefully slide it over
the a lignment pin to guide it in place ¢0 .
.,. Use the hexagonal socket in the screwdr iver
handle to screw in and tighten all wheel bolts
slightly.
.,. Remove the alignment pin and insert and tight
en the remaining whee l bolt slightly like the
rest .
.,. Turn the jack handle counter-clockwise to lower
the vehicle until the jack is fully released.
.,. Use the wheel bolt wrench to t ighten all wheel
bolts firmly¢
page 243. Tighten them cross
wise,
from one bolt to the (approx imately) op
pos ite one, to keep the wheel centered .
0 Note
When removing or installing the wheel, the
r im could hit the brake rotor and damage the
rotor. Work carefully and have a second per
son help you.
@ Tips
Never use the hexagonal socket in the handle
of the screwdr iver to loosen or tighten the
wheel bolts.
- Pull the reversible blade from the screwdriv
er before you use the hexagonal socket in
the handle to turn the wheel bolts.
Emergency assistance
-When mounting tires with unidirectional
tread design
make sure the tread pattern is
pointed the right way¢
page 245 .
-The wheel bolts shou ld be clean and easy to
t ur n. Check for dirt and corrosion on the
mating surfaces of both the wheel and the
hub. Remove all dirt from these surfaces be
fore remounting the wheel.
Tires with unidirectional tread design
Tires with unidirectional tread design must be
mounted with their tread pattern pointed in the
right direction .
U sing a spare tire with a tread pattern
intended for use in a specific direction
When using a spare t ire with a tread pattern in
tended for use in a specific direction, please note
the following:
- The direct ion of rotation is marked by an arrow
on the side of the tire.
- If the spare tire has to be insta lled in the incor
rect direction, use the spare tire only tempora
r ily since the tire w ill not be able to achieve its
optimum performance characteristics with re
gard to aquaplaning, noise and wear .
- We recommend that you pay part icular atten
tion to th is fact during wet weather and that
you adjust your speed to match road condi
tions.
- Replace the flat tire with a new one and have it
installed on your veh icle as soon as possible to
restore the handling advantages of a unidirec
tional tire.
Notes on wheel changing
Please read the information ¢ page 221 if you
are going to use a spare tire which is different
from the tires on your vehicle.
After yo u change a tire:
-Check the tire pressure on the spare immedi-
ately after installation.
lill-
245