torque AUDI S3 SEDAN 2017 Owners Manual
[x] Cancel search | Manufacturer: AUDI, Model Year: 2017, Model line: S3 SEDAN, Model: AUDI S3 SEDAN 2017Pages: 400, PDF Size: 67.32 MB
Page 87 of 400
CXl CXl .... N ,.__
N .... 0 N > 00
you press the accelerator pedal, the parking
brake releases automatica lly and your vehicle
starts to move Ā¢
page 85.
(D Tips
-Occasional noises when the park ing brake is
set and re leased are normal and are not a
cause for concern .
-The parking brake goes through a se lf-test
cycle at regular intervals when the vehicle is
stopped. Any noises associated w ith this are
normal.
-If there is a power failure, the parking brake
will not set if it is released, and it will not
release if it is
setĀ¢,&.. See an author ized
Audi dealer or authorized Audi Service FaĀ
cility for assistance.
Starting from a stop
Various convenience and safety functions may be
ava ilable when the vehicle begins dr iv ing, deĀ
pending on vehicle equipment .
Starting on hills with the parking brake set
Requirement: the driver's door must be closed.
.,. To start driving comfortab ly when on a hill, set
the parking brake and begin driving as usual.
The braking force of the parking brake does not
release automatically until the wheels build up
enough driving force .
Starting on hills with hill hold assist
Hill hold assist makes it easier to start on hills.
Requirement: the driver's door must be closed
and the eng ine must be r unning.
.,. To activate hill hold assist, press and hold the
brake pedal for several seconds . The vehicle
must be in an uph ill direction of travel.
After releasing the brake pedal, the braking pow Ā
er is ma inta ined for a br ief
moment Ā¢,& to preĀ
vent the vehicle from rolling back when starting.
During this time, you can easily beg in to move
your veh icle.
Driving
A WARNING
Applies to: ve hicles with h ill ho ld assist
-I f you do not beg in driving immediate ly or
the engine stalls afte r releasing the brake
pedal, your veh icle may begin to roll backĀ
ward. Press the brake pedal or set the parkĀ
ing brake immediately.
-The intelligent technology of hill hold assist
cannot overcome the limitations imposed by
natural physica l laws. The increased comfort
offered by hill hold assist should not cause
you to take safety risks.
-Hill hold assist cannot hold the vehicle in
p lace on a ll hills (for example, if the ground
is slippery or icy).
-To reduce the risk of an accident, always make sure the veh icle is situated safely
while stationary.
Automatic transmission
Introduction
Applies to: vehicles with automatic transmissions
T he automatic transmission is controlled elecĀ
tronically . Upshifting and downshifting occur auĀ
tomatica lly .
When a
moderate driving style is used, the
transm ission selects the most economica l dr iv ing
mode. The transmission upshifts at a lower RPM
and downshifts at a higher RPM to improve fue l
efficiency.
In the S selector leve r pos ition, the transmission
switches to a sporty mode after a kick-down or
when the driver uses a
sporty driving style charĀ
acterized by quick accelerator pedal movements,
heavy acce leration , frequent changes in speed
and traveling at the maximum speed.
If desired, the driver can also select the gea rs
manually (tiptronic mode) Ā¢ page 90, Manual
shifting (tiptronic mode).
The S tron ic is a dual-clutch transmission. Power
is transferred using two clutches that work inde Ā
pendent ly from one another. They rep lace the
torque converter used in conventional automatic
..,.
85
Page 153 of 400
CXl CXl .... N ,.__
N .... 0 N > 00
Intelligent Technology Electronic Stabilization
Control (ESC)
Description
Electronic Stabilization Control ( ESC) supports
driver safety . It reduces the risk of slipping and
improves dr iving stability. ESC detects critica l sitĀ
uations such as the vehicle oversteering and unĀ
dersteer ing or the wheels are spinning. The vehiĀ
cle is stabilized by apply ing the brakes or reduc Ā
ing engine torque . When the ESC engages, the
G1 indicato r light b links in the instrume nt clusĀ
ter.
The follow ing systems are integrated in the ESC:
Anti-loc k bra king system (ABS)
ABS prevents the whee ls from locking when brakĀ
ing. The vehicle can still be steered even during
hard brak ing. Apply steady pressure to the brake
pedal. Do not pump the pedal. A pulsing in the
b rake pedal indicates that the system is act ing to
stabilize the vehicle .
Brake a ssist system
The brake assist system can decrease braking disĀ
tance. It increases brak ing power when the driver
presses the brake pedal quick ly in emergency sitĀ
uations . You must press and hold the brake pedal
u nti l the dangerous sit uat io n is ove r. In veh icles
with adaptive cr uise contro l*, the bra ke assist
s ys tem is more sensitive if t he d istance detec ted
to the veh icle dr iv ing ahe ad is too small.
Anti -slip regulation (ASR)
ASR reduces eng ine power when the drive wheels
begin spinning and adapts the force to the road
conditions . This makes i t eas ie r to sta rt, accelerĀ
ate and dr ive up hill s.
Electronic differential lock (EDL )
The EDL applies the brakes to a wheel that starts
spinning and transfers t he drive power to the
other driving wheel or wheels ( if the veh icle is
eq uipped w ith all whee l dr ive*) . T his function is
n o t available at higher speeds.
Intellig ent Technology
In extreme cases, ED L automat ica lly switches off
to keep the brake o n the braked whee l from overĀ
heating. The veh icle is still working correct ly. EDL
will switch on again automatically when condiĀ
t ions have returned to normal.
Ste ering recommendation
The ESC he lps to s tabilize the vehicle by changing
the steering torque.
Select ive wheel torque control
Se lective wheel to rque cont rol is used w hen drivĀ
i ng on curves. The fron t whee l on the inside of
the curve or bo th wheels on the i nside of the
c u rve are braked se lective ly as needed . This alĀ
l ows more precise driving in c urves.
Automatic post-collision braking system
T he "automat ic pos t-collision braking system"
c an help to reduce the risk of sliding an d of addi Ā
tiona l co llisions a fter an acciden t. If the ai rbag
contro l modu le detects a co llision above a certain
vehicle speed, the veh icle is bra ked by the ESC.
T he vehicle does not bra ke autorn,;1tically if;
- t he dr ive r presses the acce le rator pedal, or
- the ESC, the brake system or the veh icle elect ri-
cal system are not functioning .
A WARNING
-The ESC and its integ rated systems cannot
overcome the lim its imposed by natura l
phys ic al laws. This is especially important
on sli ppery or wet roads . If the sy stems beĀ
gin acting to stabilize your vehicle, you
should immediately alter your speed to
match the road and traffic conditions. Do
not let the inc reased safety provided tempt
you into taking risks. This could increase
your r isk of a coll is ion.
- Please n ote the r isk of a coll is ion increases
when dr iv ing fast, especially t hrough curves
a nd on slippery or wet roads, and when dr ivĀ
ing too close to objects ahead. The ESC and
its integrated systems ca nnot always preĀ
vent collisions
-there is st ill a ris k of ac ci-
dents!
..,.
151
Page 356 of 400
Emergency assistance
ā¢ To open the side pane l, turn the lock and reĀ
move the
cover @*/ @ Ā¢ fig. 283.
ā¢ Lift the cargo floor using the plastic handle @
un til the cargo floor engages behind the tabs
Ā© in both side panelsĀ¢ fig. 284 (upper imĀ
age) .
ā¢ Fold the cargo floor back before closing the
luggage compartment lid.
Vehicle tool kit and cargo floor cover
App lies to: ve hicles w ith versio n 2
The vehicle too l kit, tire mobility kit* and comĀ
pressor* are stored in the luggage compartment
under the cargo floor
cover @Ā¢ fig. 283 .
ā¢ Engage the plastic hookĀ® in the luggage comĀ
partment
seal Ā¢ fig. 284.
ā¢ Fold the cargo floor back before closing the
luggage compartment lid .
.&_ WARNING
Improper use of the vehicle jack can cause seĀ
r ious personal injuries.
- Never use the screw driver hex head to
tighten wheel bolts, since the bolts cannot
attain the necessary tightening torque if you
use the hex head, potentially causing an acĀ
cident.
- T he factory-supplied jack is intended only
for your vehicle model. Under no circumĀ
stances should it be used to lift heavy
vehicles or other loads; you risk injuring
yourself.
- Never start the engine when the vehicle is
raised, which could cause an accident.
- Support the vehicle securely with appropriĀ
ate stands if work is to be performed underĀ
neath the vehicle; otherwise, there is a poĀ
tent ial risk for injury.
- Never use the jack supplied with your Audi
on another vehicle, particularly on a heavier
one. The jack is only suitable for use on the
vehicle it came w ith.
@ Tips
The vehicle jack* in your vehicle is mainteĀ
nance-free.
354
Tire mobility kit
Preparation
App lies to: vehicles with tire mobility kit
ā¢ Read and fo llow the important safety precau-
tions
in Ā¢ page 353.
ā¢ Set the parking brake.
ā¢ Move the selector lever into the P position.
ā¢ Check if a repair with the tire mobility kit is posĀ
sible
Ā¢ page 354.
Using the tire mobility kit
Applies to: vehicles wit h tire mobility kit
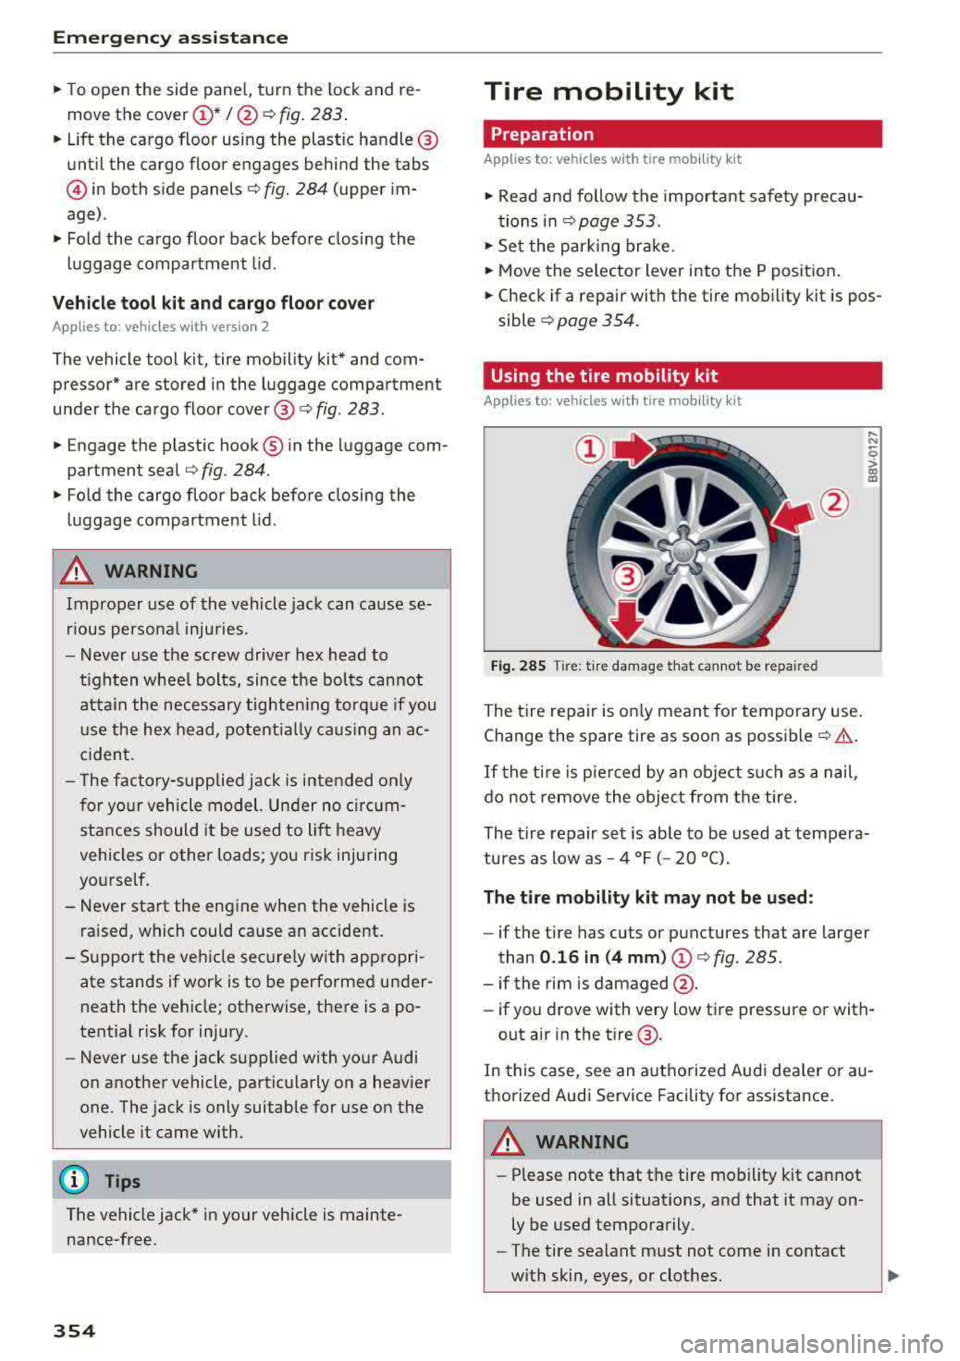
Fig. 285
Tire: t ir e damage that cannot be repaired
The tire repair is only meant for temporary use .
Change the spare tire as soon as possible
c:;> .&..
If the tire is pierced by an object such as a nail ,
do not remove the object from the tire.
..... N
0
> 00 m
The tire repair set is able to be used at temperaĀ
tures as low as -4 Ā°F ( -20 Ā°C).
The tire mobility kit may not be used :
-if the tire has cuts or punctures that are larger
than
0.16 in (4 mm) (!)Ā¢ fig. 285.
-if the rim is damaged @.
- if you drove with very low tire pressure or with-
out air in the tire @.
In this case, see an authorized Aud i dea ler or auĀ
thorized Audi Service Facility for assistance.
~ WARNING
-Please note that the tire mobility kit cannot
be used in all situations, and that it may onĀ
ly be used temporarily.
-The tire sealant must not come in contact
with skin, eyes, or clothes.
Page 359 of 400
a, a, ..... N
" N ..... 0 N > 00
_& WARNING
You or your passengers could be injured while
changing a wheel if you do not follow these
safety precautions:
- If you have a flat tire, move a safe distance
off the road. Turn off the engine, turn the emergency flashers on and use other warnĀ
ing devices to alert other motorists.
- Make sure that passengers wait in a safe
place away from the vehicle and well away
from the road and traffic.
- To help prevent the vehicle from moving
suddenly and possibly slipping off the jack,
always fully set the parking brake and block
the wheel diagonally opposite the wheel beĀ
ing changed. When one front wheel is lifted
off the ground, placing the Automatic
Transmission in P (Park) will
not prevent the
vehicle from moving.
- Before you change a wheel, be sure the
ground is level and firm. If necessary, use a
sturdy board under the jack.
- Always store the vehicle tool kit, the jack
and the replaced tire in the luggage comĀ
partment
c:> page 253.
Changing a wheel
When you change a wheel, follow the sequence
described below step-by-step and in exactly that
order.
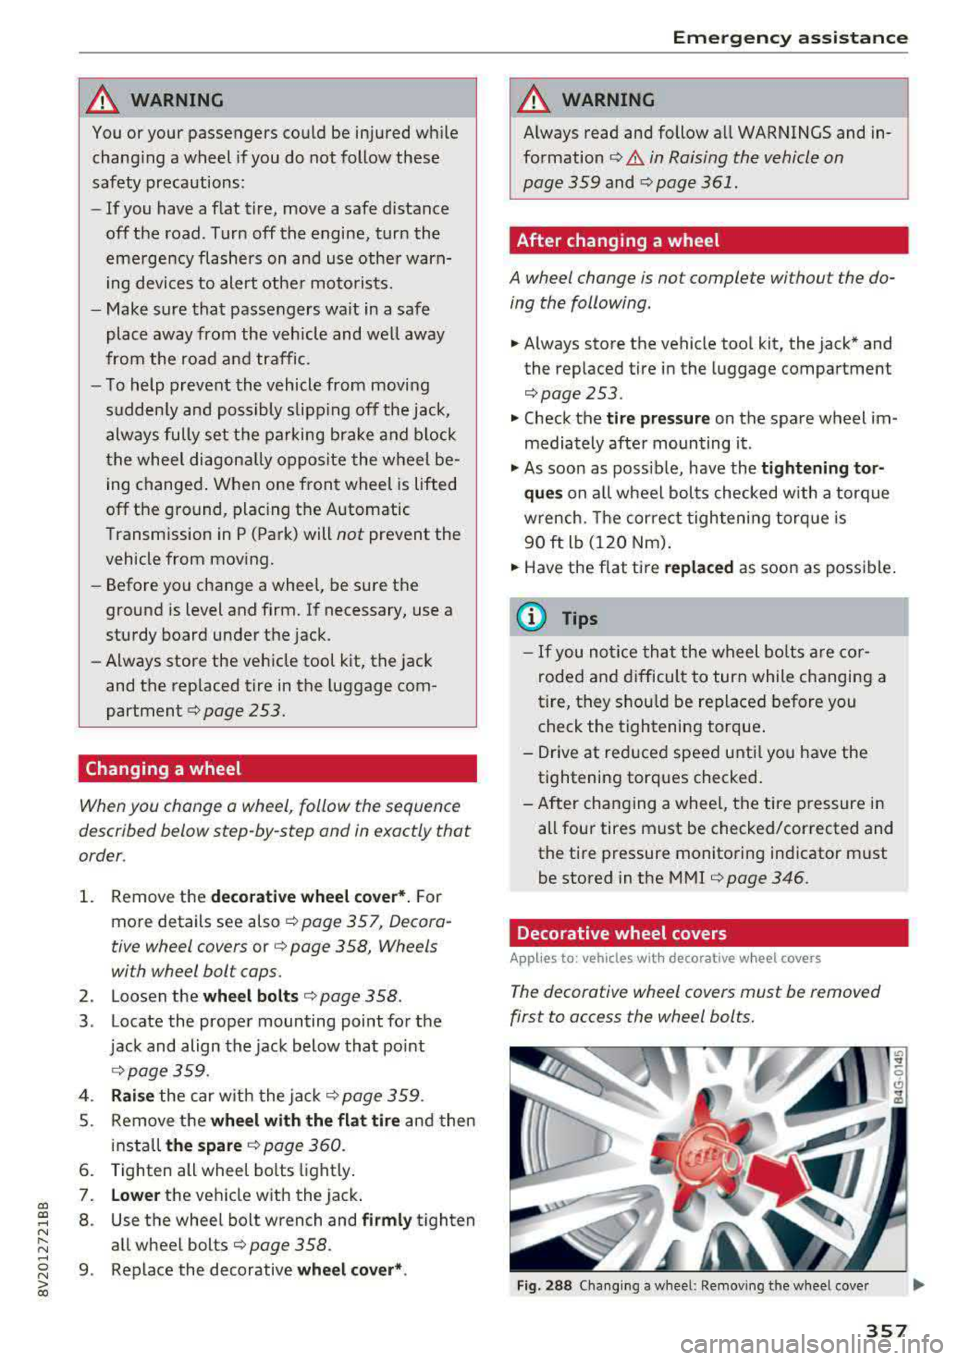
1. Remove the decorative wheel cover*. For
more details see also
c:> page 357, Decora-
tive wheel covers
or c:> page 358, Wheels
with wheel bolt caps.
2. Loosen the wheel bolts c:> page 358.
3 . Locate the proper mounting point for the
jack and align the jack below that point
c:> page359.
4. Raise the car with the jack c:> page 359.
5. Remove the wheel with the flat tire and then
install
the spare c:> page 360.
6. Tighten all wheel bolts lightly.
7. Lower the vehicle with the jack .
8 . Use the wheel bolt wrench and firmly tighten
all wheel bolts
c:> page 358 .
9. Replace the decorative wheel cover* .
Emergency assistance
_& WARNING
-Always read and follow all WARNINGS and in-
formation
c:> .&. in Raising the vehicle on
page 359
and c:> page 361.
After changing a wheel
A wheel change is not complete without the doĀ
ing the following.
.. Always store the vehicle tool kit, the jack* and
the replaced tire in the lugg age compartment
c:> page 253.
.. Check the tire pressure on the spare wheel imĀ
mediately after mounting it .
.. As soon as possible, have the tightening torĀ
ques
on all wheel bolts checked with a torque
wrench. The correct tightening torque is
90 ft lb (120 Nm).
.. Have the flat tire replaced as soon as possible.
@ Tips
-If you notice that the wheel bolts are corĀ
roded and difficult to turn while changing a
tire, they should be replaced before you
check the tightening torque.
- Drive at reduced speed until you have the tightening torques checked.
- After changing a wheel, the tire pressure in
all four tires must be checked/corrected and
the tire pressure monitoring indicator must
be stored in the MMI
c:>page 346.
Decorative wheel covers
Applies to : vehicles wit h decorative w heel covers
The decorative wheel covers must be removed
first to access the wheel bolts.
Fig. 288 Changing a wheel: Removing the wheel cover
357
Page 363 of 400
CXl CXl .... N ,.__
N .... 0 N > 00
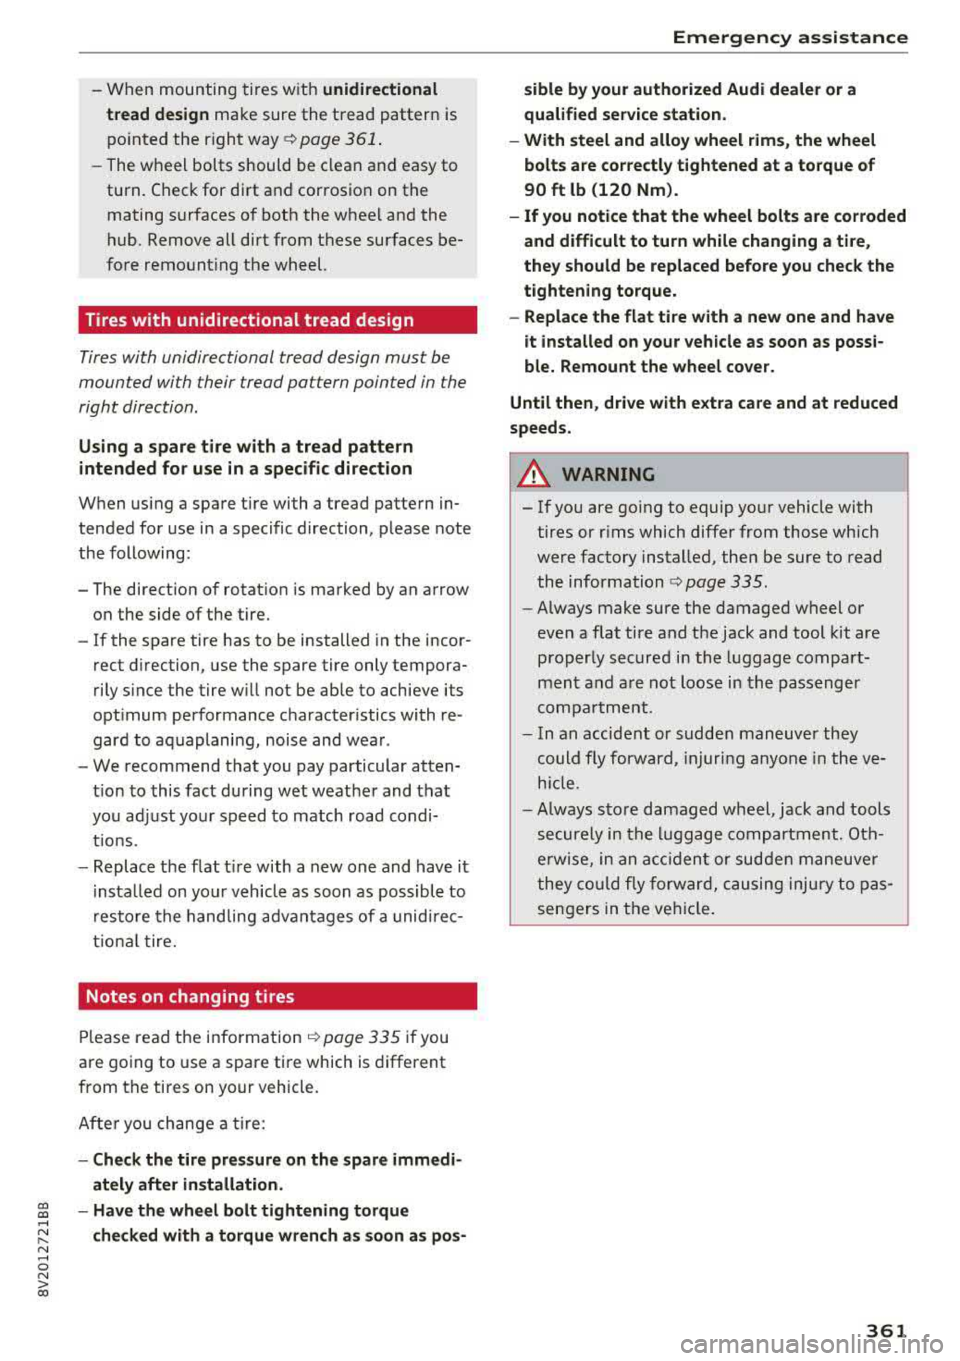
-When mountin g tires w ith unidirectional
tread design
ma ke sure the t read pattern is
p oin ted the r ight way Ā¢
page 36 1.
-The wheel bolts should be clean and easy to
turn. C heck for d irt a nd cor rosion on the
ma ting surfaces o f both the wheel an d the
hub. Remove all dirt from t hese surfaces beĀ
fo re remo unt ing the wheel.
Tires with unidirectional tread design
Tires with unidirectional tread design must be
mounted with their tread pattern pointed in the
right direction.
Using a spare t ire with a tread pattern
intended for use in a specific direction
W hen using a spa re t ire with a tread patte rn in Ā
tended fo r use in a specific direction, please note
the following:
-The direct ion of rotat ion is ma rked by an a rrow
on the side of the tire .
-If the spare tire has to be installed in the incorĀ
rect d irection, use the spare tire only temporaĀ
ri ly s ince the tire w ill not be ab le to achieve its
opt imum p erformance c harac ter istics wi th reĀ
gard to aquaplaning, noise and wea r.
-We recommend t hat you pay particular attenĀ
t io n t o this fac t during we t weat her and that
yo u adju st yo ur speed to match road condi Ā
ti ons.
-Rep lace the flat t ire with a new one and have it
insta lled on yo ur ve hicl e as soon as possibl e to
r es to re th e hand li n g adva ntages of a unid irec Ā
tional t ire.
Notes on changing tires
Please read the info rmation I:!> page 3 35 if you
are go ing to use a spare tire which is different
from the tires on your veh icle.
Af te r yo u c hange a tire:
-Check the tire pressure on the spare immediĀ
ately after in stallation .
-Have the wheel bolt tightening torque
checked with a torque wrench as soon as pos -
Emergency assistance
sible by your authorized Audi dealer or a
qualified service station.
-With steel and alloy wheel rims, the wheel bolts are correctly tightened at a torque of
90 ft lb (120 Nm).
-If you notice that the wheel bolts are corroded
and difficult to turn while changing a tire ,
they should be replaced before you check the
tightening torque.
-Replace the flat tire with a new one and have
it installed on your vehicle as soon as possi Ā·
ble. Remount the wheel cover .
Until then , dr ive with extra care and at reduced
speeds.
_& WARNING
-I f you are going to equip yo ur vehicle with
tires or r ims which differ from those w hich
were factory installed, the n be sure to read
th e information
Ā¢ pag e 335.
-Always make sure the damaged wheel or
e ven a flat tire a nd the jack and tool kit are
p rop erly secur ed in t he lu ggag e compartĀ
m en t an d are not l oose in th e p asseng er
compa rtme nt.
-In an accide nt or sudde n man euv er th ey
could fly forward, injuri ng a nyo ne in the veĀ
hicl e.
-Always s tor e damag ed w heel, jack and t ools
securely i n the lu ggage compa rtm ent. Ot hĀ
erwise, in an accid ent or sud den m aneuve r
t he y c ould fl y forwar d, ca using injury to pas Ā
sen gers in the ve hicle.
-
361
Page 377 of 400
CXl CXl .... N ,.__
N .... 0 N > 00
Gross Axle Weight Rating
The G ross Axle We igh t Rating is the max imum
l oad that can be applied at each axle of the vehi Ā
cle~.& .
Vehicle capacity weight
The vehicle capac ity we ight (max. load) is listed
e ithe r o n the dr iver's side B-pillar o r inside the
f u el fi ller flap.
& WARNING
-T he actual Gross Ax le Weight Rating at the
front and rear axles sho uld not exceed the
permissible weights, and their comb inat ion
must not exceed the Gross Vehicle We ight
Rat ing.
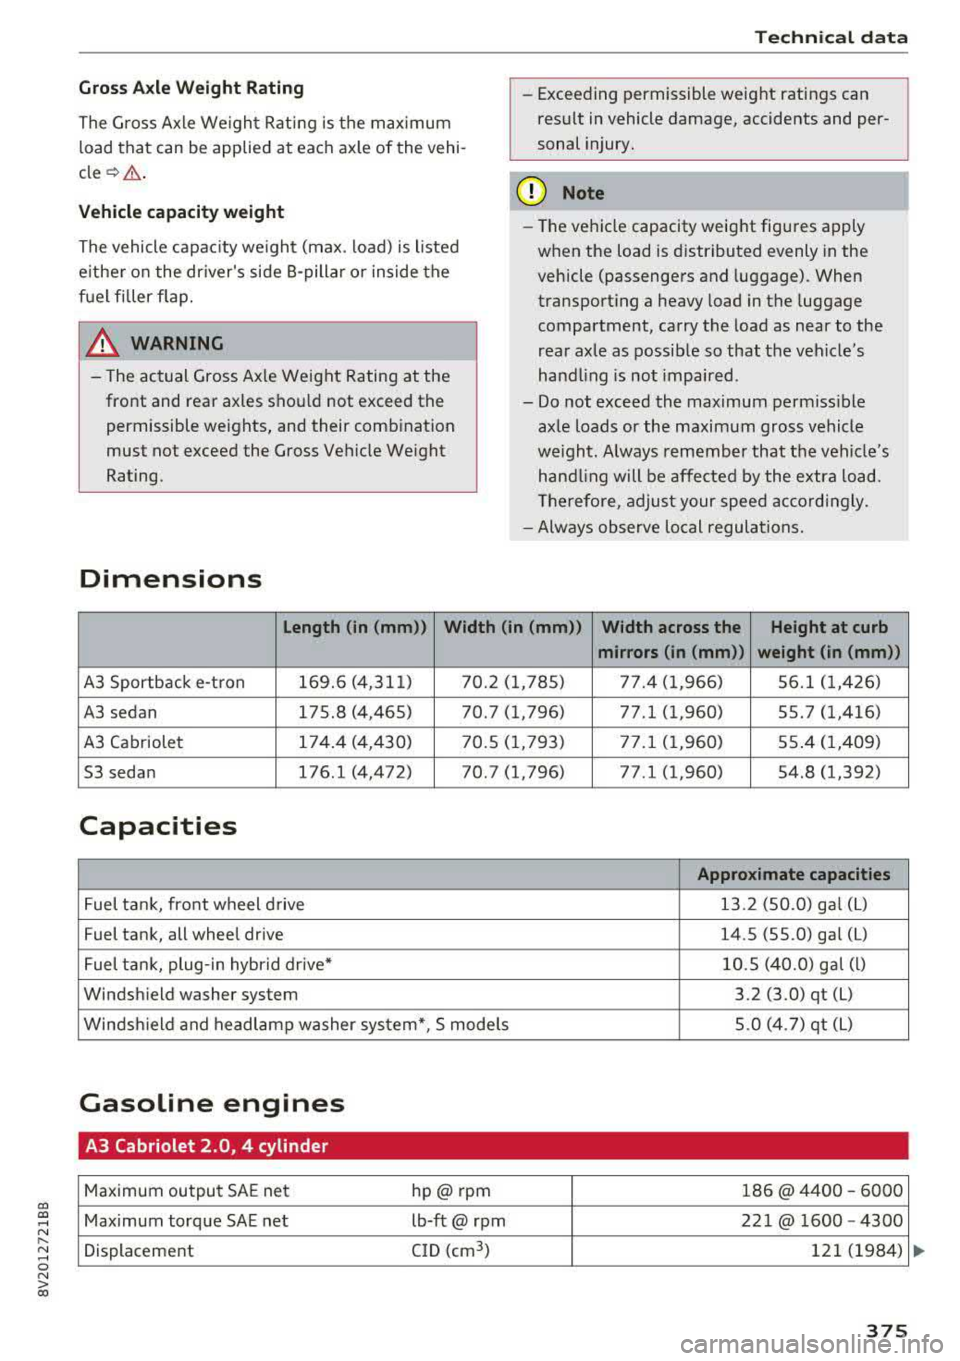
Dimensions
Techn ical data
-Exceeding permissible weight ratings can
res ult in vehicle damage, accidents and perĀ
sonal injury.
(D Note
-T he vehi cle capacity weig ht figu res apply
when the load is d istributed evenly in the
vehicle (passengers and luggage). When
transport ing a heavy load in the luggage
compartment, ca rry the load as near to the
rear axle as possib le so that t he veh icle's
hand ling is no t impaired .
-Do not exceed the maximum perm iss ible
ax le loads or the maximum gross vehicle
we igh t. Always remember that the veh icle's
han dling will be affe cted by the extra load.
Th erefore, adjust your spee d accordingly.
-Always observe local regulations.
Length (in (mm)) Width (in (mm )) Width across the Height at curb
mirrors (in (mm )) weight (in (mm))
A3 Sportback e-t ron 169.6 (4,31
1) 7 0.2 ( 1,785) 77.4 ( 1,966) 56.1 (1, 426)
A3 sedan 175.8 (4,465) 70.7 (1,796) 77.1 (1,960) 55.7 (1,416)
A3 Cabriole t 174
.4 (4,430) 7 0.5 ( 1,793) 77 .1 ( 1,960) 55.4 ( 1,409)
53 seda n 176.1 (4,472) 70.7 (1,796) 77.1 (1,960) 54 .8 (1,392)
Capacities
Appro ximate capacities
Fuel ta nk, front w heel d rive 13
.2 (50.0) ga l (L )
Fuel tank, all wheel drive 14.S (55.0) gal
(L)
Fuel tank, plug -in hybr id drive* 10
.5 (40.0) g al (l)
Windshield washer system 3.2 (3.0) qt (L)
Winds hield and headlamp washer sys tem*, S mode ls 5.0 (4.7) qt
(L)
Gasoline engines
A3 Cabriolet 2.0, 4 cylinder
Maximum output SA
E net hp@rpnn 186@ 4400 -6000
Maximum torque SAE net lb-ft@ rpm 221@ 1600
-4300
Displacement C
ID (cm
3
) 12 1 (1984)
375
Page 378 of 400
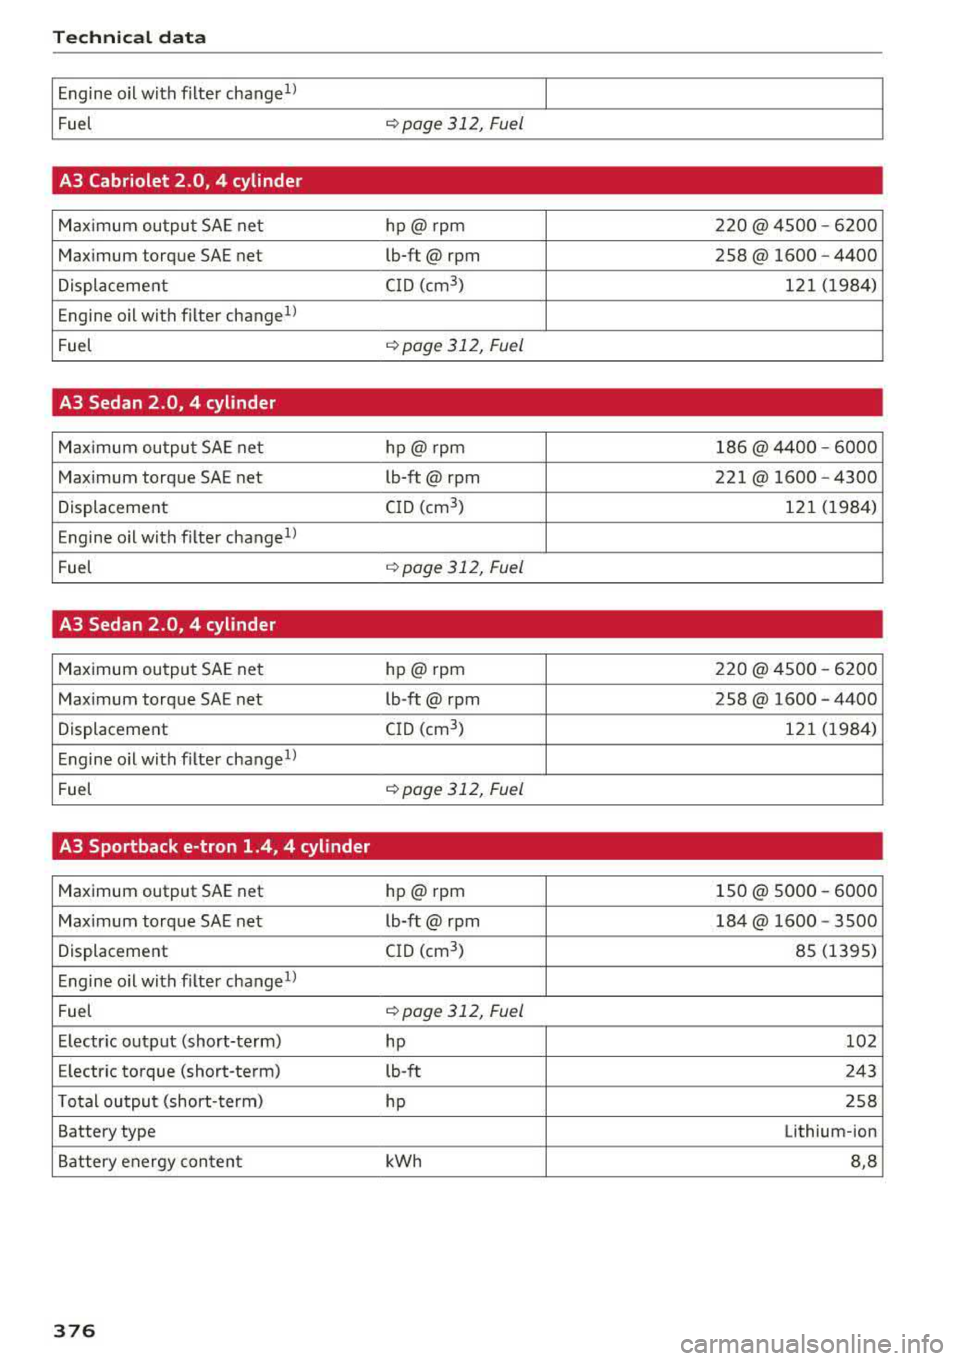
Tech nical data
Engine oil with filter change1l I
Fuel <:!)page 312, Fuel
A3 Cabriolet 2.0, 4 cylinder
Maximum output SA E net hp@ rpm 220@ 4500 -6200
Maximum torque SAE net lb-ft@ rpm 258@ 1600
-4400
Displacement C
ID (cm
3
) 12 1 (1984)
Engine oil with f ilter change
1l
Fuel
qpage 312, Fuel
A3 Sedan 2.0, 4 cylinder
Maximum ou tput SA E net hp@ rpm 186@ 44
00 -6000
Maximum torque SAE net lb-ft@ rpm 221@ 1600
-4300
Displacement C
ID (cm
3
) 121 (1984)
Engine oil with f ilter change
1l
Fuel
q page 31 2, Fuel
A3 Sedan 2.0, 4 cylinder
Maximum ou tput SA E ne t hp@ rpm 220@ 4500 -6200
Max imum torque SAE net lb-ft@ rpm 258@ 1600
-4400
Displacement C
ID (cm
3
) 12 1 (1984)
Engine oil with filter change
1l
Fuel
q page 312, Fuel
A3 Sportback e-tron 1.4, 4 cylinder
Maximum output SAE net hp@ rpm 150@ 5000 -6000
Max imum torque SAE net lb-ft@ rpm 184@ 1600
-3500
Displacement CID (cm
3
) 85 (1395)
Engine oil w ith filter
change1l
Fuel qpage 312, Fuel
E lectr ic output (short-term)
hp 1
02
E lectr ic torque (short-term) lb-ft 243
T otal output (short- term) hp 258
Battery type Lithium-ion
Battery energy conten t kWh 8,8
376
Page 379 of 400
CXl CXl .... N ,.__
N .... 0 N > 00
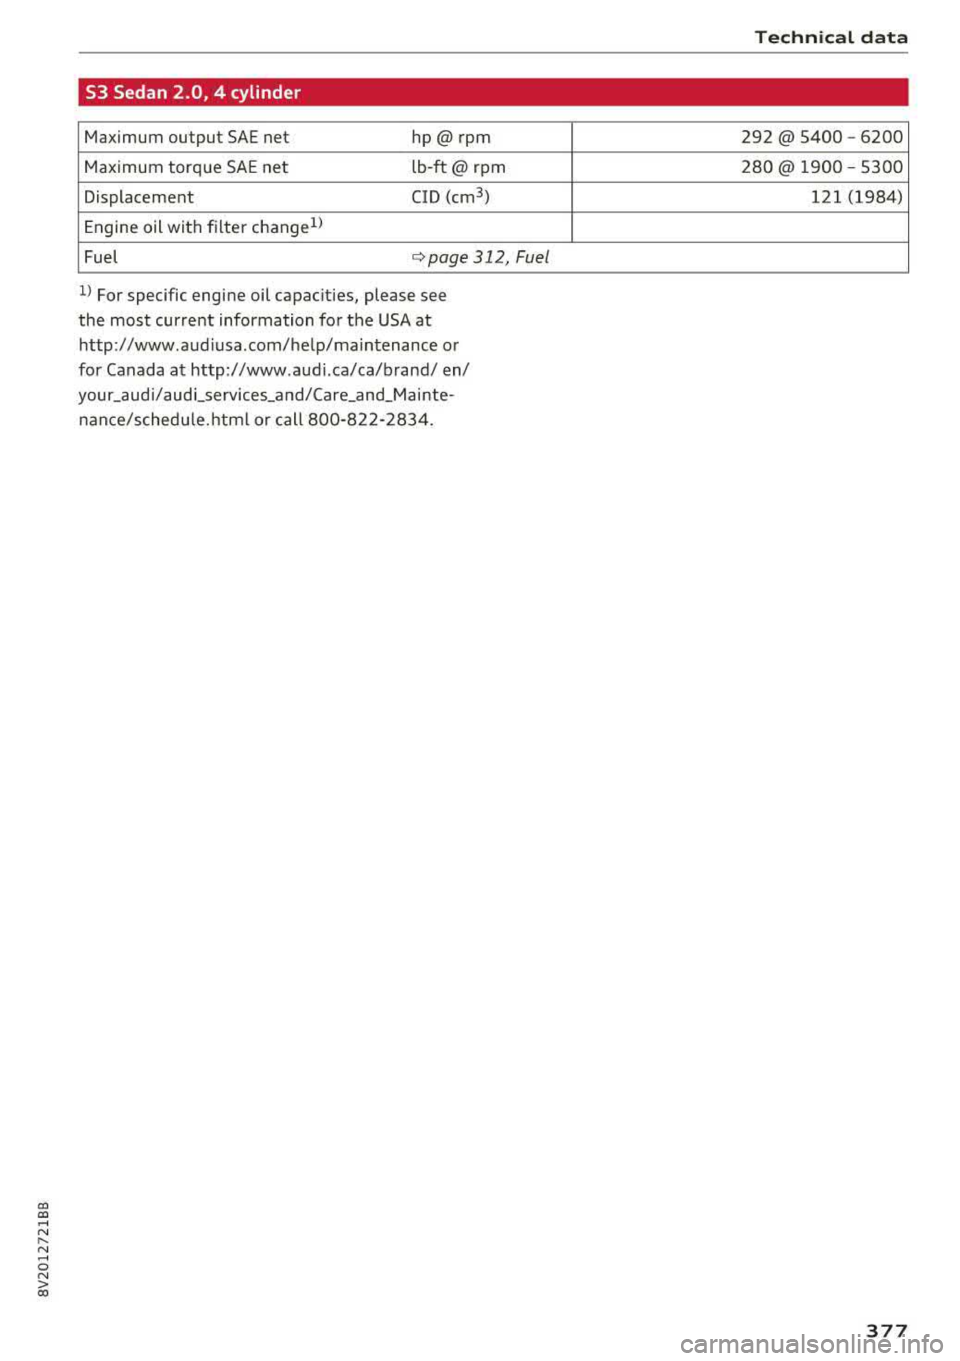
53 Sedan 2.0, 4 cylinder
Maximum output SAE net hp@rpnn
Maximum torque SAE net lb
-ft@ rpm
Displacement CID (cm
3
)
Engine oil with f ilter change1>
Fuel <=> page 312, Fuel
ll For specific engine oil capacities, please see
the most current information for the USA at
http:/ /www.audiusa.com/help/ma intenance or
for Canada at http:/ /www.audi.ca/ca/brand/ en/
your _aud i/ aud i_services_a nd/Ca re_and_M a i nteĀ
na nce/ schedu le.html or call 800-822-2834.
Techn ical dat a
292 @ 5400 -6200
280@ 1900 - S300
121 (1984)
377
Page 393 of 400
CXl CXl
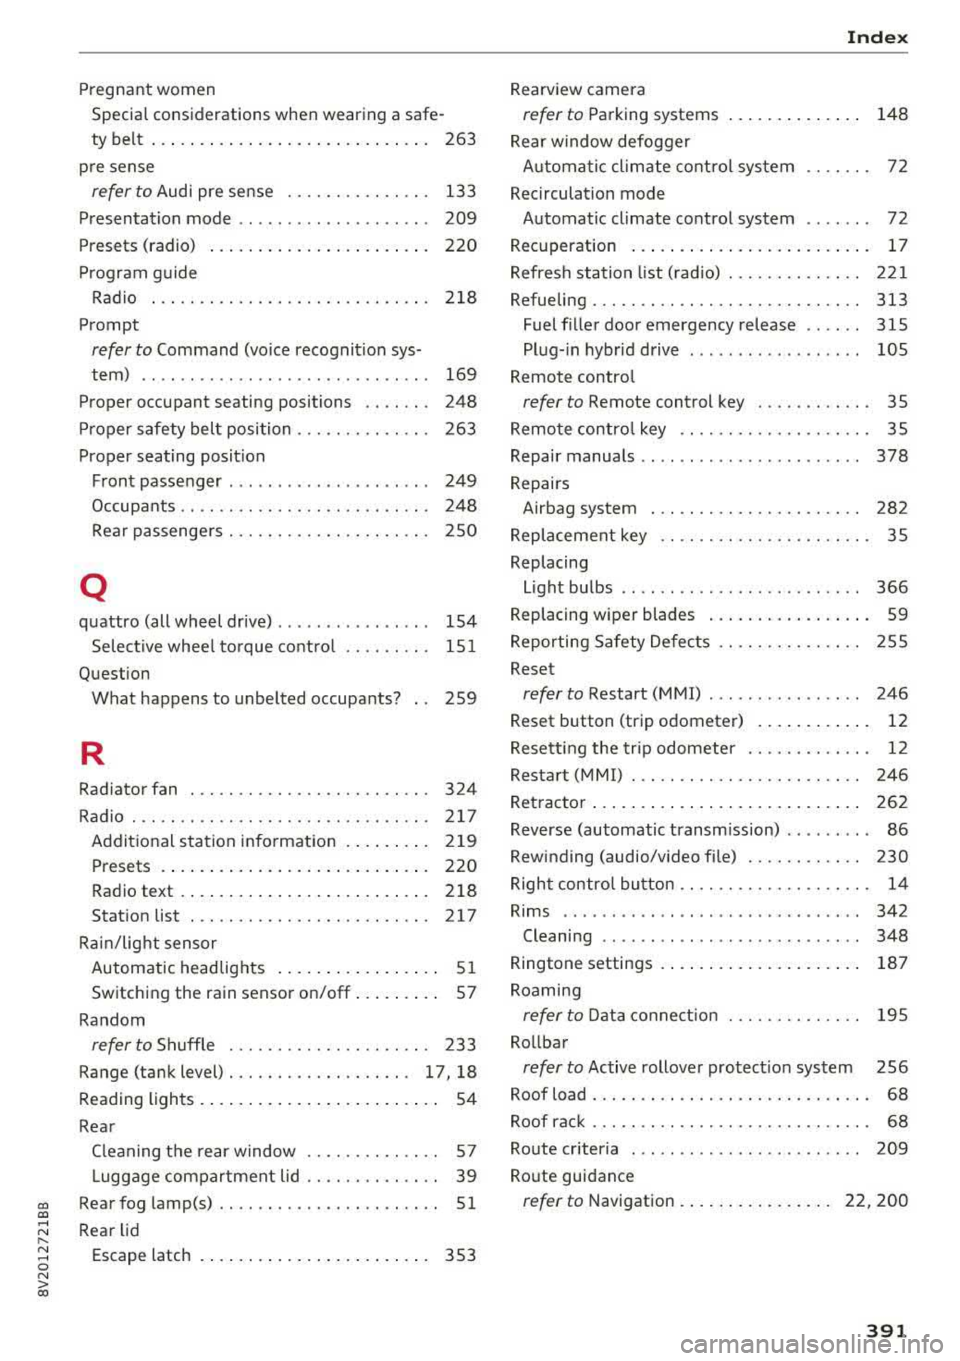
Pregnant women
Special consid erations when w earing a safe-
ty belt . . . . . . . . . . . . . . . . . . . . . . . . . . . . . 263
pre sense
refer to Audi pre sense . . . . . . . . . . . . . . . 133
Presentation mode . . . . . . . . . . . . . . . . . . . . 209
Presets (radio) . . . . . . . . . . . . . . . . . . . . . . . 220
Program guide
Radio . . . . . . . . . . . . . . . . . . . . . . . . . . . . . 218
Prompt
refer to Command (vo ice recognition sys-
tem) . . . . . . . . . . . . . . . . . . . . . . . . . . . . . . 169
Proper oc cupant seating positions . . . . . . . 248
Proper safety belt position . . . . . . . . . . . . . . 263
Proper seating position Front passenger . . . . . . . . . . . . . . . . . . . . . 249
Occupants . . . . . . . . . . . . . . . . . . . . . . . . . . 248
Rear passengers . . . . . . . . . . . . . . . . . . . . . 250
Q
quattro (all wheel drive) . . . . . . . . . . . . . . . . 154
Selective wheel torque control . . . . . . . . . 151
Que stion
What happens to unbelted occupants? 259
R
Radiator fan 324
Radio ... .. .. .. .... .. .. ....... .. .. .. . 217
Additional station information . . . . . . . . . 219
Presets . . . . . . . . . . . . . . . . . . . . . . . . . . . . 220
Rad io text .. .. ................ ..... . 218
Station list . .. ............. .. .. .. .. . 217
Ra in/light sensor
Automatic headlights . . . . . . . . . . . . . . . . . 51
Switching the rain sensor on/off. . . . . . . . . 57
Random
refer to Shuffle . . . . . . . . . . . . . . . . . . . . . 233
Range (tank level) . .... ......... .. .. . 17, 18
Reading lights . . . . . . . . . . . . . . . . . . . . . . . . . 54
Rear Cleaning the rear window . . . . . . . . . . . . . . 57
L uggage compartment lid . . . . . . . . . . . . . . 39
Rear fog lamp(s) . . . . . . . . . . . . . . . . . . . . . . . 51
;:::: Rear lid ,.__
~ Escape latch . . . . . . . . . . . . . . . . . . . . . . . . 353 0 N > 00
Rearview camera
refer to Parking systems
Rear w indow defogger
Index
148
Automatic climate control system . . . . . . . 72
Recirculation mode Automatic climate control system . . . . . . . 72
Recuperation . . . . . . . . . . . . . . . . . . . . . . . . . 17
Refresh station list (radio) . . . . . . . . . . . . . . 221
Refueling... .... .. .. ............... .. 313
Fuel filler door emergency release . . . . . . 315
Plug- in hybrid drive . . . . . . . . . . . . . . . . . . 105
R emote control
refer to Remote control key . . . . . . . . . . . . 35
Remote control key . . . . . . . . . . . . . . . . . . . . 35
Repair manuals . . . . . . . . . . . . . . . . . . . . . . . 378
R epairs
Airbag system . . . . . . . . . . . . . . . . . . . . . . 282
Replacement key . . . . . . . . . . . . . . . . . . . . . . 35
Replacing Light bulbs . . . . . . . . . . . . . . . . . . . . . . . . . 366
R eplacing wip er blades . . . . . . . . . . . . . . . . . 59
Reporting Safety Defects . . . . . . . . . . . . . . . 255
Reset
refer to Restart (MMI) . . . . . . . . . . . . . . . . 246
Reset button (trip odometer) . . . . . . . . . . . . 12
Resetting the trip odometer . . . . . . . . . . . . . 12
Re sta rt (MM I) . . . . . . . . . . . . . . . . . . . . . . . . 246
Retractor . . . . . . . . . . . . . . . . . . . . . . . . . . . . 262
Reverse (automatic transmission) . . . . . . . . . 86
Rewinding (audio/video file) . . . . . . . . . . . . 230
Right control button . . . . . . . . . . . . . . . . . . . . 14
Rims ......... ... .. ... ........... ... 342
Cleaning . . . . . . . . . . . . . . . . . . . . . . . . . . . 348
Ringtone settings . . . . . . . . . . . . . . . . . . . . . 187
Roaming
refer to Data connection . . . . . . . . . . . . . . 195
Rollbar
refer to Active rollover protection system 256
Roof load . . . . . . . . . . . . . . . . . . . . . . . . . . . . . 68
Roof rack . . . . . . . . . . . . . . . . . . . . . . . . . . . . . 68
Route criteria . . . . . . . . . . . . . . . . . . . . . . . . 209
Route guidance
refer to Navigation . . . . . . . . . . . . . . . . 22, 200
391