drive mode AUDI S3 SEDAN 2018 Owners Manual
[x] Cancel search | Manufacturer: AUDI, Model Year: 2018, Model line: S3 SEDAN, Model: AUDI S3 SEDAN 2018Pages: 404, PDF Size: 62.3 MB
Page 11 of 404
u. 00 .-< N l' N .-< 0 N > 00
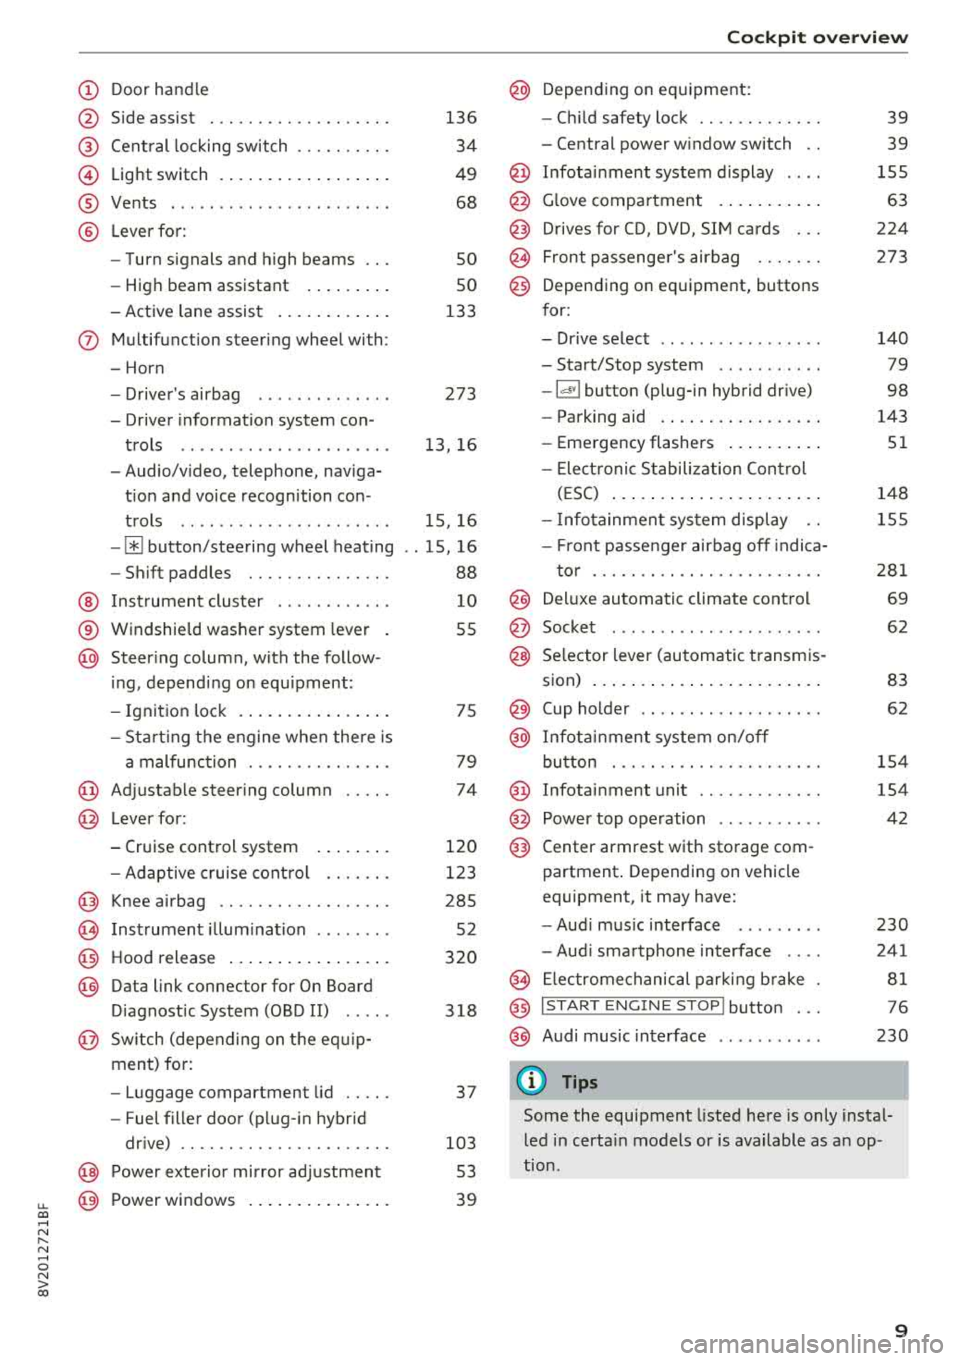
(D Door handle
@ Side assist ................ .. .
@ Central locking switch ......... .
@ Light switch ................ . .
® Vents ... .. ................ . .
@ Lever for:
- Turn signals and high beams
- High beam assistant ....... . .
- Active lane assist .......... . .
(J) Multifunction steering wheel with:
- Horn
- Driver 's airbag ............ . .
- Driver information system con-
trols .. .. ................ . .
- Audio/video, telephone, naviga
tion and voice recognition con -
trols .. .. ................ . .
-[ii button/steering wheel heating
- Shift paddles ............ .. .
@ Instrument cluster ........... .
® Windshield washer system lever
@ Steering column , with the follow -
ing , depending on equipment:
- Ignition lock .............. . .
- Start ing the engine when there is
a malfunction ............ .. .
@ Adjustable steering column
@ Lever for:
- Cruise control system
- Adaptive cruise control ...... .
@ Knee airbag ................. .
(8) Instrument illumination ....... .
@ Hood release ................ .
@) Data link connector for On Board
Diagnostic System (OBD II) .....
@ Sw itch (depending on the equ ip
ment) for:
- Luggage compartment lid .... .
- Fuel filler door (plug-in hybrid
drive) ................... .. .
@ Power exterior mirror adjustment
@ Power windows .............. .
136
34
49
68
so
so
133
273
13, 16
15, 16
. . 15, 16
88
10
55
75
79
74
120
123
285 52
320
318
37
103 53
39
Cockpit overview
@ Depending on equipment:
- Child safety lock ............ .
- Central power window switch ..
@ Infotainment system display ... .
@ Glove compartment .......... .
@) Drives for CD, DVD, SIM cards .. .
@ Front passenger 's airbag ...... .
@) Depending on equipment, buttons
for:
- Drive select .. .. ............ .
- Start/Stop system .......... .
-l<'l"I button (plug- in hybrid drive)
- Parking aid .... ............ .
- Emergency flashers ......... .
- Elect ronic Stabilization Control
(ESC) ..................... .
- Infotainment system display ..
- Front passenger airbag off indica-
tor ... .. .. ................ .
@ Deluxe automatic climate control
@ Socket ..... .. .. ............ .
@ Selector lever (automatic transmis-
sion) ....................... .
@ Cup holder .. .. ...... ........ .
@ Infotainment system on/off
button ... .. ................ .
@ Infotainment unit ............ .
@ Power top operation .......... .
@) Center armrest with storage com-
partment. Depending on vehicle
equipment, it may have:
-Audi music interface ........ .
- Audi smartphone interface ... .
@ Electromechanical parking brake
@ I START ENGINE STOP I button ...
@ Audi music interface
(D Tips
39
39
155
63
224
273
140
79
98
143
51
148
155
281
69
62
83
62
154
154
42
230
241
81
76
230
Some the equipment listed here is only instal
led in certain models or is available as an op
tion .
9
Page 22 of 404
Cockpit overv ie w
Shift light indicator
Applies to: vehicles with shift light indicator
The s hift lig ht ind icator informs t he d river when
t he rpm limit is reached .
Accessing the shift light indicator
Requirement: tiptron ic mode must be act ivated
c:> page88 .
.-Se lect the sport view c:> page 14. The sh ift light
indicator is d ispl ayed with green , yellow and
red ranges in the upper areas of the tachome
ter .
The s hift lig ht indicator w ill blink red when ap
proaching the engine speed lim it. Shift to the
next h ighest gear at the right time .
Sport displays
Applies to: vehicles with Audi virtual cockpit and sport dis
plays
Depending on the vehicle equ ipment, the sport
d isp lays may i nclude the G-meter, the engine da
ta and the tire p ressure mo nitoring system .
Accessing the sport displays
.-Open the first vehicle functions tab using the
I 4 1>1 button on the multifunction steering
whee l.
.- Se lect o n the multifunction stee ring wheel: left
contro l butto n >
Sport display s .
.- T urn the left thumbwheel on the mult ifunct ion
stee ring wheel u ntil the des ired sport display
appea rs in the ins trumen t cluste r.
G meter*
The G meter displays the longitudina l and latera l
acceleration . Th e max imum values that are
reached are sto red and d isp layed when the vehi
cle is s tat io nary.
.- To reset the stored values, se lect on the multi
funct io n steer ing wheel: r ight control b utton>
Reset value s.
Engine data*
The engine data displays the cur rent power and
torque.
20
Tire Pressure Monitoring System*
The tire press ure monitor ing sys tem d isp lays the
cu rrent tire press ures and tempe ra tu re. Also see
c:> page 350 , Tire pressure monitoring system.
Indicator lights
Description
The ind icator lights in the instrument clus ter
blink or tur n on. They ind icate fu nctions or mal
func tions.
Messages may appear w ith some indicator ligh ts .
A war ning s ignal will sound at the same time .
The ind icator lights and messages in the inst ru
ment clus ter d isp lay can be cove red by ot he r dis
plays . You can have these d isp laye d again in the
driver information system by opening the second
Vehicle tab (messages) using the
14 1>I b utton o n
the m ultif unction steering whee l. If there a re
severa l ma lfunctions, you can display them one
at a t ime us ing the thumbw heel.
Some indicator lights in the display can disp lay in
severa l co lors.
Lt Central indicator light
If the . or Q indicator light turns on, check
the instr ument cluster d isp lay for more informa
tion .
Applies to: vehicles with monoch rome display
If a message appears toget her with a central in
dicator light . or
d. the cen tra l ind icator light
will indicate the priority of the warning . If a
wh ite ind icator light also appea rs , the cen tra l in
dica tor light w ill have its ow n colo r. Fo r example ,
if ll appea rs togethe r with . , read the descr ip
t ion
for • .
Overview
Some indicator lights t urn on briefly as a f unction
c h eck w hen you switch the ignition on. These sys
tems a re marked with a ./ in the fo llow ing tab les.
If one of these ind icator lights does not turn on,
there is a malfunct io n in that sys tem.
IIJJ,,
Page 26 of 404
Cockpit overv ie w
If th e indicator light t urns on and th is message
appears, there is a malfunction in the brake booster.
I f t he ABS indica to r li ght
rlll) (USA mode ls) /
«~a (Canada mode ls), the ESC indicator light Bl
and the brake system indicator light 11111 (USA
models)
I . (Canada mode ls) turn on and this
message appears, then the ABS, ESC and braking
d istr ibut ion are
malfunctioning¢ &.
Do not continue driving . See an authorized Audi
dea ler or aut horized Aud i Serv ice Facility for as
sistance
¢ & .
11111 (USA models )/. (Canada model s) Park
ing brake: malfunction! Safely stop vehicle. See
o w ner 's manual
- If the indica to r li ght a nd the message appear
when the vehicle is stationar y or after switch
ing the ignition on ,
check if you can release the
parking brake . If you cannot re lease the park
ing brake, see an authori zed Aud i dea ler or au
thorized Audi Serv ice Facility. If you can re lease
the parking brake and the message still ap
pears, see an authorized Aud i dealer or author
ized Audi Service Facility immed iately to have
t h e malfunct ion corrected.
- If the indicato r light and message appea r while
drivin g,
the hill sta rt assist or emergency b rak
i ng func tion may be malfunctioning. It may no t
be possib le to set t he pa rking bra ke or release
it once it has been set . Do not pa rk your ve hicle
on hi lls. See an authorized Audi dealer or au
thorized Audi Service Facility for assistance .
Brake b oost er: limited fun cti onality . You can
con tinue d riv ing. Ple ase contact Service
There is a malfunction in the brake booster. The
b rake booster is available, but its effec tiveness is
reduced . B raking be hav io r may be diffe rent from
how it norma lly functions and t he b rake pedal
may vibrate.
Dr ive to an a uth o rized Aud i dea le r or a uth orized
Aud i Serv ice Facil ity immediately to have t he
mal funct ion corrected .
Brake booster: deactivated . S ee own er's manual
24
The brake assist (brake booster) rema ins active
for a brief period of time after switc hing
off the
i gnition. To secure the vehicle from ro lling away,
select the "P" selector lever posit ion or set the
parking brake .
A WARNING
-Read and fo llow the warnings in
¢ page 318, Working in the engine com
partment
befo re opening the hood and
checking the brake fluid level.
- If the brake system indicator light does not
turn
off or it turns on wh ile driving, the
brake flu id leve l in the reservo ir is too low,
an d this incre ases the risk of an accident.
Stop the vehicle and do not continue driv
ing . See an authorized Audi dea ler or a u
thorized A udi Service Facility for assistance.
- I f the brake system indicator light t urns on
together with the ABS and ESC indicator lights, the ABS/ESC regu lating function may
be malfunct ion ing. Functions that stabilize
the vehicle are no longer available. This
could cause the rear of the vehicle to
swerve, wh ich increases the r is k that the ve
hicle will slide. Do not cont inue driving. See
an authori zed A udi dealer or authori zed
Aud i Serv ice F acility fo r ass ist ance.
PARK/(®)/~ Electromechanical parking
brake
If the -(USA mode ls) I. (Canada models)
i ndicator light turns on, the parking brake was
set.
If the
-(USA mode ls)/ . (Canada models) in
dicator light blinks, the braking force is not build
i ng up eno ugh or not building up at a ll. Se lect the
P selector lever posit ion to help secure the vehi
cle . Make sure the indicator light is
off before you
start driving.
riJ Parking brake: malfunction! Please contact
Ser vice
There is a ma lfunction in the parking brake. Drive
to an authorized Audi dea ler or authorized Audi
Service Facility immediate ly to have the malfunc-
tion corrected.
.,..
Page 27 of 404
![AUDI S3 SEDAN 2018 Owners Manual u. 00 .-< N l N .-< 0 N > 00
~ (USA models) / 6] (Canada mod
els ) Pa rking brake auto release una vailable
If t his message appea rs, press the brake pedal
fi rst and then relea AUDI S3 SEDAN 2018 Owners Manual u. 00 .-< N l N .-< 0 N > 00
~ (USA models) / 6] (Canada mod
els ) Pa rking brake auto release una vailable
If t his message appea rs, press the brake pedal
fi rst and then relea](/img/6/57651/w960_57651-26.png)
u. 00 .-< N l' N .-< 0 N > 00
~ (USA models) / 6] (Canada mod
els ) Pa rking brake auto release una vailable
If t his message appea rs, press the brake pedal
fi rst and then release the pa rking bra ke.
~ll. PARK BRAKE (USA model s) / [<~) ( Can ada mod
e ls) Parking brake : caution! V ehicle park ed too
s tee p
If the indicator light blinks and the message ap
pea rs, the re is not enough brak ing power to se
cure the veh icle . T he brakes have ove rheated. The
ve hicl e co uld ro ll away even on a small incli ne.
@ Tips
For addit iona l information on the park ing
b rake, see¢
page 81.
- L Cooling system
• Turn off engine and che ck coo lant le vel! See
o wner 's manual
• Stop v ehicl e and check coolant le ve l! S ee
owner 's manual
The coolant level is too low .
Do not cont inue driving and switch the engine
off. Check the coolant level ¢
page 324.
Plug-in hybrid drive *: refer to ¢page 102.
- If the coolant level is too low, add coolant
¢page 325. O nly cont inue dr iv ing o nce the in
dicato r light turns off .
• Coolant temp eratur e too high! Let engine
run with vehicle stationar y
Let the eng ine run at idle for a few minutes to
cool off, until the ind icator light turns off.
- If the indicator light does not turn off, do not
continue driving the vehicle. See an authorized
Audi dealer or authorized Audi Service Facility
for assistance .
A WARNING
-Never open the hood if you ca n see o r hear
steam o r coolant escap ing fro m the eng ine
compartment. This inc reases the risk of
Coc kpit o ver view
burns. Wait until yo u no longer see o r hear
steam or coo lant escaping.
- The engine compartment in any vehicle can
be a dangerous area. Stop the engine and
allow it to cool before working in the eng ine
compartment. Always follow the informa
tion found in
¢ page 318, Working in the
engine comportment .
@ Note
Do not continue dr iv ing if the . indicator
light turns on as this increases the risk of en
gine damage.
Stop the engine and do not continue driving.
Check the eng ine oi l level ¢
page 322 .
-If the engine oi l level is too low, add engine oil
¢
page 321 . Only continue driving once the in
dicator light turns off.
- If the engine o il level is correct and the indica
tor light still turns on, turn the engine off and
do not cont inue driving. See an authorized Audi
dealer or authorized Audi Service Facility for as
sistance .
(D Tips
The oil pressure warni ng is not a n oil leve l in
d icator. Always check the oil level regularly .
1:::1 Generator/Vehicle battery
• Electrical system: malfunction! Batt ery is
not charging
There is a malfunction in the alternator or the ve
hicle electr ical system .
Drive to an authorized Audi dealer or authorized
Audi Service Facility immed iate ly. Turn off a ll un
necessary electrical equipment because it will
dra in the battery . See an author ized Audi dealer
o r authorized Aud i Serv ice Facility if the battery
c h arge leve l is too low.
(•] F.lectrical sy stem: malfunction! Re start not
po ssible . Plea se cont act Ser vice
.,.
25
Page 29 of 404
u. 00 .-< N l' N .-< 0 N > 00
There is a malfunction in the eng ine start ing sys
tem .
Dri ve to an autho rized Aud i dea le r o r a uth o rized
Aud i Serv ice Fac ility immedia tely to have t he
mal funct ion corrected.
~ Engine stop while driving
• Engine stopped! Power stee ring and b rake
boo ster not possible
There is a malfunction in the eng ine or in the fue l
supp ly system.
M ore fo rce is needed to s teer and bra ke the mov
in g vehi cle when the engine is stopped. If the ve
hi cle is roll ing , try to bring it to a stop off to the
side from moving traffic. See an authorized Audi
dea ler or authorized Audi Service Facility for as
sistance .
A WARNING -
If the eng ine stops whi le dr iv ing, yo u will
need to use more fo rce to brake the vehicle.
Th is increases the r isk of an accident . There
w ill still be power steer ing if t he ignit io n is
sw itched on wh ile the vehicle is rolling an d
t here is s ufficie nt vehicle batte ry c har ge. Oth
erwise, yo u m ust use g re ate r fo rce when
steer in g.
~ Hood
• Warning! Hood is not locked. Stop vehicle
and check the lock
I f t he in dicator lig ht tur ns on and t he message
appears, the hood loc king mechanism is no t en
gaged correctly .
Stop immed iate ly a nd close the hood
q page 320.
B l~ Electronic Stabilization Control (ESC)
If the G) indicato r light b lin ks w hile driving, the
ESC or AS R (Anti -S lip Regu lation) is active ly reg u
l ating.
I f t he
G) indica to r li ght turns on, the sys tem has
switched the ESC off . In this case, you can switc h
Cockpit o ver view
the ignit ion off and then on to switch the ESC on
again. The indicator light t urns off whe n the sys
tem is functioning fu lly.
If the II ind ic a tor light tu rns on, ESC was
switched o ff using t he
1~ 00'1 b utton ¢ page 148.
Stabilization con trol (ESC /ABS ): malfunction!
S ee owner's manual
If the If] ind icator light and the llB (USA mod
els) ;tlJ (Canada mode ls) ABS indicator light turn
o n and the message appears, there is a malfunc
t io n in the A BS o r th e e lectron ic diffe re nti al loc k.
T his also causes the ES C to malfunc tion . The
brakes st ill function with t he ir normal power, but
ABS is not active .
Dr ive to an author ized A udi dealer or au tho riz ed
A udi Se rvice Faci lity immed iate ly to h ave the
malfunction corrected.
(D Tips
F o r a ddi tio na l in format io n on E SC an d ABS,
see
qpage 148.
Wt:: /BRAKE WEAR/( 0: Brake pads
If the IIJ~:);f;131WfJ;! (USA models)/ [I] (Canada
models) turns on, the bra ke pad is worn out .
Drive to an authorized A udi dealer or authorized
Audi Se rvice Facility immed iate ly to have the
brake pads checked .
·~ Hill hold assist
II Hill hold a ssist: unavailable
When this message appea rs, hill hold ass ist is
not avai lab le.
@ t.ilanual control!
If t his message appea rs, press t he bra ke peda l.
Cont in ue driv ing wi th the he lp of t he parking
brake
q page 81.
d:::i Engine control
If the II indicator light tu rns on if there is a mal -
f unct ion in the engine control.
Iii"
27
Page 57 of 404
LL co .... N
" N .... 0 N > co
Windshield wipers
Switching the windshield wipers on
Fig. S6 Windshield wiper lever
Fig. S7 Rear window wiper• operatio n
t® I
a @
lll ®
Iii @
•®
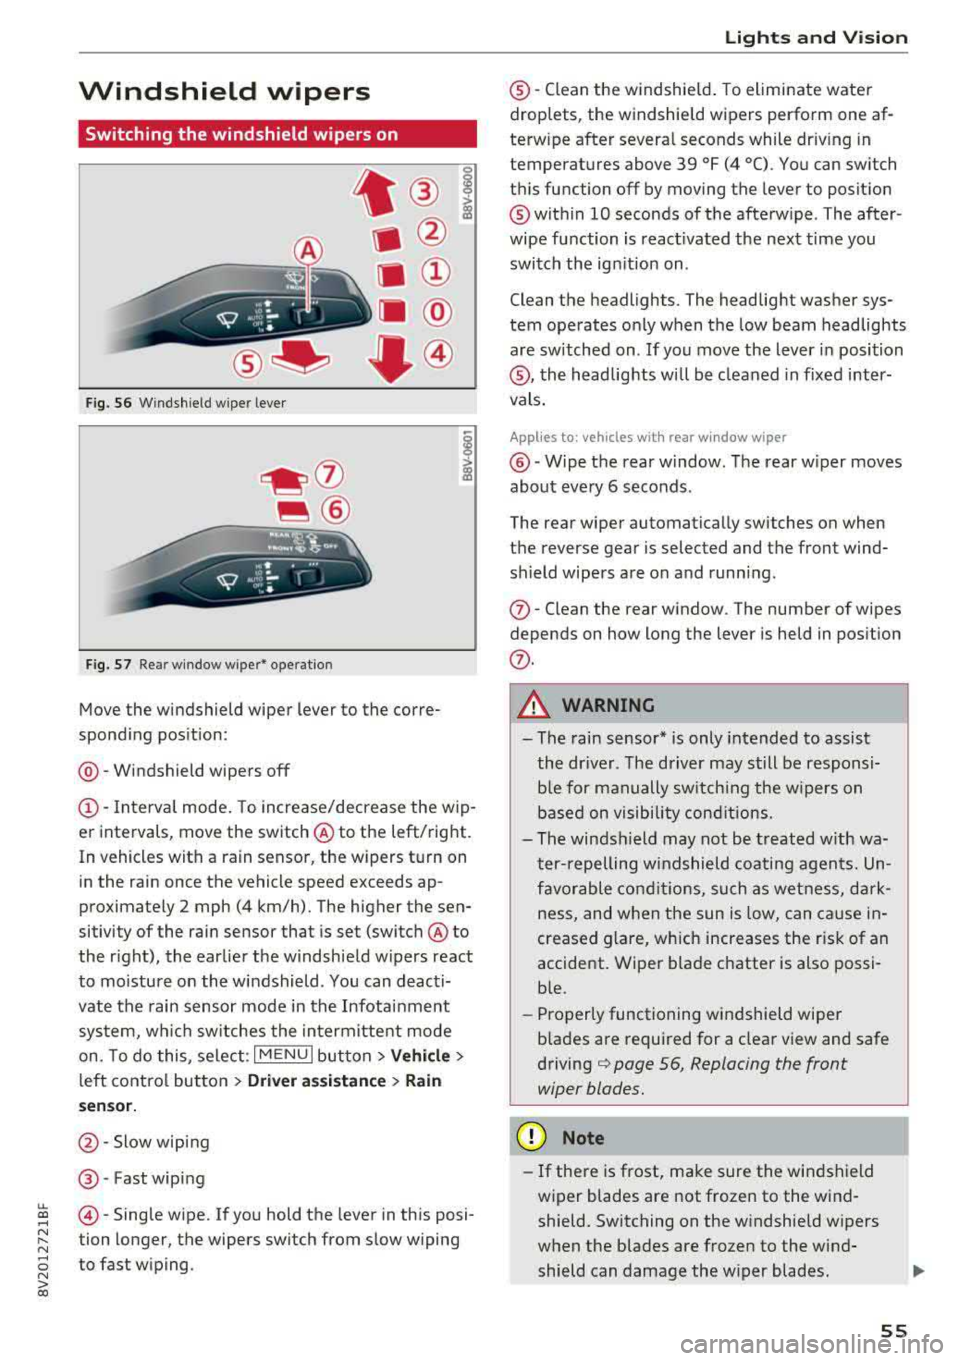
Move the windshield wiper lever to the corre
spond ing pos ition:
@ -Windshield wipers off
(D-Interval mode. To increase/decrease the wip
er intervals, move the switch
@ to the left/right.
In vehicles with a rain sensor, the wipers turn on in the rain once the vehicle speed exceeds ap
proximately 2 mph (4 km/h). The higher the sen
sitivity of the rain sensor that is set (switch
@ to
the right), the earlier the w indshield w ipers react
to moisture on the windshield . You can deacti
vate the rain sensor mode in the Infotainment
system, wh ich switches the intermittent mode
on. To do this, select :
I MENU I button> Vehicle>
left control button > Driver a ssistance > Rain
se nsor.
@ -Slow wiping
@ -Fast wiping
@-Single wipe. If you hold the lever in this posi
tion longer, the wipers switch from slow wiping
to fast wiping.
Lights and Vision
®-Clean the windshield. To eliminate water
droplets, the windshield wipers perform one af
terw ipe after several seconds while dr iv ing in
temperatures above 39 °F (4 °C). You can switch
this function off by moving the lever to position
@within 10 seconds of the afterwipe . The after
wipe function is react ivated the next time you
switch the ignition on .
Clean the headlights. The headlight washer sys
tem operates only when the low beam headlights
are sw itched on . If you move the lever in position
®, the headlights will be cleaned in fixed inter
vals.
Applies to: vehicles wi th rear window wiper
@ -Wipe the rear window. The rear wiper moves
about every 6 seconds .
The rear wiper automatically switches on when
the reverse gear is selected and the front wind
sh ield wipers are on and running.
(j)-Clean the rear window . The number of wipes
depends on how long the lever is held in position
(j) .
A WARNING
-The rain sensor* is only intended to assist
the driver. The driver may still be responsi
ble for manually switch ing the w ipers on
based on visibility conditions.
-The windsh ield may not be treated w ith wa
ter-repelling windshield coating agents. Un
favorable conditions, such as wetness, dark
ness and when the sun is low, can cause in-
'
creased glare, which increases the r isk of an
accident. Wiper blade chatter is also possi
ble.
-Properly functioning windshield wiper
b lades are required for a clear view and safe
driving¢ page 56, Replacing the front
wiper blades.
(D Note
- If there is frost, make sure the windshield
wiper blades are not frozen to the wind
shield. Switching on the windshield wipers
when the blades are frozen to the wind
shield can damage the wiper blades .
-
55
Page 60 of 404
Lights and Vision
Adjusting the magnetic zone
Applies to: ve hicles w ith d ig ital compass
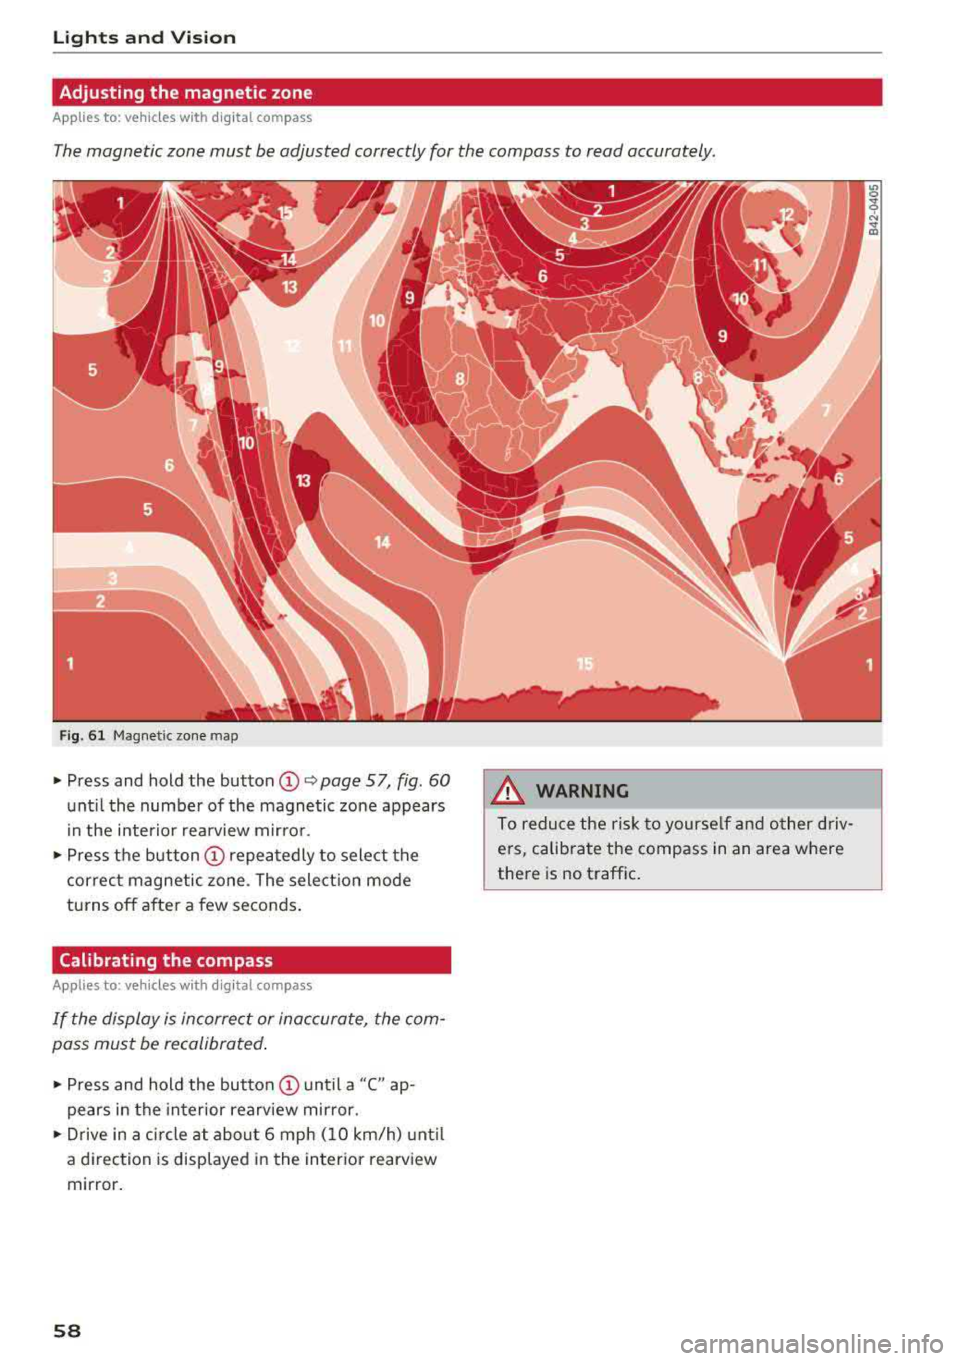
The magnetic zone must be adjusted correctly for the compass to read accurately.
Fig. 61 Magnetic zone map
~ Press and hold the button CD~ page 57, fig . 60
until the number of the magnetic zone appears
in the interior rearview mirror.
~ Press the button CD repeatedly to select the
correct magnetic zone . The selection mode
turns off after a few seconds.
Calibrating the compass
A pp lies to: ve hicles w ith d ig ital compass
If the display is incorrect or inaccurate, the com
pass must be recalibrated.
~ Press and hold the button CD until a "C" ap
pears in the interior rearview mirror.
~ Drive in a circle at about 6 mph (10 km/h) until
a dir ection is displayed in the in terior rearview
mirror.
58
A WARNING
To reduce the risk to yourself and other driv·
ers, calibrate the compass in an area where
there is no traffic.
Page 71 of 404
Warm and cold
Automatic climate control system
Applies to: ve hicles with a utomat ic climate contro l system
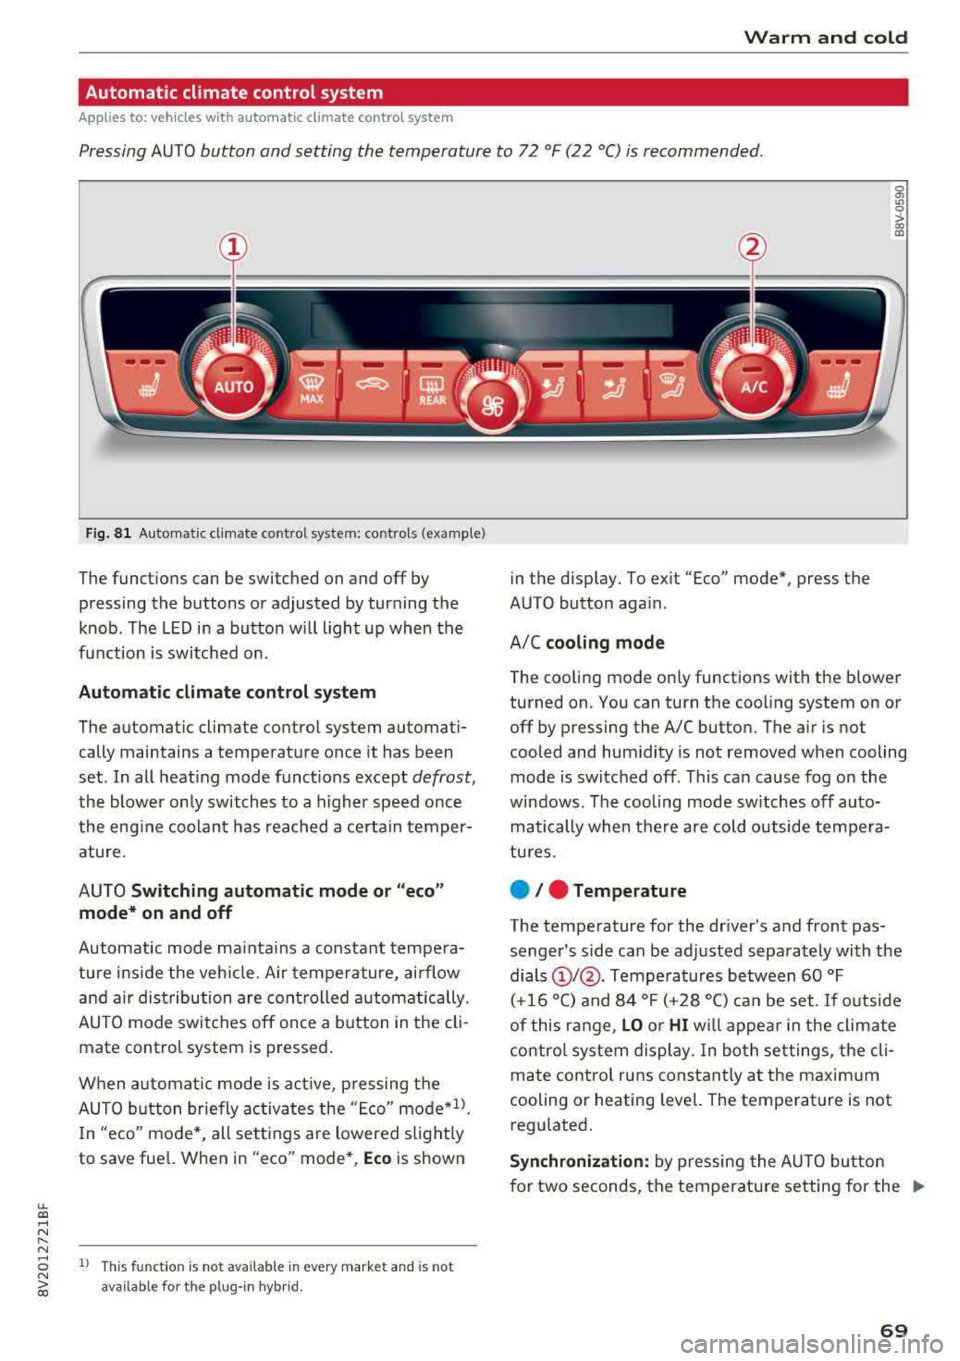
Pressing AUTO button and setting the temperature to 72 °F (22 °C) is recommended.
LL co .... N
" N
Fig. 8 1 Automatic climate control system: controls (example)
The funct ions can be switched on and off by
pressing the buttons or adjusted by turning the
knob. The LED in a button w ill light up when the
f u nction is switched on.
Automatic climate cont rol system
The automat ic climate control system automati
cally maintains a temperature once it has been
set . In all heat ing mode funct ions except
defrost,
the blower on ly switches to a higher speed once
the eng ine coolant has reached a certain temper
ature.
AUTO
Switching aut omatic mode or "ec o"
mode * on and off
Automatic mode ma inta ins a constant tempera
ture ins ide the veh icle. Air tempe rature, airflow
and a ir distribution are controlled a utomatically.
AUTO mode switches off once a b utton in the cli
mate control system is pressed.
When a utomat ic mode is act ive, pressing the
AUTO b utton briefly activa tes the
" E co" mode*1l.
In "eco" mode *, all sett ings are lowered slight ly
to save fuel. When in
"eco" mode*, Eco is shown
8 1l This fu nct ion is not available in every market and is not N ii'i available for the plug- in hybr id.
in the display. To ex it "Eco" mode*, press the
AUTO button aga in.
A/C
cooling mod e
The cooling mode on ly functions with the blower
turned on. You can turn the cooling system on or
off by pressing the A/C button. The air is not
cooled and humidity is not removed when cooling
mode is switched off. This can cause fog on the
windows . The cooling mode sw itches off auto
matically when there are cold outside tempera
tu res.
e / e Temperature
The temperature for the driver's and front pas
senger's s ide can be adjusted separately with the
dials
(D I@ . Tempera tures between 60 °F
(+16 °() and 84 °F (+28 °() ca n be set. If outside
of this range,
LO or HI w ill appea r in the climate
contro l system display. In both settings, the cli
mate contro l runs constant ly at the maxim um
cooling or heating level. The temperature is not
regulated.
S ynchr oniza tion : by pressing the AU TO butto n
for two seconds, the temperature setting for the
..,.
69
Page 72 of 404
Warm and cold
driver 's side is transferred to the front passeng
er's side. This applies a temperature change to
the front passenger 's side .
8/r Blower
Using the regu lator 8f?, you ca n manually adjust
the vo lume of a ir generated by the blower to your
p reference . The blowe r shou ld always run at a
low setting to prevent the windows from fogging
and to ensure a continuous exchange of air inside
t he vehicle . To h ave the blower regu lated au to
mat ically , press the AUTO button.
~/ :01 ~ Air distribution
The air distribution can adjusted with t he but
tons. To have the air distribution regulated auto matica lly, press the AU TO button.
The round air vents in t he cockpit are adjustable
q page 71 .
To keep the front s ide windows from fogging up
in damp weathe r, we recommend opening the
side air vents and tilting them to the side .
Foot vents are located under the front seats and
adjustab le vents o n the end of t he center console
t o heat the re ar of the vehicle .
3fx Defrosting
The windshield and s ide windows are defrosted
or cleared of condensation as qu ickly as possible .
The max imum amo unt of air flows ma inly from
the vents below the w indshield. Recircu lation
mode switches off. The temper ature s hou ld be
set at +72°F (22°() or higher. The temperat ure is
controlled automatica lly. In the
;Ix setting, the
A/C cooling mode switches on a utomatically , de
pending on the outside air temperature.
The A UTO button switches the defroster off.
~ Recirculation mode
The recircu lation mode can be turned on manua l
ly or automat ica lly*.
- Swi tc h ing man ua l rec irculat ion mode on and
off: press
t h e ~ button .
70
-Automatic * reci rcu lat ion mode : auto recircula
tion needs to be activated in the Infotainment
system. Se lect in the Infotainment system:
I MENU I button > Veh icle > left control button >
Air cond itioning > Aut o recircul ation
The air
quality sensor that is designed for d iesel and
gasoline exhaust automatically sw itches the re
circulation mode on or off depending on the level of pollutants in the o utside air.
In rec irculat ion mode, the air inside the vehicle is
c ir culated and filte red . T his prevents the unfil
te red air outs ide t he ve hicle from enteri ng the
vehicle inte rior. Switching rec irculat io n mode on
whe n driving throug h a tu nnel o r whe n sitting in
traffic is recommended
q & .
Pressing the~ button, A UTO o r the ;Ix button
switches recirculation mode off .
T he system switches to recirculation mode when
driv ing in reverse when the engine is cold .
SP. Rear window defogger
If the rear window defogger is act ivated when
the ignit ion is swi tched on, the battery manage
ment determines based on the battery charge if
i t is possible to turn on . Otherwise, the rear w in
dow defogger funct ions w it h the eng ine runni ng
and switches off automat ically after approxi
mately 1 0 - 20 m inutes, depending on the out
s ide temperat ure.
To p reve nt the rear window defogger from
switching off automat ica lly, press and hold the
!fP. button for more tha n two seconds. This re
mai ns sto red up to approxim ate ly lS m in utes af
te r turning off the ignition.
J Seat heating*
P ressing the J button switches the seat heat ing
o n at t he hi ghest sett ing (level 3) . The L EDs ind i
c a te the temperat ure level. To reduce the tem
per atu re , press t he button again . T o swi tc h t he
seat heating off, press the bu tton repeatedly un
ti l the LED turns off .
After approximate ly 10 m inu tes, the sea t heat ing
a utomat ic all y switches from leve l 3 to leve l 2.
..,_
Page 73 of 404
LL co .... N
" N .... 0 N > co
_& WARNING
-You should not use the recirculation mode
for an extended period of time, because no
fresh a ir is drawn in and the windows can
fog when coo ling mode is sw itched off. This
increases the risk of an accident .
-Individuals with reduced sensitivity to pain
o r temperature could develop burns when
using the seat heating function. To reduce
the risk of injury, these indiv iduals should
not use seat heating.
(D Note
To avoid damage to the heat ing elements in
the seats, do not kneel on the seats or place
heavy loads on a small area of the seat.
@ Tips
-The setting for the seat heating on the driv
er's side is ass igned to the key that is in use .
-If the front passenger's seat heating is
turned on, it will not turn on again automat
icall y if more than 10 minutes have passed
between switching the ign ition off and
switching it on again.
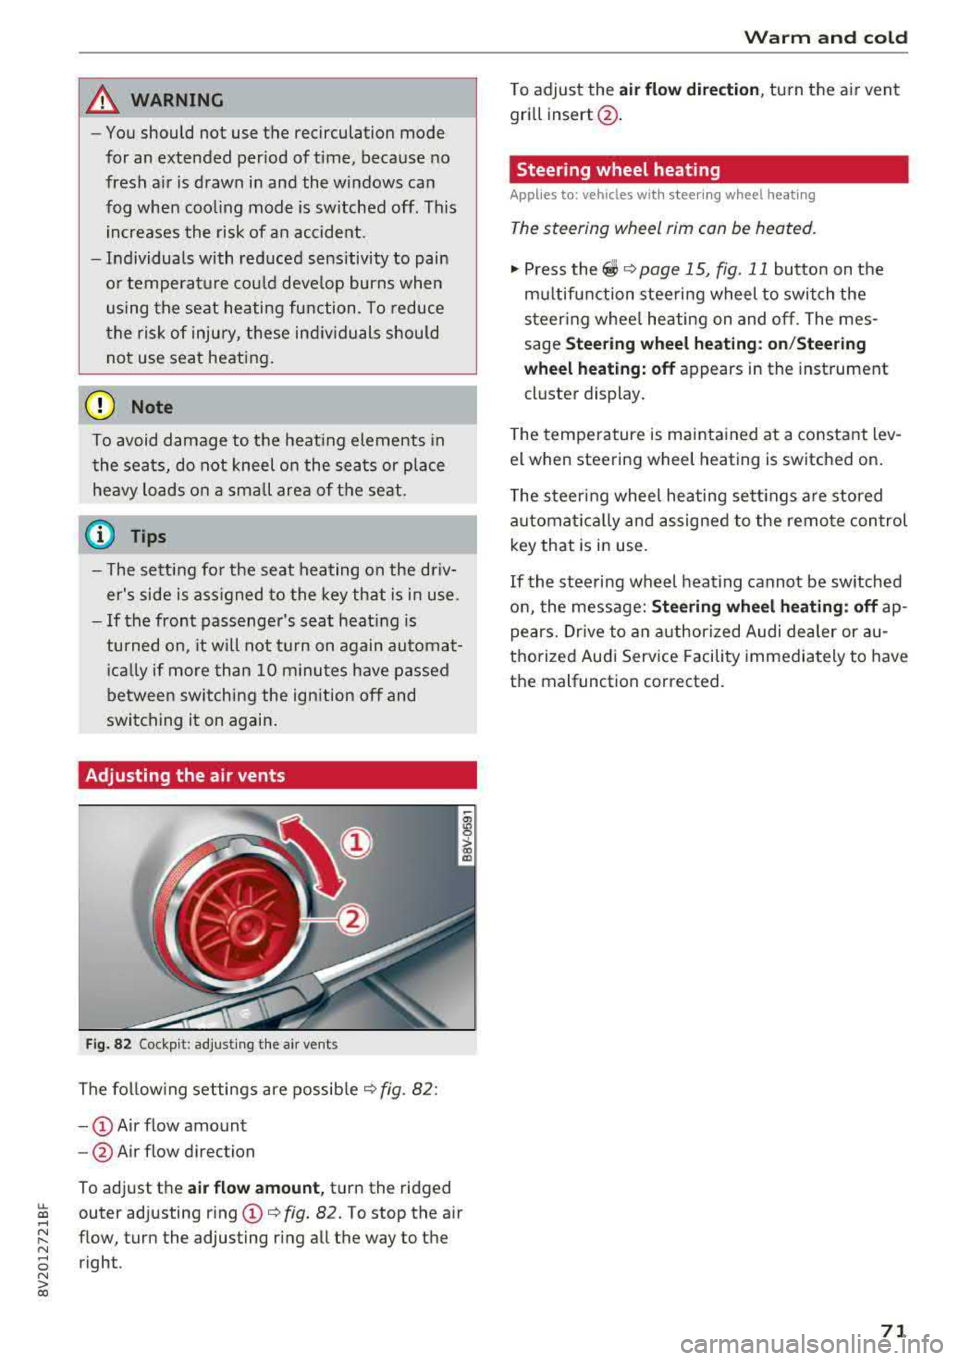
Adjusting the air vents
Fig. 82 Cockp it: adjust ing the a ir vents
The following settings are possible ¢ fig. 82 :
-CD Air flow amount
- @ Air flow direction
To adjust the
air flow amount, turn the ridged
outer adjusting ring
CD ¢ fig. 82. To stop the air
flow, turn the adjusting ring all the way to the right .
Warm and cold
To adjust the air flow dire ction , turn the air vent
gri ll insert @.
Steering wheel heating
Applies to: veh icles w ith steering whee l heating
The steering wheel rim can be heated.
"' Press the ~ ¢ page 15, fig. 11 button on the
mu ltifunction steering wheel to switch the
steering whee l heating on and off. The mes
sage
Steering wheel heating: on/Steering
wheel heating: off
appears in the instrument
cluster display.
T he temperature is maintained at a constant lev
el when steering wheel heating is switched on .
The steering wheel heating sett ings are stored
automat ically and assigned to the remote control
key that is in use .
If the steering wheel heating cannot be switched
on, the message:
Steering wheel heating : off ap
pears. Drive to an authorized Audi dealer or au
thorized Audi Service Facility immediately to have
the malfunction corrected.
71