heated AUDI S3 SEDAN 2018 Owners Manual
[x] Cancel search | Manufacturer: AUDI, Model Year: 2018, Model line: S3 SEDAN, Model: AUDI S3 SEDAN 2018Pages: 404, PDF Size: 62.3 MB
Page 27 of 404
![AUDI S3 SEDAN 2018 Owners Manual u. 00 .-< N l N .-< 0 N > 00
~ (USA models) / 6] (Canada mod
els ) Pa rking brake auto release una vailable
If t his message appea rs, press the brake pedal
fi rst and then relea AUDI S3 SEDAN 2018 Owners Manual u. 00 .-< N l N .-< 0 N > 00
~ (USA models) / 6] (Canada mod
els ) Pa rking brake auto release una vailable
If t his message appea rs, press the brake pedal
fi rst and then relea](/img/6/57651/w960_57651-26.png)
u. 00 .-< N l' N .-< 0 N > 00
~ (USA models) / 6] (Canada mod
els ) Pa rking brake auto release una vailable
If t his message appea rs, press the brake pedal
fi rst and then release the pa rking bra ke.
~ll. PARK BRAKE (USA model s) / [<~) ( Can ada mod
e ls) Parking brake : caution! V ehicle park ed too
s tee p
If the indicator light blinks and the message ap
pea rs, the re is not enough brak ing power to se
cure the veh icle . T he brakes have ove rheated. The
ve hicl e co uld ro ll away even on a small incli ne.
@ Tips
For addit iona l information on the park ing
b rake, see¢
page 81.
- L Cooling system
• Turn off engine and che ck coo lant le vel! See
o wner 's manual
• Stop v ehicl e and check coolant le ve l! S ee
owner 's manual
The coolant level is too low .
Do not cont inue driving and switch the engine
off. Check the coolant level ¢
page 324.
Plug-in hybrid drive *: refer to ¢page 102.
- If the coolant level is too low, add coolant
¢page 325. O nly cont inue dr iv ing o nce the in
dicato r light turns off .
• Coolant temp eratur e too high! Let engine
run with vehicle stationar y
Let the eng ine run at idle for a few minutes to
cool off, until the ind icator light turns off.
- If the indicator light does not turn off, do not
continue driving the vehicle. See an authorized
Audi dealer or authorized Audi Service Facility
for assistance .
A WARNING
-Never open the hood if you ca n see o r hear
steam o r coolant escap ing fro m the eng ine
compartment. This inc reases the risk of
Coc kpit o ver view
burns. Wait until yo u no longer see o r hear
steam or coo lant escaping.
- The engine compartment in any vehicle can
be a dangerous area. Stop the engine and
allow it to cool before working in the eng ine
compartment. Always follow the informa
tion found in
¢ page 318, Working in the
engine comportment .
@ Note
Do not continue dr iv ing if the . indicator
light turns on as this increases the risk of en
gine damage.
Stop the engine and do not continue driving.
Check the eng ine oi l level ¢
page 322 .
-If the engine oi l level is too low, add engine oil
¢
page 321 . Only continue driving once the in
dicator light turns off.
- If the engine o il level is correct and the indica
tor light still turns on, turn the engine off and
do not cont inue driving. See an authorized Audi
dealer or authorized Audi Service Facility for as
sistance .
(D Tips
The oil pressure warni ng is not a n oil leve l in
d icator. Always check the oil level regularly .
1:::1 Generator/Vehicle battery
• Electrical system: malfunction! Batt ery is
not charging
There is a malfunction in the alternator or the ve
hicle electr ical system .
Drive to an authorized Audi dealer or authorized
Audi Service Facility immed iate ly. Turn off a ll un
necessary electrical equipment because it will
dra in the battery . See an author ized Audi dealer
o r authorized Aud i Serv ice Facility if the battery
c h arge leve l is too low.
(•] F.lectrical sy stem: malfunction! Re start not
po ssible . Plea se cont act Ser vice
.,.
25
Page 58 of 404
Lights and Vi sion
-The windshield wiper system must be
switched off (lever in position @) before us
i ng a car wash. This prevents the wipe rs
from sw itching on unintentionally and ca us
i ng damage to the w indshie ld w iper system .
(D Tips
-The windshield wipe rs switch off w hen t he
i gnition is switched off. Yo u can act ivate the
windsh ield wipers after the ign ition is
switched back on by moving the windsh ield
wiper leve r to any pos it io n.
-Worn or dirty windshield wiper blades result
i n streak ing . This can affect the ra in se nsor
f u nct io n. Check yo ur windsh ield wiper
blades regularly.
-The washer fl uid nozzles in the w indshield
washer system are heated* a t low tempera
tures whe n the ignition is on .
-When stop ping tempora rily, such as at a
traffic light, the speed of the windsh ie ld
wiper s automat ica lly re d uces by o ne leve l.
Cleaning the wiper blades
Clea n the w ipe r blades when you see wipe r
strea ks. Use a so ft clot h and a glass cleaner .
Windshield wiper
"' Place the windshield wipe r arms in the se rvice
pos it ion
<=> page 56.
"' Fo ld t he w indshield wipe r arms away from the
winds hield.
Rear window wiper
Applies to: vehicles with rear window wiper
"'Fold the wi per arm away from the rear w indow .
A WARNING
Dirty w indshield wi pe r blades can impair vi
sio n, which incre ases the risk of an accident.
«1j) Note
If you see streaks aga in a fter cleaning the
w iper blades, the blades mus t be replaced
<=> page 56.
56
-
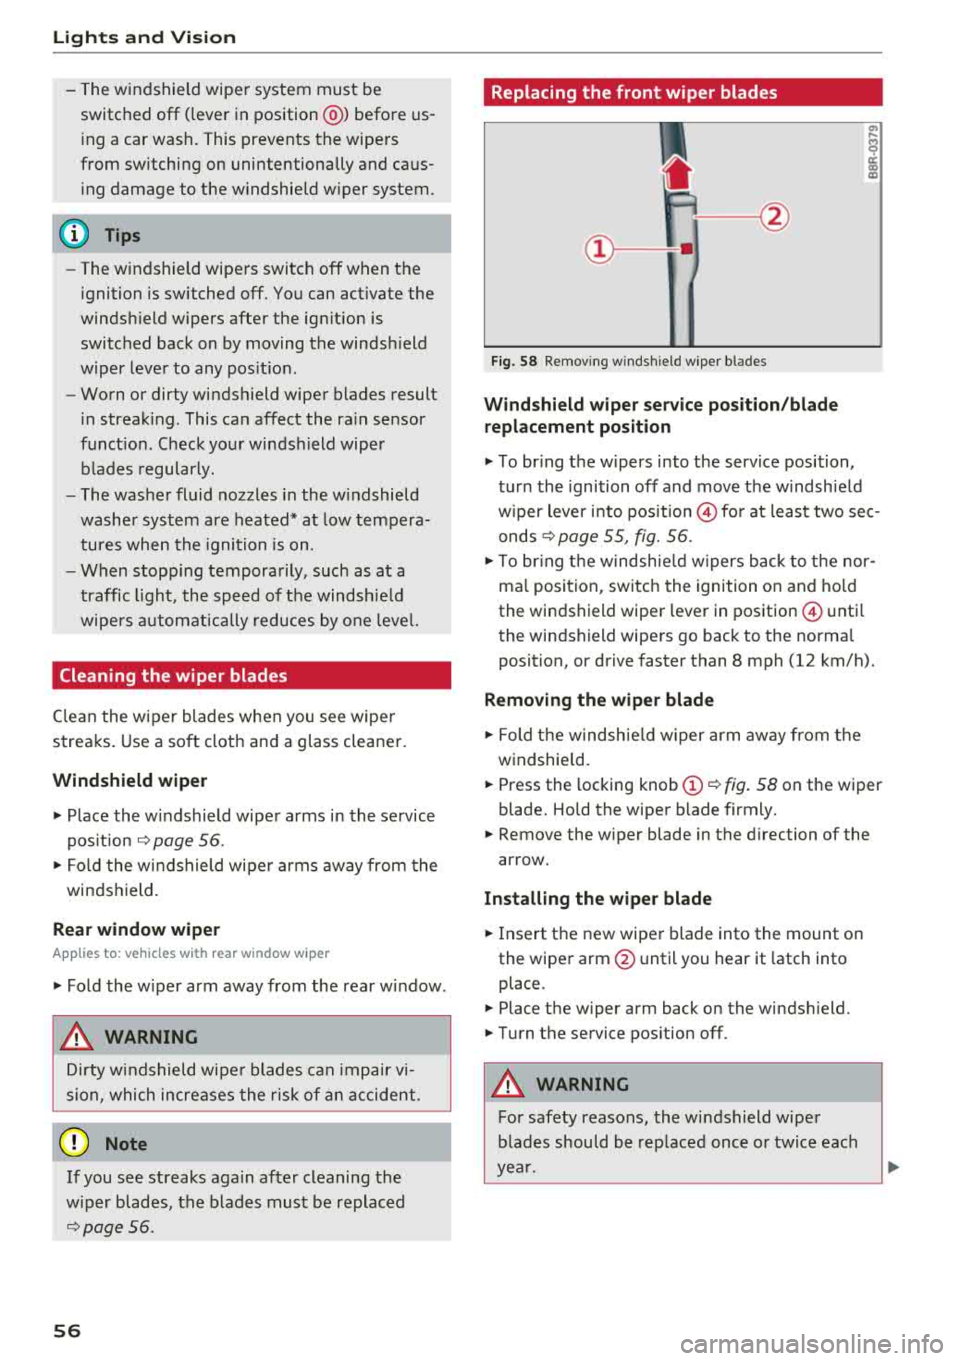
Replacing the front wiper blades
Fig. 58 Removin g windsh ie ld wiper bl ades
Windshield wiper service po sition /blade
replacement position
a, ... M 9
I
"' To br ing the w ipers into the service position,
tur n the ignition off and move t he w indsh ie ld
w iper lever into pos it ion
@ for at least two sec
onds
c:> page 55, fig. 56.
"' To bring t he w indsh ie ld w ipers b ack to t he nor
ma l posi tion, switc h the ignition on and ho ld
the windshield wiper lever in position @ unti l
the windshi eld wipe rs go back to t he normal
position, or drive faster than 8 mph (12 km/h).
Removing the wiper blade
"' Fold th e w indsh ie ld w iper arm aw ay from t he
windshie ld.
"' Press the locking knob (D <=> fig . 58 on the wiper
blade. Ho ld the wipe r blade firmly.
"' Remove the w iper blade in the d irection of the
ar row.
Installing the wiper blade
"' Insert t he new wiper blade into the mount on
the wipe r
arm@ until you hear it latch into
place .
"'Place the wiper arm back on the winds hield.
"'Turn the service pos ition off .
A WARNING -
For safety reasons, the wi ndshield wipe r
b lades should be rep laced once o r twice eac h
ye ar.
Page 73 of 404
LL co .... N
" N .... 0 N > co
_& WARNING
-You should not use the recirculation mode
for an extended period of time, because no
fresh a ir is drawn in and the windows can
fog when coo ling mode is sw itched off. This
increases the risk of an accident .
-Individuals with reduced sensitivity to pain
o r temperature could develop burns when
using the seat heating function. To reduce
the risk of injury, these indiv iduals should
not use seat heating.
(D Note
To avoid damage to the heat ing elements in
the seats, do not kneel on the seats or place
heavy loads on a small area of the seat.
@ Tips
-The setting for the seat heating on the driv
er's side is ass igned to the key that is in use .
-If the front passenger's seat heating is
turned on, it will not turn on again automat
icall y if more than 10 minutes have passed
between switching the ign ition off and
switching it on again.
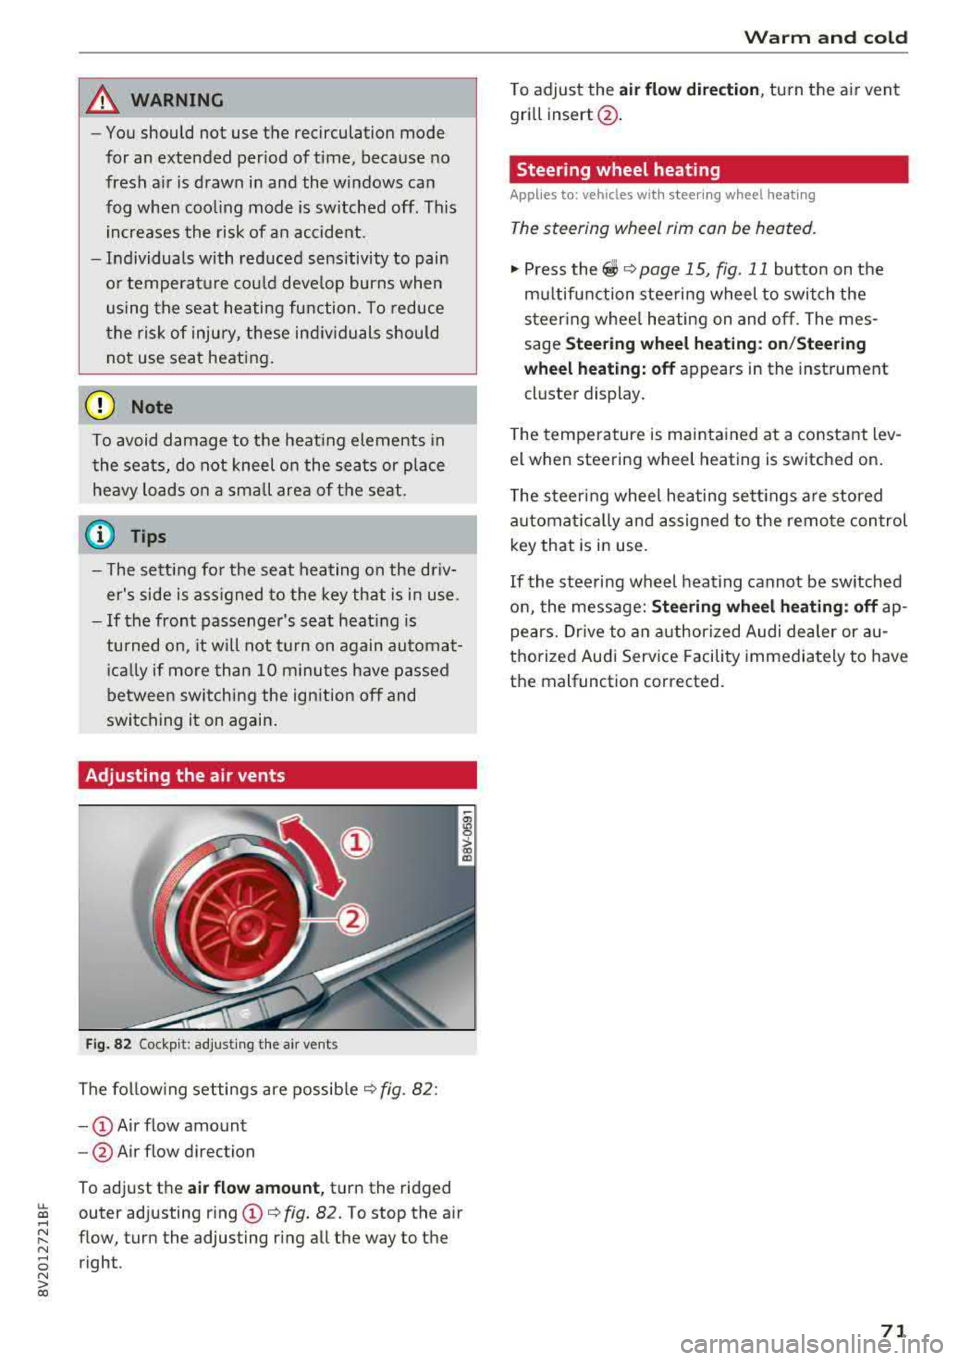
Adjusting the air vents
Fig. 82 Cockp it: adjust ing the a ir vents
The following settings are possible ¢ fig. 82 :
-CD Air flow amount
- @ Air flow direction
To adjust the
air flow amount, turn the ridged
outer adjusting ring
CD ¢ fig. 82. To stop the air
flow, turn the adjusting ring all the way to the right .
Warm and cold
To adjust the air flow dire ction , turn the air vent
gri ll insert @.
Steering wheel heating
Applies to: veh icles w ith steering whee l heating
The steering wheel rim can be heated.
"' Press the ~ ¢ page 15, fig. 11 button on the
mu ltifunction steering wheel to switch the
steering whee l heating on and off. The mes
sage
Steering wheel heating: on/Steering
wheel heating: off
appears in the instrument
cluster display.
T he temperature is maintained at a constant lev
el when steering wheel heating is switched on .
The steering wheel heating sett ings are stored
automat ically and assigned to the remote control
key that is in use .
If the steering wheel heating cannot be switched
on, the message:
Steering wheel heating : off ap
pears. Drive to an authorized Audi dealer or au
thorized Audi Service Facility immediately to have
the malfunction corrected.
71
Page 95 of 404
u. 00 ... N l' N ... 0 N > 00
injuries. When the vehicle enters drive ready
mode, the status message
e-no"' ~... ap
pears briefly in the instrument cluster display
and the needle in the power meter points to
READY ¢ page 9 5.
-Make sure that the selector lever is in the P
position and the ignition is switched off
when leaving the vehicle.
@ Note
-The high-voltage system can be damaged if
the vehicle underbody comes into contact
with the ground . Immediately drive your ve
hicle to an authorized repair facility and
have it inspected.
- The electric drive motor can become very
hot during operation . Do not stop the vehi
cle if there is oil, fuel residue or other flam
mable substances under or next to the vehi
cle.
Special considerations for the high-voltage
battery
Applies to: vehicles with plug-in hybrid drive
Please first read and note the introductory infor
mation and heed the warnings
¢page 92.
All batteries age with use and over time. There
are things you should know about the care of the
high voltage battery that will help it keep giving
you good service and reliability over time. Please
read and keep the following information in mind
while you enjoy the performance and economy of
your vehicle.
- Be sure to charge the high voltage battery be
fore leaving the vehicle parked and unused for a longer period of time. Ideally the high-voltage
battery should have a charge level between
40 % and 60 % when parked for a long t ime .
- If the battery charge level is below 3 %, never
park the vehicle for more than 21 days without
charging the high-voltage battery. Should you
have to park the vehicle for a long time, make
sure that the charge level is sufficient to help
prevent the battery from aging prematurely.
- Frequent and consecutive charging of the high
voltage battery when the charge level is above
e-tron
98 % can also decrease the capacity of the
high-voltage battery. Make sure the charge lev
el is be low 98 % when you start the charging
process.
- Should the vehicle be parked for longer than
2 days at temperatures below -13 °F ( -25 °C),
the high-voltage battery could free ze and not
be able to provide energy to the electric motor.
The battery will start working again, once it
warms up . The battery can be warmed up when
the outside temperature rises or when the vehi
cle is garaged appropriately. The battery will al
so warm up when being used (sw itching on the
air conditioner, the heater or by driving the ve
hicle) . Should you have to park your vehicle at
very low temperatures for longer than 1 day,
make sure that the high-voltage battery does
not freeze by parking the vehicle in a garage
that is heated or protected from the outside
temperature.
- The high-voltage battery can be damaged and
the capacity can be decreased when the vehicle
is parked for longer than 24 hours when the
ambient temperature is higher than 118 °F
(48 °C). Always make sure that the h igh-volt
age battery is not exposed to temperatures
above 118 °F (48 °C) for a long time.
- Never park the veh icle in areas that are lik ely to
be flooded, such as beaches or river banks, and
never drive the vehicle in WA TER, on flooded
roads or through water that is higher than the
bottom of the vehicle body. The high-voltage
battery, along with other vehicle components,
can be damaged severely if the high-voltage battery is exposed to open water especially for
a longer time. However, you can drive through
water on roads under certain conditions
~ page 72.
Failure to heed any of these requirements can
age the battery prematurely and lead to a perma
nent decrease of the high-vo ltage battery's ca
pacity.
(D Tips
Always make sure that the high-voltage bat
tery is not exposed to extremely low and high
temperatures as well as to water espec ially
for a longer time. Failure to protect and care
93
Page 98 of 404
e-tron
For additional information, see ¢ page 17, Trip
computer (Audi virtual cockpit).
~ Applies to: vehicles with analog instrument
cluster: Open the
Tachometer display by turn
ing the left thumbwheel on the multifunction
steering wheel.
When opening the driver's door, the charge level is shown in the instrument cluster when the igni
tion is switched on, or the charge level and the
remaining charge time for the high -voltage bat
tery is displayed when charging .
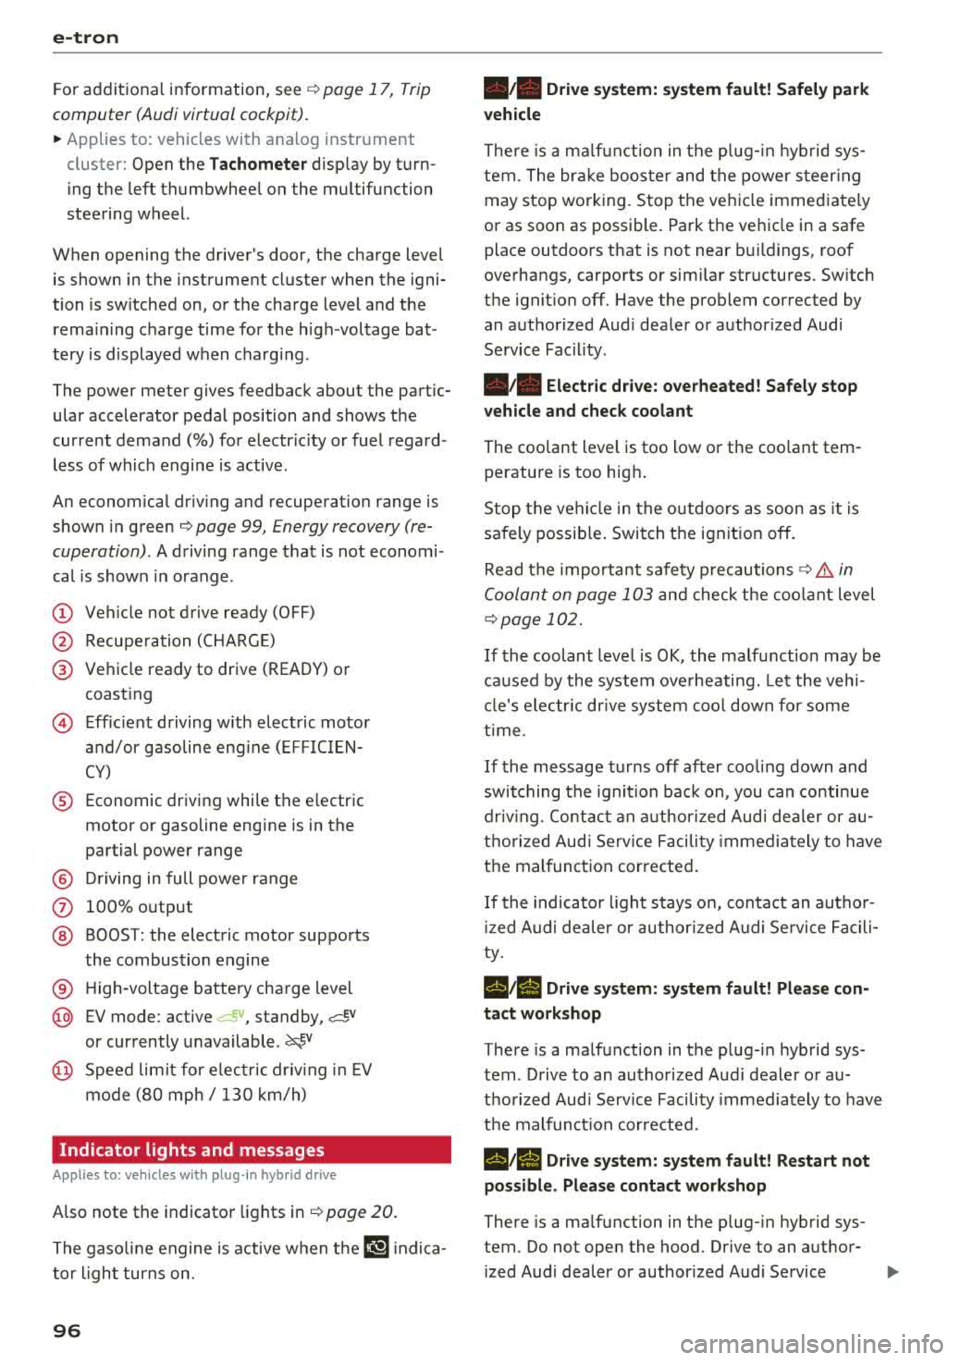
The power meter gives feedback about the partic ular accelerator pedal position and shows the
current demand
(%) for electricity or fuel regard
less of which engine is active.
An economical driving and recuperation range is
shown in green
¢ page 99, Energy recovery (re
cuperation) .
A driving range that is not economi
cal is shown in orange .
(D Vehicle not drive ready (OFF)
@ Recuperation (CHARGE)
@ Vehicle ready to drive (READY) or
coasting
© Efficient driving with electric motor
and/or gasoline engine (EFFICIEN
CY)
® Economic driving while the electric
motor or gasoline engine is in the
partial power range
@ Driving in full power range
0 100% output
@ BOOST: the electric motor supports
the combustion engine
® High-voltage battery charge level
@ EV mode: active a=,v, standby, a=,v
or currently unavailable. ~v
@ Speed limit for electric driving in EV
mode (80 mph/ 130 km/h)
Indicator lights and messages
Applies to: vehicles with plug -in hybr id drive
Also note the indicator lights in¢ page 20.
The gasoline engine is active when the II'§] indica
tor light turns on.
96
•• Drive system: system fault! Safely park
vehicle
There is a malfunction in the plug-in hybrid sys
tem. The brake booster and the power steering
may stop working. Stop the vehicle immediately
or as soon as possible. Park the vehicle in a safe place outdoors that is not near buildings, roof
overhangs, carports or similar structures. Switch
the ignition off. Have the problem corrected by
an authorized Audi dealer or authorized Audi
Service Facility.
•• Electric drive: overheated! Safely stop
vehicle and check coolant
The coolant level is too low or the coolant tem
perature is too high.
Stop the vehicle in the outdoors as soon as it is
safely possible. Switch the ignition off.
Read the important safety
precautions ¢.& in
Coolant on page 103
and check the coolant level
¢page 102.
If the coolant level is OK, the malfunction may be
caused by the system overheating. Let the vehi
cle's electric drive system cool down for some
time .
If the message turns off after cooling down and
switching the ignition back on, you can continue
driving. Contact an authorized Audi dealer or au
thorized Audi Service Facility immediately to have
the malfunction corrected.
If the indicator light stays on, contact an author
ized Audi dealer or authorized Audi Service Facili
ty.
lltll Drive system: system fault! Please con
tact workshop
There is a malfunction in the plug-in hybrid sys
tem . Drive to an authorized Audi dealer or au
thorized Audi Service Facility immediately to have
the malfunction corrected.
1/1111 Drive system: system fault! Restart not
possible. Please contact workshop
There is a malfunction in the plug-in hybrid sys
tem. Do not open the hood. Drive to an author- ized Audi dealer or authorized Audi Service
.,,_
Page 115 of 404
u. 00 .-< N l' N .-< 0 N > 00
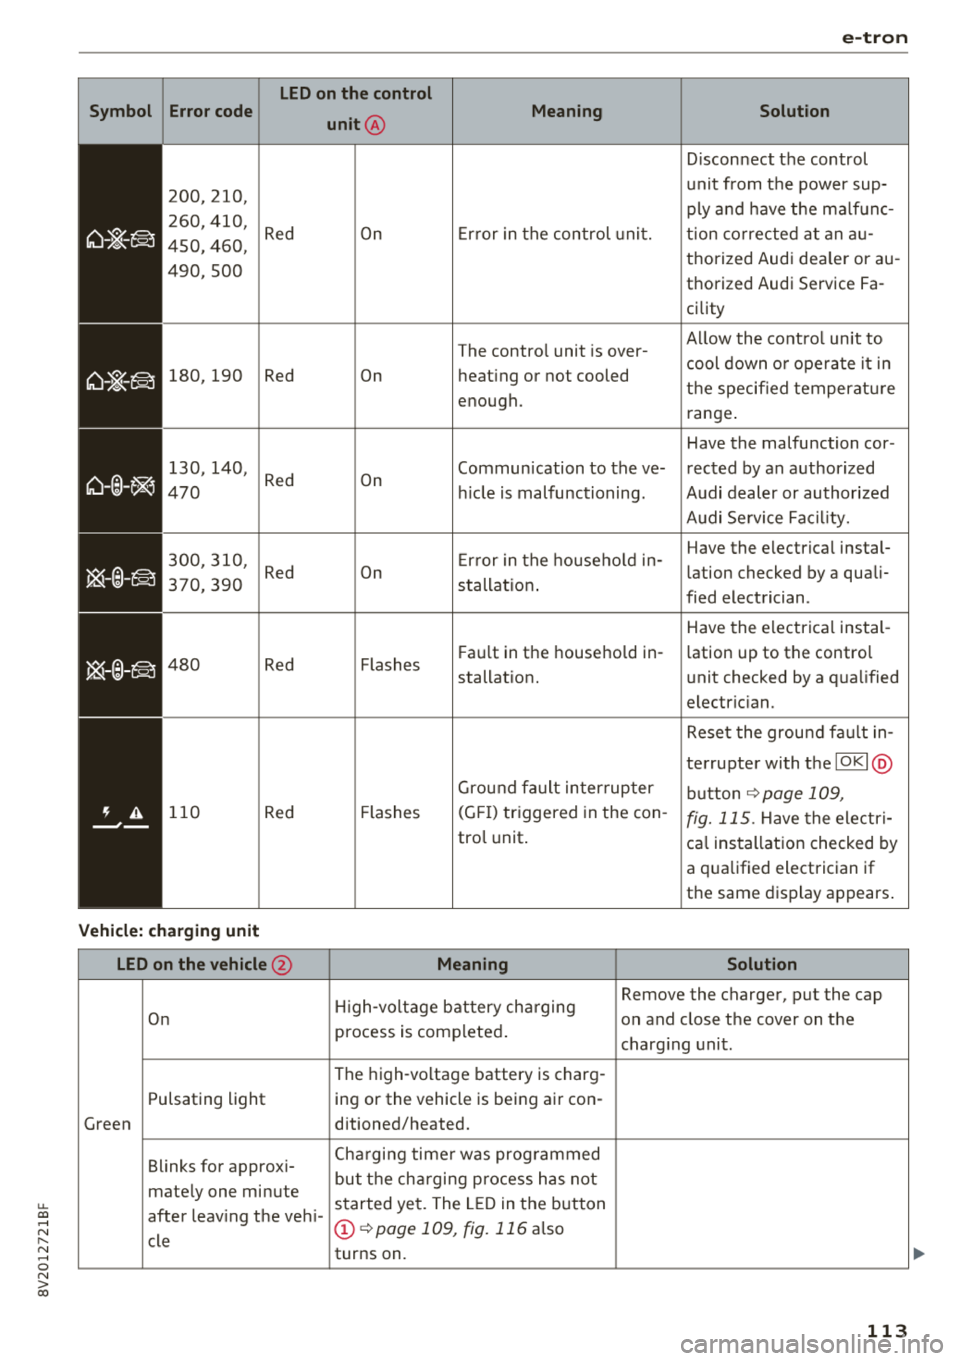
e-tron
LED on the control
S y mbol Error code
unit
@
Meaning
Solution
Disconnect the control
200,210, unit from the power sup-
ply and have the ma lfunc-
260, 410,
Red On Er ror in the con trol unit. t ion co rrected at an a u-450, 460, thorized Audi dea ler or au-
490,500 thorized Audi Service Fa -
cility
The control unit is over-Allow the control unit to
cool down o r ope rate it in
180,190 Red On heat ing or not cooled
the specified temperatu re
enough.
range.
Have the malfunction cor-
1 30, 140,
Red On Communication to the ve- rected by an authorized 470 h
ide is malfunctioning. Audi dealer or authorized
Audi Service Fac il ity.
300,310, E rror in the househo ld in- Have the
electrical instal-
Red On lation checked by a quali-
370,390 sta llat i on .
fied electrician.
Have the electrica l instal-
480 Red Flashes F
au lt in the househo ld in-
lation up to the contro l
sta llation. unit checked
by a qualified
electric ian.
Reset the ground fa ult in-
terrupter with the
IOKI @
Ground fa ult inter rup ter
button ¢page 109,
110 Red Flashes (G
FI) triggered in the con-fig. 115. Have the electr i-
tro l unit .
cal installation checked by
a qua lified electrician if
the same display appears .
Vehicl e: charging unit
LED on the vehicle @ Meaning Solution
High-voltage battery charging Remove
the charger, put the cap
On on and close the cover on the
process is completed .
charging unit .
The high -voltage battery is charg-
Pulsating light ing or the vehicle is being air con -
Green ditioned/heated.
Blinks for approx i- Cha
rgi ng time r was prog rammed
but the charging process has not
mately one minute
started yet. The LED in the button
after leaving the veh i-
CD ¢page 109, fig. 116 a lso
cle turns on .
113
Page 394 of 404
Index
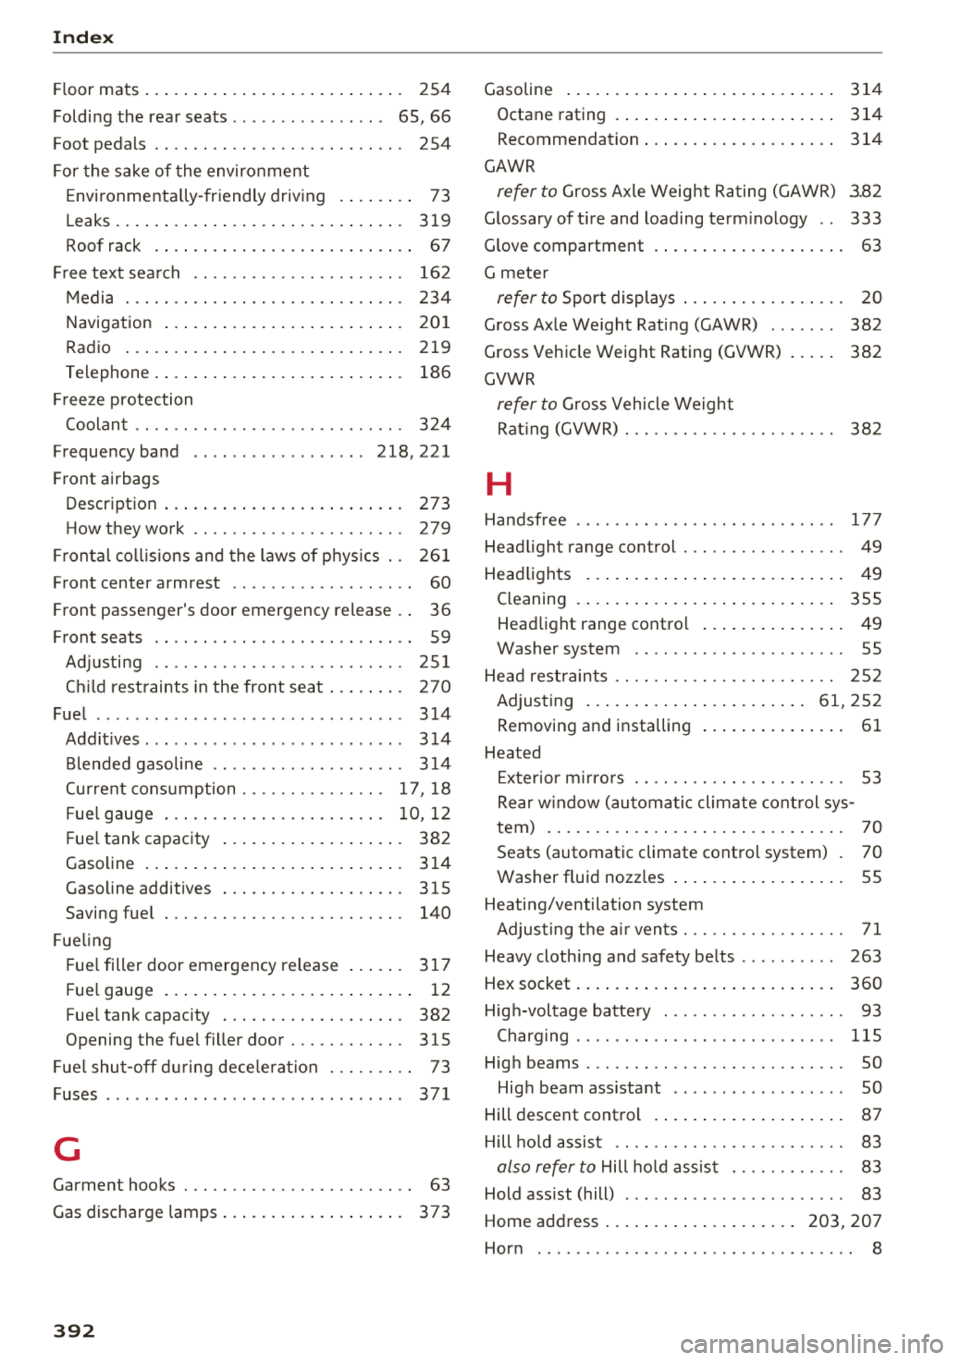
Floor mats . . . . . . . . . . . . . . . . . . . . . . . . . . . 254
Foldi ng the rea r seats . . . . . . . . . . . . . . . . 65, 66
Foot pedals .. .. .. ............. .... .. . 254
For the sake of the enviro nment
E nvi ronme nta lly -fr iendly driv ing . . . . . . . .
73
Leaks. ... ...... ... .. ..... ... .. .. ... 3 19
Roof rack . . . . . . . . . . . . . . . . . . . . . . . . . . . 67
Fr ee tex t sea rc h . . . . . . . . . . . . . . . . . . . . . . 16 2
Media . . . . . . . . . . . . . . . . . . . . . . . . . . . . . 234
Navigation . . . . . . . . . . . . . . . . . . . . . . . . . 20 1
Radio ... ...... ... .. ..... ... .. .. ... 2 19
Telephone. . . . . . . . . . . . . . . . . . . . . . . . . . 186
Fr ee ze protection
Coolan t . . . . . . . . . . . . . . . . . . . . . . . . . . . .
324
Frequency band . . . . . . . . . . . . . . . . . . 2 18 , 221
Front airbags
Description . . . . . . . . . . . . . . . . . . . . . . . . .
273
How t hey wo rk . . . . . . . . . . . . . . . . . . . . . . 279
Fr on ta l co llisions and the laws of p hys ics . . 261
Front center armrest . . . . . . . . . . . . . . . . . . . 60
Front passenger 's door emergency release . . 36
Front seats . . . . . . . . . . . . . . . . . . . . . . . . . . . 59
A dju sting . . . . . . . . . . . . . . . . . . . . . . . . . . 2 51
Ch ild restraints in the front seat . . . . . . . . 270
Fue l . . . . . . . . . . . . . . . . . . . . . . . . . . . . . . . . 3 14
Add it ives . . . . . . . . . . . . . . . . . . . . . . . . . . . 3 14
B lended gasoline 3 14
Curre nt cons umption . . . . . . . . . . . . . . . 17 , 18
Fue l g auge . . . . . . . . . . . . . . . . . . . . . . . 10, 12
Fue l tank capacity . . . . . . . . . . . . . . . . . . . 382
Gasoline . . . . . . . . . . . . . . . . . . . . . . . . . . . 3 14
Gasoline additives ............ .... .. . 315
Saving fue l . . . . . . . . . . . . . . . . . . . . . . . . . 140
Fue lin g
F ue l fi ller door emergency release . . . . . .
3 17
Fue l gauge . . . . . . . . . . . . . . . . . . . . . . . . . . 1 2
Fue l tank capac ity . . . . . . . . . . . . . . . . . . . 382
Opening the fuel fille r door . . . . . . . . . . . . 315
Fue l shu t-off d uring dece lera tion . . . . . . . . . 73
Fuses . . . . . . . . . . . . . . . . . . . . . . . . . . . . . . . 371
G
Garment hooks . . . . . . . . . . . . . . . . . . . . . . . . 63
Gas discharge lamps . . . . . . . . . . . . . . . . . . . 373
392
Gasoline 314
Octane rating . . . . . . . . . . . . . . . . . . . . . . . 314
Recommendat ion . . . . . . . . . . . . . . . . . . . . 314
GAWR
refer to Gross Axle Weig ht Ra ting (GAWR) 3 .82
G lossary of t ire and loading term inology . . 333
Glove compartment . . . . . . . . . . . . . . . . . . . . 63
G mete r
refer to Sport displays . . . . . . . . . . . . . . . . . 20
Gross Axle We ight Rati ng (GAWR) . . . . . . . 382
Gross Vehicle Weight Rating (GVWR)
GVWR
refer to Gross Vehicle Weight
382
Rat ing (GVWR) . . . . . . . . . . . . . . . . . . . . . . 3 82
H
Handsfree . . . . . . . . . . . . . . . . . . . . . . . . . . . 17 7
Head light range control . . . . . . . . . . . . . . . . . 49
Head lights . . . . . . . . . . . . . . . . . . . . . . . . . . . 49
Cleaning . . . . . . . . . . . . . . . . . . . . . . . . . . . 355
Head light range contro l . . . . . . . . . . . . . . . 49
Washer system . . . . . . . . . . . . . . . . . . . . . . 55
He ad rest rain ts . . . . . . . . . . . . . . . . . . . . . . . 252
Adjus ting . . . . . . . . . . . . . . . . . . . . . . .
61, 252
Removing a nd insta lling . . . . . . . . . . . . . . . 61
Heated
Exte rior m irro rs . . . . . . . . . . . . . . . . . . . . . .
53
Rear w indow (au toma tic climate con trol sys -
tem) . . . . . . . . . . . . . . . . . . . . . . . . . . . . . . .
70
Seats (automatic climate contro l system) . 70
Washer fluid nozz les . . . . . . . . . . . . . . . . . . 55
Heating/ven tilation system
Adjus ting the air ven ts. . . . . . . . . . . . . . . . .
71
Heavy cloth ing and safety be lts . . . . . . . . . . 263
Hex socket . . . . . . . . . . . . . . . . . . . . . . . . . . . 360
Hig h-voltage batte ry . . . . . . . . . . . . . . . . . . . 93
Charg ing . . . . . . . . . . . . . . . . . . . . . . . . . . . 115
Hig h beams . . . . . . . . . . . . . . . . . . . . . . . . . . . SO
H. h b . 1g earn ass istant . . . . . . . . . . . . . . . . . . SO
Hill descent control . . . . . . . . . . . . . . . . . . . .
87
Hill ho ld assist . . . . . . . . . . . . . . . . . . . . . . . . 83
also refer to Hill hold assis t . . . . . . . . . . . . 83
Hold ass ist (hill) . . . . . . . . . . . . . . . . . . . . . . . 83
Home address . . . . . . . . . . . . . . . . . . . . 203, 207
Horn . . . . . . . . . . . . . . . . . . . . . . . . . . . . . . . . . 8